Both large-scale industrial and private farming, and even amateur farming, cannot do without loosening the soil. In a flowerbed with tulips or a bed of dill with an area of a couple of square meters, a hand hoe can successfully perform this operation. A plot of ten acres (one hundred is a plot of land one hundredth of a hectare with an area of 10 x 10 = 100 m2), sown, for example, with potatoes, will most likely require more powerful agricultural machines. And to loosen the soil you will need a harrow. Tooth or disk, homemade or factory-made, aggregated by a walk-behind tractor, horse-drawn or even human. The most common and simple type of harrow is tooth harrow.
It is not difficult to make such an agricultural implement with your own hands. It is important not to make a mistake with the size and weight so that the harrow, instead of promoting the harvest, does not “bury” it. So, about everything in more detail.
Harrowing with a walk-behind tractor
When harrowing with a toothed harrow, the plowman follows the walk-behind tractor at medium engine speeds - about 2 km/h.
Heavy soils require placing a load on the harrow; the weight of the load is selected experimentally. The plowman follows the walk-behind tractor and regulates the movement of the harrow using the handles of the walk-behind tractor. If necessary, the part of the harrow that does not go deep or is knocked out when moving forward is pressed down with the foot. Harrowing with a disc harrow is similar to cultivating soil. Work is carried out at a speed of 1.5-2 km/h. The plowman follows the walk-behind tractor, adjusting the movement of the harrow using the handles - the axis of rotation of the harrow must be strictly perpendicular to the required direction of movement of the walk-behind tractor.
Agricultural work cannot be done without the use of a functional harrow. It is impossible to carry out sowing without destroying the top crust of the earth and without digging up the soil to a loose consistency, thereby destroying all the weeds. That is why the presence of a disc harrow in every farm is an urgent need.
You can organize your own production of disc harrows at home if you have a garage, a welding machine and additional tools. Farmers are clients with good solvency. If you make your offer with a lower price but the same quality, then you can easily sell an expensive disc harrow unit. After all, this type of agricultural equipment brings large incomes to farmers.
Classification of tooth harrows
Conventionally, the tooth harrow can be divided into three classes:
— heavy (one tooth of such an agricultural implement presses on the ground with a force of approximately 2-3 kg);
- medium (tooth pressure from 1 to 2 kg);
- light (no more than one kilogram - the pressure of the tooth of this harrow).
Recently, the classification has been rapidly changing due to the increasingly widespread use of units for complex soil cultivation. In one pass, such a machine wraps the layer, destroys it into lumps of a given size, levels the surface, and, if necessary, compacts it and even applies mineral fertilizers.
Types of tools
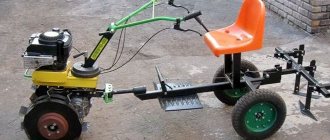
A harrow is an agricultural tool used in soil cultivation. Harrowing protects the soil from dryness, levels or destroys it, destroying weeds. This design for planting potatoes, made with your own hands according to the drawings, made it possible to crush large clods of earth formed after plowing.
It is known that such tools appeared at the same time when people began to cultivate the soil with an ordinary plowshare. At that time, such plowing devices were very large, lacked maneuverability, and weighed a lot.
In ancient times, horses were used for harrowing. Nowadays, when tractors appeared, metal harrows on a walk-behind tractor began to be used, which you can buy or make yourself.
They are able to break through clods, cover the soil so that moisture is stored longer, and even collect the remains of dry grass.
The tool can easily remove weed roots, and the harrow coupling will help double the speed of this process.
- Disk.
- Dental.
- Rotary.
Looking at such different and useful objects of labor, one can note their noticeable difference in weight. All industrial designs are attached to agricultural machinery. The traditional joint is used, in particular, for loose surfaces. This canopy structure helps retain moisture and thereby prevent the soil from drying out.
The homemade tool is installed manually. It crushes large lumps, eliminates weeds and vegetation residues. A self-made harrow for a walk-behind tractor weighs very little, and is most often used for crushing clods of earth and shallow loosening.
- The disc harrow is usually used on dry soils and is practically no different in functionality from rotary (power) harrows. The only difference is that here the working body is disks mounted on independent axes, and the attachment to the walk-behind tractor occurs via a hitch.
- Dental appearance. This type of equipment is considered the most common in agriculture. This homemade harrow for a walk-behind tractor is suitable for crushing and loosening soil after working with a plow. Farmers use this device when removing soil crust after rain, for distributing mineral fertilizers, planting seeds, and even when removing weeds.
There are 3 types of dental appliances:
- The rotary harrow for the walk-behind tractor is combined from six edges, a disk and a bushing. Usually, for better effect, the blades are set at an angle.
Using the same scheme, you can make a spring harrow with your own hands.
Types of surface tillage. Processing without formation turnover
There are few methods (types) of mechanical tillage. In different sources they may be classified differently and have different names. So, processing involves, in addition to compaction (rolling, slamming, pressing), three types of loosening:
— loosening the soil with soil turnover;
— loosening without formation turnover;
— loosening with leveling.
If we are talking about preparing the soil for the winter in central Russia, then most often this is loosening with soil rotation, or plowing. All different types of plow shares provide different results. Thus, a plow with a cylindrical surface of the ploughshare partially wraps the layer, but breaks it along its entire length, simultaneously providing good loosening. But the screw ploughshare turns the layer exactly 180°, keeping it almost unchanged and well burying weed seeds to a depth (where a significant part of them dies due to distance from light and heat).
Some types of harrows also partially wrap the formation, such as the disc harrow. Its “relative”, the tooth one, refers to agricultural implements that perform loosening and leveling.
Disc harrow
This is a more advanced device in terms of function, providing effective soil cultivation. The disc harrow has many complex design features, so it is recommended to purchase a ready-made product rather than try to make it yourself.
The unit can be either a light type, attached to a small walk-behind tractor weighing up to 100 kilograms, or a heavy one, the maximum weight of the draft device is up to 200 kilograms.
The disc harrow got its name from the working element, which is round discs with a diameter of about half a meter, mounted on one axis. All these cutting devices are fixed in a certain order and at different angles in more than one row, which ensures a significant penetration into the soil.
The discs themselves come in straight and cup shapes. Cup ones have a more complex configuration and are designed to turn over the earth when sowing grains or potatoes early.
The edges of the discs are made uneven to cut the soil better and reduce resistance to the soil layer. At the same time, the layer rises and falls, which contributes to its grinding and breaking into small particles.
Disc harrows are the least susceptible of all types to clogging with soil and plant debris. Consequently, they do not require constant cleaning for a long period, which saves effort and time.
Types of harrows
Harrows are divided into the following types:
- Dental
- Disk
- Rotary
Tooth harrow
The tooth harrow is the oldest known to man. It consists of several rows of teeth that pass through the soil during processing, loosening and leveling it. They differ in the number of teeth - for a walk-behind tractor, they most often use a wide one, in which the teeth are arranged in three or four rows and often.
It is most rational to use it with traction-type walk-behind tractors, for example, Neva or MTZ. These walk-behind tractors are capable of developing significant longitudinal force and have increased traction with the soil, which is necessary for work.
A subtype of the tine harrow is the spring harrow, which is often used when cultivating an agricultural plot with a tractor. When working with a walk-behind tractor, springs instead of teeth will allow you to reduce their number and dimensions, and they rarely break.
Disc harrow
Is an active harrow. This tool is best used with cultivator-type walk-behind tractors - on traction ones you will have to design a power take-off shaft. Tillage is carried out by cutting through it with rotating discs.
The discs can have a straight shape, be turned at different angles relative to the axis of rotation, or have a cup shape. Cup ones are more difficult to manufacture, but they allow you to wrap the layer - thereby taking on some of the plowing functions. Such discs are perfect for planting green manure or shallow early plowing before weeds emerge when sowing potatoes or grains early.
You might be interested in a DIY potato digger for a walk-behind tractor.
The edges of the disks are usually made of an uneven shape so that they cut the soil more easily during plowing and experience less resistance when rotating inside the formation.
Disc harrow - design features
Disc harrows for walk-behind tractors can be light or heavy. The first option is used in conjunction with walk-behind tractors weighing up to 100 kg, while heavy structures are suitable for use in conjunction with equipment weighing up to 200 kg.
Disc harrows are used to solve the following problems:
- destruction of the crust formed as a result of frost;
- stubble peeling;
- effective loosening of turf layers;
- processing of pastures and meadows;
- removal of large weeds.
The working body of a disc harrow is a sharp steel spherical disc, which can have a diameter of 45 to 51 cm. The entire design of a disc harrow for a walk-behind tractor resembles a battery formed from several discs mounted on one axis.
There is a distance between the disks in which spacer bobbins are placed. All cutting discs are fixed to the axis at a certain angle and always in 2 rows. When cultivating the soil, the front discs operate in a dumped position, and the rear discs always function in a dumped position.
In order to loosen the soil more efficiently, the disc harrow attached to the walk-behind tractor is equipped with offset rear discs.
During the use of the harrow, the discs in its design rotate, due to which they adhere to the ground. The edges of the cutting discs cut off the hard layer of soil, lifting and turning it over.
In this case, a layer of earth falls from a certain height, as a result of which it turns over and crumbles.
An important advantage of disc harrows on walk-behind tractors is that they are much less clogged with soil and weeds. Thus, they can be used for much longer without regular cleaning, which saves the farmer time and effort.
DIY disc harrow
What does the design of the harrow consist of, which we propose to make with our own hands for use on the MTZ-80 tractor?
Trailed disc harrow 2.6x2N on MTZ-80 (KOMPAS-3D):
- Frame.
- Front section of cutting units.
- Rear section of cutting units.
- Left turning axle.
- Right turning axle.
- Hinge bracket.
- Cleaner.
- Front beam.
- Rear beam.
- Adjustment rod of the mechanism for adjusting the angle of attack of the disks.
- Train roller.
The harrow's working width is 2.6 meters. It can be aggregated with tractors from 1.4 to 2nd traction class. The weight of the structure is 1150 kg. Operating speed up to 12 km/h. Productivity - 3 hectares/hour. The number of working bodies (discs) is 16 pcs., disc diameter is 560 mm.
Attention! This 3D model assembly was created in the KOMPAS-3D program version 14.1 and contains 122 parts. To view it in detail, you can use the free KOMPAS-3D Viewer program.
Trailed disc harrow on MTZ-82 with a working width of 2.2 meters (PTC Creo Elements/Pro):
This is an alternative version of the 3D model of a mounted diskator for tractors of 1.4 traction class (LTZ-60AV, MTZ-50/52, MTZ-80/82, Belarus-921 and YuMZ-6). Attention! This model contains 117 parts and was made in PTC Creo Elements/Pro, but can be opened with the free PTC Creo View Express.
This mounted tillage disc unit consists of metal discs mounted on an axle at a certain angle. Depending on the type of field work being carried out, the depth of penetration of the structure into the soil is regulated. The maximum processing depth is up to 12cm.
A mandatory requirement for the manufactured harrow will be high metal resistance to corrosion, so choose only high-quality materials, which we recommend additionally treating with special anti-rust agents.
So, first you need to weld a strong rectangular frame (1400 by 650 millimeters) from metal profiles. You can use iron corners measuring 450 by 450 mm. An independent axle with 8 spherical disks with a diameter of about 500 mm and a thickness of about 5 mm will be attached to the resulting base using special bushings.
The width of the area to be processed usually does not exceed 1-2 meters. There is no point in making a wider harrow. In this case, efficiency will significantly decrease and the load on the tractor will also greatly increase. Please note that the angle of soil attack in a disc harrow must be adjustable.
You can easily buy all materials and components for the manufacture of a harrow via the Internet on specialized websites, as well as at local industrial markets. Their total cost (taking into account the labor invested in subsequent assembly) will be an order of magnitude less than the purchase of ready-made factory equipment. Here the efforts spent will pay off many times over!
The resulting harrow is connected to the tractor linkage at the top of the stand, as well as via two axles. When the tractor moves, the discs should rotate freely, loosening the ground and grinding the remains of weeds, as well as stems of cultivated plants.
Trailed disc harrow ABD 4x2PG (hydraulic) on T-150 (KOMPAS-3D):
This is a 3D model of an ABD 4x2PG disk drive. The trailed unit is designed for tractors of traction class no lower than 3. Brief characteristics:
- working width - 4 meters;
- operating speed - up to 12 km/h;
- productivity - up to 4.4 hectares/hour;
- processing depth - from 8cm to 18cm;
- weight of the structure - 2130 kg.
Attention! The 3D model was created in the KOMPAS-3D program version 14.1 and contains 181 parts. To study the design, you can use the free KOMPAS-3D Viewer.
Note. When opening a file, the program may ask you to replace the path to a file that it cannot read, then simply specify the path (for example, working body).
Application of different types of harrows
The most difficult soils from the point of view of agricultural technology are clays and loams. To break up clods after plowing (reverse plowing) or chiseling, a heavy toothed harrow is used. The coupling of such implements is usually combined with tractors of class 2 and above.
Previously, the use of such couplings was a whole undertaking. The hitch itself and the harrows included in it were transported to the work site in a trailer. It took several people to assemble all the pieces of agricultural equipment together. Modern hydraulic tooth harrows can be easily maintained by one operator. Directly on the field, the harrow can be transferred from the transport position, thanks to the presence of hydraulic drives, to the working position at the touch of a button.
Medium harrows work on light soils – sandstones and sandy loams. But the use of light harrows is associated not with the type of soil, but with technology. They are most often used to “close moisture”—breaking the crust that forms after precipitation. This is done in order to destroy the channels through which moisture was absorbed into the ground - to save water for plants.
Light harrows are also used to control weeds. Weeds that have just sprouted from seed fall to the surface along with the roots and die from dehydration.
Tooth harrow
This type of construction was the earliest known to mankind. A tooth harrow looks like a platform with rows of teeth attached vertically to it. They loosen and level the soil.
For walk-behind tractors, a harrow with a large width and a significant number of teeth, which are located in more than four rows and at a short distance from each other, is mainly used.
The pulling unit must have good power to ensure deep penetration of the teeth into the soil layer and obtain a high-quality work result.
Important! One of the varieties of tine harrow is the so-called spring harrow, where, instead of pins, springs are used, which make it possible to reduce the size of the structure and contribute to less frequent breakdowns.
A gear-type walk-behind harrow consists of a metal frame with rigidly attached rows of teeth, usually ranging from 2.5 to 5 centimeters in length. They are arranged in a zigzag or at right angles. You can adjust the depth of loosening by installing the teeth in different ways. When the sharp edge is in front, penetration into the soil increases.
The teeth can also be attached to the frame and on hinges. Such devices are used on more uneven areas of land with a significant number of obstacles.
Tooth harrows are used either as a separate attachment or working in conjunction with a plow, seeder or motor cultivator.
Tooth harrow – advantages and applications
The design of a tooth harrow includes trough-shaped and rectangular bars, at the intersection of which there are teeth. The latter are installed in such a way that during operation each of them leads its own furrow. Depending on the type of harrow used, the distance between furrows can range from 220 to 490 mm.
In order to prevent clogging of the harrow with weeds and soil, adjacent teeth are located at a distance of 15 cm. The depth of tillage when working with the harrow depends on the force of the teeth on the ground, as well as on the length of the leads connecting them.
Depending on its design, the teeth on a harrow can be straight, curved with a special spring strut, or clawed.
All teeth in the harrow design are mounted on a hinged or rigid frame. Harrows with articulated mounts are more preferable in areas where there are a lot of uneven surfaces.
Structures with a rigid frame should be used on more or less flat surfaces.
Tooth harrows for walk-behind tractors are used to solve the following problems:
- cutting and crumbling turf;
- chopping and pulling molehills across pastures and meadows;
- effective combing of grass.
The design of tooth harrows allows them to be used not only as independent attachments, but also to work together with cultivators, seeders and plows.
Purposes of harrowing
What is harrowing used for? After all, there is plowing and cultivation. These agricultural techniques loosen the subsoil layer and promote air supply to the root systems of crops. And what can a toothed harrow compare to a plow or a chisel? Light processing of the surface itself, nothing more. But this type of influence on the field is sometimes in demand.
A simple example. The field is plowed on loam, there has been no rain for a week, but on the contrary, the sun heats the giant clods of earth formed during the plowing process, and a warm breeze drives out the remaining moisture from them. What will happen if you simply put grain seeders into such areas? Anything but not sowing grain. You shouldn't expect a harvest with this type of farming.
If the land is located on difficult, heavy soils, a tooth harrow will work successfully after plowing. The heavy structure bristling with metal teeth will break heavy clods.
And the already smooth surface, now consisting of lumps no larger than a few centimeters in size, will not dry out ahead of time and will be ready to give life to a new harvest.
DIY tooth harrow
This device is easiest to make yourself. If you have metal materials, a grinder and a welding machine, then the process will not cause many difficulties.
To produce a harrow for a walk-behind tractor with your own hands, you need to understand the drawings and determine the required dimensions.
The design looks like a lattice with teeth welded to it. If possible, it is recommended to tighten them with bolts to ensure replacement in case of breakdown. A towbar to the walk-behind tractor must be provided in front. To facilitate work, a chain is welded between the two units.
The grille is made of durable materials. They mainly use water pipes and corners with a thickness of more than 4 millimeters so that the teeth do not come off the thin-walled base. A more reliable design involves welding the rods at an angle of 45 degrees to the movement, which reduces loads.
The size of the grid cells should correspond to the size of the teeth. The frame size is designed in such a way as not to interfere with the control of the walk-behind tractor.
The frame should not be made wider than the location of the handles on the walk-behind tractor!
To make teeth, reinforcement corrugated steel with a diameter of about 15 millimeters and a length of up to 200 is usually used. The smaller the tooth, the thinner it is. They are hardened before not being used for strength.
When harrowing with a walk-behind tractor is carried out, for efficiency, the elements entering the soil are spaced a maximum of 1 centimeter apart. A slight shift is allowed to ensure greater intensity and quality of work.
The build process looks like this:
- First you need to assemble and weld the grate.
- Then attach the teeth using welding or bolts. You need to measure accurately and do it at an angle of 90 degrees.
- At the approximate location of the center of force, it is necessary to weld a chain, one of the links of which is to the grid, the other to the hitch.
- The final stage will be to check the fastening when performing work, and when the harrow moves in any direction, the target is digested.
Regardless of whether the finished product was purchased or whether it was built independently, wet soil and residues of organic crops accumulate on the working elements. Therefore, you should periodically clean the teeth with metal objects or an appropriate scraper.
DIY harrow
The design of a tooth harrow is simple. The simplest agricultural implement for loosening and leveling the soil layer is made as an ordinary wooden lattice. The distance between adjacent teeth, if we talk about small garden plots, can be planned in the range from 100 to 200 mm.
Teeth can be inserted into the grid units in different ways:
— The easiest way is to drive nails of sufficient thickness and then bite off the heads. Not the best solution in terms of reliability, suitable for a light harrow (weed control before the crop has sprouted, sealing off moisture).
— Instead of nails, you can use thick self-tapping screws, and the unthreaded part remains on the outside, as a working area.
— Pieces of reinforcement 8-12 mm, driven with guaranteed interference into pre-prepared holes.
A metal harrow will be better and more reliable. As slats, you can use any available rolled steel: angle, channel, pipes, etc. Just do not weld the teeth (pieces of steel reinforcement are most often used as them) directly to the surface of the harrow. Such a tooth is likely to break off quickly. Holes are pre-drilled in the slats, prepared rods are inserted and their exit points are welded on both sides.
How to make a harrow for a walk-behind tractor with your own hands?
After studying all the drawings and design features of a homemade harrow for a walk-behind tractor, you can begin its direct assembly. To avoid common mistakes, it is extremely important to adhere to the correct procedure when working.
Making a homemade harrow for a walk-behind tractor is carried out in the following sequence:
- First, the frame parts are assembled and welded to each other;
- Next, you will need to weld the teeth to the manufactured frame. They must be pre-sharpened and necessarily welded to the frame at a right angle. There is no need to worry when installing the teeth, since after welding the hardened teeth are not annealed, so their strength is not lost;
- At the next stage, you will need to decide on the location where the center of influence of the forces will be located. In the middle of this part of the harrow you need to weld the chain provided in the design. To do this, you need to take the first of the chain links and overlap weld it to the grille. Then the second end of the chain used will need to be connected to the hitch using bolts or a welding machine;
- To check the performance of the manufactured harrow, you need to secure it, and then walk with it and the walk-behind tractor. If it is found that the harrow is pulling in either direction, then the chain will need to be welded in the opposite direction. You can also learn more about the manufacture of a harrow from the video.
The manufactured design for the walk-behind tractor will be practically in no way inferior to its factory counterparts. It is quite durable and can serve on the farm for many years, provided that the owner regularly cleans it of weeds and soil, and also treats the structural parts with a special anti-corrosion agent.
A self-made harrow for a walk-behind tractor can be used to work together with walk-behind tractors produced by the brands Cascade, MTZ, Neva, Krot and Agro. The design of these units provides almost identical coupling mechanisms, which will allow you to easily connect them with a homemade harrow.
How to make a harrow for a walk-behind tractor with your own hands? requirements and the process itself
To begin making your own harrow for a walk-behind tractor, first of all, you will need competent drawings. And it is recommended to learn how to compose them using the example of the simplest design - a tooth one, which, in combination with motorized equipment, will successfully cope with the placement of small seeds and other material, as well as pre-planting loosening of the soil. Externally, it will look like a lattice frame with bolts attached to it or welded teeth:
It is necessary to equip the front side with a hook (this can be a banal beam with a hole, which is inserted into the tow bar tube with a “finger” fixation). After final assembly, a moving chain should be welded between the hook and the frame.
To make a harrow on a walk-behind tractor durable, it is better to weld the grate from strong corners or square pipes with a metal thickness greater than 3 mm. It can be decorated with a cage with transverse and longitudinal elements.
When assembling the product, you must ensure that each segment of this grid has a 45-degree inclination to the straight line along which the walk-behind tractor moves to reduce bending loads. It should also be taken into account that the entire frame must fit within the limits of the equipment’s handles.
In terms of size, it is optimal to make it a maximum of a meter, as shown in the drawing - only full-fledged tractors can pull more.
Then you should prepare teeth 10-20cm long. Reinforcing steel 1.0-1.8 cm in diameter has proven itself well in their role. Here it is important to adhere to the rule: the longer, the thicker.
The teeth are additionally hardened and sharpened before welding them to the grille. There they should be placed 10cm apart (more frequent placement is ineffective).
It is good to stagger them to increase the intensity of processing.
In no case should the chain be welded at the initial stages of installation, since if the center of application of force is incorrectly calculated, the harrow will be pulled to the sides, and everything will have to be redone. You can see in detail an example of making a harrow for a walk-behind tractor in the video.
Design
Drawing of a harrow for a walk-behind tractor
A harrow is a grid to which teeth are rigidly welded or bolted. In the front part it has a towing device - usually it is a hitch with holes, which is inserted into the towbar pipe of the walk-behind tractor and then fixed with a finger. It is necessary to weld a chain between it and the hitch - without this, the work will be very difficult for the plowman.
The grate must be strong enough. It can be made from square or water pipes and angles. The thickness of the metal must be at least 3-4 mm, otherwise the teeth welded to the thin-walled pipe will break out during operation along with the pipe metal.
The lattice design can be in the form of a cage consisting of longitudinal and transverse elements. But a grid in which the “rods” are welded at an angle of 45 degrees to the direction of movement of the walk-behind tractor is better suited - such a grid will be less subject to bending loads.
The cell size is selected according to the location of the teeth. It’s best to figure out in advance how your teeth will be positioned, sketch it out in the drawing, and then draw a grid on top of them to which they are attached. The size of the frame itself should be such that it does not interfere with driving and following the walk-behind tractor.
The harrow frame should not extend beyond the handles of the walk-behind tractor.
In this case, it is necessary to take into account the dimensions of the coupling. There is no need to make a grill that is too wide - the walk-behind tractor simply cannot handle more than 1 meter.
The teeth are best made from corrugated reinforcing steel with a diameter of 10 to 18 mm. The length of each tooth is from 10 to 20 cm. The height of the walk-behind tractor coupling does not affect the height of the tooth - the harrow is attached using a chain.
The longer the tooth, the thicker it should be. It is advisable to sharpen the teeth before installation and be sure to harden them, because unhardened teeth will bend during operation.
On light soils, you can use a harrow with unsharpened teeth.
The frequency of their location should be no less than every 10 cm - if done less frequently, harrowing will be ineffective.
It is allowed to place the teeth with a slight offset across the row so that they can be conveniently welded and provide the required processing intensity.
At the same time, it is necessary to calculate that their resistance is directed symmetrically to the traction axis, otherwise the walk-behind tractor will “wobble” and it will be impossible to harrow with it.
Who harrows what? Page 3 of 23
I have a harrow hitch like this.
https://www.youtube.com/watch?v=W_CqNiz34es The video is not mine. Insanely simple and the result is excellent. Respect to the author
". And to the happiness of our unique ones, the fragrant smell of bread. ",
In our village, one made it according to the principle of the “English harrow” (that’s what we call it). I think you understand what I mean. He welded a frame for 4 heavy harrows, welded them in, and made a roller at the back. I made a train at the front (like Europak, or the same “English harrow”). I got it from the factory from the collective farm, although I don’t use it, since it was invented more for use with beets.
Features and Benefits
What is a diskator? This is a disc harrow, where a separate mounting post is used for each cutting element.
This design allows you to completely eliminate clogging of the cutting discs, which has a positive effect on labor productivity.
In addition, discators show good performance in conditions of high humidity and dense vegetation. The main purpose of this type of agricultural equipment is to prepare the land for sowing without prior plowing.
It is worth noting that individual fastening of discs allows for better control of weeds by mixing the soil with plant residues. However, these are not the only advantages of PM.
Diskators can perform the following operations:
- Prepare the soil for planting all varieties of agricultural crops, including industrial and fodder.
- Preparation of small-contour areas and fields with complex geometry.
- Peeling stubble and forming a mulch layer.
- Preparation for planting of turfed areas of the field and land allocated for pastures and meadows.
It is worth noting that in one pass across the field, the disker performs several operations at once: it crushes the soil, levels the surface and mixes the soil with weed residues.
Moreover, each of the installed disks has individual adjustment, allowing you to smoothly change the processing width or angle of attack.
Thanks to their versatility, diskers help save up to 12 liters of diesel fuel per hectare processed. Accordingly, this type of agricultural equipment pays for itself already in the second season of operation.
Diskators also have design flaws. For example: a rigid mounting option for a strut often leads to mechanical damage to the hub.
To avoid breakdowns, the bearing must be lubricated regularly, which requires additional maintenance time.
It is typical that such problems occur only in Russian-made disk drives. Imported models use a spring-loaded rack mounting system.
Manufacturing of disc harrows as a business
A properly made harrow will cope well not only with the densest layers of soil, but will also perfectly counteract weeds and dead wood. It will also be able to grind sunflowers and corn, which is not possible for other types of agricultural equipment.
By making your own disc harrow, you will save a lot of money. In addition to the many other advantages that this unit has, we can also highlight the fact that the disc harrow has high productivity and does not clog. This means that you can quickly process the entire field with it without any problems!
Having mastered your own production of disc harrows for MTZ-80, T-150 tractors and other types of tractors, you can start a profitable business. Experts estimate its profitability at 50 percent (it all depends on the cost of the materials you will use in production).
By setting up the production of disc harrows, you can achieve a monthly profit of $1000. Despite the fact that you are selling expensive equipment, its demand is ensured by the good solvency of the target consumer (farmer). There is nothing to wait! Time to open your own business!
People involved in agricultural activities have probably come across the concept of “diskator”. However, most farmers do not attach due importance to this type of equipment, preferring to use more conventional harrows for cultivating the land.
Let's figure out what the advantage of disk drives is over similar types of trailed equipment.
Rotary harrow
The rotary harrow attached to the walk-behind tractor is a mixture of a cultivator and a disc harrow. The main advantage of such a device is that it perfectly removes and levels the top layer of soil, and the depth of treatment is adjustable. It is necessary to correctly determine the ratio of the width of the structure to the power of the walk-behind tractor for the greatest efficiency of work.
The bending of the teeth of such a device directly depends on the radius of the disk and the amount of sliding of the wheels of the traction unit. The greater the grip on the soil, the more the tooth bends. It enters at an angle of 90 degrees and improves oxygen saturation of the soil.
When using a rotary harrow, large plants are practically not damaged, while weeds that have expanded their root system shallowly are pulled out. The aeration that occurs during this process promotes the intake of minerals and organic fertilizers from the air.
Rotary harrows are either active or passive. The active type is more often used, where the structure is installed instead of the front wheels of a walk-behind tractor. But at the same time, the traction unit must have greater power and the ability to operate at different speeds. When used with other equipment, you can not only loosen the soil, but also level the soil.
The advantages include the ease of use of the design, long service life and efficiency of work. The only drawback is the high purchase price and the significant size of the device.
Toothed rotary harrow
Appeared in domestic crop production relatively recently. It is most often used in potato cultivation. After passing such a harrow, the farmer receives the correct bed of a trapezoidal cross-section. The harrow pulls out weeds perfectly and loosens the soil wonderfully. What is important is that it can be used until the potatoes bloom - the rotor teeth practically do not damage the plant stems.
Another plus. After the rotor passes, the potatoes end up in beds at a height relative to the general field level. Thanks to this, since the ridges warm up better, earlier and more vigorous seedlings of the crop are ensured.
Rotary harrow - pros and cons of the design
If harrowing with a walk-behind tractor is carried out on an area with virgin soil, or the use of the unit is planned to remove only the top layer of soil, then the use of a rotary harrow will be optimal. Despite the fact that the maximum processing depth with this equipment does not exceed 7 cm, this design is best suited for the purpose of primary cultivation of land in areas where grain crops were previously grown.
Rotary harrows for walk-behind tractors can be active or passive. Unlike passive structures, active harrows are mounted on a walk-behind tractor instead of wheels or rototillers are mounted on standard shafts of the unit.
To increase the efficiency and productivity of the harrow, it should only be used in conjunction with walk-behind tractors that have high power and are equipped with gearboxes.
These structures are best used in conjunction with other types of attachments - in this case, a harrow on a walk-behind tractor will not only loosen the top layer of soil, but also effectively level the ground on the site.
The advantages of rotary harrows for walk-behind tractors include ease of use, high efficiency and durability of these designs. Among the main disadvantages of this type of attachment, one should highlight the high cost, difficulty in making it yourself, as well as the cumbersome design.
Who is harrowing what?
Isn't one track enough? I have trailed two-track harrows for 10 harrows Files: foto0069.jpg
the transfer from working to transport takes about 15-20 minutes, I did it on 6 and there are those who did it on both 7 and 8 harrows, only one minus is the turning radius increases Files: 08082011182.jpg 08082011181.jpg
We also have such a unit.
Isn't one track enough? I have trailed two-track harrows for 10 harrows
the transfer from working to transport takes about 15-20 minutes, I did it on 6 and there are those who did it on both 7 and 8 harrows, only one minus is the turning radius increases
It’s possible with support ones, you just didn’t get the hang of it during transportation, it doesn’t bend during work, although it can be strengthened with guy wires for wheat, harrowed deflections were not observed here, the main thing is convenience when moving
and not give reasons for yourself to do
and, if this option: Files: akb10.jpg
just what you need, a two-track one loosens the arable land better, a single-track one only for grasses or winter crops
what you need dada)
just what you need, a two-track one loosens the arable land better, a single-track one only for grasses or winter crops
I have a friend who processes two-track, five-meter pairs with welded-on segments under MTZ 82.
I have a friend who processes two-track, five-meter pairs with welded-on segments under MTZ 82.
Guys, I found such an option, but I don’t quite understand where to put it together? Files: clip_image001.jpg clip_image002.jpg
Now in the process of creating a hanging hitch for 7 harrows, I’ll finish painting it and attaching photos
Files: izobrazhenie_659.jpg izobrazhenie_661.jpg
Homemade disc harrow
When considering how to make such products, it is important to note that during soil cultivation they simultaneously perform several functions. For this reason, a power harrow for a walk-behind tractor has a more complex design, and its manufacture is quite labor-intensive. Work to create such a device is carried out as follows:
- you need to prepare the disks, as well as 2 pipes, which must be fixed to the shaft of the walk-behind tractor itself. In this case, their length should be 1 m, and the diameter of the disks should not be more than 20 cm;
- Using a grinder, you need to make cuts on the disks, which will be located around the circumference in increments of 10 cm. A mounting hole is made in the center, which is then used for mounting on the shaft. It is desirable that the mounting holes for such disks be larger than the diameter of the shafts. The total number of such elements should allow them to overlap each other;
- when the disks are ready, they are mounted on the shaft, in increments of 5 to 9 cm. In this case, it is important to maintain an inclination to the axis; for this, a slope is made on the left side in one direction, and on the right, in the opposite direction.
Such an active harrow for a walk-behind tractor, when manufactured independently, is more complex than a toothed one and requires a more precise adjustment of the parts in size in accordance with the diagram. However, the choice of the type of model to be created depends on personal preferences, as well as the purpose for which the device will be used.