The bulk of Russians' garden space is traditionally allocated to potatoes, because our people also call it the second bread. Many have transferred part of the labor of growing potatoes onto their shoulders, or rather onto trailed small-scale mechanization equipment: walk-behind tractors and mini tractors.
And if planting potatoes is not a big job, then hilling them, and most importantly, digging them up is not an easy task. For hilling and weeding, the hiller included with walk-behind tractors is most often used, but for digging in its pure form it is not entirely suitable. Let's figure out what to dig and how to make a potato digger for a walk-behind tractor with your own hands.
There are several known designs of potato diggers for walk-behind tractors and mini tractors. Let's look at them: from the simplest to the most technologically advanced.
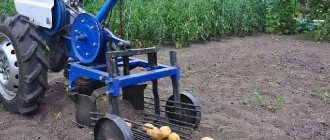
Homemade conveyor potato digger for walk-behind tractor
The conveyor model is quite suitable for working in extreme conditions and heavy dust.
This is a high-precision, high-speed device, if the assembly is carried out correctly and the components are securely mounted. The digger allows you to mechanize almost the entire assembly process if you install a receiving hopper in addition to a mini-tractor or walk-behind tractor, which will save money and manual labor when harvesting potatoes. In addition, improvised material can always be picked up at a landfill or at home in the garage of craftsmen. Any old mechanisms will do the job. Conveyor potato digger for walk-behind tractor
Stages of work to create a conveyor unit:
- take a steel profile with a square cross-section and weld a frame from it;
- make a ploughshare knife from sheet steel;
- install the roller in the frame for mounting the conveyor belt;
- assemble a conveyor belt from chains and rods;
- attach brackets to the gearbox;
- install the conveyor belt and mechanisms into the frame;
- mount the wheels and plowshare to the frame.
Today, digging potatoes on a plot with a shovel is practically a thing of history. Modern potato diggers for walk-behind tractors allow you to harvest crops much faster. At the same time, it is not necessary to buy expensive equipment for production. It is enough to quickly make it from scrap materials, simplifying the harvesting process.
Note! To know how to properly make a potato digger with your own hands for a walk-behind tractor, it is important to study in advance the types and structure of various models, determine the optimal dimensions, make drawings, a diagram and inquire about the density of the soil on the site. This is the only way to choose the best option for manufacturing a mechanized device without loss of yield.
Owners of land plots willingly use mechanized assistants when cultivating the soil and collecting grown vegetables. Until recently, mechanized harvesting of potatoes and other root crops was used only by large private and state agricultural enterprises. Today, even small farmers are striving to reduce the share of manual labor.
If the plot of land is small, then there is no need for a tractor or combine; a walk-behind tractor equipped with attachments will help you harvest. A potato digger for a walk-behind tractor is in particular demand among small business owners.
Manufacturers of agricultural machinery take into account all the wishes of consumers and produce different models of potato diggers, but purchasing both a walk-behind tractor and attachments for it for a small private farm is not always justified (this is evidenced by annual reviews of average prices). Therefore, private owners decide to manufacture a trailer hitch on their own, using readily available and inexpensive materials and spare parts from old mechanisms.
Design Features
As soon as the spring sowing season ends, as well as the work of digging up the soil and applying fertilizers, the no less troublesome period of comprehensive crop care begins. But even with the onset of autumn, the life of a farmer does not become easier - after all, he is faced with the difficult task of harvesting. Especially a lot of effort and time is spent on harvesting potatoes.
Of course, you can also dig up root crops manually, but it’s quite difficult to do it alone; in most cases, you have to hire assistants, whose services must be paid. If potatoes are grown for sale, then such an expense item can seriously reduce the profit received, or even completely negate all the long efforts to grow root crops.
In addition, manual work takes a long time, which is extremely undesirable. It is in this case that a potato digger can be the optimal solution; this device was invented quite a long time ago.
Work on creating a vibration model
Rules for manufacturing each part separately and assembling the entire mechanism.
The basis
It is optimal to use a square profile pipe 40 by 40 mm. It is better to take a 4-meter piece of rolled metal and divide it into segments of 120 and 80 centimeters. We get four support beams.
From them you need to weld a base in the form of a rectangle at a right angle. Its dimensions will be 120 by 80 centimeters.
Rod mount
It is necessary to weld the jumpers not in the middle of the frame (rectangle), but at a quarter of its length.
On the back side of the base, we fix the square tubes in a vertical position by welding. They are placed outside the base to install the axle. Wheels are then installed on the axle.
Using a drill or engraver, make a 1 centimeter hole in a place convenient for fastening.
Vertical racks
We retreat 5 centimeters from the edge of the frame and secure the square profile by welding. Its length is no more than 50 centimeters. After 15-20 cm, we also fix the square profile by welding, but already 40 centimeters long. After the second rack, we measure 40 centimeters and secure the 30 centimeter profile with welding.
As a result, the design is similar to a metal pair of descending stairs.
Rigidity for racks
It is necessary to secure the racks at the bottom of the structure. To do this, use a strip of metal 0.4 - 0.5 mm. The racks should be connected by welding at 45 degrees, additionally welding the strips together.
Plowshare or ralo
Creating the working part of a potato digger. A homemade ploughshare must sink into the soil, digging through potato rows for harvesting.
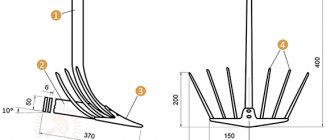
To make a ralo, you need metal from 0.3 mm thick. Two “working” blades are cut out according to the drawing and a homemade plow is welded. To give it a three-dimensional shape convenient for gripping the soil, you need to tap the center of the blades with a hammer, after securing the entire structure with a fastening rod.
Making pitched boards
The pitched board is a continuation of the design of the potato digger, or rather steel rods welded to the base. The easiest way is to use reinforcing bars with a diameter of no more than 10 mm and a length of up to 120 centimeters. Every 4-5 centimeters you need to weld the reinforcement, as shown in the photo.
Adjustment rods
An optional element, because adjustment is only needed on problematic (watery) soil.
The rods will easily adjust the desired angle for tilting the reinforcement (pitched) board. The easiest way is to make a movable structure in the form of a frame on which the pitched board is located. The frame is tightened with ordinary bolts.
Support wheels
The design of a digger for a walk-behind tractor, created by yourself, must be equipped with movable wheels for ease of operation and movement.
It is most profitable to equip the digger with wheels from a garden wheelbarrow with wide tires. We purchase axles, attach them to the frame and install the wheels. It is easier to secure the wheels with a pin (as in a garden wheelbarrow).
DIY vibration option
A screening (or vibrating) type digger has moving parts, which significantly complicates the design, so the mechanism requires precise manufacturing. However, a device of this type performs well on hard and wet soil, cutting it well. You need to know how to make a potato digger with your own hands without outside help in order to save money.
Manufacturing procedure:
- Form a frame. Cut the pipe into 4 parts. It is advisable to use blanks with a square cross-section - these are easier to join. You need two pieces 120 cm long, and two 80 cm long. The cross-section of the pipe is 4 by 4 cm. The parts are connected by welding into a rectangle.
- Install jumpers that will serve as the basis for control rods. On one side, elements are mounted a quarter of the length of the base of the frame, and on the other, two blanks for fastening the wheels. To do this, you will need two tubes with a diameter of 3 cm and a length of 15 cm.
- Install the racks vertically. On the side where the jumpers are located, 2 sheets 50 cm long are fixed at a distance of 5 mm from the edge of the frame. At a distance of 20 cm from them, racks 4 cm long are installed. Then another 40 cm are retreated and racks 30 cm long are installed.
- Ralo is made of metal sheet. It should be 40 by 40 cm in size and at least 3 mm thick. The workpiece is rigidly attached to the racks from below. The second workpiece, measuring 70 by 70 cm and 4 mm thick, is butt welded to the first, then the shape is bent into a cone with a sledgehammer.
- The grille is made of metal rods with a diameter of 1 cm. At the bottom they are attached to the railing, and the second end extends beyond the perimeter of the frame. You will need 10 to 15 rods. For additional rigidity, two rods should be welded across the structure.
- The wheels are installed in a pre-prepared place.
The manufacturing work is simple. Of the things that require special skills, you only need to be able to work with welding. Drawings and dimensions of a homemade screen digger may differ depending on the model of the MTZ mini-tractor or walk-behind tractor. For the latter, a device should be made that will not interfere with control. Don't forget about the weight - operating a bulky mechanism will be very tiring.
see also
Comments 15
Kopalka from farmer.ru?) I also wanted to make one like this, there are drawings, but it never got to the point of assembly)
Yes, I’m registered there, a lot of tips were taken from there))) mostly compared with the factory one, a friend has a factory digger for the MTZ walk-behind tractor...
I want to ask about the rear wheels. They are wider than standard ones and, in principle, should crush the edges of the boletus. I also have a T-25 in my village and have been cultivating potato polka on it since 2010, which is why I was interested in this question
Everything is cultivated normally for me, I plant 70cm standard row spacing, on the collective farm they process MTZ potatoes, their rear tires are wider than mine...
70 cm is understandable. If not wider than MTZ's, then good. On our collective farm on John Deere they cultivate potatoes and install specially narrow wheels, but their regular ones are of course 2 times wider than MTZ ones.
The width of mine seems to be approximately 30cm, MTZ’s is definitely wider, I measured it somehow, I forgot the accuracy
When the time comes to dig up potatoes, gardeners can do it in the usual way - with a shovel. However, such work is very labor-intensive. To accomplish this, it is beneficial to use mechanization tools. One of them is a potato digger. The article will tell you what it is and how you can make it yourself.
How to choose a potato digger?
There is a huge selection of potato diggers on the market, and the question of which is better to use: a screening or a conveyor, or maybe even a universal potato digger for a simple cultivator, is decided depending on various factors.
To choose the right potato digger, you need to pay attention to the following parameters:
- Crop area. The larger it is, the more modern and powerful equipment you need to buy.
- Soil properties. In some cases, the soil is too hard and there is no point in buying the most primitive equipment.
- Humidity. Most cheap models cannot clean the soil if it is wet and stuck to the tubers.
- Financial opportunities.
Also focus on the condition of your candy bar. If it is outdated, it is recommended to upgrade the basic equipment first and then buy modern attachments. Otherwise, problems with the monoblock can damage expensive equipment.
Having studied the information in detail, comparing the prices and useful characteristics of different potato diggers, you can choose the type of equipment that is right for you.
If you don’t know how to choose a potato digger for a walk-behind tractor, then you should contact the qualified specialists of the agro-moll.ru store. There is a large selection of models at competitive prices.
Required Tools
For work you will need the following materials and tools:
- alloy steel pipes with a diameter of 4 cm;
- corners of the “six”;
- reinforcement 10 mm thick;
- chain;
- gears;
- turbine;
- welder;
- adjustable wrench;
- drill;
- bolts with nuts and lock washers.
Good steel is needed to make a plowshare - it should be quite thick (at least 4 mm). The design has a welded frame, suspension, rods, which will allow you to adjust the dynamic elements - wheels and hooks.
Making the unit yourself is not particularly difficult. This potato digger can actually be used on any, even very dense soils.
Craftsmen independently construct two types of potato diggers.
- fan-shaped;
- thunderous.
Things are a little more complicated with the creation of conveyor and drum units, since their designs will be a little more complicated, but technically it is quite possible to implement the creation of such units.
If you have to harvest over large areas, then you should pay attention to a screening or conveyor potato digger. For a dacha or garden plot of 10 acres, a fan digger may be quite suitable
How to make a homemade potato digger for a walk-behind tractor
Before you start making a potato digger for a walk-behind tractor, you should decide what type of digger you want to have on your farm. This largely depends on the density of the soil, since, for example, a simple lancet digger will easily cope with light soils. In soil with a dense structure, a simple digger will not help you much - a design with a conveyor mechanism is more appropriate here.
Making a simple potato digger is quite easy - it does not require special knowledge or skills.
A bipod for the lancet type can be cut from an old shovel, and fork teeth or reinforcement are used as guide rods.
Required tools and materials
To make a vibration-type walk-behind potato digger, you will need a little more time and skill, as well as special tools and equipment.
So, we need at our disposal:
- welding machine;
- angle grinder (grinder);
- electric drill and metal drills;
- a set of keys;
- sledgehammer (heavy hammer);
- level, caliper, square,
When everything is in stock, you can begin manufacturing the unit.
The following materials will be required:
- U-shaped metal profile (channel No. 8);
- sheet steel about 8 mm thick;
- steel or iron rods 10 mm in cross section;
- iron corner (rolled metal);
- metal pipe for racks;
- fastening elements – plates and steel bolts with nuts No. 10;
- roller chain;
- wheels - metal or rubber.
Making and assembling a potato digger
The design of a vibrating potato digger for a walk-behind tractor includes:
- base frame;
- plowshare for digging;
- suspension system;
- adjustment rod;
- lugs or wheels.
We will start assembling the walk-behind tractor with the manufacture of individual components.
- The frame is welded from an iron channel No. 8 and a corner 63x40 mm. The length of the frame should be approximately 120 cm.
- We weld one channel at a distance of one third from the beginning of the frame, and the second - at a distance of approximately 1/6 from the front edge. The channels will serve as the basis for attaching the regulatory part of the digger.
- To the side edges of the frame on both sides, vertically to the ground, at a distance of 10 cm from each other, we weld metal posts of different lengths, starting from 50 cm (hereinafter - 40, 30, etc.). The base for the grill bars will be welded to these posts.
- Weld the remains of the channel to the short posts on both sides of the frame. As a result, you should get two rigid triangles on which the ploughshare will be attached.
- We cut out a plate of the required length, approximately 30 mm wide, from sheet metal and weld one end of it to any of the resulting triangles. Let it cool, then bend it with a sledgehammer and bolt it to the second triangle.
- To make a ploughshare, metal plates, an old plow, or a piece of pipe with a diameter of 200 mm cut lengthwise are suitable. We bend it like a plow and make a rounded sharpening of the part so that when working we do not cut the potato tubers. We fasten the plowshare to the elevator casing with four bolts, tightening the nuts securely.
- We cut the reinforcement into rods of the required length so that one end can be welded to a metal plate, and the other freely protrudes beyond the frame of the walk-behind digger. We weld the rods to the metal plate, leaving the other end free, at a distance of 4-5 cm from each other. Sheet metal strips can be welded onto the sides of the elevator over the rods to prevent the tubers from falling out on the sides.
- The free ends of the reinforcement are welded onto a metal bracket made from a strip of metal or a small cross-section pipe. The mobility bracket is attached to the end of the frame using hinges.
- If desired, the elevator can be replaced with a cleaning drum. It is made in the shape of a half-cylinder from metal strips and fittings.
- We install a reduction unit that will allow you to change the inclination of the elevator and the angle of inclination of the ploughshare. The reduction block is attached to the slider rod on bearings.
- We fasten the connecting bridge rod using sprockets. We weld metal disks onto it at both ends and attach the wheels.
- The potato digger is attached to different types of walk-behind tractors in the same way as other equipment.
Whatever type of digger you choose, in any case, homemade potato diggers for walk-behind tractors significantly facilitate agricultural work and at the same time help to significantly save on the purchase of an industrially produced digger.
The procedure for making a potato digger with your own hands
Before you make the equipment, you will need to prepare the material and equipment. To work you need:
- Several sheets of metal, channels and metal corners;
- Bolts and nuts;
- Welding machine;
- Bulgarian;
- Roulette;
- Sledgehammer.
Having collected everything you need, you can begin to study the drawings. They indicate the material of each element and their dimensions.
It is very important to thoroughly study the diagram so that when working you do not get distracted by searching for the necessary information.
The build process looks like this:
- To begin, take metal corners, a channel 1.2 m long, and start welding the frame;
- To install the adjustment mechanisms, weld a separate channel, moving 30 cm down from the frame;
- After this, you need to weld the racks. Start doing this from any edge, welding the parts in a vertical position. There should be a distance of 15 cm between them. First, weld a long 50-centimeter stand, and then, one by one, fasten the parts a few centimeters smaller;
- Next, the racks are connected with pieces of the remaining channel. Thus, you should get a kind of metal triangle;
- Weld a metal plate to it. After this, bend it with a sledgehammer and fix it on the back side;
- Attach the share to the elevator with bolts;
- Weld the reinforcement to the frame, and attach thick, reliable metal to the sides that will hold the tubers to the structure;
- Attach the shafts to the elevator;
- Fix the reduction block on the rod using bearings;
- At the end, all that remains is to assemble the support and transport mechanism.
If you do everything according to the algorithm, the result will be a reliable device that will serve you for more than one season.
When manufacturing equipment, you should listen to the advice of experts. Experts do not recommend using metal that is too thick - sheets 5 mm thick are sufficient. If you need a small structure, you can make it using hinges from an old car or tractor. For more reliability, use welding instead of bolts.
Finger drum
If possible, a finger drum can be installed on the elevator. It is a piece of pipe onto which fingers of the required length are welded.
The part should be of such a size that it does not reach the grill by just a couple of centimeters. The drum is mounted on a special axis, which has a welded sprocket.
Using a chain drive, the drum axis is connected to the wheel shaft.
If everything is done correctly and the calculations are correct, your fingers will break up the hard, dried soil, which falls along with the tubers onto the elevator grate. As a result, the potatoes will be as free as possible from adhering soil.
To make this option you will need:
large diameter pipe cut- round sheets of metal
, which will subsequently cover both holes in the pipe; - steel rod
, which will serve as an axis of rotation; - long cylindrical metal fingers
(you can use reinforcement used to reinforce concrete).
The entire structure is manufactured using resistance welding.
Buying a factory potato digger is a very expensive undertaking. Therefore, if you don’t have extra money and have a lot of time, as well as a well-working head and hands, you can easily save a decent amount.
After watching the video, we can conclude that it is important to be careful and conscientious about your work, then a homemade potato digger will be able to serve you without breakdowns or downtime for a very long time:
Probably, every owner of a large personal plot or vegetable garden wants to minimize the labor intensity of land work and reduce the time of tillage to a minimum, which is why gardeners strive to acquire a walk-behind tractor and various equipment for it. If you are the happy owner of this useful equipment and like to grow a lot of potatoes on your plot, then it makes sense to think about the need for a potato digger for mechanical harvesting. Now you can buy various designs and improved equipment for all types of walk-behind tractors, or you can put in a little effort and make a digger for a walk-behind tractor with your own hands. In this article we will introduce you to the varieties of this device and tell you how to make a potato digger yourself.
What is a potato digger and its types
A potato digger is an agricultural technique used by farmers and private farmers to simplify the process of harvesting potatoes.
Main parts of a potato digger for a walk-behind tractor with your own hands:
- base - the metal base of the potato digger: this is a frame made of heavy-duty thick metal;
- the traction mount is responsible for fastening the mechanism's rods;
- vertical stands - needed to secure the knife-ploughshare on them;
- ploughshare - the main element of a potato digger, is a knife that goes deep into the ground, loosening the soil;
- adjusting rods - designed to adjust the angle of attack of the ploughshare;
- support wheels - necessary for moving the potato digger across the cultivated area.
Potato diggers for mini tractors are used on loose, medium-compacted soil.
Note! Regardless of the type, the operation of all devices is similar: the tool goes deep into the ground with its pointed part, moving along the beds, lifting soil layers with potato tubers.
There are the following potato diggers for the walk-behind tractor:
- fan-shaped (lancet);
- conveyor;
- vibrodynamic (screening).
Assembling a garden shredder with your own hands
Fan
A homemade fan potato digger for a walk-behind tractor is universal. The potato digger is structurally very simple. Its mechanism does not have rotating parts, which in other potato diggers quickly fail under heavy loads during harvesting. This species has other names: because of its characteristic appearance, they are called “paw” or pointed, and the industrial model is called Dolphin.
From experience with fan models for tractors, farmers using this type:
- ability to work with low-power walk-behind tractors;
- ease of connection with a walk-behind tractor;
- relatively low prices for industrial models;
- reliability;
- good cleaning speed.
The disadvantages of working with fan potato diggers include:
- the likelihood of loss of the potato crop occurs due to the small working width of the digger;
- part of the crop may be damaged by a knife, making it unusable.
Conveyor
The design of the conveyor potato digger for the walk-behind tractor is simple. In the center of the mechanism there is a transport belt, with the help of which the harvested crop of root crops moves upward along the belt, being cleared of dirt and adhering soil. The conveyor belt moves in a circle using the power from the rotating element of the walk-behind tractor through chains, a variator, and gears. You can make a potato digger with your own hands, but you need to follow the technique.
Advantages of a conveyor digger:
- does not damage potatoes;
- ease of operation;
- Compatible with high-power walk-behind tractors and small tractors.
The disadvantages of a conveyor CC include the likelihood of foreign objects getting into the conveyor, which can jam the mechanism and damage it.
Grohotnaya
The design of the vibrating CC, also called “screening”, is simple - the device consists of 3 parts:
- ploughshare;
- a movable grid with a vibrating mechanism that processes the harvested crop;
- metal carcass.
This type of CC is used in agricultural production for harvesting potatoes from large areas, sometimes on an industrial scale. The unit works like this: collecting and sifting tubers on a vibrating table is carried out through vibrations coming from a screening mechanism.
The advantages of using this unit include:
- wide coverage of the cultivated strip of soil;
- large depth of immersion of the knife into the ground;
- minor losses of potatoes during harvesting.
There are also disadvantages to using vibrating diggers:
- vibrations from the screening mechanism enter the control part of the walk-behind tractor, the impact of the vibration mechanism tires the body;
- Before working with CC, S-cleaning must be cleared of foreign plants that could clog the grate.
Manufacturing Guide for Screen Harvest Separator
This design is much more difficult to manufacture, but its performance is several times greater than the previous model. If the area of the vegetable garden planted with potatoes is two or more hundred square meters, there is a reason to spend time and effort on creating an effective device. When harvesting, it will completely pay for itself.
For production we cannot do without:
- the frame for which the corrugated pipe will serve;
- steel sheet for the bucket, 3-4 mm thick;
- circle or steel reinforcement;
- 30-32 mm channel for vertical rods;
- front hub from any rear-wheel drive passenger car (“Zhiguli”, for example);
- gearbox from the rear axle of a VAZ classic;
- cardan shaft (when connected to the power take-off shaft);
- splined connection from a failed gearbox;
- wheels from old agricultural machinery (you can completely buy ready-made ones);
- welding machine, grinder and drill;
- fasteners.
The digger for the walk-behind tractor of the design in question has independent support on the ground through one or more wheels. The supporting frame has two support points. The traction device is a suspension for a walk-behind tractor. The support wheels adjust the height of the device above the field. The power take-off shaft of the walk-behind tractor drives the gearbox, or it is combined with the wheels of the potato digger. The rod, which is connected at one end to the crank device, produces oscillatory movements.
Using a spline connection, the ploughshare is launched (rotates back and forth like an excavator bucket) and the rumble (like a dog's tail, moves to the sides). Subsequently, the entire dug crop is separated from the soil and accumulated in a lattice storage tank. If you make a storage bin with a positive inclination angle, then you can stop from time to time and unload the potatoes, peeled from soil, directly into the bags. When setting a negative angle, the tubers will be uniformly unloaded on top of the soil, so that they can then dry and be collected in containers.
If such a device is difficult for you to implement, you can start making a more primitive one, with a vibration separator. Making a potato digger yourself means giving free rein to your creative thoughts and imagination. With this design, the crop is sifted along the movement of the mini-tractor. Using a plowshare, the potatoes are raked into the grid, which makes back-and-forth reciprocating movements. To do this, you need to place the suspension on swinging hinges.
The vibrator drive is based on a pipe and an eccentric connected by a shaft and a pulley. The connection of the pulley to the wheel is possible using a belt drive. Or, using an angular gearbox, it can be connected to the power take-off shaft of the walk-behind tractor. The sifted potatoes are loaded behind the device. Or, as it accumulates, you can stop and ship the crop into boxes, bags or any other container.
All of the above structures can be made essentially from junk, which is available in abundance in any household. If there is a need to buy some missing parts, this will not greatly affect the cost of the device, especially if you compare the prices of factory copies.
But pay attention! Do-it-yourself potato digging can cause injury
Therefore, observing basic precautions when using it is mandatory! Photo
Photo
How to make your own potato peeler
Homemade potato digger
This type of potato digger is also called a vibration digger. Its operating principle is as follows. Just as in other versions of potato diggers, a ploughshare is used here, with the help of which the potatoes are removed from the ground and gradually moved back while moving. Then the root vegetables, mixed with soil, fall onto a grate that constantly vibrates. In this case, the earth crumbles, and the potatoes move backward until they fall to the ground.
On a note. This homemade potato digger is suitable for the T 40 tractor.
For manufacturing you will need materials and tools:
- You will need a grinder saw.
- To create reliable connections you will need a welding machine.
- When creating bolted connections, you will need to drill holes in the metal. For this you will need a drill and appropriate drill bits.
- To create a frame, it is customary to use a square metal profile. It is necessary to prepare one whose cross-section is 2.5 by 2.5 cm.
- Steel sheet, the thickness of which can be from three to five millimeters. It is used to make ploughshares.
- You will need to make a vibrating basket from 8 mm thick wire, the relative strength of which will be sufficient.
- Wheels on which the potato digger will move.
- Bolts and other consumables.
The following is how to make a potato digger with your own hands:
- First, you need to cut pieces of the metal profile in such a way as to make a rectangular metal frame from them.
- Weld the wheel stands. They are made from pieces of metal profile that need to be attached in a vertical position.
- The screening basket will be attached to special hinge holders. At this stage they need to be welded to the frame.
- Now you need to install mechanisms that will create vibration using a reciprocating motion. The torque will be transmitted from the motor of the walk-behind tractor.
- A ploughshare is made from a steel sheet. To do this, you need to not only cut it in the right way, but also bend it.
- Now it's time to attach the share to the structure. To do this, it is attached on special hinges to the screening basket and to the frame.
- Wheels are installed on the unit.
]On a note. When making a ploughshare, you can choose different options: it can be made pointed, convex or concave.
When making a plowshare, you can choose various options
In most cases, the width of the working strip is approximately 40 cm. The knife is immersed in the soil to a depth of 25 cm.
Important! The depth of immersion of the plowshare into the ground can be adjusted. This can be done by adjusting the height of the potato digger wheels.
Yield losses with this method of processing are insignificant. In different situations, this value can range from 2 to 10%.
Before cultivating the area, it is recommended to completely clear it of potato tops and weeds so that they do not interfere with the harvesting of tubers.
DIY vibrating digger
The vibrating digger is suitable for harvesting large areas, since it captures strips up to 40 cm and leads to a crop loss of no more than 10% in loose soil.
The design consists of a ploughshare for loosening the soil and then dropping it, along with tubers and tops, onto several mesh grates mounted to the wheels. During operation, the model begins to vibrate, the soil begins to sift, and potato tubers separated from the tops are poured onto the treated clean soil.
Vibrating digger
The base of the potato digger is made from a profile square pipe (40×40 mm), from which you will need to obtain 4 support beams. To do this, corners are selected, which are welded in the form of a rectangle measuring 120x80 cm. Next, fasteners (square tubes) for rods are welded on the other side of the base vertically 1/4 of the length of the frame.
Note! When assembling the model, it is important to install the tubes vertically outside the frame in order to further mount the axle and the wheels on it. The posts are connected by welding at an angle of 45°, attached to the bottom of the structure on a metal strip (0.5 mm in diameter)
For the manufacture of the ploughshare, metal with a thickness of 0.3 mm is selected. According to the drawing, 2 blades are cut out and tapped in the center with a hammer. Steel rods are welded to the base as a continuation of the structure. To form a pitched board, you can use rods (200 mm in diameter) made of reinforcement and 120 cm in length with connections at a distance of every 4-5 cm from each other.
Important! In order to increase vibration, it is recommended to mount not 1 eccentric, but 2, thereby obtaining impeccable design features of the potato screening machine. The model works better in areas cleared of potato tops and weeds
Otherwise, grass will become clogged in the wheel mounts and the screen grid.
Connection methods
two ways:
- Resistance welding is not a reliable method of fastening. The fact is that when using equipment on hard, petrified soil, there is too much stress on the metal parts of the structure. The weld may come apart.
- Bolt nut. This connection does not require special equipment, just keys and a drill. The option is much more reliable than resistance welding. This method of fastening is not subject to overload.
Note! The nut can always be unscrewed and the structure can be disassembled. This is an excellent solution if there is a need to transport a potato digger over long distances.
Equipment with conveyor
The conveyor potato digger has a standard appearance, in which the main elements are a ploughshare and a platform with a conveyor. Peculiarities:
- a conveyor is installed on the platform, the type of which is regulated by the requirements;
- simple design allows installation on almost any version of walk-behind tractors, including domestic ones;
- often used in areas with hard or loamy soil;
- A potato digger for a walk-behind tractor is created strictly according to the specified parameters of the conveyor and platform, as this is necessary for normal digging of tubers.
When creating it yourself, it is worth considering two factors that will affect installation and operation. The first factor is the size of the device, which allows you to mount the mechanism on the walk-behind tractor. The calculation should always be made taking into account the technical parameters. Another factor is the manifestation of versatility. Most homemade conveyor-type devices can be supplemented with secondary elements.
Manufacturers
These devices are produced at many enterprises in Russia and the CIS countries. Below is a list of the most famous companies producing potato diggers:
- , located in Starokonstantinov (Ukraine), produces the KM-1P potato digger. This device is recognized as one of the best on the Russian and CIS markets. It is certified according to all requirements of the ISO 9001:2009 standard.
- IP Akimov (Cheboksary, Russia) produces the KKM-2 potato digger. It is widely used by Russian farms.
- Mechanical Plant LLC, located in Molodechno, Belarus, produces high-quality and reliable potato digger KM and its variety KM-2.
- SAZ LLC (Smorgon, Belarus) produces the KFT-2 digger. This is a powerful and reliable digger, powered by a Belarus walk-behind tractor.
- Beltractora LLC (Brest, Belarus) produces the KT-5 potato digger. Its designers are constantly working to improve the model and improve its performance.