Preparing and adjusting the baler
1) Using an external inspection, check the completeness and condition of the baler. All components and parts must be without visible damage and securely fastened.
2) After connecting the baler to the tractor, secure the connecting pin from falling out. Secure the baler safety chain to the tractor. Rotate the jack handle counterclockwise to raise the jack or lift the freely moving part of the jack and secure it with the locking pin.
3) Install the three-position control lever in the Omega support.
4) Place the bobbins in the twine box and thread the twine.
5) Connect the high-pressure hoses of the baler to the tractor. Install a thin hose hose on the supply line, and the other on the drain line of the tractor hydraulic system.
6) Connect the cardan shaft.
7) Connect the power supply connector of the baler to the tractor, making sure that the tractor’s electrical system is in good working order.
Adjust the position of the rake.
Depending on the type of mass being selected, the rake can be in the following positions: A - upper hole - for long stems (hay, alfalfa, etc.) B - middle hole - for medium stems C - lower hole - for short stems (straw, etc. )
9) Secure the rake against axial movement with R-shaped cotter pins. Adjust the gap between the rake teeth and the picking device based on the density of the windrow experimentally. Secure the rake from rotation with bolts and secure with nuts. In this case, the harvested mass should be pressed against the collecting device and not clog it.
10) Check the tension of the drive chains and adjust if necessary.
11) Start the tractor engine. Test the controls of the baler mechanisms. To do this, set the three-position control lever located in the tractor cabin to position 1 “collection device control”. Then, using the tractor hydraulic distributor lever, we control (raise/lower) directly the picking device.
12) To open and close the rear part of the baler body, it is necessary to switch the three-position lever to position 2 “Control of opening/closing bale chamber” and, by controlling the same lever of the tractor hydraulic distributor, open and close the rear part of the body under pressure.
13) To turn on the thread tying device, you need to switch the three-position lever to position 3 “Control of the thread tying device” and, by controlling the same lever of the tractor hydraulic distributor, turn the thread tying device on and off.
14) When the rear part of the housing is completely closed under pressure in the hydraulic system, the pressure should be 100...120 bar, the pressure gauge needle should be in the blue sector. The blue color of the scale is the closing pressure of the bale chamber.
Yellow – weak pressing force (hay, straw).
Green – average baling force (silage).
Red – pressure at which it is prohibited to work.
15) Raise the tractor hitch to the middle position, ensuring the distance between the cardan shaft and the steering wheel of the baler is about 15...20 cm. Slowly, without jerking, engage the tractor PTO. In this case, the torque from the tractor PTO must be transmitted to the working parts of the baler. Let it run for 5...10 minutes at idle engine speed.
If the transmission chain does not rotate at a pressure of 100...120 bar, then the gap between the fixed and sliding coupling halves should be adjusted.
TASK FOR PRACTICAL WORK
1 Get acquainted with the technological process of the PR-1520 baler by starting the press and observing the working parts of the machine.
2 Understand the operating sequence of the knitting device and the dropping mechanism.
3 Check the main adjustment dimensions and, if necessary, make adjustments in compliance with safety precautions.
CONTROL QUESTIONS
1 Purpose and basic adjustments of roll and piston balers.
2 Sequence of wrapping a bale at a piston press.
3 Design and principle of operation of a beltless pressing mechanism.
4 The operating principle of the twine tying and trimming mechanism of a roll press.
5 Basic adjustments for balers.
6 Adjusting the stroke of the feed needle relative to the piston.
CONTENTS OF THE REPORT
1 Brand of machines and purpose of balers.
2 Brief technical characteristics of the machines.
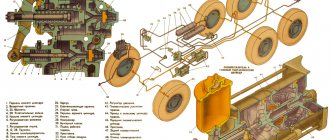
3 Technological diagram of the machines, indicating the main components.
4 Basic adjustments for balers.
5 Possible malfunctions and ways to eliminate them.
BIBLIOGRAPHICAL LIST
1 Mechanization and electrification of agricultural production: textbook. aid for students universities in agronomic specialties/A.P. Tarasenko [and others]. - M.: KolosS, 2006. – 551 p.
2 Setting up and adjusting agricultural machines: recommendations/
D. Z. Fairushin, R. Kh. Zainullin, R. F. Ziyazetdinov. - Ufa: BSAU, 2007. – 71 p.
3 Baler PS-1.6 “Kyrgyzstan”. Technical description and operating instructions. – Frunze: 1984. – 128 p.
4 Roll baler PR-1520. Technical description and operating instructions. JSC Neftekamsk Automobile Plant. 2004. – 17 p.
5 Agricultural machines: a textbook for students. universities in agronomy. special/ V.M. Khalansky, I.V. Gorbachev. - M.: KolosS, 2004. – 624 p.
License of the Republic of Belarus for publishing activities No. 0261 dated April 10, 1998
Signed for publication on _________ 2009. Format 60x84. Typographic paper. Times typeface. Conditional oven l. _____. Conditional ed. l. ____. Circulation ____ copies. Order No._____.
Publishing house of the Bashkir State Agrarian University.
Printing house of the Bashkir State Agrarian University.
Address of the publishing house and printing house: 450001, Ufa, st. 50 years of October, 34.
1) Using an external inspection, check the completeness and condition of the baler. All components and parts must be without visible damage and securely fastened.
2) After connecting the baler to the tractor, secure the connecting pin from falling out. Secure the baler safety chain to the tractor. Rotate the jack handle counterclockwise to raise the jack or lift the freely moving part of the jack and secure it with the locking pin.
3) Install the three-position control lever in the Omega support.
4) Place the bobbins in the twine box and thread the twine.
5) Connect the high-pressure hoses of the baler to the tractor. Install a thin hose hose on the supply line, and the other on the drain line of the tractor hydraulic system.
6) Connect the cardan shaft.
7) Connect the power supply connector of the baler to the tractor, making sure that the tractor’s electrical system is in good working order.
Adjust the position of the rake.
Depending on the type of mass being selected, the rake can be in the following positions: A - upper hole - for long stems (hay, alfalfa, etc.) B - middle hole - for medium stems C - lower hole - for short stems (straw, etc. )
9) Secure the rake against axial movement with R-shaped cotter pins. Adjust the gap between the rake teeth and the picking device based on the density of the windrow experimentally. Secure the rake from rotation with bolts and secure with nuts. In this case, the harvested mass should be pressed against the collecting device and not clog it.
10) Check the tension of the drive chains and adjust if necessary.
11) Start the tractor engine. Test the controls of the baler mechanisms. To do this, set the three-position control lever located in the tractor cabin to position 1 “collection device control”. Then, using the tractor hydraulic distributor lever, we control (raise/lower) directly the picking device.
12) To open and close the rear part of the baler body, it is necessary to switch the three-position lever to position 2 “Control of opening/closing bale chamber” and, by controlling the same lever of the tractor hydraulic distributor, open and close the rear part of the body under pressure.
13) To turn on the thread tying device, you need to switch the three-position lever to position 3 “Control of the thread tying device” and, by controlling the same lever of the tractor hydraulic distributor, turn the thread tying device on and off.
14) When the rear part of the housing is completely closed under pressure in the hydraulic system, the pressure should be 100...120 bar, the pressure gauge needle should be in the blue sector. The blue color of the scale is the closing pressure of the bale chamber.
Yellow – weak pressing force (hay, straw).
Green – average baling force (silage).
Red – pressure at which it is prohibited to work.
15) Raise the tractor hitch to the middle position, ensuring the distance between the cardan shaft and the steering wheel of the baler is about 15...20 cm. Slowly, without jerking, engage the tractor PTO. In this case, the torque from the tractor PTO must be transmitted to the working parts of the baler. Let it run for 5...10 minutes at idle engine speed.
If the transmission chain does not rotate at a pressure of 100...120 bar, then the gap between the fixed and sliding coupling halves should be adjusted.
TASK FOR PRACTICAL WORK
1 Get acquainted with the technological process of the PR-1520 baler by starting the press and observing the working parts of the machine.
2 Understand the operating sequence of the knitting device and the dropping mechanism.
3 Check the main adjustment dimensions and, if necessary, make adjustments in compliance with safety precautions.
CONTROL QUESTIONS
1 Purpose and basic adjustments of roll and piston balers.
2 Sequence of wrapping a bale at a piston press.
3 Design and principle of operation of a beltless pressing mechanism.
4 The operating principle of the twine tying and trimming mechanism of a roll press.
5 Basic adjustments for balers.
6 Adjusting the stroke of the feed needle relative to the piston.
CONTENTS OF THE REPORT
1 Brand of machines and purpose of balers.
2 Brief technical characteristics of the machines.
3 Technological diagram of the machines, indicating the main components.
4 Basic adjustments for balers.
5 Possible malfunctions and ways to eliminate them.
BIBLIOGRAPHICAL LIST
1 Mechanization and electrification of agricultural production: textbook. aid for students universities in agronomic specialties/A.P. Tarasenko [and others]. - M.: KolosS, 2006. – 551 p.
2 Setting up and adjusting agricultural machines: recommendations/
D. Z. Fairushin, R. Kh. Zainullin, R. F. Ziyazetdinov. - Ufa: BSAU, 2007. – 71 p.
3 Baler PS-1.6 “Kyrgyzstan”. Technical description and operating instructions. – Frunze: 1984. – 128 p.
4 Roll baler PR-1520. Technical description and operating instructions. JSC Neftekamsk Automobile Plant. 2004. – 17 p.
5 Agricultural machines: a textbook for students. universities in agronomy. special/ V.M. Khalansky, I.V. Gorbachev. - M.: KolosS, 2004. – 624 p.
License of the Republic of Belarus for publishing activities No. 0261 dated April 10, 1998
Signed for publication on _________ 2009. Format 60x84. Typographic paper. Times typeface. Conditional oven l. _____. Conditional ed. l. ____. Circulation ____ copies. Order No._____.
Publishing house of the Bashkir State Agrarian University.
Printing house of the Bashkir State Agrarian University.
Address of the publishing house and printing house: 450001, Ufa, st. 50 years of October, 34.
Varieties
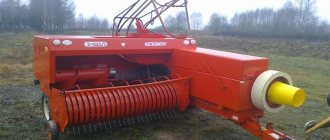
How do balers work? The design is based on a pressing chamber. Here the plant mass is compressed, formed into windrows of a certain shape and covered with wire or twine.
The result is a compact roll of hay, which is convenient for transportation and further storage.
Please note that balers are available in several versions. All models on the market belong to the category of trailed equipment; accordingly, the force required for operation is transmitted through the power take-off shaft of the tractor.
Taking into account the features, the equipment can be divided into two groups: large-sized equipment and a mini baler.
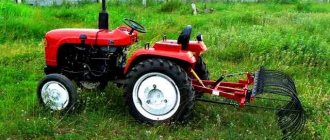
- The first group is used on an industrial scale;
- The second one works with walk-behind tractors and tractors of small and medium traction class.
It is worth noting that using high-performance attachments that are combined with heavy tractors in small areas is unprofitable.
In addition to performance parameters, the technology differs in the way the plant mass is processed. Based on their operating principle, balers are classified into 2 types.