Maintenance of the KamAZ brake system: Adjusting the KamAZ brake mechanism
Adjustment of the KamAZ brake mechanism can be complete or partial. In both cases, it is necessary to check whether the wheel bearings are tightened correctly. The brake drums must be cold. The parking brake should be turned off.
Full adjustment is carried out only after disassembling and repairing the brakes or in case of misalignment of the working surfaces of the friction linings and the brake drum.
The necessary operations must be performed in this sequence.
1. Loosen the nuts securing the pad axles and bring the eccentrics closer together, turning the axes with the marks facing each other. The marks are placed on the outer ends of the axles protruding above the nuts. Loosen the expansion knuckle bracket mounting bolts.
2. Supply compressed air to the brake chamber at a pressure of 1-1.5 kgf/cm2 (press the brake pedal if there is air in the system or use compressed air from a garage unit).
Adjusting the KamAZ brake mechanism
If there is no compressed air, remove the brake chamber rod pin and, pressing the adjusting lever towards the stroke of the brake chamber rod when braking, press the shoes against the brake drum.
By turning the eccentrics in one direction or the other, center the pads relative to the drum and achieve a tight fit to the drum. After this, through the windows in the brake shield, located at a distance of 20-30 mm from the outer ends of the linings, direct a 0.1 mm thick probe under the lining: it should not pass along its entire width.
3. Without stopping the supply of compressed air to the brake chamber, and in the absence of compressed air, without releasing the adjusting lever and holding the axles of the pads from turning, securely tighten the axle nuts and the nuts of the bolts securing the expansion knuckle bracket to the brake caliper.
4. Stop the supply of compressed air, and if there is no compressed air, release the adjusting lever and attach the brake chamber rod.
5. Rotate the worm axes of the adjusting lever so that the stroke of the brake chamber rod is within 20-30 mm.
Make sure that when turning the air supply on and off, the brake chamber rods move quickly, without jamming.
6. Check how the drums rotate: they should rotate freely and evenly, without touching the pads.
After the indicated adjustment, there may be the following gaps between the brake drum and the pads: at the expansion knuckle 0.4 mm, at the axles of the pads 0.2 mm.
Partial adjustment is carried out only to reduce the gap between the pads and the drum, which increases during operation due to wear of the linings. The presence of large gaps, at which partial adjustment is required, is detected by an increase in the stroke of the brake chamber rods (the stroke of the rod should not exceed 40 mm). Partial adjustment is performed only by rotating the worm axes of the adjusting levers in the same way as with full adjustment (see paragraphs 5 and 6). In this case, you should not loosen the nuts of the shoe axles and change the installation of the axles, as this may disrupt the normal fit of the shoes to the drum during braking. If the installation of the axles is changed, a full adjustment must be made.
For partial adjustment, it is necessary to set the smallest stroke of the brake chamber rods, equal to 20 mm.
To obtain equal braking efficiency for the right and left wheels, it is necessary that the strokes of the rods of the right and left chambers of each axle differ little from one another.
When checking brakes on a roller stand, it is necessary that the difference in braking forces between the right and left wheels of the tested bridge does not exceed 15% of the maximum value.
Other
Extending brake life with boring
To extend the service life of the mechanisms, it is recommended to bore KamAZ brake pads.
You can make the surface of the disc more even by using abrasive inserts. This option requires a minimum of tools and effort. A hole is made in the old block and abrasive is inserted. Then the processed spare part is installed and driven for a short time on the car. It is advisable to drive for about 5 kilometers, braking periodically. The method is suitable for home use.
You can also contact a specialized center. Boring will be performed without removing the pads. Professionals remove the caliper and process the units with special machines. You can also read about Kamaz smoking white smoke - Causes and consequences.
How to move the pads apart and bring them together
Truck braking is ensured by adjusting the brake devices. After replacing the friction material, the car's brakes are completely adjusted. This operation is performed using adjusting eccentrics. Adjustment is necessary in order to bring the pads as close as possible to the brake drum. To check the quality of work performed, use a 0.1 mm thick probe. It should not fit into the gap between the lining and the brake drum.
Partial adjustment is performed in case of reduced braking efficiency or jamming of the pads. As a result of wear of the friction material, the stroke of the brake chamber rod increases.
When the value reaches 35 mm, partial adjustment of the brakes is required.
To spread the pads on a KamAZ, you need to hang the wheel and bring the linings to the drum. Adjustment is carried out only by rotating the axes of the adjusting levers.
Why are the brakes bad?
Malfunctions of the KamAZ brake system can lead to malfunctions of the vehicle.
Breakdowns and ways to fix them:
- Air in the parking brake system. Because of this, the brake pedal does not release. Air flow can enter the system during depressurization, a drop in fuel level, or due to damaged pipes and hoses. To eliminate the breakdown, it is recommended to bleed the brake mechanism.
- Damaged vacuum. This mechanism directly affects the operation of the brakes. To check its serviceability, you need to press the pedal 5-7 times in a row with the engine turned off. This will help remove the vacuum in the amplifier device. After this, you need to start the unit while holding the pedal. If after starting it drops a little, it means the vacuum is working, if not, then you need to replace the damaged element.
- Extraneous noise while driving may be due to damaged brake pads. In this case, it is recommended to install the KamAZ on a platform and lift it using special equipment, remove the front wheels and inspect the disc elements. The thickness of the disk must be at least 10.8 mm. You also need to check the movement of the pads. Using a screwdriver, they are removed from the disk element; if this cannot be done, then the problem lies in the jamming of the piston mechanism.
Read also: New Prado 2022 photo
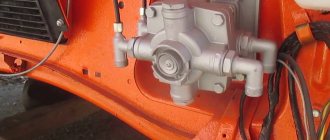
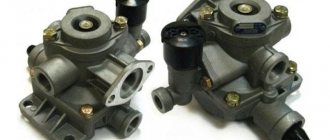
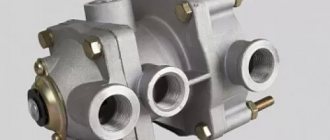
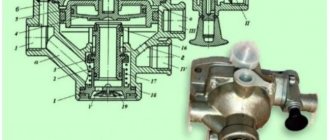
Adjusting brake levers (ratchets)
The website presents brake adjusting levers (ratchets) for trucks and buses. Hottecke ratchets for KAMAZ, MAZ, NEFAZ, LiAZ, PAZ, Ikarus vehicles. Brake components with pneumatic drive are of German quality. Corrosion-resistant, wear-resistant, reliable and durable.
Adjustable brake levers Hottecke
The brake adjustment lever is an important component of air-actuated brake systems found on trucks and buses. It transmits the force (torque) from the brake chamber to the brake pad drive. By changing the angle of the expansion fist, you can adjust the distance from the friction linings to the surface of the brake drum. That is, it maintains the performance of the brake system with gradual wear of the friction linings.
Possible causes of brake pad failure
Manufacturers always indicate the service life of this part, however, this figure can vary up or down depending on the driver’s driving style (for example, with constant heavy braking, the pads can wear out after a mileage of 5 thousand km). Also, brake pads can wear out naturally. Below we will look at the main causes of pad failure:
- Natural wear of the pads due to friction;
- Poor quality material from which KAMAZ brake pads are made;
- Ineffective driving and braking (for example, sudden braking when driving fast);
- Errors in the operation of the brake system (for example, if the pneumatic system reservoirs fill very slowly or do not fill at all).
Messages out of 56
312013-09-03 20:10:33
My friend, install simple, self-propelled ones, I’ll work for a little bit, then they’ll be destroyed, and they’ll create a very big mess when it’s necessary to bring the pads together and remove the hub. install energach brackets and 10 ton ratchets, they are longer and therefore the brakes are more powerful, the old people at the base advise installing MAZ ratchet brackets on 10k brackets, but I don’t understand why they are better than a stopper-clamp, they say they wear the pads down to the metal, but KAMAZ ones will wash them too if spread the pads as needed, of course until the fist turns.
322013-09-03 21:06:34
Pan Mozh there is nothing left to clean up.
There are pads, the drum is still working. Today I used the handbrake on wet asphalt with sand. The two wheels on which the rods extend larger were not caught when skidding. And on two where the rods come out a little they grabbed it to the south.
332013-09-03 23:03:58
The two wheels on which the rods extend larger were not caught when skidding. And on two where the rods come out a little they grabbed it to the south.
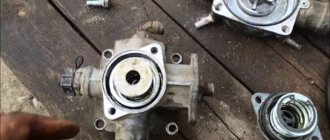
Design and principle of operation
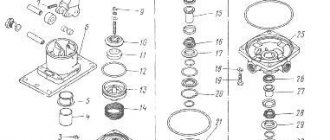
The brake lever (ratchet) structure includes the following mechanisms and parts:
- lid;
- gear type wheel;
- stub;
- worm;
- frame;
- sleeve;
- retaining bolt;
- fasteners;
- spring locking mechanism;
- locking device ball;
- oiler;
- worm axis.
In the body of this device there is a gear-type worm wheel, which is equipped with special holes. The axles on the expansion fist are installed in these holes.
In order for the axial mechanism to be fixed, the design provides a locking device, the ball of which is inserted into a special hole on the worm axis under the influence of a spring mechanism. The spring itself rests against the bolt of the locking mechanism.
The gear-type wheel mechanism does not fall out of the lever body thanks to protective covers. As the axial device rotates, the worm begins to rotate the wheel, and the expansion cam rotates with it, thereby moving the brake ratchets apart and reducing the gap between the shoes and the drum mechanism.
When you press the brake pedal, the ratchet is rotated by the chamber rod. Before adjusting the clearance of the locking bolt, you need to loosen the bolt itself by 1-2 turns, and after adjustment, tighten it back.
Replacing pads on KAMAZ Euro
Replacing brake pads on a KAMAZ all-terrain vehicle is possible using pads purchased in a store, or by independently restoring old ones. Most drivers do just that. Replacing KAMAZ rear pads involves removing the outdated friction substance from the spare parts, then cleaning the seating surface.
Before installation, the linings are ground using a lathe. The friction substance is installed on the brake pad, the holes are aligned. To ensure correct placement of the trim, all rivets are installed at the same time. Riveting starts from the central part to the edges. This increases the tightness of contact of the friction material to the surface.
Removing pads on KAMAZ
Any of the above reasons can lead to uneven wear on your brake pads. Replacing brake pads on KAMAZ requires their preliminary removal. Before removing it, you need to wait until the car cools down, place the car on a level surface, install a stop under its bottom, and special blockers under the wheels.
How to remove pads with a disc system
- The wheel nuts are unscrewed, the car is raised using a jack, and the wheel is removed.
- The brake fluid reservoir cap is unscrewed to simplify the process of pressing in the brake piston.
- The guides on the caliper are unscrewed. The brackets are removed for fixation with a screwdriver. If there is a pad wear indicator, it is necessary to disconnect the connector.
- Using a flat screwdriver, remove the pads to press in the brake piston (for this purpose, insert a flat, strong screwdriver into the gap separating the pads) and remove the brake pads.
How to remove pads for a drum system
- Removing KAMAZ from the handbrake.
- Unscrewing the bolts for fixation and removing the brake drum.
- Release the handbrake cable, remove all springs and rods on the rear brakes with a screwdriver, remove the pads.
How to replace brake pads
All modern brake systems operate according to the Euro standard. They often fail, so they may need to be replaced. You can install and remove the pads yourself. To do this, you need to acquire the skill of breeding them.
How to remove pads with a disc system
With a disk system you need:
- unscrew the wheel nuts and remove it;
- remove the brake fluid reservoir cap;
- remove the caliper and its guide;
- Use a special screwdriver to remove the brake pads.
These pads are usually installed on models 43118 and 4310.
How to remove pads for a drum system
With a drum system, you can remove it yourself as follows:
- unscrew the wheel nuts and remove it;
- remove the brake fluid reservoir cap;
- remove the brake drum bolts;
- remove the bolts and cables of the hand brake, remove the pads.
Have you ever had to replace brake pads yourself?
Source
How to install and remove pads
To dismantle the used friction material, you need to put the car on a jack or lift and remove the wheel, then remove the brake drum. Since it is made of cast iron, use the hammer carefully. Once you have access to the brake pads, remove the outer tension springs. Using a pry bar, move the part away from the expansion knuckle and remove the roller. After this, it is removed from the axle.
To replace, you can use pads purchased at the store, or restore the old ones yourself. Most drivers do this. Worn friction material is cut off from the parts and the seating surface is cleaned. Before installation, grind the linings on a lathe. The friction material is installed on the block and the holes are aligned. To position the trim correctly, install all the rivets at once. They start riveting from the middle to the edges. This will allow the material to adhere more tightly to the surface.
Installation of the restored part is carried out in the reverse order. It should be remembered that tension springs are installed on the inside of the pads. To secure them, use a simple device made of cable. The loop is inserted into the hole and the hook of the spring is pulled into it.