Equipment of the Okhotets all-terrain vehicle
The standard kit for assembling the Okhotets snow and swamp-going vehicle includes:
- side elements with wings;
- bottom with structural reinforcements;
- aft and frontal skin sheets;
- top panels and body protection elements;
- kit for self-production of caterpillar tracks;
- Lifan gasoline engine equipped with an electric starter;
- centrifugal type clutch;
- intermediate shaft with driven pulley;
- drive belts and chains;
- supporting elements with bearings;
- drawings and assembly instructions;
- packing list and list of parts that need to be purchased for assembly.
Popular models in Siberia
Among fishermen and hunters living beyond the Urals, home-made all-terrain vehicles built on the basis of units of Russian or imported cars are common. Before starting the construction of such equipment, it is necessary to purchase or develop drawings, determine the concept of the all-terrain vehicle and the type of chassis. The vehicles can be equipped with a tracked or wheeled undercarriage; gasoline engines and diesel engines are used as the power plant.
To move around the taiga, vehicles are built based on the bodies of passenger cars. Drive axles and transfer gearboxes are attached to a welded frame, and a spring or spring suspension is provided. Tires from military trucks undergo a mechanical treatment cycle to reduce the weight of the parts and increase the elasticity of the tread and sidewalls. The standard body of the car is cut off, and a cargo-passenger platform with an awning is provided at the rear.
There are simplified vehicles on a tracked chassis. To transmit torque, a drive wheel with protrusions is used, which clings to metal plates on a rubber band. The upper part of the body is frame type; tarpaulin or dense polyethylene is used to protect against wind and precipitation. The engine and transmission from VAZ cars were used.
Do-it-yourself crawler all-terrain vehicle: manufacturing features, drawings:
It's no secret that in our vast country there are areas where it is completely impossible to move normally on the roads due to their poor quality. In this case, a special vehicle, which is characterized by high maneuverability, comes to the rescue.
We are talking about an all-terrain vehicle. But, unfortunately, it is almost impossible to purchase a vehicle that is light, economical and inexpensive.
Therefore, many craftsmen with engineering and technical skills decide to create a tracked all-terrain vehicle with their own hands, taking into account their needs and capabilities.
How can tracked all-terrain vehicles be used?
Such homemade tracked devices come in different sizes and are used for a variety of purposes. With their help, heavy loads are moved, which are placed either in the body or in a special trailer. If a crawler all-terrain vehicle, made by yourself, is used for a summer residence, then in this case various construction materials are most often transported.
In addition, such a vehicle has transport versatility, and if any unforeseen circumstances arise, you can quickly, without any difficulties, get to a certain destination over rough terrain.
What to pay attention to when creating a homemade all-terrain vehicle?
If you decide to make a crawler all-terrain vehicle with your own hands, you must clearly understand for what purpose it will be used. Be sure to consider the following points:
- Weather conditions during operation.
- Dimensions. The width affects the cross-country ability of a self-made crawler all-terrain vehicle, the length is calculated based on the number of seats or the presence of a luggage compartment, and the height should be optimal when creating the amphibious properties of the unit.
- Motor power. The more powerful the engine, the easier it is to overcome hard-to-reach sections of the road.
- Target. Depending on the purpose for which the mobile device is intended, its design may vary.
- Number of wheels. Most often, a homemade tracked all-terrain vehicle, made with your own hands, has wheels from two to eight pairs, which are necessary to support the caterpillar track.
Create a drawing
The most important stage is making a sketch of a tracked all-terrain vehicle. Do-it-yourself drawings with the location of the mechanisms of the unit and its components are drawn after this. They must be very accurate. When creating such a vehicle, they usually use both homemade parts and ready-made factory-produced elements. They are drawn separately, with the calculation of the compatibility and performance of parts and assemblies.
Design features
A crawler all-terrain vehicle, created with your own hands, must have an engine. Basically, this element is taken from cars, most often domestic ones. You can also borrow it from a motorcycle. The chassis consists of rubber tracks, a tension system, suspension, and rollers. Car tires are often used to make tracks. The chassis base consists of a bathtub, frame or any other metal frame. For the control system, various components are taken or ready-made control elements of motorcycles or cars, as well as tractors, are used. A homemade tracked all-terrain vehicle, made with your own hands, has a power system, which is represented by a fuel tank, gasoline or diesel. Gas equipment is used much less frequently.
Review of famous mini all-terrain vehicles
Every year new models of small all-terrain vehicles appear on the market from automobile manufacturing enterprises and self-taught designers. Vehicles differ from each other in power, technical characteristics, functionality and price. A review of models is compiled according to the characteristic that unites them.
Among amphibious tires, the following brands are noted:
- ZIS-5;
- KIT-TM-06;
- ZID Barkhan;
- Shogrash;
- VEPS.
Their cost ranges from 170 to 330 thousand rubles.
The tracked range of mini-all-terrain vehicles is represented by the following models:
- Tinger Scout 420;
- Pelec Mini:
- RASH;
- Mirage T;
- Okhotets and others.
They cost from 190 to 400 thousand rubles.
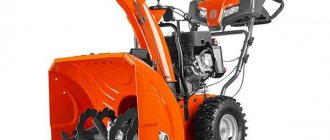
Model Hunter
The 6-wheeled amphibious all-terrain vehicle Okhotets has a beautiful appearance and high technical capabilities. The unit is capable of lifting weights up to 300 kg. It is equipped with a Chinese Lifan engine with a power of up to 18.5 hp.
All components and parts are completely similar to VAZ spare parts. They are easily replaceable, because available for sale.
Therefore, it is easy to repair and reliable in operation.
The cost is 220-339 thousand rubles. depending on modification and configuration. This is a lightweight all-terrain vehicle, it fits in a light trailer or Gazelle body.
Pelec mini
A compact tracked all-terrain vehicle, this helps it move through dense forests. The complete package includes the following additions:
- roll cage;
- awning;
- tow bar, etc.
Pelets mini easily overcomes forests, high steeps, steep banks, holes and ravines. It can remain in water for a long time due to the sealed body structure.
The Karakat has a gasoline engine, centrifugal clutch and hydraulic disc brakes, a spacious interior for the driver, passengers and luggage.
Main characteristics
| Name | Index |
| Engine | 15 hp |
| Weight | 535 kg |
| Maximum speed on land | up to 30 km/h |
| Maximum speed on water | up to 3 km/h |
| Price | from 287 thousand rubles. |
Rush is quite large in its category
The Rush all-terrain vehicle is one of the largest in size among the line of mini-all-terrain vehicles. It will not fit in the back of a Gazelle or in a car trailer.
In addition to the size, it differs from the classics in its special pendant.
In it, a rubber track is installed on large-diameter pneumatic rollers. Main characteristics
| Name | Index |
| Engine | up to 27 hp |
| Weight | from 550 kg |
| Maximum speed on land | up to 30 km/h |
| Maximum speed on water | up to 5 km/h |
| Price | from 390 thousand rubles. |
Model Beaver
This is the most durable mini-all-terrain vehicle model. Operates over a wide temperature range. The beaver is used for work in the Arctic and the Far North, and copes just as well with tasks on the slopes of the southern mountains.
The design is based on GAZ.
This is a set that includes a minibus and a diesel tractor. It has a wide track and increased ground clearance. Due to this, he can pass any obstacles. Main characteristics
| Name | Index |
| Engine | 125 hp |
| Weight | 550 kg |
| Maximum speed on land | up to 70 km/h |
| Maximum speed on water | up to 5 km/h |
| Price | 200-500 thousand rubles. |
By creating a model with his own hands, the owner receives as a result an individual vehicle with the necessary characteristics and capabilities. During the design process, he studies the structure of the all-terrain vehicle in detail, and this helps in the repair and operation of the vehicle.
In how many months can 1 person assemble a mini-all-terrain vehicle?
All-terrain vehicles with sleeper
To exclude independent production of a complex case, a factory product is used. The brutality of the VAZ 2109 on caterpillar tracks is complemented by its excellent cross-country ability and interior comfort. The standard transformation of the front seat backs allows you to create 2 full berths. There will be plenty of cargo space left in the trunk.
Drawings and diagrams
Materials for assembling large all-terrain vehicles have been published on the Internet:
- "Mishutka";
- "Falcon";
- "Pelec"
The Petrovich model is mass-produced. But the manufacturer does not hide the layout of the components. Studying factory design documentation will simplify the creation of a set of homemade drawings.
Making at home
It is necessary to clarify what additional preparations are needed. In addition to formulating criteria, making drawings and creating a list of parts, you will need an appropriate room. Weather conditions will not allow performing work operations outdoors without interruption.
The equipment of a home workshop must correspond to the characteristics of technological operations.
In addition to purchasing a welding machine, you will have to master the creation of high-quality seams. Individual operations can be entrusted to experienced specialists.
How to attach tracks
The simplest option is tires with cut beads. Solid products are characterized by high strength and minimal cost. However, for reliable fastening it is better to use a structure made of a conveyor belt or a composite caterpillar made of tracks. Fixation of the working position is ensured by special limiters - fangs.
?
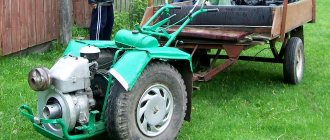
Creation of a vehicle based on a walk-behind tractor
The engine, transmission and other components of this small-scale mechanization tool will be useful for building a snowmobile. The consistency of functional components makes it easier to create a quality design on a new frame. To create a karakat, the equipment is equipped with appropriate tires and a comfortable seat. The handles with the fuel supply and brake control drives can be left with minimal changes.
Drawings of homemade all-terrain vehicles
Design documentation can be found in whole or in part on the Internet. Changes are added to ready-made solutions taking into account personal preferences.
Build process
After manufacturing the frame, they proceed to installing the rear axle.
Next install:
- suspension elements;
- steering;
- wheels;
- braking system;
- motor;
- Gearbox, lever and rocker;
- armchair;
- lighting technology.
Field tests check the performance of the all-terrain vehicle.
Tracks for an all-terrain vehicle based on a walk-behind tractor
If you have a powerful enough power unit, you can create a homemade tracked all-terrain vehicle. Tracks are made of metal plates with welded rings. Original components can be made from epoxy resin with a frame made of polymer reinforcement. The prepared mixture is poured into the mold. After hardening, the caterpillars are collected.
DIY Crawler Platform for Robots and Entertainment
We are thinking about developing a perimeter security robot using the software we developed for our golf ball collection robot. When we decided on the technical requirements, we started looking for something similar on the Internet. This is how we found Andrey Zolotoev’s project. Tracked platform for a research robot.
Andrey told how the idea for this project came to him and where you can watch a video instruction for assembling a tracked platform with motors from a hoverboard.
I don’t remember how I came up with the idea of making a tracked platform; 30 years ago I assembled tracks from two-core aluminum wires, using braided wire as a track and the rigid wire itself as a bushing. I disassembled an iron alarm clock and a fabulously expensive, at that time, audio player, extracting a motor, a pulley and a rubber belt, applying rotation to the smaller gear of the alarm clock, I received horse torque on the large gear, this was the heart of any toy!
I recently took up the old stuff, fortunately now I don’t need to invent anything, the tracks are ready, motors, controllers and other components are available. Just put your hands and head to work, a couple of experiments, the main thing is not to listen to advice along the way, otherwise everyone is experienced, everyone has already done something similar and knows better!
Ready-made caterpillars are what raises the most questions - From what, how much, where? The goose is called Ant from the composite track company, length 2200, width 22cm, multi-layer, extremely durable, lantern type of engagement, but can also be hooked onto spikes. Very heavy 7kg and too thick for this type of transport, the fact is that I use it for children's entertainment transport, because the length is not enough to make an adult with large powerful motors, but at the same time it is too rigid and absorbs a lot of energy and efficiency on steep bends around the skating rinks, if only we could make it thinner!
The drive sprocket from the Buran snowmobile, the shaft is cut in half, several turning manipulations, the chain sprocket from the Ant scooter is the smallest and the largest, they give 1:3 and remove the load-bearing load from the engine. The chains stretch like an elastic band from underpants, I still can’t understand - at a price of 960 rubles they cannot make it efficiently, and this despite the fact that the load is not at all large. Therefore, a pretensioning mechanism is necessary.
Engines! The motors come from a hoverboard, I had to disassemble a dozen different weights and deal with 6-8 types of motors, the most powerful that I have encountered is with 30*3mm magnets and 5 cores 350 watts at 36 volts and 500 watts at 48v
There are motors from kiwano hoverboards, they have about 400 and 500 watts, but I haven’t come across such ones. It should be noted that even the smallest motor with a 3-core winding and a 25*2 magnet produced full and almost comparable torque, with the only difference being that after 20 minutes of riding it heated up to more than 70 degrees. And this, as we know, is the complete destruction of magnets. At 36 volts we get a maximum speed of 5 mph at 48 -8 mph. But at the same time, in my opinion, the traction will pull the car and carry more than 200 kg. Of course, to the detriment. Drivers are a serious topic, at first I used the development of MIT graduate Benjamin Vedder VESC, but the guy turned out to be a genius, but greedy! (just kidding) and they cost 100 USD. and there were no analogues, then I foolishly bought 6 pieces, and half a year later exact copies appeared for 50 euros. Uuuuuuuuck, oh well! By the way, here they are!
I connect directly to the RC remote control, although the driver itself provides control of both the throttle and throttle via the BT module. This driver squeezes all the potential out of the motor. There is a soft start, sharp reverse and recuperation (although this is not relevant on a tank!), and the main thing with this size is that it delivers 2-3 kW, without getting too hot. Lifepo4 battery, since it is meant to be a winter activity, the battery should not be afraid of cold weather, and this is what will stop many before taking on this project because the price tag is absolutely ridiculous at 30,000 rubles. Surprisingly, it shows itself really well, more than 2 hours of active riding is enough for 24 ah in winter.
Price
Initially, of course, I considered this as a business, but when I calculated that the cost of the battery approached 100,000 rubles and it turned out to be almost impossible to sell such a tank with at least a profit of 20,000. Few people can afford such entertainment even for rent. And many fathers dream of building something similar for their children, even though they have different levels of technical skills. Therefore, I posted an assembly guide on my YouTube channel, where I describe in detail how you can assemble this and other vehicles for yourself and your children. To get closer to that childhood joy that they themselves have already begun to forget about.
I can say that I am a specialist in finding solutions to make anything from the most accessible, cheapest components, but even this did not help to make many mistakes with cost overruns. There are many projects on my YouTube channel that we started and successfully completed, but there are even more in our plans, subscribe, there will be a lot of interesting things!
What are homemade products?
At the preparation stage, it is necessary to decide whether the equipment will be used on public roads.
In this case, it is necessary to obtain registration documents and state license plates from the traffic police according to the standard procedure.
The vehicle must comply with current safety standards, which is confirmed by the results of certification tests.
Self-assembled all-terrain vehicles for off-road travel can be registered with Gostekhnadzor according to the following scheme:
- develop technical specifications;
- collect documents confirming rights to the power unit and other functional units;
- undergo the certification procedure at a specialized enterprise.
The collected documents are submitted for registration of a self-propelled vehicle passport. Failure to register is punishable by a fine of 1,500 to 2,000 rubles. for individuals.
If you do not take into account the official requirements of safety standards, the manufacturer of the homemade product has the right to use any design solutions:
- install 10 wheels or choose the classic 4x4 formula;
- Instead of a manual transmission, install a comfortable automatic transmission.
All-terrain vehicles equipped with auger-rotor propulsors have high cross-country ability.
However, in practice, 2 SUV schemes are most often used:
- on tracks;
- on pneumatic tires with low pressure.
To reduce the cost of the project and ease of maintenance, the homemade product is equipped with a manual gearbox and simple control devices. When creating drawings, it is recommended to objectively evaluate your own knowledge and skills in order to eliminate errors along with excessive difficulties during the assembly process.
On caterpillar tracks
Vehicles in this category differ:
- good maneuverability;
- limited speed characteristics;
- increased fuel consumption;
- complexity of manufacturing.
The tracks are suitable for equipping a heavy all-terrain vehicle with a large load capacity.
On low pressure tires
A typical wheeled snow and swamp-going vehicle is a lightweight design that is easy to assemble yourself if you have metalworking skills. For the basis of the design, you can take the frame and engine of a road motorcycle. The standard plug is extended. In the absence of a cabin and other complex additions, the construction of such a vehicle will be completed in several months at minimal cost.
Photos of the coolest homemade all-terrain vehicles
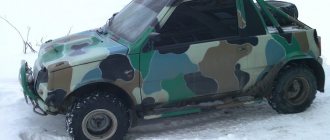
One of the popular models of light all-terrain vehicles is Karakat:
All-terrain vehicle Karakat
Also, tracked all-terrain vehicles were created in other countries and had the following appearance:
Another domestic homemade product is a frame structure equipped with a gearbox and disc brakes:
All-terrain vehicles perform well in difficult road conditions
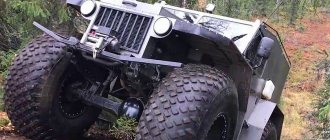
Models are also made with winches in front:
You can watch other hand-made models and their manufacturing process on video. Creating homemade all-terrain vehicles equipped with caterpillar tracks is a complex process that requires skill and drawings of the future design. Usually they resort to this when it is not possible to purchase factory models, but a high-cross-country vehicle is very necessary. During the process of its creation, it is important to provide the nodes and elements with a high level of reliability.
Homemade tracked all-terrain vehicle "Khoma": assembly photo, test video
The author of the homemade product built himself the simplest tracked all-terrain vehicle for fishing trips and mushroom picking in the forest, the body of the all-terrain vehicle is a boat, and it weighs only 300 kg.
Technical characteristics of the tracked all-terrain vehicle:
- Front-wheel drive (one drive axle).
- Turning - differential activation.
- Boat hull.
- Track width – 450 mm.
- Center distance – 1180mm.
- Belt clutch.
- The width of the boat is 700 mm.
- The height of the boat is 570 mm.
- The length of the all-terrain vehicle is 2000 mm.
- Width - 1760 mm.
- Maximum speed is 30 km/h.
To assemble the homemade product, the following materials were needed:
- Lifan engine 7 hp
- Gearbox from an Opel Rekord.
- Gearbox from a Luaz car.
- Lada bridge.
- Drum brakes are also from the Lada.
- The frame is welded from a profile pipe 50 x 50 x 2 mm, the upper part is made from a corner 40 x 4 mm.
- Conveyor belt 6 mm thick.
- Galvanized sheet metal.
Gear ratios:
- From engine to gearbox - 5.5.
- Gearbox 1st - 3.64.
- Onboard Luaz - 1.3.
- Bridge - 4.1.
A frame is welded from a profile pipe and a corner, an engine, gearbox, and axle are installed.
Belting.
The tracks are made from angle 25 x 25 x 3 mm. The lugs are welded.
Fangs from a strip of 25 x 4 and 20 x 4 mm.
The height of the fang is 75 mm.
The width between two conveyor belts is 150 mm.
The caterpillar is ready for installation.
At first, the author placed the all-terrain vehicle on two axles.
The author took the all-terrain vehicle to the test site on a trailer and began testing.
As a result of preliminary tests, it was decided to install a middle axis. The central axle is welded 50mm lower relative to the drive and tension axle, which leads to improved turning on hard ground without unnecessary effort.
- Installing a central axis significantly increased the turn of the all-terrain vehicle.
The boat is made of galvanized steel with rivets. The engine control is located on the handle.
- Spare mount.
- Movement through the water is carried out using a propeller and an additional rudder at the stern.
- In the photo, the author is sailing on his all-terrain vehicle.
- The tracked all-terrain vehicle confidently overcomes water obstacles.
- I recommend watching a video testing homemade equipment from the author of the homemade product.
- The all-terrain vehicle is floating.
- Speed in fourth gear.
- Homemade author: Alexander Abakumov.
Step-by-step instruction
To assemble the machine, you will need to prepare a set of tools (recommendations are given in the factory instructions) and clear the area on which installation will be carried out. Since the body is welded from a 2 mm thick steel sheet, electrical power must be supplied to the work site. Equipment for applying a layer of primer and paint should be provided: cars and other products should not be in the room, since paint splashes will damage the external finishing elements.
Drawings for DIY assembly
The manufacturer completes each kit with documentation describing the sequence of actions during assembly. At the same time, the instructions do not contain linear dimensions of the parts; the workshop only gives advice on calculating the dimensions of the units. It should be taken into account that each Okhotets all-terrain vehicle has its own shape and dimensions. The user can independently make sketches or drawings based on the calculated dimensions of the structural elements.
Required materials and tools
Minimum set of tools and accessories for assembly:
- semi-automatic welding;
- tape measure and square;
- cutting machine for obtaining blanks and cleaning edges;
- drilling machine;
- drill and set of metal drills;
- spanners.
All-terrain vehicle assembly process
Approximate assembly algorithm:
- Unpack the kit and check the completeness, purchase additional components and fasteners.
- Weld reinforcement ribs and guides for installing units to the base, and then assemble the lower bath.
- Boil the joints of the metal panels, which will ensure the tightness of the housing and allow it to overcome water barriers.
- Degrease the surfaces and cover the metal with a layer of primer that is resistant to mechanical stress and the influence of petroleum products.
- Assemble a steel base for mounting the engine, provide rubber dampers for the supports, which reduce the level of vibrations transmitted to the body of the all-terrain vehicle.
- Install the engine and gearbox, adjusting the attachment points of the units. Displacement of the pulleys relative to each other is not allowed - with incorrect positioning, the load on the belt and chain drives increases.
- Secure the brake calipers and discs to the rear axle axle shafts (using homemade or factory-made adapter strips).
- Place the bridge on the base and connect the cardan shaft. The drive is equipped with a movable coupling that compensates for errors when calculating the position of the nodes.
- Install the electrical wiring with the fuse box and install the battery (if using an electric starter). The cable layout depends on the number and installation locations of additional equipment (for example, headlights or courtesy lights for the passenger compartment).
- Install the pedals and control levers, as well as the gas trigger connected to the carburetor throttle valve. Adjust the tension of the connecting cable after the first test drive.
- Install an additional pipeline with a tap to facilitate the procedure for changing the oil in the engine crankcase. The engine life declared by the Lifan manufacturer is up to 1000 hours only if the power plant is serviced in a timely manner.
- Assemble a caterpillar, which consists of parallel rubber bands and metal brackets that increase the coefficient of adhesion to the ground. For drilling holes, it is recommended to use a machine that allows you to increase productivity and improve workmanship. When drilling with a drill, the risk of drill breakage increases.
- Install guides in the passenger compartment for fastening the seat (for example, from a passenger car; the manufacturer offers seats with upholstery that does not absorb water).
- Mount a homemade or ready-made fuel tank; the capacity of the tank depends on the density of the arrangement of the units in the housing.
- Paint the external surfaces with several layers of enamel with intermediate drying.
The design of the all-terrain vehicle may use additional components made by analogy with equipment from other workshops (for example, from the Vologda region). A frame with a windshield is placed in front of the driver's seat; there are designs with electric heating and a windshield wiper. A tubular frame for a canvas awning is mounted above the driver's seat and cargo platform. After assembly, a test drive is carried out, after which the units are adjusted.
All-terrain vehicles with low pressure tires
Quite often, homemade swamp walkers are installed on pads. A specific term is used to refer to converted large tires. To reduce weight and improve flexibility, the cord and excess rubber are removed. To perform the procedure, use a knife and a winch. Processing is carried out taking into account the operating characteristics. For driving in marshy areas, for example, reduce the depth of the grooves.
Drawings for homemade all-terrain vehicles
When looking for structures on tires, it is recommended to pay attention to the following models:
- Professor;
- Priob-70;
- "Imp";
- "Body".
A fresh look at the proposed ready-made solutions will help make the necessary changes to the design documentation.
How to assemble
Installation work is performed according to the algorithm discussed above. The pads are fixed to a new frame. Functional discs can be made from old aluminum cans or other suitable blanks. A fire hose will provide a strong fixation.
Nuances when working with your own hands
For conversion, you can use a wheel from MAZ, ZIL, or other trucks. The integrity of the internal part should be checked. When working with durable rubber, tools quickly become unusable. You need to prepare a sharpening wheel to restore the sharpness of the edge if necessary. Crayons are used for marking.
Wheels
First, you need to determine the tire sizes. Many people take tires from ZIL-131 or from Oka, in which the top of the wire cord is removed. One of the screws is cut through the cut window, the wire is removed around the entire perimeter. Then the sidewall from the cord to the tread is cut at a distance of about 8 cm. The fang is undermined and the edges are trimmed with a knife.
This is done clockwise, after which a tread is formed. A picture is placed on the camera, most often a Christmas tree is chosen, but you can deviate from this rule. The pattern is cut with a knife, the angle is trapezoidal.
After which you will need perseverance, since the peeling process is quite long. There is no need to rush, so as not to ruin all the work, making the work unsuitable for use.
Homemade swamp vehicles can be no worse than industrial ones, if all the nuances are taken into account correctly. When choosing a tread, you need to take into account that it must be self-cleaning, this is important when moving through wetlands.
On peat bogs, you should not choose too deep a terrain to avoid breaking through the surface and loss of adhesion. A rare pattern is selected for movement on sand and snow. Disks, as a rule, are standard. But many people prefer to attach additional “basins” to belts or transport tape.
Specifications
This section and further presents the best home-made cars. Model names can be used to search for additional information on the Internet. The authors of inventions publish drawings and tips on assembling individual components.
The following list shows the technical characteristics of the wheeled all-terrain vehicle DIF, created by St. Petersburg engineer A. Gargashyan:
- dimensions (length, width and height), cm - 340x250x230;
- diesel engine - Kubota V1505-t (Japan);
- number of cylinders - 4;
- power, l. s - 44;
- working volume, cubic cm - 1498;
- speed (maximum/on water/with trailer), km/h - 45/6/33;
- angle of climb, degrees - up to 35;
- load capacity, kg - 1000;
- ground clearance, mm - 600;
- dry (maximum permissible) weight, kg - 1300 (2450).
Based on the design documentation, in agreement with the author, the production of the serial model “Sherp” was mastered.
Design and operating principle
Amplifiers are installed inside the steel case, on which the transmission units and engine are mounted. Torque is transmitted using a belt clutch to a driven sprocket, connected by a roller chain to a manual transmission from VAZ cars. The transmission is connected to the drive axle by a cardan transmission; the drive wheels have protrusions that engage with corresponding recesses in the track. The rubber band has metal reinforcements that extend the life of the unit.
The engine is equipped with a carburetor, fuel is supplied from the tank by gravity, starting is carried out by a starter (not installed on all all-terrain vehicles) or manually.
The transmission ratios allow you to start moving at 4th speed without the risk of stopping the engine. The track tension is regulated by the pressure in the pneumatic tires of the road wheels; the tires simultaneously reduce the level of vibration when driving over rough terrain. The all-terrain vehicle is floating (subject to hermetically sealed welding); movement on water is ensured by the rotation of the caterpillar tracks.
The machine is equipped with hydraulic disc-type brake mechanisms, borrowed from the VAZ-2108 car. Stopping is accomplished by pressing the pedal; fluid is supplied to the calipers through flexible lines. The design of the rear axle uses a standard differential; an optional forced locking mechanism is installed, which improves maneuverability on soft ground.
Advantages and disadvantages
Main advantages of the design:
- has a simple device;
- low specific ground pressure ensures increased maneuverability;
- the design uses components from serial automotive equipment, which simplifies the search for spare parts and repairs;
- it is possible to work with an original trailer on tracks;
- the case, when assembled with high quality, does not allow water to pass through;
- It is possible to order caterpillar tracks with increased link width.
Disadvantages of an all-terrain vehicle:
- to assemble the kit you will need to purchase additional components;
- it is necessary to secure the cargo during transportation using improvised means;
- when driving off-road, brake hoses may break;
- There is no standard engine hour meter.