Often, alteration of a walk-behind tractor is carried out in cases where the operational characteristics of the unit, functionality and ease of operation no longer satisfy the owner of the equipment. In some cases, individual craftsmen tune a walk-behind tractor to realize their visual fantasies or to impress others. Today, almost every private house and summer cottage has a walk-behind tractor or a walk-behind cultivator. However, the capabilities of this technique are limited. To expand the functionality of walk-behind tractors, you can contact a specialized workshop, but the price of such conversion can be very high. There are several ways to inexpensively and practically upgrade a walk-behind tractor with your own hands.
Criterias of choice
If you are planning to remake walk-behind tractors in advance, then before purchasing a machine you need to take into account a number of factors:
Power indicator. This parameter should be weighed against the type of soil and the size of the area intended for processing. Fuel. As practice shows, units operating on diesel fuel are preferable. They are more powerful and more economical than gasoline versions and have a longer working life. Unit weight. When choosing, you should take this factor into account. If the equipment is intended for use as an individual household tool, you should focus on lightweight models. For more serious use, massive modifications are chosen, since they are intended for multifaceted soil processing. Price. An expensive walk-behind tractor will not always be the optimal base for a future mini-tractor. However, reworking walk-behind tractors involves the use of high-quality parts that have a long service life
Therefore, it is better to pay attention to trusted brands.
Simple technique
To assemble a walk-behind tractor for plowing ordinary soil with your own hands, use the engine from the Karpaty moped. To increase the power of the power unit, it is recommended to equip the equipment with an additional shaft. More powerful equipment can be made from a motorcycle Voskhod, Ant, Minsk.
A homemade walk-behind tractor, equipped with an engine from a Voskhod motorcycle, has a power of 13.5 hp. The ignition is removed from the Vyatka-Electron scooter. To maintain normal operation of the motor, forced cooling is installed. To do this, we use a supply type fan.
To assemble the drive shaft, use pieces of splined shafts from the following units:
- gearbox from ZIL-130;
- transfer case from GAZ-66.
The crankcase is fixed to the gearbox housing, in which we cut out a window for fixing the gears. The next stage is making the wheels. Experts recommend welding steel wheels. We weld a rim to the disk, to which lugs (16 pieces) are welded.
To make motorcycle control levers, we use a steel pipe. We connect the levers at the top with a cross member, and weld the flanges at the bottom. To change gears, you will need a handle. It can be installed on the left control lever.
To attach attachments to a walk-behind tractor equipped with a motorcycle engine, suspension and adjustment units are made. A bracket is used to fix the first element. The disadvantage of homemade agricultural machinery is the lack of a differential.
Do-it-yourself modification of the Oka walk-behind tractor
Do-it-yourself modifications to the walk-behind tractor can be almost anything, it all depends on engineering skills and the availability of the necessary resources. The Oka walk-behind tractor can be upgraded in different ways: improving what is already there, or adding various devices and accessories.
https://youtube.com/watch?v=m5OmE4jeU3k
The most common modification is replacing the engine, since the engine included in the factory configuration may not suit the owner. When changing the engine, it is necessary to take into account the weight of the walk-behind tractor itself, as well as the loads to which it will be subjected. Depending on the class of the walk-behind tractor, an engine of appropriate power is selected - the heavier, the more powerful the engine.
You can modify the Oka walk-behind tractor in the same ways that are used for other brands: creating trailers, various attachments, replacing wheels, improving driving performance, etc.
Have you upgraded your walk-behind tractor?
Beginning of work
So, we come to the most interesting place - assembling a Neva-type walk-behind tractor with your own hands. Before starting work, it is recommended to stock up on the most popular tools, namely: grinder, drill, welding machine, pliers, spanners, bolts, screws, nuts.
The advantage of this approach is almost zero cost. Photos of homemade walk-behind tractors are presented below.
- Complete transformer substations KTP
- Manufacturing of containers and reservoirs
- Signaling devices SUM1
Types of replacement attachments for cultivators
A cultivator for a motor tractor can be equipped with various attachments.
They are divided into several types:
paws - necessary for plowing the soil while simultaneously removing weeds. There are several types of these nozzles. Chisel-shaped devices are designed for loosening the soil to a depth of 15 cm. Lancet universal paws are used for continuous or inter-row plowing of soil to a depth of 14 cm. Devices of this type do a good job of chopping soil and cutting weeds. Single-sided flat-cutting paws are intended exclusively for cutting large weeds;
- harrows - nozzles of this type are used for processing the soil between rows and in protective zones;
- Feeding knives – used for loosening the soil between rows and simultaneously incorporating fertilizers into the soil. The maximum working depth is 16 cm;
- needle discs - designed to destroy the earth crust and destroy weeds. The processing depth is 4 cm, and the soil shift is 1–2 cm;
- Hillers - these attachments are used for cutting ridges and destroying weeds between rows. Maximum processing depth – 16 cm:
- furrow cutters - used to prepare furrows for further irrigation. The depth of the furrows does not exceed 20 cm.
All replaceable attachments are fixed on the cultivator stands using a bolted connection. To extend the life of your equipment, you should regularly clear it of weeds and avoid contact with soil that is too wet.
A walk-behind tractor based on an IZH engine, it’s real
5 years ago I made a walk-behind tractor based on the Izh Planeta -3 engine, with a gearbox from Murovya. I thought for a long time after the snowmobile, there was no money, but I had to work in the field, so I came up with the idea and did it in 2 months, because almost everything was at hand. When fishing, running errands, and in the field, he became my indispensable assistant. Transport speed reaches 70 km per hour, I had to learn how to drive.
Radosneg wrote: based on the Izh Planet -3 engine,
With (forced) cooling or without?
Cooling is forced through ignition, I’ll lay out everything in detail, the design structure will be clear from production, if anyone likes it, of course. This spring there were cold winds, I hardly used any air during cultivation. As in the transport version, it is also not needed.
I made this walk-behind tractor to order, here the cooling is better visible, a simple impeller from the stove, side turbulence with a conical air supply, the chamber drive is from pulley to pulley.
Radosneg wrote: Forced cooling through ignition
I just saw one with an engine from a disabled woman in Izhevsky. Works fine. But in the first photo it’s simply not visible. By the way, how strong is he?
The scheme is suitable for Minsk, Voskhod, Ant engines, there are design changes when installing the engine, but everything can be solved, Izh has proven itself to be the best. You can’t put me on a simple low-speed walk-behind tractor anymore, I try to drive more quietly in front of the traffic police, and up to 50 km per hour is a completely manageable speed.
Source
Re-equipment of modern walk-behind tractors
I would like to note that with certain skills of a mechanic, due perseverance and the availability of all the necessary consumables, from an ordinary powerful walk-behind tractor, you can make a miniature multifunctional tractor with your own hands according to a previously drawn up project. However, there is no limit to the improvement of home-made products from a walk-behind tractor, and every person, with a strong desire and small financial investments, can make an entire multifunctional harvester to facilitate work on a personal plot.
- Motorized unit with trailer. This homemade product involves the creation of an additional tow hitch, which is connected to the walk-behind tractor using a rigid hitch. The main nuance in the manufacture of such an improvement is compliance with the displacement of the center of gravity, which should move back. In addition, you will need to increase the width of the front axle by installing special bushings, which are available in markets and specialized stores. Additionally, you will have to install a differential, which will make the mini tractor as maneuverable as possible.
- Conversion of a walk-behind tractor into an all-terrain vehicle. By converting a motorized unit into an all-terrain vehicle, its owner will receive many advantages that make complex work in the garden or vegetable garden easier. Such a major alteration is based on attaching the walk-behind tractor by welding to a special frame equipped with 4 wheels, the rotational movement of which is transmitted through a driveshaft to the rear axle of the machine. At the same time, depending on the power of the power unit, you can make either a small ATV or a mini tractor.
- Homemade product for collecting hay. Many farmers are familiar with the complex process of making hay for cattle. Structurally, this addition consists of a welded system made of pipes and special pins fixed to a plate. This device is somewhat reminiscent of a large rake that is installed behind a motorized unit and rake up the mown hay. Additionally, an axle is fixed in the front part, with wheels turning the unit into a homemade mini tractor from a walk-behind tractor. This homemade machine does an excellent job of collecting mowed grass.
- Taking into account the fact that in most regions of our state there is a lot of precipitation in the form of snow in the winter, many owners of personal plots are thinking about converting a walk-behind tractor into a snowmobile. This improvement will allow a person to easily move through any snow drifts. And considering that in winter the walk-behind tractor is not used for its main purpose, such a homemade product may come in handy. One of the variations of this improvement is the installation of tracks, which will turn the walk-behind tractor into an excellent means of transportation in wetlands.
In order for a homemade tractor, assembled with your own hands, to serve without breakdowns for a sufficiently long period, it is important to choose the right gasoline walk-behind tractor, the power of which will be sufficient to withstand additional loads. Plus, it is desirable that the unit be with the most extended wheelbase
In this regard, walk-behind tractors from the Cascade or Zubr model range are perfect, as they have proven themselves among consumers as reliable and practical devices.
Such powerful and high-quality walk-behind tractors will be able to both plow a garden and pull a trailer full of cargo, or, if they have tracks, drive over impassable off-road terrain or mow the grass on the lawn, as well as perform many other useful jobs on a personal plot.
Replacing the Lawn Mower Drive Belt
It is also worth carefully monitoring the location of the belts on the Cascade walk-behind tractor after reinstalling the engine - it may be necessary to align the pulleys along the axes of the grooves.
If your walk-behind tractor is not subject to heavy loads, it is advisable to loosen the belt tension rollers. This will significantly extend its service life.
Features of belts for walk-behind tractors Cascade
There are not many models of Perm Cascade walk-behind tractors on the market. And the more difficult it is to maintain this type of equipment, since all components must be selected specifically for a specific type of equipment. After all, even belts from walk-behind tractors of the same company, but of different models, can differ significantly. And such an alternative will result in rapid damage to the part and, possibly, breakdown of the walk-behind tractor itself.
Therefore, when selecting a new belt, it is very important to check the data in the operating instructions and the markings of the old part.
How to change a belt
One of the most common walk-behind tractor breakdowns is associated with rupture or wear of spare parts. This situation often arises if the device is primarily used for cultivating or plowing land. If a break occurs, the first thing to do is to put the cultivator in neutral gear and move it to the place where repairs will be carried out in the future. If this is not possible, it can be repaired on the spot.
Next, you need to prepare the necessary tools that will be needed in order to disassemble the part of the apparatus where the tension roller and pulley are located. Now the master begins to remove the protective casing and old worn parts. If the belts have not broken, but are very worn, they can simply be cut with large scissors or a knife. Once these worn elements are removed, you can begin installing new ones.
If it is a Salyut walk-behind tractor, which has two transmission belts, one of which remains intact, it will still have to be replaced, and there are reasons for this. This situation is explained by the fact that when using a new and old belt, they will differ in different degrees of tension when the clutch is engaged. This means that the main load will be transferred to the newly replaced structural element.
Thus, it will not last as long as stated by the manufacturer. Therefore, experts advise immediately purchasing two spare elements of this system in order to immediately repair the device if necessary. In order to facilitate the work of the master, you can remove the pulley from the motor drive shaft. Next, one or both belts are put on a pulley located on the gearbox shaft of the unit.
Don’t forget to choose a suitable belt for the Salute walk-behind tractor
Homemade dumps
Nowadays, many people prefer to live in their own homes, and accordingly the surrounding area occupies a large area. To work on a personal plot, motor cultivators, walk-behind tractors and mini-tractors are purchased.
In winter, snow removal turns into a competition to see who can beat whom. And owners who have motorized equipment prefer to remove snow with its help. Attachments for a walk-behind tractor are not cheap, so craftsmen prefer to make them themselves.
The domestically produced walk-behind tractor "Neva" is widely used. It has standard places for hanging devices and rubber wheels that are suitable for driving on loose snow. Most of the homemade dumps were made for the Neva.
Important Colored electrical diagram of the old-style MTZ-82 tractor with a description: electrical equipment of the tractor with a small and large cabin
On the Internet you can find many descriptions and drawings of a shovel for a walk-behind tractor with your own hands. But before manufacturing, you should familiarize yourself with the characteristics of the dumps. Product composition:
- executive (working) body;
- rotation mechanism;
- mounting bracket.
Rotation angles:
Turning the shovel to the side allows you to remove the snow mass while moving. By going to websites for amateur craftsmen, you can find a lot of information on how to make a blade for a walk-behind tractor with your own hands.
Blade from a cylinder
One of the available materials for making a dump is a gas cylinder. Its height is just over a meter, and the recommended shovel width is 1000 mm. Manufacturing work proceeds in the following sequence:
- Release excess pressure from the cylinder, if any.
- Trim both sides of the lid so that the width is equal to a meter.
- Cut the resulting pipe lengthwise into two halves
- Using a welding machine, connect these two halves so that the height of the blade is about 700 mm.
- The mounting bracket is made as follows. Cut a scarf from thick metal. Drill several holes in it to rotate the shovel in different directions. Weld a piece of pipe to the gusset.
- Weld the resulting device to the shovel at the height of the bracket on the walk-behind tractor.
- Installation is done using a thick finger.
The thickness of the cylinder is sufficient and no reinforcement is required. But the lower part can be equipped with dense rubber, which will remove loose snow and not spoil the compacted road. To do this, you need to take hard rubber from a rotary conveyor.
The width of the rubber sheet is 100−150 mm. Use an electric drill to drill holes in the blade to secure the rubber. To securely fasten the canvas you need a metal strip 900x100x3 mm. Drill holes in the strip and in the canvas, first marking them along the blade. Secure with bolts.
Sheet steel blade
The material is cut according to the drawings. The blade of the shovel itself has four parts: frontal, lower and two side. The welded structure needs reinforcement. To do this, elements cut from the five are welded in the vertical direction.
Next, the rotating mechanism is manufactured. It is an ear with a hole for an axis. The ear is welded to a corner that is attached to the blade. The axis is fixed at one end of the pipe, and the other end is fixed to the walk-behind tractor. The required angle of rotation is fixed with a finger (dowel).
3 mm - the thickness is small, so reinforcement is required. Cut a strip of 850x100x3 from a 3 mm sheet. You can secure it with a bolted connection, but you will have to first drill or weld the strip.
As you can see, to carry out the work you will need:
- working material;
- grinder with discs;
- electric drill with drills;
- bolts with nuts;
- welding machine with electrodes;
- spanners;
- round or profile pipe.
If you have certain skills, the job is not difficult. And the resulting structure can be used not only in winter, but also in summer. Level the site after construction work, level out a place for a children's sandbox and much more. Which design to choose is up to you.
External tuning of the unit
Structurally, light, medium and heavy walk-behind tractors are practically the same.
They consist of a power plant, chassis and controls. The operator resembles an ancient plowman, holding the handles of the machine with both hands. However, it is not protected from sunlight, rain, snow and heat coming from the engine. To create additional comfort, you do not need to spend additional money. Everything you need is at hand. External modernization of a walk-behind tractor involves the installation of a removable or permanent awning, an additional protective casing or hood over the power plant.
To work you will need:
- roulette;
- building level;
- Bulgarian;
- welding machine;
- electric drill;
- set of wrenches;
- steel or aluminum corner 30 x 30 mm;
- paint brush;
- acrylic paint;
- tarpaulin or cellular polycarbonate;
- flexible plastic.
External modification of the walk-behind tractor is carried out in the following sequence:
- Drawing up drawings. It is necessary to accurately calculate all dimensions of the frame and provide options for attaching it to the frame and handles.
- Carrying out markings, cutting out blanks for the awning, casing, wings and hood.
- Welding a frame from a corner. Drilling mounting holes, cleaning metal from rust, oil and dirt. Painting of the manufactured structure.
- Fitting the frame onto the frame. Marking and making holes in it. Fastening the frame with bolts and nuts, checking the reliability of all connections.
- Installation of plastic casings and awnings on frames.
There is an option to mount the instrument panel on the handle. This way the unit will look solid and representative. The operator additionally gets the opportunity to control the state of the power plant, know the speed of the machine and the distance traveled. When remodeling the walk-behind tractor from the outside, you need to pay attention to ensuring that air freely penetrates to the motor, cooling it efficiently.
Attachment overview
Attachments significantly expand the capabilities of any walk-behind tractor, and Khoper is no exception. Next is a more detailed review of attachments suitable for working with any Khoper walk-behind tractor.
They are also suitable for attachments from walk-behind tractors "Neva", "Cascade", "Salyut", "Ugra", "Oka", "MTZ", "Belarus" and other domestic brands. “Hoppers” are also combined with most Chinese mounted ones, since all of them are manufactured according to the “Russian” mounting standard.
Mowers
With the Khoper walk-behind tractor you can use rotary, segment, tine mowers from such manufacturers as Volodar, Yarilo, MTZ, Belarus, as well as mowers made in China, Poland, and Germany. The most budget-friendly and popular option among farmers is the Zarya type rotary mower.
Adapter
The adapter is one of the most popular devices for walk-behind tractors, especially for heavy ones. It is the adapter that turns an ordinary agricultural implement into a universal vehicle. It is recommended to use adapters with the following parameters: for heavy walk-behind tractors with a load capacity of up to 1000 kg, for light and medium walk-behind tractors - up to 500 kg. Manufacturer - any (subject to the presence of a universal hitch).
Trailer for attachments PNO-3 “Adapter-3” for walk-behind tractor type 1100 (Hoper)
The function of an adapter can also be performed by a trailer with a seat, homemade or ready-made. Dump trailers are recommended only for use on heavy walk-behind tractors weighing more than 100-120 kg.
Milling cutter - design and assembly
The milling cutter is an important working element for a walk-behind tractor. The soil is cultivated using a milling cutter. The assembly process of the cutters is described in the instructions for the walk-behind tractor. You can also familiarize yourself with the correct position of the cutters in the assembly by looking at the diagram below. The principle of assembling cutters is the same for most walk-behind tractors. A one-piece rototiller with direct connection to the PTO is sold already assembled.
Figure 1. Design of a collapsible conventional cutter.
Wheels
All Khoper walk-behind tractors are equipped with pneumatic wheels, wide and textured. Comfortable wheels, ideally sized for the weight and dimensions of the walk-behind tractor, are one of the advantages of the Khoper. Standard wheel sizes: 4.00-8, 6.00-12. If desired, you can install larger wheels than on your walk-behind tractor model, if the technological design allows this.
Lugs
Grousers of various diameters can be purchased either separately or in sets - special sets of attachments. Such kits usually include a pair of lugs, hillers, a plow, axle extensions and fasteners. The cost of the kit starts from 20 thousand rubles.
Plow
For Khoper walk-behind tractors weighing up to 100 kg. It is recommended to use a classic single-hull plow of the “Mole” type or another model - from Chinese, Russian, Belarusian manufacturers. For walk-behind tractors weighing more than 120 kg. You can install a double-furrow plow, a reversible plow, or a plow with a ploughshare. , MTZ and others.
Snow blower and plow
The standard size of a shovel blade suitable for a Khoper walk-behind tractor: from 1 to 1.5 meters. Shovels can be ordinary metal or with a rubber lining along the lower edge. Mainly used to clear areas of snow. Manufacturers: TM Yarilo, TM Solnyshko, TM Volodar, MTZ, Belarus and others.
Potato digger and potato planter
Types of potato diggers: universal “Mole” with classic mount; rattling, frictional. For Khoper walk-behind tractors, you can use any type of potato digger, both PTO-mounted and conventional, bolt-mounted.
Types of potato planters: belt, chain and others. Models: APK-3, KS-02P, KSM-2b, KS-02.
Description
The “Mole” motor-cultivator appeared in the early 80s of the last century and immediately gained popularity among rural residents and dacha owners. This is not surprising, because with the help of this agricultural technology, mechanized soil cultivation, as well as planting, care and harvesting, became possible.
Over more than 30 years of its existence, “Mole” has been modified more than once. Such parts as the engine, gearbox, handles, cutters, as well as other equipment (including attachments) were brought to perfection. Having gone through a difficult path of improvements, we no longer received the original motor cultivator, which has some limitations in operation, but a multifunctional motorized device, with which we can easily carry out the following field work:
- plowing the soil;
- cutting beds;
- planting potatoes;
- spud of plants;
- weeding plants from weeds;
- mechanized potato harvesting;
- mowing;
- irrigation;
- transportation of bulk and piece goods;
- snow removal.
In order to perform all of the above work, you need to acquire the appropriate tools. You can find out more in the article about attachments for the Mole cultivator on our website.
No matter how powerful your unit is, no matter how much you care for it, sometimes it still requires repair - the engine won’t start, the engine gets hot, or some other malfunction... To know how to repair a motor cultivator, you need to understand its structure.
Homemade products turned a monkey into a human
The Favorite walk-behind tractor is good for everyone, but some improvements, in my opinion, are required.
walk-behind tractor favorite modification
For example, a standard muffler is practically a tin can, which weakly muffles the sound of the exhaust and also emits exhaust gases in the center of the walk-behind tractor itself, thereby “fouling” all nearby mechanisms. A homemade pipe eliminates all these troubles.
It can be made from 30-35 cm pipes with a diameter of 50-70 mm. The ends of the pipe must be welded with plugs, cuts made with a grinder and metal partitions inserted, then welded.
Important Reviews from owners about petrol trimmers Lynx: is it worth buying a lawn mower
rice. Diagram of a homemade muffler.
Now the exhaust gases are emitted far beyond the walk-behind tractor and nothing is additionally heated by them.
It is also necessary to make and install additional casings for directing air from the cooling fan to the blowing and cooling of the cylinder. The factory airflow is very superficial and in hot summer weather the engine overheats, as evidenced by potassium ignition when the engine is turned off. Installing additional tin casings normalizes the thermal regime, and the upper casing also organizes cooling of the valve cover.
But the most important modification, thanks to which there is no need to take out the air filter and clean it after each cultivation (if you work on very dry soil), is raising the air suction point. During dry summers, the walk-behind tractor works in a cloud of impenetrable dust during cultivation (this is exactly how it is on my plot!), so after every couple of hundred square meters it simply completely stalled due to the lack of air supply, in order to plow the entire garden, I had to disassemble and clean the paper one five times filter. After lifting, using a 60-100 cm pipe, suction upward, the dust does not rise to such a height and the filter is able to work indefinitely.
The mounting for the suction pipe is very simple and is conveniently mounted on two bolts in the frame. Now the main thing is that after work, be sure to put the can on top so that rainwater does not get inside, otherwise you will have to disassemble the carburetor, and this is very inconvenient to do on this engine.
The factory installation of the damper opening cable is very unsuccessful, there is a strong bend and, as a result, wedging, it fit somewhere from above, rearranging it as in the photo eliminates this trouble.
The original belt tensioner pulley with one bearing failed in one season, about 10 hours of operation. I couldn’t get such a bearing, so I put three common used bearings on the M10 bolt, and for 6 years now they have been working flawlessly and are not going to break.
Tuning in the form of a generator, headlights and other pampering will be in the following description.
Motoblocks today are perhaps one of the most popular agricultural machinery, which has found its application both in farming and in summer cottages. These units will efficiently process any soil in a fairly short time without much difficulty. Everyone knows that any technology tends to fail. This also applies to walk-behind tractors. Now we will analyze several cases of breakdowns of the Cascade walk-behind tractor and give short instructions for eliminating them.
The main causes of breakdowns - why doesn’t the walk-behind tractor start?
The "Cascade" walk-behind tractor, like any gasoline walk-behind tractor, sometimes may not start or may not start on the first try. Possible causes of this problem could be:
- too low temperature (excessive cooling of engine, fuel);
- small amount of fuel, insufficient to turn on and operate;
- low or no oil level;
- incorrect assembly;
- clogged carburetor jets;
- oxidation of contacts in the electric starter;
- The spark plug is faulty or the spark plug needs to be cleaned;
- wire insulation is broken;
- low fuel quality
do not violate the recommendations for fuels and lubricants! This will accelerate wear on the piston group and the engine as a whole.
Oil seals (cuffs) of the "Cascade" walk-behind tractor
Oil seals provide engine sealing, protect against engine oil leakage and are installed in special places in the rotating parts of the engine. The oil seal is installed on the shaft and its working edge tightly fits the working surface of the shaft. The oil seal can be replaced yourself.
The replacement process is very simple:
- the cutters are removed from the shaft and cleaned of dirt and dust, then the cover mounting bolts are removed, and the cover itself is removed.
- After that, the worn out oil seal is removed, a new one is installed in its place, and sealant is applied to the connector.
- Dimensions of oil seals "Cascade": 42/28/7 (shaft 30 mm).
- The gearbox bearing of the Cascade walk-behind tractor has dimensions 941/20 (262014 mm).
- The clutch of the "Cascade" walk-behind tractor is dry type. The clutch mechanism works by tensioning the V-belt drive belts.
Headlight and dimensions for walk-behind tractor
Almost all owners of land plots have to decide how to make light on a walk-behind tractor. Very often you have to work late or drive modernized equipment in the dark. Without path lighting, it is not only inconvenient, but also dangerous.
There are the following options for installing headlights and dimensions for the Neva walk-behind tractor:
- From the generator. A standard product or a generator from a passenger car is used. To prevent the light from dimming when the speed decreases, it is better to take a generator from a tractor. The part is installed on a bracket welded to the frame.
- From the battery. If the unit is heavy, it is better to use a battery from a moped or outboard motor. It is advisable to install batteries from passenger cars on light walk-behind tractors. They will not only provide a long-lasting glow, but will also press the wheels to the ground.
To expand the lighting sector, the headlight itself must be installed on a bracket. It is better to place the power switch on the steering wheel. The wires must be insulated and placed in a corrugated tube.
The walk-behind tractor is an indispensable assistant in the garden. But even when working with such a reliable unit as the Neva, fatigue occurs. This is due to the fact that when carrying out arable work it is necessary to follow him all the time, making a certain effort, and this can last for a very long time, sometimes all day.
Not everyone can withstand this, especially people of retirement age. For a summer cottage, using a walk-behind tractor is very problematic. Therefore, many craftsmen manage to make a compact mini tractor from a walk-behind tractor. To do this, you will need drawings and diagrams, tools, materials and minimal skills.
Peculiarities
Walk-behind tractor
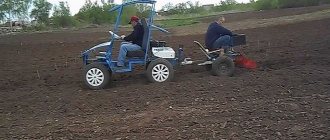
can be practiced individually, and also attach various auxiliary tools to it, such as a harrow, cultivator, mower. Such devices make it possible to seriously increase the possible range of tasks that a walk-behind tractor can handle. But besides this, it is possible to use a motorcycle as a vehicle if you create a specialized adapter for it in advance.
This device allows you to sit quite comfortably on the seat with which the adapter is equipped and do exactly the same work, only with a much greater level of comfort.
In essence, the structure of the adapter is relatively primitive. It looks like a cart on which various elements are attached:
- a hitch for fixing a walk-behind tractor and an adapter for attachments;
- driver's seat;
- wheels;
- frame for fastening primary components;
- steering wheel.
If you reconstruct a walk-behind tractor
under a mini-tractor, you can further expand its functionality. Of course, identification with a mini-tractor is to some extent symbolic, since the power of the unit will remain the same, as will the resources of the unit used, or rather, its motor. You can build an awning from the scorching sun. With such equipment, you will not be afraid of tedious agricultural work under the hot sun. You can improve the vehicle's maneuverability in rainy or snowy weather by installing a tracked attachment.
The lion's share of adapters has a system that involves attaching a trailer in which you can move loads. Additionally, it can be equipped with a lifting handle. There are 2 couplings: the Neva unit itself is fixed to one, and any attachments are attached to the second. In addition, the design has a steering wheel, which optimizes its maneuverability.
The center mount of the unit is made of durable materials, since it must withstand considerable overloads, because you will also be driving the unit and additionally transporting quite large loads. The unit can be used in almost all conditions, including the most difficult ones.
Standard
These modifications include the basic frame structure on which the required components are based, the driver's seat, the wheelbase, the axles, the coupling device (coupling) of the unit with the adapter. Roughly speaking, the designated structure can without hesitation be called an ordinary cart with a comfortable seat adjacent to the walk-behind tractor.
In addition, the possibility of additional aggregation with all kinds of mounted equipment cannot be ruled out, which will increase the practicality of the mechanism. Nowadays, you can purchase an adapter or create it yourself with special sections for placing compact additional items.
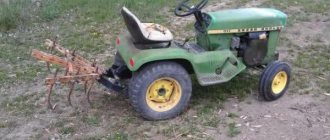
Do-it-yourself mini tractor from a walk-behind tractor - manufacturing procedure
Before you start manufacturing a mini tractor based on a walk-behind tractor, you will need to prepare the materials necessary for the work. Conversion kit includes:
- welding machine;
- screwdrivers and wrenches;
- electric drill and a set of various drills;
- grinder and a set of discs for working with metal;
- set of nuts and bolts.
Suitable drawings will help you assemble a tractor from a walk-behind tractor correctly. In them you will find information about the order in which to connect the parts and which fastening method is suitable for their reliable installation.
Converting a walk-behind tractor into a mini tractor is carried out in the following order:
- A mini tractor based on a walk-behind tractor must be equipped with a strong, reliable frame. It must withstand an additional pair of wheels, plus the load carried in the tractor will put pressure on the supporting structure. To make a durable frame, metal pipes or angles are best suited. Be sure to keep in mind that the heavier the frame, the better the grip of the minitractor with the road, and the better the quality of plowing. The thickness of the frame walls is also not very important - the main thing is that they do not bend under the pressure of the cargo being transported. You can cut the blanks for making the frame using a grinder. Then all the parts are connected to each other first with bolts, after which they are finally welded to each other. To make the frame stronger and more reliable, equip it with a cross beam;
- Immediately after manufacturing the frame, it can be equipped with a hinged mechanism, through which the small tractor will be equipped with additional accessories. The hitch can be installed both in the front and in the rear of the supporting structure. If in the future the manufactured minitractor is planned to be used in tandem with a trailer, then a tow bar should be welded to the back of its frame;
- At the next stage, the homemade product is equipped with front wheels. To do this, it is best to equip the mini-tractor being manufactured with two ready-made hubs with brakes provided on them. Next you need to secure the wheels themselves. To do this, take a piece of steel pipe whose diameter fits the front axle. Next, attach the wheel hubs to the pipe. Drill a hole in the central part of the pipe, which is necessary for mounting the product to the front of the frame. Then install the tie rods and adjust them to the frame using a worm gear. After installing the gearbox, install the steering column. The axle at the rear of the tractor being manufactured is mounted through pressed bearing bushings. The wheels used must be no more than 15 inches in diameter. Smaller parts will lead to the front part of the unit “burying”, and larger wheels will significantly impair the maneuverability of the mini tractor;
- At the next stage, it is necessary to equip the minitractor with an engine from a walk-behind tractor. It is best to install the motor at the front of the unit, as this will improve the balance of the agricultural machine when operating with a loaded trailer. To install the motor, arrange a reliable mounting system. When installing the motor, do not forget that the power take-off shaft must be secured coaxially to the pulley located on the rear axle of the mini-tractor. The force on the wheels must be carried out using a belt drive. The video will tell you more about converting a walk-behind tractor into a mini tractor.
Important Design and characteristics of a scrap truck with a manipulator on a KamAZ chassis
A self-made tractor will remain equipped with a reliable brake system and a high-quality hydraulic distributor, which is necessary for the proper operation of the unit with attachments.
Power plant modernization
Despite the fact that the Neva walk-behind tractor is equipped with reliable American and Japanese engines, they will only produce the required power if they are regularly serviced. With use, the quality of gaskets, spark plugs and cylinder rings deteriorates. A necessary operation is the periodic replacement of the oil seal on the gearbox.
You can improve engine and transmission performance in the following ways:
- Seal all gaskets using special sealant. This will help maintain high compression and prevent oil leaks.
- Clean the spark plugs regularly and adjust the gap. You need to change spark plugs regularly, without waiting for them to fail.
- Install a stainless steel manifold. A modern exhaust system almost completely dampens vibration and noise from a running engine.
DIY cultivator: assembly instructions
To create a cultivator, you can use a chainsaw, starter, grinder or washing machine.
From a chainsaw
The method of making a cultivator from a Druzhba chainsaw with your own hands has long proven itself. The principle of creation is quite simple. As a result, the equipment is light in weight, compact and reliable, with a very productive engine. The speed is approximately 2.5 km/h and the power is 4 HP. s., which is quite enough for a decent walk-behind tractor.
So, the process of assembling a cultivator from a chainsaw does not differ much from the general collection mechanism, but it has its own nuances:
The main shaft is equipped with a collar-type flange. In the future, this will allow you to attach bridge gearboxes without any problems. Sprockets (usually from a UAZ) and a double-row chain are taken and installed on the future mechanism. Thanks to them, the distance from the gear axle to the ground becomes an order of magnitude greater. Timing sprockets, unlike others, increase the distance to the ground by as much as 15 cm.
Housing-type bearings are attached to the main axle, and then a gearbox is designed or purchased. It requires a standard centrifugal clutch. A steel pipe is taken, and with its help the structure is supplemented with cutters
When assembling the cultivator cutters, it is important that their cutting part faces the direction of movement of the walk-behind tractor. After assembling the cutters, a load sufficient to maintain the center of gravity is attached to the frame. Handles are made that are comfortable to use and durable, so that you can easily guide the device. A cultivator made from a chainsaw must be tested on site to immediately determine whether there are any malfunctions. If there are, they are eliminated, and then the mechanism is put into permanent use.
From the starter
Creating such a cultivator will not be difficult if you have a starter from a car in your home arsenal. If there is such a need, then the shaft is slightly shortened. It is also advisable to replace the front cover, having first made many small holes in it (up to 5 mm in diameter) to allow air to flow in from the attached fan. The prepared starter is combined into a structure with cutters. Then the almost finished device is installed on the most common working platform of a cultivator and tested.
From the Bulgarian
A homemade cultivator made from an angle grinder does not have much power, but nevertheless does a good job of weeding the area. The grinder in such a device acts as an electric drive. Everything else is taken from old non-working cultivators.
Important! An ordinary grinder is capable of making up to 600 revolutions per minute, so when creating a cultivator, a pulley with a groove for a V-belt is used, rather than cutting wheels. It is necessary to weld the angle grinder suspension unit to a frame made or taken from an old cultivator, and in order for the product to be connected to electricity, use an ordinary extension cord on a reel
It is necessary to weld the angle grinder suspension unit to a frame made or taken from an old cultivator, and in order for the product to be connected to electricity, use an ordinary extension cord on a reel.
After the cultivator base is assembled, you can test the machine. The cutters of such an assembled device should produce 300 rpm.
From the washing machine
Many owners have an old and unnecessary washing machine somewhere in the garage or barn, which is still capable of working, but is no longer relevant. Based on its engine, it is possible to make a small electric cultivator. This way the old equipment will come to life and still serve for the economy. To be able to create such a cultivator, you will need, in addition to the electric motor from the machine, the following parts: a two-core wire, a gearbox, an ordinary wheel (diameter - 1.5 m), a metal corner (no more than 3 m in length), a toggle switch, springs from a car as knives, a start button and a drum with a piece of tin.
Cultivator
When everything is found, you can immediately begin collecting. And the first stage is welding work. This is followed by the preparation of knives. For each knife, it is necessary to maintain its own trajectory of movement that does not intersect with any other.
The motor itself requires two windings (starting and working). The starting winding is activated only when the tool is started, but the working winding must be connected to the network for the entire period of operation.
In principle, this is where all the key aspects of collecting a cultivator from a washing machine end. This data is enough to try to assemble the structure yourself.
Where is it used?
Initially, this type of equipment was created as an assistant for the farmer. With a motorized cultivator you can plow the ground, transport loads, collect garbage, hay and leaves. However, the useful qualities do not end there. Based on it, you can create a snowmobile that will help those who live in the North.
A good and properly modernized motor cultivator does not care about dirt or snow. Even in difficult areas, such equipment can accelerate to 75 km/h.
An all-terrain vehicle is especially useful in rural areas where there is no asphalt, but there are frequent showers and snowfalls. In this case, an all-terrain vehicle can become a real savior. At the same time, when the season comes, the all-terrain vehicle can be upgraded again into a regular walk-behind tractor, which will plow the land, clean the territory and perform a lot of other useful things, allowing the farmer to save time and effort.