Manual planting of potatoes is quite a labor-intensive task, especially in cases where the garden is quite large. Not only are there quite a lot of rows, but you also need to dig quite deeply - about 20 cm in depth.
It’s good when the garden is small, but what if you have several hundred square meters of space at your disposal?
Of course, it is possible to attract additional forces, but this is not always possible. In this case, the optimal solution would be to use a potato planter that is combined with a mini tractor. Their choice is quite wide, depending on what model of mini tractor you have in stock.
Mini tractor track for potatoes. Controversial points.
Questions can only be asked after registration.
Please login or register. I can't quite figure it out. On the one hand, it is clear that the track along the centers of the wheels should be a multiple of 750mm. those. 750, 1500, etc.
On the other hand, I came across messages like this:
ShakhterPetr wrote: >> Hello Igor! hi >> That’s the question for 2-3 hectares: is it worth overpaying 20-50 thousand rubles for a variable gauge. >>It might be better to buy an additional attachment. >>I personally cultivate about 2 hectares of potatoes (for myself and my neighbors) and do not experience any inconvenience from the 960 mm track.
I wrote to this guy, he hasn’t responded yet.
I have a tractor with a 900mm track (at the centers of the rear wheels). And now I’m thinking about how they can process potatoes?
In our area, from time immemorial they planted at 700mm. My centers are 1240mm and I plant them at 620mm. In your case, at 450mm, very little. Plant at 900mm row spacing, so what can you do? You only need a single-row planter and a double-body hiller.
I had 90 cm on the centers in my minivan, I made spacers - it became 130 cm! I plant MTZ, hill up and spray with Sintaem!
". And to the happiness of our unique ones, the fragrant smell of bread. ",
The track at the wheel centers should be a multiple of 750mm.
And why is that? Of course, the most common planting systems are on a 150 cm and 180 cm track (the distance between the ridges is 75 and 90 cm, respectively), but you can make any distance for yourself. Of course, it’s hardly worth doing already 60 cm
I have a tractor with a 900mm track (at the centers of the rear wheels). And now I’m thinking about how they can process potatoes?
and what is the clearance? Maybe it’s not just a matter of track width and your tractor is a priori unsuitable for working with ridges.
Anyone who, instead of one ear or one stalk of grass, manages to grow two in the same field, will render a greater service to humanity and his homeland than all politicians taken together. (Jonathan Swift)
Yes, that is Is 90 cm between ridges normal? Or maybe make it 80-85cm, there’s plus/minus 2 cm around the edges, maybe that’s okay?
>>********************* >>and what kind of clearance? Maybe it’s not just a matter of track width and >>your tractor is a priori unsuitable for working with ridges. >>*********************
Yanmar 2210 tractor, rear wheel drive. The clearance is just big. It is just for agricultural purposes.
Tractor Yanmar YM2210. + front loader. + cutter.
already 60 cm is hardly worth doing
It grows normally at 60. Before flowering I have time to do 4 treatments. Last year, from 4 acres there were 68 heaped buckets like this.
Weituo TY180, 9YK8050, Wirax Z069/1, T-40AM, PR-110M You have to try to do everything well - it’s bad and it will turn out that way. https://www.youtube.com/channel/UCDp9zCIPzyUJdo42qrmXXlw/
The day before yesterday I hilled up 3 times with Sintai 24 (belt belt), the potatoes were already blooming, I bent them a little, after two, like never before, the potatoes straightened up and continued to bloom!
". And to the happiness of our unique ones, the fragrant smell of bread. ",
Yes, that is Is 90 cm between ridges normal?
ok, all of Europe works this way.
Or maybe make it 80-85cm, there’s plus/minus 2 cm around the edges, maybe that’s okay?
what's so scary about that? I’m telling you, you can make a comb at your discretion. not necessarily 75 cm or execution.
It grows normally at 60.
I don't argue that it's normal. It’s just that if the track on the minivan is 90 cm, then it won’t be possible to make two ridges between the wheels, since 45 cm between the ridges is not enough, except perhaps for carrots.
Anyone who, instead of one ear or one stalk of grass, manages to grow two in the same field, will render a greater service to humanity and his homeland than all politicians taken together. (Jonathan Swift)
I read this thread. Interesting.
If you do this, increase my track from 90cm to 100cm (make 5cm spacers on the rear wheels, and the front track is adjusted)
And plant as they write in this thread with a row spacing of 50cm. It will be normal, what do you think?
PS I live in Siberia, Tomsk.
Tractor Yanmar YM2210. + front loader. + cutter.
and the front track is adjustable)
How long is it regulated? Since the front tires are narrower than the rear ones, you can try to spread them as far apart as possible (and if the disks are convex enough, then turn them over), and use spacers to make the rear tires as wide as possible so that the width on the inside matches.
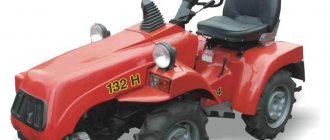
Do you have a tractor like this one?
Weituo TY180, 9YK8050, Wirax Z069/1, T-40AM, PR-110M You have to try to do everything well - it’s bad and it will turn out that way. https://www.youtube.com/channel/UCDp9zCIPzyUJdo42qrmXXlw/
already 60 cm is hardly worth doing
It is IMHO and 60 is not worth doing, the reserve of soil in the inter-rows for hilling even with a hoe is not enough, too little.
those. Is 90 cm between ridges normal?
This is excellent in my opinion.
Or maybe make it 80-85cm, there’s plus/minus 2 cm around the edges, maybe that’s okay?
There’s absolutely nothing wrong with that, you can do that too.
such pood buckets with a slide.
For a bucket of potatoes to be worth a pound, it must be 20 liters, but in your photo there are 16 liters, they won’t even weigh 16 kg, don’t worry.
Here they sit at 50 cm
Well, the flag is in their hands.
And plant as they write in this thread with a row spacing of 50cm. It will be normal, what do you think?
I wrote roughly what I think. spud with what you will. Or let it grow like this - without hilling. This simple technique can increase the yield by 2 times, if you really manage to hill up properly and the second tier of tubers will go.
Pavel Vadimovich Vorobyov
Not. Well, if you plant it in the boundaries and then sprinkle the ridges on the potatoes, or better yet, cut the boundaries where the ridges were, you can plant them at 50cm, it will spud normally. But first of all, it will be impossible to drive a tractor along the ridges, and if the tractor passes, it is not a fact that the cultivator will listen to it and will not jump into the boundary. Secondly, it’s cold in the boundary, but warm in the ridge, and potatoes, you know, love warm soil, but not very well; thirdly, there is little air in the boundary, and with a lack of it in the soil, potatoes barely grow at all. Fourthly, the tops will close instantly. Fifthly, it will suck to blow through all this planting, hence the diseases. Well then. so that it’s not 50cm.
Potato row spacing when processed with a mini tractor
Whatever you say, Belarusian bread - potatoes, are grown by many in their own plots.
And the point is not that it is expensive or cheap in the market or in a store, no, it is very affordable, the point is that when growing potatoes on your own plot, you can grow a clean ecological product. When producing potatoes on farms, collective farms and agricultural towns, technologies are used that use both various fertilizers (and these are nitrates) and herbicides. Therefore, leave the peeled boiled potatoes for several hours after cooking and, having tasted them, you will understand that all the taste has disappeared after they have cooled. The same cannot be said about potatoes grown on your own plot.
Therefore, many people grow potatoes just for themselves. But nowadays, all agricultural processes are mechanized, so many people have cultivators, walk-behind tractors and mini tractors. When choosing these iron helpers, the question arises, what should be the track of the purchased walk-behind tractor or mini tractor in order to process potatoes. Here are a few quotes from the Internet and forums:
“The best results are achieved by ridge planting of potatoes. The ridges are cut manually, using a walk-behind tractor or tractor cultivator. The height of the ridge is no more than 12 cm, the width at the bottom is 65 cm. Then the tubers are planted into the ridges manually or using a potato planter. The soil warms up better in the ridges, and more air flows to the tubers.” https://www.profisam.ru/metody-posadki-kartofelya
“Potatoes can be planted at row spacings of up to 700 mm. The optimal width is 550-600 mm, since one row of potatoes can be planted after every two passes of the plow.” https://www.mastercity.ru/showthread.php?t=53012&page=2
“On the beds, tubers are placed in two rows with row spacing of 60 cm for early varieties and 70 cm for late potato varieties. On light soils, you can reduce the row spacing to 60 cm. Plants of early varieties, unlike later ones, have smaller vegetative organs and erect stems, so they are planted in rows at a distance of 25-30 cm from each other.” https://www.profisam.ru/metody-posadki-kartofelya As we see, there are quite a lot of recommendations. But let's say frankly that we must proceed from the gauge of the iron helper cultivating this garden. On many walk-behind tractors and mini tractors the track can be set, but on mini tractors with driving front wheels, this is more difficult to do.
In addition, the old mini tractors made in Japan, which have become popular, are not at all suitable for cultivating potatoes and the track can be 110, 105, 96 and 80 cm. Therefore, based on these dimensions, make row spacing. Either it will be two tracks that are not wide, or one that is very wide. When purchasing such mini tractors, pay attention to the ET wheels; perhaps by rearranging them, you will be able to change the track. Video of the front wheels of a mini tractor 126cm, rear track 130cm. Author RVT
Source
Mini tractor track
I want to make a mini tractor on four Niva R-16 wheels and have a 70 cm track. Does anyone know: with such a track and such wheels, will the equipment be prone to overturning, especially on uneven areas? If so, what is the minimum possible track? I will place the engine, gearbox and rider as low as possible, but I don’t know how low it will be.
Kirov, I have a GST 24, it has 1050 mm at the centers of the wheels, when I plow on it, one wheel goes in the furrow, and just see what turns over, I increased it to 1200 mm. became much more stable. 700 mm I wouldn’t risk riding it.
Vladimir58 wrote: 700 mm, I wouldn’t risk driving it.
750mm. We're not going anywhere.
Kirov wrote: I want to make a mini tractor on four Nivov R-16 wheels and have a 70 cm track. Does anyone know: with such a track and such wheels, will the vehicle be prone to overturning, especially on uneven areas?
her. on uneven 700mm. It won’t be enough, I’ll “save myself” with the heavy weights in the wheels. otherwise it would definitely not be MSPA. and "cheburator".
"Centaurs" (clones 105 and 135)
Kirov wrote: I want to make a mini tractor on four Niv R-16 wheels and have a 70 cm track. Does anyone know: with such a track and such wheels, will the vehicle be prone to overturning, especially on uneven areas? If so, what is the minimum possible track? I will place the engine, gearbox and rider as low as possible, but I don’t know how low it will be.
The tendency of equipment to capsize depends more on the location or “Towerless” of the one who is sitting behind the wheel!
VTS wrote: 750mm. By
Tell me, what is the height and length of your tractor?
Kirov wrote: Tell me, what is the height and length of your tractor?
.
Yes, somehow I measured it a long time ago. I don’t remember, at the wheel centers the wheelbase was 750mm, the length (wheelbase) between the front and rear axles seemed to be about 1400mm, the seat height was 800mm. but I shortened the height. If you really need it, I'll try it on tomorrow. but I repeat, weights (Gaz-51 flywheel with clutch basket) are hidden in the wheel wells (rear), which additionally provide stability on slopes. but there is also a negative side. "Centaurs" (clones 105 and 135)
A sea of tractors with a 70 cm track, including mine. It has never capsized.
kazik wrote: A sea of tractors with a 70 cm track, including mine. I have never capsized.
What height is the seat?
kazik wrote: A sea of tractors with a 70 cm track, including mine.
Would you mind posting a photo?
I think about this too. My wheels and tires will be almost 70 cm in diameter and the track width will be 65-70 cm. I want to install wheels like this (Nivov’s) so that when hilling the tops will not break, and the track will be based on the distance between the rows of potatoes. I don’t know how to do it to “kill all the birds with one stone” and get a stable tractor.
"Centaurs" (clones 105 and 135)
Please explain - it's not clear to me.
It turns out that the assembled wheel with weights has a lot of weight, i.e. the load on: transmission increases; on the engine (and we still do not move at a constant speed, now starting, now slowing down the minivan, now releasing and adding gas); to the brake system. Therefore, the opinions of users on the site are divided, some are in favor of using weights in the drive wheels, some will not install them under any pretext (I installed them forcedly, due to the low weight of the unit and because of the narrow track).
"Centaurs" (clones 105 and 135)
It turns out that the assembled wheel with weights has a lot of weight, i.e. the load on: transmission increases; on the engine (and we still do not move at a constant speed, now starting, now slowing down the minivan, now releasing and adding gas); to the brake system. Therefore, the opinions of users on the site are divided, some are in favor of using weights in the drive wheels, some will not install them under any pretext (I installed them forcedly, due to the low weight of the unit and because of the narrow track).
I installed bearings on the axle shaft between the gearbox and the wheel, I think the additional load (including the weight of the rider) will rest on these very bearings. And the wheel will be unloaded and there will be no pressure from above on the gearbox.
VTS wrote: some will not supply them under any pretext
Then, apparently, they will have to do without hilling.
Vladimir S. wrote: I installed bearings on the axle shaft between the gearbox and the wheel, I think the additional load (including the weight of the rider) will rest on these same bearings. And the wheel will be unloaded and there will be no pressure from above on the gearbox.
Vladimir S., You probably forgot that this is how I did it, the gearbox bearings are unloaded. but due to the absence (particularly on my MSPA) of satellites in the box, I “twisted” five drive shafts over four seasons. and this is also a negative side of additional wheel load. There is also a positive side - high cross-country ability.
Kirov wrote: Then, apparently, they will have to do without hilling.
Not. The weight of the minik plays a role here. For example, the Valera-7 minivan has no additional loads on its wheels, but it will do the job.
Additional equipment for planting potatoes
To plant potatoes using a mechanized method, additional mounted and trailed equipment is used.
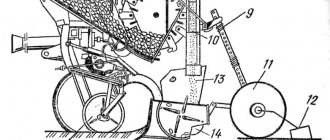
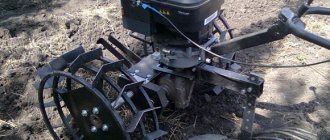
Jerzy
A device that allows you to form ridges when planting potatoes with a tractor. It consists of studded joints of different diameters located at an angle of 40° to each other. The advantage of hedgehogs is that they work on all types of soils.
The discs are mounted on a frame, which is attached to any tractor or motor cultivator. In fact, the hedgehogs are welded to a hollow pipe. Each disc has spines 6-7 cm long and 6-8 mm in diameter. The interval between the spikes is maintained at approximately 4-5 cm. The discs on one frame gradually decrease in diameter to 35-15 cm.
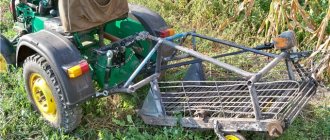
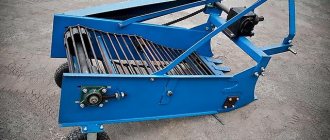
Planter
The planter is used when planting potatoes with a tractor for the following purposes:
- for forming furrows;
- for folding seed material;
- for filling furrows.
The design of this device is a plow, a container and hillers. Small planters consist of one block; for greater productivity, multi-block devices can be installed on the machine. Additional rows allow you to optimize the process and add fertilizer to the earth cuts during planting, or increase productivity. Using multi-row planters, you can plant a 1-hectare plot in just 30 minutes.
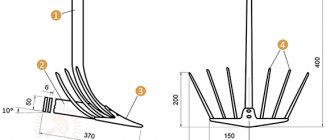
Hiller
A device for loosening soil, hilling and laying furrows. According to the principle of action there are:
- disc hillers, which are used on any type of soil and with any type of machine;
- plow hillers, the structure of which is similar to a conventional plow. Only work in combination with high power tractors.
There is also a classification of hillers by design:
- fixed, not allowing changing the row spacing when planting potatoes with a tractor. They are distinguished by their versatility in performing tasks: loosening, making furrows, removing weeds, covering tubers with soil;
- adjustable, which change the working width, working with an optimal row spacing of 70-80 cm.
Simple DIY mini tractor
We present to your attention a homemade mini tractor made by a village craftsman, photos, descriptions, as well as videos are attached.
A small mini-tractor with the simplest design was built by one village “Kulibin”. The homemade product is made from spare parts from an old Moskvich and scrap metal. In fact, the author had to buy only the engine, and he had everything else in stock.
So, let's take a closer look at the design of a homemade mini tractor.
This is a tractor with a classic layout, the drive goes to the rear wheels. The homemade product is equipped with the most common air-cooled gasoline engine with a power of 6.5 hp (from a walk-behind tractor).
Belt clutch. The small pulley has an outer diameter of 55mm and the large pulley has an outer diameter of 310mm. The large pulley was taken from agricultural machinery, the small one was turned on a lathe.
The front wheels are taken from a rotary cutter, the rear wheels are R13 from agricultural machinery.
Steering from Moskvich.
The rear axle and gearbox are taken from Moskvich. The bridge has been shortened to fit the track.
The mini tractor frame is welded from profile pipes and channels.
A homemade tractor is used to tow a cart (transporting firewood, building materials and other cargo). This mini tractor is so easy to operate that even a child can ride it.
Also included is a short video of a homemade mini tractor.
Do-it-yourself mini tractor: how to make it, the best homemade options
A mini tractor is exactly the same agricultural equipment for farmers as a tractor, but with slightly less productivity, which is sacrificed for the sake of maneuverability and efficiency. In addition, some specimens are so light that they can be transported in a trailer. Small tractors perform all the same tasks as their higher class counterparts. You can also attach attachments to them for cultivating and fertilizing the soil, cleaning the area and transporting various loads. In addition, many tractors, even those made independently, have a rotation drive for auxiliary units and hydraulics.
It differs from a walk-behind tractor, first of all, in that it is a full-fledged agricultural machinery. Of course, a powerful walk-behind tractor also has considerable functionality, but when operating it you have to walk all the time. This is very tedious, especially when cultivating a large area of arable land. And by doing this with a self-propelled machine, even the smallest one, the operator gets much less tired. Understanding all the advantages of mini tractors, domestic inventors sometimes create first-class examples with their skillful hands, and on the Internet you can now find many descriptions, diagrams and even ready-made drawings of such homemade products.
How to choose a mini-tractor for growing potatoes
Planting, growing, and harvesting potatoes in a personal plot are very labor-intensive processes.
With the help of mini-tractors and attachments, you can mechanize all processes in growing potatoes, from planting to harvesting. The choice of a mini-tractor for growing potatoes should take into account the track width, tractor power, and the possibility of attaching mounted and trailed equipment.
Track width
It must be taken into account that the width of the rows when planting potatoes is 600-700 mm; the track width of the mini-tractor should be approximately the same - if it is wider or narrower, the mini-tractor can damage the plants.
Choosing a mini tractor
Currently on the agricultural machinery market there are mini-tractors of domestic production, European, Japanese and Chinese companies.
Mini-tractors “Kronos” of various modifications (manufacturing country Belarus) are in great demand among owners of personal plots and farmers The distinctive features of the Kronos minitractor are high performance, small size, and maneuverability.
The most popular Japanese agricultural machines are KUBOTA mini-tractors, which are distinguished by their reliability, durability, and environmental friendliness. KUBOTA mini-tractors do not emit pollutants into the atmosphere.
Of the Russian equipment, the tracked-wheeled mini-tractor T-0.2.03.2-1, produced in Chelyabinsk, deserves attention. It has a three-point hitch that allows you to attach a potato planter, tops mower, potato digger, and weeding equipment.
The Kurgan Machine-Building Plant produces KMZ-012 012, which also has an attachment.
Domestic and Ussuriets trademarks deserve attention. The manufacturer of the Uralets mini-tractor is Traktor LLC, Ussuriets is produced by the Ussuri Automobile Repair Plant.
Attachments and trailed equipment for mini tractors
Among the attachments on the market there are:
When choosing mounted and trailed equipment, you need to take into account that it must match the power of the mini-tractor. For example, single-row potato diggers are suitable for mini-tractors with a power of 12-16 hp, and double-row potato diggers are suitable for mini-tractors with a power of 30 hp. With.
Source
Mini tractor designs
For the most part, when making a tractor, amateur designers simply remake some serial product, adding some components and eliminating others. This is an easy way, but it is not always feasible, because... a complete machine must be available. And the design of homemade tractors created from scratch is individual in each case, so today the variety of solutions is simply off the charts. For example, the frame for a mini-tractor is made solid and breakable (called “fracture”), the rotation is made with steered wheels and onboard, the layout is classic or in the form of separate modules, allowing you to change the purpose of the device. Install the hydraulic system (hydraulic system) and power take-off shaft.
A tractor from the manufacturer at the price of a homemade product - the entire model range is here. We buy good attachments for a homemade agricultural machine using the link. Read in this article - the easiest way to assemble a mini tractor from a walk-behind tractor.
The homemade motor tractor proposed below is one of the easiest to manufacture and allows you to get by with affordable materials and parts. Instructions are in the picture below.
But, of course, anyone who is planning to do something themselves, with their own hands, is recommended to have technical skills, the ability to work with tools and read drawings. And, most importantly, have a lot of time and a great desire to do it.
It is made from rolled metal. Calculating strength is a thankless task (and in this case, unnecessary), so you just need to lay down a multiple reserve in advance. Based on this, using a channel from No. 6 to 12 is the best solution for a homemade mini tractor. It is not worth making any “cuts” and “bending around” the units, because This will greatly complicate and increase the cost of the project. An ordinary flat “ladder” is simple and accessible to many.
As practice shows for a homemade tractor, it is more useful to use a channel of a larger rolling size (up to 20) as the front and rear traverses (cross members), because subsequently, it is to these cross beams that various working parts and auxiliary equipment are attached. Moreover, it is better to place it with shelves inside. The channels of the side members (longitudinal beams) can be placed both inward and outward. Fuel lines and lines are laid inside the side members, which are naturally protected.
In shape, the simplest design of a homemade frame is a rectangle with two or more traverses, but a frame in the form of a trapezoid will have much greater rigidity. The width in the front part should be smaller to accommodate the minimum dimensions of the steered wheels, as well as to allow monitoring of movement strictly along the arable row. The joints between the side members and the traverses must be reinforced by welding gussets.
How to do it yourself
If you do not have the necessary funds to purchase a new potato planter, then it makes sense to think about making this unit on your own.
Do it yourself
Indeed, a do-it-yourself potato planter for a mini tractor, the drawings of which are widely presented on the Internet, is the way out of a crisis situation when there is a constant lack of money.
In addition, the purchase of a mini tractor itself is a rather expensive undertaking, after which there is virtually no free funds left. Why then think about buying a potato planter in a store, you have to try to recoup the previously made investments. Therefore, the construction of a homemade unit is completely justified.
At the same time, the procedure is virtually the same, regardless of the type of mini tractor:
- A homemade potato planter for a minitractor, the sizes of which can be very different, is made from whatever tools you have on hand. The whole point is minimal cost, so it's natural.
Frame
- At the first stage, the frame structure will be manufactured, to which other components will be welded. To do this, we will need channels No. 8, from which two longitudinal spars are welded, connected to each other by three transverse steel strips.
- In front of the structure, you need to weld an arch with mounting forks directed to the central rod of the unit.
- The frame is strengthened by two steel inclined beams, which must be secured to the middle of the arch located in front. Next, you need to secure the support on which the seat will be located, made from a 50x50x5 mm corner.
- It is attached to the spar with your own hands. A plastic type bracket must be welded to the inclined beams. It is to these beams that the potato bin will be attached.
- The bunker will be made of four sheets of plywood, 12 mm thick. You need to cut out equal parts, and then fasten them together with steel corners. You also need to apply drying oil, and when it dries, paint it with waterproof paint.
- You can lay a rubber coating inside the bunker so that the tubers are not damaged by the walls of the tank. Using a pair of bolts, secure the hopper to the bracket.
- The ripper and wheel axle will be located at the bottom of the frame.
- You will have to make the wheel axle yourself.
- The base will be an ordinary steel pipe, along the edges of which trunnions are installed. Their dimensions will have to be adjusted to the diameter of the pipe used, but there is nothing difficult about it.
- You need to make holes in the steel pipe into which special pins will be installed, where the spikes will be inserted. At the end of the assembly process, they need to be brewed.
- The wheel axle must be secured using steel clamps using four M16 bolts.
- You need to weld hubs onto the wheels, which will have two bearings on each wheel. Next, we place the bearings on the spikes and protect them with a felt gasket, which will prevent excess dirt from getting in.
Thus, we get a semi-automatic potato planter for a mini tractor, made by ourselves. It is semi-automatic because a person will sit on the potato planter itself and throw the tubers into the corresponding seed tubes.
Therefore, this design needs to be supplemented with a seat on which you can sit comfortably. It is made from ordinary boards, which are then covered with foam rubber and covered with leatherette.
A homemade two-row potato planter for a mini tractor will be a slightly more complex design, because you will have to design more components and parts of the unit. But there are quite a lot of detailed drawings on the Internet indicating exact dimensions, which will greatly simplify this task.
Layout
The relative arrangement of the units of any tractor has historically developed a long time ago. The classic layout of a self-propelled vehicle is as follows: the engine is located in front, longitudinally, above the front axle. A gearbox is connected to it through the clutch, followed by a transfer case and followed by a drive axle. The shafts of the units are connected to each other using cardans and (or) couplings.
Following this scheme will be the best option when creating a mini tractor, because will allow you to use existing units without changing them. According to the experience of many creators of homemade tractors, it is better to assemble the units “in place”, without doing unnecessary drawings and calculations. The best option is to place all the main components and homemade mechanisms on the finished frame, installing them on temporary supports (conveniently, on wooden blocks), and, having found the best mutual position, make mounting brackets. But we must not forget that all components on self-assembled tractors must be mounted through supports that dampen vibrations (rubber cushions). It is best to borrow them from the same equipment from which the unit was taken. Another important factor needs to be taken into account. This is weight distribution, i.e. distribution of the total weight of the minitractor along the front and rear axles. The most acceptable option is that 60% of the weight falls on the drive wheels, 40% on the steering wheels.
Posts 1 page 17 of 17
Share August 131, 2013 10:54:49
Some considerations addressed to those who want to make a homemade tractor. (1)
Some considerations addressed to those who want to make a homemade tractor. (2)
Next, select the remaining units: boxes, gearboxes, axles, etc. All components must be designed to transfer the loads that will arise during operation. If the nodes are weak, then they will break and this is of course bad. If the units used have a significant margin of safety, then there is nothing good in this either, because in this case, the dimensions and weight increase, the losses due to their scrolling increase, the layout suffers, etc. Therefore, it is best when the units used have a minimum safety margin. Therefore, the design cannot be considered successful when UD 1, ZID, etc. are connected to the engine. dock boxes and bridges from GAZ 51, GAZ 66 or something in this regard. The use of small-sized components will allow the design to be compact, maneuverable, convenient and reduce losses. Sometimes you can hear objections that we collect from what we have. I can't agree with this 100%. If you know exactly what you specifically need, you can usually select suitable units. For example, if I clearly understood that I needed units from SAZ, I put a corresponding advertisement in the newspaper and after a while an option appeared - a motorized stroller in excellent condition and, in addition, a mountain of spare parts. Here is a special case of solving the issue. What can be said about the choice of wheel formula: 2x4 or 4x4. This depends on how the tractor is configured. There are several points to consider here. If you choose a 2x4 scheme, then the drive wheels should, of course, be at the rear, this will ensure their additional load from the torque arising on the drive wheels and also additional load from the use of the weight of the implements used. The design of the tractor must ensure optimal weight distribution between the front and rear axles. The traction force developed is proportional to the weight on the drive wheels; the larger it is, the stronger the traction. On the other hand, the front axle must bear a certain minimum weight, which will ensure reliable controllability of the tractor during all types of work. Typically the rear axle takes 2/3 and the front 1/3 of the total weight. If the design does not allow achieving such a weight distribution, then it is advisable to carry out ballasting by placing additional. cargo. These loads are positioned as low as possible to lower the center of gravity, which will provide increased tractor stability when working on slopes. Fulfilling these requirements and having wheels with herringbone tread will ensure excellent traction properties of your tractor. Otherwise, you will need to switch to a 4x4 scheme, and this solution will require a significant complication of the design. Moreover, in this case it is desirable to have a locking differential between the axles or the ability to disable one of the axles with the possibility of forced or automatic connection. Otherwise, due to the always present kinematic discrepancy, additional losses will occur, leading to wear of the wheels and additional damage. fuel consumption. You should also keep in mind the decrease in efficiency. transmission due to the presence of an additional set of gears. It is very indicative to look at the condition of the front wheels of the MTZ-82 tractor. Their appearance usually confirms what was said above.
Engine for homemade
From the point of view of thrust-to-weight ratio, weight, availability and low cost of repair, it is most logical when manufacturing a tractor at home to use an engine from classic VAZ cars - from 2101 to 2107 or from a motorcycle. They can be found in good condition for the price of scrap metal. If you're lucky, one car can become a donor for most of the parts for a mini tractor. Or you can equip it with a new Chinese diesel engine.
The motor with clutch and gearbox are fixed as a single unit, which simplifies the work on a homemade tractor and saves the creator from many difficulties. Be sure to install a fan impeller on the shaft of the water pump (“pump”), even if it was not there. After all, the speeds of agricultural machinery are much lower than those of automobiles, so the operating mode of a mini tractor engine is the same as when standing in a traffic jam, which is considered difficult for any engine. Consequently, the radiator of the cooling system of a homemade tractor requires forced airflow.
Transmission
As mentioned above, it is advisable to install the entire power plant on self-propelled vehicles. In this case, what will later become a mini tractor will already have at least four forward gears and one reverse gear. All that remains is to coordinate the optimal tractor engine speed and the desired speed. For this, a transfer case from any all-wheel drive car will be quite sufficient. The most suitable option is an all-wheel drive UAZ. By the way, you can also use the previously discussed components from the UAZ, but they are heavier, the consumption of the resulting tractor will be higher, and all its power will be rarely used.
A good element for connecting shafts is an elastic coupling, which is installed on the output shaft of the VAZ gearbox. By making a flange for the transfer case, you can do without an intermediate cardan. But from the transfer case to the drive axle, a cardan is required, because the loads there are significantly higher, and the coupling will not withstand them. When building a tractor yourself, it is best to use the drive axle from a UAZ vehicle that has final drives. This will increase, firstly, traction, and secondly, ground clearance (which should preferably be increased to 450 mm). The required track size for a homemade mini tractor is obtained by cutting the bridge stockings (narrowing it) or making spacers for fastening the wheels (widening it), because The nominal track of the UAZ is 1445mm, which does not coincide with the accepted ranges for agricultural vehicles (1260-1285, 1350-1370, 1490-1515, 1790-1815).
Tires for mini tractors: selection criteria
If it’s time to change the tires on your mini tractor, then first of all you need to rely on the manufacturer’s requirements. They must be specified in the instructions. For a homemade mini tractor, you can simply select tires according to the general criteria for all cars:
- Tread width is important. When working in spring, when the ground is still wet, it is worth choosing tires with a wide tread. This will avoid slipping and increase the speed of the equipment.
- Much depends on the type of soil. After all, wet, stubborn soil makes it much more difficult to move equipment. But in case of agnesia, it is worth purchasing rubber with a deep pattern.
- It is worth paying attention to the carrying capacity.
If your mini tractor is equipped with a bucket, mounted excavator or front loader, then you should take durable tires that can withstand such a load.
Chassis and propulsion
This system in the homemade mini tractor under consideration almost completely replicates that of tractors produced by industry and differs from the automobile system in some important points. The main difference is the absence of a rear suspension, i.e., the drive axle is not attached to the frame on springs, but is rigidly fixed to it. This must be done if you plan to build not only the tractor itself, but also all the agricultural implements for it with which it is supposed to be used. Since such attachments as a plow, harrow, tiller, mower and other devices attached to the rear of a homemade mini tractor very heavily load the rear axle and, if the latter has a rear suspension device, will quickly render it unusable. The front axle on a homemade tractor can also be installed without suspension, comfort will not decrease significantly. It is convenient to use forks of cardan joints of trucks (ZIL, KAMAZ, KrAZ) as turning axles, spare parts for which can be found in motor vehicles and at metal receiving yards. Two forks are welded to the beam, or directly to the frame, maintaining alignment, and two counter forks are welded to the steering knuckles of the donor car. The steering linkage along with the entire steering mechanism is also borrowed.
There is no point in using the brake system in its “automotive form” on a tractor made by hand, because wrong speeds. Only the parking brake is enough. However, the mechanism is driven not from a lever, but from a pedal with a fixed pressed position. Then the homemade product can be slowed down in motion and fixed in the parking lot. It is best to use wheels from agricultural machines, because... they have the required tread, but it is quite possible to adapt tires from SUVs or light trucks by cutting them into the desired tread pattern (better - herringbone, for self-cleaning). Tire pressure is determined empirically to find the optimal combination of comfort and performance.
User manual
Recommendations for using potato planters are quite similar to each other, differing only in minor points. You cannot put more fruits into the tuber hopper than stated in the technical specifications of the unit. The potato planter cannot be transported when it is fully loaded.
Before starting work, you need to make sure that the wheel tracks of the mini tractor and the potato planter completely coincide.
- It is necessary to carry out preliminary preparation of the soil before using a potato planter on it. This means that the land should be plowed and have a loose structure.
- After passing the first row, you need to adjust the degree of immersion of the coulters, the depth of laying potato tubers, as well as the distance between them.
- It is necessary to inspect the working components of the unit every 8 hours of continuous operation.
- After completion of the work, the unit must be returned to normal condition, i.e. clean it from dirt, remnants of vegetation, etc.
- In addition, you need to inspect the fastening connections. If necessary, you need to tighten the bolts and also check the condition of the wheels.
- If you will not use the potato planter for some time, you need to reduce the tire pressure and also remove the roller chains that are located on the planting devices.
As we can see, the operation of the unit is quite simple to implement, no different from the recommendations for other technical means.
Electrics on a homemade tractor
You can use any parts from anything, the main thing is that the voltage of the generator and consumers match. We must not forget that the battery is a container with acid, so it must be secured very firmly. The recommended solution is to place it under the seat of the mini tractor in a special box, or simply in a fence. Detailed description of the electrics in the pictures below.
Headlights and side lights, as well as brake signals, are desirable elements, but not required, because You can only exploit the result of your labors away from other transport.
Driving on the roads
Not all of the designers’ homemade mini-equipment goes on public roads. And this is correct, because. Our country lists a number of strict requirements that must be met by vehicles moving along them. Even if everything turned out well and the product meets all the requirements, certification will be required to confirm this, which is very expensive.
Therefore, it is prohibited to drive on the roads on a homemade tractor. If you have to deliver it to the work site, it is better to do it on a trailer. This is one of the reasons why they are trying to make homemade work easier.
vote
Article rating