Types of homemade all-terrain vehicles
Two main models are very popular among home-made people - tracked vehicles and do-it-yourself snow and swamp-going vehicles on low-pressure tires. We will use these examples to get acquainted with the machines.
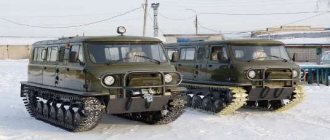
Tracked
All-terrain vehicles, which are quite complex to manufacture, have advantages and disadvantages. On the positive side, it has good maneuverability; in this regard, tracked models have no competitors. Cars of this class are often produced using VAZ engines, so their fuel consumption is higher compared to others, but they also have enough power reserves, unlike analogues with motorcycle power units.
Negative qualities are high fuel consumption and high cost of the all-terrain vehicle. Even though many components may be available, the cost will be higher when compared to wheeled models.
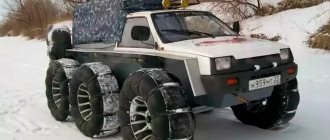
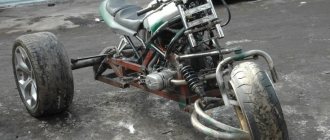
Models on low pressure tires (LPT)
They are created on the basis of the frame and engine from a motorcycle. It is much easier to make a 3-wheeled SND all-terrain vehicle than a model made from a caterpillar track, while there are no difficult-to-manufacture elements, and the component parts are much cheaper and more accessible; the same power unit from a motorcycle will cost less. Of course, the degree of convenience is lower, but you can make a small cabin on a homemade caracat and equip it with a heating device.
Performance characteristics of the unit
Here are the average technical characteristics of homemade products on low-pressure tires:
- breaking frame;
- URAL wheels;
- Japanese engine, diesel, three cylinders, approximately 30 l/s;
- Transmission;
- transfer case NIVA;
- steering gear.
All-terrain vehicles on special low-pressure tires are popular among designers and there are certain reasons for this, one of which is ease of manufacture.
Homemade all-terrain vehicle - how is it made?
Our country occupies a huge area and not all corners of it have the opportunity to travel on decent roads. For example, in the northern regions and the Far East it is often impossible to do without an all-terrain vehicle.
What can industry offer for such cases? And if you need an all-terrain vehicle that is small, economical and inexpensive? Alas, there are no such samples on sale, and most likely there won’t be for a long time. So people build homemade all-terrain vehicles, each in accordance with their needs and capabilities. In this article we will take a step-by-step look at the principles of manufacturing such devices and give some tips for novice designers of all-terrain vehicles. Let's start by looking at how all-terrain vehicles are classified.
How can tracked all-terrain vehicles be used?
Such homemade tracked devices come in different sizes and are used for a variety of purposes. With their help, heavy loads are moved, which are placed either in the body or in a special trailer. If a crawler all-terrain vehicle, made by yourself, is used for a summer residence, then in this case various construction materials are most often transported.
In addition, such a vehicle has transport versatility, and if any unforeseen circumstances arise, you can quickly, without any difficulties, get to a certain destination over rough terrain.
Types of caterpillars
Caterpillar belts are divided into several types:
- According to the material of the links. For example, for heavy equipment, prefabricated belts of metal elements connected by pins are used. Links can be manufactured using casting, stamping or welding technologies. For light or home-made vehicles, rubber tracks are used, which are characterized by reduced weight and low noise levels.
- According to the design and type of lubrication of the hinge. In homemade tracks for an all-terrain vehicle, instead of hinges, an elastic tape with an internal reinforcing layer is often used, which does not require lubrication during operation.
- According to the type of engagement of the drive wheel and the design of the road wheels. Homemade equipment uses standard wheels from passenger cars; torque is transmitted through friction. There are tracked snow and swamp-going vehicles with a metal drive wheel, which is equipped with teeth for engagement with the track links.
What to pay attention to when creating a homemade all-terrain vehicle?
If you decide to make a crawler all-terrain vehicle with your own hands, you must clearly understand for what purpose it will be used. Be sure to consider the following points:
- Weather conditions during operation.
- Dimensions. The width affects the cross-country ability of a self-made crawler all-terrain vehicle, the length is calculated based on the number of seats or the presence of a luggage compartment, and the height should be optimal when creating the amphibious properties of the unit.
- Motor power. The more powerful the engine, the easier it is to overcome hard-to-reach sections of the road.
- Target. Depending on the purpose for which the mobile device is intended, its design may vary.
- Number of wheels. Most often, a homemade tracked all-terrain vehicle, made with your own hands, has wheels from two to eight pairs, which are necessary to support the caterpillar track.
How to choose an engine
In order to create a snowmobile, it is necessary to take into account the most important and central part of the entire mechanism - the motor. The motor must have decent traction in order to move the entire mechanism in difficult snowy weather conditions. For everything to work out as it should, a powerful motor from the Neva walk-behind tractor will do.
If such an engine is available, one or two people will be able to move on a homemade snowmobile from a walk-behind tractor with their own hands. The engine power is 6-7 horsepower, which is quite enough to move on snow cover.If you add a snowmobile stand to the walk-behind tractor, the lifting force will increase and you can easily load your walk-behind tractor for snow trips.
What is good about this engine, many ask. In fact, there are many more advantages than you might think:
- First of all, it is an affordable price.
- Also good quality is proven by Japanese production.
- The motor has an additional air cooling system.
Also note that gasoline can be used as fuel.
What elements are all-terrain vehicles made from?
At the preparation stage, the intended purpose of the vehicle is clarified.
When drawing up technical specifications, the following parameters are approved:
- number of seats;
- weight and dimensions of transported goods;
- seasonality of operation;
- requirements for cross-country ability, buoyancy.
The maximum speed for this category of transport is not a determining factor.
However, the range on a full charge is an important indicator for many users.
Taking into account the listed features, it is necessary to consider the main functional components of the homemade product.
Engines and transmission
Motorcycle power units are chosen because of their affordability. The relatively simple design simplifies repair and configuration. However, when choosing a car engine, you can get high power and reduce noise and vibration.
To make the right choice, you need to take into account that a 2-stroke engine is suitable for a karakat - an all-terrain vehicle with large pneumatics. It is advisable to provide a forced cooling system. A relatively slow off-road vehicle will not be subject to strong air flow when moving, like a motorcycle speeding along the highway.
If you plan to build a tracked all-terrain vehicle with your own hands, choose a car engine. The standard 4-cylinder engine produces high torque even at low speeds. Diesel consumes less fuel and has an increased service life. A gasoline unit is easier to start in severe frost.
If you prefer the economical option, you will have to increase the investment to add a pre-heater to the design.
Transmission elements are created taking into account the characteristics of the power unit and other important factors. When installing a low-power engine from Zaporozhets, for example, you will often have to increase the speed to increase the torque on the drive shaft. To ensure the required rotation speed of the drive wheel, it is necessary to select an appropriate gearbox.
Frame and body
The load-bearing frame is created from steel pipes of round or square cross-section. Welded or screw connections are used. A monocoque body is rarely used, since this option will not provide high resistance to loads. In addition to strength, special attention is paid to resistance to destructive corrosion processes. For this reason, as well as to reduce weight, aluminum or plastic cladding elements are used.
If buoyancy is required, ensure the lower part of the homemade hull is sealed. Oil seals prevent water from penetrating into the drive outlet area. You can move the corresponding node above the waterline.
The articulated frame—the “fracture”—allows you to transform the all-terrain vehicle. This feature is useful for turning in tight spaces, when driving over boulders and logs. It should be remembered that increasing the complexity of the design increases the weight of the vehicle and accordingly reduces reliability. Simple engineering solutions mean no extra labor during assembly and the possibility of repairs in the field.
Tires and tracks
To mount pneumatics, the discs are widened and supplemented with jumpers with welded ring retainers. The camera is secured with flexible elements cut from a conveyor belt. For additional protection and improved off-road performance, protectors are installed.
Spring or spring suspension is rarely used, since pneumatics have good damping properties. Reducing the pressure, if necessary, transforms the wheel profile into a wide “cutlet”. Widening the support reduces the load on the ground. We must not forget that low ground clearance makes it difficult to overcome high obstacles. A torsion bar is suitable for a tracked all-terrain vehicle. Instead of serial drum brakes, you can create a planetary mechanism.
If it is impossible to use a factory caterpillar from a snowmobile or other equipment, they create a homemade analogue. A typical solution is a durable conveyor belt with built-in lugs.
Other Required Parts
In accordance with the chosen construction scheme, a list of additional functional components is compiled.
You can add to the design:
- doors;
- lighting technology;
- control devices, indicators;
- rear view mirrors;
- windscreen wipers;
- electrically heated seats;
- autonomous stove;
- snorkel for overcoming water obstacles;
- towbar and trailer;
- music center and acoustics;
- kenguryatnik and steps;
- winch.
Clarifications are made taking into account the intended purpose. To improve autonomy, additional tanks are installed. To save the engine life of the main power unit, independent power supply is provided using a separate gasoline (diesel) generator.
DIY amphibious all-terrain vehicle
Design of a homemade six-wheeled amphibious all-terrain vehicle on pneumatic wheels by G. Vidyakin. The car has an attractive appearance, its equipment takes into account the traffic police requirements for vehicles as much as possible.
In the proposed design of a homemade six-wheeled amphibious all-terrain vehicle, the pneumatic runner layout is sufficiently developed and designed for maximum use of standard components. The car has an attractive appearance, its equipment takes into account the traffic police requirements for vehicles as much as possible. True, such all-terrain vehicles are not subject to the traffic police requirements for home-made cars, so they are not registered. However, they are allowed to operate, having established certain routes and times for such vehicles to leave the city.
Fig.1. Exterior view of a six-wheeled amphibious all-terrain vehicle made by hand.
The basis of the all-terrain vehicle is an open-top box-shaped body. Its vertical sides are made of plywood 7 mm thick; wings are attached along the upper edge of the sides, forming a single plane; a small bevel is made in front. In plan, the body is rectangular in shape with a slightly narrowed front part. The body is divided by vertical transverse partitions; in front there is a trunk, then in the expanding part there is a cabin with a steering wheel and a driver's seat, behind it on the sides there are two drawers that serve as seats for passengers.
Fig.2. Three-axle all-terrain vehicle on low-pressure pneumatics designed by G. Vidyakin:
1 — front axle support, 2 — bumper, 3 — steering device, 4 — rear wheel balancer, 5 — chain drive to the rear wheel, 6 — fuel tank, 7 — step, 8 — wheel disk. 9 - wheel hub, 10 - front axle, 11 - chamber, 12 - valve, 13 - detachable rim, 14 - rear axle wheel shaft.
The next compartment is the transmission compartment. By the way, the transmission is covered with a horizontal cover, located at the same level as the passenger seats.
Fig.3. All-terrain vehicle body:
1 - trunk, 2 - windshield, 3 - driver's seat, 4 - box, 5 - space for passengers and luggage, 6 - window covered with rubberized fabric, 7 - engine cover, 8 - mud flaps, 9 - side, 10 - side spars of the engine and transmission power frame, 11 rear wheel balancer niche, 12 front axle niche.
And the last compartment is the power compartment, closed by a horizontal lid, slightly raised above the seats, in which the engine is mounted. The cover has an additional box-shaped casing for the engine. The lids of boxes, transmissions and the engine hood are hinged, providing easy access to the units.
Rice. 4. Frame for engine and transmission:
1 - middle spars (angle 40 x 40 mm), 2 - cross members (square pipe 40 x 40 mm), 3 - side spars (angle 40 x 40 mm), 4 - cross member (angle 30 x 30 mm), 5 - support bracket balancer (angle 40 x 40 mm).
The wings, partitions, and covers are made of plywood, connected to the body with duralumin corners, the floor is made of duralumin sheet, and duralumin corners are riveted at the bottom for rigidity. In the front part of the body, under the trunk partition, there is a small transverse niche for the front axle. In the rear part of the body, under the seat boxes and further to the engine compartment, on both sides, there are longitudinal niches for the rear wheel balancers. By the way, the rear wheels are as close to each other as possible, the front wheels are moved slightly forward - the turning radius of the all-terrain vehicle depends on this distance.
Above the wings in the front part of the body there is an inclined windshield and two side windows. Gas tanks are mounted under the wings between the rear wheels on both sides, the cross-section of which has the shape of a trapezoid tapering downwards. Above all the wheels, in the horizontal parts of the wings, there are rectangular cutouts covered with rubberized fabric: when hitting an obstacle, this allows the wheels to rise above the level of the wings and not brake against them.
Engine and transmission units
mounted on a frame that is integral with the body. It consists of four spars made of steel angles 40X40 mm and cross members made of square steel pipes. On the outside of the sides there are small brackets made from 40 x 40 mm angles for attaching the rear wheel balancer supports. Wherever possible, the flanges of the corners of the longitudinal side members are trimmed to reduce weight and holes are drilled into them.
Fig.5. Engine and transmission location:
1 - elastic coupling, 2 - middle spar, 3 - cross member, 4 - side spar, 5 - bulkhead, 6 - differential lock rod, 7 - reverse gear engagement rod, 8 - reverse gear, 9 - bevel gear, 10 - partition, 11 — intermediate shaft, 12 — cross member for attaching the intermediate shaft sprocket support, 13 — gear selector rod, 14 — air filter, 15 — tailgate, 16 — generator, 17 — engine, 18 — left side, 19 — muffler, 20 — starter, 21 — battery, 22 — chain drive to the rear wheels, 23 — rear wheel balancer support, 24 — rear wheel balancer pins, 25 — brake drum, 26 — chain drive, 27 — differential lock assembly.
Engine from SZD motorized stroller
mounted in the rear part of the body on intermediate supports, which, in turn, are fixed to the side members through four damping rubber gaskets from the Moskvich engine. A cross member with an intermediate sprocket is also installed on the intermediate supports, connected by a vertical chain transmission to the engine output sprocket. The intermediate sprocket shaft is connected through an intermediate shaft with elastic couplings (the elastic element is a disk made of a flat drive belt 10 mm thick) to an angular bevel gear mounted on the cross member. A sprocket is installed on the output shaft of the gearbox, connected by a chain transmission to the input shaft of the main gear (from the sidecar), mounted on two crossbars.
Fig.6. Kinematic diagram of the all-terrain vehicle. In Latin letters it is indicated:
z is the number of sprocket teeth, t is the pitch of the bushing-roller chains, b is the width of the bushing-roller chains.
The output shafts of the main drive are connected through elastic couplings (from the same drive belt) to intermediate shafts with sprockets that transmit rotation to the wheels through a chain drive. The output shafts of the main gear, intermediate shafts and balancer journals are located coaxially, as shown in Figure 3. It can also be seen that the journals are fixed in supports on bearings, and the intermediate shaft bearings are pressed into the journals. The inner journal is hollow and the intermediate shaft passes through it. At the inner ends of the intermediate shafts, brake drums from the wheels of the Tulitsa scooter are mounted, on which ring gears are installed; through chain drives they are connected to the rollers of the differential locking mechanism. The latter is a sliding splined sleeve connecting the rollers. The axes of all transmission mechanisms are located almost in the same plane. Tension of chain drives: transmissions - with the help of spacers, gears to the wheels - with pressure screws.
All bearing units are protected from dirt by seals from a Volga car or have protective washers.
All-terrain vehicle front axle
- from a steel pipe 0 60X3 mm, reinforced in the middle part with a welded overlay from the same pipe. Along the axis of symmetry of the bridge, perpendicular to it, a horizontal axis is welded, the ends of which are fixed in bearing supports installed in the niche of the front part of the body. Racks with king pins and pivot pins from a Volga car are welded to the flattened ends of the pipes. Rubber buffers installed along the edges of the niche limit the swing of the bridge in the vertical plane.
Fig.7. The front axle of an amphibious all-terrain vehicle made by hand.
Steering
, as required by traffic police rules, factory-made, from a motorized stroller. The housing with the rack is installed under the body floor on a bracket, the steering wheel shaft is connected to the pinion shaft through a cardan joint, the second (upper) support for the steering shaft is a ball bearing mounted on the bracket. Since the steering wheel is located in the symmetry plane of the body, the tie rod joints on the rack are shifted to one side and the rods differ significantly in length, this leads to the fact that the swing of the cross member is accompanied by a noticeable leash of the near wheel.
Rice. 8. Steering device and front axle support:
1 — front axle support, 2 — tie rod joint, 3 — rack and pinion steering device, 4 — body floor. 5 — hinge, 6 — steering column, 7 — steering rod.
Rear wheel balancers
They are symmetrical frames welded from two rectangular pipes 40X 20 mm, connected by cross members from the same pipes. The central support of the balancer rotates in axles - bushings welded to plates fixed to the frame. The wheel shaft supports at the ends of the balancers are of a similar design. The balancer frame is slightly curved, the balancer pins are located on top, and the wheel shaft supports are located below, so the wheel axes are 180 mm below the balancer hinges. The rigidity of the balancers is low; under load they are somewhat deformed, just like the engine and transmission frames, however, the presence of elastic couplings and the possibility of misalignment of chain drives compensate for this disadvantage.
Rice. 4. Transmission device:
1 — chain drive, 2 — balancer frame, 3 — axle, 4 — balancer support, 5 — bracket, 6 — side, 7 — main gear, 8 — elastic coupling, 9 — brake drum, 10 — gear ring of the differential lock chain drive , 11 — brake lever, 12 — intermediate shaft, 13 — wheel shaft.
All-terrain vehicle wheels
made from a wide-profile tire tube 1120 x 450 x 380. The tubular rims, central disc and supports for supporting the cascar are made of aluminum alloy. The lodgments are connected to the rims by welding, and to the disk using corners with rivets. The mounts are split, so the outer rim is detachable and is bolted to the disk. The disk in the central part is reinforced with a riveted lining and is bolted to the hub. The valves are moved to the side surface, which allows the cameras to rotate on the rims. Drive and steered wheels are interchangeable. The design of the all-terrain vehicle uses several components that can be attributed to those that came to hand. One of them is a bevel gear. It can be abandoned if the engine is placed in the longitudinal direction. When assembling the transmission and installing the engine, all mounting parts were fabricated and fitted in place. At the same time, all possible measures were used to reduce the size and weight of standard components; for example, the mounting protrusions of the main gear and sidecars were trimmed, and a small-sized muffler for the engine was made.
Control systems.
The all-terrain vehicle's controls and alarm system are completely identical to those of a car. Control drives: throttle - cable, clutch and brakes - hydraulic, gear shifting, reverse gear - rods and handles located on board the all-terrain vehicle to the right of the driver; The differential lock control handle (via rods) is also mounted there. All hydraulic cylinders come from the brakes of the front wheels of the stroller.
Power supply system
slightly different from that adopted on a motorized stroller: along the axis of the crankshaft and engine fan, an automobile alternator is mounted on four legs, connected to the crankshaft by an elastic coupling.
To heat the windshield, warm air is supplied from the engine cylinder through the air intake and corrugated sleeve by two automobile fans - at the inlet and outlet.
G. Vidyakin, Arkhangelsk region.
What type of diesel or gasoline engine should I choose for my all-terrain vehicle?
It is impossible to answer this question specifically. Both motors have their advantages and disadvantages.
It’s a good idea to use domestic engines in an all-terrain vehicle. They have shown their reliability. This refers to the Zaz engine and the M-67 motorcycle engine. Engines based on tractor “starters” are also good. In recent years, many have begun to make all-terrain vehicles from walk-behind tractors. This is explained by the fact that the market is flooded with affordable Chinese walk-behind tractors with engines of sufficient power. These motors are reliable and do not require frequent maintenance.
It is recommended to make the chassis with independent wheel suspension. To do this, you will need to make some effort, but the comfort of those inside will be ensured. An excellent result is achieved when the suspensions are paired with low-pressure pneumatic wheels.
If we are talking about a tracked all-terrain vehicle, the frame for it is a one-piece structure. In the case of wheeled vehicles, an articulated version is used. Although an articulated frame can be chosen for a tracked all-terrain vehicle.
Chassis
In the design of the chassis, it is best to use independent wheel suspensions, although they are technologically more complex, but they provide comfortable conditions for the driver and passengers. Together with wheels based on low-pressure pneumatics, this gives a good effect.
The frame can be either a spatial design or a flat one, in addition, solid or articulated (for tracked and wheeled vehicles). By the way, the articulated design of a tracked all-terrain vehicle has great potential for the work of design ideas, but due to its complexity, it finds little application in such an area as homemade all-terrain vehicles with your own hands.
For the manufacture of frames, channels, angles and pipes of different sections and sizes are used.
Design of a flatbed all-terrain vehicle
There are many options for all-terrain vehicles on the market that are produced by industry, but their capabilities and price do not always meet expectations. Therefore, from time to time interesting homemade products appear; the owner himself brings his own version of the car to mind. Of particular interest are side-turning all-terrain vehicles. This type of vehicle is capable of making a complete turn on the spot by transmitting torque to one of the sides; this type of turn is their main difference from standard all-terrain vehicles.
The peculiarity of such products is their small size, so they are most often produced by amateur designers. In addition, the size of the car must be such that it can be transported in a trailer. The good thing about a self-made car is that it is made in accordance with the needs and requests of the future owner. The all-terrain vehicle is almost equal in its capabilities to standard swamp vehicles.
Features of the design plan
The simplest version of a snowmobile consists of a part that drives and one that is driven first. The second part consists of a seat, shock absorbers, a steering part and runners, thanks to which this part moves. The second part is much more complicated, since it contains all the elements that set the snowmobile in motion.
First of all, in the second part it is necessary to correctly provide the power unit, that is, the motor itself. The frame on which everything will be arranged and the drive are also important.
Do-it-yourself diagrams and drawings of a snowmobile from a walk-behind tractor must be made in advance, and you can find the required option on the Internet or in various types of literature.
First, before drawing up the drawing, determine the purposes for which the snowmobile will be used. After the drawings, you will need to select the parts, and, if possible, make some with your own hands.
Next, determine what speed your future snowmobile will be at. It can be a wheeled or tracked snowmobile made from a walk-behind tractor with your own hands.
Best models
There are many different models of all-terrain vehicles, all of them are built on the basis of different equipment, but they perform approximately the same tasks, the main one being to provide off-road movement. It is almost impossible to select the best one among them. But it is worth listing those that are distinguished by their originality and good technical characteristics.
Smolensk
The all-terrain vehicle of the Smolensk brand is homemade with good driving characteristics. All components are taken from cars produced by the domestic auto industry. To assemble it you need:
- wheels with a size of 1450 mm;
- internal combustion engine 62 hp;
- brake discs;
- rear window
The all-terrain vehicle with this name is homemade with good driving performance. The body design is of the most common boat type. The car can accommodate 4 people, including the driver.
To assemble the swamp vehicle you will need:
- Trekol wheels;
- several circuits;
- some parts taken from an old Toyota, including a diesel internal combustion engine;
- metal sheets 2 mm thick;
- pipes and profile;
- 100 liter fuel tank.
The maximum speed of the homemade product is 35 km/h.
The assembly procedure is standard. First, the frame is mounted, then the chassis is installed. The front part turns out to be heavier than the rear, so a tank is installed to balance the latter. The body is covered with sheets.
Bel-79
The peculiarity of this model is its compact size and relatively low cost of components.
To assemble the machine you need to prepare:
- Chinese-made internal combustion engine complete with clutch and belts;
- the gearbox can be taken from a passenger car;
- gearbox;
- clutch cylinders.
First, the frame and internal chains are assembled with normal tension. Then the clutches and brakes are installed. All this will further ensure the reliability of the design. Clutch discs are taken from VAZ.
Barnaul
This all-terrain vehicle was developed as an all-terrain vehicle with high reliability. It was created from parts taken from VAZ cars.
The frame is created from a profile by welding.
The result is a car with a cabin width of 123 cm, height of 145 cm, length of 280 cm.
Caravan
Quite an interesting design of a swamp vehicle. All components can easily be selected or replaced if necessary:
- internal combustion engine;
- gearboxes;
- brake mechanisms;
- seat from UAZ;
- brake cylinders from Gazelle;
- frame profiles;
- Additionally, you will need a chain 10 m long with a pitch of 15.8.
After assembly, you get an all-terrain vehicle with the following dimensions:
- length - 320 cm;
- width - 260 cm;
- height - 200 cm;
- clearance - 45 cm.
What are the features of caracats
The vehicle includes:
- Wheeled chassis.
- Lightweight cabin.
- Low pressure tires (soft, oversized).
The machine has the following features:
- It surpasses tracked tractors in cross-country ability.
- Overcomes swamps and small rivers.
- Unlike all-terrain vehicles with steel tracks, it does not cause damage to nature, keeping the vegetation cover intact.
The name of the swamp walker comes from the word “cuttlefish”.
Execution options
At home, 2 types of caracats are collected. Each has its own advantages and disadvantages.
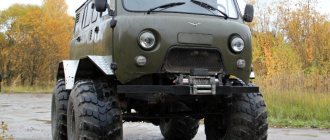
All-wheel drive design
The basis is taken from a Russian SUV - UAZ or Niva. An inexpensive Chinese car, for example Lifan Solano 452, is also suitable.
In order to reduce weight, they replace the standard engine with a motorcycle engine from the Dnepr or Ural.
Advantages of the 4x4 scheme:
- Large load capacity.
- Increased cross-country ability.
- Comfortable closed cabin.
- Reliability. If one of the axles fails, the car remains on the move.
- Minimum labor costs. Only minor changes are made to the design.
Disadvantages of homemade all-wheel drive:
- High price.
- Heavy weight.
- Low maneuverability.
An example of an all-wheel drive caracat is the ZIS 5 model.
A convincing argument in favor of this design is the presence of differentials, thanks to which the car turns freely.
Three-wheeled all-terrain vehicle
Assembled on the basis of a motorcycle. There are 2 wheels installed at the rear (half shafts or axle), and 1 at the front (on the fork).
If the vehicle is intended to be used only in the summer season, the cabin is not installed.
Otherwise, a primitive booth made of aluminum profile is attached.
Design advantages:
- Light weight.
- High maneuverability.
- Compact sizes.
Flaws:
- Weak traction (2-wheel drive).
- Low load capacity.
- A large amount of work involved in self-production.
In addition, the model with axle shafts turns poorly due to the lack of a differential. In early versions, a ski was installed in front. Such a machine is easier to assemble, but it does not have buoyancy.
The option with a single-wheel front end turned out to be more practical.
It crosses wetlands and rivers; does not go to the bottom if the ice underneath breaks.
Device and main components
The all-terrain vehicle consists of the following components:
- Support frame.
- Engine. Rear placement is preferable, otherwise the car will nod off.
- Chassis: chassis, clutch, independent suspension, etc. Soft all-terrain tires with an increased diameter are installed.
- Steering.
- Cabins.
In the three-wheeled version, control is carried out using a simple motorcycle fork.
A 4x4 vehicle uses one of the following mechanisms:
- automobile rotating unit;
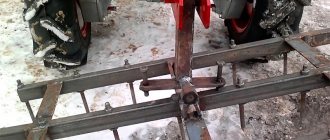
- breakable frame type.
The second option allows for high maneuverability with a long length. Vehicles with such a frame are called “fracture”. It consists of 2 parts connected by a steering knuckle.
This unit can be borrowed from the front axle of a UAZ car. The “turning point” principle is used, for example, in “accordion” trolleybuses, the T-150 tractor, etc.
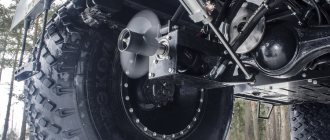
Instead of a pneumatic chassis, the vehicle can be equipped with tracks.
How to make it yourself
You can create your own all-terrain vehicle if you have parts from cars, the necessary tools and experience in such work. General tips for creating a cross-country vehicle with your own hands:
- draw up a plan before actual assembly, consult with experts, read articles - prepare thoroughly;
- find the optimal amount of engine power and fuel consumption so that driving an all-terrain vehicle does not cause problems with the budget and the environment;
- combine wheel disks of the same size and type of fastening, secure them at the same level.
The basic sequence of actions when creating your own all-terrain vehicle: measure the parts available, weld the frame with all the supports and axles, add fasteners. After this, body sheets are applied to the frame, electronics are introduced, etc.
How to make obodryshi
This is what homemade all-terrain tires are called. They are much cheaper than factory ones. As a basis, they take large-sized tires from a truck (GAZ-66, KrAZ-255, ZIL-131), tractor or airplane and cut off the excess material. The cross-country ability is explained by the low specific pressure on the ground, which in turn is due to the large area of the contact spot.
Before you make tires out of tires, you need to choose the type of tread.
It depends on what kind of surface you plan to move on.
It can be:
- Dirt. Requires a self-cleaning protector.
- Wetland. A pattern with lowered grooves is used to provide improved traction.
- Snowdrifts, sand. A protector with closely spaced elements is used.
Tools used:
- awl;
- construction knife with a set of blades;
- grindstone;
- clamps for straightening automobile bodies or clamps;
- winch with cable;
- hammer;
- cardboard or tin tread template;
- chalk.
Procedure:
- The tire is cleaned of dirt. It should not be worn out inside, otherwise holes will appear in the rubber as a result of peeling.
- The pattern of the future tread is drawn using chalk according to the template.
- Using a construction knife, make a cut along the inner circumference.
- Near it, rectangles are drawn with chalk. They cut them out with a knife.
- The wire that appears in the “windows” is hooked with a winch hook and removed. The tire must first be nailed to the base.
- Cuts are made along the tread pattern drawn in chalk.
- Use pliers to pinch the edges of the hole and open it.
- The exfoliated material is torn off using a winch. During the process, the rubber is cut with a construction knife, periodically sharpening and changing the blades.
- Excess is removed from the side surface in the same way.
- Treat the tire with sandpaper and, if necessary, correct it with a hammer.
The camera is mounted on a homemade disk. The latter is made from an aluminum basin and carefully ground.
The tire is tied to it with a fire hose.
The area of the contact patch is regulated by internal pressure. Before driving onto hard ground, inflate the tire.
Photos of the coolest homemade all-terrain vehicles
One of the popular models of light all-terrain vehicles is Karakat:
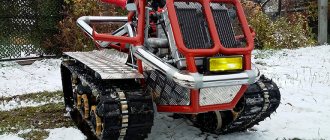
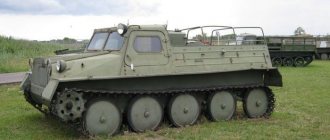
Also, tracked all-terrain vehicles were created in other countries and had the following appearance:
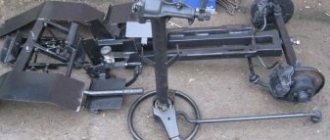
Another domestic homemade product is a frame structure equipped with a gearbox and disc brakes:
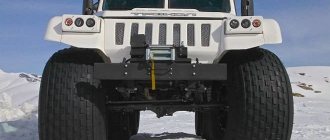
Models are also made with winches in front:
You can watch other hand-made models and their manufacturing process on video. Creating homemade all-terrain vehicles equipped with caterpillar tracks is a complex process that requires skill and drawings of the future design. Usually they resort to this when it is not possible to purchase factory models, but a high-cross-country vehicle is very necessary. During the process of its creation, it is important to provide the nodes and elements with a high level of reliability.
Sources
- https://minitraktor34.ru/selhoztehnika/vezdehody-samodelki.html
- https://grifon-kamaz.ru/zapchasti/samodelnyj-vezdehod-na-gusenitsah.html
- https://SpecMahina.ru/vezdehod/samodelnye-na-gusenitsah-i-shinah.html
- https://texnotoys.ru/avto/samodelnye-vezdehody.html
- https://SpecMahina.ru/vezdehod/bortopovorotnyy-na-shinah-nizkogo-davleniya.html
- https://tym-tractor.ru/populyarnye-stati/bortopovorotnyj-vezdehod-svoimi-rukami-mehanizm-s-bortovym-povorotom-ustrojstvo-samodelnogo-na-shinah-nizkogo-davleniya-bez-tsepej-konstruktsiya-malenkij- na-kolesah.html
- https://SpecMahina.ru/vezdehod/kak-sobrat-karakat-svoimi-rukami-chertezhi-i-shemy.html
[collapse]