Buying a new one or repairing an old one is a dilemma for car owners whose battery has failed. For owners of modern maintenance-free batteries, it would seem that the choice is clear - buy. Ingenuity and knowledge of battery design will help extend the life of a “dead” energy source.
Winter is a real test for car enthusiasts. A working car may not start in the morning if the battery misfires. If you purchased a maintenance-free one and it let you down, don’t be upset, you can charge it, check it and continue using it.
Battery device
Lead-acid batteries are made of containers connected in series - cans. In jars, lead alloy plates are immersed in a sulfuric acid solution. Due to the reduction and oxidation of lead at the anode and cathode, a difference in electrical potential exists in the battery.
The main causes of battery failure:
- Electrolyte boiling away.
- Change in the chemical composition of the electrolyte.
- Dissolution of plates - sulfation.
- Short circuit in banks - the anode touches the cathode without a gap.
Types of batteries
Acid batteries can be serviced or maintenance-free. The serviceable one has special removable plugs that give access to the inside of the battery. You can check the density with a hydrometer and visually determine the level and color of the electrolyte. Maintenance-free batteries do not have this capability. Technologically, they are more advanced, since the evaporation of water from the electrolyte is minimized, and the sulfuric acid solution is designed for the entire service life of the device. Maintenance-free batteries are needed if they are installed inside a car.
When trying to make a serviceable battery out of a maintenance-free battery, you need to determine whether this is possible, more on that later.
Maintenance-free lead batteries are:
- With liquid electrolyte – WET
- With glass fiber core - AGM
- With gel electrolyte - GEL
fully serviced. Depending on the material of the plates, these batteries are:
- Antimonous: lead has excessive ductility; antimony is added to it for strength. Its disadvantage is that it is a catalyst for the electrolysis of water. the electrolyte level and density change. This type needs to be serviced more often. They are designated by the letters Sb.
- Calcium: the presence of calcium reduces the service life of the device - the plates quickly sulfate. There is practically no need to maintain such batteries, but the main thing is to prevent deep discharge. They are designated by the letters Ca.
- Hybrid: one part of the terminal is made of calcium, the second - antimony material. An excellent compromise - gas emissions are kept to a minimum. Designated Ca/Sb.
Only after first finding out whether your battery can be serviced should you proceed directly to work.
Main differences
Serviced batteries are usually equipped with plugs, which can be unscrewed to allow you to look inside the can. You can also check the condition of the electrolyte, measure its density, and assess whether the plates are susceptible to shedding or sulfation.
There is no such possibility in a maintenance-free battery. The main difference between such products is a sealed housing and a special system of labyrinth channels, which ensures the removal of steam if it is formed as a result of charging, heating or condensation. The products are equipped with special valves that regulate pressure in case of overcharging.
If an increased voltage is applied during charging, a lot of steam (electrolyte) will be released through these valves and its level will drop below the plates, which will lead to their shedding.
Another difference between maintenance-free batteries is the composition of the plates. Today, positive and negative plates are made with the addition of silver and calcium. Previously, plates with a high antimony content were used, which required high water consumption.
Is it possible to charge a battery without removing the terminals?
Modern designs lose charge more slowly and require almost no water or other human intervention. That is why they got the name “unattended”. The following manufacturing technologies exist:
- WET. Based on a liquid electrolyte, Ca/Ca or Ca+ is also indicated on their body.
- EFB. The electrolyte is placed in a special “package”.
- A.G.M. Fiberglass is used as a filler.
- GEL. A gel electrolyte is used.
Only the first type can be fully serviced, so before starting work, you should find out which category the battery belongs to.
Do I need to add water or electrolyte?
A new, maintenance-free battery that works properly in your vehicle does not need to be opened or serviced.
If it was subjected to a long recharge, turned over, or its performance dropped sharply - only then you need to think about either purchasing a new battery, or how to disassemble and restore the faulty battery.
When to service your battery:
- If it is visible to the light that there is less electrolyte in one jar.
- The voltage at the terminals is low and charging has no effect.
- capacity noticeably decreased.
- Electrolyte leaked due to damage to the housing.
- Carrying out restoration after battery sulfation.
Proper operation and nuances of minimal maintenance
How to maintain a maintenance-free battery to increase its life? The key to long-term operation of a maintenance-free battery is, first of all, the serviceability of the vehicle’s electrical equipment. If its on-board systems are working normally, it means that the optimal voltage and current will be supplied to the battery terminals. Interruptions in the operation of the generator, short circuits in the electrical circuits of the car - all this negatively affects the health of the battery. When storing the battery for a long time, place it in a cool place to reduce self-discharge by reducing the activity of chemical processes.
How to check a maintenance-free battery? It’s good if you purchased a battery with a more or less transparent case. Such products are marked with marks that can be used to determine the current electrolyte level. In other cases, pay attention to the “eye”-hydrometer: it should be green. When you come to the garage or parking lot in the morning, do not be lazy to take a multimeter with you to measure the voltage at the battery terminals: U = 12.6–12.7 V. If it is around 11 V, the battery needs to be recharged. How to do it correctly is described below.
How to open the battery cover
Serviceable batteries have plugs for checking the cans. Getting to the contents of a maintenance-free battery is more difficult. There are no plugs, and the monolithic lid is a labyrinth for trapping and condensing vapors. Disruption of the labyrinth's passages will reduce the efficiency of the system. Therefore, before opening the battery cover, you need to weigh the pros and cons.
Attention! Before opening and checking the battery, it must be charged! The density of the electrolyte on a discharged battery is significantly lower!
Here are some options for how to get to the electrolyte:
Do-it-yourself repair - how to restore the battery correctly
Having reached the electrolyte, you need to check three parameters:
- Color. The electrolyte should be transparent, without foreign inclusions. The collapsing lead plates give the liquid a dark color.
- Level. As water evaporates, the electrolyte level drops, which reduces power. Each battery has its own liquid level parameters, but all batteries must have plates immersed in electrolyte.
- Density. It is checked with a special device - a hydrometer. The density of the electrolyte in a charged battery is 1.27.
Important! When working with electrolyte, use personal protective equipment! Wear goggles, protective gloves and a respirator. Electrolyte splashes in the eyes or on the skin will cause a chemical burn.
The procedure for diagnosing a maintenance-free battery is as follows:
- We check the voltage of the battery and the vehicle's on-board network. This is necessary to prevent chronic undercharging of the battery. During short, frequent trips, the battery does not have time to charge; as the temperature drops, the capacity drops by 20 - 40%. Many owners blame working equipment, although it needs to be operated correctly.
- We charge the battery. For charging, it is advisable to use a factory-made charger, preferably with a controller. The use of electronics will increase the accuracy of the charge. If the charger is idle, set the current to approximately 0.1 of the capacity. A 60 A/h battery needs to be charged with a current of 5 - 6 Amps. Charging continues. until the ammeter readings drop to 2-3 amperes. A severely discharged battery needs to be charged with a current of 1-2 amperes (about 1/20 capacity) for several days. The voltage should not exceed 15 volts, otherwise the jars will “boil” and may swell.
- Drill holes in the battery cover. We check the electrolyte level using an improvised dipstick. If the battery case is made of light plastic, then the level can be checked by shining a flashlight through the battery.
- We check the density with a hydrometer.
- After checking and topping up, the battery must be tightly closed.
How to correct electrolyte status
There are three options for correcting electrolyte density:
- At a normal level, low density. We use a hydrometer to take out the entire contents of the jar and pour it into a glass container. Add concentrated acid and bring the density to the recommended level. Fill the electrolyte into the jar to the level.
- When the electrolyte level is low, the density is high. You need to add distilled water, stirring the electrolyte with a glass rod. After work we measure the density.
- At normal levels, high density. Drain the electrolyte, add distilled water, fill to the level.
Important! The density of the electrolyte is its main characteristic. The entire operation of the battery depends on maintaining this parameter normally.
When performing battery maintenance, you can drain all the electrolyte into a glass or enamel container, stir and check the density. Pour the normal electrolyte back into the jars, and if there is a shortage, add fresh electrolyte with the appropriate density. Topping up should be done evenly into all jars so that the amount of fresh sulfuric acid is the same in all jars.
Precautionary measures
Inside a maintenance-free battery, the gas may be under significant pressure. The composition of such a mixture can be highly flammable, so do not smoke while drilling the housing. Work must be carried out at a considerable distance from open fire, for example, a gas burner or fireplace.
In addition, to protect your eyes and skin from splashing acid, you will need to use the following personal protective equipment:
- Latex gloves.
- Glasses.
- Special clothes.
Spilled acid can not only cause harm to health, but also to the flooring, walls or room furnishings. Work of such complexity should be carried out in the garage, but if this is not possible, then plastic film should be used, which must be carefully covered with furniture, floors and walls of the room.
Is it possible to disassemble a maintenance-free battery?
The maintenance-free nature of the power supply is attractive for those who do not want to worry about the condition of the power source once again. At the same time, many are accustomed to monitoring all elements of the automotive system. It is traditionally believed that a closed battery cannot be opened. Indeed, there are no technical holes on the body of such batteries. However, if you want to make a car battery serviceable or remove lead from it, then you can disassemble a maintenance-free power supply. To do this, you will need some tools and knowledge of safety rules.
What types of lids are available?
The contents of any car battery are enclosed in a housing. Serviced batteries are distinguished by the ability to gain access to the banks and, if necessary, add electrolyte or distilled water. The maintenance-free closed-type battery is characterized by a smooth surface of the housing. To avoid any contamination, the upper part of the battery is retracted under the cover. It can be removable - with latches or monolithic - heat welded to the body. Most often, a closed type battery has a monocap.
What tools are needed for opening
To gain access to the filler holes, even if they are filled at the factory to the surface level of the case, you must remove the cover from the battery. How to open the battery cover? If it is on the grooves, then carefully unclip the fasteners and remove the element. You may need a flathead screwdriver.
A hot pressed part will not come off easily. During its dismantling, there is a high probability of the part breaking. Therefore, we do not recommend removing this type of element. However, if you wish, you can try to break the integrity of the part using an awl, screwdriver or drill. You will not remove the cover completely, but you will be able to make holes for further operations.
How to open a maintenance-free battery
There are not many ways to open a closed-type power source, and they depend on the intended purpose. If you need lead (for hunting or fishing), then you don’t have to worry about opening the battery and just break its case.
In order to extend the life of the battery, you need to make holes that will give access to the banks.
- Remove the stickers from the surface of the battery.
- Carefully inspect the body. Since the sealed lead-acid battery was filled at the factory, stamping of the plugs remained.
- Take an awl, screwdriver or drill and carefully make holes in place of the bays.
This simple procedure requires care, but allows you not to purchase a new power source, but to restore the functionality of the existing one.
general information
When trying to understand how to open a Varta battery, it is necessary to clarify the main design features of this unit, its placement in the car and the subtleties of dismantling. To accomplish this task, you need to prepare the following tools and available means:
- Spanners.
- Pliers.
- Instructions for the car.
- Latex gloves.
- Sandpaper.
- Brush or scraper.
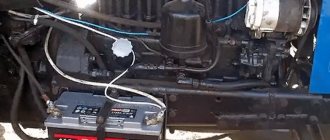
To determine where the battery is located, it is enough to carefully examine the engine compartment by opening the hood. If a visual inspection does not bring any results, you need to study the instructions again. Now that the battery has been found, you should make sure that the upcoming dismantling will be easy and quick. In some cars, these units are secured with additional fasteners and equipped with protective covers.
Having seen how the battery is secured, you can begin to remove it.
In most cases, the role of the latch is performed by a metal strip placed on top of the battery and connected by two rods. In some cars, the component is fixed deep in the socket, so it is simply not possible to get to it without a socket wrench and serious investment of time and effort. Before the upcoming work, you need to protect yourself with rubber gloves.
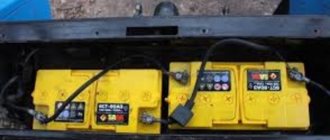
Next you should check the battery terminals. There are two types of batteries used in modern cars:
- With top terminals.
- With side terminals.
In the first case, dismantling is carried out using a regular wrench with a suitable size. If there are spring clamps, the wires are removed using pliers. If the terminals are located on the side, then you need to use combination or socket wrenches as a working tool.
Having prepared the necessary devices, you can begin to unscrew the protective covers and latches. The first step is to remove the negative wire from the terminal, which is required to prevent accidental short circuit when in contact with the metal body of the vehicle. After this, you can remove the positively charged wire. The polarity of the battery is indicated on its case in the form of “plus” and “minus” . The main thing is not to confuse anything.
Then it remains to pull out the battery by the handles or corresponding recesses for transportation.
How to turn a maintenance-free battery into a serviceable one
The time comes and the car owner is no longer satisfied with the characteristics of the battery. If you have a sealed battery, you shouldn’t throw it away and buy a new one. You can make it serviceable if you open the lid using the method we described above. This will allow you to carry out a number of procedures necessary to maintain the functionality of the power source.
The ability to check and change the electrolyte level is one of the signs of battery serviceability. Closed batteries are equipped with an indicator that allows you to see the electrolyte level. Some containers are made of translucent materials or have markings that help you keep track of the amount of solution in all jars. The electrolyte level can be checked using a special tube or syringe by inserting them into the holes made in the lid. The normal amount of solution corresponds to 10–12 millimeters of liquid above the plates.
Do not forget that not only the acid level, but also its density is an important characteristic of battery performance. Data on the density of the solution can be obtained using a hydrometer. Take a syringe, insert it into the hole on the lid and take the electrolyte from the jar. Pour into the hydrometer and watch the readings. Too low a density (less than 1.22 g/cm3 at temperatures up to +6) does not allow the battery to work fully and indicates a small amount of electrolyte and the need to replenish it. Increased density or insufficient level of solution requires adding distilled water.
Battery hydrometer.
Read more about the process of adjusting density in our article: How to use a hydrometer correctly.
Check the electrolyte level using a transparent tube.
Please note that excessive concentration of electrolyte leads to tragic consequences - sulfation and destruction of the plates.
The figure shows the electrolyte density values under various conditions.
After completing the work of adding water or acid solution, the holes in the lid must be sealed with sealant.
Safety precautions
- We strongly recommend using protective equipment when disassembling the power supply. It is strictly forbidden to turn over or shake the jars. This may cause a short circuit.
- If the battery cover is secured with fasteners, be careful not to break them. In the event of a breakdown, the part will have to be glued, and this does not guarantee safe operation of the power source.
- If you want to split the battery using a tool, choose special products that will help protect your eyes from splinters.
Can we safely say that a maintenance-free battery can be made into a serviceable one? Of course, a closed battery can be remade! If the purpose of opening the battery is to extract lead for fishing or hunting, then by observing a number of precautions, you can easily do it with just a hammer.
Important points
After dismantling the battery, you need to pay attention to the condition of the wire terminals and the unit itself. Often these parts oxidize, becoming covered with a white coating. If such a defect is present, it is enough to treat the surface of the battery with sandpaper. It is also necessary to inspect the seat of the device.
If there are various technical contaminants in it, you need to go through it with a scraper or brush.
At any stage of dismantling, it is important to remember safety rules. Under no circumstances should you smoke near the battery, light matches or a lighter, or come into contact with an open flame source. Such an impact can cause damage to the unit, and in the worst case, ignition of vapors from leaked acid.
We recommend: How to properly install a battery in a car
If there is a serial number, model name and other technical characteristics on the battery cover, it is recommended to photograph them or write them down on a sheet. The fact is that this data can significantly simplify the upcoming purchase of a new battery.