9.8. Wheel and tire care
During the operation of the vehicle, it is necessary to timely tighten the wheel nuts to avoid breaking the mounting holes, remove rust from the wheels and touch up the paint.
To ensure the longest tire life, follow these guidelines:
- Maintain the required tire pressure. The pressure is checked on cold tires before leaving. At stops along the way, you should inspect the tires and visually monitor their air pressure. Do not drive with low tire pressure, even for short distances. Do not reduce the pressure in heated tires by letting air out of them, since during driving an increase in pressure is inevitable due to the heating of the air in them;
- perform wheel balancing. At the factory, tire and wheel assemblies are dynamically balanced using weights mounted on both sides of the rim flanges. Checking and balancing wheels and tires should be done on a special stand. The permissible residual imbalance on each side of the wheel and tire must not exceed 100 g on the wheel rim;
- When returning from a trip and at stops, you should inspect the tires and remove foreign objects from them. The vehicle should be parked in a clean and dry place. Do not allow oil, gasoline, or oil-based paint to come into contact with the tires;
- Do not park your car on flat tires;
Tire rotation (Fig. 9.9) should be done as necessary. The basis for rearranging tires may be the need to obtain uniform wear on all tires, including the spare, as well as to ensure the correct selection of tires on the axles. Tires that have equal tread wear should be installed on the axles, with more reliable tires should be installed on the front axle of the vehicle.
The maximum degree of tire tread wear corresponds to a residual groove depth of 1.6 mm, which is determined by measurements or wear indicators. Wear indicators, 1.6 mm high in the form of solid strips of rubber, are located in the tread belts and are marked on the sidewalls of the tire with TWI icons.
When operating tires, you must be guided by the “Rules for the operation of automobile tires” (2004 edition).
Rice. 9.9. Tire rotation scheme
9.12. Types of car maintenance
The following types of maintenance are established:
- Daily Maintenance (EO).
- First maintenance (TO-1) - after 20,000 km.
- Second maintenance (TO-2) - after 40,000 km.
- Seasonal maintenance (MS).
- Seasonal maintenance is performed once a year, together with regular maintenance work on TO-1 or TO-2.
The frequency of the first and second technical services is set depending on the following operating conditions of the vehicle.
| Category of operating conditions | Vehicle operating conditions | Maintenance frequency, km | |
| TO-1 | TO-2 | ||
| 1 | 2 | 3 | 4 |
| I | 1. Highways of I, I, III technical categories outside the suburban area on flat, slightly hilly and hilly terrain, having cement concrete and asphalt concrete pavements. | 20000 | 40000 |
| II | Highways of I, II, III technical categories outside the suburban area in mountainous areas, as well as in small towns and suburban areas (in all types of terrain except mountainous), having cement concrete and asphalt concrete pavements. Highways of I, I, III technical categories outside the suburban area (in all types of terrain, except mountainous), as well as in small towns and in the suburban area on flat terrain with a coating of bitumen-mineral mixtures. 3. Highways of III, IV technical categories outside the suburban area, having crushed stone and gravel surfaces in all types of terrain, except mountainous and mountainous. | 18000 | 36000 |
| III | Highways of I, II, III technical categories outside the suburban area, highways in small towns and in the suburban area (mountainous areas), as well as in large cities, with cement concrete and asphalt concrete pavements. Highways of I, II, III technical categories outside the suburban area (mountainous areas), highways in small towns and suburban areas (in all types of terrain, except flat), as well as in large cities (in all types of terrain, except mountainous ), having coatings made of bitumen-mineral mixtures. Highways of III, IV technical categories outside the suburban area in mountainous and mountainous areas, highways in the suburban area and streets of small towns, streets of large cities (all types of terrain, except mountainous and mountainous), having crushed stone and gravel surfaces. Highways of III, IV, V technical categories outside the suburban area, highways in the suburban area and streets of small towns, streets of large cities (flat terrain) with pavements made of cobblestones and crushed stones, as well as pavements made of soils treated with binding materials. | 16000 | 32000 |
| III | 5. In-plant roads with improved coverage. 6. Winter roads. | 16000 | 32000 |
| IV | Streets of large cities with coatings made of bitumen-mineral mixtures (mountainous areas), crushed stone and gravel coatings (mountainous and mountainous areas), coatings made of cobblestones and crushed stones and soils treated with binders (all types of terrain except flat) materials. Motor roads of technical category V outside the suburban area, motor roads in the suburban area and streets of small towns (flat terrain) with un-reinforced soil surfaces or reinforced with local materials. Logging and forestry dirt roads that are in good condition. | 14000 | 28000 |
| V | 1. Natural dirt roads, on-farm roads in rural areas, intra-quarry and dump roads, temporary access roads to various types of construction sites and places of extraction of sand, clay, stone, etc. periods when traffic is possible there. | 12000 | 24000 |
9.10. Cabin care
The car cabin is painted with single-layer synthetic enamel or two-layer enamel, consisting of base enamel and varnish. For anti-corrosion protection and to prevent abrasive wear, a plastisol coating is applied to the bottom and wheel arches of the cab.
The basis for the durability of the paintwork coating (LPC) of the cabin and its anti-corrosion protection was laid during manufacturing, however, the preservation of the protective and decorative properties of the coating largely depends on timely and proper care, which consists of:
- in timely cleaning of the cabin and treatment with polishing compounds;
- in the timely elimination of damage to paintwork and plastisol coatings;
- in periodic treatment of the cabin with protective compounds.
In this case, you must be guided by the following rules:
- The car cabin must be washed periodically in order to remove industrial and chemical emissions, waste products of plants, birds and animals, de-icing agents, road dust and dirt that fall on it during operation and storage, since they contain chemically active substances that can, both over a long period of time, and, with short-term exposure, destroy the paintwork.
When washing it is prohibited:
- use chemically active compounds and substances that have a negative effect on paint, for example, soda, kerosene, gasoline, solvents, sea water;
- use water containing mechanical impurities;
- Carry out washing in the cold.
It is not recommended to wipe the dry surface of the cabin from dust and dirt, use too coarse brushes when washing, or apply excessive force when washing or polishing, as this leads to abrasion of the top layer and loss of shine of the enamel or varnish.
It is especially necessary to wash regularly when operating on roads treated with salt-based anti-icing agents. In this case, it is also necessary to wash the bottom of the cabin and chassis parts, since mud and salt deposits lead to corrosive changes. Considering that the door flanges, hood, cab flange joints, and welds are especially susceptible to the aggressive effects of salt solutions, it is necessary to regularly wash and clean these areas from accumulated salt and dirt. If salt contaminants are not removed in a timely manner, they, together with moisture, penetrate into the crevice zones with the subsequent development of corrosion.
When washing, it is recommended to use car shampoos. After washing, the outer surface of the cabin must be rinsed with water and wiped dry with a soft cloth.
In order to further protect the paintwork, it is recommended to periodically treat it with polishes intended for this purpose, in accordance with the instructions of the manufacturer of the polishing agent. It is especially necessary to carry out similar treatment for cars stored outdoors.
- If aggressive substances come into contact with the paintwork, they should be removed immediately, and then the contaminated area should be washed with water or special cleaners for caring for paintwork. If the paintwork becomes damaged, it must be restored by polishing using grinding and polishing pastes or painting, depending on the degree of damage
The most common such substances include: - products of plant origin (sap, tree resin, pollen, etc.);
- bird waste products;
- operating fluids (transmission oils, brake fluid, low-freezing fluids);
- battery electrolyte;
- bitumen;
- petrol.
Dust emissions from foundries and metal processing industries, sparks from electric vehicle wires, and sparks from cutting, welding and grinding of metal also have an aggressive effect on paintwork. At the same time, particles of iron oxides, which settle mainly on horizontal sections of the cabin, begin to oxidize at high humidity, destroying the top film of the paintwork, creating the smallest points of corrosion products on the painted surface.
During operation, the paintwork of the cabin, the floor covering, and chassis components are constantly exposed to stones, crushed stone, gravel, sand, etc. This entails various mechanical damage to the anti-corrosion protection elements (paint chips, scratches, abrasive wear).
This primarily applies to wheel arches and arches, the edges of wings, doors and sills, the surface of the hood and chassis components. Therefore, the car must be inspected after washing and if such places are found, as well as other damage to the paintwork, they must be repaired. Failure to promptly repair such damage to the coating will lead to under-film corrosion with subsequent peeling of the paintwork and corrosion damage to the metal.
It is necessary, depending on the operating conditions, but no later than two years after purchasing the vehicle, to treat hidden cavities and areas of the cabin that are most vulnerable to corrosion with appropriate protective compounds, and then regularly check and restore the protective coating in accordance with the recommendations for use protective composition.
It is recommended to store the car in a garage or under a shed. It is forbidden to store the car under rubberized covers or cover it with rubber products, as dark spots may form on the coating that cannot be removed by polishing, and also to cover it with waterproof films or covers during storage.
The side platform of the car is painted with synthetic enamels. The rules for caring for the platform coating are generally similar to the rules for caring for the cabin. It is recommended to wash the onboard platform at the same time as washing the cabin. Considering that the platform coating is most susceptible to damage during the transportation of goods, special attention must be paid to the timely elimination of damage.
The recommended diagram of zones for additional anti-corrosion treatment of hidden cavities of the cabin is shown in Fig. 9.11.
Rice. 9.11. Diagram of zones for additional anti-corrosion treatment of hidden cabin cavities:
1 — closed cavities of the footrests;
2 — door floor; 3 — area where the front wings meet the mudguard; 4 — hood cavity around the perimeter; 5 - door area
9.9. Replacing wheels
Replace the wheel in the following order:
1. Place the car on a solid and level horizontal platform;
2. Brake the car with the parking brake;
3. Place wheel chocks on the side opposite to the wheel being removed;
4. Loosen the six nuts of the wheel being removed;
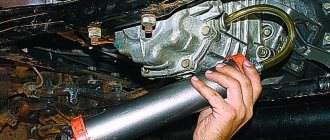
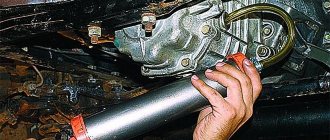
5. Place a jack (Fig. 9.10) under the beam of the front axle or rear axle near the wheel to be removed and turn out screw 2 by hand until it stops against the indicated parts. When lifting a wheel on the ground, it is recommended to place a beam or board under the base of the jack;
6. Turn locking needle 7 all the way to the right (clockwise), insert the knob into lever 5 and swing the knob to lift the car so that the wheel to be removed comes off the road surface by 4–5 mm.
Rice. 9.10. Jack: 7 1 - head; 2 — pull out; 3 and 4 - working plungers; 5 — lever; 6 - injection plunger; 7 - locking needle; 8 - plug
If the jack fails to lift, make several swings with the crank with the shut-off needle 7 open to remove air that could get into the working cavity of the jack.
The lifting of the plungers is limited mechanically; if the force on the lever increases at the end of the lift, stop lifting;
7. Unscrew the six wheel nuts, change the wheel and tighten the nuts;
8. Lower the car from the jack, slowly opening the locking needle 7, turning it to the left (counterclockwise);
9. Tighten the six wheel nuts to the required torque and remove the wedges;
10. Bring the air pressure in the tires to normal.
When using the jack and storing it, observe the following rules:
- To stabilize the vehicle, you should place chocks under the wheels of the opposite side and apply the parking brake.
- It is prohibited to carry out any work under a vehicle that is raised on a jack.
- To perform adjustment and installation and dismantling work, you should lift the car with a jack and lower it onto stands.
- When storing the jack, the screw should be screwed in, the working and discharge plungers should be lowered, and the locking needle should be unscrewed 1-2 turns.
- Fill the jack with clean filtered oil VMGZ-S or MGE-10A to the level of the filler hole.
- At ambient temperatures down to minus 40° C, transformer oil can be used.
- The use of other oils and fluids, including brake fluid, is prohibited.
- It is necessary to correct jack malfunctions in a timely manner. Oil leakage in the plungers and shut-off needle is eliminated by tightening the oil seal nuts. Oil leakage into the connections of the housing parts is eliminated by tightening the housing head. If the seals are worn, they should be replaced.
Failure to operate the jack occurs due to the presence of air in the working cavity or due to stuck valves. To eliminate the malfunction, lightly tap the pressure plunger lever several times and continue lifting. To avoid air getting into the working cavity of the jack, you should not lift the working plunger by hand with the needle closed.
Incomplete lifting of the working jack plunger occurs due to lack of oil. It is necessary to periodically check the amount of oil in the jack and add oil if it is low. The oil level should reach the filler hole, closed with plug 8.
Failure to operate, in addition to the reasons indicated, can be caused by dirt getting inside the jack. To remove dirt, you need to fill in clean kerosene instead of oil and bleed the jack with the shut-off needle turned off, then remove the kerosene and add oil.
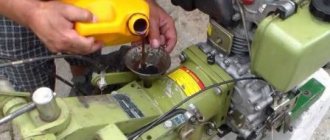
9.2. Checking the oil level in the gearbox and rear axle
Checking the oil level must be done with the vehicle unloaded, placed on a level surface, and with the units cooled down. The oil level in the gearbox should be level with the lower edge of the filler hole - fig. 9.2.
Rice. 9.2. Checking the oil level in the gearbox:
1 — drain plug; 2 - filler plug
The oil level in the rear axle (Fig. 9.3) should be at the level of the lower edge of the filler hole.
Rice. 9.3. Checking the oil level in the rear axle:
1 — drain plug;
2 - filler plug
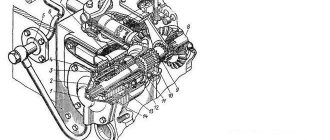
9.4. Checking the wear of the brake pads
There are markings on the moving brackets 1 of all disc brake mechanisms (see Fig. 9.5).
By the position of the marking point “P” on the movable bracket 1 relative to the flange “R” of the fixed caliper 2, you can determine the thickness of the brake pad without removing the wheel.
In Fig. 9.5 “A” shows the position of the “P” mark with new pads. If the position of the mark corresponds to that shown in Fig. 9.5 “B”, then you should check the thickness of the friction linings and brake disc with the wheels removed. In addition, to determine the wear of the friction linings, a wear limit sensor is installed in each disc brake. When the wear limit of the pads of any of the brakes is reached, a warning light on the instrument panel lights up. Replace brake pads only at service stations.
Rice. 9.5. Checking the wear of the brake pads
How to extend the service life of a CUMMINS engine Prevention Gazelle
The general consensus is that the expected service life of a Cummins engine is up to 700,000 thousand km. If you do the right things, you can control the life of your engine. For those approaching these numbers, or for those looking to extend the life of their Cummins, this article is dedicated. How to increase the life of your engine? First of all, if you take care of your engine, it will take care of you. So, without further ado, here is a quick guide to general maintenance to keep your engine healthy.
Common Cummins maintenance tasks:
- Regular oil changes
- Fluid replacement
- Replacing the air filter
- Replacing the fuel filter
As for filters, it is probably a good idea to replace them according to the manufacturer's recommendations. You can find such information on the packaging or on the manufacturer's website.
What to do and what not to do...
It's a well-known fact that an ounce of prevention is worth more than a cure, so perform preventive maintenance to avoid wear and tear. Also pay special attention to the fuel injector, replacing the injector will save you money, don't wait until it eventually cracks. Another helpful tip is to add a bottle of diesel every time you fill the tank. This will prevent the diesel fuel from becoming saturated with impurities floating around your tank, which will prove beneficial to your parts.
Do not drain engine fluids until they are at a cool temperature. Diesels tend to run much hotter than gas engines, and if they are hot, it can cause serious injury and, more importantly, engine damage.
Key diesel engine components to watch out for...here's a short list of symptoms to look out for:
Gasket leak:
The extreme pressure your gaskets endure can cause them to wear out. If the engine produces a high-pitched sound, then there is a chance that it could be the diesel fuel pump. Different pumps will make different sounds, but this gives you a reason to start checking.
Thick smoke:
If you see a trail of thick smoke following you from your rearview mirror, the color of the smoke may reveal the source of the problem.
- Black: Diesel injector, pump or air filter is faulty.
- Blue: Engine oil burning.
- White: Possible water ingress into the engine or low compression.
If you notice or recognize any of the above symptoms, it may be worth consulting with one of our auto mechanics. General maintenance of your engine can extend its life.
9.3. Checking the coolant level
Check the coolant level in expansion tank 2 (Fig. 9.4) only on a cold engine. The fluid level in the expansion tank must be no lower than the MIN mark and no higher than the upper edge of the clamp.
Rice. 9.4. Checking the coolant level in the expansion tank:
1 - plug; 2 - tank
Add coolant through the opening of the expansion tank, which is closed with a plug. When frequently adding fluid, it is necessary to check the tightness of the cooling system.
9.6. Checking the electrolyte level in the battery
The electrolyte level in the battery should be between the MIN and MAX marks (Fig. 9.7) marked on the translucent battery body, and if they are absent, along the lower edge of the filler hole.
Rice. 9.7. Accumulator battery:
1 - cover; 2 - plug; 3 - filler hole
If the electrolyte level is below normal, it is necessary to remove cover 1, unscrew plugs 2 and through holes 3 add distilled water to the battery cells to the normal level; then tighten the plugs 2, having first checked the cleanliness of the ventilation holes in them and install the cover 1. After this, you need to wipe the outer surfaces of the battery with a clean rag soaked in a 10% solution of ammonia or baking soda.
It is necessary to constantly monitor the cleanliness of the battery terminals and wire clamps, as well as the reliability of their connections.
When installing the battery on a car, you must ensure that the wires are connected in accordance with the polarity indicated on their tips and battery terminals (the positive terminal is greater than the negative one).
Before installation on the vehicle, the batteries are charged to a density of 1.25–1.27 g/cm3. Depending on the climatic region in which the vehicle is used, the electrolyte density must be adjusted (see the battery operating instructions).
When parking the car for a long time, disconnect the battery from the car body to ensure fire safety.
To avoid failure of some electrical equipment, it is not allowed to disconnect the battery while the engine is running.