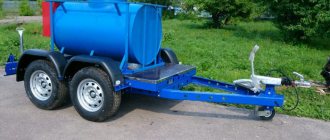
Many farmers are interested in how to make a homemade trailer for a mini tractor. Most rural residents appreciated agricultural machinery, but only more economical and compact ones, such as a mini-tractor. With such a vehicle you can not only plow, loosen the garden, mow grass and remove snow, but also transport various loads. And for this type of work you need to have a convenient and reliable trailer. Many people do not dare to buy such a simple but expensive product on the Russian market, but try to do it with their own hands. But where to start and how to make a tractor trailer with your own hands?
Photo: alexhobby.ru
Requirements for a car trailer according to GOST
The first thing a person who has decided to independently manufacture a car trailer needs to know is that it, like any vehicle, has certain requirements. In this case, all requirements are described in detail in GOST 37.001.220-80, which is called “Trailers for passenger cars.” In order not to burden car enthusiasts with reading the primary source, it is worth making a selection of relevant information specifically on the issue under discussion.
So, a car trailer must meet the following requirements:
- The weight of a passenger car trailer should not exceed 1.8 tons. However, it should also not exceed half the weight of the towing vehicle.
- The static load indicator on the central part of the ball joint of the coupling device should be from 25 KGS to 100 KGS.
- The total length of the trailer cannot exceed eight meters, the width cannot be more than two hundred and thirty centimeters, and the height limit is three meters.
- The ground clearance of the trailer should not be less than the vehicle towing it.
- For a passenger car trailer, it is intended to use one axle. A possible option is two parallel axes located at a distance of no more than one meter from each other.
- For insurance purposes, the towing coupling device is equipped with two non-removable sections of cable or chain, which insure the structure if the coupling becomes disconnected as a result of a hinge failure.
- The mandatory equipment of the trailer being used must include wheel chocks. It is stipulated that they do not have to be factory-made.
- The design must include fenders and mudguards if body parts do not perform this function.
- The towbar must be of factory origin and have an appropriate certificate.
- Fastenings must be provided to secure the license plate.
- To connect to the vehicle's on-board network, a cable with a plug must be provided; the electrical circuit diagram is regulated by GOST 9209-76.
Neutral transmission on an automatic transmission: why is it needed, when can and cannot be turned on
- Bulk cargo is transported only on special trailers designed for such purposes. Another reason to buy rather than assemble it yourself;
- An awning, plastic cover or other covering is placed on top of the body;
- The absence of a protective awning does not allow transporting bulk cargo above the level of the edge of the side. Operation without an awning leads to the loss of cargo, its spilling onto the road and creating a danger for cars that pick you up;
- Observe the speed limit when driving with a trailer;
- Do not exceed the established trailer load capacity;
- To transport bulk cargo, the trailer must be equipped with rigid sides. Preferably galvanized.
All this is provided initially at the factory. When converting a conventional trailer, problems and difficulties sometimes arise.
If you don’t want to modernize, but your plans include the need to transport different types of cargo, including bulk cargo, then it’s better to initially buy yourself a trailer equipped with a dumping mechanism.
This choice will allow you to use one trailer for different purposes, rather than redo something and create unnecessary problems for yourself.
Thank you all for your attention! Subscribe to our website, leave comments, ask questions and invite your friends to join us!
Required tools and materials
So, before you start assembling the desired structure, it is worth preparing a number of tools and materials that will be required at various stages of assembly.
- Steel channel for the frame.
The optimal channel size for assembling a car trailer frame is 25x40 mm. It is also possible to use a square pipe with dimensions 40x40 mm. The length of the material is selected individually based on the design features. - Sheet steel for body sides.
The thickness of the sheet steel from which the body sides will be made should be about 1 mm. The dimensions of the required sheets should also be calculated based on the dimensions of the finished structure. - Thick plywood.
The bottom is made from it, therefore, the thickness should be chosen with a margin for sufficient strength. - Chassis.
Everything here relies only on the imagination of enthusiasts. For example, the use of suspension elements for Moskvich, Volga, ZAZ, etc. cars is quite popular. Attempts are often made to build a trailer on the classic “Zhiguli” bridge. - Elements of electrical equipment.
Wiring, brake lights, direction indicators, dimensions. Nowadays there are often ready-made solutions specifically for car trailers on the market. In this case, rear lights from onboard UAZs and Gazelles are often used. - Fastening elements.
It all depends on the design features. It is worth noting that in order to increase strength, you should not skimp on bolted connections. - Hand tool.
The minimum set of hand tools includes the following. Hammer, pliers, wrenches, drill, jigsaw and grinder. Depending on the design features of the trailer, the tool can either be replenished or reduced. - Welding machine.
Actually, the element, without which assembling the trailer will simply be impossible, you will also need to find either an experienced welder or have the necessary skills yourself.
Trailer installation for tractor
Before you start creating your own trailer, it is important to know its structure and design features. Consists of the following parts:
- flatbed body;
- several wheels and chassis;
- base - metal frame;
- mechanism for lifting the body;
- trailed for connection to a tractor.
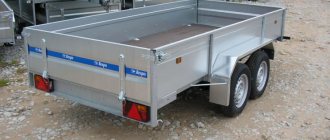
Also, depending on the scope of use and required characteristics, there are two types of trailers:
- With one axis - the simplest and most popular model, especially relevant for transporting bulk or other materials;
- With two axles - they have a powerful design and therefore allow you to transport heavy loads and materials.
Step-by-step instructions for making a homemade trailer
Once the entire set of materials and tools has been assembled, you can proceed directly to assembling the structure.
The instructions will allow you to do everything quickly and efficiently.
- The first thing the trailer assembly begins with is the frame;
in fact, it acts as the load-bearing part of the structure. Accordingly, it is subject to special requirements for strength and reliability. To begin with, the channel or pipe is cut into pieces of the required length, after which a rectangular or square base is welded from them, to which the sides will be attached. Particular attention should be paid to the quality of welding seams, since it is at this point that, as a rule, the main problems arise in home-made structures. The coupling device is mounted in the front part of the frame, and eyes for shock absorbers are installed in the middle. - Body assembly begins with the frame of the sides.
Vertical posts are installed first, then horizontal ones. It is separately recommended to strengthen the sides with additional stiffening ribs, since during movement, especially on bad roads, the elements may experience high loads. Additional stiffeners can be either vertical or horizontal. - Installation of trailer chassis.
This process has a lot of subtleties. For example, the axle should be moved closer to the rear of the trailer. In general, any peculiarities in the installation of the chassis are caused rather by the design features of the elements that the car owner chose to test. Eyelets for shock absorbers and reaction rods are welded to the frame; it is unacceptable to neglect the latter, since they serve as retaining elements of the bridge. - Sheathing of the sides and bottom is carried out at the final stages.
Sheet steel and plywood are excellent for this. First of all, the bottom sheathing elements are cut out with a jigsaw, and they are secured using bolts. Next, the side cladding is made from sheet steel. It is noteworthy that it can be secured either by welding, for example, or using aluminum rivets, which are quite affordable for purchase. - Installation of electrical equipment.
The following should be installed on the rear wall of the trailer: red reflective triangles, license plate lights, reversing lights, brake lights, direction indicators and clearance lights. There should be orange reflectors on the side. The front wall provides for the installation of white markers and reflectors of the same color. It will be much more effective to use ready-made wiring solutions. Be sure to use a protective corrugation for the wires. All connections must be tight and reliable. It is most convenient to attach the wiring harness to the frame using special plastic clamps.
- Anton.
I assembled the trailer with my own hands on the Moskvichevsky bridge. I was pleased, it was just right for the village. There is only one piece of advice: if you don’t know how to use a welding machine, then you shouldn’t take it on; bolted connections are inappropriate here. - Kirill.
I assembled the trailer from scratch, the taillights fit perfectly with the gazelle, and a friend welded the frame. The main problem was with the installation of the bridge. I had to tinker with it, several times I even went to the dealer to see how the “Kurgan trailer” worked. Be prepared to spend a lot of time and effort, and carefully weigh the pros and cons.
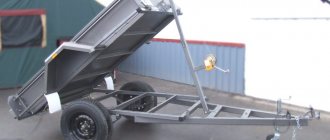
Fig.1. Homemade dump trailer:
1 — coupling device, 2 — spare wheel, 3 — lock, 4, 7, 10 — body sides, 5 — mudguard, 6 — signal light, 8 — valve, 9 — coupler, 11 — wheel, 12 — body spar, 13 — lifting device fitting, 14 — spare wheel cradle, 15 — trailer frame, 16 — body hinge.
I bring to the attention of readers a dump trailer with a tipping body. By making one for yourself, you can get rid of problems when unloading it.
A few words about the design of the trailer.
Its frame is welded from steel pipes with a square section of 40x40 mm, the bridge is from an SZD motorized stroller, using spring-hydraulic shock absorbers of a Ural motorcycle. The bridge is attached to the frame using struts, also welded from square pipes.
Fig.2. Lifting mechanism of a homemade trailer:
(A - transport position of the body, B - position of the body during unloading): 1 - connecting hose, 2 - fitting of the lifting device, 3 - support platform, 4 - rings, 5 - pneumatic chambers, 6 - cover.
The trailer is equipped with a standard ball hitch designed to accept a ball with a diameter of 50 mm.
Fig.3. Connection diagram of pneumatic chambers:
1 - chambers, 2 - threaded pipe, 3 - nuts, 4 - washers.
The body is assembled from panels, each of which has a frame made of 30x30 mm steel corners and a 12 mm thick plywood sheathing with M6 screws and nuts. Two spars made of wooden beams with a cross section of 120x30 mm are attached to the bottom. The body is attached to the frame using a hinge, the mating parts of which are welded to the frame and screwed to the side members; in the front part there is a lock, reminiscent of a regular latch, which prevents the body from tipping over while driving.
Fig.4. Mounting diagram for the lifting device fitting:
1 - cover, 2 - pneumatic chamber, 3 - angle ring, 4 - nuts, 5 - washer, 6 - support platform, 7 - lifting device fitting, 8 - connecting hose, 9 - clamp.
Now about the main thing - the design of the lifting device. It is pneumatic, driven by the engine exhaust system. Under the bottom of the body, between the side members, there are three car cameras in a case made of durable fabric - tarpaulin or synthetic canvas, attached with M5 screws to rings made of steel angle on the bottom of the body and on the frame. All chambers are connected to each other using threaded pipes, nuts, gaskets and washers, and a fitting bent in the shape of the letter “L” is screwed to the bottom, onto which a rubber hose is pulled.
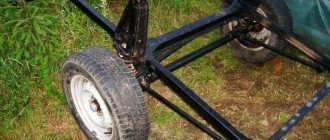
Fig.5. Homemade trailer chassis:
1 - coupling device, 2 - frame spar (steel pipe 40×40), 3 - fixing device ear, 4 - body hinge, 5 - rear strut, 6 - front strut, 7 - wheel, 8 - rear cross member, 9 - suspension torsion bar axle, 10 — front cross member, 11 — bolts, nuts and washers securing the front strut, 12 — bolts, nuts and washers securing the bridge, 13, 14 — docking clamps.
To lift the body, you need to put the second end of the hose on the exhaust pipe of the towing vehicle and “add on the gas.”
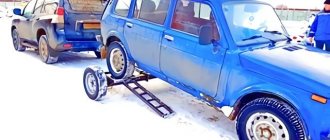
Two or three minutes - and the body will rise. To lower the body, it is enough to remove the hose from the exhaust pipe. I. Khoroshevsky Light car trailers are popular among rural residents, summer residents and private construction crews. These units simplify the transportation of goods of different directions. You just had to unload it all with your own shovel, if it weren’t for the dump truck trailer for the passenger car. A trailer with a lifting body box will save you from annoying unloading work.
How to make a homemade trailer hitch for a walk-behind tractor
If you decide to make a homemade trailer hitch for a walk-behind tractor, then let's get down to implementation. To make this trailer, you will have to spend several days of work. The trailer's carrying capacity was calculated based on the weight of the transported cargo of 400-450 kg. When tested, the trailer could easily hold 6-7 bags of potatoes.
There were no problems with overload. The trailer was designed for transporting goods in bags, so there are no folding sides.
We think through the constructive part of the project in advance. The trailer will consist of a fairly durable carrier, a body, a frame made of steel corners and reliable wheels.
- Bracket for walk-behind tractor attachments;
- Console;
- Tow hitch;
- Step, use board s20;
- Driver's seat, use s20 board;
- Frame;
- Body, use s20 board;
- Support beam, we use three 50x50 beams;
- Bolt M8;
- A persistent ring, we use a 58x4 pipe;
- Two wheels removed from an SZD motorized stroller.
The trailer hitch for a walk-behind tractor consists of several parts. We connect the different parts together by welding. The junction of the drawbar and the turning part is the most loaded, so we reinforce this place with additional stiffening ribs.
To make the frame we use scraps of round and rectangular pipes and steel angles. The design will be slightly intricate, but with an additional margin of safety. The reason was the difficult terrain and difficult operating conditions of the trailer.
1. For bracing we use a corner 21x21x3; 2. We also make the frame for the seat from a 21x21x3 corner; 3. We make the riser from a pipe 50x25x4; 4. We make the seat posts from a 40x40x4 corner; 5 and 14. For the front struts we use a 50x25 pipe; 6 and 15. For longitudinal spars we use a corner 40x40x4; 7 and 8. We make the right wheel axle supports from a 32x32x4 corner; 9 and 16. We make the rear struts from a 50x25 pipe; 10. To make a reinforcing cross member, we use a 40x40x4 corner; 11. We make the body of the longitudinal hinge from a 58x4 pipe; 12. To make the wheel axle we use a rod with a diameter of 30 mm; 13 and 17. For transverse spars we use a corner 40x40x4; 18. To make a scarf, we use metal s4.
If large loads on the trailer are not planned, you can make a simpler option.
- Rotary housing;
- For the drawbar we use a pipe 49x3, L1820;
- For the frame of the footrest we use a corner 25x25x4;
- For support we use a 58x4 pipe;
- For the stiffener we use s4 steel;
- For the lining we use a 25X4 strip.
Wheel axle for trailer to walk-behind tractor
To make the wheel axle we use a steel rod with a diameter of 30 mm. We connect it by welding to the side members and the body of the longitudinal hinge, using corner gussets and supports. The wheels should not protrude beyond the dimensions of the body, so we choose the correct axle size. The body is knocked together with 20 mm boards and reinforced with a steel angle. Next, it is attached to the frame with three strong, supporting beams of 50x50 timber.
https://youtube.com/watch?v=tD8pjrbcRtQ
The center of gravity of the transported cargo must be closer to the front, as is customary for single-axle trailers. The wheels are taken from an SZD motorized stroller. They are used assembled with the hub, and the ends of the axial rod are machined in accordance with the diameter of the hub bearings.
Trailer hitch
To connect the trailer to the walk-behind tractor, a tow hitch is made. The shape of the upper part of the console is taken from the hiller holder, since the standard attachment bracket will be used for fastening. The swivel assembly of the tow hitch is fixed around the axis in the lower part. Between the angular contact bearings, the remaining space must be filled with grease and covered with anthers.
We make the connection between the towbar and the trailer articulated, depending on the complexity of the trailer’s operation. The drawbar must be inserted into the tubular body of the longitudinal joint and secured. This solution will allow the trailer to be independent of the wheels of the walk-behind tractor, which makes it very easy to control the trailer on strong uneven surfaces.
The components of the carrier rotating assembly are:
- tow hitch (1),
- anthers (2),
- bearings 36206 (3.6),
- body (4),
- spacer sleeve (5)
- remote (7),
- washer (8),
- nut m20x2.5 (9),
- oiler (10)
- drawbar (11).
There is a seat for the driver in the front part of the body. It is made with a very soft base. So that the driver can rest, a step is made on the drawbar. In other words, the driver uses the control levers with his hands, and rests his feet on a special footrest.
Features of dump truck trailer
Trailers for passenger cars come in several types and with different load capacities. All of them perform their main function - transporting things and cargo. Among the vast number of such units there is a tipper trailer for a passenger car. The front part of its body rises, which makes it easier to unload bulk cargo or load and unload motorcycles and special equipment.
Kurgan trailer Krepysh 8213 03
This may seem strange to some, since dump trailers are more often associated with heavy-duty truck units. But the technology for creating dump trailers for passenger cars has been mastered by manufacturers for decades. These units have the following characteristics:
Dimensions:
- Length – from 3 to 4 m.
- Width – from 1.5 to 1.7 m.
- Side height – from 0.3 to 0.4 m.
Equipped with additional equipment:
- Awning or frame.
- Snowmobile ramps.
- White fog lights or triangular reflectors.
- Multifunctional. They are good for transporting solid or bulk materials for construction, equipment, furniture and other goods.
- Suitable for transporting motorcycles.
Kurgan trailer "Universal Plus 8213"
Body and frame with a movable (hinge) joint that prevents the body from tipping over when moving. The joints are welded to the frame structure and screwed to the side members; a latch-type latch is installed at the front.
How to choose a dump trailer
Before purchasing a trailer for a dump truck, take into account the conditions of use: city, highway, off-road, since car trailers are equipped with different suspensions designed for different conditions of use:
- The torsion bar takes turns with ease and is not whimsical.
- The leaf spring is good on the highway and off-road. Durable and easy to repair, but expensive to maintain.
Main criteria for choosing a trailer:
A trailer for a passenger car, a dump truck, can be:
- Buy. Many factories produce trailers with a lifting mechanism. Such units are created in accordance with GOST, so state registration will not be difficult.
- Build from scratch.
- Convert a flatbed trailer.
- Making it yourself: a dump trailer for a passenger car with your own hands is not difficult, but if you don’t have the skills, it’s better not to assemble it. If a dump trailer for a passenger car is made according to the requirements with your own hands, it will not be inferior to its analogue from the factory.
Pay attention to the following aspects:
- Components (imported ones last longer).
- Perform test loading and unloading to check the convenience and reliability of opening and closing the locking mechanisms.
- Take it for a test drive if possible.
- If you have car wheels with tires lying around in the garage, like the model you are buying, check out the possibility of purchasing a unit without wheels.
- Watch videos, options for modifications to on-board models, and study products from popular manufacturers.
Recommendations for use
Since we are talking about dump trailers as vehicles for transporting bulk cargo (although you can transport whatever you need), pay attention to a few recommendations regarding proper operation.
Compliance with them will allow you to avoid unnecessary fines and not create a danger on the road for other road users.
DIY dump trailer
One of the options for making a dump trailer for a car with your own hands:
- Regarding the design:
- Steel is selected to make a frame with a square section of 4x4 cm.
- The chassis is borrowed from a motorized stroller.
- Hydraulic shock absorbers with springs of the Ural motorcycle form the suspension.
- Tube struts connect the bridge to the frame.
- The unit is equipped with a standard coupling head.
- Body box - steel corners 3x3 cm and plywood sheathing 1.2 cm. Nuts with M6 screws are used for fastening.
- Two longitudinal spars made of wood 12x3 cm are fixed on the bottom.
- A hinge mechanism is used to secure the dump body box to the frame. It is welded to the spars or traverses, depending on where the unloading will take place.
- There is a lock in the front in the form of a latch, which prevents tipping over when moving.
- To organize pneumatics for tipping, three machine chambers in a thick cover made of canvas or tarpaulin are located between the side members on the bottom. They are attached using M5 screws to the rings from the corner located on the frame, the bottom of the body box.
- The chambers are connected using threaded pipes, nuts, gaskets, and washers.
- An L-shaped fitting with a stretched rubber hose is screwed to the lower chamber.
- Tipping is done by threading the other end of the hose onto the exhaust pipe, which will raise the body box in three minutes. Lowering - by disconnecting the hose and deflating the chambers.
Video about a homemade trailer body lifting mechanism
Types and features of coupling devices
A hitch is an element made of durable metal, designed for attaching additional equipment to agricultural machinery. In general, the hitch consists of a stand, a clutch housing with a screw and a handle, staples and pins, and these elements are fastened together using bolts and nuts.
There are several types of coupling devices for walk-behind tractors.
- The APM hitch is used when cultivating the land with a plow or hiller and harvesting the crop with a digger. The coupling for the Neva walk-behind tractor in this case is carried out with only three bolted connections.
- Thanks to its design, the universal hitch is capable of lifting the walk-behind tractor so that the plow or hiller enters perpendicularly into the soil. In addition, with its help you can attach not one, but two or even three canopies. The universal hitch is equipped with a mechanism for adjusting the angle of inclination in all planes.
- The “MK” coupling device is designed exclusively for cultivating crop lands with “Krot” and “ON” walk-behind tractors.
- Homemade couplings of various designs are used in cases where original devices cannot be purchased for some reason.
Review of manufacturers and models
Plant of passenger car trailers "Vector".
- LAV-81011V:
Trailers manufactured by LAKER.
- Heavy Duty 400:
- Eurotrailer LLC model 711914-ATHOS, tilting backwards with a load capacity of 2 tons. Equipped with an electric jack and a 1.5 m awning. Involves the installation of a mesh superstructure.
- LLC "Trailer" model 829450 with a carrying capacity of 0.48 tons, body dimensions - 3x1.5 m. Equipped with a low or high awning and a hydraulic jack.
- Plant of passenger car trailers "Vector" model LAV 81012A - a platform with a folding ramp and spring suspension. Load capacity – 0.6 t.
- LLC Trading House "SaranskSpetsTekhnika" model SST-7132-6K - single-axle trailer with expanded functionality, load capacity -0.54 tons.
Comparison with conventional flatbed trailers
Why is a dump trailer for a passenger car more profitable:
- A dump truck trailer for a passenger car is suitable for transporting bulk substances: sand, gravel or soil, since its design allows you to instantly unload large volumes. Dump trailers for passenger cars are excellent where it is necessary to transport crops: grain, root crops; boards, earth, hay.
- Such trailers appeal to owners of self-propelled vehicles, since the tilting body box with a hinged tailgate ensures easy loading and unloading of motor vehicles.
- In flatbed trailers, the frame and body are one-piece, so the entire trailer tips over backwards. Inconvenience comes with danger, so unloading bulk materials from flatbed trailers is not recommended. The essence of the dump unit is a movable connection between the frame and the body.
ATV Mounts
Among specialized samples, fasteners designed for ATVs are very popular.
The set of accessories includes traps for the front wheels, as well as a locking lock. The advantage of such a mechanism is its ease of maintenance. All elements are quick-release, which greatly simplifies the process of loading and unloading equipment.
Pros and cons of a dump trailer
Advantages of tipper passenger car trailers:
- Simplified loading and unloading.
- Minimal physical effort required by a person during unloading.
- Body lifting speed control.
- Ability to work with different loads.
- The mechanism can also be installed manually.
- The trailer structure is not damaged.
Video about the Kurgan dump trailer Krepysh
As for the cons. There are almost none:
- Hydraulics consists of hydraulic cylinders and a hydraulic pump. It’s difficult to create it yourself, but a purchased sample will be affordable.
- There are also a lot of problems and troubles with hydraulics and pneumatics.
If you plan to frequently transport various cargo and equipment, but there is no desire to modernize, purchasing a trailer with a tipper mechanism is an excellent option. This choice will protect you from alterations and the creation of unnecessary problems. It will allow you to use one trailer to transport the necessary cargo and equipment.
Travelers need a caravan on a long journey; it allows them to take with them all the necessary things, and there may be a lot of them. Industrial trailers are presented in a wide range, but they have one significant drawback - a fairly high price.
To save money, you can make a trailer for a car with your own hands; for this you will need to draw up a drawing, purchase the necessary material, and have the tools for manufacturing available.
Mounts for motorcycles and bicycles
To install two-wheeled equipment on a trailer platform you will need a simple device. The mechanism consists of a special trap that securely holds the wheels and auxiliary parts. Such devices most often include additional stops and belts. Professional devices are equipped with adjustable locking mechanisms.
The same principle applies to mounting bicycles on a platform. The difference is the size of the traps.
How to attach the motorcycle:
Trailer material
Often, in the garages of car owners, various rubbish lies as unnecessary cargo, which is a pity to throw out, but it has not found any use. You need to dig into these things and see if maybe something will be suitable for making homemade goods. What may be useful:
- wheels and springs from an old car, disassembled for parts;
- pieces of sheet iron;
- channel or corner;
- various fasteners (nuts, bolts);
- pieces of automotive electrical wiring.
You need to decide for yourself what the load capacity of a car trailer (AT) should be - the car’s passport details indicate what the maximum weight of the trailer is designed for. If some material is missing, you will have to purchase it in addition; you will also need a plug to connect the car's electrical wiring to the AP.
Do-it-yourself trailer for a car: drawing up a drawing
When all the necessary material has been collected, you can begin drawing up the drawing. It is not very easy to draw a sketch of a future product on paper yourself, so to make the task easier, you can take a ready-made drawing from the Internet as a basis, and make your own adjustments to it as you create the design. The car owner should also remember that the homemade product will have to be registered with the traffic police, and it is important to note that the coupling device can only be used here as a factory-made one.
For example, a drawing of the Zhiguli AP can serve as a model for a future trailer, if the vehicle itself is similar in size and carrying capacity to this car model. Any car trailer consists of the following main parts:
- body;
- frames;
- drawbar;
- coupling device.
In any case, the frame must be rigid, so it is made of durable steel. As a rule, the body is also made of ferrous metal, but it can also be aluminum or wood.
A homemade trailer for a passenger car usually has one axle, but it can also be biaxial. The main advantages of a two-axle trailer are:
- road stability;
- large load capacity.
But the two-axle design has its drawbacks, such a trailer:
- more difficult to control, especially during manual maneuvering;
- weighs quite a lot;
- less mobile.
When making a homemade product, it should be taken into account that a single-axle AP should be designed for transported cargo weighing no more than 750 kg. The rules for operating vehicles with trailers also state that the load on one wheel cannot exceed 700 kg.
Caravans vary according to type of use:
Trailers are often equipped with an awning; motorhomes, which are very convenient for long journeys, are also popular among motor tourists. True, to transport such a design, a passenger car must have sufficient carrying capacity; crossovers and SUVs are well suited for towing.
Creating a Frame
The process of creating a frame is quite simple, especially if you worked with an angle grinder and steel profiles. First of all, we take the necessary measurements and weld all the parts.
But it is important to take into account that the surface of the profiles must be flat, otherwise the sheets will be placed awkwardly and crookedly. The bottom itself can be made from plywood, but it must be thick enough
Fastening should be done with screws to the frame; the screws should not protrude on the surface, otherwise this will create discomfort during unloading. For better results, some experts treat the bottom surface or install a thin sheet of metal. Wheels for an ATV trailer are selected at your discretion and based on which axle is used. Car wheels are usually used, but they must be of small radius and not too heavy. Otherwise, the trailer will turn out to be heavy and it will be difficult for the equipment to drag it when loaded. A simple trailer should weigh 50 kg
Also note that it is not possible to register such equipment, since the ATV does not require the use of a trailer due to the lack of a differential
The cost of an industrial car trailer for a passenger car
Industrial trailers have different prices, the price depends on:
- on the complexity of manufacturing;
- dimensions;
- quality of materials used;
- type (purpose);
- configurations
The simplest general purpose trailer will be the cheapest in terms of cost, for example, you can buy a trailer of the LAV-81011 model from on average for 40 thousand rubles. The characteristics of this design are as follows:
- own weight – 175 kg;
- weight of transported cargo – 525 kg;
- The maximum weight of a loaded aircraft is 700 kg.
The trailer has dimensions of 2.9/1.6/1.28 m (length/width/height) and has a very good ground clearance of 167 mm. LAV-81011 is equipped with an awning, its height is 0.45 m. The sides of the body of this model can be folded down or completely removed; there are two modifications.
There are trailers that are much more expensive, for example, a trailer for transporting boats costs on average from 200 to 350 thousand rubles.
Tool for making a homemade trailer
To make homemade products, designers primarily use welding; there are motorists who only use it. Using gas welding, you can not only weld structural parts, but also cut pieces of metal of the required size with a cutter.
Even when assembling a homemade structure, the following is often used:
- angle grinder (grinder);
- automotive tools (spanners and socket wrenches, sockets with wrenches and extensions).
Having drawn up a drawing, the DIYers first begin to manufacture the frame. To assemble it, a steel channel is very often used, so that the metal can withstand loads well; its cross-section must be at least 25x50 mm. Also, the frame is often made of a metal pipe, but it is more convenient to work with a channel.
The rolled metal is first cut to the dimensions specified in the drawing, then the sections of the channel profile are welded together. After welding the main body, the frame should be reinforced with additional stiffeners, otherwise the structure will be unreliable.
If you plan to create a trailer on springs, brackets should be welded to the frame. The springs will be attached to the frame base with bolts and nuts, and the axle and springs will be connected using stepladders. The brackets are welded with a slight offset to the rear of the structure, this ensures the greatest stability of the homemade trailer.
Next, a drawbar should be welded to the frame, and a towbar should be mounted at its end. If the connection point between the trailer and the car is made too long, driving the trailer will not be very convenient, and it will be especially difficult to maneuver in reverse. The drawbar must be welded strictly in the center, otherwise the trailer will pull to the side. Even for a single-axle design, it is necessary to distribute the weight so that the main load of the empty AP falls approximately on the bogies; the heavier the carts, the force on the coupling device will increase, and it will be under constant tension.
A part of the coupling device is installed at the end of the connecting unit; the tow bar can be rigidly attached to the drawbar by welding, or with bolts and nuts.
Next you should work on the body; the easiest way is to make it from plywood or wood. The plywood floor is screwed to the base with bolts and nuts; the sides are better made of a more durable material - wood or sheet iron. It would also be a good idea to cover the floor with sheets of iron; plywood can quickly become scratched and become unusable.
But the assembly of the trailer does not end there; it is still necessary to install the rear lights and connect the wiring. Two-axle trailers are often equipped with brakes; the braking system makes driving the vehicle easier. It is especially important to install brakes on a trailer for transporting heavy loads weighing more than 1400 kg.
An AP is often necessary for transporting bulk cargo - river sand, gravel or crushed stone. Unloading construction materials from a regular body is inconvenient - unloading takes a lot of time. You can make the task easier by installing a dump-type body on the trailer, with a reverse tipping mechanism.
The frame and axle in this design have a movable connection, and a manual body lifting mechanism is installed in front.
You don’t have to install the mechanism, but then you need to weld a support in front. In this option, the body will tip backwards under its own weight when the locking device is removed.
For a homemade dump truck trailer, it is important that its sides tip over.
To connect the trailer to the car body, you need to install a tow bar on the car. A towbar for a car consists of parts:
- hinge with hook;
- power beam;
- sockets for connecting wires.
The industry produces towbars of various designs; there are trailer hitches in which the hook is welded to the beam, and together with the hinge it represents a single, monolithic structure. But more often hinges are produced with a removable hook, and this version of the device has the advantage that in case of damage to the coupling joint or wear of the ball, the coupling can always be replaced.
There are also trailer hitch systems where the ball can be removed from the hook and replaced separately. Many towbars are equipped with a safety device that prevents complete loss of connection between the car and the trailer; it is necessary for safety.
We continue assembly work
After you have made the grating, two longitudinal pipes are welded to it, in the upper part of which a 25x25 mm trim is made and connected by welding. A do-it-yourself trailer for a walk-behind tractor, the photo of which you see in this article, has folding sides. This solution is most preferable and to implement it, the frames are made separately from the frame. Thin sheets of steel can be used as material for the sides.
Now we need to make a beam. To do this, you will need two channels that are inserted into each other. One of the ends must be equipped with wheel axles. Now we will need pre-prepared springs with which we will connect the spar. To do this, the end of the springs is put on the axis of the earring and the axis of the beam, and the central part is welded with stepladders to the same beam. All that remains is to make a drawbar from 60x30 mm pipes. To do this, the pipes are joined and welded to the trailer, and the rear parts are welded to the side members.