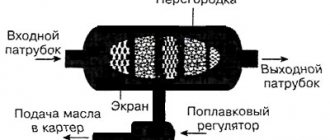
For any all-terrain vehicle, the decisive condition for excellent cross-country ability is the use of the right tires.
But the cost of a suitable kit is considerable, because it is often produced either in small quantities or by special order.
But it is quite possible to make low-pressure tires yourself . This work is labor-intensive and requires patience and attention. The finished product has a characteristic name - odorishi.
What are buds and what are they for?
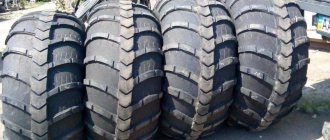
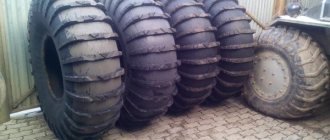
Tires (also known as low-pressure tires) are huge tractor, truck or helicopter tires that have been stripped of excess rubber.
Thanks to the large area of such wheels and their low pressure on the surface, an ordinary passenger car equipped with them becomes a real SUV .
With encouragement, Niva and UAZ can overcome a wide variety of obstacles - fields, deserts, rocky and marshy soil.
It is difficult for hunters and simply those who like to ride in difficult terrain to do without wheels with low pressure.
Making such tires yourself is not a problem. For this, the most common tools like a knife or winch . It will still take a little skill.
Before you start creating low-pressure tires, you need to clearly understand what exactly they will be needed for , that is, in what conditions, where exactly they will be used.
- primarily for driving on dirty, bumpy roads and rural roads - then you need to use a self-cleaning tread;
- If we go through swamps on tires, we will need to lower the tread grooves a little so that the grip becomes as good as possible;
- In snow drifts and sand, it is better to drive on tires on which the tread pattern elements are as close to each other as possible.
You need to think about the above in advance.
Algorithm for completing parts
There are several proven ways to make a caterpillar with your own hands. They have proven themselves to be the most reliable.
Application of conveyor belt
It is considered one of the simplest methods. In addition to the transport belt, you will need a bushing roller chain. The simplicity in this case lies in the fact that manufacturing does not require a large number of auxiliary materials and tools. To extend the life of the transport belt in the device, you need to circle its edges with fishing line
It is important to ensure a step of 10 mm. To connect the tapes, in this case you need a ring, you need to stitch it along the ends or use hinges
Particular attention is paid to the thickness of the transport tape. The level of load on the unit directly depends on this
The optimal choice would be to select a tape with a thickness of at least 7 mm
Among other things, you will have to take care of an additional wheel on each side
The optimal choice would be to select a tape with a minimum thickness of 7 mm. Among other things, you will have to take care of an additional wheel on each side
You can remove it from an old car, but it is important that its diameter matches the same parameter as the wheel on the walk-behind tractor
Using a tire
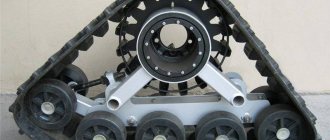
For walk-behind tractors, tracks are often taken from tires. Craftsmen claim that the design is highly reliable when the specified element is included in it. In order for the resulting walk-behind tractor to be practical, you must take care of the quality of the car tires. They must have the correct tread pattern. In this regard, tires from large cars and tractors are preferable. The tread pattern is of key importance, as it acts as a lug.
The manufacturing process can be divided into several stages. Here they are:
- After finding suitable tires, a track for the tracks is cut out of them. This is labor-intensive work that will take a lot of time.
- Use a well-sharpened knife for cutting. It's better to take the one that shoemakers use. From time to time it must be moistened in a soap solution. This will make the rubber easier to cut.
- Both sidewalls are cut off the tires. To make the process easier, you can use a fine-tooth jigsaw for this. Remove excess fragments inside the tire if necessary. If the track turns out to be too hard inside, this manipulation can be repeated.
Thanks to this, it is possible to improve the reliability of the tracks, which is especially important under heavy load conditions. And yet such caterpillars are of rather limited length.
It corresponds to a similar parameter for a car tire
It corresponds to a similar parameter for a car tire.
From chains and belts
All-terrain vehicles with tracks are often manufactured using conventional V-belts. They are connected to each other by means of lugs. The straps are attached with screws or rivets.
An additional method is to use chains of the same size. This material is often found in large quantities in gardeners' garages. The manufacturing process boils down to the following points:
- Take 2 chains of the same size. The last links are broken, after which they are combined into a closed ring. The links are clamped and welded.
- The lugs connect the chains to each other and provide reliable fastening. These devices can be made from simple steel plates of suitable thickness. They are connected using bolts.
If you don’t want to make tracks yourself, you can take such products from old equipment. For example, a walk-behind tractor on Buran tracks demonstrates good efficiency. It makes sense to use old parts, since new Buranovsky tracks are quite expensive.
https://youtube.com/watch?v=TRCcf646ahQ
The process of creating low pressure tires
To make low-pressure tires for a UAZ, Karakat or Niva, you need to create the tire itself, as well as a strong metal base to attach it to.
To create your own wrappers you will need:
- The main material is old tires for trucks such as Gaza-66, Kraza 255 (VI-3 tires), ZIL 131. Tires from helicopters, tractors and small aircraft are also perfect. If the tires have a “chewed” inner part, they should not be used. A hole may form in such rubber after the top layer is removed. As a result, they will simply have to be thrown away.
- An awl, a knife (construction knife), a set of blades and a sharpener for straightening them. When in contact with durable truck tires, the blades quickly dull and become unusable, so you can’t do it alone.
- A special template made of a thin steel sheet or thicker cardboard, as well as chalk or a marker for outlining the template.
- Clamps (maximum strength). The best ones are those that straighteners use to clamp the bodies of crumpled vehicles when they try to straighten them. A standard clamp will also work for stripping tires , but you will need to be very careful. You can use the workflow with ordinary wire cutters.
- A winch (automatic or manual) and a cable to tension the part of the tread that we will cut off. It can also be tightened using a manual gearbox.
You may also need a hammer (for straightening).
To make the tires airy, large tires will need to be freed of excess rubber on the tread and sidewalls. It is also necessary to remove the seat cores and the base of the cord (the inner protective layer of the tire).
- thoroughly clean the tire from all dirt and then dry it;
- using a template, using a marker or chalk along the entire circumference of the wheel, we create a tread pattern (the way it will become after some of the unnecessary rubber is removed).
- We make a cut along the inner perimeter of the tire to get rid of the wire . It is better to make the cut with a construction knife. It is convenient because you can set the length of the blade on it.
- In the area of the cut, mark rectangles with a marker and begin cutting .
- Through the holes formed in the tire we will be able to see the wire, which we will get rid of.
- We fix the tire with an iron rod so that it does not move, and pry up the wire with a hook , and remove it from the tire with a winch. You can also remove it with a screwdriver, but this will require a lot of effort.
Calculation and assembly of caterpillars
The caterpillar is a tape, on the outer surface of which tracks are attached. Tracks are rigid lugs installed along the entire length of the tracks. Track options:
- Made from 3mm thick transport tape.
- From a car tire.
- From V-belts.
- Ready-made factory-made tracks.
The conveyor belt must be looped. Its strength is only sufficient for light snowmobiles with engines no more powerful than 10 liters. With. Car tires are stronger than tape and are suitable for powerful engines. Solid tires do not need to be looped, so the likelihood of a rupture is minimal. It is more difficult to choose a tire of the required length than a tape.
Finished tracks are removed from other similar equipment (snowmobiles “Buran”, “Sherkhan”). They are equipped with lugs from the factory. The products are not suitable for use with low-power motors from walk-behind tractors. Homemade snowmobiles made from Buranovsky tracks must have gears from the same “donor”.
The size of the caterpillar is selected according to the required driving characteristics: the larger the width, the lower the handling, but the higher the maneuverability. The minimum area of the contact patch from the snowmobile (skis and tracks) must be such that the pressure from the equipped vehicle does not exceed 0.4 kg/cm2 of surface. Light snowmobiles use a 300 mm wide conveyor belt, cut lengthwise into 2 strips of 150 mm each.
Preparing the Tape
The tracks are attached to homemade tracks with M6 bolts with a wide head. The bolts are fixed with a nut, a washer and a groover are used. Before fastening, leading holes with a diameter of 6 mm are drilled in the tape and tracks. When drilling, use a jig and wood drills with special sharpening.
The conveyor belt is also looped with M6 bolts. To do this, the edges of the tapes are overlapped with an overlap of 3-5 cm, the connection contains 1-2 rows of bolts. For a 150 mm wide track, the following distances are maintained:
- From the edge of the tape 15-20 mm.
- Between bolts on tracks 100-120 mm.
- Between the bolts when banding 25-30 mm.
Homemade lugs
The tracks are made of polyethylene pipe with a diameter of 40 mm with a wall thickness of 5 mm, sawn in half in the longitudinal direction. The entire section of the lug is adjacent to the tape. In light snowmobiles, one track connects the tracked pair. With a track width of 150 mm, the track length is 450-500 mm.
The lugs are cut using a wood circular saw. They use a special machine with two guides (metal and wood), rigidly fixed on a fixed tabletop. The walls of the pipes are sawed one by one.
The distance between the tracks depends on the parameters of the gears on the drive shaft. Typically 5−7 cm. The specified distance is maintained with an error of no more than 3 mm. Otherwise, the operation of the drive is disrupted: the lugs “run” onto the teeth of the drive wheels, the caterpillar begins to slip and fly off the rollers.
Advantages and disadvantages
Wheels have many advantages over purchased wheels:
- Price. All-terrain wheels are very expensive, which can’t be said about the wheels.
- Such wheels have excellent adhesion to almost any surface, which significantly reduces the risk of accidents.
- The husks weigh relatively little. An “unpumped” passenger car engine will be quite capable of cranking them.
- Low surface pressure due to the large tire area. With encouragement, muddy terrain, quicksand and deep snow become quite passable obstacles. The tire pressure on the surface can be adjusted. They just need to be pumped up or lowered a little.
- Tires with low pressure do not harm the surface soil layers in any way, so you can safely drive an all-terrain vehicle with tires across plowed fields or use it as a tractor in agriculture.
They are also not without some disadvantages :
- You should try to ride less on hard asphalt and concrete surfaces. Otherwise, they will have to be changed very soon .
- A car on such wheels is not very stable. It’s better not to make sharp turns on it, and you shouldn’t drive it fast at all.
- Wheels wear out much faster than normal ones.
- Encouragement is a considerable burden. Transmission and suspension parts with such wheels will have to be changed and repaired more often.
- Low pressure tires are very flexible. This increases their permeability. But due to their increased stretchability, tires get punctured more often than regular tires.
- The car will have to be re-registered - “upgraded” to the status of an all-terrain vehicle.
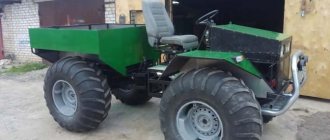
How to make a karakat from a walk-behind tractor
Typically, a karakat from a walk-behind tractor is operated at a speed of less than 70 km/h, which is quite acceptable for bad roads, not to mention their complete absence.
Due to the strong suspension, welded from steel pipes connected by hinges, the caracat can withstand significant loads. Steering the steering wheel of such an all-terrain vehicle is not complicated, since it is based on a simple design based on a conventional worm gear.
Even a powerful carat based on the Urals is characterized by good performance, not counting the ease of maintenance and availability of spare parts, unlike factory all-terrain vehicles.
Light Caracat
A lightweight caracat, equipped with huge wheels, easily passes difficult off-road conditions, finding its way where other vehicles simply cannot pass. From the point of view of their design, such homemade caracats do not have a complex technical basis and are easy to manufacture, which has led to their wide popularity among most home craftsmen.
Snowmobile with a walk-behind tractor engine and inner tubes
The walk-behind tractor practically does not have to be redone if you upgrade the original wheels.
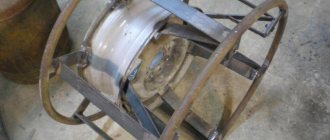
You will need lowered tubes from the truck. Five of them are pulled onto each wheel and secured with chains. The cameras are pumping. Due to the fixation with chains, their shape becomes like a daisy with segments in the form of an ellipse. The new wheels will handle deep snow well. Another wheeled snowmobile can be built from a walk-behind tractor by putting steel hoops on the inner tubes instead of chains. They are equipped with tracks on the outside. The jumpers are welded from metal plates. The height of the track is about 2-3 cm. After inflating the chambers, the metal hoops will be securely fixed to the wheels.
Making a karakat from a walk-behind tractor with your own hands
So, how can you make a karakat from a walk-behind tractor with your own hands and thereby create for yourself a reliable and indispensable assistant not only for your own household, but also for fishing and hunting trips?
In creating such a carat from a walk-behind tractor, the main stages described below can be distinguished:
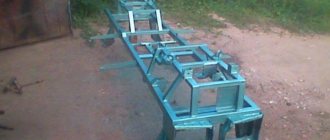
Choosing a Frame for Caracat
A carat from a walk-behind tractor, naturally, requires the skilled designer to have a walk-behind tractor, preferably belonging to the heavy or middle class. In fact, a carakat is nothing more than a home-made all-terrain vehicle mounted on four or three wheels (depending on the design), with wheels “shod” in low-pressure tires, driven by an internal combustion engine.
To ensure that the karakat made from a walk-behind tractor does not disappoint your expectations and becomes an indispensable vehicle for long hunting or fishing trips on difficult off-road terrain, you need to clearly imagine all the stages of its production.
First you need to decide on the frame. In principle, many designers of home-made caracats took frames from IZH motorcycles, or even from URAL, which is determined by the financial capabilities of the participant(s) in the caracat manufacturing process, as well as what is available at hand.
Karakat from IZh has good maneuverability, which predetermines its main use when moving through the forest, as well as when overcoming rough terrain with large differences in elevation, slopes and ravines.
Making your own pendants
At the next stage of making a karakat from a walk-behind tractor, it is necessary to make the suspension and rear axle. The pendant will need to be made with your own hands, since the karakat pendant involves a welded structure of two parts connected by means of hinged fasteners. In the Karakat suspension design, the spars are mated to each other by means of a steering bushing, a strut and a special strut, resulting in the formation of an independent rear and front suspension.
When installing both the side members and the steering wheel bushings and special struts, it is necessary to achieve the independence of the suspension, since it is the independent suspension that is of particular importance for all types of homemade caracats, since it provides the caracats with the maneuverability of a tracked all-terrain vehicle along with maneuverability and a soft ride, especially when overcoming rough terrain.
Installation on homemade karakat wheels
The wheels of the future caracat are its most important and most expensive part. You can either purchase them or make them yourself. It is important to note that all the known home-made designs of these all-terrain vehicles, including even the karakat from the Ant scooter, are equipped not with wheels themselves, but only with tubes and tires for the wheels of trucks (KAMAZ, Ural, as well as their trailers, including the large K-700) .
It is these wheels that ensure ease of steering and overcoming uneven terrain, which ultimately ensures the safety of driving such an all-terrain vehicle. The significant volume of the chambers gives the caracat with such wheels good buoyancy, which is a useful addition to its good maneuverability. Sometimes caracats are equipped with simple inner tubes attached to the suspension via wheel rims and metal bands that wrap around the outside of the wheel inner tube and are attached to the rims.
Installation of the engine and its complementary torque transmission systems to the drive wheels. After installing the suspension with wheels on the karakat frame, you can begin installing the engine, as well as all other systems that complement it - the clutch, the braking system and the system for removing burnt fuel products.
Upon completion of this, it is necessary to comprehensively test the karakat, and only after successful completion of the tests can it be fully exploited. Depending on what kind of walk-behind tractor (high or medium power) the home designer of the karakat has at his disposal, so will its power.
Materials for production:
- Children's snow scooter.
- Trimmer (the author used Parther t281).
- Ripper attachment with gearbox.
- Garden wheelbarrow wheels - 2 pcs.
- Chain.
- Office chair leg.
- The handle from the bicycle handlebar to the brakes.
The entire manufacturing process is shown in the photo.
First of all, we disassemble the ripper attachment.
The lug mount must be secured to the wheel rims.
The result was a gearbox with a pair of wheels.
To prevent the wheels from slipping in the snow, we put on chains.
We shorten the trimmer rod and drive cable.
We make the mount for the gearbox from a chair leg. We attach it to the frame using this fastening.
Skis can be reinforced with an aluminum angle.
The gas handle is made from a bicycle brake handle.
This is how a snow scooter with a trimmer motor turned out, great fun for children.
The design is collapsible and easily fits into the trunk of a car.
A video of the author of the homemade product testing a homemade snow scooter is attached.
In winter, movement becomes difficult, so you need a universal vehicle for driving through snowdrifts. Using available tools, you can begin constructing a snowmobile. With the right approach, a homemade snow scooter will become an indispensable assistant in winter.
You can begin assembling the structure after developing the drawings. The reliability of the future vehicle depends on their accuracy.
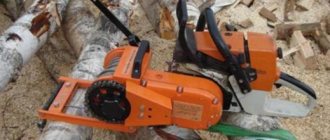
You can make a snowmobile using one of the chainsaws as a basis:
- Friendship. Acts as a power plant. The result is a simple device without unnecessary parts. Such a vehicle will have a fairly large mass with little power, and there will be no safety covers. The saw engine has a power of 1 kW and runs on gasoline. Tool weight 12 kilograms;
- Ural. A more reliable option with more power and less weight. The tool is environmentally friendly and works even at sub-zero temperatures. Two-stroke saw engine with a power of 3.6 kW. Tool weight 11.7 kilograms;
- Calm. The advantage of this saw is its environmental friendliness and low noise level.
Having decided on a chainsaw, you can start designing a snowmobile.
The design consists of the following parts:
- Steering wheel;
- Fuel tank;
- Power plant of petrol tools;
- Steering ski stand bushings (two pipes with a diameter of 30 cm);
- Control ski;
- Crawler gear;
- Track bed;
- Support base;
- Track roller;
- Back brace-limiter;
- Track tensioner;
- Track tension gear;
- Bearing;
- trunk;
- Driver's seat;
- 1st part of chain drive;
- 2nd part of chain drive;
- Driver's seat backrest holder;
- 1st gear driven sprocket;
- 2nd gear drive sprocket;
- Sprockets for the 2nd stage of chain transmission;
- Sprockets for the 1st stage of chain transmission;
- Steering knuckle lever;
- Traction steering rack;
- Bipod with steering shaft;
- Front axle beams;
- Track mounting shaft;
- Track tension axles.
Karakat from walk-behind tractor drawings and video
The topic of homemade vehicles is especially popular today. Many “traditional craftsmen” try to make carakat from standard means of transportation and special equipment. How can you make a budget karakat using a walk-behind tractor (even the simplest Neva will do). At first glance, doubts arise about the quality of the equipment, because visually it is a bulky and at the same time inconvenient machine. In fact, a caracat made from a walk-behind tractor, made with your own hands, shows simply excellent performance characteristics and can easily move in harsh climates and difficult terrain. And if we talk about moving through swamps, various river mouths, and in mud, then such an all-terrain vehicle will simply become an indispensable solution for every person.
Recommendations from professionals
It must be remembered that a homemade snowmobile is a vehicle. Experts recommend not to forget about this. Even if you have many years of experience in driving a walk-behind tractor, after the modification you need to get used to the new machine. You cannot immediately master snowdrifts and unknown terrain at high speed. The maneuverability of the snowmobile due to the rigid coupling with the sled is reduced. The risk of overturning on difficult roads increases.
Children are driven at low speed on level ground
Children will definitely want to ride in the sleigh. You cannot deprive yourself of such pleasure, but again you need to remember about safety precautions. They choose a flat road and drive at low speed. You can make a train from several drags.
In the video, a homemade snowmobile made from a walk-behind tractor:
Homemade caracat from a walk-behind tractor with your own hands
The classic homemade version, when a karakat is made from a walk-behind tractor, can move without problems at speeds below 70 kilometers per hour, which is an excellent indicator for a number of roads with poor surfaces. And if they are absent, such a means of transportation will be simply necessary.
Three-wheel fracture diagram
The unit is able to withstand significant loads, which is facilitated by a fairly strong and reliable suspension, welded from prepared steel pipes. The structure is connected by hinges, which guarantees ease of movement and performance of even the most unusual maneuvers. True, operating this unit requires a certain skill, because the design does not provide for the presence of a worm gear. Below is a typical drawing of a homemade karakat.
Stages of karakat development
Conventionally, we can distinguish the following stages on how to assemble a floating caracat:
- Creating a Frame
- Making a pendant
- Creation and installation of wheels
- Engine and systems installation
Caracat frame
First of all, you need to choose a suitable frame for installing all the necessary equipment and units on it. It is desirable if it is a walk-behind tractor belonging to the medium or even heavy class of equipment.
In fact, even the most “advanced” karakat is nothing more than a homemade all-terrain vehicle, which is usually mounted on a frame with four (4x4) or even three wheels (tricycle). The choice of the number of wheels depends solely on the design features of the intended vehicle and the previously developed design.
The wheels must be “shod” with high-quality low-pressure tires; the structure is powered by an installed powerful internal combustion engine.
Suspension
The suspension of a walk-behind tractor will require special attention and precision on the part of the developer. At this stage, in addition to the suspension itself, the master will need to make a rear axle, which is done exclusively with his own hands.
Rear axle drawing example
The suspension provides a special design made of two separate parts connected together by hinges. In this case, the spars must mate with each other, for which a steering bushing is used. Ultimately, it is possible to form independent front and rear suspensions.
The main condition is to achieve exceptionally high suspension independence, because It is this indicator that allows the all-terrain vehicle to be operated in the most unpredictable places, guaranteeing the safety of the structure.
Maneuverability and cross-country ability should be the primary factors that you should pay attention to when making a homemade caracat design from a walk-behind tractor.
Do-it-yourself karakat wheels
Caracat wheels are, in fact, the most expensive product, which requires a lot of time to be spent on. You can either purchase ready-made disks or try to make them yourself. It is worth noting that almost all vehicles (karakats), made as homemade products, are equipped not with wheels directly, but with tires and low-pressure chambers. Especially for these purposes, it is best to choose products installed on trucks such as the Ural, KamAZ and others.
As an option, you can use wheels from the trailers of these vehicles - if possible, you can purchase tires and a tube from the K-700 model. The most important thing to pay attention to is that the wheels must be large enough, which will allow you to easily move off-road in the future, easily covering significant distances without the risk of overturning.
Engine and systems
Installation of the engine and other systems is carried out at the last stages of work. These operations are carried out when a suspension with prepared wheels is installed on the vehicle frame.
In addition to the engine, clutch systems, brake elements, as well as systems responsible for removing burnt fuel products from the mechanisms are mounted.
When the engine is installed, it will be necessary to conduct a full test of the karakat, then it can be operated.
It is worth noting that depending on the walk-behind tractor used as the initial unit, the power of the vehicle can be calculated.
For assembly you will need to use a standard set of tools and technological equipment and available materials. It is important to ensure the maximum possible safety of the vehicle driver and eliminate the possibility of accidents. A self-constructed karakat from a walk-behind tractor will allow you to move without problems in harsh weather conditions and will last for a long period of time without the need for regular repairs and expensive maintenance.
IN SUMMER – MOTORCYCLE, IN WINTER – SNOWMOBILE
The shafts of the front and rear support drums of the caterpillar are machined from steel bar d 25 mm. At the ends of each, journals are machined for bearing No. 204, and in the middle part sprockets (Z = 17) of the chain drive and flanges of the support drums are welded. Since only the front shaft is driving, the rear sprocket is not used, but the shafts are completely interchangeable, which can be useful if the sprocket fails.
The bearing housings of these shafts are machined from steel blanks. In addition to the bearing housing, they have axial holes for fastening to the frame plates and a radial hole (in place) for a long pin used as a caterpillar tensioning rod.
Rice. 3. Caterpillar propulsion device:
1 - attachment point for the propulsion unit to the motorcycle, 2 - drive sprocket (Z=42) with hub, 3 - frame, 4 - caterpillar, 5 - driven shaft disk, 6 - support roller, 7 - drive shaft sprocket, 8 - balancer, 9 — tensioner rod, 10 — tensioner stop, 11 — shaft, 12 — drive sprocket (Z=17), 13 — support drum, 14 — bearing cover, 15 — bearing No. 204, 16 — bearing housing.
The housing covers have a groove for installing a sealing collar and are attached to the housing with M5 bolts.
The caterpillar support drums are machined from duralumin blanks and assembled from two halves with six MB bolts. During assembly, drive sprockets cut from a thick rubber sheet are clamped between them - on the front shaft and cylindrical rollers - on the rear. The teeth of the drive sprockets transmit force to the track by engaging the lugs through the gap between the track strips. And the drums themselves roll along the inside of the track. Semicircular grooves on their outer surface are made so that the heads of the screws that attach the lugs to the tape do not interfere with operation.
The caterpillar consists of four strips 56 mm wide, cut from a conveyor belt and connected together by common lugs - steel U-shaped profiles bent from strips 2 mm thick.
The front track shaft is driven by a chain drive from the drive sprocket (Z = 42), installed in place of the wheel. The sprocket itself is borrowed from the IZH-10 motorcycle. It is attached with six M6 bolts to the wheel hub, which is finished as shown in the drawing. This part is mounted on the rear fork in the same way as the rear wheel with the addition of a simple spacer.
The intermediate supports of the caterpillar propulsion system are balancers - four double-armed levers mounted on a common axis with roller axles fixed at the ends.
Not finding wheels suitable in size and strength for the balancer, I made them myself. Using a simple stamp, I squeezed out halves of wheel disks from round steel plates, and turned out bronze hubs - plain bearings and a mold for roller tires. By connecting the half-discs with six bolts, I got a durable wheel that can be easily repaired in case of wear.
We recommend reading
- LIGHTING EFFECTS! ANYONE! Most automatic lighting effects (ASE), including homemade designs for decorating discos, New Year’s and other holidays (see “Model Designer” No. 4 and 5 for 1995), ...
- AIRBRUSH FROM A BOTTLE It’s a shame when the labor-intensive work of making a model or sample of furniture is ruined due to poor-quality painting. If you look at such a product - it looks unattractive, there are brush marks,...
Here you can evaluate the author's work: