For any all-terrain vehicle, the decisive condition for excellent cross-country ability is the use of the right tires.
But the cost of a suitable kit is considerable, because it is often produced either in small quantities or by special order.
But it is quite possible to make low-pressure tires yourself . This work is labor-intensive and requires patience and attention. The finished product has a characteristic name - odorishi.
What are buds and what are they for?
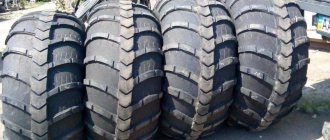
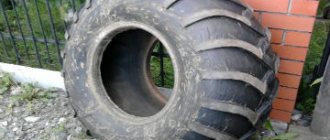
Tires (also known as low-pressure tires) are huge tractor, truck or helicopter tires that have been stripped of excess rubber.
Thanks to the large area of such wheels and their low pressure on the surface, an ordinary passenger car equipped with them becomes a real SUV .
With encouragement, Niva and UAZ can overcome a wide variety of obstacles - fields, deserts, rocky and marshy soil.
It is difficult for hunters and simply those who like to ride in difficult terrain to do without wheels with low pressure.
Making such tires yourself is not a problem. For this, the most common tools like a knife or winch . It will still take a little skill.
Before you start creating low-pressure tires, you need to clearly understand what exactly they will be needed for , that is, in what conditions, where exactly they will be used.
- primarily for driving on dirty, bumpy roads and rural roads - then you need to use a self-cleaning tread;
- If we go through swamps on tires, we will need to lower the tread grooves a little so that the grip becomes as good as possible;
- In snow drifts and sand, it is better to drive on tires on which the tread pattern elements are as close to each other as possible.
You need to think about the above in advance.
Tread selection and disc selection
To choose low-pressure tires, for example, for a field, you need to focus on the following indicators. To operate a modernized car in mud, you should have a high tread with a self-cleaning effect. For peat bogs, a very rough and high tread is not required, as it will displace (tear) the top layer and reduce traction. In sandy areas (or operation in snowy areas), tires should have thin tread elements.
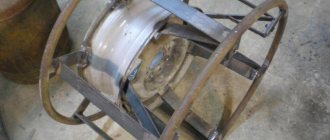
At the end of our story about how to make low-pressure wheels, we should mention disks.
Homemade disc made from aluminum cans with rivets
Most often, such disks are made from standard ones, with some adjustment of parameters. Sometimes they are expanded by inserting a liner strip. Lighter all-terrain vehicles such as caracats and scooters can be equipped with disks made of aluminum basins (in heavier versions, the disks cannot withstand loads).
The disks and cameras are secured using belts, the role of which can easily be played by a conveyor belt or a fire hose.
Source
The process of creating low pressure tires
To make low-pressure tires for a UAZ, Karakat or Niva, you need to create the tire itself, as well as a strong metal base to attach it to.
To create your own wrappers you will need:
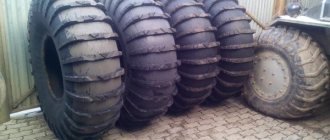
- The main material is old tires for trucks such as Gaza-66, Kraza 255 (VI-3 tires), ZIL 131. Tires from helicopters, tractors and small aircraft are also perfect. If the tires have a “chewed” inner part, they should not be used. A hole may form in such rubber after the top layer is removed. As a result, they will simply have to be thrown away.
- An awl, a knife (construction knife), a set of blades and a sharpener for straightening them. When in contact with durable truck tires, the blades quickly dull and become unusable, so you can’t do it alone.
- A special template made of a thin steel sheet or thicker cardboard, as well as chalk or a marker for outlining the template.
- Clamps (maximum strength). The best ones are those that straighteners use to clamp the bodies of crumpled vehicles when they try to straighten them. A standard clamp will also work for stripping tires , but you will need to be very careful. You can use the workflow with ordinary wire cutters.
- A winch (automatic or manual) and a cable to tension the part of the tread that we will cut off. It can also be tightened using a manual gearbox.
You may also need a hammer (for straightening).
To make the tires airy, large tires will need to be freed of excess rubber on the tread and sidewalls. It is also necessary to remove the seat cores and the base of the cord (the inner protective layer of the tire).
- thoroughly clean the tire from all dirt and then dry it;
- using a template, using a marker or chalk along the entire circumference of the wheel, we create a tread pattern (the way it will become after some of the unnecessary rubber is removed).
- We make a cut along the inner perimeter of the tire to get rid of the wire . It is better to make the cut with a construction knife. It is convenient because you can set the length of the blade on it.
- In the area of the cut, mark rectangles with a marker and begin cutting .
- Through the holes formed in the tire we will be able to see the wire, which we will get rid of.
- We fix the tire with an iron rod so that it does not move, and pry up the wire with a hook , and remove it from the tire with a winch. You can also remove it with a screwdriver, but this will require a lot of effort.
Now we start stripping the tire:
- We make cuts along the perimeter of the tread circle we drew , digging a little deeper into the rubberized base of the cord;
- using pliers we fix the resulting hole ;
- and peel off the rubber that has peeled off using a winch .
To make things go easier and faster, we cut it with a knife.
- gradually peel off unnecessary layers of rubber and cord from the tread surface and sides until only one frame remains;
- clean the surface using sandpaper (if necessary, straighten it with a hammer).
Self-installation
After choosing, you will have to put in a lot of effort to get a high-quality homemade product, but it is possible. The following work will need to be done:
- Tear off excess tread elements that weigh down the structure using a mechanical winch;
- Remove cores from the interior designed to improve the aircraft's landing characteristics;
- Cut the product along the inner rim by 1.5-2 cm to remove excess reinforcing wire;
- Sand and polish the modified tread.
Obviously, the discs for such protectors will also have to be made independently. They are made on the basis of “native” ones by welding an additional metal structure. In this case, you need to choose not classic durable aluminum alloy AD31, but high-quality ferritic structural steel for welding. This brand guarantees structural strength under high loads. It is possible to use stainless steel, which has optimal characteristics for these purposes and is resistant to disk corrosion.
Advantages and disadvantages
Wheels have many advantages over purchased wheels:
- Price. All-terrain wheels are very expensive, which can’t be said about the wheels.
- Such wheels have excellent adhesion to almost any surface, which significantly reduces the risk of accidents.
- The husks weigh relatively little. An “unpumped” passenger car engine will be quite capable of cranking them.
- Low surface pressure due to the large tire area. With encouragement, muddy terrain, quicksand and deep snow become quite passable obstacles. The tire pressure on the surface can be adjusted. They just need to be pumped up or lowered a little.
- Tires with low pressure do not harm the surface soil layers in any way, so you can safely drive an all-terrain vehicle with tires across plowed fields or use it as a tractor in agriculture.
They are also not without some disadvantages :
- You should try to ride less on hard asphalt and concrete surfaces. Otherwise, they will have to be changed very soon .
- A car on such wheels is not very stable. It’s better not to make sharp turns on it, and you shouldn’t drive it fast at all.
- Wheels wear out much faster than normal ones.
- Encouragement is a considerable burden. Transmission and suspension parts with such wheels will have to be changed and repaired more often.
- Low pressure tires are very flexible. This increases their permeability. But due to their increased stretchability, tires get punctured more often than regular tires.
- The car will have to be re-registered - “upgraded” to the status of an all-terrain vehicle.
Features of using low-profile products
Recently, the use of low-profile tires on cars has become very popular. They provide a larger contact patch with the surface and, as a result, better adhesion. The frame of low-profile products is softer - they are used for high-speed cars.
However, the use of low-profile wheels causes the car to feel all the imperfections of the road more harshly - your suspension will need repairs faster than when using a high profile.
Please note that the noise level from low-profile treads is much higher due to the increase in the contact patch with the road surface.
Low profile tires for cars
Why does a fisherman need a swamp rover?
The swamp boat is used by professional fishermen; novice fishermen are most often content with bodies of water that are open to access. While professionals are looking for complex and hard-to-reach places to catch fish. In such places you can hunt for big trophies.
The use of a swamp vehicle has the following features:
- allows you to overcome shallow water;
- allows you to overcome muddy places;
- very often used for new places that have not been fished before
- can be used as transport in areas with no roads.
How to make a swamp vehicle with your own hands?
You can buy a swamp vehicle in specialized stores; many fishermen make such a device themselves. This allows you to implement all the necessary requirements and make the device according to your personal preferences.
To make your own, you should follow the following steps:
- Make all necessary drawings and prepare materials.
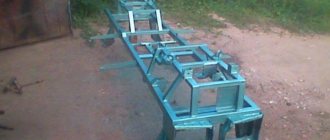
- Make a frame for the future all-terrain vehicle.
- Prepare the pendant.
- Mount the wheels.
- Install the engine.
- Install the wiring and lighting system.
At the last stage, the device is checked and all deficiencies are eliminated.
Drawings of a swamp vehicle
Engine selection
When choosing a motor, you need to take into account the power of the device and its size.
The following types of engines can be used:
- motorcycle engine - used if a small vehicle is being designed for one person. However, many fishermen do not advise using this type of engine; the swamp vehicle must be able to overcome heavy loads, which a conventional motorcycle engine cannot handle;
- car engine - used very often, especially if it is a ZAZ car brand. The devices have a high level of power and traction capabilities, which allows the swamp vehicle to be used even in extreme conditions;
- engine from a walk-behind tractor or small tractor. This is a frequent case, since such devices meet all the necessary conditions.
Chassis
When installing the chassis, it is important to select the quality of the metal and observe all the little details that will affect the comfort of movement and the duration of operation. The chassis is made using corners and sheets of durable metal.
Metal pipes can also be used in the design. Hitch frames are used, but many anglers use frames from old vehicles, changing their design to suit their needs.
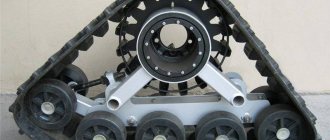
Track or tires?
When choosing tracks or tires, each user individually considers this type of issue. Caterpillars are a more complex type of structure, but in the process of moving through impassable areas they have a greater advantage than tires.
Tires for swamp vehicles are used much more often, this is due to the availability of the part and easier installation.
How to make wheels for a swamp vehicle with your own hands?
To make wheels at home, you need to follow the following algorithm:
- prepare the truck ramps, wash them, remove any possible damage, and dry them thoroughly;
- using a white marker to draw a design, the most commonly used ornament is in the shape of a herringbone;
- make a small cut and, using pliers, remove the wire cord;
- Using a construction knife, you need to make cuts in the places where the top layer of the tire will be removed. Eliminate the top layer, leaving only the places where the drawing will be visible. A winch can be used to remove the top layer;
- the surface of the wheels must be thoroughly sanded with sandpaper or a special grinding device;
- For installation, a standard disk is used, which is pre-cleaned and possible sharp edges that could damage the tire are eliminated.
Stages of karakat development
Conventionally, we can distinguish the following stages on how to assemble a floating caracat:
- Creating a Frame
- Making a pendant
- Creation and installation of wheels
- Engine and systems installation
Caracat frame
First of all, you need to choose a suitable frame for installing all the necessary equipment and units on it. It is desirable if it is a walk-behind tractor belonging to the medium or even heavy class of equipment.
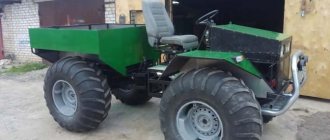
In fact, even the most “advanced” karakat is nothing more than a homemade all-terrain vehicle, which is usually mounted on a frame with four (4x4) or even three wheels (tricycle). The choice of the number of wheels depends solely on the design features of the intended vehicle and the previously developed design.
The wheels must be “shod” with high-quality low-pressure tires; the structure is powered by an installed powerful internal combustion engine.
Suspension
The suspension of a walk-behind tractor will require special attention and precision on the part of the developer. At this stage, in addition to the suspension itself, the master will need to make a rear axle, which is done exclusively with his own hands.
Rear axle drawing example
The suspension provides a special design made of two separate parts connected together by hinges. In this case, the spars must mate with each other, for which a steering bushing is used. Ultimately, it is possible to form independent front and rear suspensions.
The main condition is to achieve exceptionally high suspension independence, because It is this indicator that allows the all-terrain vehicle to be operated in the most unpredictable places, guaranteeing the safety of the structure.
Maneuverability and cross-country ability should be the primary factors that you should pay attention to when making a homemade caracat design from a walk-behind tractor.
Do-it-yourself karakat wheels
Caracat wheels are, in fact, the most expensive product, which requires a lot of time to be spent on. You can either purchase ready-made disks or try to make them yourself. It is worth noting that almost all vehicles (karakats), made as homemade products, are equipped not with wheels directly, but with tires and low-pressure chambers. Especially for these purposes, it is best to choose products installed on trucks such as the Ural, KamAZ and others.
As an option, you can use wheels from the trailers of these vehicles - if possible, you can purchase tires and a tube from the K-700 model. The most important thing to pay attention to is that the wheels must be large enough, which will allow you to easily move off-road in the future, easily covering significant distances without the risk of overturning.
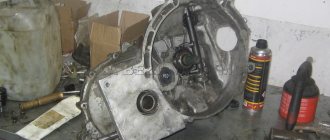
Engine and systems
Installation of the engine and other systems is carried out at the last stages of work. These operations are carried out when a suspension with prepared wheels is installed on the vehicle frame.
In addition to the engine, clutch systems, brake elements, as well as systems responsible for removing burnt fuel products from the mechanisms are mounted.
When the engine is installed, it will be necessary to conduct a full test of the karakat, then it can be operated.
It is worth noting that depending on the walk-behind tractor used as the initial unit, the power of the vehicle can be calculated.
For assembly you will need to use a standard set of tools and technological equipment and available materials. It is important to ensure the maximum possible safety of the vehicle driver and eliminate the possibility of accidents. A self-constructed karakat from a walk-behind tractor will allow you to move without problems in harsh weather conditions and will last for a long period of time without the need for regular repairs and expensive maintenance.
Types of homemade all-terrain vehicles
Depending on the type of design and chassis, the following types of homemade all-terrain vehicles differ:
- Swamp boats. They have a simple design and are relatively cheap to manufacture. They are equipped with an outboard motor and allow you to move around shallow bodies of water.
- A caterpillar swamp vehicle allows you to drive through overgrown bodies of water, but it is quite complex and expensive to manufacture, as it requires the attachment of a special type of tracks.
- An all-terrain vehicle with low-pressure tires is the simplest and most promising type of swamp vehicle, the performance of which depends on the design and reliability of the tires.
Some homemade products later become serial models. This happened with Alexei Garagashyan’s all-terrain vehicle called “Sherp,” which is now known all over the world.
Types of homemade all-terrain vehicles with low pressure tires
Homemade all-terrain vehicles on low-pressure tires, having the same principle of off-road movement, may differ in type of design. There are the following main types of vehicles of this type:
1. All-wheel drive caracat . In its design, it uses transmission and chassis elements from outdated types of passenger cars. It has all-wheel drive, a transfer case, and the adapted boat hull in its lower part and the tightness add buoyancy to the all-terrain vehicle. Designed to overcome swamps and swamps, it is capable of delivering cargo and people to areas inaccessible to ordinary SUVs.
2. Tricycle on low pressure tires . It has a very simple design and can be made by almost any car enthusiast in a garage. The IZH Planet 3 motorcycle is often taken as the basis for such an all-terrain vehicle, due to its endurance and unpretentiousness.
3. Homemade karakat with an SZD motorized stroller engine . Its peculiarity is that the engine is located not under the frame or gas tank, but under the seat or in the rear of the all-terrain vehicle’s frame. Chassis parts are traditionally taken from cars, and elements of motorcycles are used in the front part. Pipes, channels and angles are used to make the frame.
4. All-terrain vehicles with low-pressure tires based on cars or ATVs . They are manufactured using ready-made main units by reworking the transmission and chassis, as well as equipping them with low-pressure tires.
How to make an all-terrain vehicle on low-pressure tires?
Work on manufacturing an all-terrain vehicle begins with drawing up an action plan, the full implementation of which means achieving the desired result. The following tips will help you save time and money:
- Availability of free time, allowing you to regularly carry out work on assembling the all-terrain vehicle. If it is absent, it is better not to start at all.
- Budget planning. Creating an all-terrain vehicle yourself allows you to save on purchasing a production model, but in order to eliminate unnecessary expenses, you need to make all the calculations and buy the necessary components and parts, and also leave a certain amount for unforeseen expenses or breakdowns.
- Developing a plan. If you have experience in developing vehicles or the inclinations of a design engineer, it is possible to independently create a drawing of an all-terrain vehicle. In the absence of such, they use other people’s experience and ready-made drawings, of which there are a sufficient number on the Internet.
DIY low pressure tires
Tires of this type visually resemble huge pillows that support the entire structure. The degree of grip in such wheels allows the vehicle to be passable on any off-road terrain. Depending on the design features, such tires are divided into the following types:
- Arched. They are 5 times larger in size compared to a standard wheel, and have a thickness of up to 700 mm. The pressure in them is like in a regular ball - 0.05 MPa. Installed exclusively on the drive drive.
- Wide-profile. They are distinguished by an oval design and pressure up to 2 times lower than standard. Most often used in lifting vehicles.
- Toroidal. They are manufactured in tube and tubeless versions and are highly popular among car enthusiasts.
- Pneumatic rollers , having lugs to improve cross-country ability, and ribs to increase rigidity, giving the entire structure stability and strength.
How to choose for self-installation?
First of all, you need to decide on the chosen type for your needs (see photo):
- tube tires - have a lot of weight, but increased strength and cross-country ability;
- tubeless - safer during normal driving, but have an increased danger during maneuvers.
Decide on the design:
- arched type - for off-road (tire width up to 70 cm, profile 2-3 times wider, 0.05-0.14 MPa);
- wide-profile – used for freight transport, the advantage is rolling resistance;
- pneumatic rollers - have excellent cross-country ability, are not designed for heavy loads;
- toroidal - most suitable for private drivers due to their low cost.
For modifications to the same Niva, they recommend airplane tires; when they are replaced with new ones, they can still serve faithfully for a small vehicle.
Choosing an engine for an all-terrain vehicle
Most often, the following types of engines are used as a power unit for self-manufacturing an all-terrain vehicle:
- Motorcycle.
- ZAZ car.
- Motoblock.
- Domestic cars.
The presence of a specific engine in an all-terrain vehicle does not make a fundamental difference. It is more important to take into account such a feature as ensuring its sufficient cooling , since the vehicle is operated all year round in different temperature conditions and at low speeds. The ZAZ engine is excellent for this, as it can withstand temperature changes well. All-terrain vehicles running on motoblock power units have also proven themselves to be the best.
Another main criterion for choosing an engine for a future homemade product is its power .
The power reserve must be sufficient so that an all-terrain vehicle on low-pressure tires can get out of mud, water, or deep snow.
By choosing a unit with a power reserve, you get better performance, prevent overheating and create conditions for the longest service life.
Karakat from walk-behind tractor drawings and video
The topic of homemade vehicles is especially popular today. Many “traditional craftsmen” try to make carakat from standard means of transportation and special equipment. How can you make a budget karakat using a walk-behind tractor (even the simplest Neva will do). At first glance, doubts arise about the quality of the equipment, because visually it is a bulky and at the same time inconvenient machine. In fact, a caracat made from a walk-behind tractor, made with your own hands, shows simply excellent performance characteristics and can easily move in harsh climates and difficult terrain. And if we talk about moving through swamps, various river mouths, and in mud, then such an all-terrain vehicle will simply become an indispensable solution for every person.
Features of the all-terrain vehicle chassis
The chassis of all-terrain vehicles on low-pressure tires is made in the form of an independent suspension to give the all-terrain vehicle better cross-country ability, increase the comfort of driving the vehicle and make riding easier for the driver and passengers. This type of design has a main drawback - the complexity of manufacturing.
To create it, pipes, angles and channels made of durable alloy steel are used, creating a strong base that can last for several years without breaking. The frame is made both solid and articulated. The latter has a high working potential, but the complexity of its manufacture makes it quite rare in home-made designs.
Design Features
The main differences of such rubber are: low pressure, increased buoyancy and good shock-absorbing qualities. All this ensures high cross-country ability of vehicles in snow and muddy soils.
The all-terrain tread for off-road vehicles is made in the form of a herringbone, and for off-road sports cars it is in the form of a checkerboard.
The design of such a tire consists of the following elements:
- tread - it is redesigned for good grip on the road surface;
- the frame is made of metal or synthetic threads and serves to give the rubber the necessary strength characteristics;
- breaker - a belt made of steel cord, which serves to increase the tire's resistance to damage and prevent its delamination;
- side rubber strips protect from the negative effects of external factors;
- fender tape - it is also made of rubber, it improves the comfort of movement and controllability of the car;
- The ring-shaped steel rod ensures reliable fixation of the rubber on the rim.
The collapsible rim on which such tires are mounted must have a device that prevents the tire from coming off the rim.
Sequence of self-assembly of an all-terrain vehicle
Assembling an all-terrain vehicle on low-pressure tires includes the following steps:
1. Selecting the type of all-terrain vehicle and the base on which the units and parts will be mounted. For this, frames of cars or motorcycles are used, as well as home-made structures developed on their own or borrowed from someone else’s drawings.
2. Manufacturing and assembly of suspension with rear axle. For this, the optimal solution is an independent design , and although much more time will be spent on its creation, the end result will be an all-terrain vehicle with higher cross-country ability and ride comfort.
3. Installation of wheels. Performed after completion of work on the rear axle and suspension. Metal hubs are used to mount the cameras. Properly manufactured or selected low-pressure wheels will provide the all-terrain vehicle with increased driving safety and good handling.
4. Engine installation. Particular attention is paid to the correct design of the cooling system.
5. Installation of additional systems. Includes connecting the brake system, exhaust gas communications, clutch and electrical equipment. At this stage, the body of the all-terrain vehicle and lighting fixtures are installed.
6. Completion of work and implementation of a trial test, which shows the performance of components and systems. If there are problems or points that need to be improved, the shortcomings are eliminated, after which the all-terrain vehicle is ready for use.
Selection of finished products
There is an international qualification according to which wheel marking is carried out. For example, if the entry is in the form 26″×12″-10″, then the numbers (they are indicated in inches) mean:
- 26 — outer diameter of the tire;
- 12 — tire width;
- 10 - landing diameter.
The marking also contains the bolt-to-bolt distance (PSD), indicating the number of bolts with which the wheel is secured, and the distance in millimeters between the centers of the side holes.
Another important indicator that you need to pay attention to is the disc offset (displacement relative to the edge of the hub of the tire landing part). Positive offset is designated ET+; if it is greater than the permissible value, the tire will rub against the car body. Negative offset is indicated by the symbols ET; exceeding its indicators leads to increased emission of dirt when the car is moving. This problem is solved by widening the wheel arches; special elements are installed for this purpose.