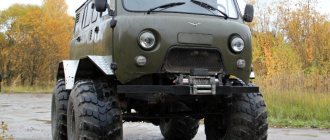
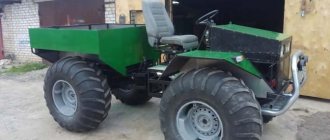
Homemade all-terrain vehicle “Svyatogor” on low-pressure tires with independent suspension, made from an Oka car: photos of production and video testing of the all-terrain vehicle.
Dear readers, we present to your attention a wheeled all-terrain vehicle with low-pressure tires.
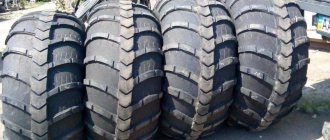
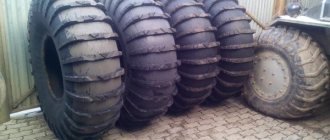
The body, engine and calipers were taken from the Oka, the axles were taken from LUAZ and redone, the transfer case, CV joints, flanges were from the Niva, the VAZ-2109 hub, tires from the Urals, inner tubes from T-150 wheels.
The photo shows the main stages of manufacturing an all-terrain vehicle. The frame is welded from a profile pipe.
Frame manufacturing process, profile pipes used:
- 40 x 60 mm – 12 meters.
- 25 x 40 mm – 3 meters.
- 10 x 10 mm – 3 meters.
The design uses independent suspension.
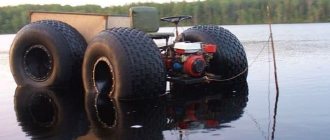
At the initial stage, the author installed cameras from T-150 wheels on the all-terrain vehicle.
The engine is mounted longitudinally to the all-terrain vehicle frame, the differential is locked.
Subsequently, the author removed the cylinders and installed “flat” tires, the wheels were welded from GAZ wheel rings, the author took the tires for the all-terrain vehicle from the Urals and slightly improved them by cutting out a new tread, which made the wheels themselves much lighter.
The figure shows the gear shift diagram of the all-terrain vehicle.
The weight of the all-terrain vehicle is small, less than one ton, which allows it to easily move over rough terrain; on a flat road Svyatogor reaches a speed of more than 60 km per hour.
Here in the photo the author has already replaced the tubes with “flat” tires.
Trailer for transporting an all-terrain vehicle.
I recommend watching an interesting video of what an Oka-based all-terrain vehicle is capable of.
Source samodelki-n.ru
Lightweight all-terrain vehicles with huge cameras are able to overcome severe off-road conditions that other types of off-road vehicles cannot traverse. Self-made vehicles of this type are simple, since they do not have a complex technical base, which is why they have won the recognition of most home craftsmen. Such equipment is especially in demand by residents of rural areas, where precipitation greatly reduces the quality of roads, as well as by lovers of hunting, fishing and extreme recreation.
Types of homemade all-terrain vehicles
Depending on the type of design and chassis, the following types of homemade all-terrain vehicles differ:
- Swamp boats. They have a simple design and are relatively cheap to manufacture. They are equipped with an outboard motor and allow you to move around shallow bodies of water.
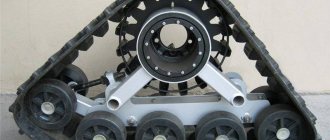
- A caterpillar swamp vehicle allows you to drive through overgrown bodies of water, but it is quite complex and expensive to manufacture, as it requires the attachment of a special type of tracks.
- An all-terrain vehicle with low-pressure tires is the simplest and most promising type of swamp vehicle, the performance of which depends on the design and reliability of the tires.
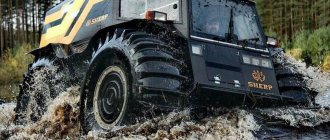
Some homemade products later become serial models. This happened with Alexei Garagashyan’s all-terrain vehicle called “Sherp,” which is now known all over the world.
Homemade tractors and all-terrain vehicles
Homemade all-terrain swamp vehicle on low-pressure tires with all-wheel drive, made with your own hands.
This all-terrain vehicle is built for off-road travel in forests and swamps, mainly for fishing trips.
The all-terrain vehicle is equipped with a single-cylinder, four-stroke ZiD engine with a power of 4.5 l/s. The engine was made in the Soviet Union and was received in a new condition, so I started making it based on it.
Gearbox (short) from Moskvich. The engine is connected to the gearbox through a homemade clutch made from a Zaporozhets flywheel, its basket and clutch, and the release clutch guide is homemade. The disc had to be re-riveted to fit onto the input shaft of the Moskvich gearbox. A reduction gearbox is installed on the engine.
Frame of fracture type (two half-frames connected by a fracture unit).
In the photo: the fracture site of two half-frames.
In the photo: the author of the homemade all-terrain vehicle.
The swamp vehicle has successfully passed tests and is used for fishing trips. The engine is quite economical, fuel consumption is about 1.5 liters per hour.
The steering wheel is located on the right, this was done because the cord used to start the engine came out from this side, and it’s more convenient to start it while standing on the frame with your right hand. The homemade caracat is transported on a trailer, the trailer is from Taiga. The wheels are removed before packing into the trailer and the caracat drives into the trailer under its own power on bare rims. It can be transported by any passenger car; it can be unloaded on site and assembled in a few minutes.
To inflate the wheels, there is a standard compressor driven by the engine; the all-terrain vehicle is loaded with everything necessary and off-road.
The all-terrain vehicle does not have mudguards; it does not splash with mud or water; in the worst case, only the swamp boots suffer from the mud. And even then only along forest ruts. The speed of movement is low, so nothing is thrown from the wheels in all directions, and in the swamps there is nothing else except grass and water, there is no dirt.
The all-terrain vehicle is more designed for traction; it travels freely through the swamp with a load of 500 kg (fish, driver, passenger) at a speed of about 8-10 km/h according to GPS.
When the swamp rover is not loaded, you can drive faster; when empty, the speed is higher. And for severe cases, there is also a reduction gear, which makes it possible to load the vehicle to pull the UAZ out of the mud, or cross deep ravines. There are no differential locks on both axles, but there are separate front hydraulic brakes on the front axle, which makes it possible to brake a slipping wheel, thereby transferring torque to the other wheel. Such brakes are very helpful if a wheel falls through a “window” in a swamp.
This is how the all-terrain swamp rover turned out, made by hand.
Types of homemade all-terrain vehicles with low pressure tires
Homemade all-terrain vehicles on low-pressure tires, having the same principle of off-road movement, may differ in type of design. There are the following main types of vehicles of this type:
1. All-wheel drive caracat . In its design, it uses transmission and chassis elements from outdated types of passenger cars. It has all-wheel drive, a transfer case, and the adapted boat hull in its lower part and the tightness add buoyancy to the all-terrain vehicle. Designed to overcome swamps and swamps, it is capable of delivering cargo and people to areas inaccessible to ordinary SUVs.
2. Tricycle on low pressure tires . It has a very simple design and can be made by almost any car enthusiast in a garage. The IZH Planet 3 motorcycle is often taken as the basis for such an all-terrain vehicle, due to its endurance and unpretentiousness.
3. Homemade karakat with an SZD motorized stroller engine . Its peculiarity is that the engine is located not under the frame or gas tank, but under the seat or in the rear of the all-terrain vehicle’s frame. Chassis parts are traditionally taken from cars, and elements of motorcycles are used in the front part. Pipes, channels and angles are used to make the frame.
4. All-terrain vehicles with low-pressure tires based on cars or ATVs . They are manufactured using ready-made main units by reworking the transmission and chassis, as well as equipping them with low-pressure tires.
How to make an all-terrain vehicle on low-pressure tires?
Work on manufacturing an all-terrain vehicle begins with drawing up an action plan, the full implementation of which means achieving the desired result. The following tips will help you save time and money:
- Availability of free time, allowing you to regularly carry out work on assembling the all-terrain vehicle. If it is absent, it is better not to start at all.
- Budget planning. Creating an all-terrain vehicle yourself allows you to save on purchasing a production model, but in order to eliminate unnecessary expenses, you need to make all the calculations and buy the necessary components and parts, and also leave a certain amount for unforeseen expenses or breakdowns.
- Developing a plan. If you have experience in developing vehicles or the inclinations of a design engineer, it is possible to independently create a drawing of an all-terrain vehicle. In the absence of such, they use other people’s experience and ready-made drawings, of which there are a sufficient number on the Internet.
DIY low pressure tires
Tires of this type visually resemble huge pillows that support the entire structure. The degree of grip in such wheels allows the vehicle to be passable on any off-road terrain. Depending on the design features, such tires are divided into the following types:
- Arched. They are 5 times larger in size compared to a standard wheel, and have a thickness of up to 700 mm. The pressure in them is like in a regular ball - 0.05 MPa. Installed exclusively on the drive drive.
- Wide-profile. They are distinguished by an oval design and pressure up to 2 times lower than standard. Most often used in lifting vehicles.
- Toroidal. They are manufactured in tube and tubeless versions and are highly popular among car enthusiasts.
- Pneumatic rollers , having lugs to improve cross-country ability, and ribs to increase rigidity, giving the entire structure stability and strength.
The cost of factory-made low-pressure tires may be unaffordable for many car enthusiasts. But for your own all-terrain vehicle, it is quite possible to make such a wheel yourself. The work is performed in the following order:
1. Selection of source material, for example, agricultural or aircraft tires, as well as other types of industrial transport.
2. The tread is cleaned, washed and dried, after which the desired patterns are drawn to create your own design, as well as to remove excess wire and rubber.
3. To remove excess wire, the inner part of the wheel is trimmed and the cord is removed using a winch.
4. Excess rubber is also removed with a winch, making cuts around the circumference, and securing them to the cable with pliers, carefully pulling them and cutting them with a knife.
5. After removing the tread layer, the surface is cleaned with sandpaper.
6. Disk assembly. To do this, use a standard disk cut in half, or welded from plates and pipes, and then carefully polished to prevent damage to the camera.
7. The tire is pulled onto the rim and secured with belts or a fire hose, and then inflated. The wheel is ready.
What type of tread should I choose for an all-terrain vehicle?
To select the right type of tread for an all-terrain vehicle with low-pressure tires, you need to consider the following factors:
- The protector must have the ability to self-clean. This property is especially important for using an all-terrain vehicle in harsh and wetlands.
- When using an all-terrain vehicle on peat bogs, choose tires with low and shallow terrain, otherwise if their top layer breaks, the grip will be insufficient for full movement.
- When used in snowy areas and on sandstones, tires with a rare pattern are chosen.
Do-it-yourself crawler all-terrain vehicle: manufacturing features, drawings:
It's no secret that in our vast country there are areas where it is completely impossible to move normally on the roads due to their poor quality. In this case, a special vehicle, which is characterized by high maneuverability, comes to the rescue.
We are talking about an all-terrain vehicle. But, unfortunately, it is almost impossible to purchase a vehicle that is light, economical and inexpensive.
Therefore, many craftsmen with engineering and technical skills decide to create a tracked all-terrain vehicle with their own hands, taking into account their needs and capabilities.
How can tracked all-terrain vehicles be used?
Such homemade tracked devices come in different sizes and are used for a variety of purposes. With their help, heavy loads are moved, which are placed either in the body or in a special trailer. If a crawler all-terrain vehicle, made by yourself, is used for a summer residence, then in this case various construction materials are most often transported.
In addition, such a vehicle has transport versatility, and if any unforeseen circumstances arise, you can quickly, without any difficulties, get to a certain destination over rough terrain.
What to pay attention to when creating a homemade all-terrain vehicle?
If you decide to make a crawler all-terrain vehicle with your own hands, you must clearly understand for what purpose it will be used. Be sure to consider the following points:
- Weather conditions during operation.
- Dimensions. The width affects the cross-country ability of a self-made crawler all-terrain vehicle, the length is calculated based on the number of seats or the presence of a luggage compartment, and the height should be optimal when creating the amphibious properties of the unit.
- Motor power. The more powerful the engine, the easier it is to overcome hard-to-reach sections of the road.
- Target. Depending on the purpose for which the mobile device is intended, its design may vary.
- Number of wheels. Most often, a homemade tracked all-terrain vehicle, made with your own hands, has wheels from two to eight pairs, which are necessary to support the caterpillar track.
Create a drawing
The most important stage is making a sketch of a tracked all-terrain vehicle. Do-it-yourself drawings with the location of the mechanisms of the unit and its components are drawn after this. They must be very accurate. When creating such a vehicle, they usually use both homemade parts and ready-made factory-produced elements. They are drawn separately, with the calculation of the compatibility and performance of parts and assemblies.
Design features
A crawler all-terrain vehicle, created with your own hands, must have an engine. Basically, this element is taken from cars, most often domestic ones. You can also borrow it from a motorcycle. The chassis consists of rubber tracks, a tension system, suspension, and rollers. Car tires are often used to make tracks. The chassis base consists of a bathtub, frame or any other metal frame. For the control system, various components are taken or ready-made control elements of motorcycles or cars, as well as tractors, are used. A homemade tracked all-terrain vehicle, made with your own hands, has a power system, which is represented by a fuel tank, gasoline or diesel. Gas equipment is used much less frequently.
Manufacturing technology
Lightweight tracked all-terrain vehicles are made by hand using a certain technology. Their creation begins with the construction of the body, which must have high strength and complete waterproofness.
The base of a homemade transport must be rigid, so steel pipes are used that can withstand any physical stress arising from movement. Then they begin to make the tracks. To do this, take ordinary sheet rubber and create ring rubber.
Small aluminum blades are placed on its outer side using rivets, and the necessary limiters are installed on the inner side, the step width of which is equal to the width of the tire tires.
The next stage is that the bridges are removed from the car through holes that were specially made in the body for this purpose. Rubber couplings are used as protection.
The rubber band is attached so that the wheels are located directly in the center of the stops. In addition, additional wheels are also attached. They are necessary to maintain the track tension.
To complete the work, heavy-duty glass is installed in the cabin of the all-terrain vehicle, which was made by hand.
Choosing an engine for an all-terrain vehicle
Most often, the following types of engines are used as a power unit for self-manufacturing an all-terrain vehicle:
- Motorcycle.
- ZAZ car.
- Motoblock.
- Domestic cars.
The presence of a specific engine in an all-terrain vehicle does not make a fundamental difference. It is more important to take into account such a feature as ensuring its sufficient cooling , since the vehicle is operated all year round in different temperature conditions and at low speeds. The ZAZ engine is excellent for this, as it can withstand temperature changes well. All-terrain vehicles running on motoblock power units have also proven themselves to be the best.
Another main criterion for choosing an engine for a future homemade product is its power .
The power reserve must be sufficient so that an all-terrain vehicle on low-pressure tires can get out of mud, water, or deep snow.
By choosing a unit with a power reserve, you get better performance, prevent overheating and create conditions for the longest service life.
Features of the all-terrain vehicle chassis
The chassis of all-terrain vehicles on low-pressure tires is made in the form of an independent suspension to give the all-terrain vehicle better cross-country ability, increase the comfort of driving the vehicle and make riding easier for the driver and passengers. This type of design has a main drawback - the complexity of manufacturing.
To create it, pipes, angles and channels made of durable alloy steel are used, creating a strong base that can last for several years without breaking. The frame is made both solid and articulated. The latter has a high working potential, but the complexity of its manufacture makes it quite rare in home-made designs.
What are homemade products?
At the preparation stage, it is necessary to decide whether the equipment will be used on public roads.
In this case, it is necessary to obtain registration documents and state license plates from the traffic police according to the standard procedure.
The vehicle must comply with current safety standards, which is confirmed by the results of certification tests.
Self-assembled all-terrain vehicles for off-road travel can be registered with Gostekhnadzor according to the following scheme:
- develop technical specifications;
- collect documents confirming rights to the power unit and other functional units;
- undergo the certification procedure at a specialized enterprise.
The collected documents are submitted for registration of a self-propelled vehicle passport. Failure to register is punishable by a fine of 1,500 to 2,000 rubles. for individuals.
If you do not take into account the official requirements of safety standards, the manufacturer of the homemade product has the right to use any design solutions:
- install 10 wheels or choose the classic 4x4 formula;
- Instead of a manual transmission, install a comfortable automatic transmission.
All-terrain vehicles equipped with auger-rotor propulsors have high cross-country ability.
However, in practice, 2 SUV schemes are most often used:
- on tracks;
- on pneumatic tires with low pressure.
To reduce the cost of the project and ease of maintenance, the homemade product is equipped with a manual gearbox and simple control devices. When creating drawings, it is recommended to objectively evaluate your own knowledge and skills in order to eliminate errors along with excessive difficulties during the assembly process.
On caterpillar tracks
Vehicles in this category differ:
- good maneuverability;
- limited speed characteristics;
- increased fuel consumption;
- complexity of manufacturing.
The tracks are suitable for equipping a heavy all-terrain vehicle with a large load capacity.
On low pressure tires
A typical wheeled snow and swamp-going vehicle is a lightweight design that is easy to assemble yourself if you have metalworking skills. For the basis of the design, you can take the frame and engine of a road motorcycle. The standard plug is extended. In the absence of a cabin and other complex additions, the construction of such a vehicle will be completed in several months at minimal cost.
Sequence of self-assembly of an all-terrain vehicle
Assembling an all-terrain vehicle on low-pressure tires includes the following steps:
1. Selecting the type of all-terrain vehicle and the base on which the units and parts will be mounted. For this, frames of cars or motorcycles are used, as well as home-made structures developed on their own or borrowed from someone else’s drawings.
2. Manufacturing and assembly of suspension with rear axle. For this, the optimal solution is an independent design , and although much more time will be spent on its creation, the end result will be an all-terrain vehicle with higher cross-country ability and ride comfort.
3. Installation of wheels. Performed after completion of work on the rear axle and suspension. Metal hubs are used to mount the cameras. Properly manufactured or selected low-pressure wheels will provide the all-terrain vehicle with increased driving safety and good handling.
4. Engine installation. Particular attention is paid to the correct design of the cooling system.
5. Installation of additional systems. Includes connecting the brake system, exhaust gas communications, clutch and electrical equipment. At this stage, the body of the all-terrain vehicle and lighting fixtures are installed.
6. Completion of work and implementation of a trial test, which shows the performance of components and systems. If there are problems or points that need to be improved, the shortcomings are eliminated, after which the all-terrain vehicle is ready for use.
Source voditelauto.ru
Homemade all-terrain vehicles and other off-road vehicles are often made on the basis of a walk-behind tractor. There are several reasons for this:
- there is an energy-rich transport unit with high traction characteristics, assembled on a frame;
- engine and transmission controls have been moved to comfortable handles;
- The weight of walk-behind tractors is low; they can be transported to the desired location in the trunk, body or on a car trailer.
For hunting and fishing, a lightweight mini all-terrain vehicle is quite in demand. But the industry has not yet seen commercial prospects in creating sets of attachments that convert a serial walk-behind tractor into an off-road vehicle. There are quite interesting examples of the creation of such machines. Do-it-yourselfers created role models with their own hands. There is room for ideas when developing new interesting devices.
All-terrain vehicles with sleeper
To exclude independent production of a complex case, a factory product is used. The brutality of the VAZ 2109 on caterpillar tracks is complemented by its excellent cross-country ability and interior comfort. The standard transformation of the front seat backs allows you to create 2 full berths. There will be plenty of cargo space left in the trunk.
Drawings and diagrams
Materials for assembling large all-terrain vehicles have been published on the Internet:
- "Mishutka";
- "Falcon";
- "Pelec"
The Petrovich model is mass-produced. But the manufacturer does not hide the layout of the components. Studying factory design documentation will simplify the creation of a set of homemade drawings.
Making at home
It is necessary to clarify what additional preparations are needed. In addition to formulating criteria, making drawings and creating a list of parts, you will need an appropriate room. Weather conditions will not allow performing work operations outdoors without interruption.
The equipment of a home workshop must correspond to the characteristics of technological operations.
In addition to purchasing a welding machine, you will have to master the creation of high-quality seams. Individual operations can be entrusted to experienced specialists.
How to attach tracks
The simplest option is tires with cut beads. Solid products are characterized by high strength and minimal cost. However, for reliable fastening it is better to use a structure made of a conveyor belt or a composite caterpillar made of tracks. Fixation of the working position is ensured by special limiters - fangs.
Features of all-terrain vehicles made from a walk-behind tractor
The main components that you should purchase or make yourself for a vehicle based on a walk-behind tractor:
- frame, it serves to organize a mobile vehicle;
- the rear axle is needed to install the rear wheels;
- a seat for the driver, it is advisable to protect it from moisture and dirt from under the wheels;
- A lighting system is needed to move safely at any time of the day.
An all-terrain vehicle based on a walk-behind tractor is created as a single-seater vehicle. Its load capacity should be about 200 kg. The width is calculated based on the conditions of resistance to rollover, usually it is 1100 mm or more.
Modern walk-behind tractors Neva, Ugra, MTZ and others are equipped with engines with a power of more than 10 hp. This power is enough to move at speeds of more than 10 km/h. On off-road roads, when passing through mud or swampy places, the speed may decrease to 1-2 km/h.
Where to begin?
First you need to decide, according to your needs, what type of all-terrain vehicle you are going to build. It all depends on specific conditions and personal desires, so it’s difficult to advise anything. The only thing is, if you don’t have any experience working with tracked mechanisms, it’s probably worth starting with a simple pneumatic.
Next, we determine the operating conditions, capacity and load capacity and, based on these data, outline the general concept of the future machine. Afterwards, you can move on to the preliminary design of the all-terrain vehicle, which outlines the layout and location of all components and assemblies of the vehicle, and do not forget about the driver and passengers if the vehicle is multi-seat.
Note: to make it more convenient to make layout sketches, make scale models of the main components of the machine from thick paper and stock up on paper figures of people in the same scale - this will be much more convenient at the initial stage than drawing identical contours over and over again in search of the optimal location.
How to make a homemade wheeled all-terrain vehicle
An example of a drawing of an all-terrain vehicle on low-pressure tires
It makes sense to equip the basic unit with a reduction gearbox. The reason is that gasoline and diesel engines have the best torque performance at a crankshaft speed of approximately 75-85% of the maximum.
The engine must have a forced cooling system. When driving at low speed, the oncoming flow will not be enough to maintain optimal thermal conditions.
All-terrain vehicle frame
An example of a frame-fracture drawing
A frame is created between the front and rear axles. It is better to use profile pipes of rectangular or square cross-section as the basis. They provide greater rigidity than rolled angles, channels and I-beams of the same mass.
The joining of the frame elements of a wheeled all-terrain vehicle can be rigid, then it will be formed in a single-volume format. When using heavy Neva or MTZ walk-behind tractors, this option will be preferable.
As an option, a breakable frame (fracture) is made; this option is used for areas with a complex profile. Here the articulation is performed through the kingpin. The front and rear axles have independent suspension from each other. Craftsmen create such all-terrain vehicles based on the Neva and Ugra walk-behind tractors.
For hunting and fishing, it is better to have a wheeled all-terrain vehicle with a breakable frame. Its maneuverability is higher than when using a rigid frame design.
Rear axle and suspension of a homemade all-terrain vehicle
To simplify the design, some DIYers use a ready-made rear axle from a passenger car. For example, from the Moskvich-412 car: its low weight allows installation on a light all-terrain vehicle. The suspension is performed on shock absorbers for a smooth ride and reduced vibration.
Other craftsmen make independent suspension on each rear wheel. This approach is implemented on the Ant scooter. When driving, a slight rocking is felt, at the same time the wheels experience less resistance on uneven surfaces, and fuel consumption is noticeably reduced.
The rear axle is connected to the frame with long, hardened bolts. For elastic joints, rubber inserts are used, for example, silent blocks. This improves the performance characteristics of an all-terrain vehicle based on a walk-behind tractor.
The rear axle on skis is used in winter. The resistance to movement is minimal, the design is greatly simplified.
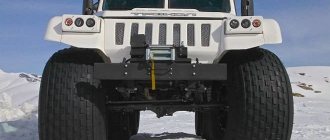
Wheels (low pressure chambers)
To move on wet and unstable ground, you can use lugs. They provide high grip. Large-diameter low-pressure chambers perform even better. Pneumatics have minimal ground pressure, and the presence of air contained in the all-terrain vehicle’s chambers will make it possible to create a floating all-terrain vehicle.
For installation on the rear axle, homemade or special wheels for all-terrain vehicles, swamp vehicles and snowmobiles are used. They can be purchased assembled or as separate elements: tire, tube, disc. The wheel is easy to assemble.
- Homemade discs for pneumatics are made by welding ordinary discs and mounting plates using metal tubes. This expansion is necessary in order to adjust the small diameter of the car rim to large cameras and better fix them.
- A large camera is placed on a specially expanded disk - either a proprietary one or from other units (GAZ 53, Ural, Kamaz or another truck, an aviation camera, etc.).
- An air valve is installed in the hole of the disk.
- The wheel is inflated with air.
- The resulting tires are installed on a homemade all-terrain vehicle.
You can increase the cross-country ability of regular wheels on low-pressure chambers by creating an additional tread. For example, additionally secure the cameras with chains, conveyor belts, homemade tracks or another method.
Another option is to cut a patch lug from the tire. The depth of the structure’s hook reaches more than 20-25 mm. Rolling resistance increases, while at the same time the slip coefficient decreases sharply.
Assembling a homemade all-terrain vehicle from a walk-behind tractor
When all the tools, spare parts and components are prepared, you can begin assembly. This is a rough plan for how to assemble a homemade all-terrain vehicle, it all depends on the chosen design.
- A walk-behind tractor is installed on a welded or finished frame.
- The rear axle and, if necessary, the front axle are mounted.
- The seat is placed on the frame.
- If provided in the drawing and diagram, the steering control is installed.
- The protection is attached to the frame; it is made of plastic or metal sheet.
- The future driver should try out the comfort of the seat; if necessary, provide auxiliary devices for adjusting the seat.
- The functionality of the brakes is checked.
- Electrical circuits and lighting fixtures are installed.
As individual elements and assemblies are manufactured, their performance is checked. A fivefold safety margin is provided here.
After completing the bench tests, they begin the field tests. You need to know how the car behaves in difficult conditions.
How to make a swamp vehicle with your own hands?
You can buy a swamp vehicle in specialized stores; many fishermen make such a device themselves. This allows you to implement all the necessary requirements and make the device according to your personal preferences.
To make your own, you should follow the following steps:
- Make all necessary drawings and prepare materials.
- Make a frame for the future all-terrain vehicle.
- Prepare the pendant.
- Mount the wheels.
- Install the engine.
- Install the wiring and lighting system.
At the last stage, the device is checked and all deficiencies are eliminated.
Drawings of a swamp vehicle
Engine selection
When choosing a motor, you need to take into account the power of the device and its size.
The following types of engines can be used:
- motorcycle engine - used if a small vehicle is being designed for one person. However, many fishermen do not advise using this type of engine; the swamp vehicle must be able to overcome heavy loads, which a conventional motorcycle engine cannot handle;
- car engine - used very often, especially if it is a ZAZ car brand. The devices have a high level of power and traction capabilities, which allows the swamp vehicle to be used even in extreme conditions;
- engine from a walk-behind tractor or small tractor. This is a frequent case, since such devices meet all the necessary conditions.
Good to know! Among engines, car engines are often used, since it is easier to purchase them in used condition. Using a used engine is possible if the device has undergone a major overhaul beforehand.
Chassis
When installing the chassis, it is important to select the quality of the metal and observe all the little details that will affect the comfort of movement and the duration of operation. The chassis is made using corners and sheets of durable metal.
Metal pipes can also be used in the design. Hitch frames are used, but many anglers use frames from old vehicles, changing their design to suit their needs.
Track or tires
More often, tires are installed on homemade swamp vehicles, this is due to easy installation and availability of parts. Factors influencing the choice:
- Tracks are a more complex type of design, but have more advantages when moving in hard-to-reach places. The disadvantages include the high fuel consumption of tracked vehicles. All parts will have to be assembled manually, because... factories practically never produce such running gears.
- Swamp vehicles on low-pressure tires are a more realistic and feasible option. Less time and money is spent on assembly, such a chassis is technically simpler, and there are no problems with purchasing spare parts.
The choice between tires and gooseneck depends on the purpose of the vehicle and personal preferences.
When choosing tracks or tires, each user individually considers this type of issue. Caterpillars are a more complex type of structure, but in the process of moving through impassable areas they have a greater advantage than tires.
Tires for swamp vehicles are used much more often, this is due to the availability of the part and easier installation.
How to make wheels for a swamp vehicle with your own hands
We need to prepare tires from trucks. They should be washed and dried. Further actions:
- Make a cut and pull out the wire cord using pliers. Use a white marker to draw a design (herringbone pattern).
- Use a construction knife to make cuts around the perimeter of the design. Remove loose rubber using a winch.
- Sand the surface of the resulting chamber.
- To create a tire frame, weld the wheels with the plates and grind them. Place the camera on the frame and pump it up.
To increase cross-country ability, the wheels can be equipped with chains.
How to make a trailer for a swamp vehicle
Making a trailer will allow you to move cargo. A simple design is suitable for this purpose. It can be assembled from a metal corner; elements from a walk-behind tractor will also work. For fixation, a through pin with a bottom lock is used.
Sources
- https://SpecMahina.ru/vezdehod/samodelnye-na-gusenitsah-i-shinah.html
- https://TraktoraMira.ru/vezdehody/samodelnyj-gusenichnyj-vezdehod.html
- https://grifon-kamaz.ru/zapchasti/samodelnyj-vezdehod-na-gusenitsah.html
- https://activefisher.net/kak-sdelat-bolotohod-svoimi-rukami-process-izgotovlenia-certezi/
- https://EasyTravelling.ru/vsya-ryba/chertezhi-bolotohoda.html
- https://bagorik.ru/aksessuari/bolotoxod-svoimi-rukami.html
- https://SpecMahina.ru/vezdehod/kak-sdelat-bolotohod-na-gusenitsah-ili-shinah-nizkogo-davleniya.html
[collapse]
Related posts:
- Logic problems for children 6–7 years old with answers
- Intelligence level test (IQ test) according to Eysenck