Today on the Internet you can find many instructions and drawings on how to make a pneumatic snowmobile with your own hands. Before moving on to developing circuits, it is necessary to find out what is special about pneumatics. The homemade device consists of a control support ski and a leading support pneumatic. The rear axle of such devices has a rather primitive structure; it is usually made independently. The shaft is presented as a single piece, unlike the shaft in conventional snowmobiles. Both wheels are driven, there is no differentiation at all. The differential structure in this case is compensated by the stable design of the hull, resulting in an increase in the overall maneuverability of the vehicle. A significant disadvantage is low maneuverability, although this disadvantage can be smoothed out with special technical features.
The leading ski has two side cuts, which greatly improves traction on snow or ice. Is duralumin used as a material for making corners? This metal, like nothing else, increases ride quality in snowy areas.
The shaft moves due to the tension of the chain, the housing is fixed in the required position. Low-pressure pneumatic tires do an excellent job of shock-absorbing snowmobiles, and special cut tubes are often used as a supplement. Typically, pneumatics for traveling on snow are created from the following parts:
- chambers from tractor wheels (with low internal pressure);
- frame disks of the required size;
- transport belts (only bandages are used).
Together, these elements provide excellent control and uninterrupted shock absorption for the machine. Shaft sprockets must always meet the following parameters:
- front? 8 incisors;
- back? 28 incisors.
Thanks to this resonance, the speed of the machine increases and the shock absorption improves. The above parameters are optimal for snowmobiles.
It is worth paying attention to the fact that the main characteristic of any snowmobile is traction; the quality of movement and safety will depend on this parameter. Typically, snow machines do not accelerate more than 50 km/h? Perhaps everyone will agree that this is the optimal speed for a good device. A car on pneumatic wheels does not weigh much, but its engine power is quite high. With these characteristics, the device can cope with steep slopes and difficulties on snowy roads. Proper structure and high-quality construction can ensure the transportation of cargo or passengers whose total weight does not exceed 100 kilograms.
Relevance and features of operation
A pneumatic snowmobile has a number of positive characteristics compared to conventional snowmobiles:
- quite high speed;
- high depreciation;
- ease of control;
- simple structure;
- powerful engine;
- resistance to breakage and deformation.
Even if a breakdown does occur, it will not be difficult to repair the device with your own hands, even in the most severe conditions. Today, snowmobiles with this structure are increasingly used. A homemade machine will give you a certain level of freedom, since you can easily customize the machine to suit your parameters and needs. To make snowmobiles with your own hands, you do not need high qualifications and knowledge in the field of engineering; you can make a snowmobile from old parts from vehicles and scrap materials. You will have to buy a minimum of spare parts if you have old motors, tires, large transport skis and bearings lying around in your garage.
Be careful when choosing a motor for your device; it should not be too powerful, but durable enough. The optimal parameters for the motor are:
- middle class (motoblock);
- manual control;
- rear type hitch.
A pneumatic machine with such an engine will consume a little gasoline without losing maneuverability, power and speed. Some of the highest quality motors are Japanese-made engines; such devices are time-tested and tested.
Before you start making a machine, make sure you have:
- device for bending pipes;
- welding machine;
- small necessary details.
Of course, the engine will play the most important role in creating a vehicle.
Materials for building an all-terrain vehicle
- ICE - Tiger-390E with a power of 13 hp.
- 5 speed gearbox from the Golf-2 car.
- The clutch and CV joints are also from Golf.
- Bridges from VAZ classic.
- Profile pipes.
- Sheet metal.
Let's take a closer look at the stages of construction and the main components of the all-terrain vehicle.
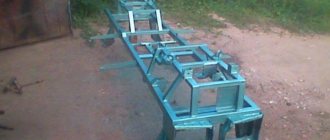
The all-terrain vehicle frame was welded from a profile pipe. The Tiger-390E four-stroke single-cylinder engine is installed on the frame.
Improvements to the front axle of the all-terrain vehicle.
Here are the spare parts used to lock the differential:
The author installed a K65S carburetor on the engine. After which the engine speed increased to 5 thousand. The carburetor is quite easy to adjust and works great.
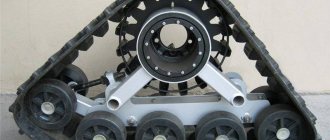
Then the author began making the wheels of the wheels. The used wheels from the truck were torn off, but the landing gear was not touched and the wire was not removed. As you can see, the tread is cut into a fir tree with a flange.
The rubber is cut to the next canine to be able to grip further. The undercut is where the inner cord is.
Discs are made.
Below is a diagram of how the disks were made with the main dimensions:
To make the disks, a 50 cm barrel with a thickness of 1.5 mm was used, with a 45 degree end 2 mm thick, and a disk from a classic 13-inch vase was taken as the basis. The disc is secured with standard 6 M6 nuts. There are also two locking rings. The weight of the assembled disc is 22 kilograms.
The tube weighs 15 kg, the tattered tire from the VI-3 is single-beam with four layers, the width of the lugs is approximately 3 centimeters, weighs 36 kg. The assembled wheel weighs about 73 kg.
Locking ring.
Homemade vulcanizer.
Muffler made. The length of the muffler is 400 mm, the diameter is 11 centimeters; to give rigidity, the author made the last can an ellipse. The first and second cans are made thick-walled.
Attaching the axle to the frame.
Steering.
Rear semi-frame.
A 14V 65A generator is installed.
The homemade all-terrain vehicle successfully passed tests not only on land, but also on water. The engine handles well and has enough power. The all-terrain vehicle feels great on the water. In first and second gears, any obstacles can be easily passed. The maximum speed of the all-terrain vehicle in fifth gear on a flat surface is 35 km/h.
Video by the author of the homemade product: testing the all-terrain vehicle on land and water.
Homemade author: Vladimir. Belarus.
Types of homemade all-terrain vehicles
Depending on the type of design and chassis, the following types of homemade all-terrain vehicles differ:
- Swamp boats. They have a simple design and are relatively cheap to manufacture. They are equipped with an outboard motor and allow you to move around shallow bodies of water.
- A caterpillar swamp vehicle allows you to drive through overgrown bodies of water, but it is quite complex and expensive to manufacture, as it requires the attachment of a special type of tracks.
- An all-terrain vehicle with low-pressure tires is the simplest and most promising type of swamp vehicle, the performance of which depends on the design and reliability of the tires.
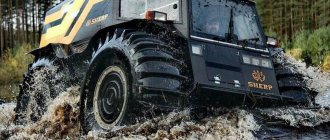
Some homemade products later become serial models. This happened with Alexei Garagashyan’s all-terrain vehicle called “Sherp,” which is now known all over the world.
Design features
A distinctive feature of all representatives of the class of equipment under consideration is that their frame is articulated. It is thanks to this that the wheels are able to be located at almost any angle (not exceeding the indicator provided by the design) in relation to the others. And this, in turn, significantly increases the cross-country ability of snow and swamp-going vehicles. Such a frame also reduces the risk of the car turning over on its side, which is extremely important in extreme driving conditions - for example, on rocky ground.
All-terrain vehicles can have two or three axles, the specific number depends on operating conditions. The engine can be of two types:
- diesel;
- carburetor
If the car will be used for hunting, then it is better to give preference to the second option.
Types of homemade all-terrain vehicles with low pressure tires
Homemade all-terrain vehicles on low-pressure tires, having the same principle of off-road movement, may differ in type of design. There are the following main types of vehicles of this type:
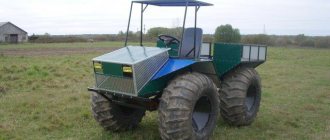
1. All-wheel drive caracat . In its design, it uses transmission and chassis elements from outdated types of passenger cars. It has all-wheel drive, a transfer case, and the adapted boat hull in its lower part and the tightness add buoyancy to the all-terrain vehicle. Designed to overcome swamps and swamps, it is capable of delivering cargo and people to areas inaccessible to ordinary SUVs.
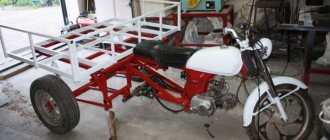
2. Tricycle on low pressure tires . It has a very simple design and can be made by almost any car enthusiast in a garage. The IZH Planet 3 motorcycle is often taken as the basis for such an all-terrain vehicle, due to its endurance and unpretentiousness.
3. Homemade karakat with an SZD motorized stroller engine . Its peculiarity is that the engine is located not under the frame or gas tank, but under the seat or in the rear of the all-terrain vehicle’s frame. Chassis parts are traditionally taken from cars, and elements of motorcycles are used in the front part. Pipes, channels and angles are used to make the frame.
4. All-terrain vehicles with low-pressure tires based on cars or ATVs . They are manufactured using ready-made main units by reworking the transmission and chassis, as well as equipping them with low-pressure tires.
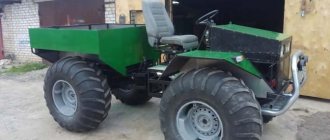
Untitled swamp vehicle
A four-wheel drive swamp vehicle is perfect for hunting and fishing. We can say that 80% of homemade all-terrain vehicles are built for hunting or fishing trips. The four-wheel drive swamp vehicle, although very miniature, can easily overcome swampy terrain. Thanks to twin KAMAZ tubes and a protector made from pipe scraps.
The Zhiguli wheel was used as the basis for the wheel, which fit well to the required size. The homemade all-terrain vehicle is very controllable at a maximum speed of 50 kilometers per hour. The swamp vehicle weighs about 250 kilograms, which does not interfere with good cross-country ability in swampy areas. In order to assemble the fracture unit, home-made workers used pipes, a bushing that was turned for a reamer on a lathe, and steering bipods. Of course, all this was welded efficiently for several hours, or even days.
How to make an all-terrain vehicle on low-pressure tires?
Work on manufacturing an all-terrain vehicle begins with drawing up an action plan, the full implementation of which means achieving the desired result. The following tips will help you save time and money:
- Availability of free time, allowing you to regularly carry out work on assembling the all-terrain vehicle. If it is absent, it is better not to start at all.
- Budget planning. Creating an all-terrain vehicle yourself allows you to save on purchasing a production model, but in order to eliminate unnecessary expenses, you need to make all the calculations and buy the necessary components and parts, and also leave a certain amount for unforeseen expenses or breakdowns.
- Developing a plan. If you have experience in developing vehicles or the inclinations of a design engineer, it is possible to independently create a drawing of an all-terrain vehicle. In the absence of such, they use other people’s experience and ready-made drawings, of which there are a sufficient number on the Internet.
What is important to consider?
- Attention should be paid to work daily. If you are not sure that you can do this, then it is better not to start anything at all.
- Create a project for the future design in advance. If necessary, use the drawings of other inventors, fortunately there are a lot of them on the Internet.
- Plan your budget correctly. Yes, making it yourself will help you save a lot, but to do this you need to calculate the cost of consumables and purchase them in advance. You also need to set aside a little in case there isn’t enough.
As you can see, the described snow and swamp-going vehicles are very useful for difficult terrain. They are quite expensive, but if you have the skills and appropriate equipment, you can save a lot by building a vehicle with your own hands.
Add ProCrossovers to your favorites
DIY low pressure tires
Tires of this type visually resemble huge pillows that support the entire structure. The degree of grip in such wheels allows the vehicle to be passable on any off-road terrain. Depending on the design features, such tires are divided into the following types:
- Arched. They are 5 times larger in size compared to a standard wheel, and have a thickness of up to 700 mm. The pressure in them is like in a regular ball - 0.05 MPa. Installed exclusively on the drive drive.
- Wide-profile. They are distinguished by an oval design and pressure up to 2 times lower than standard. Most often used in lifting vehicles.
- Toroidal. They are manufactured in tube and tubeless versions and are highly popular among car enthusiasts.
- Pneumatic rollers , having lugs to improve cross-country ability, and ribs to increase rigidity, giving the entire structure stability and strength.
The cost of factory-made low-pressure tires may be unaffordable for many car enthusiasts. But for your own all-terrain vehicle, it is quite possible to make such a wheel yourself. The work is performed in the following order:
1. Selection of source material, for example, agricultural or aircraft tires, as well as other types of industrial transport.
2. The tread is cleaned, washed and dried, after which the desired patterns are drawn to create your own design, as well as to remove excess wire and rubber.
3. To remove excess wire, the inner part of the wheel is trimmed and the cord is removed using a winch.
4. Excess rubber is also removed with a winch, making cuts around the circumference, and securing them to the cable with pliers, carefully pulling them and cutting them with a knife.
5. After removing the tread layer, the surface is cleaned with sandpaper.
6. Disk assembly. To do this, use a standard disk cut in half, or welded from plates and pipes, and then carefully polished to prevent damage to the camera.
7. The tire is pulled onto the rim and secured with belts or a fire hose, and then inflated. The wheel is ready.
What type of tread should I choose for an all-terrain vehicle?
To select the right type of tread for an all-terrain vehicle with low-pressure tires, you need to consider the following factors:
- The protector must have the ability to self-clean. This property is especially important for using an all-terrain vehicle in harsh and wetlands.
- When using an all-terrain vehicle on peat bogs, choose tires with low and shallow terrain, otherwise if their top layer breaks, the grip will be insufficient for full movement.
- When used in snowy areas and on sandstones, tires with a rare pattern are chosen.
Self-production
Let's consider step by step how to make different types of snowmobiles with your own hands.
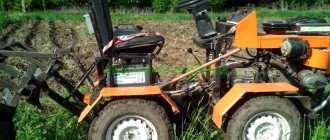
Snowmobile made from a walk-behind tractor on wheels
To turn a walk-behind tractor on wheels into a snowmobile you will need to take:
- iron connecting structure-trailer;
- wheels for winter use, capable of overcoming snow obstacles.
A strict condition of the whole idea is that the trailer must be rigidly coupled to the frame of the snowmobile. A metal channel about half a meter long must be welded parallel to the axis of the snowmobile. To do this, two holes are drilled at the edges of the channel. Clamps with holes along the edges provide additional fastening and structural rigidity. They are attached to the snowmobile axle with bolts and a locknut, using a crosspiece welded to the structure.
This mount will become a stopper that secures the trailer, preventing it from moving at an angle. Although such an element reduces the ability to maneuver on a snowmobile, it makes it more stable. Thus, a two-wheeled mechanism on one axle can easily be converted into a stable four-wheeled vehicle. In this case, you will not need any diagrams and drawings, or additional costs.
A snow scooter with a motor will also require the correct selection of wheels. The easiest option is to purchase them in a retail chain for winter use, but looking for the easy way is not always advisable. A more economical solution would be to make the wheels yourself. A budget option is to equip the snowmobile module with cameras designed for trucks. Deflated tubes are placed on each wheel and secured over the chain for driving on snow and ice. One is not enough, you need five. The inflated chamber in the wafer of chains will be an ellipse with a surface divided into segments, like a daisy.
Another option for using ingenuity and saving the family budget is to use metal hoops over the cameras. They should be wide enough, twice as wide as the snowmobile wheels. The diameter of the hoop must correspond to the inflated wheels of the walk-behind tractor and trailer. Several metal plates are welded on the inside of each hoop. The thickness of the plates should be made about 2-3 cm. Having lowered the chambers, you should put hoops on the snowmobile wheels and inflate them again. The inflated chambers will press against the metal circles as much as possible. Ground grip-like plates will help increase traction on snowy roads.
Read also: Vga cable pinout diagram
Snowmobile made from a walk-behind tractor on tracks
Converting a crawler walk-behind tractor into a snowmobile is a little more difficult, but possible. Using a walk-behind tractor motor, you can make a structure with great stability and maneuverability. To do this, a frame and transmission are mounted. Make sure that the engine power is sufficient; you will need a walk-behind tractor of at least 6 horsepower. To make a snow scooter with an engine you need to use:
- gearbox;
- fuel tank;
- steering;
- centrifugal clutch.
It’s good if you have tracks from other snowmobiles in your home supplies. If not, then don’t give up. It is quite possible to assemble the tracks yourself using available tools and materials.
Next, you need to decide where to install the engine: front or rear. Try to make the structure as light as possible and the ski suspension as soft as possible. All this will allow you to achieve high cross-country ability in deep snow. The principle is this: inside the caterpillar, when moving, 4 wheels roll along the transport belt. Special ground hooks are attached to the tracks to enhance traction. The tracks can be made at your discretion, but you should carefully consider the dimensions.
Wide or too long tracks will place undue stress on the engine. Which, in turn, will make it more difficult to control a snowmobile on tracks in the snow. A track that is too small will not be able to support the weight of the entire structure with the driver. It will become unstable and will sink in loose and deep snow. To make tracks, the simplest materials are used: small-diameter plastic or plastic pipe, wheels, bearings.
Blanks 0.5 cm long are made from the pipe, from which ground hooks are obtained. They are attached to the tape at the same distance from each other. Then they are secured with bolts in the holes on the transport belt. The frame is made using square pipes or a channel. Use a tie rod without ball ends, since the axes of the steering wheel and skis lie in the same plane.
Bushings are attached to the front of the frame to allow the skis to turn. They can be made from steel couplings with small diameter pipes and threads. The ski racks and tie rods are welded to the pipes. To control the snowmobile, corners with a metal undercut are attached to the skis, which will allow you to move on ice or snow crust.
The weight of such a snowmobile is no more than 100 kg, and it is very easy to operate the vehicle. Since the motor power is low, the speed does not exceed 10-15 km/h, so there are no brakes. The end of movement occurs due to the reduction of engine speed or the so-called engine braking.
Many farmers are interested in how to make a snowmobile from a walk-behind tractor. To cultivate a small plot of land, gardeners purchase a walk-behind tractor. To use it in winter, owners turn the device into a walk-behind snowmobile.
Choosing an engine for an all-terrain vehicle
Most often, the following types of engines are used as a power unit for self-manufacturing an all-terrain vehicle:
- Motorcycle.
- ZAZ car.
- Motoblock.
- Domestic cars.
The presence of a specific engine in an all-terrain vehicle does not make a fundamental difference. It is more important to take into account such a feature as ensuring its sufficient cooling , since the vehicle is operated all year round in different temperature conditions and at low speeds. The ZAZ engine is excellent for this, as it can withstand temperature changes well. All-terrain vehicles running on motoblock power units have also proven themselves to be the best.
Another main criterion for choosing an engine for a future homemade product is its power .
The power reserve must be sufficient so that an all-terrain vehicle on low-pressure tires can get out of mud, water, or deep snow.
By choosing a unit with a power reserve, you get better performance, prevent overheating and create conditions for the longest service life.
Features of the all-terrain vehicle chassis
The chassis of all-terrain vehicles on low-pressure tires is made in the form of an independent suspension to give the all-terrain vehicle better cross-country ability, increase the comfort of driving the vehicle and make riding easier for the driver and passengers. This type of design has a main drawback - the complexity of manufacturing.
To create it, pipes, angles and channels made of durable alloy steel are used, creating a strong base that can last for several years without breaking. The frame is made both solid and articulated. The latter has a high working potential, but the complexity of its manufacture makes it quite rare in home-made designs.
Sequence of self-assembly of an all-terrain vehicle
Assembling an all-terrain vehicle on low-pressure tires includes the following steps:
1. Selecting the type of all-terrain vehicle and the base on which the units and parts will be mounted. For this, frames of cars or motorcycles are used, as well as home-made structures developed on their own or borrowed from someone else’s drawings.
2. Manufacturing and assembly of suspension with rear axle. For this, the optimal solution is an independent design , and although much more time will be spent on its creation, the end result will be an all-terrain vehicle with higher cross-country ability and ride comfort.
Major failures of all-terrain vehicles
The main malfunctions of home-made structures are associated with the low residual life of the components used. For example, due to increased loads in the transmission (due to the lack of a center differential), the gears of the main pairs and the transfer gearbox are destroyed. The all-terrain vehicle's fracture unit generally does not experience loads exceeding the design values, so there are no problems with the hinge. When driving off-road, the keys on the cardan shafts and the outboard bearing (used on some modifications of Karakat all-terrain vehicles) may be damaged.
Video testing a homemade all-terrain vehicle
The walk-behind tractor is a universal unit that helps make work easier in the garden. Nowadays, a lot of equipment is made from a walk-behind tractor with your own hands: a mini tractor, an all-terrain vehicle, a snowmobile.
The snowmobile appeared in the 60s as one of the categories of homemade all-terrain vehicles. At first, these devices were configured like a tricycle, with the front wheel replaced by a ski. This scheme for snowmobiles is still popular today. But the most popular is a snowmobile based on a walk-behind tractor, with three to six wheels.
What you need to know when making a snowmobile based on a walk-behind tractor
Before creating such a snowmobile, you need to solve the following problem: what is the purpose of the future machine? To do this, the weight of the maximum luggage, the desired number of pieces, and the conditions under which the device will be used are specified. After we have finally figured out all of the above, when we have determined the future concept of the snowmobile, we begin to consider options for creating the machine. After which they move on to the selection of components and components of the snowmobile. To do this, determine which type and model of engine is best suited.
Select the transmission, type and design of the frame and other elements. Particular attention should be paid to the choice of the shape of the chassis system. Design parameters are also carefully calculated: tire sizes, engine power and weight of the snowmobile.
After analyzing and comparing possibilities with desires, the design of the all-terrain vehicle is finally selected. A necessary condition for completing this stage of activity is a diagram and drawing of a homemade snowmobile.
For a snowmobile with pneumatic wheels, a walk-behind tractor engine is perfect. To do this, select the motor that is most suitable for the conditions of use and power. Another advantage of using engines from a walk-behind tractor is the presence of forced air or water cooling, since the snowmobile does not have the conditions necessary for natural cooling.
Four-stroke engines have a number of advantages over their two-stroke counterparts. When choosing the type of engine: carburetor or diesel, you also need to weigh all the pros and cons. After all, both systems contain advantages and disadvantages. Compared to a gasoline engine, a diesel engine is more economical. But in severe frosts it is difficult to start and operates unstably, without a pre-heater. Gasoline engines are much less susceptible to this.
Snowmobile assembly instructions
To create a quality pneumatic snowmobile, you first need to think about a forced air cooling system. To create it, you just need to put a special extension with a pulley in two streams on the knee shaft. From this device you need to run belts to the generator and two fan impellers to ensure rotation.
You can quickly carry out these simple operations with your own hands. Next, you can proceed to creating a fuel pump device; it is better to place it on top of the oil pump cover drive; the fuel pump must be connected to the shaft of the oil structure. It is best to use a fuel container with a volume of 30 liters; it must be hung under the frame from the body, near the rear of the axle. An excellent option for a fuel pump would be the device from the ZAZ-965A.
Next you need to install the filter and carburetor. The air filter can also be borrowed from the ZAZ-965A, and the K-127 is suitable as a carburetor. The final stage of the design will be the installation of the ring gear; it must be mounted on the flywheel using an adapter. Don't forget to cover your homemade snowmobile with a hood; a galvanized steel sheet is perfect for this. You can create other elements for pneumatics with your own hands; wheels for it can also be homemade. Let us remind you that for this you will need:
- chambers with low internal pressure (wheels from a tractor trolley can be used);
- frame disks (sizes must be selected individually);
- bandages from transport belts.
Knowing the entire sequence of actions and instructions for constructing a snowmobile, you can quickly and easily make a budget vehicle for snowy roads!
What wheels to put on a snowmobile with a walk-behind tractor engine
When making a snowmobile with a walk-behind tractor engine, in most cases, hand-made low-pressure wheels are used. What is unusual about snowmobile tires? They have relatively light weight, high elasticity, and the pressure on the ground is within small limits. A large rolling radius and good characteristics give the snowmobile efficiency and excellent cross-country ability.
The large volume of chambers gives the structure greater maneuverability. And when the space inside the discs is filled with foam, the snowmobile will noticeably reduce the adhesion of dirt and snow. The simplicity of the chassis design and the availability of materials allows us to avoid difficulties in the manufacture of a snowmobile.
Four principles for making your own all-terrain vehicle tire
- 1. Two disks made of sheet metal bridge each other. Then they are attached to the sleeve and the camera is put on them. It is fixed with pieces of conveyor belt. For greater camera protection, a protector from another camera is sometimes used.
- 2. Attach one disk to the sleeve. After that, jumpers are attached to it, to which the side rings are riveted or welded.
- 3. The design is similar to the previous construction principle. In this case, when installing the central disk, a spoke made of pipe or sheet metal is required.
- 4. The fourth principle is to mount two discs on the hub, like a motor scooter wheel disc.
Let's finish here. Of all the options, you can use the one you like best. You just need to decide what the purpose of the machine is and get to work!
What are these snow and swamp-going vehicles?
Numerous videos highlight the cross-country ability of this miracle technology. So, in the video below, you can clearly see that for the described all-terrain vehicles there are no obstacles in principle.
And it doesn’t matter whether the terrain is rocky, swampy or sandy - the snow and swamp-going vehicle will cope with it perfectly, mainly thanks to these same wheels.
Note! It has been proven that the maximum cross-country ability of this type of equipment is achieved under conditions where the area of the flat part of the tire in contact with the surface corresponds to 1/3 or 1/4 of the diameter of the tire itself.
As a result, the pressure on the surface under the weight of the vehicle is minimized. Moreover, if the tire pressure exceeds the surface pressure on them, then plastic deformation disappears. The car simply cannot move on such surfaces, so the pressure is reduced (within reason, of course).
You can find out why more and more motorists love crossovers in this material.
Are you thinking about whether to do engine chip tuning? Take a look at our material, you will find all the information you need in it.