Spring-balance suspension is used in three-axle and two-axle trucks of the Kama Automobile Plant, as well as semi-trailers with three axles, where the central one is shifted to the rear axle. In such vehicles, springs are placed on the bridges, only special equipment is mounted in the middle - a KamAZ 6520 balancer.
In terms of its structure, it may have differences in individual moments, but its role remains the same - to absorb vertical loads and make lateral displacements stable. The main advantage of such a device is to reduce wear on the KamAZ chassis and its spare parts.
Structure of the KamAZ balancer unit
A node may contain one or a pair of transverse axes. It all depends on the structure of the car:
- if there is one, then the spring connection is strengthened with clamps;
- with two shafts, the connection is fixed with brackets that are connected with ties. Fastening is carried out with studs to the rear suspension. To connect the latter with welded side members, frames are used, which are reinforced with bolts.
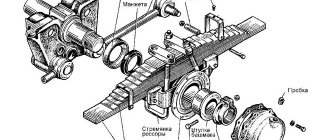
The basis of the suspension is a pair of holders that are rigidly fixed to the frame. The axis of the balancer and the tie pass between them. The axle is secured on each side with special shoes. They are installed in such a way that they are able to swing freely. Springs are installed to the upper surface using stepladders. They lie on the beams of the central and last bridge.
Reference! The holders, axle, and shoes are located exactly in the center between the central and rear axles, which are connected to the truck frame using reaction rods.
The design of bridges and reaction bars forms a trolley, thanks to which quiet movement is achieved on uneven sections of the track. This is achieved due to the relatively free rolling of the structure on the axis.
In addition, the balancer suspension can be additionally equipped with pneumatic elastic parts and have shock absorbers. In any case, the main element continues to be the balancer shoe.
Where is the balancer shoe in the suspension located and what is it for?
This KamAZ spare part plays an important role. Due to the fact that the part is present in the car, a bogie is formed that softens the movement of the car over uneven surfaces. If the shoe were missing, the suspension would be stiff. There would be no smooth ride, and all the irregularities would have a negative impact on the KamAZ frame. It is also worth noting that the spring shoe performs the task of a load-bearing component for mounting the springs.
Considering the above, we can conclude that the shoe receives increased loads, which means that strict requirements are placed on this element.
Types and structure of the KamAZ balancer shoe
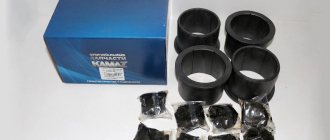
There is nothing complicated about the structure. The shoe consists of three components: a cast shoe and a pair of bushings.
The balancer is a complex element that is divided into a couple of parts. The first has a cylindrical shape, where the bushings and axle are mounted. The second is flat, on which the spring rests. A pair of bushings are placed inside the element. They perform the task of friction bearings. In addition, the part has openings for mounting stepladders and fixing screws.
Today KamAZ installs standardized elements under an axle with a diameter of 88 mm. They differ from each other in the type of pressed bushings and oil.
There are 4 types of bushings in total, which are made from the following resources:
- Grodnamid or plastic;
- zinc and aluminum alloy;
- bronze;
- aluminum.
Bronze bushings are considered the most durable. In terms of service life, they can be compared with alloy plugs. As for the latter, their service life is about two years. True, they are easier to maintain and update than the previous ones. Because of this, such elements are most popular among KamAZ drivers.
As for lubricants, liquid or thick are used. However, the second one is used more often because it needs to be changed less often.
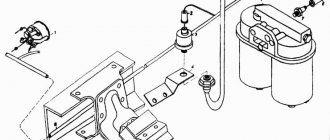
Reference! Trucks from the Kama Automobile Plant have a special opening for filling oil and are equipped with several seals - these are rubberized cuffs that prevent lubricant from leaking, and rings protect the insides of the axlebox from dirt and dust.
Indications for repair
Over time, even such a durable element is prone to wear, which causes the breakdown of components. For this reason, it is necessary to undergo timely inspection and maintenance at a service station.
Repair of the rear suspension often involves updating bushings and holders due to the following defects that have arisen on them:
- wear;
- cracks;
- kinks.
In addition, the condition of the springs, reaction loads, retainers, spacers and shoes should be assessed.
Damage to bushings is a popular problem with balancer failure. The components are seated by tapping with a hammer. If the pins are weak, then they are updated. If a leak occurs from the crankcase, the gaskets should be updated. Axle repairs are performed by grinding. This removes traces of damage, and also mounts parts with smaller internal dimensions. It is worth noting that on modern trucks the axle can burst. However, you can fix the damage yourself.
How the node works
The balancer device contains, depending on the design of the machine, 1 or 2 transverse axes:
- In a mechanism with 1 axle, the spring connection is reinforced with stepladders.
- With 2 axles, it is pressed into brackets connected with a tie and secured with studs to the rear suspension elements. The latter are connected to the welded frame side members with reinforced bolts.
At each free end of the axle there are shoes on springs. They fix the parts, have a plug hole through which oil is poured, and are equipped with seals:
- rubber cuffs prevent oil leakage;
- rings protect the inside from contamination.
A special bushing made of a material with a low friction coefficient and increased wear resistance is installed at the shoe attachment point. The manufacturer most often makes it from aluminum or bronze.
Modern trucks are equipped with bushings made of aluminum-zinc alloy or fluoroplastic.
The lubrication in the shoes is liquid or grease. When installing polymer bushings, a thick fill is used, which requires less maintenance.
Maintenance and repair of balancer shoes
Each rubbing element of the balancer is subject to wear, but the inner part of the bushings, the place where there is contact with the shaft, is subject to greater damage.
Reference! The required shaft diameter is 88 mm. The internal parameter of the KamAZ balancer axis bushing is always smaller, sometimes equal to 84 mm. Because of this, this part is subjected to boring before installation. Other KamAZ spare parts should also be checked and prepared.
The inner diameter of the shoe is 100 mm, and the outer diameter of the bushing is 100.2-100.3 mm. This creates a high-quality press fit. It is worth boring after this procedure. This ensures their location on the same straight line.
It is necessary to regularly inspect the bushing clearances. As soon as the critical opening size of 0.5-1 mm is reached, update the bushings. Until this point, it is worth calibrating the axial slot in the shoe.
Calibration Sequence
Calibration proceeds as follows.
- Install KamAZ on a stand.
- On the rear axle, you need to pull the spring ends from the supports. Then remove the element. This will create rotation of the balancer.
- Unfold the washer so that the assembly does not rotate by hand. To do this, unscrew it 1/6 of a turn.
- Tighten the clamping screw. The moment is 8-10 kgf*m.
- Estimate the balancer speed. If they are difficult, then loosen the screw and unscrew the washer.
As for stepladders, they should also be measured during replacement. At the same time, the craftsmen evaluate the condition of the thread, the width of the landing area and the length of the stepladder. When diagnosing reaction rods, it is worth assessing the fit of the fingers in the bracket. If a backlash is detected, they are updated. The seating area has a nominal size of 43 mm.
All adjustment and replacement procedures should be carried out in a specialized service center. Self-repair may be performed incorrectly or with errors. Such oversights will cause serious damage in the future. Eliminating them will take more time and money. A timely visit to the service station will save you from spending. Our technicians will carry out professional and high-quality repairs using original spare parts.
Always ask for help, and then KamAZ will last a long time.
Repair
During the operation of KamAZ, the balancer, despite the strength of the parts, wears out, which leads to breakdown of its components. Therefore, inspection and maintenance are carried out in a timely manner in specialized service centers or with your own hands.
Rear suspension repair involves diagnosing and replacing brackets and bushings due to emerging defects, such as:
At the same time, the condition of springs, reactive traction loads, stepladders, oil seals and shoes is checked.
Bushing wear is a common cause of balancer failure. The fit of the parts is periodically checked by tapping with a hammer. When loosened, the pins are replaced with new ones. Bushings are repaired when consumables wear up to 90.2 mm.
If there is an oil leak from the crankcase, replace the seals.
Repairing the balancer axis consists of eliminating traces of damage by grinding and installing repair elements reduced in internal dimensions.
How to adjust
Adjusting the axial clearance in the balancer shoe on a KamAZ vehicle is performed as follows:
- Place the machine on a stand.
- Pull the spring ends from the rear axle supports and remove the part, thereby ensuring the rotation of the balancer.
- Unscrew the split nut so that the mechanism cannot be turned by hand.
- Unscrew it 1/6 turn.
- Tighten the pinch bolt. The tightening torque should be 8-10 kgf*m.
- Check the rotation of the balancer. If they are difficult, loosen the pinch bolt and unscrew the nut.
Replacing bushings
As you drive, the wear rate increases. An increase in the space between the bushing and the axle affects the balancer, which swings in different planes and deforms the parts.
The standard axle diameter is 88 mm. For tight pressing, the outer dimensions of the balancer bushing are 100.2-100.3 mm, the inner dimensions are 1 mm less.
The nominal gap is 0.12-0.30 mm. Replacement of worn bushings is carried out when the critical value reaches 1 mm.
The balancer at the landing site can be ellipsoidal or conical. For alignment and reliability, it is better to press the bushings into the shoe, install them on a boring machine and bore 2 pieces at once. The calculated diameter of the sleeve should be 0.05-0.08 mm larger.
Do-it-yourself maintenance of the KamAZ balancer - we cover the issue
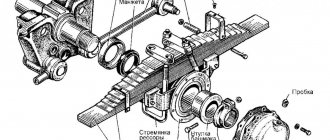
KAMAZ vehicles have a rear suspension equipped with a balancing device, which is pressed into a bracket, which is part of the balancer axis, acting as a coupler. The springs are equipped with removable supports. The reaction arms located below, which increase repairability, are also removable. Mounting plates are used to secure the supports to prevent them from moving. To limit the movement of the axles in the downward direction, the spring supports are equipped with axle roll limiters.
Repair of KAMAZ balancers, including repair and restoration of the KAMAZ balancer axis, involves checking, first of all, the condition of springs, torque rods, balancer shoes, and stepladders. When the shoe bushings related to the balancing device are worn out, when the level of wear exceeds the permissible level, the axles should be ground to remove signs of wear and repair bushings with a reduced internal diameter should be installed.
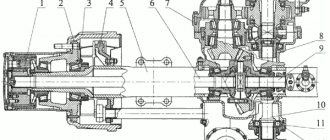
Balancer axis of different Kamaz models
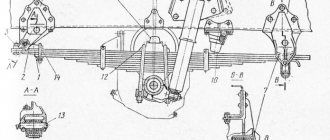
The balancer axle is a part of the rear suspension of a truck. The figures below show assembly diagrams of the balancer axis of various heavy truck models from the Kamaz company.
Figure 1 — Diagram of the Kamaz 43118 balancer axle
- main axis of the part;
- part fastening bracket.
Figure 2 - Diagram of the Kamaz 65115 balancer axle
- axial mounting bracket;
- balancer tie.
Do-it-yourself KAMAZ balancer repair
When repairing a KAMAZ balancer axle or repairing a KAMAZ balancer shoe, it should be taken into account that this axle has a nominal size of 8.8 cm, the shoe bushing is 8.75 cm, and the repair bushing is approximately 8.4 cm. The nominal size of the gap between the bushings and axle - from 0.12 to 0.305 mm, and the permissible maximum gap size between the bushings and the axle is 1 mm. If the bushings move freely, they must be replaced with new ones. We also need to replace the balancer cuff, boot, protective cup and nut, and inject the shoes using a grease fitting.
If cracks are detected in the spring sheets, they must be replaced with main sheets with a thickness of 12 mm (nominal) to 18 mm (maximum). It is recommended to measure the sheet size using a tape measure and caliper to provide the seller with accurate data. When assembling the springs, it is necessary to lubricate the rubbing leaf surfaces with graphite-based lubricant, and lubricate the pins on the front springs. Installation of rear and front springs on a car is carried out in pairs, the difference in deflection should not exceed 1 cm.
Repair of the rear suspension of a KamAZ car
In the article we will consider the removal and installation of the balancer axis, and the replacement of reaction rods
In the previous article we looked at replacing rear suspension springs
Replacing the rear suspension balancer axle
The balancer axle with bracket assembly must be replaced:
— with radial movement of the spring shoe, which cannot be eliminated by adjusting and replacing the bushings;
— mechanical damage (breakage, bending of the axle, cracks of brackets, etc.)
Removing the balancer axis with the bracket assembly
We remove the rear spring, as described in the article “Replacing and repairing springs on a KamAZ vehicle”
Using a 46mm spanner, unscrew the pin nuts of the lower reaction rods, remove the spring washers and press the pins out of the balancer axle bracket
Using a 13mm socket wrench, unscrew the bolts of the shoe cover, drain the oil into a prepared container and remove the cover with the gasket
Using 19mm wrenches, unscrew the nut of the tension bolt of the spring shoe nut
Unscrew the shoe nut and remove the spring shoe
Using a 55mm socket wrench, unscrew the nut securing the tie rod for the balancer axle brackets and loosen the second nut at the opposite end of the tie bar
We install stands under the brackets of the balancer axles (we do this with an assistant)
Using a 41mm socket wrench, unscrew the nuts securing the balancer axle brackets to the rear suspension brackets
Raise the rear of the car until the rear suspension bracket studs come out of the holes in the balancer axle bracket
We remove the axle assembly (we do it together with an assistant)
Installing the balancer axle with bracket assembly
We install the balancer axis with the bracket assembly on the stand, putting the bracket on the tie, and tighten the tie nuts (we do this together with an assistant)
We lower the rear of the car and secure the balancer axle brackets to the suspension brackets with nuts
We install the shoe bushings, the spring shoe with the cuff and tighten the split nut so that the balancer does not turn by hand, then unscrew the nut 1/6 turn and tighten the coupling bolt nut with a torque of 78.2-98.1 Nm (8-10 kgf ) (perform together with an assistant)
Install the gasket and secure the shoe cover
Fill the shoes with TSp-15K oil to a level no lower than 60 mm from the lower edge of the filler hole and tighten the plug
We insert the pins of the reaction rods into the bracket of the balancer axis and put on the spring washers, tighten the pin nuts with a torque of 353-392 Nm (36-40 kgcm)
We install the rear spring “Replacement and repair of KamAZ vehicle springs”
Replacement of reaction rods
The reaction rod must be replaced if the following malfunctions occur:
— wear of the ball surfaces of the fingers and liners. An external sign of wear is the presence of free play in the ball joints of the rod;
— rupture, wear of the dirt seal;
— mechanical damage to the rod
Removing the upper reaction rod
Remove several platform floor panels
Unscrew and unscrew the ball pin nut and press it out with a puller from the rear suspension torque rod arm.
Unscrew the nuts of the puller 5, remove the cover 4, pass the rod between the studs of the puller
Place cover 4 on the studs and tighten nuts 5
We insert wedge 3 all the way between the ends of the tip of the rod and the eye of the pin, while screw 1 should be in the extreme right position
Tighten nuts 5 and, screwing screw 1 into housing 2, press the pin out of the eye
We do the same for the rod head pin fixed in the bracket of the upper reaction rod
Replacement of liners and fingers of reaction rods is carried out when the axial play in the reaction rod is more than 1.3 mm
Installing the top reaction rod
We install the rod head pin in the upper reaction rod bracket, put on the spring washer and tighten the pin nut with a torque of 353-392 Nm (36-40 kgcm)
We do the same for the rear suspension reaction rod lever.
We lubricate the ball joints of the jet rod heads using grease nipples with Litol-24 lubricant.
We remove the lower reaction rod and install it according to the same scheme
Adjusting the axial clearance in the shoe of the balancing device
We lift the car by the frame and place it on stands. We provide the ability to rotate the balancer by separating the ends of the rear spring from the axle supports or by removing the spring
Tighten the split nut so that the balancer does not turn by hand
We unscrew the nut 1/6 of a turn, tighten the coupling bolt with a torque of 78.2-98.1 Nm (8-10 kgcm) and check that the balancer can be rotated. If the balancer does not turn, additionally loosen the split nut, having first loosened the coupling bolt
When disassembling the balancing device, if the axles and bushings of the balancing device shoes are worn beyond the permissible limit, you must grind the axles until traces of wear are eliminated and install repair bushings (reduced in inner diameter).
With a nominal balancer axle diameter of 87.93-88.00 mm, the nominal gap between the axle and bushings should be 0.120-0.305 mm. The permissible gap between the axle and bushings without repair is no more than 1.0 mm
Wear of the cheeks under the spring
Wear of balancer bushings is the most common “disease”. The second problem is the wear of the cheeks under the spring. A gap is allowed between the bushings and the balancer axis (according to the manufacturer’s passport - about 1 millimeter). With such a gap, in fact, large loads are applied to the bushing, especially during turns.
There are four types of bushings made of different materials: aluminum with zinc, bronze bushings, regular plastic and aluminum. Our company most often uses bushings made of bronze and aluminum-zinc alloy.
The fact is that the balancer axis is in normal condition, i.e. in terms of cylindricity, its wear is 0.1-0.2 millimeters; in this case, bushings with zinc are ideal, which are quite strong and one and a half times cheaper than bronze ones, but they are quite fragile (the “shoulder” breaks off on them on worn axles).
When the axle is worn by more than 0.2 millimeters, it is recommended to use bronze bushings when overhauling a KAMAZ, because bronze is more viscous than zinc and can withstand heavy loads, especially when turning. Plastic and aluminum bushings are not used, because the parts cannot withstand the loads and after two years of operation they break.
We should talk about bushing boring and clearances. First of all, it is necessary to select the correct bushings by size, or rather, by internal and external diameters.
To tightly press the bushing into the balancer, it must have an outer diameter of 100.2-100.3 millimeters; on bronze bushings, a size of up to 100.5 millimeters is allowed. The bushing must have an internal diameter 0.5-1 millimeter less than the nominal value for high-quality boring of the balancer with bushings.
Boring of bushings
Boring the bushings on a lathe and further pressing will not give the required result, because the balancer quite often has a conical and ellipsoidal seat; the outer diameter of the bushing also has an allowance of 0.2-0.3 millimeters, so after pressing the bushings with 2- x sides, the alignment between them will not be ideal, the internal size of the bushing will repeat all the errors of the balancer, and as a result, it will be almost impossible to adjust the axle diameter. That is why the bushings are pressed into the balancer, installed on a boring machine, then two bushings are calculated from the first installation at the same time.
The bushings should have a calculated diameter that is 0.05-0.08 millimeters larger than the balancer axis. If the standard axle has a diameter of 88, then the seat in the balancer will have a size of 88.05-88.08. The smaller the gap between the bushings and the axle, the more time it will take for it to wear to critical sizes.
With every tenth of a millimeter of bushing wear, the wear rate increases significantly, because due to the gap, the balancer can swing in different planes, wearing out the axle and bushings. Therefore, the practice of our company allows us to say that before replacing the balancer bushings, the maximum gap should be no more than 0.5 millimeters.
Wear of the balancer axis
We should also touch on the topic of wear on the balancer axis. The technological procedure for manufacturing the balancer axes is quite complex and can only be carried out in a factory environment. The difficulty lies in the fact that this is not just turning, machining the ends for the shoes and pressing into the brackets, but also heat treating the areas for the bushings.
The ideal situation was in Soviet times, when the places for the bushings were hardened, cemented and ground. The spaces for the bushings have a Rockwell hardness of 62-64 HRc, which is equal to the hardness of a file. The balancer bushing is a softer material and is a replaceable element. Due to the fact that in old shoes the bushings were lubricated with “thaw”, which was poured inside, good sliding was ensured; the hardness of the axles did not allow the material of the bushing to be riveted onto it.
With timely replacement of the shoe bushing and no lubrication, the axle could last up to 30 years, with less wear (up to 0.2 millimeters). In modern conditions, without loss of production culture and without quality control, the reliability of spare parts cannot withstand criticism, so it is not surprising that balancer axles are not thermally treated on new trucks, on which axle wear is up to 1 millimeter in 2 years.
To shoot or not?
Our company practices reworking the axle on site without removing it from the vehicle. When performing a major overhaul of a KAMAZ internal combustion engine, a grinder, a square, a straight edge or a micrometer are used and the axle is aligned within 87.5 millimeters in cylindricality. This extends the life of the axle.
Another option involves removing the axle from the car, installing it on a cylindrical grinding machine, and grinding the journal to fit the bushings. Depending on wear, the recommended size is up to 86 millimeters. Repair bushings are pressed into the shoe and bored to fit the axle; bushings are ordered for repair.
In this case, the cementation goes away, the axis becomes “raw”, but is restored to cylindricity. Such axles are recommended for installation on dump trucks, where the axle load is less than that of grain trucks.
The third method involves turning, surfacing and grinding the axle. The craftsmen of our company made a large number of similar axes and ended up using this method. Many axles break; during surfacing, the structure of the metal changes and the axle cannot withstand the loads.