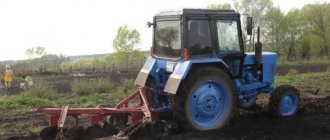
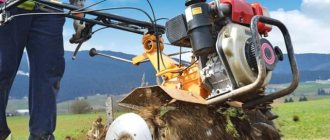
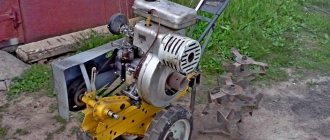
Use of T-40, T-40A tractors for agricultural work. Plowing
IN
Depending on the given plowing depth and on the soil resistivity, plowing units with T-40 and T-40A tractors are made up of two-three-furrow plows PN-2-30R, PN-3-35, PON-2-30, PSG-3-30A , PKS-3-35 and others.
T
The T-40 tractor is most often aggregated with a double- or three-furrow plow, from which one body is removed. Three-furrow plows can be used at shallow plowing depths or on light soils.
N
It is most advisable to use the T-40 tractor with a three-furrow plow and use a double-furrow plow with it only in difficult working conditions.
IN
The above-mentioned mounted plows are attached to three points of the mounted system of the tractor linkage mechanism. The locking rods should be adjusted so that the plow in the working position deviates from the average position to the right and left by 120 mm, and does not swing when lifted to the transport position.
Z
It is forbidden to adjust the working stroke of the plow using locking rods, because this will lead to their breakage. In addition, a plow secured in this way will not work correctly and its resistance will increase.
D
To work with mounted plows, a movable stop is moved on the rod of the power cylinder of the tractor hydraulic system in order to avoid locking the cylinders. Otherwise, when working in fields with uneven terrain, breakdowns of the plow or hitch mechanism cannot be avoided.
AND
From the transport position to the working plow, it should be transferred by moving the hydraulic system distributor handle to the floating position of the distributor spool. The plow lowers under its own weight. The lever should be moved quickly, without holding it in the “neutral” or “lowering” position, because due to forced lowering and excessive pressure, parts of the tractor’s mounted system may fail. When working with mounted plows, it is prohibited to set the distributor handles to the neutral position, in which the piston and rod are locked, because the resulting rigid connection between the tractor and the plow will lead to uneven plowing depth and breakdowns.
AND
From the working position to the transport plow, the plow is transferred by quickly moving the distributor handle to the uppermost position. It is recommended to maneuver the tractor only with the plow deep.
U
Stable operation of a tractor unit with a mounted plow is ensured if the middle of the plow's working width coincides with the longitudinal axis of the tractor.
E
If the middle of the plow's working width is to the right of the longitudinal axis of the tractor, it tends to exit the furrow to the right; if left - left.
P
When working with double-furrow plows, set the tractor track width to 1200 mm, with three-furrow plows – 1350 mm.
N
and when plowing, the right wheels of the tractor move in the furrow, the left wheels move along the unplowed field. Due to the fact that the tractor moves at an angle, more traction weight falls on the right drive wheel. And the traction conditions of the right drive wheel are better than those of the left one. This is why the left drive wheel slips more than the right one.
D
To reduce slipping of the left drive wheel, it is recommended (in addition to securing the main set of weights to the disks of the drive wheels) to use additional weights applied to the tractor. They are mounted on the disk of the left drive wheel using bolts 170 mm long. You can also increase the grip weight by filling the tires with a special solution or water.
D
To reduce slipping of the left wheel in straight processing areas, it is recommended to lock the drive wheels.
P
When working with mounted plows, a mechanical drive wheel loader should be used. It is also necessary to take into account that the use of a mechanical loader when processing heavy and very dense soils leads to such a decrease in the deepening force of the plow that the uniformity of plowing depth is disrupted. If by adjusting the plow it was not possible to restore its normal depth, then the central link is moved along the comb one or two holes higher.
E
If the tractor is not fully loaded, it is recommended to attach one link of harrows or light rollers to the arable unit.
P
The straightness of the furrows affects the productive operation of high-speed arable units. That is why, when dividing fields in a plowing area, you should ensure that the paddock is as straight as possible.
P
the productivity of the T-40 tractor when plowing stubble with a double-furrow plow at a plowing depth of 25 cm and at a speed of 7.5 km/h is 0.47 hectares per hour of net work with a fuel consumption of 15.75 kg/ha; when plowing fallow land to a depth of 24 cm - 0.45 ha/h with a per hectare fuel consumption of 12.9 kg.
P
The productivity of the T-40 tractor when plowing stubble with a three-furrow plow PN-3-35 (according to experimental data) is 0.58 ha/h with a per-hectare fuel consumption of 12.8 kg.
P
The performance of the T-40A tractor when plowing fallow land with a PN-3-35 plow to a depth of 24 cm was 0.63 ha/h with a fuel consumption of 15.2 kg/ha.
WITH
The average performance of the T-40 and T-40A tractors on plowing (translated into soft plowing) is 0.52 ha/h for the T-40 tractor, and 0.55 ha/h for the T-40A tractor.
Setting the working width
Modern general purpose plows have the ability to adjust the working width using a hydraulic system. Typically, such units are purchased by large agricultural producers working on different types of soil. It is also possible to adjust the width mechanically: to do this, you need to fix the mounting bolts in other positions. This is a simple procedure that takes 15-20 minutes, but many farmers prefer to work on standard settings, simply increasing the plowing speed. Such a decision can hardly be called reasonable. The fact is that as the speed of the tractor increases, fuel consumption increases sharply - it burns 20 percent more diesel fuel, and this increases the cost of cultivating the land. As a result, production profitability decreases. If the plowing speed exceeds 10 km/h, the quality of tillage drops significantly, and wear on the working surface of the knife increases by almost 400%. Of course, buying spare parts for a plow is not a problem today. However, when working on light soils, it is more prudent not to increase the processing speed, but simply to increase the working width. Hydraulically controlled devices usually have end stops that prevent the blades from extending beyond their limits. After expansion, it is necessary to adjust the support wheel so that the balance of the system is not disturbed. It is installed parallel to the field board. When the support is located at the rear, nothing needs to be adjusted.
Important The best KamAZ tow trucks with partial loading and a sliding platform
How to properly adjust a plow on MTZ?
- Product design - main components
- Preliminary adjustments of the plow - points that must be taken into account when working
- Final adjustment – adjustment under operating conditions
- Afterword
What components does a plow consist of? What do you need to know to adjust it correctly?
The range of attachments, including plows, for MTZ tractors is growing every year. New models are becoming more and more advanced, and their use can significantly increase the efficiency of using tractor equipment. What this device is, what it consists of and how to adjust it will be discussed within the framework of this material.
Homemade attachments
Almost any attachment for a tractor can be made independently. This could be a homemade potato digger, a homemade rotary mower (or haymaker), a rotary plow, a cultivator, or a hiller. Sometimes you can remodel some equipment to make it more functional.
The most popular queries in the search engine remain the design of an active plow on MTZ or DT and the question of how to make a cultivator with your own hands. After all, cultivators are faithful assistants to agricultural workers. The most complex element on MTZ or DT is the rotary cutter. A converted cultivator with a high-quality cutter can carry out hilling for a long time.
It is not difficult to understand how to install attachments, be it plows for tractors, a homemade cultivator, a potato digger for a tractor, or other homemade products. The main thing is to act according to the given algorithms and check the diagrams and drawings. In the same way, you can easily understand how to adjust the chisel plow of a wheeled tractor without any extra effort. Installing chisels on a wheeled tractor is a labor-intensive process, which can nevertheless be done by the tractor driver himself.
What would you choose? Should I buy a new plow or make one myself?
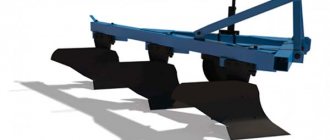
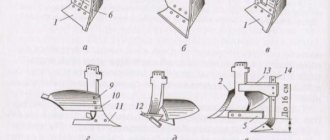
Product design - main components
The basis of the plow consists of the following parts:
- Frame – the base on which all its components are fixed;
- The body is a solid cast stand with a blade, a plowshare and a field board attached to it;
- Skimmer - a small casing with a working surface used for the final embedding of plant residues;
- Support wheel - used for precise regulation of plowing depth, and its adjustment is possible due to a system of special marks printed on the stand;
- Hitch – provides connection between the tractor and the plow;
- Harrow hitch – is responsible for harrowing the surface, which takes place simultaneously with plowing.
DIY trailer
The single-axle cart design for the T-25 tractor is the most suitable option. The average weight of the standard design is 800 kg, which will allow it to transport loads up to 2 tons. The cart frame is made by welding spars at least 10 cm thick. A complete axle of a small tractor can be used as an axle and wheels for the cart.
To equip the trailer with a blade option, it is necessary to reinforce the frame with a beam in the middle part. A socket is welded to the beam for installing a cylinder, which will be responsible for the dump of the body, and a reinforced support for installation. The hydraulic cylinder most suitable for a small-sized cart blade is PTS-9. The maximum output of the cylinder is 85 centimeters, which will allow the body platform to become at an angle of 50 °.
Preliminary adjustments of the plow - points that must be taken into account when working
Preliminary adjustments must be made before the tractor leaves the field, observing the following sequence of actions:
- Place spacers under the support wheel on the plow and the left tractor wheels (their height is equal to the plowing depth, with a difference of about 2-5 cm) and lower the plow down so that the plowshares touch the surface;
- By means of a screw mechanism on the support wheel, it is slightly lowered down until it comes into contact with the gasket;
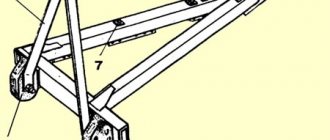
- The plow is leveled along the transverse plane by means of a right brace mounted on a tractor hitch, and along its longitudinal plane - due to a central type of traction. The main requirement is that the frame must be parallel to the base along both planes;
- The hitch braces are adjusted in accordance with the front holes in the longitudinal links, while the upper link is attached to the automatic clutch frame exclusively through the hole. Connection through a groove is unacceptable, as this causes some problems and unstable movement of the plow when moving at depth;
- Restrictive type chains installed on the hinge are adjusted by rotating the screw ties until they slightly sag. This makes it possible to achieve a small swing of the plow in the transport position - about 20 mm, no more;
- Install the left brace on the hinged kit so that the gap between the hinge axles is 515 mm. During operation, it is not permissible to change the length of the left brace; this value must be fixed.
Final adjustment – adjustment under operating conditions
Well, the adjustment is completed in the field. After the first two passes, check the width and depth of the treatment. If the first body plows deeper than the rear one, lengthen the central link; otherwise, shorten it slightly. Distortions in the transverse plane are adjusted by adjusting the braces, and the grip width is adjusted by moving the suspension axis to the left or right along the guides.
They also pay attention to the correct position of the central link - it should be in a parallel position with respect to the longitudinal axis of the tractor, with the limit chains freely lowered. When turning the plow in the direction of the arable field, move the axis forward along the left bracket, but if it moves to the left, move it back.
After the adjustment is completed, all mechanisms remain unchanged until the completion of work in this area. After moving to a new site, the operations for setting up the unit are repeated.
Afterword
When carrying out work on adjusting the plow, you should be extremely careful, since the slightest mistake can result not only in the loss of precious time, but also in significant financial expenses. Take into account the recommendations outlined above and you are guaranteed high-quality work in the field.
Related Posts
I bought a 40 t plow, the entire attachment on it was broken. How to digest under a square?
- Author: Maxim Kandaurov
- November 10, 2020
Hi all. I bought a t 40 plow, the entire attachment on it is broken, I want to weld a nick under the square, tell me how to do everything correctly
Is it worth using a rototiller instead of a plow at 40 m? There are doubts about the depth of cultivation.
- Author: Lego Go
- April 15, 2020
Good health to everyone! The question is next. I have a T40am, I want to buy a rotary cutter. I want to use it instead of a plow. There are doubts about the depth of processing. Maybe someone uses the same thing, tell me whether it’s worth doing this or not. And maybe someone recently purchased it? Where, at what price? Thank you.
If you mow hay on a 40-segment mower, what is its fuel consumption per hour?
- Author: Oleg Vinokurov(admin)
- July 28 11:21
Good morning. Tell me, here’s a question: if you mow hay on a 40-segment mower, what is its fuel consumption per hour?
Tractor T40. Why is oil leaking from under the head?
- Author: Denis Semenov
- 22 July 13:10
Question: [id232460791|Denis Semenov] Hello, the T40 tractor is throwing oil out from under the head, tell me what to do?
Why doesn't the vom turn off? It turns when the tractor moves. And while the tractor is standing, the plow does not turn. What could it be? Tractor T 40
- Author: Askhat Magambetov
- 13 July 18:06
Good day. The vom stopped turning off. It turns when the tractor moves. And while the tractor is standing, the plow does not turn. What could it be? Has anyone encountered this? Tractor t 40
Is the MTZ geared starter suitable for the T 40 tractor?
- Author: Viktor Sokolov
- 01 July 10:00
Guys, can you tell me if the MTZ gearbox starter is suitable for the T 40 tractor?
Why is the right front wheel constantly blocked on the T-40? Eats rubber, constantly slipping.
- Author: Oleg Vinokurov(admin)
- June 30 15:30 3 comments
Good afternoon. Tell. On the T-40 the right front wheel is constantly blocked. It eats rubber, constantly tears the turf from under itself with slipping, you remove the shaft to the front, which stops eating. Maybe someone had this. How to fix this? What are your thoughts on this? Thank you in advance.
Why does the T 40 shake when you release the clutch pedal? We tried to adjust the paws, but there was no result. When the shaft is turned on, it spins only when in motion.
- Author: Almas Sultanov
- June 30 00:52 4 comments
Good evening, such a problem, when releasing the clutch pedal t 40 there is a rattling sound, we tried to adjust the paws, but without results. Tell me, please, what could be the reason? Can the voma's paws influence this? They weren't touched. Does the turned-on shaft spin only when driving, or should it also spin in neutral?
Do crosspieces from a UAZ fit on the front axle of a T 40? And what are they suitable for? Is it necessary to remove the side panel?
- Author: Konstantin-Lesnik Ivanenko
- 09 June 21:21
Tell me if the crosspieces from the UAZ are suitable for the front axle T 40. And from what they are suitable. And is it necessary to remove the side panel?
I'm dismantling the onboard T40. Should there be some kind of plug or something else on the lid with the hole?
- Author: Artur Danilov
- 03 June 10:12
I'm dismantling the onboard T40. As you can see in the photo there is a hole in the lid, there should be some kind of plug there or something else? Question: [id140112482|Artur Danilov]
How to properly set up and adjust a plow on the MTZ 80
The plow for the MTZ 80 tractor is suitable for PLN-3-35. Used to flash any type of soil across a variety of crops. Flash depth up to 30 cm, on soil with a resistance of no more than 0.09 kg/cm². But incorrect assembly and adjustment of the plow will lead to poor-quality tillage and rapid wear of the equipment. How to set up a plow on MTZ 80 video and photos will help the reader understand and find answers. Which plow is best for MTZ 80?
- Plow design features
- Safety precautions before setup and assembly
- Preparing and setting up the plow for work
- Rules for plowing with an adjusted plow
PSK 5
This plow belongs to the group of five-furrow devices. It is also used to prepare the soil before sowing. Soil cultivation can be carried out to a depth of 16-35 cm. You can find out the price of a Polesie forage harvester here.
The plow can be installed on the following tractor brands: T-150K, T-150, MTZ-1523, DT-175. Also, work can occur with some foreign-made models. The productivity of this device reaches 18-24 hectares, while fuel is consumed in the amount of 6-7 l/ha. After removing the blade, it is allowed to be used as a ripper.
Plow design features
The PLN-3-35 is aggregated with tractors of the 1.4 kN class. These include the MTZ 80 and 82 tractors. A plow with angles or a skimmer is installed. If a vertical knife is mounted on the last body, then risky ones are no longer installed. The choice depends on the type of soil that needs to be processed and the condition of the tractor.
After purchase, it is necessary to assemble the following parts of the plow into a single structure:
- Frame;
- Frame;
- Support wheel;
- Coulter;
- Trailed part of the harrow;
- Hang it up.
When assembling and adjusting the plow, you must understand that the harrows and cleaning parts attached are its parts. The thrust wheel screw is necessary to regulate the depth of soil flash. The skimmer should be mounted depending on the depth of tillage. We recommend installing a skimmer on the MTZ 80 according to the following rules:
- Fixing the stands on the top hole corresponds to a flash depth of 20 cm;
- Posts in the second hole - plowing to a depth of 22 cm;
- Stand on the third hole - plowing depth 25 cm;
- Stand on the fourth hole - plowing depth 27 cm;
- The bottom hole corresponds to a flash at a depth of 30 cm.
The plow body is assembled from shares that rotate to a solid stand. The blade and floorboard are also attached there. There are several types of plow body: cut-out, high-speed, moldless and classic with a deepening element.
The plow skimmer for the MTZ 80 tractor consists of a working part and a small body. A skimmer is used to remove plant residues. The skimmer structure consists of elements: blade, ploughshare, stand.
The wheel on the plow is necessary to regulate the depth of plowing. Refer to the directions above and the markings on the stand to set the depth correctly. The wheel consists of a disk with a rim, a bracket with a hub and an axle shaft.
The plow is connected to the tractor using a canopy. The harrow is attached to a special trailer. More detailed setup of the equipment can be seen in the video:
The video explains in detail how to adjust the model, what should be taken into account. After watching the video, the reader will finally understand everything.
Chisel units
Chisel plows come in quite a wide range these days, making it a little difficult to choose. Let's get acquainted with the technical characteristics of the most popular models compatible with MTZ 80 and 82 tractors.
PCH-4.5 "Almaz"
Plow from the Almaz line - PCH-4.5
This model weighs 1,640 kg, and with an additional roller - 2,540 kg. Its dimensions (L\W\H) are 2,830x4,500x1,950 mm. Productivity reaches up to 3.5 ha/h with a processing depth of 450 mm and a speed of 8 km/h. The unit is compatible with almost all tractors of domestic and foreign production and having a power of 300-400 hp.
PCH-2.5 "Almaz"
The unit weighs 780 kg, and with a roller 1,245 kg with the same dimensions as the previous model. The tillage depth is 450 mm, and the width is 4.4-4.5 m. With 11 working elements, the productivity of the unit is 3.2 ha/h. Compatible with traction units with a power of 300-390 hp.
PCH-6 "Almaz"
The PCh-6 chisel plow weighs 5,748 kg without a roller and 5,920 with a roller with dimensions of 8,300x6,100x1,600 mm. The productivity of the unit is impressive - 4.3 ha/h, and the processing depth is 450 mm with a soil working width of 6,000 mm. The plow has 16 working parts and operates at speeds of up to 8 km/h. The unit is compatible with tractors with a power of 450-480 hp.
You can see the plow in more detail in the video:
The video shows an example of plowing with a chisel plow.
Which Almaz model is best to purchase for cultivating a 2-hectare plot? You can take a small plow PCH 2.5. Its size is enough to process a small field. What is the maximum tillage depth for the Almaz plow? The maximum tillage depth is 45 cm. Is the PCH 4.5 plow suitable for the Belarus mini tractor? No, it will not work, since the power of the tractor should be 300-400 hp.
Safety precautions before setup and assembly
You cannot start assembling and setting up a plow for a tractor without knowing the safety rules. They include the following items:
- Before the tractor starts moving, you must sound a sound signal. Only then do they begin to move smoothly.
- Before raising and lowering the plow, you must make sure that there are no animals or people nearby.
- It is forbidden to engage infantry if there is any malfunction of the plow.
- Stand near a working plow.
- If the restrictive chain system of the plow is weakened, turns cannot be made.
- Do not sit or stand on the frame of the equipment while moving.
- With the tractor running, adjust, adjust or tighten fasteners on the equipment.
- Remove soil and plant debris from the plow during operation, without turning off the equipment.
- The plow cannot be adjusted without additional support.
- Before transporting the plow, it must be raised and the limit chains tightened as much as possible.
- If the fasteners are not tightened enough, you cannot start flashing.
Why setup is needed
General preparation and adjustment of equipment can reduce fuel consumption by 20–30%, reduce labor costs and plowing time, improve soil characteristics and increase the yield of the site. The first step is to prepare the tractor for working with the plow. It is necessary to equalize the tire pressure by setting the minimum permissible values. You should also study what the footprint of agricultural machinery that will work with the plow looks like. Typically, it uses wheels with a profile width of about 60 centimeters. To give the equipment better cross-country ability and increase maneuverability, many owners of agricultural equipment increase the front track. However, this results in misalignment with the rear wheels. This leads to problems when the tractor moves along the furrow: it moves obliquely and plows the field unevenly.
To avoid imbalance, it is recommended to shorten the lifting rods to the maximum possible level. Check their length: it must be the same, otherwise there will be a skew and the quality of plowing will decrease.
Preparing and setting up the plow for work
The plow is assembled on a special supporting wooden block or beam with a cross-section of 65 or 70 cm. The plow is heavy and if the structure falls, it can kill the tractor driver.
Assembly work is carried out in the following stages:
- Open the packaging and select spare parts; they should be put aside. We lay out the main components in a convenient order.
- We bring the frame into locking mode and install it on the prepared stand.
- The housing is hung and inserted into the stiffening beam and the rack with a bolt. The housing stand is mounted to the frame using locknuts.
- On the left, the skimmers are screwed to the body in front of the body holders using brackets. There is no need to tighten the staples at this stage.
- We secure the support wheels using brackets and spring washers. They are attached to the outside of the structure.
- The support wheels are lowered all the way; to do this, turn the screw nut at the end counterclockwise).
- We tighten all the brackets until they stop and remove the plow from the stand.
- The scraper is mounted to the wheel bracket using washers and nuts.
- The hitch is mounted on the plow frame using bolts, which must be tightened until they stop.
- We screw red reflectors to the back of the main beam.
The plow is assembled and ready to be set up. The tincture is carried out in the following steps:
- Before using for the first time, inspect the equipment. Lubricate the wheel bearings and all rubbing parts with grease.
- Set the skimmer to the required plowing depth. The gap between the coulter shares and the body must be at least 250 mm. Using the protrusion on the holder, we adjust the depth of tillage.
- Tighten the skimmer clamps completely. In this case, the field edge of the skimmer covers the edge of the body.
- The PLN plow has a soil grip of 105 cm, so the track should be 1560 mm. To prevent shortfalls when plowing, the right wheel of the machine is placed in the furrow.
- The slanting rods of the mounted part are adjusted after the plow is installed on the ground.
- The braces are placed in the front holes of the rod.
- Before work, it is necessary to adjust the limit chain. The longitudinal rods should swing freely horizontally by 120-130 mm in different directions. To do this, the chain is built with a slight slack.
- Before plowing, it is necessary to adjust the depth by adjusting the traction of the mounted part and the support wheel. Initially, according to the timing of the front wheel, the average depth value is set and the first row is passed. Next, the flash depth is adjusted for each type of soil individually.
- When working, the right side of the frame should always be slightly higher than the left. As the furrow passes, it will break out and be strictly parallel to the soil.
- After passing the furrow, make sure that the plowing is uniform and completely covers the plant residues. There is an adjustment on the left side of the plow that will help make the plow for the MTZ 80 tractor more stable. If the plow moves to the side, then the canopy is moved back.
- If the frame warps, then you need to lengthen the brace.
- You can adjust the plowing depth of the front part of the body using the right link slants from the mounted unit, the rear part using the top one. In this case, the support wheel is placed at the required plowing depth and the position is fixed using a support bolt in the holder.
High-quality plowing can be determined by several criteria:
- The plowing depth of all plow bodies is uniform, the furrows are the same.
- When plowing forever, the adjusted units remain in the same position.
After moving to new fields, with a different type of soil, the plow must be adjusted in a new way.
Rules for plowing with an adjusted plow
For uniform and correct plowing, a number of rules must be followed:
- When moving from one furrow to another, the plow rises to the transport position.
- Circular plowing can only be done with a reversible plow.
- The plow turns smoothly.
- When transporting the working body, it is necessary to control the ground clearance. The distance from the road to the plow must be constant.
- When using a power deepener, the support wheel is removed from the plow. The depth is adjusted automatically.
- When plowing with power control, remove the support wheel from the plow. In this case, the specified plowing depth is maintained automatically using a power regulator.
The price of a new plow for the MTZ 80 tractor is presented in the table:
| Model PLN | With skimmer | Without skimmer |
| PLN: 3-35 | 60 000 | 55 000 |
| 4-35 | 85 200 | 80 600 |
| 5-35 | 110 000 | 100 300 |
| 4-80 | 135 000 | 120 000 |
The price for setting up used equipment from specialists will cost about 5,000 rubles. Setting it up yourself is difficult, only for the first time. New equipment is set up by specialists; they service the equipment free of charge for the entire warranty period. The plow must be monitored and maintained. Periodically during work, the tool is cleaned of adhering dirt and grass. Once a season, maintenance is done, the parts are lubricated and tightened. Proper adjustments and operation will extend the life of your equipment.
Types of plows for mini tractors
Among the main types there are:
- plowshare-dump;
- rotary;
- disc plow.
The plowshare-moldboard type is currently considered obsolete. It uses the traction force of the tractor to loosen the soil with wedge-shaped plowshares. It works exclusively along a straight path, 2-4 blades are attached to the frame. A mini tractor with a plow of a similar design is suitable for plowing already developed and tested land in order to reduce the cost of expensive equipment.
Tractor with reversible plow
The disc plow is used exclusively for difficult soil: rocky, clayey, clogged, as well as virgin soil. The sharp discs are attached to a single frame by movable spindles. While the tractor is moving, this mount helps the discs move and cut through hard soil.
The main difference between imported models and Russian ones is that domestic ones are not afraid of moderately contaminated soil, which is common among the main areas for farming in Russia. Difficulties in operation for imported ones lie in problems with the delivery of spare parts. Among the well-known brands, LS plowshare and moldboard is a model for working on a medium-power tractor, RT rotary is for a mini tractor.
Rotary plow for tractor
A rotary plow for a mini tractor is the most common and convenient type. Its blades are created in such a way that they balance each other. Two blades of workers plow the ground, the other two level it. When moving back, they change places, the plow turns independently.
This allows you not to turn the tractor and plow around and save time and fuel. Since the ground is simultaneously leveled by the same working blades, there is no need to use a milling machine in the field. Further sowing and creation of furrows for seeds is simplified.
Unlike other modifications, where the plow is driven by the movement of the machine, the rotary one rotates using a power take-off shaft (PTO). The soil processed by this type is more crushed and loosened, so the rotary is ideal for cultivating rice fields.
Rotary plow for tractor
Important How to make a snow plow on the MTZ-82 with your own hands: homemade rotary snow removal oblique shovel, drawings and dimensions
It is capable of loosening the soil to a maximum depth of up to 50 cm, which is twice as much as other types. Also, rotary plows for modern mini tractors are used in conjunction with disk plows for cultivating virgin soil; adjusting the plow to a mini tractor allows you to do this without problems.
Plow at MTZ
The Belarusian Tractor Plant is very popular these days, so plows for MTZ 80 and 82 tractors, with an average power of 80 horsepower, have become widespread. Any mechanisms with a rear PTO connection are suitable for these tractors. Among them, the PLN and PSK (PSKu) series are distinguished.
The plow for MTZ 82 from the PLN series is used to perform work with heavy and light soil, due to the difference in modifications. These plows are created specifically for the MTZ tractor. The simplest, 3-hull 3-35 plow for MTZ 80. It is suitable for clean land of no more than 1-2 hectares, it is afraid and breaks from strong roots and large stones. The depth of the furrow is 20-30 cm.
PLN 4-35 has a double configuration: disc knives on the skimmer and side grooves. It is capable of cultivating soil at a speed of 8 km/h. It is 4-hull, the coulter width is 260 mm, the depth is 25 cm. It can cultivate fields of up to 10 hectares without loss of productivity. The next modification, rotary model PLN 4-80, 3-hull, also does not like clogged soil, depth 18 cm.
For unclogged soil with a moisture content of no more than 30% and a resistance of 0.09 MA, use MTZ 82 with a PSK plow. This is a modern and universal three-furrow plow for the MTZ minitractor and MTZ 80, capable of working as a chisel or rotary-reversible plow. It has only positive reviews. The chisel option involves simple deep plowing in straight lines without turning or mixing the soil.
Mounted reversible plow PNO- (3+1) -42
Unlike the PLN, the PSKu plow (universal modification) does not lose adhesion to the ground during sudden compaction of the rock thanks to the chisel design. The productivity of the PSK is 50% higher than that of the PLN, with a fuel consumption of 8 liters less per hectare.
The PSKu-3 model is suitable for clean soil for sowing crops to a depth of 15-35 cm. It has two working blades, and the width of the layer of soil being processed with a ploughshare is 600 mm. It is possible to install an additional blade to loosen the soil. 5 buildings, total plowing width 3 meters, maximum speed during operation 10 km/h, which is even higher than that of PLN 4-35. This is the optimal PSKu option for the average farmer; it allows you to install a lot of additional equipment.