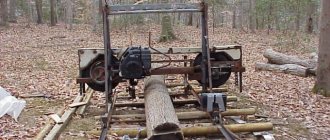
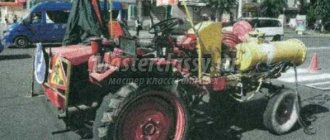
Homemade all-terrain vehicles on a pneumatic walk-behind tractor
Homemade pneumatic tires on low-pressure tires are popular due to their versatility and durability: both in summer () and winter () such a unit will always be on the move.
The design of a home-made pneumatic runner is based on the main traction force - the walk-behind tractor. The walk-behind tractor is an engine with a rotating element that allows the use of attachments - a cultivator, a rotary mower, a plow and others. You can often find pneumatics with a trailer - the power of a middle-class unit is even enough to transport a haystack.
In any case, there is no point in buying an expensive mechanism, since the pneumatic duct will still be upgraded to meet specific needs.
Engine selection
The engine power of a homemade pneumatic walker determines the performance of the walk-behind tractor, and therefore, the higher the power, the more efficient the pneumatic walker will work. But there is also a downside: with high power, fuel consumption also increases, and this is not practical if you live far from a gas station. If you plan to use an all-terrain vehicle only in the summer, then it is better to choose a budget model that has a two-stroke engine. It starts quickly and has a simpler design.
For winter fishing or hunting, only a four-stroke is suitable.
Four-stroke walk-behind tractors, thanks to step-by-step stages of activation, warm up gradually, which significantly extends the service life of the pneumatic drive.
Required tools and materials
Since it is necessary to weld metal parts together, you definitely cannot do without a good welding machine!
The list contains the following tools:
- Hammer;
- Screwdriver;
- Metal cutters;
- Drill with drills for metal;
- Grinder with a circle for metal;
- Set of car keys size 10 or 12.
The next step is to purchase the missing materials for a homemade pneumatic runner:
- Walk-behind tractor: you can use the engine from hybrid agricultural equipment;
- Wheels from a car or motorcycle: they are iron, so buy anti-corrosion paint; or homemade/modified depending on needs;.
- Cameras GAZ or others (for example, aviation or from trailed agricultural machines);
- Pipes: any pipes and even their trimmings will do;
- Steering column: it is advisable to purchase a model as new as possible, since the quality of control of a pneumatic all-terrain vehicle depends on this, or use a car rack;
- Hubs: suspension elements must be selected with the least wear, automobile ones can be used;
- Metal corners;
- Fastening elements (bolts, screws);
- Rebar or wire.
Assembling a pneumatic duct on low-pressure tires
Approximate drawing of a pneumatic duct
Before you start assembling a pneumatic walker from a walk-behind tractor with your own hands, make sure that all electrical components are compatible with each other. Be sure to draw up a detailed plan for the implementation of the project, as well as describe the assembly process step by step.
Observe safety precautions when working with a welding machine. Always wear a mask to protect your eyes and cotton gloves.
The installation process can be divided into the following stages:
- Preparing and cleaning the workplace from excess debris and tools.
- After determining the dimensions of the supporting frame, cut pieces of pipes with a grinder and then weld them into a single structure.
- Next, put the cameras on the disks and secure them. Check the tightness of the joints by pumping them with air.
Pneumatic wheel with a rim from an Izh motorcycle and a disk from a Moskvich
- Pay special attention to the design of the pneumatic steering: it must be free of damage and obvious signs of wear. Install the steering and secure it to the frame using a galvanized bolt.
- It's time to connect the drive! Screw the wheels and attach the brake pads to the metal axle.
- Installation of electrical circuits.
- After all the manipulations have been completed, proceed to install the walk-behind tractor. For stationary use, securely fix it with bolts. Now you can understand how your invention will work.
For durability and an attractive appearance of the pneumatic walker made from a walk-behind tractor, the finished structure should be painted with a special protective paint for metal.
DIY pneumatic wheels
Wheels can be of the following types:
- Tire with treads. Tires from a tractor or truck will do. They have a deep pattern that increases the maneuverability of a homemade pneumatic all-terrain vehicle. Often, home-made tires are made lighter by increasing the tread pattern by cutting off excess rubber on the outer layer - such wheels are called “rip-off” or “scuff” wheels.
- A car tube filled with air - low pressure tires. To increase the grip of the pneumatic hose with sand, ice, mud and water, it is necessary to attach metal chains, rings or belts to the chambers - this will give the structure additional rigidity when moving, and also increase maneuverability when cornering.
- Combined, when tires are used together with low pressure chambers.
For wheels, choose galvanized metal cast wheels, despite their cost - they will last much longer than iron ones and will fully pay for themselves in a few years.
To distribute traction more smoothly and evenly while working on a pneumatic track, install a four-speed gearbox from Zhigulenka. This way you can regulate the speed and significantly save fuel consumption.
If you plan to use the pneumatic vehicle at night, be sure to install headlights in the front of the frame: build a box where the generator and battery will be installed.
Buying a pneumatic walker is an expensive pleasure that not everyone can afford, but almost everyone can assemble a homemade pneumatic walker from a walk-behind tractor and scrap materials, saving a lot of money!
Making pneumatic tracks with your own hands on low-pressure tires is quite possible. These machines are popular due to their durability and versatility. This technique performed well in the summer heat and on snowy roads. You can use a walk-behind tractor as a basis. The unit is a power unit with a rotating element designed for aggregation with various attachments. Such a device is able to transport cargo on a small trailer.
Design Features
Such devices are considered universal, so more powerful machines are converted to small tractors. With this tool, the owner will be able to save money and get a practical and convenient device. In rural areas, as a rule, difficult roads predominate. And many owners love winter fishing, as well as hiking in the autumn forest to pick mushrooms.
Homemade transport devices consisting of walk-behind tractors have a wide range of types. The positive feature of a mini-tractor is its comfortable use
When creating such a vehicle, it is very important to take into account several features: a shift in the main center of gravity, an increase in the front axle, and the use of a new differential
Currently, entire kits are available for sale that help increase the number of functions built into the device.
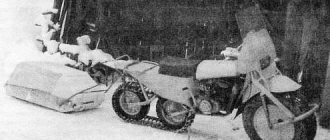
For those who want to drive on snowy roads in rural areas, this option is also well suited. Making a snowmobile with your own hands is quite simple. The most difficult thing in this case is drawing up drawings and mounting the chassis on four wheels. A feature of such transport can be considered the minimum pressure that falls on the surface of the earth. It is best to make specialized ground couplings based on the wheels of the walk-behind tractor.
For owners of heavy vehicles, everything is much easier. The structure of the transport device is almost invisible. In this case, the owner only needs to secure the lugs to the surface of the wheels of the transport model.
There are some features of creating an all-terrain vehicle. The main parts that you need to buy or create yourself for transport based on a walk-behind tractor:
frame - needed to create mobile transport in difficult areas; It is important to use the rear axle when mounting the rear wheels; a place for the driver to sit - it should be protected from dirt and water getting from under the wheels when driving; lighting that will help you move safely at any time of the day.
An all-terrain vehicle with a base in the form of a walk-behind tractor is created as a single-seat vehicle. The total carrying capacity of such equipment should reach 200 kilograms. The width will be calculated based on the resistance to possible vehicle rollover; most often it starts from 1100 mm.
Modern MTZ, Ugra and Neva walk-behind tractors produced in production include a power exceeding 10 horsepower. This power is quite enough to move at a speed of more than 10 kilometers per hour. When driving through impassable places and swampy areas, the speed can decrease significantly and reach only 1-2 millimeters per hour.
https://youtube.com/watch?v=cBc__uja2IU
Engine
The power indicator on a homemade unit determines the performance of the selected walk-behind tractor. The higher this parameter, the more efficiently the equipment will function. On the other hand, high power causes increased fuel consumption. If the owner lives in the outback, far from a gas station, this aspect will play a significant role.
Those users who plan to use the equipment only in the warm season are advised to opt for a budget modification with a two-stroke engine. It is simpler and launches quickly. For fishing and hunting in winter, the best option would be a four-stroke power unit. Such variations warm up more slowly, providing longer engine life.
Tools
To make pneumatic ducts with your own hands, you will need a set of certain tools and devices. This list includes the following items:
- Welding machine.
- Hammer, set of screwdrivers.
- Metal cutters.
- Drill and grinder with attachments for metal processing.
- Set of car keys.
The following materials will be needed:
- Motor from a walk-behind tractor or similar agricultural equipment.
- Iron motorcycle or car rims that should be treated with an anti-corrosion coating.
- Cameras from aviation or
- Pipe cuttings.
- Steering column. It is advisable to purchase this part in a new form, since it will be responsible for the quality of control of the machine.
- Suspension elements (car hubs can be used).
- Metal corners and fastening fittings.
- Wire and fittings.
Do-it-yourself pneumatic walk-behind tractor: assembly
Before assembling the unit in question, you must make sure that all electrical connectors and contacts fit together. It is necessary to draw up a schematic plan or drawing of the proposed apparatus. It is also necessary to develop work stages and observe safety precautions.
The installation procedure is divided into the following stages:
- Preparing and cleaning the workplace.
- Determining the dimensions of the base frame and cutting pieces of pipes to the required length and then connecting them by welding.
- Installing prepared cameras on disks and checking them for tightness of connections.
- Steering assembly installation. Particular attention should be paid to the quality of the column, its absence of damage and correct fixation using a suitable galvanized steel bolt.
- Connecting the drive by installing wheels and brake pads on a metal axle.
- Installation of electrical circuits.
After performing these manipulations, you can begin installing the walk-behind tractor with your own hands on the pneumatic ducts. The base must be securely secured with bolts. To make the machine look attractive and have a longer service life, it is advisable to paint the body and open parts with protective materials.
Wheels
When manufacturing the equipment in question, it is better to use parts from a truck or tractor with wide treads as wheels. Such modifications are distinguished by a deep pattern, which ensures high cross-country ability. Alternatively, you can lighten the tires by eliminating excess rubber on the outside. Such “homemade products” are called stripping.
A self-made pneumatic duct from a walk-behind tractor can be reinforced with low-pressure tires. They will provide traction on surfaces covered with ice or snow. To do this, you will need to adapt metal rings or chains, which will create additional rigidity when moving and improve the maneuverability of the equipment.
Instructions for making an all-terrain vehicle
Before starting work, you need to study the drawings and begin creating the machine according to this plan:
- weld a frame from a metal square or rectangular profile;
- make a kingpin and independent suspension to assemble a breaking joint;
- assemble the rear axle or take a ready-made one from an old car;
- mount the suspension on shock absorbers;
- install a suitable engine on the frame, for example from a walk-behind tractor;
- secure the seat;
- screw on plastic or metal protection;
- put the wheels on;
- connect lighting equipment.
The master selects brakes, fasteners for attachments and security systems individually for the project being implemented.
Difficult aspects of assembly
The most labor-intensive part of pneumatic tire production is the production of low-pressure tires.
They are made this way:
- select an old truck tire with a low degree of wear;
- clean it from dirt;
- dismantle the wire through the cut over the entire area;
- cut a rectangular window nearby;
- securely fix the wheel;
- tear off the outer layer of rubber;
- weld a disk from scrap material;
- They put the resulting camera on him.
What does a homemade product look like?
Each master sees the fruit of his labor in his own way. Most often, a homemade pneumatic duct is a small cabin with or without glazing, mounted on a breakable frame. This design moves on 3 or 4 large wheels.
All-terrain vehicles based on the Ural
It is possible to make homemade pneumatic propellers with your own hands from a Ural motorcycle. The main load-bearing part is the frame arc, consisting of pipe elements with a diameter of at least 4.2 mm. The rigidity of the structure is also ensured by pipes that form a reinforced triangle, and spacers made of a similar material. This complicated configuration makes it possible to correctly distribute the weight of the all-terrain vehicle, taking into account the transportation of additional cargo or passengers.
Made on motorcycle-type pneumatic wheels, they allow the use of standard seats. However, the mounting method remains the same. They are placed taking into account the build and height of the average person and distance from each other. This ensures ease of boarding and travel. The factory seat handles are replaced with rigid bars 24 centimeters long.
This ensures the safety of the passenger, allowing him to be securely held when driving on difficult terrain. A box mount is provided as additional equipment. It serves as a reservoir for storing a first aid kit, tools and other useful items. An additional fuel tank with a capacity of 5-7 liters can be mounted on the rear of the frame.
Manufacturers of pneumatic all-terrain vehicles
Not only homemade products are popular among fishermen and hunters, but also factory-made equipment:
- The Max company supplies the two-seater Max 2, which is an amphibian with a speed of movement on water of up to 12 km/h. Max 4 for 6 people and Buffalo transport are available for sale.
- Argo offers the 8x8 OutFitter model with 8 wheels or tracks. The car drives through snow, swamps, rocks and overcomes water.
- The tracked Tinger is versatile and does not go fast: only 45 km/h on land and 4 km/h on water. The pressurized cabin comfortably accommodates 5 people.
- The domestically produced industrial all-terrain vehicle Transmash carries 10 people or other large cargo in a closed body. Track suspension is useful in snow, mud, and forest floors.
- The two-wheeled pneumatic vehicle Tarus 2X2 is a reliable single-seat two-wheeled vehicle for off-road travel. Thanks to its collapsible design, it can be transported in the trunk of a car.
For a person who is passionate about hiking in the wilds of the forest, to distant lakes, a pneumatic vehicle will become a faithful friend and assistant: it does not matter whether it is bought in a store or made with one’s own hands.
How to make a pneumatic duct with your own hands from a motorcycle?
The rear-wheel drive of the unit in question is very simple in design and easy to manufacture. The main thing is to take into account the location of the axle shafts and the load on them when assembling the part. In this regard, the yoke should be welded after assembling the main unit. Analogs from GAZ-69 or 21 are suitable as axial elements.
If the installation of disc wheels is provided, it is better to use special studs, and connect the axle to the disc using a special flange. DIY pneumatic snowmobiles will also require a driveshaft tube with suitable bearings with a diameter of 76 mm. Each axle shaft will rotate independently, which will allow for reliable and practical operation of the unit’s chassis.
A homemade pneumatic vehicle made by craftsman Ivan Stepchenko from Sumy.
The pneumatic vehicle is made from a motorcycle MT Dnepr -11, and various scrap metal. The main pleasure for me is the design process itself and the anticipation of the result.
The engine, gearbox, axle and everything connected with it were taken from the motorcycle. The rear axle is a homemade bridge from the Volga, which is slightly lightened and expanded.
The differential is open and has a driven sprocket instead of a bevel gear. In place of the rear wheel of the motorcycle, only a hub remained with a brake drum to which the drive sprocket was attached. Replacing these two sprockets allows you to change the gear ratio. Wheels with a diameter of 1200 mm, width 500 mm. Such fairly large wheels are the main advantage of the all-terrain vehicle; they provide excellent maneuverability.
Wheels taken from UAZ, lightweight. The wheels themselves are made from inner tubes from a tractor trailer with protection from the same cut inner tube and a shell made of durable reinforced PVC and rubberized clamps. Wheel pressure 0.2 atm. The seats are designed for 4 people. The 55A battery is under the seat, there is also a glove compartment.
Since the motorcycle engine operates under difficult conditions, it overheats and often has to be stopped. I decided to do forced cooling.
There was a cooling system fan from a VAZ 2106 available, so I decided to install it. There is no room in front of the engine, so I installed it underneath the sump. I made a deflector from an aluminum sheet. The first tests confirmed the correctness of the solution; with forced cooling, the engine operates much more stable.
Let me summarize: the all-terrain vehicle is very huge, the visibility is excellent, the clearance is huge, and the cross-country ability is excellent for such a configuration. The disadvantages are large weight and dimensions.
Video: homemade pneumatic runner on low-pressure tires.
Among amateur designers of all-terrain vehicles, low-pressure wheels of their own production are very popular. The beginning of the history of the use of this type of propulsion by enthusiasts of homemade all-terrain vehicles can be considered the mid-sixties of the last century.
It was then that the first timid attempts were made to master the production of wheeled vehicles capable of moving with equal success through wetlands and virgin snow. All these machines were equipped with low-pressure pneumatics, and became the ancestors of today's homemade products.
How to make tire rims with your own hands
The main factor in the vehicle's high cross-country ability are the tires. High-quality low-pressure tires are expensive and many people cannot afford them. It is often difficult to find them and you have to wait for a special order. All this forces car enthusiasts to make analogues on their own. This work is difficult and requires attention and patience, but the result will be incredibly pleasing. Do-it-yourself husks are one of the ready-made homemade products.
In addition to price, they have other advantages over purchased wheels:
- excellent adhesion to any road surface, reducing the likelihood of accidents;
- They weigh less, so they are also suitable for passenger car engines;
- They have a large area, due to which low pressure on the surface is ensured, quicksand and loose snow can be easily overcome.
Old tractor or truck tires, as well as helicopter tires, are quite suitable for these purposes. They need to be stripped of excess rubber with a knife. Before doing this, it is recommended to decide where the rinds will be used:
- on potholes and rural roads you will need a self-cleaning tread;
- in flat lowlands and swampy areas - a tread with lowered grooves;
- on a winter road - a pattern with the “checkers” as close as possible to each other.
Below are the main materials you will need for your work.
- Old tires from GAZ-66, Kraz 255, ZIL 131, aircraft. They should not have a damaged interior, otherwise a hole will form when the outer layer is torn off.
- Technical knife with replacement blades.
- The pattern is made of thick cardboard, or better yet, a thin metal sheet.
- Chalk or marker for outlining.
- Durable clamps - can be used for straightening on the body.
- The winch is manual or automatic. It is needed to tension the parts of the tread that will be cut off.
Here's how to strip tires:
- the tire is thoroughly washed from dirt and dried;
- the future tread pattern is created on the pattern (template) and transferred to the product;
- a cut is made along the inside of the wheel and a small section is cut out to pull out the wire;
- through the resulting “window” the wire is removed using a hook from a winch - the tire should be firmly fixed with clamps;
- after removing the wire, you need to make cuts along the entire border of the circle marked with a marker;
- pull out the peeled rubber and peel it off using a winch;
- step by step, peel off other excess layers of cord;
- Clean the surface with sandpaper and, if necessary, pre-straighten with a hammer.
The low pressure tire tube is ready, now all that remains is to create a new frame:
- weld the wheel rim with the plates;
- polish;
- put the headband on the frame.
All that remains is to inflate the tire and install it on the car. We must not forget that it is not recommended to use homemade low-pressure wheels on asphalt and concrete, or to increase speeds above 60 km/h. In addition, the damage will require restructuring of the car's design.
Distinctive features of low pressure wheels
Why did designers like this type of tire so much? The pneumatic has low weight, very high elasticity and pressure on the ground within small limits. All these characteristics, coupled with a large rolling radius, give the all-terrain vehicle amazing maneuverability along with efficiency.
Factory LP wheels
A decent volume of chambers gives the design with such a propulsion sufficient buoyancy. This can be called an additional bonus to the vehicle's cross-country ability. In addition, by filling the inner space of the disk with foam, you can give the all-terrain vehicle additional stability on the water and at the same time reduce the sticking of snow or dirt on the inner surfaces of the wheel.
The simple design of these chassis elements and the absence of problems with finding materials for their manufacture allows you to make a pneumatic passage with your own hands without any special material and labor costs. This made machines built according to this principle very popular among home-made people.
Of course, such designs also have their drawbacks, in particular the short service life of the cameras, but they are overcome by introducing additional elements into the design.
DIY low pressure tires
Like any wheel, a low-pressure pneumatic is structurally composed of a hub, a solid or split disk (or spokes) and a tire. Let's look at some types of homemade wheels and how to make them.
The simplest design is a pneumatic with two discs. According to pre-made calculations, the hub is machined (if it is a driving element, then with a seat for the axle; if the wheel is not a drive wheel, then a seat for bearings is made). Flanges for mounting disks are also machined on the hub. Next, you need to cut two disks from sheet metal. Hobbyists often use thin sheet steel (1 - 3 mm), or aluminum-based alloys (D16-T, AMG) and the like.
Example of fastening a low pressure wheel disc
After securing the disks to the hub, they should be connected to each other with metal strips curved along the diameter of the cross-section of the chamber. The number of such strips is usually made at least 12. Connecting strips are made of the same material as the disks. All connections of the propulsion parts are made either by rivets or bolts with locking elements.
After assembling the base, the camera is put on it and secured to the rim (disc) with canvas straps using hooks or screws. Instead of canvas belts, some “homemade” ones use strips of thin conveyor belt. When the tire is inflated, the inner tube protrudes somewhat into the spaces between the fastening belts, thereby forming a kind of lug.
Since the “bare” camera is susceptible to damage from sharp ice, stones and other obstacles, the following measure to increase survivability is common: homemade low-pressure wheels are put on lightweight tires.
Homemade tire
To do this, use either a cut chamber of the same size as the main cylinder, or use lightweight standard tires from various equipment.
An example of making a lightweight tire using the method of A. Koksharov from Karelia
In his technique, the author uses the principle of cutting excess layers of rubber on a tire (using a grinder with a homemade limiter) and removing them. Along the way, he cuts a new tread pattern, the one he needs. According to him, almost all tires produced by the domestic industry can be converted.
A pneumatic vehicle, this category of homemade all-terrain vehicle, appeared in the 60s of the last century. These devices were configured like a tricycle, only the front wheel was replaced with a ski. This scheme for all-terrain vehicles is still used today, although much less frequently. Nowadays, pneumatic drives made from walk-behind tractors are more popular, and they use wheels from three to six.
Making your own low pressure tires
Many car enthusiasts are interested in whether there are homemade low-pressure tires. As practice shows, it is possible to make this type of tire. In this case, the work is carried out in several stages.
First, prepare the starting material from which the tires will be made. The best option is to use aircraft tires.
Their advantages are increased strength and excellent all-terrain qualities. You can use tires from all-terrain vehicles for industrial or agricultural purposes.
Remove excess rubber from the side of the tire and directly from the tread. Remove the so-called seat cores from the inside of the tire (they will interfere).
Ideally, you should also get rid of the rubberized part of the base of the cord (but the main thing here is not to damage the nearby layer). Moreover, the lighter the tires become after treatment, the better.
Now you can proceed directly to the production of low-pressure tires. This is done in the following order:
- 1. Clean, wash well and dry the prepared tire. Use a marker to mark the locations where the new cuts will be.
- 2. Run a sharp knife around the inside perimeter of the wheel. This is necessary to remove unnecessary wire.
- 3. Make a small “opening” anywhere in the strip you just cut.
- 4. Pry up the wire using a screwdriver or any other available tool.
- 5. Securely secure the tire so that you can hook the winch by the wire and pull it out.
- 6. After removing the wire, trim the tire around the perimeter at a level slightly below the cord. Be sure to secure the opening (you can use pliers for this purpose).thumb]https://autotopik.ru/uploads/posts/2015-02/1422866833_15.jpgthumb]https://autotopik.ru/uploads/posts/2015-02/ 1422866914_16.jpg
- 7. Tear off the excess piece using the same winch.
- 8. Using a sharp knife, trim the pulled part of the rubber.
- 9. Remove the main part from the outside of the sides and treads of the tire until only the carcass remains of the tire.
- 10. Sand the surface well with sandpaper.
- 11. Now assemble the disk frame itself. To do this, weld plates to it (tubes can be used) and weld them together.
- 12. Sand the workpiece to a shine to prevent damage to the camera from the rough edges of the disc.
- 13. Assemble the wheel and inflate the tire. In front of you is a wheel with low pressure, ready for new achievements.
- 14. Install it on your car and test it for your pleasure.
How to make a pneumatic duct from a walk-behind tractor
In order to take on the creation of such an all-terrain vehicle, an amateur designer must solve the following problem: for what purpose is the future vehicle intended. Here you need to clarify the desired number of seats, the weight of the maximum luggage, the season of use and for what conditions the device is intended.
Definition of pneumatic duct design
Only after the final clarification of all of the above, after determining the concept of the future all-terrain vehicle, can we begin to search for possible options for solving the problem.
And now the idea is ready, the goal is visible, which means we can move on to the issue of selecting the elements of the all-terrain vehicle. Here you need to decide on the type and model of the engine, the composition of the transmission, the design and type of frame, the equipment of the cabin and other elements. One of the main characteristics that needs to be paid attention to when creating an all-terrain vehicle is the choice of the propulsion system formula.
It is also necessary to calculate the design parameters - dead weight, useful weight and total weight, what will be the tire sizes, what is the required engine power for the intended purpose.
After analyzing and comparing all desires and possibilities, you can make the final choice of the required all-terrain vehicle design. At this stage of activity, a project for a homemade all-terrain vehicle is a necessary condition for its completion.
We make a pneumatic walker with our own hands from a walk-behind tractor
Choosing a motor for a pneumatic duct
Very often, the lack of sufficient funding leads to restrictions when choosing an engine, therefore, you have to use what is available. These, as a rule, are two- or four-stroke motorcycle engines, and also use old automobile power plants, but much less frequently. If you still have extra money available and when choosing an engine you don’t have to think about its quantity, then you can use the following recommendations:
For such a homemade all-terrain vehicle on pneumatic wheels, it is best to take the engine from a motorcycle; for this you need to choose a motor that is most suitable in terms of power and conditions of use. For the motor, you need to have a forced cooling system (air or water), since the all-terrain vehicle does not have all the conditions that are necessary for normal, natural cooling.
Four-stroke engines have a number of advantages over their two-stroke counterparts, which is why many designers use them. For example, you can take boxer engines from heavy motorcycles. In such devices, you can also use a motor from a car, which is most suitable for installing it on a homemade tracked all-terrain vehicle. Such an engine has sufficient torque, is also reliable in use, and it has (and importantly) a good price-to-required performance ratio. What type of engine to use - diesel or carburetor - will be your decision.
Both schemes have their advantages and disadvantages. For example, a diesel engine is more economical than a gasoline engine, although in severe frost conditions it can be difficult to start it stably and make it work stably without using additional equipment (preheater). (What can be said about gasoline engines, but to a much lesser extent).
Design of pneumatic wheels
Designers of all-terrain vehicles in many cases use homemade low-pressure wheels.
What is so unusual about pneumatic tires? They have relatively low weight, high elasticity and pressure on the ground within small limits. Such characteristics, along with a large rolling radius, provide the all-terrain vehicle with good maneuverability along with efficiency.
How to do it yourself?
Many craftsmen do this - they assemble special equipment in a garage or repair bay in order to save financial costs and make their dream come true. To make an all-terrain vehicle from auto parts and improvised tools, you will need a basic model of the vehicle, wheels with low-pressure tires and additional materials.
You can assemble a homemade product on wheels yourself, for example, from a nine, with a Lifan engine. It all depends on the concept of what the extreme recreation lover ultimately wants to see. You will also need drawings to simplify the process of assembling the wheeled SUV. Discs and other minor devices are selected at the last stage.
If you don't have much experience, you can first try to build a small four-wheeled or three-wheeled all-terrain vehicle with a motorcycle engine. In another case, it makes sense to try to make a powerful SUV with a 6x6 wheelbase and a breakable frame, when breaking the structure will allow you to overcome any difficult terrain. Such models are considered universal.
Tools and materials
You can assemble an all-terrain vehicle yourself using different machines:
- from LUAZ;
- from Oka;
- from UAZ.
You will need low-pressure rubber or caterpillar tracks, components, mechanisms, tools and additional materials. It all depends on the modification of the all-terrain vehicle. For large models of special equipment, it is recommended to choose a powerful engine so that there are no problems in overcoming difficult areas and when climbing slopes. In order to ensure high strength of metal structures, it is necessary to prepare a welding machine. For small models, it is advisable to use motorcycle engines or motors installed on Urga, MTZ, Neva walk-behind tractors. When building a large off-road vehicle: a swamp vehicle, an amphibian or a universal vehicle for overcoming land, snow and water obstacles, you should take power units from URAL and UAZ vehicles.
Manufacturing
You can assemble a powerful all-terrain vehicle based on a certain modification of the car or according to your own drawings, if you have exceptional talent. It is reasonable to describe the assembly stages in order to get a clear idea of how to make a model of special equipment.
- Prepared metal profile: cut the pipe, square according to size.
- If you plan to travel over difficult terrain, it is advisable to consider the concept of a breaking frame. In this case, it will be necessary to create an independent suspension: rear, front, and also use a king pin.
- Assemble the rear axle, which can be taken from an old car of the required design.
- Make a suspension with shock absorbers, connect complex components.
- Install the engine onto the frame.
- Place the seat.
- Attach frame protection made of plastic or metal.
- Attach the wheels.
- Equip the model with electronic devices.
- Equip with attachments, cooling, braking, ignition, and fuel supply systems.
One of the last points is testing the all-terrain vehicle. Such all-terrain vehicles are equipped with low-pressure tires. The advantages of such products are widely known - improved dynamic characteristics of the machine, successful overcoming of various obstacles, minimal impact on the ground. You can buy special rubber or make it yourself. The second option will require considerable effort and patience.
- The tire is cleaned of dirt.
- When the rubber dries, a new tread pattern is applied.
- Next, the excess metal cord is removed (cut the rubber along the perimeter inside the tire along the marks - make holes and remove the wire).
- Below the location of the cord, trim the perimeter of the circle, pull off a piece of rubber and cut with a knife.
Further on the surface, the main part of the material should be removed to the provided frame, treated with sandpaper, tubes or plates welded to the disk and the camera put in place. If you do not have experience in making an all-terrain vehicle and low-pressure tires, it is advisable to use the help of an experienced mechanic.
An overview of amphibious all-terrain vehicles on low-pressure tires is presented below.