A snowmobile is a universal technical means of transportation in the winter season. Thanks to the peculiarities of the chassis, it is able to overcome kilometers of deep snow, while developing up to 50-70 km/h. Economical fuel consumption, maneuverability and extraordinary ease of control are all that make it indispensable where winter snowstorms and snowdrifts occur almost all year round. True, the cost of such machines ranges from several to tens of thousands of dollars, which complicates the purchasing process.
In a situation where purchasing a factory snowmobile is an unrealistic dream, and circumstances require its availability, homemade products come to the rescue, ready to solve it in a less expensive way. One of them is the conversion of a walk-behind tractor into a snowmobile, to which we will devote the article.
Do-it-yourself snowmobile from a walk-behind tractor: reasons for choice and selection criteria
A walk-behind tractor is a worthy technique for transformation, which is in the arsenal of almost every resident of our country.
In the list of homemade devices that can be adapted from it, the snowmobile occupies one of the first places, competing with the caracat and the all-terrain vehicle. This is due to the fact that in winter, when a snowmobile is needed, the farm does not need the standard tasks of plowing, hilling or mowing the grass. Therefore, it makes sense to remove the engine in the winter and make a snowmobile based on it, and in the summer to return it to the walk-behind tractor and operate it in the standard way. Not every modification of a walk-behind tractor is suitable for a snowmobile. It is best to use for this purpose those that have:
- rear towing device;
- possibility of manual control;
- medium-power motor, cooled by air.
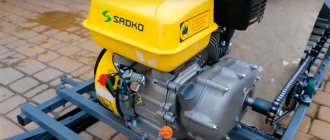
The Neva walk-behind tractors, which are available in eight models, are considered ideal for a homemade snowmobile from a walk-behind tractor. All of them represent a group of tillage machines with average traction potential (6-9 hp). Despite their low cost, the motor systems are assembled and tested in Japan, which makes them extremely durable.
Taking all these points into account, such walk-behind tractors make snowmobiles with good power. This means that it will be able to carry not only the driver, but also at least one passenger.
Motor
Today you can buy high-quality spare parts for motorized dogs.
The correct choice of engine should be based not only on personal preferences and experience of use, but also on the recommendations of specialists. An equally important indicator is the price of the device. Operational parameters directly depend on the shaft diameter, as well as maximum power. The second category includes the presence of an electronic start system and a lighting coil. The standard engine power (6.5 liters) is often not enough to carry out the tasks that hunters and fishermen regularly face. Having a reserve of horsepower never hurts; the price difference between classic models and more advanced units is not so high. But powerful engines are larger.
Snowmobile based on a walk-behind tractor: various design options
Among the varieties of walk-behind snowmobiles available today are:
- wheeled;
- tracked;
- snowmobile on skis.
The wheeled snowmobile has a primitive design.
The only element that is replaced is the wheels - they are replaced with larger tires or even low-pressure wheels. They are made with all-wheel drive so that the equipment can easily turn to the sides. Among the disadvantages of wheeled snowmobiles made from a walk-behind tractor is their suitability only for shallow snowdrifts. A homemade snowmobile on skis is also considered one of the simplest options for replacing branded motor sleighs. If you take a ready-made sled as a basis, the assembly process is simplified as much as possible. Another method is also possible, when skis are made independently from plastic.
A tracked snowmobile based on a walk-behind tractor engine is considered the most labor-intensive to recreate. Considering its versatility, excellent cross-country ability and maneuverability, we will dwell on it in more detail.
What is a motorized towing vehicle - description and purpose
A motorized dog is understood to mean a mini snowmobile (mini-all-terrain vehicle) with an engine. This vehicle is a coupling of a caterpillar towing vehicle with a sleigh or drag sleigh. The driver of the motorized dog sits in the sleigh, and any cargo is placed there. Some dog models have a special cargo area on the tractor. Engine power is usually from 6 liters. With. up to 13 l. s., speed is 30-40 km/h. The motorized dog does not have a brake, which the driver must always remember.
Motorized towing vehicles are popular among fishermen and hunters. They can also be used in agriculture and forestry for transporting small loads. Unlike wheeled vehicles, skis on a motorized dog sled allow you to move even on loose snow and winter off-road conditions, which makes the vehicle resemble a snowmobile. The only difference is the driver’s position: he sits outside the platform with the motor, which reduces the weight of the motorized dog and increases cross-country ability. Also advantages in comparison with a snowmobile are the simplicity of the design and lower price.
You can use motorized dogs to move along the frozen surface of a body of water - a lake, a river. They are ideal for ice fishing enthusiasts and have been designed specifically for them. The machine can be easily transported in a car using a cover, unloaded on shore, and then used for its intended purpose. On a motorized dog it is possible to transport cargo over rough terrain, replete with descents and ascents. They use the equipment for traveling in summer, spring, and autumn along swampy meadows and forest paths.
Why is it worth making a motorized dog - reasons
Both purchased equipment and homemade equipment are unpretentious, compact, and do not require much space for transportation and storage. But some hunters prefer to make motorized dogs themselves, using improvised means. The main reason is cost-effectiveness: a homemade version will cost an order of magnitude cheaper. For no more than the cost of the simplest towing vehicle from China, you can also build a reliable, durable pusher towing vehicle.
Many models of motorized dogs, especially those made in China, have a lot of design flaws. For example, the caterpillar can often become clogged with snow, which is associated with mistakes by the developers. Other possible problems are the motorized dog rearing up, burying itself in too deep snow, throwing snow into the sled. All these troubles can be avoided if you build the vehicle yourself.
With a front-mounted motorized dog engine, which is almost always planned in home-made models, the operation of the machine will be much more efficient. Here are the obvious advantages:
- fuel savings and overall reduction in design costs;
- higher driving speed;
- the ability to make additional compartments for gear.
How to make a snowmobile from a walk-behind tractor yourself?
The process of manufacturing a future homemade snowmobile begins with competent design and execution of drawings - a strong point in any homemade product.
For convenience and better understanding, the design of the machine can be divided into two parts:
- leading;
- to the slave.
Leading members include:
- traction unit (motor from a walk-behind tractor);
- frame;
- drive elements.
The slave is formed by:
- steering column;
- shock absorbers;
- caterpillar mechanisms.
Before making a snowmobile from a walk-behind tractor, the auxiliary devices and material resources are determined. Electric welding and a pipe bender are a must, without which the assembly would not be complete. It is advisable to purchase parts that are not on hand in advance.
What is a motorized dog
Before you figure out how to make a motorized dog with your own hands, you need to take a closer look at this type of device. They are compact snowmobiles or swamp vehicles equipped with an engine. The main elements of a motorized dog are a caterpillar-type towing vehicle, as well as a sled attached to it.
Depending on the specific modification, this type of mechanism may have other components, for example, a loading platform located on the tractor. The power units used in the design of this vehicle are equipped with low-power motors - from 6 to 13 hp, which allows you to move over rough terrain at low speeds, about 30-40 km/h.
It should be noted that a motorized dog made from a cultivator does not require a braking system; this makes driving at high speed unsafe. The device is in high demand among lovers of fishing, hunting, and outdoor recreation. It is used to perform various household tasks and transport small loads.
It is advisable to include the following features among the characteristic advantages of motorized towing vehicles:
- simplicity of design, allowing you to assemble such a device yourself;
- the highest cross-country ability, due to which it is possible to move even in difficult terrain;
- low cost of operation, maintenance and repair.
In their design, such devices resemble classic snowmobiles, but the driver’s position is located outside the towing vehicle, which can significantly reduce its weight, increasing cross-country ability.
The products are excellent for lovers of winter fishing, since, thanks to their low weight, they can easily move across the surface of frozen lakes without creating the threat of breaking the ice.
Motorized towing vehicle for difficult terrain
When planning to make homemade motorized towing vehicles, you must take into account that their cost will be similar to the most budget models on sale. However, they are mostly made in China, have poor build quality and often break, unlike a homemade unit with increased reliability.
A self-made motorized towing vehicle is perfect for moving and transporting goods in the following conditions:
- marshy areas;
- snow;
- dirt roads;
- uneven terrain, replete with descents and ascents.
The device is small in size and light in weight, which allows it to be transported to the place of operation using standard vehicles without unnecessary inconvenience.
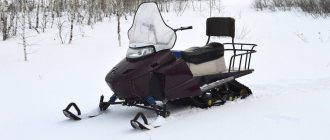
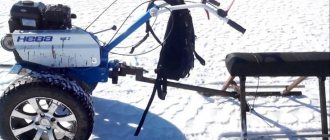
Crawler snowmobile from a walk-behind tractor: the manufacturing process at home
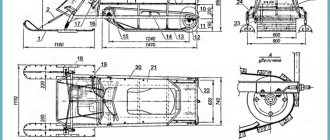
The snowmobile, the picture of which is presented below, is based on the motor of the Neva cultivator. Its production begins with the frame.
DIY snowmobile frame
The frame is made of metal pipes with a diameter that is used for motorcycle frames. Water pipes are also suitable. A pipe bender is used to give the desired shape.
To simplify the task and reduce design time, we suggest using ready-made drawings.
Designations according to the drawing:
- frame;
- intermediate type shaft sprocket;
- intermediate shaft;
- sprocket with teeth;
- gear parts;
- track drive elements;
- track shaft;
- ski support stands;
- tensioner rollers for tracks;
- axis for tensioning rollers;
- towbar;
- tensioner;
- drum flanges;
- steering column
After welding the frame elements to the established dimensions, a subframe is made in its front part - the motor is localized on it. To do this, a stand with holes for it is welded. The same holes should be in the traverse itself. Through these slots it will be convenient to tension the drive chain and adjust the position of the traction unit.
In order to ensure that the device can be started with a handle, the underframe frame is moved to the rear of the unit. Equipping the original walk-behind tractor with a forced cooling function will be an invaluable bonus. This will reduce wear on the carburetor and traction mechanism.
Intermediate shaft for a snowmobile made from a walk-behind tractor
The diagram shows a general view of the intermediate shaft.
The numbers in the figure indicate:
- support part for the operator's seat;
- cross member - made of stainless pipe 28 x 28;
- rack axle - made of pipes 18 x 18;
- traverse - from a metal corner with a side of at least 25 mm;
- jib - a steel billet 0.4 x 0.05 m is taken as it;
- bearings No. 204;
- shaft (pipe based);
- toothed sprocket (like element 10);
- spar;
- rubber casing.
All these details can be made with your own hands.
Making a steering column for a snowmobile: basic drawing with dimensions
A properly assembled and adjusted steering column is a prerequisite for a snowmobile made from a walk-behind tractor to be able to navigate through deep snow and to easily overcome uneven terrain.
According to our proposed scheme, the steering block is formed by:
- frame traverse;
- steel stand in pipe design;
- corner steering support;
- a shaft made of stainless steel pipe;
- crossbar;
- bipod;
- bronze washer;
- sleeve;
- nut type M10.
After connecting them, we move on to the tracked part of the snowmobile.
Tracks for a snowmobile based on a walk-behind tractor
The tracked snowmobile attachment is made by hand using one of the proposed options:
- conveyor belt;
- water pipes;
- motorcycle chains.
For a light snowmobile, you can limit yourself to a conventional conveyor belt, to which a roller chain is adapted.
For more serious homemade products, it is better to make track tracks from slats in quantities of at least 30 pieces with a distance between adjacent ones of 3.8 cm.
The recommended size of the tracks according to the drawing is 50 x 3.8 x 1.8 cm. It is advisable to acquire a template-slipway to prevent curvature and discrepancies in values.
According to the picture:
- nut ties;
- star element;
- track drive;
- tensioner;
- ice rink;
- rack and pinion track;
- homemade spar;
- driven mechanism;
- ski;
- ski harness;
- bolt, like 12 and 13;
- guide;
- screw;
- support shoe;
- bearing fasteners;
- roller axle.
Don't forget about the front skis.
They are reinforced with side members, additional springs and equipped with a lever for pulling out the snowmobile if it gets stuck.
After the base blocks are prepared, we move on to the assembly stage.
Algorithm for completing parts
There are several proven ways to make a caterpillar with your own hands. They have proven themselves to be the most reliable.
Application of conveyor belt
It is considered one of the simplest methods. In addition to the transport belt, you will need a bushing roller chain. The simplicity in this case lies in the fact that manufacturing does not require a large number of auxiliary materials and tools. To extend the life of the transport belt in the device, you need to circle its edges with fishing line
It is important to ensure a step of 10 mm. To connect the tapes, in this case you need a ring, you need to stitch it along the ends or use hinges
Particular attention is paid to the thickness of the transport tape. The level of load on the unit directly depends on this
The optimal choice would be to select a tape with a minimum thickness of 7 mm. Among other things, you will have to take care of an additional wheel on each side
You can remove it from an old car, but it is important that its diameter matches the same parameter as the wheel on the walk-behind tractor
Using a tire
For walk-behind tractors, tracks are often taken from tires. Craftsmen claim that the design is highly reliable when the specified element is included in it. In order for the resulting walk-behind tractor to be practical, you must take care of the quality of the car tires. They must have the correct tread pattern. In this regard, tires from large cars and tractors are preferable. The tread pattern is of key importance, as it acts as a lug.
The manufacturing process can be divided into several stages. Here they are:
- After finding suitable tires, a track for the tracks is cut out of them. This is labor-intensive work that will take a lot of time.
- Use a well-sharpened knife for cutting. It's better to take the one that shoemakers use. From time to time it must be moistened in a soap solution. This will make the rubber easier to cut.
- Both sidewalls are cut off the tires. To make the process easier, you can use a fine-tooth jigsaw for this. Remove excess fragments inside the tire if necessary. If the track turns out to be too hard inside, this manipulation can be repeated.
Thanks to this, it is possible to improve the reliability of the tracks, which is especially important under heavy load conditions. And yet such caterpillars are of rather limited length.
It corresponds to a similar parameter for a car tire.
From chains and belts
All-terrain vehicles with tracks are often manufactured using conventional V-belts. They are connected to each other by means of lugs. The straps are attached with screws or rivets.
An additional method is to use chains of the same size. This material is often found in large quantities in gardeners' garages. The manufacturing process boils down to the following points:
- Take 2 chains of the same size. The last links are broken, after which they are combined into a closed ring. The links are clamped and welded.
- The lugs connect the chains to each other and provide reliable fastening. These devices can be made from simple steel plates of suitable thickness. They are connected using bolts.
If you don’t want to make tracks yourself, you can take such products from old equipment. For example, a walk-behind tractor on Buran tracks demonstrates good efficiency. It makes sense to use old parts, since new Buranovsky tracks are quite expensive.
https://youtube.com/watch?v=TRCcf646ahQ
Step-by-step instructions for assembling a snowmobile from a walk-behind tractor
- assemble the frame;
- install the engine, which should fit in the center of the machine for increased stability, and fix it;
- install an intermediate shaft to reduce angular speed and increase traction potential;
- adjust the steering column;
- aggregate caterpillars;
- choose a seat and equip it with an old car seat.
After successful testing to protect the external metal parts from corrosion, the snowmobile is cleaned and painted.
Making a trolley
In order to understand how to make a cart for a walk-behind tractor with your own hands, you need to perform the following algorithm of operations:
- To make a load-bearing welded rigid frame, take 5 pipe blanks and trim the ends with a grinder.
- Press the chipboard sheet with clamps and weld the junction of 3 longitudinal pieces with 2 perpendicular ones so that they create a lattice frame.
- Check the geometry of the structure using a regular construction square. The angles of the connected ribs must be 90°.
- Install spacers between the tacked workpieces in the corners of the bottom and in the center, and tack them by welding.
- Use a welding electrode to tack 4 vertical posts in the corners to the longitudinal pipes of the bottom.
- Check the perpendicularity of the corners, check the dimensions of the sides of the structure with the dimensions on the drawing of the cart for the walk-behind tractor.
- Finally weld all the workpieces to each other, grind the welding seams, clean them of sagging and formations.
- The body can be made of plywood or wooden boards, and the corner joints are secured with steel corners.
- The boards are installed on the frame and attached using bolted connections.
- The craftsman makes stronger sides from steel sheets. The sides can be folding or fixed. Folding sides of the body are considered more rational, because Unloading large volumes of cargo is easier. The sides are also made from metal pipes of square or rectangular cross-section. They are made in the same way as the frame, they are tacked, the geometry is checked for strength and to avoid braces and deviations, they are finally welded, and rigidly attached to the frame. The tailgate is secured with ordinary door hinges and equipped with latches.
- Take a metal rod with a diameter of 30 mm and a length of about 1050 mm to make an axle for the wheels, connect it to the longitudinal hinge and corner supports. The length should be chosen so that the axle does not extend beyond the wheels. Sharpen it to the required diameters of the bearings in the hubs.
- As a running gear, you can take the wheelbase from a scooter, stroller, wheelbarrow or other agricultural machinery. Heavy wheels from a car trailer with hubs are not recommended for installation.
- To make the drawbar, take 2 profile pipes with a diameter of 25x50 mm and a length of about 1.85 m, weld them to the frame beam so that a triangular structure is obtained. For reinforcement, metal gussets 4 mm thick are attached by welding at the corners, and a plate 8 mm thick is attached to the front of the trolley.
- Tipper technology involves the installation of door hinges attached to the bottom of the beam and to the bottom struts.
- The frame of the constructed structure is covered with wooden boards, plastic or metal.
- The driver's seat is installed on a walk-behind tractor with a trolley ready-made or in the form of homemade boxes made from a piece of chipboard and foam rubber covered with dermantine. Such boxes are necessary for covering equipment and materials.
- The parking brake drive of the unit can be used as a brake. Fix the brake pedal, made of a 6 mm thick plate, on the footrest under the seat, weld 2 corners. Install a pedal in the front part, and a plate with 2 holes for fastening brake cables in the rear part, the ends of which are connected to a T-shaped plate with a rod.
In this way, you can make a trolley for a walk-behind tractor with your own hands.
how to convert an engine from 80 to 92 gasoline? | Topic author: Fedor
Hello! In light of the latest “improvements” in life in our country, they are canceling the production of 80-grade gasoline! That is, they are actually depriving cars of vital fluid. And not only that, also motorcycles, walk-behind tractors, etc. I have a “Cascade” walk-behind tractor with an engine “DM68”. Stupidly pouring 92 into it will not lead to anything good, the pistons will burn out until they jam Natalya. Alternatively, you can bore the cylinder, but this will reduce the engine life Sergey or remove the layer of metal from the timing head on a machine, they say somewhere around 0.5- 1.0mm. In order not to “experiment blindly”, so to speak, I’m turning to you, maybe someone has asked the same question?
Lyudmila, the ignition just needs to be adjusted - set earlier. In this case, the power will drop. When burning, 92 gasoline emits LESS heat than 80. It burns worse, slower - that’s why the ignition must be set earlier - so that it has time to burn out completely by the end of the night. Timing heads Ksenia does not exist in nature, there is a cylinder head. I wouldn’t sharpen it - it’s too top***, you can make a mistake with the amount of grinding Kirill, and ruin the shape of the combustion chamber and the plane of the head. Then, if you are afraid of burnout, grinding off the head and increasing the compression ratio will increase the temp in the cylinder
Yuri, you can’t use it instead of 92 - 80, but you can increase the actane number.
Valentina buy a new engine. Most likely there is an analogue for your walk-behind tractor for 92 gasoline. we did just that. costs ten.
Grigory Just adjust the ignition and that’s it, you can safely fill the 92nd.
Valery just needs to enlarge the combustion chamber a little. and here is a clear example: there is a Ural M39 motorcycle, produced in 1976, which has been running on only 92 gasoline for more than 6 years. nothing has burned or stuck yet. I didn't change anything on it.
Diana It’s early, it’s still quite eighty. I have Tarpan on 92m. . I don't give a damn.
Irina Porshnya burn out from low-octane gasoline! IZH-Yu-2 carries A-72 or A-76. I calmly drove the AI -93, only I set the ignition a little earlier. And another small problem. In cold weather it starts worse. If you really want it to match, mill or sharpen the head by 1mm. This will be quite enough. M412 E had a piston 1 mm lower than M412.
Oleg Ley, don’t worry, but do the ignition a little later if possible. Here the demons almost talked about forcing.
Grigory, add oil to 92 and it will be 80))))) the octane number is simply the degree of purification of the fuel, the higher the octane, the more degrees of purification the gasoline has gone through. and there’s already been a lot of advice here))
Artyom If there are problems with 80 gasoline, you need to switch the engine to 92 by reducing the combustion chamber, that is, milling the head. The compression ratio and burning rate of gasoline will increase, and therefore consumption will decrease and engine power and its durability will increase.