An original homemade tracked snowmobile, made with your own hands from a 200 cc Sadko engine: photo of step-by-step assembly with a description, also a video of testing a tracked snowmobile.
The author of the homemade product, Evgeny Venglovsky, decided to thoroughly prepare for winter and take his wife and children for a ride on his own homemade snowmobile. The idea was a success, at the end of the article there will be an interesting video of driving through snowdrifts, but first, let's look at the process of assembling the vehicle.
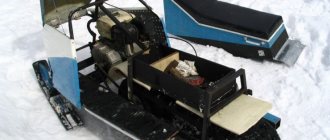
Snowmobile assembly.
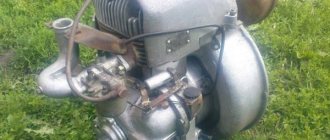
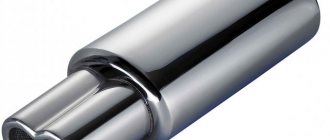
Engines of the Lifan type are very suitable for building snowmobiles; the author decided to use a similar 200 cc engine with 6.5 horsepower, the Sadko GE 200 R.
This engine already comes with a reduction gear (½) and a centrifugal automatic clutch, which is activated when the engine speed increases, which is ideal for homemade snowmobiles, walk-behind tractors, go-karts and other equipment.
The photo shows a Chinese-made Sadko engine.
The snowmobile frame is made of a 25 x 25 profile pipe with a wall thickness of 2 mm.
The caterpillar is made of a conveyor belt 3 mm thick, the width of the belt is 300 mm, the belt itself was cut in half lengthwise at 150 mm.
The tracks are made of plastic water pipe with a diameter of 40 mm and a wall thickness of 5 mm. The pipe is cut lengthwise.
The tracks are screwed to the conveyor belt with M6 bolts with a wide head, the bolts are tightened with a nut through a washer and a screw. The edges of the tape are connected with the same bolts.
Track drive axle.
Guided star from Minsk.
Stars for the caterpillar track from the Buran snowmobile, homemade guide drums.
The support ski removes part of the load from the track; there are guide rollers at the top.
The rear axle moves along the frame along a guide, which allows you to tension the snowmobile track.
The front axle is stationary.
Driven and driven sprockets, as well as a chain from a Minsk motorcycle. Chain drive with a gear ratio of 1 to 3.
Steering rack.
The hinges are made using a threaded connection, nut and stud on M16.
The skis are taken from a children's snowmobile and reinforced with a profile pipe.
The photo shows how the star engages the track track.
The seat is made of plywood in the form of a box, in front there is room for a child, in the back for two adults.
Middle support ski.
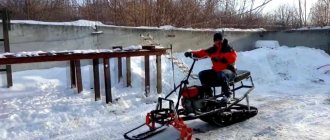
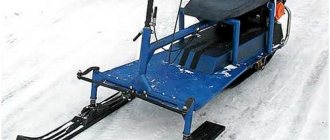
The equipment is ready for testing.
The snowmobile moves confidently when fully loaded.
In the photo is the author of the homemade product: Evgeniy Venglovsky.
I recommend the author’s interesting video about assembling a tracked snowmobile and testing it.
After people see the prices for snowmobiles in a store, they ask the question of how to make a snowmobile from a walk-behind tractor yourself, how expensive and difficult is it? How do you start making a homemade snowmobile from a walk-behind tractor? First you need to determine what engine power to use. We used a 6 horsepower walk-behind tractor engine as the engine. Typically, four-stroke engines with forced air or water cooling are installed on walk-behind tractors.
From the walk-behind tractor you can also use a reverse gearbox, a centrifugal clutch, steering and a fuel tank. Next, you need to think about the snowmobile's propulsion system. Most of them are equipped with a caterpillar drive.
Device and design
An all-terrain vehicle based on Buran assumes the presence of several supporting parts:
- Track mechanism. To ensure cross-country ability on any terrain and overcome difficult descents and ascents.
- Cabin or seat. For the convenience of the driver and his fellow travelers, if the model is designed to transport not only cargo, but also a group of people.
- Steering for ease of maneuvering and overcoming obstacles that cannot be passed directly and therefore have to be driven around.
- Engine resistant to large temperature changes. 2-4 strokes are preferred. The standard motor of such devices can withstand fluctuations from -28°C to + 30°C. If the temperature drops below, the engine needs to be warmed up additionally. If it rises higher, then the device should be stored in a cool, closed room.
The design of devices can vary greatly depending on the manufacturer. For example, models from Yamaha or Russian Mechanics are equipped with a protective windshield, 1-2 skis and an open seat. It is recommended to use them in colder seasons. At the same time, homemade tracked all-terrain vehicles may not have ski tracks as such, but are equipped with a closed cabin with possible heating (if they are created on the basis of any cars).
Snowmobile or all-terrain vehicle
The main difference between snowmobiles and all-terrain vehicles is that an all-terrain vehicle can travel through most difficult terrain, regardless of the season and weather. While the cross-country ability of a snowmobile is limited by temperature conditions (up to +5°C) and the presence of snow debris that must be overcome.
If you try to use a snowmobile in operating conditions that are not suitable for it, there is a high possibility of the device breaking down, since its engine is not designed for high temperatures, and the movement mechanism (skis, tracks) is not able to pass in places where there is not enough snow, a lot of melted earth dirt, plants, etc.
The best homemade products - a snowmobile from a walk-behind tractor
When making a homemade snowmobile, they use tracks from other snowmobiles, or homemade ones assembled from scrap materials. After choosing a track, you need to decide what type of suspension to use. You need to choose from two main types: roller suspension and skid suspension.
Each of them has both advantages and disadvantages. After this, it is important to decide what kind of layout the snowmobile will have. Typically, a snowmobile is equipped with two steering skis at the front and a track block at the rear.
How to make your own snowmobile from a walk-behind tractor
This snowmobile can be made in a few weekends at the dacha in the garage. At first glance, its design looks very simple. If we compare its cross-country ability in wet or loose snow, it will not be inferior to many industrially produced snowmobiles.
The creation of a snowmobile was based on the principle: the lighter the weight and the larger the size of the caterpillar, the higher its cross-country ability in deep and loose snow. Therefore, the design will be as light as possible.
How to make a homemade snowmobile from a walk-behind tractor on tracks
Four wheels are installed inside the track. When movement occurs, they roll along a conveyor belt with fixed lugs. The caterpillar drive is carried out by a chain from the motor, special drive sprockets, through the driven shaft. They were taken from Buran.
The engine is taken from a conventional walk-behind tractor with a power of 6 hp. You won't be able to accelerate quickly on it. The soft ski and track suspension have been removed because the sled is designed to ride on powder. This simplified the design and reduced the weight of the snowmobile.
Making tracks for a snowmobile
Let's look at the process of making a caterpillar. Plastic water pipe 40 mm, cut to length 470 mm. Blanks for lugs will be made from them. After which each of them is sawn lengthwise into equal parts with a circular saw.
The lugs are attached with furniture bolts to the conveyor belt. When making a track, it is extremely important to maintain the same distance between the lugs. Otherwise, there will be a “running” on the teeth of the drive sprocket, as a result of which the caterpillar will slip and slide off the rollers.
To drill holes for the mounting bolts in the conveyor belt, a jig was made. To drill the holes, a wood drill with a special sharpening was used.
This jig allows six holes to be drilled simultaneously into the conveyor belt to attach three track lugs. Drive sprockets (2 pcs), an inflatable rubber wheel (4 pcs), sealed bearings No. 205 (2 pcs) were also purchased.
The turner made a support for the bearings and the drive shaft of the track. The snowmobile frame is made independently. For this, square pipes 25x25 mm were used. The articulated axes of rotation of the steering wheel and skis are in the same plane and on the same line, so a continuous steering rod without ball ends was used.
Ski turning bushings are quite easy to make. A water coupling with a ¾-inch internal thread is welded onto the front cross member of the frame. The pipes with external threads are screwed in there. I welded the bipod of the ski rack and steering rod to them. Angles are installed on the skis, which serve as an attachment to the snowmobile's rotating stand. A metal undercut is made at the bottom to better control the snowmobile while driving on compacted snow or crust.
Chain tension is adjusted by motor offset
Driving a snowmobile is quite simple. To increase engine speed, use the gas handle, which is located on the steering wheel. This engages the automatic centrifugal clutch, causing the snowmobile to move. Since the engine power is low, the speed of the snowmobile is 10-15 km/h. Therefore, brakes are not provided. To stop you need to reduce the engine speed.
Tracks are manufactured in any width. Choose what is more convenient to make: a narrow but long track, or a wide but short one. It is important to remember that a larger track will put more strain on the engine and make the snowmobile more difficult to control. If the caterpillar is made small, the car may fall through in deep snow.
The weight of the snowmobile with all parts was 76 kg. It included: steering wheel and engine (25 kg), skis (5 kg), wheels with axles (9 kg), drive shaft (7 kg), caterpillar (9 kg), seat with racks (6 kg).
Repair and tuning
It is better to carry out repairs on models purchased from an official dealer at a service center, since all-terrain vehicles are not cheap, and service repairs are carried out by qualified craftsmen and have an appropriate guarantee. Contrary to the opinion of many users who claim that this model can be easily repaired on its own, and the device itself is not fussy about replacing parts, this is not recommended. Home repairs can cost more money and damage to the device than the services of professionals.
In contrast, an all-terrain vehicle assembled by hand can be serviced at home, since in this case only the assembler himself knows all the nuances of the model and can improve it by replacing parts with those that he considers necessary and suitable, completely or partially changing the design .
You can tune the devices yourself (if it’s a garage invention) or, which would be more preferable for many, hire a team of professionals to upgrade the all-terrain vehicle. This process involves not only changing the paint of the body, but also improving performance from increasing the temperature stability of the engine and increasing power to replacing parts with a complete change in design.
Homemade snowmobile from a walk-behind tractor video
Homemade products from a washing machine engine:
1. How to connect a motor from an old washing machine through a capacitor or without it 2. Homemade emery from a washing machine engine 3. Homemade generator from a washing machine engine 4. Connecting and adjusting the speed of a commutator motor from an automatic washing machine 5. Potter's wheel from a washing machine machines 6. Lathe from an automatic washing machine 7. Wood splitter with an engine from a washing machine 8. Homemade concrete mixer
We make a snowmobile with our own hands - it couldn’t be easier!
I made this snowmobile literally in a couple of weekends in the garage at the dacha. Although its design at first glance looks very simple, nevertheless, in terms of cross-country ability in deep loose or wet snow, it is not inferior to most industrially produced snowmobiles.
Several years ago, I built a snowmobile for my nine-year-old daughter with a homemade track made from conveyor belts and plastic water pipes as lugs. At first I had doubts about the reliability of such a track and how the plastic parts would behave in the cold. But during two years of winter operation, no breakdowns or severe wear of the pipes occurred. This inspired me to create a light snowmobile for myself with the same homemade track.
Understanding full well that the smaller the mass of the snowmobile and the larger the supporting area of the caterpillar, the better its cross-country ability in loose and deep snow, I tried to make the design as light as possible. The operating principle of the snowmobile is very simple (Fig. 1). There are four wheels installed inside the caterpillar, which, when moving, roll along a conveyor belt on which lugs are attached. And the caterpillar drive from the motor is carried out by a chain through the driven shaft using special drive sprockets. I took them from the Buran snowmobile.”
With an engine from a conventional walk-behind tractor with an automatic clutch with a power of only 6 hp. you won't accelerate quickly. I planned to ride the snowmobile not on compacted paths, but on loose snow, so I abandoned the soft track suspension and skis to reduce the weight of the snowmobile and simplify the entire design.
First I made the caterpillar. A plastic water pipe with a diameter of 40 mm was cut into blanks for lugs 470 mm long. Then I sawed each piece lengthwise with a circular saw into two equal parts. Using the device shown in Fig. 2, I used a wood circular saw to cut plastic pipes for lugs lengthwise.
I attached the lugs to the conveyor belt with two 6 mm diameter furniture bolts with a large semicircular head. When making a caterpillar, it is very important to maintain the same distance between the lugs, otherwise they will run into the teeth of the drive sprockets and the caterpillar will begin to slip and slide off the rollers.
To drill holes in the conveyor belt for mounting bolts with a diameter of 6 mm, I made a jig. The holes in the tape were drilled using a wood drill with a special sharpening.
Using such a jig, you can drill 6 holes in the conveyor belt at once to attach three caterpillar lugs.
At the store I purchased four inflatable rubber wheels from a garden cart, two drive sprockets from a Buran snowmobile and two sealed bearings No. 205 for the caterpillar drive shaft.
Frame construction
Before you begin building a snowmobile, you will first need to select a material. The easiest way is to make a homemade frame from wooden blocks. The result is a very light and fairly durable structure, which is considered the cheapest and easiest to manufacture. For this you will need:
- Wooden bars.
- Sheet iron.
- Metal scissors.
- Drill and drill bits.
- Hand saw.
- Bolts and nuts.
The advantages of building such a structure are undeniable. In the event of a breakdown, the wooden model will not be difficult to repair far from a populated area. In the forest it is easy to find scrap materials that can be used for repairs. But the main advantage is that this snowmobile rarely falls through the ice and does not sink in water.
Wooden structure
It is known that bars and boards made of wood do not have particular strength in their places
connections. Therefore, before starting construction, it is necessary to make additional metal corners. To do this, take sheet iron and cut square plates with scissors along the width of the bars. The places for the bolts are marked in them with a tape measure, and then four holes are drilled with a drill. After this, the plates are bent in half exactly 90 degrees. These will be excellent devices for firmly fastening wooden blocks in the corners of a homemade frame.
Usually they start construction after making a drawing with exact dimensions. And four bars are cut along them with a hacksaw, and holes for bolts are drilled in the corners with a drill. Then they are placed on a flat floor surface in the form of a regular rectangle. Metal corners are applied to the connection points, bolts are inserted and tightened tightly with nuts.
To mount the engine and track, two additional crossbars made of bars with holes for bolts at the ends are installed on the frame. But before that, the corners for fastening are first made. They are cut out of triangular shaped iron sheets and holes are drilled in the corners .
It’s better to make eight pieces at once and place them on top and bottom. Then the fastenings will be more durable and reliable in operation.
When they are ready, the crossbars are inserted inside the frame and the triangles are placed on top. Holes are drilled into them exactly to size using a drill through the bars. Then long bolts are inserted there and tightened tightly with nuts. At this point, a strong wooden frame will be ready, which will serve for a long time on a homemade device.
Metal frame for snowmobile
It is much more difficult to build homemade metal products. This requires special tools and devices that not everyone may have. Significant costs will be required to purchase or rent them. However, this building will be much stronger and more durable than a wooden structure . Here you will need:
- Welding machine.
- Electrodes.
- Mask.
- Bulgarian.
- Spanners.
- Pliers.
- Hammer.
In addition, to build a metal frame you will need more durable materials. You will definitely have to buy them in the store, since today they are not found anywhere else. And I don’t really want to build a new homemade snowmobile from old parts due to poor reliability. Therefore, only good materials will be used here:
- Metal pipes.
- Iron corner.
- Sheet steel.
- Channel.
As a rule, before you start building a frame, you need to make a simple drawing. Using a grinder, cut the pipes according to its parameters and use a welding machine to connect them into a rectangle. Inside the frame, insert a couple more partitions from the corner to install the engine and track. If you make them from channel bars, the structure will be much stronger and more reliable in operation.
After this, you just need to cut off two small bushings from the metal pipe.
And then weld them to the corners of the front part, where the swivel ski supports will be inserted. The metal frame is ready and you can begin construction, as well as installation of the main units and components.