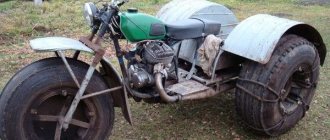
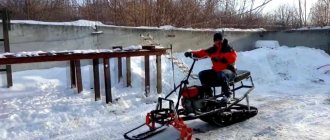
Transport that you can drive in both winter and summer without problems, but not a car. What is this? Well? This is a familiar scooter, but with minimal additional cash and resource investments it turns into a snowmobile, but what about in the summer? back on the scooter. Difficult? Not at all, especially considering that the idea of such a transformation has been around for a long time.
In principle, you can turn anything into what you need, the main thing is? wish. And since there is plenty of desire, then turning a scooter into a snowmobile should not be a problem, especially since the conversion process? This is just removing the wheels and putting skis with tracks in their place. Now are you convinced that you can do everything with your own hands?
You will need the following:
- scooter? origin and purpose are not important: children's, Chinese, adult, branded;
- frame, seat, engine, tank, steering wheel? all this is a scooter, or rather, what is needed from it to realize the conversion of a scooter into a snowmobile;
- skis ? either purchased or made with your own hands from plywood (9–10 layers, 3 mm thickness);
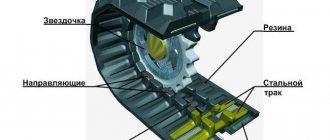
- caterpillar ? about it below and in more detail.
Is it actually a caterpillar (or mover)? This is the most important element of the future snowmobile, since the quality of the ride depends on it. Alternatively, you can make it yourself from a tire. And since it is a vicious circle, the possibility of a break is minimal.
So the process is as follows:
- cut off the bead from the tire using a shoe knife;
- cut along a plastic pipe (in the ratio diameter: thickness: 40 to 5 mm)? These are lugs. They must match the width of the tire. Attach them to the drive belt every 5-7cm using M6 bolts.
Is the mover made from a conveyor belt in a similar way? the only difference is that the ends of the tape must be overlapped approximately 3–5 cm, secured with the same bolts.
If there is neither one nor the other, craftsmen suggest using V-belts, and they need to be fastened across the width with lugs, because there are already cavities for gears on the inside. Or you can even purchase a ready-made copy, for example, a caterpillar from Buran, but in monetary terms this is a very expensive pleasure.
Regardless of the chosen option, the width of the track directly affects the cross-country ability of the future snowmobile, but worse? for controllability. For example, the factory width of the canvases is ? 15, 20 and 24 inches in ratio standard, wide and extra wide.
What kind of motorcycles can I use?
Back in Soviet times, motorcycles were created that are prototypes of modern technology. You can very easily make a snowmobile out of them. Let's remember some of them.
"Ant"
It was used as a cargo vehicle, had a body and three wheels. This model had wheels located as follows: one in front (drive), and two more at the edges of the body. The snowmobile from this motorcycle was the most popular among the residents of Russia. This is where it all started. One of the villagers dismantled his old motorcycle, installed a motor on a ski and tracks that were made from an ordinary fence. The product had its drawbacks, but people quickly figured out how to fix them.
"Dnieper"
It had various modifications: MT-9, 10, 11, 16. These models were equipped with engines from 27 to 32 horsepower. It was distinguished by a cradle for the third passenger. Almost all motorcycle parts are used for a snowmobile, however, in case of repair, it will be difficult and expensive to buy spare parts.
"Ural"
This motorcycle was usually equipped with military equipment during the Great Patriotic War. The power is very pleasing, it reaches 40 horsepower. In this regard, the motorcycle is one of the best for creating a snowmobile based on its engine. The model is three-wheeled and has additional space for a passenger.
"Sunrise"
It became the next model after the Kovrovets (K-175), which was produced from 1957 to 1965. The engine is two-stroke with one cylinder, volume 175 cc. cm, power - 20 horsepower. Good characteristics, thanks to which it will be very easy and cheap to remake the motorcycle.
"IZH Planet"
Years of production: 1962-1967, 20 horsepower. Many people still have this model; it can also be used to create new equipment.
"Minsk"
A two-wheeled motorcycle, which began to be produced in 1951. And even then, many people had a desire to convert this motorcycle into a snowmobile, but things didn’t go further than ideas.
What parts may be needed for remodeling?
Riding a scooter in the snow is practically impossible and uninteresting, so many owners of this equipment are wondering how to make a snowmobile out of it.
Before you begin, you may need the following parts:
- caterpillar from "Buran";
- brake drum;
- wheel disc;
- motor;
- fuel tank;
- hooks made of plastic pipes;
- star for caterpillar;
- propulsion frame, consisting of metal-type corners and also square pipes;
- individual elements of a caterpillar propulsion device, namely: a caterpillar, wheels, a slide with a roller for the track, a frame (its two parts - left and right);
- ski;
- steering controls;
- plastic (for example, polycarbonate), plasticine, hot melt adhesive for the track casing;
- silver powder to make a platform specifically for the feet, as well as epoxy resin.
Daniila Rukin
Snowmobile specialist "Buran". I go fishing in my free time.
Ask a Question
There is no need to make major changes to the design features of the scooter. This must be taken into account in order to use it in the warm season, as before, by removing the gooseneck and ski and putting the wheels in the appropriate positions.
How to make: instructions
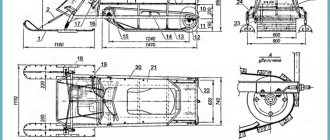
First, the frame is welded. Obviously, the larger the frame, the heavier the device will be and the slower it will move. The optimal frame length is 2 m plus/minus.
The following are sequentially fixed on the frame:
- drive shaft with receiving star;
- power plant with a transmission star and gas tank;
- front wheel axle (fixed fastening to the frame by welding or bolts);
- rear wheel axle (fixed with a movable guide element);
- front suspension with steering structure and guide ski(s);
- seat(s) and body.
Caterpillars are made of drive V-belts or conveyor belts. The optimal track width is from 40 to 50 cm. With a smaller width (40), the snowmobile will be more maneuverable and better controllable. With a higher value (50+), the patency of the device improves.
The function of lugs is performed by PVC pipes of the diameter indicated above, sawn in half lengthwise. They are attached to the rubber base using bolts and nuts. V-belts of insufficient width can be fastened to each other with metal grousers.
In order to be able to adjust the tension of the track, the rear wheel axle is attached using a movable guide element, which allows you to fix the position of the axle in a certain position.
Additional notes:
- The center of gravity should be approximately the center of the structure. Since the power plant is mounted at the front, the driver's seat should be centered over the front axle or slightly offset to the rear.
- The distance between the drive shaft and the power unit should be minimal to minimize losses of energy transmitted to the shaft.
- If you install a shock absorber under the seat, then the front seat support is rigidly mounted on a profile arch, and the rear seat rests on the shock absorber.
- If you are making a snowmobile with a heavy load in mind, then to remove some of the weight from the tracks, it is advisable to install an additional ski in the middle of the base (between two tracks). This ski, 50-70 cm long, is attached directly to the frame. However, this design requires a more accurate preliminary calculation with subsequent leveling of the height of the “leg”, which complicates the manufacture of the snowmobile.
- It is advisable to maintain low pressure in snowmobile tires to avoid rapid wear of parts and high fuel consumption.
- The considered version of the snowmobile is the simplest in design. If you have the tools and a welding machine, it can be assembled in the garage without any problems.
- As soon as winter begins in our country, given the climate, two-wheeled vehicles are put away in the garage until spring. It may be impossible to use a car for transportation due to heavy snow. And here, a snowmobile on tracks, which you can make from a walk-behind tractor with your own hands, comes to the aid of all motorists who want to move along a snowy road.
- Not everyone has the opportunity to buy an additional vehicle, but everyone can independently construct a homemade tracked snowmobile from a walk-behind tractor.
Steering
Assembling an ATV with your own hands is not an easy task. And, perhaps, the most difficult thing is to make the steering. To do this, first weld the frame of the front part of the ATV. Then you will need steering knuckles from a car, for example from a Niva, but any others will do. After which you need to build suspension arms
Pay special attention to the design of the mounting of the levers, since when they are connected to the frame, large loads arise, so additional stiffening ribs will not be superfluous. Levers are usually bolted through silent blocks
This is a rubber-metal joint that is an essential link in the suspension. It dampens wheel vibrations, preventing vibration from being transmitted to the frame. Levers can be made according to these drawings.
Go ahead. What is the front suspension without shock absorbers? Here you can use 4 motorcycle shock absorbers, one for each arm in the front, and two for the swingarm to dampen the rear axle. Rear shock absorbers from Izh will do, but if you are willing to shell out for gas-oil shock absorbers with pumping, this will give you the opportunity to adjust the suspension to suit road conditions, which is very useful for equipment such as an ATV!
Telescopic suspension
Perhaps this is one of the most common and simplest types of suspension based on the principle of operation. Most often, this suspension is used on snowmobiles of the “utilitarian” class. The design of the telescopic fork consists of a spring and shock absorber, which are located directly in the strut. Thus, the telescopic stand is able to smooth out shock-type loads. It is worth noting that the stroke of this type of suspension is limited according to the stroke of the shock absorber itself.
As a rule, snowmobiles with such suspension have incredible maneuverability in dense forest conditions, since the ski base is small.
Also, one of the simplest and most common suspensions is the spring system. This engineering solution was used on the legendary domestic car "Buran". This model has one ski track, as a result of which the equipment does not have the necessary maneuverability. It is generally extremely difficult to enter the required turn at speed. But in general. The suspension performance itself is quite acceptable.
Manufacturing
Snowmobiles of various types are created on the basis of old motorcycles, adding one or two skis. A chain or wheel suspension system can be mounted to the rear of the snowmobile. It all depends on how difficult the snow cover you have to overcome.
You can make a snowmobile at home (garage). It can be used for hunting, fishing, or just driving through the forest in winter.
To make a snowmobile, and we are considering a budget option, we will need any of the above models of old brands of motorcycles and various parts.
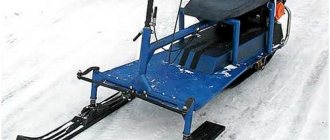
What will we get as a result?
Simply put, there is a ski with steering in front, a frame with a motor and a seat, and a caterpillar track at the bottom or rear. The frame will be suitable from IZH Planet or Voskhod, but additional fasteners will need to be reconstructed. The engine can be taken from the Voskhod motorcycle (20 horsepower) and put on caterpillar tracks.
A snowmobile with such an engine can reach speeds of up to 70 kilometers per hour. For household use this is quite enough.
You can use a ready-made frame or make it according to drawings from scraps of pipes with a small diameter. It is also important to strengthen the frame using welding. In some cases, temporary fastenings are used. If necessary, instead of the tracks and skis, you can return the wheels. The assembled structure must be strong and reliable. The chain drive is used from the main propeller shaft (you can use IZH Planeta or Ural) to the drive shaft of the tracked structure.
To make a caterpillar engine, you can use a part from the caterpillar belt of another unit (for example, Buran) or purchase it separately in a factory variation. However, this is not always possible. In this case, you can assemble it yourself.
To create a caterpillar with your own hands, you need slats (plastic or tin), a conveyor belt and tin slats, fasteners and drawings. When making slats for lugs, you need to make parts (plastic or tin) of pipes with bends of the same length and width, and then attach them to the transport belt at the same distance. Three pairs of wheels, different in size, will serve as the drive shaft in the tracked structure.
- For the drive shaft you can take larger wheels, for the other two - smaller ones (they will serve as rollers). The rollers need to be “shod” in rubber to have a better connection with the caterpillar track. It should be borne in mind that all home-made structures are not very durable, so you should not subject such a snowmobile to high speed loads.
- The shock absorbing system on the rear suspension can be left over from the original motorcycle (its basic design). On the front, you can use springs from a car or a motorcycle. Shock absorption is very important during turning movements; the stability of the entire structure depends on it.
- The fuel tank with a volume of 15 to 20 liters can be placed in a more convenient place, according to the drawings you choose, but basically it remains in its original place in the motorcycle version.
- There is also an option for making two tracks based on the Ant motorcycle. Since the side rear bases are made for wheels, they can be used for two track structures. The fuel tank may also remain under the bar, but may be moved to the rear, depending on the design chosen and the conditions in which the sled will be used.
- You can also consider the option of a snowmobile based on the Minsk motorcycle. For the front part with one ski, use the option discussed above. The back is more difficult. We will replace the driven gear of the bridge with a rear sprocket from the IZH Planet motorcycle. The intermediate shaft serves as a drive to the axle, remaining a chain shaft. If you don’t have the parts you need for the job, you can purchase them from the aftermarket.
- Some people like to modernize modern motorcycles for different types of units, for example, instead of a caterpillar mover, install large tire frames covered with a chain, which prevents slipping on snow. In this version, the snowmobile looks like 3 or 4 huge wheels and a small part of the engine, frame and seat. You can also replace parts of the ski-tire. There are options where instead of a ski there is one wheel in front.
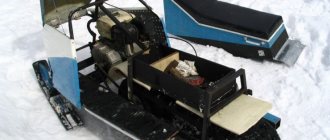
Mini snowmobile conversion process
How to make a snowmobile from a 50 cm3 scooter with your own hands? First you need to prepare the parts and then take the propulsion unit, a part of the old goose from the Buran will serve as it (photo 1). It should make 4 tracks directly for the scooter.
A sprocket for the Buran snowmobile was purchased at the Buran snowmobile spare parts store. Additionally, 2 wheels from a simple Chinese scooter and 2 small tires with wheels from a stroller were purchased.
The scooter's gearbox is designed to allow the vehicle to move at a speed of about 50 km/h. Driving on a snowy path increases the load on the power unit, leading to a deterioration in its performance, and a speed of 50 km/h on a snowy path is dangerous.
In this regard, the gears were replaced, and the main wheel of the scooter was replaced with a sports car wheel with a reduced diameter.
To do this, it was necessary to remove the brake drum directly from the old moped wheel with gears for the drive shaft and make corresponding holes for the disc with a smaller diameter (photo 2).
Next, follow these steps:
- Attach the smaller diameter wheel disc using bolts to the drum brake with splines from the main wheel of the scooter.
- How to create hooks from plastic water pipes in photo 3 that fit directly into the holes on the track itself - this is necessary in order to prevent slipping and sliding off the wheel when the track itself moves.
- It is almost impossible to choose a suitable rubber tire so that its length, directly along the circumference, can be divided without a remainder by the total number of pitches of holes on the gooseneck. Therefore, experienced craftsmen make a bandage of the required size from the appropriate strip of roofing type metal. On this bandage we attach the hooks using special M6 bolts (has a large hat) at the same distance, corresponding to the location of the holes directly on the caterpillar itself (Figure 4).
Put it on the wheel and install the bandage to the tire using the same bolts (Figure 5).
- From a simple wheel it is quite easy to obtain an improvised type of soft drive sprocket for a track. To create a driven star, connect with M8 bolts a ready-made driving sprocket made of plastic from Buran with 2 rubberized wheels directly from the roller carriage (with appropriate bearings). Use a stud (M10 thread) directly for the axis itself, as illustrated in Figure 6.
- The driven sprocket is presented in the form of two rubberized wheels from a cart and a sprocket from Buran.
- The track propulsion frame must be created using metal-type corners and special square pipes, as illustrated in Figure 7.
Propulsion, muffler and slick for caterpillars
As in Figure 8, it is necessary to fix the left part of the drive frame to the power unit of the scooter through the mounting hole for the spring and brake pads, namely, their support type disc.
Next, you need to:
- Install the drive wheel with hooks as illustrated in Figure 9
- A driven star with a caterpillar is installed, as illustrated in Figure 10
- Bolt the part of the propulsion frame (on the right) of the gooseneck to a regular muffler of a scooter.
- Attach the slide subframe directly to the corners of the frame between the sprocket wheels.
- The 2 wheels from the snow scooter are a tension type of gooseneck roller.
The muffler of the Karpat moped, unlike the muffler of a scooter, is attached more easily and reliably to the drive frame itself. The muffler is made of fairly thick plastic, but you can use a rod made of hard wood (birch, oak).
This system does not allow the track to bend upward on loose snow, while ensuring constant tension in the support area of the track.
Ski mount
Using a special rack, the ski is mounted to the front fork of the scooter. The ski must have 2 degrees of freedom of movement. The dimensions of the frame and its parts are not given here, since a person who wants to reproduce the design refers to the scooter model.
You need to buy a wooden/plastic ski or make it yourself, but add a metal bar (cut) on the bottom side so that the moped does not lose control on a slippery road.
Using a special bracket, the ski is placed on the front fork of the scooter. As was mentioned, the ski has 2 degrees of freedom of movement, for this reason, when tilting the device on the snow.
Creating a casing for the track and foot pad
The plastic body of the scooter is quite fragile in the cold, and also has suitable pockets. The snow that gets caught in them melts in the garage and then freezes, increasing the weight of the scooter.
It is recommended to make a cover for the tracks, a large platform for the feet and a cover for the front fork, and also install a special windshield for long trips in the wind.
The track cover is made of fiberglass. It's easy to make a cover on the track independently of the fiberglass, but you need to make a stamp before you glue the cover on. Cut out the side part of the future case from plexiglass, polycarbonate or any other plastic of a suitable size (Figure 11).
Place it in a larger layer, which will serve as another wall of the stamp, and secure the plastic corners along the wall with hot glue on the side.
Cut a thin and flexible strip of plastic equal in width to the future body. Connect the shape with glue, gluing the previously cut side frame, base and wide frame to the corners.
The joints of the elements are covered with plasticine. Then the fiberglass fabric is cut into suitable pieces of optimal size and moistened with resin, placing them directly into the matrix itself. A day later, the matrix is cut into pieces and the shell is removed. All that remains is to trim off the excess fiberglass along the contour and then paint it.
The foot platform was also created using a similar technology by adding silver powder to the epoxy resin just to give it more viscosity.
Daniila Rukin
Snowmobile specialist "Buran". I go fishing in my free time.
Ask a Question
In sufficiently deep snow, a homemade product with a track that is too narrow will not work, because the latter does not have sufficient supporting surface and the power of the power unit, but the device quite easily drives through snow about fifteen centimeters thick and can even be used for sledding with a child.
In the spring, you can remove the skis and put the wheel back, turning the scooter into a summer all-terrain vehicle.
Recommendations
When working on a snowmobile, it is important to follow the main manufacturing rules - evaluate engine power, stability, balance, wear resistance and replaceability of parts and the structure as a whole. It is better to use a motor with a volume of 125 cubic centimeters, with one or two cylinders, two-stroke. The desired power is from 15 horsepower. The speed of the snowmobile you assembled can reach up to 80 km/h.
Based on the parts, capabilities and desires you have, you can create the basis of a snowmobile at home. And then they usually work on modeling, improving the seats, you can even attach a cabin - for protection from precipitation or a trailer part during the transportation of goods.
When creating a snowmobile with your own hands, the most important part is the motor. It must be tested before installation on the structure prior to assembly.
When using a homemade snowmobile, you must follow safety rules - have a protective helmet, appropriate clothing and gloves (gaiters). First of all, you should conduct a test drive and make sure that there are no problems with the chassis and engine parts.
Features of homemade snowmobiles
Nowadays you can buy a snowmobile at any motorcycle dealership, both in a large metropolis and a small city, but the prices of this equipment force many winter driving enthusiasts to make a homemade snowmobile on tracks with their own hands.
There are four important advantages of a self-made vehicle over a factory one:
- Price is the most important factor for most. The cost of some units from leading manufacturers of motorcycle equipment can exceed the cost of those assembled from scrap materials by 5-10 times.
- Parameters – the ability to assemble a vehicle of the desired configuration. This applies to both appearance and power reserve, type of chassis, etc.
- Reliability is a point that products from even well-known manufacturers cannot always boast of. In self-manufacturing, a person uses the highest quality materials and pays special attention to the most important components of the mechanism.
- The benefit is the ability to use materials, parts and devices lying around in garages and utility rooms from other devices.
At the same time, homemade snowmobiles find their use both on the streets of populated areas and on off-road areas of suburban expanses and ski resorts.
Features of creating a snowmobile from a Ural motorcycle
In order to make equipment based on the Ural, you can use the circuit from any Buran model. The caterpillar system is designed in the form of rollers. You can make them yourself. The power transmission is transmitted through a chain. At the front of the snowmobile there will be several racks for attaching skis. They are equipped with springs from the shock absorbers of the Ural motorcycle.
- Snowmobiles based on the Ural motorcycle are in most cases used with tracks installed. This is due to the fact that the structure itself is very heavy. In addition, there is a cardan drive at the rear, which makes the installation of a conventional track unit with a chain drive mandatory.
- It is worth considering that when creating this tool with your own hands based on the Ural model, the modular design will be noticeably more complicated due to the organization of the drive through a gearbox. That is why some changes must be included in the frame, because the height of the Ural hull may increase, which will entail an overestimation of the center of gravity and a decrease in stability parameters.
The Ural engine has a fuel consumption of no more than 6 liters per 100 km of route. The maximum speed of such homemade equipment can reach up to 60 km/h. This model is capable of towing up to 1 ton of cargo.
What you need to know about the design
- A motor sleigh consists of a running gear - a motor, a gas tank, wheels, skis, a fuel supply and ignition system. Control - steering wheel, much like a bicycle. There is also a frame and a seat. Let's take a closer look at each element of the chassis.
- Engine – for making a snowmobile with your own hands, a small engine from a scooter or moped is ideal. It is important that it withstands cold weather well and has the ability to be wound by lever or cable. It was also possible to use the oil-fuel mixture as fuel.
- Gas tank - any container that can withstand the presence of fuel inside will do. Therefore, plastic bottles are canceled - they can melt through. An excellent option would be to use a ready-made gas tank. But if you are itching to make a sled with your own hands inside and out, then you can make the tank yourself. This will be discussed later.
- Almost any wheel will do, but it is best to use a car wheel, as it is easier to find studded tires for it. An excellent option would be a wheel from an enduro motorcycle; even a porcupine might envy its needles.
- Skis – it’s better not to skimp here and use alpine skis. They are stronger and more flexible, so they can bear weight more easily. If they don't fit in length, we make them shorter.
- Fuel supply and ignition - everything will be together with the assembled engine, so there is no need to invent anything here.
Features of creating a snowmobile from Izha
You can make a snowmobile from Izh with your own hands in several ways. The first is a wheeled ski option. At its core, the design does not change, only the wheels are removed. Instead of the front one, a ski made from a pipe is installed. It is attached to the axle shaft to the front fork.
- For the rear of the future snowmobile based on the Izha, a tracked module is being manufactured, which will be attached in place of the wheel. In addition to the frame, it will include a rear axle from a UAZ vehicle, the driven gear of which must be replaced with a rear sprocket.
- A snowmobile from Izh must have a chain intermediate shaft. The wheeled version uses cameras from PTS-2-4. Discs are made by welding rods and attaching wheels using belts. A snowmobile, which you can make yourself using the Izha base, is capable of reaching speeds of up to 60 km/h.
Manufacturing of individual snowmobile elements
The principle of converting a motorcycle, chainsaw and moped is almost the same. If you learn how to make individual elements, it will be much easier.
Suspension
When converting a vehicle into a snowmobile, special attention is paid to the rear suspension. It definitely needs improvement. To make it you need to prepare:
- chassis;
- two levers;
- connecting rails;
- hinges
After preparation, you can begin making the pendant:
- The front arm is connected to the sliding rails on one side and to the chassis on the other using hinges.
- Do the same with the rear lever.
- Position the torsion springs between the sliding rails and the rear torque rod.
- Place the fastening of two power elements between the suspension arms.
To secure the suspension, use tie rods.
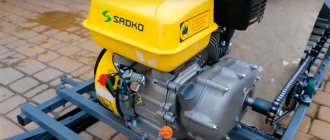
Engine
Choosing an engine for a snowmobile is an important step, since the power of the vehicle and its ability to move on snowy roads depend on it.
The optimal engine power for a snowmobile is considered to be in the range of 6-30 hp. With.
Therefore, most often these vehicles are made with a Lifan engine or with a part from a motorcycle or moped.
Snowmobile lift
This device may be needed if your snowmobile is stuck in the snow or needs repairs. It’s not difficult to make a kind of jack:
- Make a channel-type structure from a metal corner 25 mm wide. Height - 19 cm. Make two holes in the middle for attaching the fork.
- Weld a plate to the bottom that will act as a guide. Place a similar part on top, but do not fix it. The distance between them is 14 cm.
- Make holes in these plates through which to pass the jack pipe. Make the top one spring-loaded.
- Next to the top plate, place another part at an angle, which will act as a hook and hold the spring-loaded part.
- Make a fork for the lift. Its length is 12 cm. Fix one side in the channel. Place the second fastening axis at a distance of 67 mm. Insert a piece of pipe into the fork that passes through the second axle. Weld a metal ring to this pipe (you can take a metal plate in which to make additional holes for rubber bands), through which you pass the jack pipe.
- Secure this ring with motorcycle rubber bands to the area under the spring of the top plate. To prevent the elastic bands from slipping, they can be secured with screws.
Wheels
For good cross-country ability, the vehicle is built on inner tubes. Snowmobile wheels must be large in diameter. But it is better to equip the structure with skis. They can be made from plywood and large diameter pipes. If there is such an opportunity, then they can be taken from another snowmobile, including a children’s one. Additionally, it will be necessary to make rotation bushings for them, while the presence of bearings in this system is not necessary.
Homemade tracked snowmobiles perform well. It is possible to make this part yourself. The caterpillar is driven by wheels that are located inside it, for which wheels from garden equipment are suitable. The part itself can be made of plastic pipes, even if two-track snow scooters are made. Pipes with a diameter of 4 cm are suitable. If they are cut, they can serve as caterpillar lugs.
Regardless of what vehicle is being converted to a snowmobile, how extensive the modification is, or who built the design, it is recommended that it be tested in an open area first. If they passed without problems, then you can go to longer distances.
Manufacturing of caterpillar propulsion
- In the first case, a track-type mover for snowmobiles can be made on the basis of a classic roller-bushing chain and transport belt. When making a caterpillar, no special tools are required. To extend the service life of the tape, you need to stitch its edges with fishing line. The rings are connected by connecting the ends of the element.
The thickness of the tape is selected based on the power of the motor. When using domestic motorcycle engines, a tape up to 10 mm thick, which is used in agricultural conveyors, is ideal. This type of track can be easily repaired if it breaks.
- The second option is to connect V-belts to lugs that are attached with screws or rivets. The result is a caterpillar track with holes for the drive sprocket. There is a small gap left between the belts.
What can you take ready-made?
To make something like a motorbike, you don’t need to do everything from scratch. You can take some element, design, sold in the store. In order not to buy a new scooter, you can take it from your own hands, it will be even cheaper. An even cheaper option is to look at the disassembly markets, where there is a lot of this extra stuff. You can use a snow scooter for the base of a motorized sled, but you need to choose a completely metal one and additionally change the design with your own hands, otherwise this subtype of sled simply will not withstand the loads.
The wheel is also worth looking at in the store. In addition to the above-mentioned wheel from an enduro motorcycle, you can use standard wheels from a car, and for better grip on snow, simply add chains. There is also an option using dutik – tubeless rubber wheels. But first you should strengthen them with a chain or strips of iron. For wealthy citizens, an excellent option would be to introduce into the design the so-called VGD - off-road tracked propulsion units.
The seat can most often be taken from the same scooter, and if you want to make it yourself, you can use publicly available diagrams. Skis are bought in a store or kept in a garage. It is best to use ultra-light alpine skis; with them, the motor sleigh will not fall into the snow. Some homemade products use now popular modules for motorized towing vehicles as a basis. But if your task is a motor sleigh with minimal investment, then this option is not for you.
Review of factory products and homemade products for snowbike
- The Canadian company Timbersled offers several versions of its own systems for Japanese-made motorcycles. At first glance, the design is quite reliable, but the price of the product is not affordable for everyone. Manufacturers are asking $5,500 excluding delivery for the most inexpensive kit in the line. The weight of the products is slightly more than 60 kilograms.
- The Russian brand VORTEX offers kits, which they claim have no analogues in the world, for enduro and cross motorcycles with power from 250 to 750 cm3, which enable motorcyclists to engage in sports in winter. What’s important is that the kit comes with a set of bushings, with which the track and ski, according to the manufacturers, will exactly fit your motorcycle.
- The Tyumen company “Alpha Drive” is a manufacturer of Snowrider kits. The line includes three models differing mainly in the length of the tracked chassis. The weight of the set ranges from 60.5 to 64 kilograms.
“The adapter kits produced allow the track kit to be installed on almost any modern lightweight enduro or motocross motorcycle with a left-hand chain, with an engine capacity of 250 cubic centimeters or more.” -indicated on their website.
The price of product sets is from 318,000 to 342,000 rubles, delivery will be at your expense. The set of adapters is not included in the price, but is sold separately, the cost of the set is 10,000 rubles.
Let's go down the price range closer to the people.
- “Price without canister and case.
- The 101″ track kit is ideal for groomed trails as it does not require snow to lubricate the track. The set is suitable for riding in fields and forests.
- Suitable for any motocross or enduro motorcycle
- KTM. Yamaha. Husqvarna. Kawasaki. Honda. Suzuki. Kayo. BSE. Avantis. GR7. 125. 140. 150. 160. 190. 230. 250. 350. 400. 450.
- Caterpillar for a motorcycle. Snowbike. Snowbike. Snowmoto.fun. SMF. “
- Track kit SMF CROSS 101″ from 136,000 rub.
- Track kit SMF 129″ from 185,000 rub.
- Track kit SMF PRO 127″ from 250,000 rub.
- The Samara company SNOWBIKE LLC offers a set with adapters that are included in the price of the set. The issue price is 76,600 rubles. + delivery by transport company.
- For motorcycles with a volume of 110-250 m3, the company offers potential buyers a kit costing 62,500 rubles. which is suitable for motorcycles from Japanese, Chinese and European manufacturers.
- And from the same company, an offer and, in my opinion, not a budget offer.
- Electric Crawler Fat Bike Conversion Kit.
“Although the fatbike itself is quite a passable device due to the wide tires, its passability ends in loose snow. At speed, it will still be able to travel some distance in the snow, but if you drove into a snowdrift 30 degrees or deeper, then its cross-country ability will not be enough. In addition, on snowy climbs, of course, any tires, even the widest and studded ones, will slip. Therefore, we are developing a kit to increase cross-country ability. In effect, you get an ultra-light single-seat all-terrain vehicle.”
- -Assembled weight: 15 kg
- -Speed: up to 45 km/h
- -Distance on one charge: up to 70 km
- - Load capacity: 140 kg
- -Motor power: 2.2 kW
- -Battery capacity: 26 Ah.
- -Tracks width: 15-22 cm
They are asking 80,000 rubles for this device.
This is not a complete list of devices that will turn your motorcycle into a maneuverable, smaller, but more unstable and injury-prone version of a snowmobile.
For people with a technical mindset, skillful hands and a desire to create their own creation, on the vastness of the World Wide Web there are enough technical developments for the production of such kits. Good luck!
We assemble the sleigh with our own hands
First, you need to decide on the design; to do this, look for photos or videos of motor sleighs and copy them. If you intend to make motorfins yourself, then you should arm yourself with a pencil. First, sketch out on paper what you want to see. After this, begin to sweep aside those parts without which the unit will not lose its qualities. Add stiffeners and fastenings as necessary. Once you finally understand what you want, move on to the drawings. At this stage, it will become clear which bolts and nuts are best to use, which elements will be homemade, as well as the main welding points.
Look for scooters at scrap yards or markets. Any will do, the main thing is that their engine volume is no more than 50 cubic centimeters (otherwise the sled will fall under the A1 license category). Also take into account such a nuance as a stable injection and ignition system. Remaking it yourself and bringing it to mind is for those who want to do absolutely everything with their own hands. A gas tank would be a good idea. But at the same time, you can use a can of gasoline, or make it yourself.
Important: do not solder the tank under any circumstances. Only welding. Otherwise, you can witness the “tin plague” - a process when tin becomes brittle in severe frost and breaks out of the seams.
Start assembling the frame following the drawings. At this stage, the ability to do your own welding will come in handy. Use pipes for the frame. They are easier to bend than rolled profiles. They can also be connected at sharp angles without loss of stability. This will make your sled more aesthetically pleasing. Don't forget to also make a bushing for the snowmobile's steering wheel. Simply weld a piece of pipe larger than the handlebar post at a 90-degree angle to the frame.