How to cut a log with your own hands
It is not necessary to purchase a device for sawing boards with a chainsaw. You can make it yourself. The simplest option is a device made of metal profiles. Such a nozzle will not only be convenient, but also stable, durable, and reliable. Are you planning to make the most functional frame possible? Use mechanical gearboxes.
With them, the device will turn into a kind of machine for longitudinal cutting of logs. Mechanical gearboxes are necessary to simplify the process of moving the chainsaw along the trunk. There is no need to exert force (pressure on the tool manually) to process the material. All you need to do is turn the gear handle. As for adjusting the thickness of the boards, it is convenient to adjust this indicator by using an attachment made of metal profiles, lifting the workpiece itself, and not moving the gasoline saw in relation to it.
At home, you can also make a device that will cut a log not in a horizontal, but in a vertical plane. The only significant nuance is that it is more difficult to work with compared to the previous frame (despite the fact that its design is simpler).
The difficulty lies in the fact that the operator has to put effort into moving the tool along the workpiece. In addition to the chainsaw and attachment, you will have to use an addition made of boards and metal. This kind of support is attached to a log.
An alternative option is a carriage installation. To create such a frame structure, you will need a pair of wheels and a profile pipe. This device differs from others in its mobility (ease of movement along the workpiece). In addition, the wheels will simultaneously serve as stops for the chainsaw, which means that additional devices will not be needed. The only thing that is needed in addition to these parts and a profile pipe is an aluminum ladder (it will play the role of a guide element).
You need to select a ladder taking into account its width, which should coincide with the distance between the wheels of the frame structure, which will be placed directly at its ends. The best option is to attach it to the log being cut using self-tapping screws, clamps or nails. The created device for cutting boards with a chainsaw with your own hands is placed horizontally.
It should lie as flat as possible. You can make sure that it is placed correctly using a building level. It’s easy to level a ladder with a log, using boards (pieces) of different thicknesses. As for the tool itself with the nozzle, it is installed on the ladder, moving the working saw along the workpiece, applying pressure on it with your hands.
Sawing process
It includes the following steps:
- Place the log on the sawhorse.
- Attach the frame to the tire.
- Attach the supports that are designed to hold the ruler, making sure that they are installed exactly level.
- Secure the fasteners with self-tapping screws (they will be easier to remove after finishing the work).
- Make sure that the cut line will be 1 centimeter above the ruler, and not along it.
- Make the first cut.
- Release the log from the stops and move the fixture to the next cutting line.
- Next, you can remove the ruler and continue to focus on the cut you made earlier.
Snowmobile
Work begins with the snowmobile frames and track block, which are made in the form of 2 welded spars. In the middle parts, 50x36 corners are used; metal plates of 2 mm thickness are installed in the front and back. The latter have the edges bent by 90°, which adds rigidity to the parts.
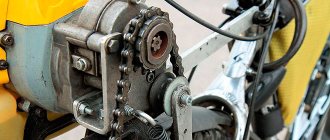
A hole is made in the front plate for the shaft that drives the caterpillar, in the rear plate - for its second axis, which is a tension one. Near the latter, on both sides of the frame, tensioning devices for the caterpillar and chain drive are mounted.
5 brackets with open grooves are welded to the side members from below. They contain the axles of the track rollers supporting the track. The last 18, 3-4 pieces each. on each axle - front and rear at the edges, middle ones - in a checkerboard pattern. The axles are secured in the grooves using nuts and locknuts.
The rollers come from a unit that is used for sorting potatoes, the axles come from a potato digger. The axles are released, machined, and an M10 thread is cut. Between the rollers, to fix the position, duralumin tubes of the appropriate diameter are placed.
3 racks are welded onto each spar using 30x30 angles. They are connected at the top with the same crossbars:
- a steel sheet 2 mm thick is welded to the front and middle on the right side, on which a gearbox with an intermediate chain drive shaft is mounted;
- Between the other pair there is a box with a lid that serves as a seat.
A transverse beam is welded to the front ends of the side members - the crossbeam of the front axle. At its ends there are bushings for the steering skis, in the middle there is a stand that forms the engine subframe. All parts are made from water pipe with an outer diameter of 32 mm.
The caterpillar for the motorized dog is from Buran. It is shortened by 50 cm and stitched. Drive and tension gears are made like “Buranovsky” ones from strong plastic 1.5 cm thick.
For the caterpillar drive shaft, a pipe with an outer size of 28 mm is used. On the edges:
- The flanges are welded to which the gears are attached through the holes.
- Pin tips are pressed into the shaft holes, the diameter of which is previously ground to fit bearings 80204. One of the tips is made longer and a driven sprocket is placed on it, through which the shaft is driven into rotation. It is secured with an M14 nut, under which the end of the axle is machined and a thread is cut.
Similar to the drive shaft, but with 2 identical tips, a tension shaft is made.
The chainsaw engine is mounted through its frame on a motor subframe - a rack located on the cross beam. The gas tank is located on top. The gearbox is rotated 180° and secured to the site. A speed reducer is also installed on it - an intermediate shaft. Sprockets with a number of teeth of 38 and 10 are attached to it. Chains for transmitting rotation are taken from the Voskhod, Minsk motorcycle.
The steering includes:
- support-steering skis on which levers are installed;
- the bipod of the steering shaft, to which the ski levers are connected by rigid rods;
- motorcycle 2-lever steering wheel with a gas control lever near the right handle.
The walls and bottom of the box are covered with 4-layer plywood or boards. Its lid serves as a seat: for its manufacture, 6-layer plywood is taken, covered with a layer of foam rubber and leatherette.
Do-it-yourself sawmill from a chainsaw: video instructions and drawings
Having the drawings available and having studied the video instructions, it is quite simple to independently make a structure for processing logs, boards and slats. Before starting work, you must select a suitable location. You can install a sawmill using a chainsaw in an old barn, garage, hangar, or even just under a shed. If the room for the unit is closed, then you should take care of the hood.
Chainsaw sawmill - option No. 1
To make the structure, in addition to a chainsaw, you will need:
- two channels 8 meters long and 140-180 millimeters high;
- two rails;
- corners 50x100 mm and 40x40 mm;
- 25 cm sections of water pipe as ties;
- steel plate 4-6 cm thick and 60 cm long;
- movable hoses;
- pipes with a diameter of 35-40 mm.
Making your own sawmill should begin with assembling the base from rails and 50x100 mm corners turned upside down. They must be installed strictly parallel to the floor, so you need to use a building level.
Next, the following work is performed:
- Along the length of the base, according to the drawing, holes are drilled in increments of 1-1.5 meters and with a diameter of 14-16 mm.
- Then, according to the number of holes, ties are taken and connected with bolts.
- Stands are made from metal squares and the base is placed on them. The distance between the outer posts and the base should be about 100 cm.
- To make the structure more rigid, braces between the posts can be welded.
After the base is completed and installed, you need to make a movable cart with your own hands. To do this, a 40x40 mm corner is welded to the bottom of the steel plate and the product is placed on rollers or bearings. Two corners are welded on top of the plate, to which a chainsaw is attached.
At the last stage of the work on making a homemade sawmill, it is necessary to make a structure for fixing the logs. To do this, movable hoses and pipes should be positioned at the required height and secured.
The first version of a homemade sawmill using a chainsaw is ready. There is another way to make a wood processing unit with your own hands. The tools and drawing for it will need the same, however, the design itself is more refined.
Do-it-yourself sawmill from a chainsaw - option No. 2
The structure consists of four main components:
- Driven saws.
- A mechanism for regulating the thickness of the board being produced.
- A mechanism for moving the saw part of the structure.
- Devices for fixing logs.
Since a chainsaw with a working engine and cutting teeth is already available, you will only need to make both mechanisms and a device for fixing logs with your own hands.
Mechanism for adjusting the thickness of the boards.
Logs are sawed by raising or lowering the base, which must be welded to the plate using four nuts with bent edges. At the top of this device, it is necessary to install lock nuts, which must be tightened after the unit is adjusted to the desired thickness of the material being processed.
Mechanism for moving the saw.
The saw in the structure moves along the frame along guide angles, the distance between which should be 50 cm. Two 20 mm rollers or bearings must be welded to the posts. The lower roller should keep the sawmill from lifting, and the upper one should rest on the guide angle.
Device for fixing logs.
On such a unit, logs are fastened using two ridges - a stationary one and one moving by means of a screw. After the material to be processed has been installed, the moving comb is secured with screws in a stationary state. Now you can safely begin to operate a homemade sawmill made from a chainsaw.
Safety regulations
Important to remember:
- Do not use a chainsaw if you are sick or under the influence of alcohol.
- Hold the chainsaw firmly with both hands to ensure full control of the tool during unexpected jerks.
- Hands should be clean and dry to ensure a secure grip on the tool.
- Only use the chainsaw on a stable surface with sufficient surface area.
- Do not operate the chainsaw with your arms raised or extended.
Chainsaw sawmill
This type of design is the easiest to manufacture, but it will also require special skills, tools and experience working with them.
This type involves installing the carriage on guides, but is not mandatory. You can use a flat wooden plank as guides, along which the carriage structure will slide easily. It allows you to remove the first layer evenly. The cutting plane on the log is used as subsequent guides.
Attention! The absence of a frame and carriage adds a number of difficulties. The master may have problems holding the log in one position
You cannot start work without proper fixation, as this can lead to injury.
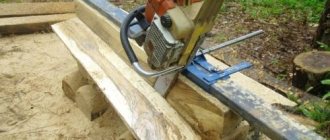
The step-by-step process for making a carriage for a chainsaw will look like this:
- Let's make the base. To do this, we weld together a pipe measuring 25x25 mm.
- Perpendicular tubes, the size of which is 30x30 mm, are welded to the base on opposite sides. They are necessary for attaching the moving part that holds the saw and sets the thickness of the planks to be cut.
- Nuts are welded into the side parts of the guides. With their help, it will be possible to fix the moving parts at the desired height with bolts.
- We make the moving part. It consists of two pipes with a T-shaped end. The end of the pipes is made in the form of a vice, clamped with bolts and nuts. These clamps will hold the chainsaw blade. Pipe size – 25x25 mm.
- To prevent the saw chain from rubbing against metal parts, two metal plates of the required sizes are welded onto the internal parts of the vice. They completely depend on the thickness and width of the chainsaw blade.
- We assemble the carriage into a single structure, select the desired height and install the saw. The sawmill is ready for use.
The video below fully describes the carriage manufacturing process. In addition, the author of this device notes the main difficulties and some inaccuracies that he made during the assembly of the sawmill. This will allow you to avoid such mistakes and make the device for sawing logs more practical.
Bottom line! This carriage design is suitable for personal use and one-time sawing of wood. It is not suitable for commercial purposes.
Carriage, grips, clamps
There remains such a problem as a frame with additional components. The one on pos. 1 pic. the left is far from optimal. For one-time sawing for self-construction, it is too complex and expensive. It is also not suitable for long-term regular use: even if the supporting frame is made of a 200 mm channel, it will not sag after the first or second dozen logs, which means the machine is completely unsuitable. A stationary sawmill must be made with separate concrete rail tracks and a carriage for the logs.
Irrational and rational designs of the frame, carriage and log grippers of a homemade sawmill
The next tasks are leveling and holding the log. In industrial woodworking, hydraulic jacks with hooks are used for this purpose. The log is hung on the hoist, lowered onto the carriage without touching it, the jacks turn on and grab it tightly. In automated carriages, a log is placed on it and hydraulics, based on sensor signals, immediately levels the timber.
In amateur conditions, the first is not feasible; the second is in no way feasible. In many homemade sawmills, log grippers are made as shown in Fig. below. The log is hung on automatic jacks (see below), hooks are brought to it, sliding along a guide (pipe, thick rod). The hooks are tapped with a hammer according to the principle of “lightly tapping with a sledgehammer”, they are wedged on the guides and hold the log.
An unreliable and inconvenient way to attach a log to a sawmill carriage
Firstly, such fastening is simply dangerous: vibrations during sawing can cause the grips to become wedged, and this is an accident most likely with serious consequences. Secondly, it is impossible to grab the wood by the very “bottom” in this way. This means that you will have to turn the log over before finishing it halfway. As a result, the cutting quality and material waste will be the same as on a vertical single-disc sawmill, see above.
Carriage
Let's try to develop technical requirements for a log carriage suitable, incl. for use with a portable mini sawmill when working on the road:
- materials – ordinary rolled metal without preliminary screening for evenness;
- for strength, reliability and durability - welded;
- the influence of the quality of welding and warping of the metal from it on the quality of sawing is absent;
- prepared base (support) surface – not required;
- weight and dimensions - suitable for transportation in a mini-truck, pickup truck and on the top trunk of a car;
- the maximum length of the processed log is 6 m;
- its maximum diameter is up to 1 m;
- leveling and hanging the log - in any way independent of the carriage, see below;
- the influence of the flatness of the carriage along the horizon on the quality of sawing - no;
- the reliability of holding the most clumsy, unrooted forest is absolute;
- the ability to dismantle the sawn blocks into edged measuring boards/beams without readjusting the sawmill - a must;
- security – sufficient for non-production conditions, when access to the site of untrained outsiders is easily controlled.
Drawings of a log carriage for a sawmill, incl. minis that satisfy the specified conditions are shown in Fig. (left/center – top view). Material – channel 120x60, rod 14 and 16 mm.
Exactly under the M14 holes in the upper flange of the channel, D15 holes are drilled in the lower flange for the passage of the shanks of the hook holders (on the right in the figure). The M16 holes in the bottom shelf (marked in green) are for threaded feet. The plan configuration and location of the grip holders make it possible to reliably hold both full-length logs and short logs. Use this carriage like this:
- the log is hung and leveled on a pair of auto jacks. An option is to use one jack at a time: put something suitable under the raised end, rearrange the jack and lift the other one;
- the carriage is slipped under the middle of the log with the widened part towards the butt and aligned along the axis of the timber. If the log was hung on a hoist, then the middle pair of legs should fall under its center of gravity;
- the holder hooks are turned out until they touch the log so that their points look inward exactly at each other. A slip by one turn (by M14 thread pitch) does not affect the cutting accuracy;
- the log is lowered onto the hooks. If the timber was hung on one jack and a support, then first release the jack, and then knock out the support with one sharp blow;
- to securely hold a thin light log, you can sit on it and jump;
- saw the log using any sawmill using horizontal cuts. The thickness of the last slab in the vast majority will not exceed 40 mm.
Design of various attachments for longitudinal sawing of logs
Let's start with something simple, with the design of a gas cutter. Visually, it resembles a bearing assembly, complemented by a pulley and a movable shaft (performs rotational movements). This device is driven by a belt drive. The unit is equipped with a special mechanism designed to fix the disks. The latter must be selected from an assortment designed for cutting metal, wood, and stones. With the help of such discs and attachments, transforming a gasoline saw into a multi-tool is not difficult.
An alternative version of the device for longitudinal cutting is a debarker. This is popular not only because of its ability to increase the efficiency of making boards, but also due to its ability to remove bark from logs. In addition, it can be used to cut grooves in the material being processed. These are just a few examples of the purpose for which a debarker is used. Such nozzles are found in two varieties:
- drums;
- disk.
They differ from each other mainly in functionality.
There are other devices for longitudinal cutting of logs. Most of them are developed by large companies, but you can also see homemade devices on the Internet. They differ from those manufactured at factories of famous brands mainly in their design features.
In this regard, homemade nozzles are much simpler. The most common version of these is a manual sawmill. The basis of such a small sawmill is a gasoline chain saw, supplemented not only with guide elements, but also with wheels designed for moving along the log (in order to reduce the resistance indicator). This device has no more than 2 wheels, one on each side of the workpiece.
A manual sawmill is a simple and convenient device. With its help, you can produce a large number of smooth and neat boards without much effort. The only essential condition is the correct installation of the chainsaw. It should be positioned horizontally (unless the operator requires an oblique cut).
Cutting technology
To cut a log into boards, it is not enough to use one attachment frame. An additional support will be required. You can’t do without it, especially in cases where you need to cut down the upper part of the material, the one that is close to the bark. In other words, a stop is needed to turn a log into a beam. The necessary device is usually made from boards in the amount of 2 pieces.
Each board must be at least 40 mm thick, but not more than 50 mm. They are fastened together by first placing both in a perpendicular plane. Afterwards, the boards are fixed to the log using self-tapping screws. Stops need to be placed on the sides, which requires the same devices made from boards.
Much attention is paid to the fastening procedure
It is extremely important that the top end of the vertical board is in relation to the top edge of the log below. The distance between these two points should correspond to the thickness of the piece of material being cut
Upon completion of the preparatory stage, the chainsaw is installed directly. Part (only one) of its frame should rest against a board installed across it. It will then be obvious to the operator why the installed plank fixtures are called supports. The base of the frame literally rests on it, on its vertical part.
After that, just start the tool and start making longitudinal cuts, focusing on the gap between the end of the vertical board and the upper edges of the log. An important point is that you don’t need to put a lot of pressure on the gasoline saw with your hands. There is no need to push the device; the cut will be smooth and precise. Upon completion, it is enough to dismantle the device from the boards. After this, the log is turned over (90 degrees), and the supports are reinstalled in the same way as described above.
If we are talking about cutting logs into regular boards, you can do without a wooden stop. But when cutting slabs, it is necessary to install it. Once the material has been converted into timber, the plank fixture can be set aside. By “timber” we mean lumber with a rectangular cross-section (with 4 smooth outer surfaces, which themselves will serve as a support for a gasoline chain saw with an attachment). The technology for working with such a tool (with frame) is simple:
- The frame is pressed against one rectangular section.
- The operating device is advanced along the workpiece, thereby cutting the timber.
In order to change the thickness of the board being cut, it is enough to use a stop element placed perpendicular to the entire structure (it is simply moved across the cut).
Ripping chains
The tooth shape of any cutting blade for longitudinal and transverse cutting of wood is different. The same applies to chainsaw chains. In a hacksaw or two-handed saw for regular cross-cutting, the tooth is located straight, at 90 degrees (along its axis) to the blade.
In rip saw blades, the tooth is inclined forward. Chainsaw chains for rip sawing have a different sharpening angle. You can find such chains on sale. But they are required quite rarely, so there is not a large selection of them on sale. We have to search. In addition, among the variety of chains for different models and brands, choosing a suitable chain is even more difficult.
When such a chain cannot be found, the old ones are resharpened for cross-cutting. In this case, the sharpening angle changes from the usual 30 degrees to 10, sometimes even 5 degrees (almost perpendicular to the axis of movement of the chain).
Sawing along the grain (lengthwise) of chains with both (30 and 5 degrees) sharpening angles will be at approximately the same speed. But at a sharper crosscut angle of 30 degrees, the chain tends to find places in the wood with the least resistance between the fibers and unpredictably pull the cut in that direction. As a result, the tire may bend, make a crooked cut, or jam.
Band sawmill
This mechanism is one of the complex types. To manufacture it, you will need to purchase expensive materials, including an engine of the required power, prepare a machine movement system and carry out complete debugging and configuration of the equipment. Making it at home can be extremely difficult and expensive.
The principle of operation of a band sawmill lies in its name. The cutting element is a long saw blade rolled into a ring. This ring is installed on the pulleys. To prevent the tape from flying off during heating, car or motorcycle wheels are used as a pulley. They provide the necessary elasticity.
The main structural element that needs to be given priority attention is the frame. It is this that will hold the cutting elements, drive, engine
The frame also provides smooth movement along the guides and adjustment of the cutting thickness. The assembly of the structure should begin with the frame.
The engine plays an important role in the sawing process. An insufficiently powerful system will lead to frequent saw jams and low efficiency, while a system that is too powerful can break the cutting element. As a rule, electric motors with a power of 2 kW are used. The engine is placed on the side of the frame opposite the cutting mechanisms.
The easiest part is installing the guides. It is allowed to use any durable materials - rails, channels, I-beams. The distance between two parallel guides is the diameter of the largest log that will be sawed on this sawmill. The guides are mounted on supports installed every half meter. The parts are fastened together by welding.
Advice! Such designs are often used by small enterprises. At a relatively low cost, you can get an effective tool capable of longitudinal sawing a large number of logs. However, for one-time use the tool cannot be called effective - the costs are too high.
This video describes the process of sawing wood with a band sawmill. This will allow you to evaluate its effectiveness, as well as notice the main positive and negative aspects.
Using the above drawings and descriptions, you can make a carriage for a chainsaw with your own hands. It must be remembered that a chainsaw is an extremely dangerous tool. All parts of the structure, especially those holding the saw bar, must be reliable and strong. Parts should not “walk” when a load is applied. Otherwise, you may suffer serious cuts or traumatic amputations of body parts. If you are not confident in your abilities, it is recommended to entrust the assembly of the mechanism to professionals or purchase a ready-made kit.
Assembly instructions for a simple manual sawmill
One of the easiest and fastest ways to cut round timber into boards is to use a manual device for longitudinal horizontal cutting with a chainsaw to a constant thickness. Lightness, simplicity and economy are ensured due to the absence of a base on which the log is laid. In fact, this is a separate cutting part of factory machines, only it is driven by the muscular force of the operator, who guides the device along the trunk, sawing it. When sawing, it is enough to lift the log onto trestles or even just two beams at the edges.
Description of the chainsaw frame
The device contains a minimum number of parts. All of them are fastened by welding or screw-threaded connections:
- The bed is the base of the tool. It is to this that the chainsaw is attached. Made from steel sheet 5 - 8 mm thick.
- Guides are welded to the frame. They support the entire structure with adjustable cut thickness. For them, it is better to use two round tubes with a thickness of at least 3 mm.
- Busbar clamps - one clamp bar is welded to the frame, the other is connected to it with two bolts. By inserting the bar between the jaws of the clamps and tightening them, you can fix the saw set and reduce the load on the attachment of the bar to the chainsaw.
- The carriage is a unit that regulates the thickness of the board cut from the trunk. It consists of two strips with semicircular grooves for the diameter of the guide pipes. Tightened with bolts and nuts.
- The support platform is integral with the carriage and is attached by welding with gussets or brackets. It moves over the part being sawed off, preventing the blade from deviating from the specified trajectory. Equipped with a handle for easy holding.
Making the base
The bed is cut from a steel sheet. Its dimensions are 160 mm length and 220 width. The most convenient way to do this is with a plasma cutter, but if you don’t have one on the farm, then an ordinary grinder will do. The main thing is not to forget to chamfer the workpiece for beauty and safety. Holes are drilled in the plate for attaching the clamps and the saw itself. To hold the latter, you can make a slot with a grinder and then refine it with a file. This will allow you to make small offsets while adjusting the tire offset on the machine.
For the guides, you can use a regular half-inch water pipe. Maintaining a right angle, they are welded to the frame strictly vertically. It is better to scald the joints thoroughly, as this place experiences significant stress.
Design features of a snowmobile and snowmobile
A snowmobile made from a chainsaw is considered one of the most complex home-made devices, because its manufacture will require a large number of additional parts, including:
- frame;
- frame;
- tracks and front skis;
- steering wheel;
- control consisting of a handle and a clutch.
There is another difficulty. In order for a snowmobile to move, it needs to be equipped with suspension and transmission, so it will not be easy for a beginner to cope with such work.
Creating a snowmobile from a chainsaw with your own hands begins with a supporting frame, which is a steel profile measuring 20x20 or 20x30 cm. A swing arm is responsible for damping the rear suspension, and a motorcycle-type steering fork is responsible for the front suspension.
To make a snowmobile from a chainsaw, you will need to purchase many additional parts. Note! A more complex design consists of two skis; with the steering wheel it will be possible not only to turn the axis, but also to pull the levers of the steering linkage. Despite the fact that this method is technically more complex, it provides more convenient control.
Additionally, a do-it-yourself snow scooter with a motor is complemented by a centrifugal clutch with a V-belt and chain. To enhance the traction force, a gear is attached to the caterpillar shaft, the diameter of which exceeds the drive part of the chainsaw shaft. For normal operation of a homemade device, you need to take a motor with a power of at least ten horsepower.
A simpler option is the snowmobile, which has a similar method of use, but is a propeller-driven aircraft moving through the snow. Due to the simplified design, the sled does not have a large load capacity, maneuverability and stability. The main advantages are simple design and ease of manufacture. The rotating propeller, installed behind the driver's back, must be covered with a protective casing made of fine mesh. Control is carried out by turning the skis, the gas lever and the brake. The optimal engine power is considered to be 5-6 horsepower.
Wood splitter for splitting firewood using a chainsaw
For chainsaws, a special attachment is offered that allows you to turn the sawing tool into a device for quickly and efficiently chopping wood. This is very important in everyday life, when large stumps remain after sawing thick wood. It is almost impossible to cut them with an ax. You can use a hand cleaver, but this process will take a long time and will require a significant investment of time and physical effort.
The average cost of such attachments is about $100. The design is used to work with hemp, the thickness of which can reach 40 cm, and the length varies from 40 to 80 cm. You can see what the tool is in action in the video clip.
The device is designed specifically for Stihl chainsaws of the following models:
- MS 180;
- MS 181;
- MS 210;
- MS 211;
- MS 230;
- MS 250.
It can also be used for chainsaws from other manufacturers, but their minimum power should be 2 horsepower or 1.5 kW. It is important to use tools with an external sprocket.
It is very easy to use the attachment, as well as to mount it on the chainsaw. To do this, you just need to remove the bar and chain and secure the attachment.
Interesting! The wood splitter has a spiral shape that effectively bites into any type of wood, splitting it into pieces.
DIY chainsaw carriage. Blueprints
Since the price of professionally produced equipment (similar to that described in the previous section) ranges from 2500 to 3000 US dollars, it is not difficult to come to the conclusion that you can make your own carriage design for longitudinal sawing of timber.
Depending on the size of the chainsaws used, the dimensions of the carriage assembly, as well as its appearance, are shown in the figure.
The manufacture and assembly of a carriage for a chainsaw is carried out in the following sequence. First, the drive motor is prepared for installation. To do this, remove the drive pulley and install the engagement clutch, resulting in a finished cutting head. A support bracket must be made for the motor mounting plate. By changing the diameter of the pulley, you can control the cutting speed of timber - up to 2.5 times faster than allowed by the base engine speed. To reduce the temperature and eliminate the possibility of engine jamming, its output shaft is ground so that the chain drive sprocket, without taking into account the dimensions of the central bearing, fits tightly to the bracket.
The presence of a belt drive on the shaft that drives the chain protects the engine from vibration and shock generated by the chain. All that remains is to adjust the gearing to get the correct chain speed. Then it is necessary to install bearings on the drive shaft for more intense operating conditions, with increased load-bearing capacity.
Most home renovation and construction work requires the availability of the necessary materials. Buying boards or timber of the right size is not a problem, but sometimes you need lumber of a certain size. Planks of one or another type of wood, non-standard thickness or width are often required. Finally, there are simply several logs from which to cut boards. It is possible to solve such problems; you only need a DIY chainsaw carriage.
This simple device allows you to make a carriage, timber or boards of the required thickness from logs of any type. This device is especially valuable because it makes it possible to process non-standard logs - short, uneven or strongly curved. Let's take a closer look at this issue.
Chainsaw Attachment for Metal Cutting
Attachments for chainsaws (suspended equipment): motor drill, compressor, wood cutter
Modern chainsaws can do more than just cut wood. This is a universal device that can be adapted to perform a wide range of tasks. If desired, an ordinary chainsaw can be used as a pump, motor drill, boat or bicycle motor.
In terms of the breadth of capabilities, no other tool can compete with them now. With additional equipment, the saw can pump water from wells or wells, cut stone, metal, and stretch cars stuck in snow or mud. All this becomes possible thanks to suspended equipment. Chainsaw attachments can significantly expand the functionality of this tool.
A few words about the capabilities of modern devices
These tools use a fairly powerful, but at the same time compact internal combustion engine.
A very sealed fuel system and a diaphragm carburetor work together with the power unit. All this allows the device to perform the widest range of tasks.
You can attach various attachments for chainsaws to the output shaft of the motor, allowing you to do whatever you want. Another advantage of such gasoline tools is increased mobility. Work can be done anywhere.
The chainsaw has a very successful design. And breakdowns of this system are a very rare case.
Types of nozzles
If you have a chainsaw, but you don't understand how to use it, and all the wood has already been cut, then this information will help you use the gasoline tool to its full potential.
Chainsaw attachments allow you to solve virtually any problem. The chainsaw attachment for the removal attachment is also called a metal cutting attachment. Buy a diamond wire saw for cutting stone wholesale from China. Products directly from factory on alibaba.com. There are a lot of species here.
So, there is a device that allows you to cut wood in a horizontal plane. With its help you can cut a log into equal parts. Collets, collet, attachment for engraver, for engraver, Dremel. Tools » power tools. With all this, the frame structure of this device will be able to provide the required hardness.
Another attachment allows you to cut logs in a vertical plane.
Despite its simplicity, cutting accuracy with this accessory is very high.
With the help of a gas cutter it is very comfortable to cut and saw a wide variety of metals and stone - it’s the same grinder, but mobile.
Chainsaw debarkers make it possible to clear logs of bark or various growths. The device is also used for cutting cups, various grooves and hollows. There are two types of this nozzle. So, there are drum and disk debarkers.
Chainsaw as a pumping unit
The autonomy of the gasoline drive is highly valued in irrigated farming areas. Compact and mobile pumping units are effectively used to supply water to areas located at a great distance from power sources.
Such devices are in particular demand in private and small-scale farms, for watering crop areas, as well as drawing water from wells and artesian wells.
Carriage for Chainsaw for Longitudinal Sawing with Your Hands
Boards are intensively used for various construction and repair activities. There is an option to make such material independently from any suitable log using an ordinary chainsaw.
A chainsaw, often also called a chainsaw, is essentially a chain hand tool equipped with a two-stroke (almost always) gasoline engine. This popular mechanism is indispensable in any homestead. The chainsaw is small-sized and at the same time powerful. It works without breakdowns for a long time in offline mode, so it can be used in any location and in a position that is comfortable for the user. A chainsaw also has the following advantages:
- Equipped with mechanisms for selecting operating speed and soft start. Therefore, the risk of breaking the chain is reduced to zero.
- Used when wet.
- Does not require electronic energy.
- It is characterized by the highest power indicators (tangibly greater than that of a power tool).
- Has a quick-acting inertia brake.
A chainsaw is essentially a chain hand tool
The main advantage of a gasoline saw is the ability to equip it with different attachments. It is they who make it a universal tool, irreplaceable for the home craftsman. Using a chainsaw, you can saw logs, cut stone, metal, brick, tiled building materials, remove bark from wood, cut out mounting grooves and various recesses in bars.
The functionality of the tool can be expanded to a greater extent; the main thing is to choose the right attachment or equip it with a special device.
We will not outline what remains to be done for our client with the ability of a chainsaw. For the purposes of this article, we are only interested in the issue of sawing logs using a chainsaw. More on the specifics of doing such work on your own.
Cutting a log with a gasoline saw can be done after equipping it with various types of devices and special attachments. It is not difficult to obtain relatively even boards from the trunk of an old, withered tree on your own summer cottage if you install a standard attachment for longitudinal cutting of wood on your chainsaw. Fundamental point. You will not get perfect boards using this attachment. But the cut products can be used to build a fence around the site or a simple shed.
Classification of chainsaw accessories for sawing logs
Depending on the direction in which the sawing will be carried out, all existing chainsaw attachments are divided into 2 broad groups:
- for longitudinal cutting of wood;
- for cross sections.
Both categories represent a range of industrial adapters that allow you to obtain boards and lumber of the required size, which can then be used for construction or repair.
When there are no factory options available, the only sure way is to make their analogues at home.
The result of making your own sawmill from a chainsaw
If you set a goal to build a mini sawmill for your home, then you need to start first by making a homemade diagram. Based on the diagram, you can begin to implement the idea into reality. Making a mobile machine for sawing boards is not difficult, and every craftsman can handle it. To do this, you need to have on hand the necessary tools in the form of a grinder, a drill and a welding machine, consumables in the form of fasteners, handles and screws, rollers, as well as the main parts - angles, channels, tubes.
Then it's a matter of time and skill. When working at a sawmill, you need to take into account the following: in the design of a chainsaw it is better to use chains made of carbide materials with pobedite or diamond coating on the teeth. This will extend the life of the chains and also eliminate excess stress on the tool when the teeth on conventional chains become dull. It is not recommended to cut logs at low temperatures, since frozen workpieces will dull the teeth of gas-powered tools even faster. Having a chainsaw on your household, you should not limit yourself to its basic functionality, since this tool is capable of performing a lot of useful work, replacing such expensive equipment as a sawmill. What other capabilities does a chainsaw have that can be expanded using special attachments? You can read it in the material.
Advantages of replaceable attachments
In the first case, there is a significant cost savings on purchasing a set of household tools for various purposes.
- The price of several attachments is 2-3 times less than the cost of a standard set. In terms of functionality, many branded models are not inferior to highly specialized household analogues.
- Replaceable attachments for chainsaw equipment take up less space; prompt replacement of a standard saw bar with any replacement equipment, provided you have the skills and the appropriate tools, can be done within a few minutes.
- The use of attachments increases the payback of a chainsaw several times. The tool, which is most often used for harvesting fuel wood, can be used to solve many household and construction problems.