Fans of two-wheeled transportation use various modifications to improve their bicycles.
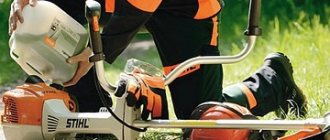
A bicycle with a trimmer engine is very common. Such a device can be made independently, and there is no need to spend a long time and large financial resources.
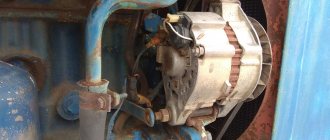
Ice screw from a lawn mower
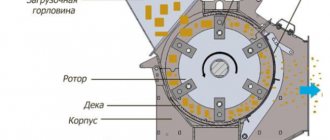
The petrol mower can be converted into an ice auger. Factory analogues are quite complex and powerful devices. Structurally, the equipment consists of a screw connected to an engine (in most cases, two-stroke units are installed). Industrial devices are equipped with automatic safety systems that turn off the ice drill in the event of a malfunction and eliminate the possibility of accidental starting. The models also differ in the number of speeds: one- or two-speed.
For lovers of winter fishing, it is expensive to buy a factory unit, and it is difficult to work with a manual device when the ice is thick. Converting an old trimmer into an ice auger will help save effort and money.
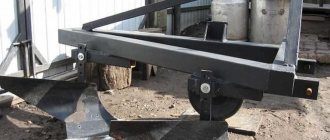
In addition to the lawn mower, the work will require a drill (factory or homemade) and tools to assemble the final structure. The difficulty lies in attaching the working part to the trimmer. Here, a lot depends on the existing model of brush cutter.
The following videos show how an ice screw made from a trimmer works:
The last video contains a possible option for attaching a drill to a lawn mower.
Compared to industrial analogues, a homemade ice drill is a low-power device, but it’s enough for drilling holes. The device also weighs little, which makes it easy to transport.
Why do you need this?
First of all, you should think about what the bicycle equipped with an electric motor will be used for. It will become heavier, it will be impossible to do cross-country and downhill riding on it, because the center of gravity of the system increases, the weight increases, and besides, it’s not worth falling on such a bike. This may damage the motor and require replacement.
Generally, an electric bike is required for the following:
- power reserve “just in case”, in case of fatigue, for reserve. This is a very good solution for older amateur cyclists, as well as for people suffering from cardiovascular diseases and obesity. This allows you to go on quiet walks without the danger of exhaustion on the way back if you can’t time them correctly;
- constant use for climbing hills, in the form of connection on difficult sections of the route. To do this, an electric bicycle must be able to move on two energy sources at once: muscle power and an engine.
It is better not to use an electric bike on rough terrain. His destiny is country paths and asphalt pavement. Also, the electric bike does not like jumping.
Bicycle with chainsaw motor friendship
Most of those reading this article have probably already asked themselves the question, what forces forced a person to come up with a bicycle with a chainsaw motor? Friendship?
The main reason lies, of course, in needs, although the realization of creative ambitions and engineering talent also played a role.
In the vast expanses of the former USSR you can often hear the saying “Why reinvent the wheel?”, and this is not just so. Every boy from an early age dreams of his first bicycle, later a moped, a motorcycle, and at the end of this journey he acquires a car.
Today there are many improved models of vehicles on the market, but not every ambitious technology lover can afford them, so they get out as best they can, using the means at hand. And if you consider that successful examples can be found at every turn on the Internet, then converting a bicycle is a matter of time. So how to implement the design of a bicycle with an engine from Druzhba?
Praising the high efficiency of motor bicycle designs is a thankless task, due to the fact that they are often assembled from parts that have been in use for a long time, namely: a moderately damaged bike, and a Druzhba chainsaw unsuitable for its intended purpose. But it is worth noting that a novice designer can easily get by with this. The first thing you need to do is clearly define all the parts included in the kit of your future motor bike. For assembly, you must have the following: a bicycle with a frame, an engine from Druzhba, a transmission belt, fasteners and pulleys. The design of the bike itself will also require some fiddling:
- lubricate each movable joint;
- properly secure the pulley to the wheel so that the rotational movement from the motor is correctly transmitted to the wheels;
choose the right place to mount the motor, as it will make the bike heavier. A trunk is best suited for this; if your bike does not have a trunk, you will have to make it manually using a welding machine; if the engine interferes with the seat, you will have to buy a new one or convert the old one; equip your vehicle with a headlight and brake lights, because safety on the road is paramount, especially at late times of the day.
If the plan to convert the bike succeeds and it is rideable, then thoughts may arise about improving the aesthetic component or implementing noise absorption. Just don’t rush to implement this, since, most likely, the reliability of this vehicle leaves much to be desired. In general, this vehicle is more of an experiment than a rational improvement of the bicycle.
Legal subtleties
By the way, adding a bicycle motor dramatically complicates the rider’s life from a legal point of view. Of course, even on a regular bicycle we are full participants in the road traffic and are responsible for our behavior on the road. With the acquisition of a source of work additional to muscular strength, the bicycle becomes a vehicle. Do you need a license to drive a vehicle? Yes, we do. This is a 2014 innovation.
Rights category "M" are quite accessible. At a minimum, all those who passed category “B” have them “by default.” Driving motorcycles, mopeds and scooters are rarely taught separately, although access to exams for this category is available 2 years earlier. In practice, the majority simply ignores this letter of the law and does not have any special problems. Traffic police officers rarely get involved with maneuvering purposes, only if the driver is a very young driver.
Consequences of various violations:
- For driving without a license – 800 rubles. fine and prohibition by management (the practice of application is not entirely clear - either the bike is taken away, or non-existent numbers are removed).
- If you are involved in an accident, you are personally liable, since compulsory motor liability insurance was clearly not issued for the bicycle.
Motor from trimmer to bicycle and scooter
A person always tries to make his life easier and construct something new from available materials. Something that will help him spend less effort and energy on daily tasks.
Such inventions can easily include a homemade motor bike and a motor scooter.
If you have a motor from a lawn mower and spare parts (or a whole) bicycle/scooter on hand, why not give them a new life? We will tell you how to assemble a scooter and a bicycle with a trimmer motor in this article.
How to make a motorbike from a trimmer with your own hands?
Making a motorbike with your own hands from a lawn mower is not as difficult as it might seem at first glance. First, determine what power the engine on the trimmer is. It must be at least 2 horsepower. Otherwise, the future unit will not be able to travel a long distance, or even not move at all.
The next stage is the design of the drive. To do this, you will need to make a drive pulley (attached to the motor), a driven pulley and a special frame for the motor. It is recommended to select a belt that transmits torque at the end of the assembly, based on the dimensions of the entire structure.
You can install the engine from a trimmer on a bicycle by making a special small frame from scrap metal scraps. The second point is attaching this structure to the bicycle. It must be reliable and at the same time easy to maintain. This suspension must be securely attached, resistant to vibration and, preferably, quickly and easily detached.
There are two mounting options:
- bolting;
- fastening by welding.
Each method has its pros and cons. Take into account all the features of your equipment and its operating conditions, and build on these data when choosing a mounting option.
Additionally, do not forget to attach parts such as a small fuel tank, exhaust pipe. It would also be a good idea to install an additional brake, since a bike with a trimmer engine will be much faster and more powerful than a regular one.
We also invite you to watch the video, which shows the process of constructing a motorbike from a trimmer:
Do-it-yourself scooter with a motor from a trimmer?
A homemade motor scooter with an engine from a trimmer is an excellent home transport for entertainment, traveling short distances outside the roadway (on sidewalks and park paths, for example).
Based on the characteristics of this type of transport, it will have the following technical characteristics:
- will be able to develop low speed (no more than 40 km/h);
- the small diameter of the wheels will cause little stability, which can lead to the scooter skidding;
- such equipment is not intended for heavy loads and transportation of heavy loads;
- Children should not be trusted with such a “toy” without adult supervision.
Top articles: Comanche Bikes
The assembly process itself is relatively simple. First, find an old scooter (if you don’t have one, you can weld a similar frame yourself). If you take an already assembled unnecessary scooter, it is appropriate to strengthen its frame with a 15 mm square metal profile.
Next you need to choose the appropriate wheels. They should be small in diameter, but wide enough and stable. Wheels from a garden cart or a go-kart car are ideal.
A chain drive will transmit power from the engine to the rear wheel. To do this, you need to make a gearbox. This is the most difficult stage of construction. The bicycle gear must be secured to the coupling of the lawn mower motor.
Next, you need to connect the second bicycle sprocket with the adapter hub, which in turn must be seated on the shaft, and the shaft on bearings.
The second sprocket and brake pad are secured using another hub on a fixed shaft. Brake and gas levers and cables can be reinstalled from a moped or purchased at a car store.
Option 2: assembling a moped with a gas engine
This is an advanced method, and the result is more reminiscent of a real moped. To make it, we need:
- gasoline engine;
- moped parts: wheels, shock absorbers, exhaust pipe, brakes;
- proven bike frame;
- tools.
Since here we are going to get a real moped, the frame must have increased strength and weight. Also, mopeds have a slightly different frame design, which may require some modifications.
Wheels from a moped are put on the frame. It will be necessary to change the fork design, since the width of the wheels will be wider than the distance between the dropouts. If possible, install shock absorbers on the fork.
Carefully overhaul the moped power unit and replace all faulty parts. The propulsion system will require a separate space; for this, a welded metal platform at the bottom of the frame would be a good option. The engine and fuel tank are secured to the site using metal fasteners. It is better to place the battery closer to the steering wheel. An exhaust pipe is connected to the bottom of the engine. The pipe must be firmly secured to the frame so that it does not dangle while driving.
Transmission. Next, you will need to make the engine torque transmission system:
- Remove the pedals and chainring from the bicycle frame.
- Install sprockets on the rear wheel of the moped and the engine shaft. A star on a wheel with a larger diameter.
- Place the rear wheel on the frame.
- Connect the stars using a chain.
Motor connection. The clutch and throttle valve are connected to the ignition lever via drive cables. The tension is selected so that the engine can immediately start and start spinning the wheel.
Brakes. If only one brake (for example, the front brake) may be sufficient for a bicycle, then it is better to play it safe and install them on both wheels. The rear one can be used as the main one, and the front one as an auxiliary one, to adjust the speed.
In general, a homemade moped based on a bicycle will look like this:
Converted bike
Since a vehicle equipped with an engine moves faster than a regular bicycle (this is why the modification is intended), for safety reasons it is necessary to install lighting devices on it. Personal protective equipment – helmet, knee pads and special shoes.
Connecting individual parts to the frame
To create a motorbike, you can use any bicycle: old, rusty, folding. A motorbike requires only a strong frame as a base. If one is not available, you can make it yourself. To do this you will need several pieces of metal pipe.
The motor is attached to the frame at the junction of the lower and seat tube. This is the most optimal, but not the only option. Sometimes you can see a motor mounted on the trunk. The main thing is that the fastening is reliable. During operation, vibration will be felt, due to which the motor may fall if it is poorly secured. It is recommended to use metal clamps for fastening. A set for a motorbike may include special perforated mounts. But their use is not at all necessary.
In addition to the engine, it is necessary to attach the battery and fuel container to the frame.
What does it take to make a moped from a chainsaw and a bike?
For the most part, converting a bicycle into a moped with your own hands by attaching a chainsaw motor to it does not require any special skills of a mechanic or engineer. If you are new to this business, then numerous drawings of a moped made from a chainsaw, as well as educational video reviews, will help you. Also, not every man has everything he needs in his garage to make a motorbike from a chainsaw with his own hands. Therefore, before assembly, it is recommended to study the list of necessary parts, fasteners and spare parts and buy the missing elements.
Moped
In specialty stores you can find entire kits that include a ready-to-install engine, fasteners and other parts that are necessary to transform a bicycle into a moped. This kit will greatly facilitate the process of assembling a motorcycle, since there is no need to select an engine, suitable power, fasteners, battery, transmission belt, cable, etc.
Assembly instructions and drawings of a homemade moped
Firstly, we will first look at the simplest and most affordable option for how to make a moped from a chainsaw from the photo above. When assembling, the question often arises of how to install a chainsaw motor on a bicycle.
Best articles: What types of bicycle navigators are there?
It is important that it is securely attached and does not move while riding. For this type of homemade motorcycle, you need to secure the following parts with clamps in certain places:
- the battery is installed on the top tube;
- the chainsaw bicycle motor itself is mounted at the intersection of the lower front and seat tubes;
- fuel tank - near the engine.
The next step in the conversion is to create and install the pulleys on the bike. They are needed so that engine operation provokes rotation of the rear wheel. Typically, pulleys use external barrier wheels, which are about the size of CDs.
DIY moped
When selecting wheels, take into account the strength and reliability of both the material itself and the fasteners. To install the pulleys, the front wheel is attached to the motor shaft, and the second pulley is attached to the rear wheel hub.
Next you need to put the belt on the pulleys. Sometimes men use a chain instead of a belt. In this case, the pulleys are replaced with a chain, and the principle of its installation is no different.
If we talk about a more complex option, then as a result you will get a homemade vehicle that is most similar to a real motorcycle. The main differences from the previous design are a more reliable and durable frame, wider wheels that can be removed from an old moped, the presence of shock absorption and the installation of an engine from a chainsaw.
The most convenient place for the engine will be a separate platform welded at the bottom of the frame. You can also place a fuel tank there. An exhaust pipe is also attached to the engine. As for the battery, owners of homemade mopeds recommend placing it closer to the steering wheel. The next step will also be the transmission and connecting the engine. You can watch all the nuances of how to properly make a motorcycle from a chainsaw with your own hands in the video.
DIY trimmer attachment. Master Class. Video
For many summer residents, the trimmer has long become a familiar and almost irreplaceable technique.
But it is not always possible to purchase a model that can satisfy all needs. It happens that the trimmer easily copes with fresh young vegetation, but there is a desire to clear a place behind a fence or along the driveway, and tall, mature grass turns out to be too tough for the equipment. DIY trimmer attachment
We offer the option of making your own trimmer attachment from simple, almost improvised, tools. You will need a metal perforated plate (100mm x 240mm), two hacksaw blades for metal, 4 screws and 4 M5 nuts, 4 washers and 4 enlarged washers.
From a safety point of view, hacksaw blades should not be completely hardened.
Everything you need to make a nozzle
The most difficult thing in making a nozzle is to symmetrically mark and make holes for the knives and trimmer shaft. That is why a ready-made perforated plate is selected.
First you need to make the base of the nozzle. To do this, use a grinder to cut out a square with a side of 100 mm from a metal plate. You need to mark it in such a way that there is a hole exactly in the center (at the intersection of the diagonals). To do this, measure a distance of 50 mm from the center of the selected hole perpendicular to the short side of the plate and mark the cutting lines.
Marking the base of the nozzle
Round the corners and drill a central hole for the trimmer shaft. We cut the blades for metal, measuring 8 cm from each end. We get four blanks with ready-made holes. We cut the blades for metal. These blanks need to be shaped like knives. To do this, we mark the cut line by eye (special precision is not required), fasten all four blanks together and grind off the excess. We cut knives from blanks
As a result, we get knives of the same weight and size; they can be sharpened a little on one side. Now all the parts of the homemade trimmer attachment are prepared, you can start assembling.
Everything is ready for assembly
We put a small washer on the screw and insert it into the corner hole. We put the knife on top, placing the sharpened side in the direction of rotation of the trimmer shaft. Next comes a large washer and a nut, which is not tightened so that the knife rotates freely. We attach the other three knives in the same way.
We secure the knives. The end of the screw must be riveted so that the nut does not fly off. The end of the screw must be riveted
The nozzle is ready. It is installed with nuts to the ground and secured in the same way as the three-bladed knife that comes with the trimmer. When colliding with a stone, the knives fold and go inward a little.
This idea was proposed by our regular video author Tatyana (Tula region). You can see in more detail the entire process of making such a trimmer attachment and learn some of the nuances by watching the video she prepared.
When working with a trimmer, it is important not to forget about safety precautions when using any attachments, especially homemade ones.
snow blower
If in the previous design you replace the shaft with plowshares or harrow spokes with an auger mechanism, add a casing, an intake device and a pipe for throwing out snow, the cultivator will turn out to be quite a decent snow blower. Many home craftsmen design their homemade products with replaceable attachments for different seasons. Motor from a Shtil saw with a power of 3-5 hp. It will cope quite well with cultivating the garden in spring and autumn, and with removing loose snow from a summer cottage in winter. The most important unit is the screw mechanism.
If you are not a professional designer, then it is better to download ready-made drawings from the Internet. The auger blades are made of thick rubber, for example, from a conveyor belt. The intake device is made of galvanized steel. A plastic sewer pipe is suitable for the snow disposal pipe.
Do-it-yourself bicycle with an engine from a trimmer
Before you start designing this type of vehicle, you should determine the power of the motor. After all, the endurance of the future bicycle and its ability to move at high speed depend on this indicator.
The engine must be at least 2 horsepower, otherwise the bike will not be able to perform all the necessary functions.
Engine selection
The engine can be of several types: gasoline and electric. The first type of engine does not require recharging and has no connection to the electrical network, this is a big advantage. The most optimal is a four-stroke engine, as it has less noise during operation and lower consumption.
Choosing an electric motor is suitable for short trips. The device will require regular charging. Also, another disadvantage of such devices is their low power.
With additional load on the vehicle, the device will quickly discharge and will not perform all the necessary functions.
Required materials and tools
In order to start building a bicycle with an engine, you need to prepare the following tools:
- the bicycle must be in good working order;
- engine;
- chain;
- sprocket suitable for the selected engine;
- tensioner;
- a cable that will be used to connect to the gas handle on the steering wheel;
- fuse;
- controller;
- exhaust pipe;
- sleeve;
- consumables (washers, screws, clamps).
Best articles: What is a BMX bike and its features
It is also necessary to prepare wires and insulation and fasteners, as well as screwdrivers, wrenches and a welding machine.
Making a bicycle with an engine - instructions
After all the components are prepared, you can proceed to assembling the product with the trimmer motor.
To do this, you need to perform the following algorithm of actions:
- Two spacers cut from rubber must be attached to the rear wheel of the bicycle. One spacer is placed between the spokes, the second behind the spokes;
- an asterisk is mounted on the hub on the outer side of the wheel;
- a crescent is mounted on the inside;
- check that the sprocket fits the trimmer motor;
- The motor is mounted to the trunk and secured with clamps. The engine must be placed in such a way that there is room for installing the battery;
- the tensioner is installed and the chain tension is adjusted;
- the throttle handles are mounted on the steering wheel, after which the cable is mounted and connected to the motor;
- a gas tank or a small plastic container is attached under the frame to contain fuel;
- install an exhaust pipe (if such a part is provided);
- carburetor is installed.
After all the parts are installed, you need to check the operation of the bike and eliminate minor defects. After the system has been checked and the shortcomings have been eliminated, it is necessary to use a welding machine and additional metal clamps to strengthen the structure.
Precautionary measures
To ensure that the device with the motor not only moves quickly, but also does not lead to injuries, before starting to break in the bicycle, everything must be thoroughly checked. First of all, all components must be firmly attached to the frame.
The braking system must be of high quality, since a product with a trimmer has a high speed, so the brakes must be disc type. Also, for this type of bicycle it is necessary to use tires on wheels that will have a low degree of slip.
It is also recommended to use such a device using a helmet and other personal protective equipment.
After all safety measures have been taken into account, you can use the vehicle for its intended purpose.
Classic chain or belt drive
This principle is most often used by DIYers because of its visual clarity and the wide selection of necessary components from ordinary bicycles. Electric motors from household appliances (for example, a washing machine) or automotive electrical equipment are often used as a motor.
What can be said about the disadvantages of such a drive?
- It should be immediately noted that modifying a bicycle in this way will require the owner to have sufficiently deep knowledge of mechanics and high technological skills.
- Another drawback is the noise of a system with this type of transmission, but in road conditions this is unlikely to cause significant inconvenience to anyone.
- The modification involves some changes in the frame design, which may reduce its strength characteristics. In any case, it is not recommended to carry out such work on bicycles with carbon or aluminum frames - only on steel ones.
But the disadvantages are brightened up by a number of advantages:
- This type of transmission is the most economical and efficient of all existing ones.
- It is possible to use stepped gear shifting, which is familiar to most cyclists. This will significantly increase battery resources by choosing the optimal mode depending on traffic or road terrain.
- As a rule, this type of transmission allows the use of components already installed on the bicycle, which does not lead to a significant increase in overall weight. In addition, the efficiency of the system makes it possible to use engines and batteries of lighter weight.
- The highest speed indicators are also shown by bicycles with this type of gear.
It is clear that there is a wide field for creative design ideas here. However, manufacturers have not forgotten about cyclists - there are ready-made kits for electric bicycles on sale. The most popular sets are Taiwanese.
Similar “constructors” are produced in different designs - using a standard bicycle chain, or with force transmission through an additional chain with one or two additional sprockets.
The systems are equipped with electric motors with power from 360 to 1500 W, with a supply voltage of 24 or 36 volts. Electronic controllers are used to control the operation of the drive, and in motors up to 500 watts they are usually built-in. The kit includes all the necessary fasteners, visual inspection and manual control of the drive.
Installing an electric drive will be a completely feasible task for any owner with “properly growing hands.”
The overall weight of the bike is quite acceptable - 3-4 kilograms, but the speeds it can reach are very impressive - 40 kilometers per hour or more.
For parkour lovers, we offer a list of the five best parkour films.
How should a snowboarder dress properly before going out on the slopes? All about clothes for skiing on our page.
Advantages of motorized bicycles over conventional trimmers
Using this type of modification has a large number of advantages, which include:
devices can reach higher speeds; the device operates using an electric current generated by a trimmer; the motorbike has a high level of maneuverability, which is very important when moving around the city; the products are durable and can be used to cover long distances; installation of such vehicles does not require the expenditure of a large amount of financial resources; Bicycle care is easy; does not require much knowledge in the troubleshooting process; The trimmer is easily removable, so you can return the original appearance of the bike at any time.
With proper installation of the trimmer, the device can be made absolutely silent, which is also a big advantage. Also, the small size of the components will not cause discomfort during movement.
What are they needed for
To begin with, why install an engine at all?
- The first is, of course, speed. With a good engine, a bicycle can reach speeds of 40-50 km/h without the participation of the cyclist. This is interesting both when walking on a weekend, and on the road from and to work, when you need to get there quickly, inexpensively, and also, preferably, without sweating. Some even go to work with the help of a bicycle engine, and return home pedaling to their heart's content.
- The second is saving energy. Not everyone uses a bicycle as an extreme endurance trainer. You just want to ride for fun, but sometimes this is not so easy to do when the landscape consists of drops, gullies and hills with long climbs. To compensate for the environment unfriendly to poor sportsmanship, the engine is very pleasant to use.
- The third - quite conditional - is the passion of modern riders for progress and uniqueness. The times of homemade mopeds in every yard, described at the beginning of the article, are long gone, and having a motorized bike, and even assembled with your own hands, is very, very cool.
Do-it-yourself scooter with a motor from a trimmer?
A homemade motor scooter with an engine from a trimmer is an excellent home transport for entertainment, traveling short distances outside the roadway (on sidewalks and park paths, for example).
Based on the characteristics of this type of transport, it will have the following technical characteristics:
- will be able to develop low speed (no more than 40 km/h);
- the small diameter of the wheels will cause little stability, which can lead to the scooter skidding;
- such equipment is not intended for heavy loads and transportation of heavy loads;
- Children should not be trusted with such a “toy” without adult supervision.
The assembly process itself is relatively simple. First, find an old scooter (if you don’t have one, you can weld a similar frame yourself). If you take an already assembled unnecessary scooter, it is appropriate to strengthen its frame with a 15 mm square metal profile.
Next you need to choose the appropriate wheels. They should be small in diameter, but wide enough and stable. Wheels from a garden cart or a go-kart car are ideal.
A chain drive will transmit power from the engine to the rear wheel. To do this, you need to make a gearbox. This is the most difficult stage of construction. The bicycle gear must be secured to the coupling of the lawn mower motor. First, the dimensions of the coupling should be adjusted to the gear (cut off the teeth from it, make it thinner by turning it on a lathe). The best way to fasten the coupling and sprocket is by shrink fit or welding. Next, you need to connect the second bicycle sprocket with the adapter hub, which in turn must be seated on the shaft, and the shaft on bearings.
The second sprocket and brake pad are secured using another hub on a fixed shaft. Brake and gas levers and cables can be reinstalled from a moped or purchased at a car store.
Peculiarities
Motorbikes can be purchased at the store. But they are quite expensive, and the appearance is far from desirable. And this design weighs about 20 kg. This weight will make the journey much more difficult if the engine fails and you have to pedal. Such disadvantages can be avoided if you make a motorbike with your own hands.
This type of transport was widely popular among teenagers during the Soviet Union. But modern capabilities and tools make it possible to significantly change an ordinary bicycle and create an original means of transportation. Experienced DIYers, when asked how to make a motorbike with their own hands, will answer that it is very simple. Almost anyone can cope with such an activity.
Bicycle with a motor: we connect the engine from a chainsaw with our own hands
If you have a craving for experimentation and would not refuse the opportunity to turn your bicycle into a homemade moped that can accelerate to 50 km per hour and above, this instruction is for you.
Using simple spare parts, you can build a bicycle with a chainsaw motor with your own hands. Let's get started!
- Carefully inspect and test your bike. The proposed modernization will significantly increase the load on all its parts. Therefore, every part must be inspected and well lubricated. Also check all fasteners and re-tighten the bolts. In addition to constructive necessity, all these actions are the key to your safety.
- You can make a bicycle with a chainsaw engine or a trimmer engine (also called a gas trimmer). If you are wondering how to adapt a motor from a lawn mower to a bicycle, then there is nothing complicated here. A gas mower is suitable for this design in the same way as a chainsaw. If you choose a chainsaw, make sure that its power is at least 2 kW. And if you have a trimmer, then 1 kW of power will be enough, since the lawnmower engine has a lower speed. The point is that you need to get enough traction to get moving. But at the same time, a more powerful engine means more weight. You need the motor weight to not exceed 6 kg, otherwise the bike will sway noticeably on the road.
Engine of a lawn mower on a bicycle
- Check the engine for functionality. A bicycle with a chainsaw engine will, of course, roar loudly - we believe you are ready for this. Most likely, your neighbors and random passers-by will not be ready. Therefore, we recommend that you conduct your tests away from human habitation - in a forest, in a park, on a country road.
Pay special attention to checking the condition of the gas tank. Gasoline must not splash out, as this creates a fire hazard.
The engine will be behind you, so you should pay special attention to this point.
- Now let's find out how to install a chainsaw engine on a bicycle. It is necessary to make room behind the cyclist, above the rear wheel. To do this you will have to remove the wing. The easiest way to use this scheme is to install a drive shaft, and use a tire instead of the driven shaft. This type of drive is the simplest and most effective; the design does not require the use of a large number of parts. The friction shaft will transmit rotation from the engine; for this, the shaft diameter should be approximately 25 mm.
Best articles: Fixed bike: speed and simplicity
Engine above the rear wheel of a bicycle
- To install the engine on your bicycle, weld a metal stand to the frame located under the seat. You need to install the engine as low as possible, then your vehicle will be more stable in motion. You can secure the motor to the stand in any way - bolts, clamps or welding.
- The throttle cable and wires that will allow you to forcibly turn off the engine must be carefully secured to the frame. This is a matter of comfortable riding and cyclist safety.
- Ready! You can try out your new bike with a chainsaw motor. Monitor the tire pressure, it should be at least 3 atm.
Bicycle with chainsaw engine
Friction transmission
This type of electric drive, although found on sale, is not particularly popular. Its principle is simple. The engine is installed directly at the drive wheel, torque is transmitted directly from the stator shaft to the tire. It would seem that everything is simple and obvious. But what may be applicable for children's electric cars and bicycles is of little use in the actual use of transport.
Judge for yourself:
- There are no transmission links, that is, the possibility of increasing the angular speed of the wheel through the use of gearboxes is excluded;
- Extremely low efficiency;
- Even a slight drop in pressure in the wheel chamber will dramatically reduce the efficiency of such a drive.
- Constant friction between the engine clutch and the tire tread dramatically reduces its durability.
- In conditions of wet weather, dirty roads, frost, the friction coefficient will decrease significantly, the clutch will slip, which will reduce the already low energy output of the drive.
The only advantage of this system is its ease of installation, which does not require any major modifications to the bicycle.
No, if you are planning a modification with real improvements in the performance of the bicycle, it is better to immediately abandon such a scheme.
Cultivator assembly
If you have a summer house or just a plot of land, then a cultivator will help make the land easier to cultivate. Usually a hoe is used for these purposes, but working with it takes a lot of time and effort. The introduction of a cultivator will reduce labor costs, and the entire process will take the shortest time period. Industrial production equipment is expensive, so if funds are limited, the question arises of assembling a cultivator yourself. Both gasoline trimmers and electric scythes are suitable for this.
To make a simple standard of technology, you should stock up on the following tools and materials:
- a grinder with a set of discs (suitable diameter - 125 mm) for metal;
- a drill with drills of different diameters;
- welding machine;
- electrodes;
- jigsaw or hacksaw for metal;
- an emery machine with 2 abrasive wheels of different grain sizes;
- a functioning petrol trimmer;
- with a pitchfork;
- a steel tube suitable in diameter for the brush cutter shaft;
- hand tools: keys, hammer, pliers, core, tape measure and marker;
- a sheet of metal with a thickness of 3 to 5 mm and dimensions of at least 10*10 cm.
The manufacturing process begins with the working part. Curved rods of garden forks will serve for this purpose. Their recommended length is from 10 to 15 cm - this is enough to loosen the soil.
The working nozzle is manufactured in the following sequence:
- the fork teeth are flattened to a width of 1 cm;
- on emery, using a circle with fine abrasive, sharpen the cutters;
- using a jigsaw, cut a circle with a diameter of 10 cm from the metal;
- process it on an emery machine until an almost ideal shape is achieved;
- Prepared cutters are welded to the metal circle at regular intervals (recommended quantity - 3).
With more than 3 pieces, the load on the equipment increases greatly.
The recommended power of a gasoline engine should be two horsepower (approximately 1.5 kW) or more.
The next step is to attach a weeding cutter to the trimmer. The process is greatly simplified if there is a reverse thread located at the end of the brush cutter shaft, onto which the manufactured working part is simply screwed. To do this, a tube with a nut is first welded to the cutter.
If you have plumbing experience and welding skills, converting a trimmer into a cultivator is quite simple. The financial costs are insignificant. If you use an electric scythe for your work, you will need to think about an extension cord so that it reaches over the entire area being processed.
Drive mechanism
Before you start converting a regular bicycle into an electric bicycle, take a look at the technical potential of your iron horse. The bicycle must have a fairly powerful frame, since it must, at a minimum, support the weight of the rider and the weight of the equipment that will be installed on it. If everything is in order with this, you can begin to remake the bicycle and install on it the motor from the washing machine, drive mechanism, control system and power supplies.
Let's start by designing and installing the drive mechanism parts. Let us note right away that in order to make a homemade electric bicycle from the engine of an old washing machine, we will need a full-fledged metalworking workshop. Well, or at least a lathe, drilling machine, welding machine, as well as an impressive set of materials and tools, including a fairly spacious room where you can conduct experiments.
The drive mechanism will consist of the following elements:
- modified bicycle hub;
- large pulley;
- drive belt from the washing machine;
- small engine pulley
- motor shaft.
The most difficult thing here, perhaps, is making a large pulley. It’s almost impossible to find a standard part that fits the size, so you’ll have to make one.
- From a steel sheet (2 mm), cut out a perfect circle.
The recommended pulley diameter is 22 cm, but if the lathe can cut a circle with a larger diameter, then do more, the more reliable the drive mechanism will be.
- We drill small holes in the hub of the rear bicycle wheel, between the spokes. We drill similarly located holes in the steel circle.
- We drill large holes along the edges of the steel circle, simply in order to reduce the weight of the part. Because, as noted above, all the equipment together with the rider will weigh a lot, and you need to unload the bicycle frame as much as possible, saving at least a few kilograms.
- Next is the crucial moment: it is necessary to weld a 20x4 mm steel strip to the edge of the disk. You need to weld gradually by bending the strip of metal exactly along the edge. This is not the easiest thing, because the welded joint must be perfectly smooth.
- After this, we load the part into a lathe and process it again, removing all the irregularities and roughness.
- So our part has turned into a full-fledged pulley. Now all we have to do is paint the main part of the drive mechanism and screw it to the rear bicycle wheel.
Important! The thickness of the large pulley will not allow the bicycle wheel to rotate after installation, since the part will touch the frame. It is necessary to either bend the frame or modify it in some other way, depending on the design of the bike.
Homemade motor cultivator: making an electric and gasoline unit
High prices and low quality of some representatives of agricultural machinery are forcing craftsmen to make homemade cultivators. The advantages of this method are more than obvious - significant savings and the ability to make a design to suit your needs. Below we will consider the main subtleties of creating a device from scrap materials.
What elements does a homemade unit consist of?
To make a motor cultivator with your own hands, you need to study the design of any unit offered for sale. It is the “store version” that should become a kind of layout that you need to focus on when assembling a homemade product. A homemade design should consist of the following elements:
- Internal combustion engine or electric motor. The electric drive can be borrowed from an old industrial compressor or ventilation system. A moped engine is ideal for an internal combustion engine. There are often cases when a homemade motor cultivator was assembled using a chainsaw. In any case, you will need to take care of an effective cooling system so that the motor does not overheat;
- Gearboxes are an essential part of any agricultural unit. The high speed observed on the shaft turns out to be too high for a small motor, so a reduction gearbox will help reduce the speed and increase the force on the working shaft;
- Handles for controlling the unit. They serve as organs for holding the cultivator. Also on the handles you need to place the speed shift levers and clutches. In any case, the device should be as comfortable as possible.
Having found all these elements, you can begin assembly. To make as few mistakes as possible, we advise you to prepare an approximate drawing in which you need to indicate the connection sequence of each of the nodes.
How to make a cultivator with your own hands with an electric drive?
An electric cultivator is often based on two electric motors, each of which must have a power of 1.5 kW. Subsequently, they are combined into one continuous system through pulleys and one belt. The main thing is that both the belt and the pulley have the same diameter.
The rear wheels of the unit must not be driven. When mounted on the front axle of the rotor, they will become a support. If you install wheels on the front axle, the axle will become more stable. This arrangement will help to use attachments, which will definitely come in handy on the farm.
The frame can be assembled from any available materials. The most important thing is that the result of the work is as reliable a design as possible. Typically, metal pipes and plates are used to make the frame, which are connected by welding.
Assembly will also require a power cable. The minimum length of the cord should be 20 m - this will allow plowing the ground in areas of up to 4 acres.
Features of manufacturing a cultivator with a moped motor
There are many options for converting gasoline equipment into a motor cultivator, or vice versa, making a snowmobile from agricultural equipment. Below we will look at how to convert a motor cultivator based on a moped.
The unit is based on a D8 engine. Around the cylinder you will need to solder a tin vessel to pour in water - thus creating a kind of cooling system. The water must be changed periodically to prevent the cylinder from heating above 100 °C.
The converted unit must be equipped with a chain gear using a bicycle sprocket. The lower part of the gearbox will perform a power function, so the output shaft will need to be reinforced with metal bushings securely fixed to the gearbox.
Such a modernization of an old moped will make it possible to produce a reliable motor-cultivator that will allow you to plow the soil and be able to perform a number of other functions.
What is included
To convert your bike into an electric bike, you need the following basic components (they are included in every kit):
- motor-wheel. This is the heart of the electric bike, the electric motor. You simply exchange one wheel for another;
- accumulator battery;
- battery fasteners, wires;
- control panel or console.
In order for disappointments not to be endless, you need to know that a fairly fast and long ride is only possible with a power of about 1000 W, that is, 1 kW. If you decide on the price, then on average you will have to pay 20 thousand rubles for a wheel motor with a kilowatt engine.
An electric bicycle can be made with a more capacious or less capacious battery. So, a battery with a capacity of 18 A/h will cost 30 thousand rubles.
Therefore, it is not recommended to buy cheap electric kits that can only last a short time on a flat road. They develop a power of 250 - 35 W and can be considered “children’s”.
An ideal, but expensive option is a 2000 W motor.
A cargo tricycle powered by car batteries can be considered a rather interesting and “budget” option. As you know, one such battery has a capacity of 55 Ah and can give very good results. It’s not difficult to make such an electric bike with your own hands; it’s much more difficult to find a reliable cargo bike with a cart for storing batteries. In addition, a bicycle with support for more than two wheels can be more comfortable for going fishing or for cycling within the “reach” of an outlet.
However, chargers have now been created that can power a bicycle's electric motor from solar panels, charging it during descent, and also charge it at rest using miniature steam turbine generators powered by the energy of a fire.
Brake system
First of all, draw a picture of your future masterpiece. You don't need to have the skills of an artist to do this. A sketch of the future moped helps the master decide on the design and technical features of the creation. Then create a technical sketch to determine the parts that will be needed. Then purchase all the necessary parts. At this stage you will have to spend money, since many parts cannot be made: engine, gearbox, wheels, frame pipes.
Assembly of a moped begins with the frame. It’s easier to take ready-made parts and elements from the frames of other mopeds and mini-motorcycles. Your entire frame will have to be made on a special one from pipes. However, do not use seamed water pipes - they are not strong enough. It is better to use pipe elements from motorcycles. Use a blowtorch to bend them, and a welding machine to weld them. Don't forget to reinforce the frame with spacers and brackets.
Weld the front fork to the frame through the bushing. You can also bend it yourself from pipes or remake a ready-made one to your liking. For a simple moped, a bicycle fork will do. For a chopper, you will have to work on the fork yourself.
It is better not to take a rear fork from a bicycle, since a moped has higher speeds and greater mass, therefore the loads will be high. Ready-made ones from mopeds or motorcycles are recommended. When making a swingarm rear suspension, try to install the swingarm as firmly as possible on the frame and cylinder. When using a classic suspension with two shock absorbers, the latter can be taken from any domestic light-class motorcycle.
The next step is installing the engine and gearbox into the frame. Think about its mounting in advance and cut the brackets from a steel sheet. Screw the brackets with bolts and nuts to the engine and tie the engine to the frame with wire. Then “tack” the brackets by welding, remove the engine and finally weld the brackets.
The final step is to install the wheels. If the rear wheel is a bicycle one, it will have to be modified by welding a new sprocket. Install the fuel tank and power system onto the frame. The fuel tank is up to the owner's taste, and the power system must match the engine, although it can be upgraded.
Electrical equipment must be moped or motorcycle type and include all lighting devices required by law: headlight, tail light, turn signals. After this, small parts will remain: the saddle, controls, additional equipment.