A cultivator is a technical tool that performs the following functions:
- weed control;
- plowing the soil;
- loosening;
- applying various fertilizers to the soil.
During intensive use, some components and parts of the unit may become damaged . Therefore, you should purchase the necessary spare parts in advance (perhaps on the day of purchase of the cultivator itself). This will allow it to return to functionality immediately after a breakdown.
About the device and manufacturer
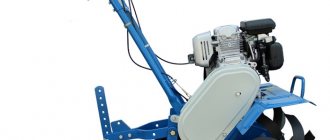
The main elements of the cultivator are a gearbox, levers, a fuel tank, a frame, a motor, a support, a wheel, and a blade of the working element. Torque transmission is ensured by a gearbox that is built into the engine.
The knives of the machine are designed to cut layers of soil, easily mix and chop them. Operating the device is effortless.
The Mole cultivator has gained popularity among gardeners and gardeners due to the fact that it carefully removes weeds and mixes various fertilizers with the soil.
Prominent representatives of the same reliable and high-quality equipment are the cultivators Tarpan, Patriot, Champion, Swift, Texas and Viking. For more information about the work of the Mole cultivator, watch the video:
All this contributes to intensive plant growth and large yields.
The Mole is a model of a Soviet and Russian cultivator, which began production back in 1983. Its production was established by the Moscow Machine-Building Enterprise named after. Chernysheva.
It is a leading company in the defense-industrial complex, employing the best specialists in the country. Now the production of the Mole cultivator has been established in the city of Omsk.
Today the complex includes several production facilities:
- foundry;
- galvanic;
- blacksmithing;
- mechanical assembly;
- welding
The quality control system used in the company has a Certificate of Conformity “NO “SOYUZSERT”.
The main features of the Mole motor-cultivator have always been increased engine life and operational reliability .
Modification of the rotors of the mole cultivator
Motor cultivators "Mole"
, produced by the Moscow MPO named after. V.V. Chernyshova, have become widespread among gardeners, who usually buy them complete with rotors, which is enough for cultivating the soil on individual plots.
In Fig. 7a shows part of a motor cultivator with rotors on the left side. Using this part as an example, we will analyze some of the shortcomings of the “Mole” design.
, or rather, the shortcomings of its rotors. First of all, we note that the rotor knives are very blunt, and the pins that secure the inner rotor to the gearbox shaft and the outer rotor to the inner rotor protrude too much from the rotor shafts. As a result, roots and stems of plants are wound around the protruding parts of the pins, which, together with soil, clog the space between the internal rotor and the gearbox housing, as well as between both rotors. All this creates additional load on the gearbox shaft, and the rotors begin to rotate unevenly.
The spring clips that are inserted into the holes in the pins are also too long, which maximizes the possibility of roots and plants getting wrapped around them with the above consequences! Again, the bolts securing the knives to the square flanges of the corresponding rotors are longer than necessary.
I got rid of my first drawback - dull knives - immediately after purchasing the Mole.
, sharpening them with emery until secured to the flanges. I identified the remaining shortcomings after the first spring tillage in 1994 and, of course, eliminated them, which greatly facilitated the further operation of the Mole.
Now a little more about correcting other shortcomings. In Fig. 8, a and b show the diameters of the rotor pipes and the lengths of the pins inserted into the holes of these pipes. It can be seen that pin 1 protrudes from the corresponding pipe by 9 mm, pin 2 by 11 mm. To “recess” the heads of the pins, I made grooves with a diameter of 15.6 mm and a depth of 2 mm in the rotor pipes on one side, and reduced the cylindrical parts of the pins to a length of 44 and 36 mm, respectively, by drilling through holes in them at a distance of 2.5 mm from the ends with a diameter of 2 mm.
Instead of the previous long clamps from wire with a diameter of 2.5 mm, I made rings (like rings for carrying keys) from spring wire with a diameter of 1.5 mm. The ring is inserted at one end into the hole of the pin (Fig. 8, c), fixing it on the pipe. Over 3 years of work, there were no cases of loss of rings during soil cultivation, and the accumulation of roots and soil practically stopped.
I shortened bolts 7 (see Fig. 7) by 5 mm and screwed nuts 5 mm thick on them (2 mm thinner than they were).
I ground all the knives at the point of attachment to the flanges to 6 mm, as shown in Fig. 9, a and b, so that these edges are flush with the edges of the flanges. Then the edges of the knives, shaded with cross lines, were sharpened at an angle of 45° (if when sharpening a knife we remove metal from one side, then when forming a chamfer, from the other).
On the flanges of the left rotors (Fig. 9, b and c), I also ground off the edges at an angle of 45° on four sides at a length of 72 mm. On the rotor flanges on the right side of the gearbox shaft, the edges were ground off on the same sides, but the sharpening was shifted to the opposite edge of the ribs (in Fig. 9, d, the places of such sharpening are opposite the bold lines).
Such modification of the knives and flanges eliminated the sinuses, reduced the accumulation of soil in them and on the flat edges of the flanges and knives, and simplified the operation of the motor cultivator.
Spare parts
If any parts fail, they must be replaced with new ones. The most popular spare parts for walk-behind tractors are housings, spare blades, motors, and gearboxes. The engine on the Mole is installed with a power of 4.5 hp.
Spare parts
If the gearbox is built into a sealed housing, when repairing the device, you will have to change the engine, including. Modern walk-behind tractor models are equipped with both gasoline and diesel engines .
Old style
Older devices need repairs much more often than newer models.
This explains the demand for old-style parts. For example, if a device needs a gas cap , a spark plug cap, or a starter dog, it will take time to find the right part.
For such purposes, online store catalogs have been opened.
Belt
From time to time, when operating the Mole walk-behind tractor, you may notice the belt slipping. This problem can be avoided by installing 2 belts. Proper installation requires an oversized idler pulley with driven pulley.
The roller is placed on bearings. To improve the cultivator, you only need to remove the old one and install a new roller.
The unit uses an A-750 drive belt. It is 750mm long, 8mm high and 13mm wide.
Drive belt A-750
Product composition:
- cord;
- wrapping layer;
- technical volcanic rubber.
The main task of the belt is to transmit torque from the motor to various components of the device. The belt is marked according to size (mm). Can be used at temperatures from +30 to +60 degrees.
Used in traditional drives, used in agricultural units. The belt is one of the most important elements of the cultivator. In order for the device to work at full power, original belts are required.
The belt for the mole 710 cultivator is installed on units with a Russian engine. The profile of the product is 13 mm.
Auxiliary equipment for walk-behind tractor
- wheels with lugs for working on loose soil;
- lift;
- mounted bucket-blade for snow removal.
To do this you need:
- 2 steel wheels from a car;
- corners 25x25 cm;
- electric welding;
- Bulgarian;
- tape measure and pencil.
The corner is cut into segments of 35-40 cm. The rims of the disk are marked into equal segments. It's best if there are . Marks are made and corners are welded at the marks.
It is better to make a do-it-yourself lift for a walk-behind tractor from a piece of pipe with a diameter of 100 mm. The lift itself is made in the form of a roller on a bracket. If necessary, it changes its position and makes it possible to lift the walk-behind tractor onto a support. In its normal position, the lift shaft is located in front of the unit and is used as a support roller when overcoming ditches and ruts.
It is recommended to assemble a bucket for a walk-behind tractor with your own hands if you plan to use it as a snowblower.
The ladle can be made:
- made of sheet metal 1.5-2 mm thick;
- hard plastic with a knife at the bottom made of a metal strip;
- from plywood 8-10 mm thick or OSB board 10-12 mm.
In order for the bucket to work for a long time, a support ski is placed in front on a bracket. This will make cleaning safer. The cutting surface will be at a certain height above the ground and will not touch the ground.
You can improve your home motorcycle equipment to suit your requirements without high costs. After all, you can assemble attachments for a walk-behind tractor yourself, doing everything yourself.
Repair
After turning on the cultivator for the first time, the load on the engine is not full . The break-in period is indicated in the unit instructions. Each part needs to be ground in. Otherwise, serious repairs will soon have to be made.
If the device is old and is not covered by the warranty, you can make minor repairs not only to the Mole cultivator, but also to a cultivator for the garden, a manual cultivator for the dacha, an electric cultivator for the dacha, and a do-it-yourself garden cultivator. It's a simple process. The main thing is to carefully familiarize yourself with the unit.
The design of the cultivator has always been so simple that a person with basic technical knowledge can independently repair and modernize it (see the article homemade with an engine from a walk-behind tractor)
What kind of oil is being used?
To lubricate the parts of the walk-behind tractor, M-8B oil is poured into it. Developed during the existence of the USSR, it is considered one of the highest quality products in its category.
Oil M-8V:
| Options | Values according to GOST |
| Kinematic viscosity mm2/s | 7.5-8.5 (at a temperature of 100ºС) and 1200 at 0ºС |
| Viscosity index | 93 |
| Mechanical impurities, percentage | 0,015 |
| Pour point, ºС | -25 |
| Corrosion on lead plates, g/m2 | 10 |
| Sulfated ash content, % | 0,95 |
| Mass fraction of active elements: zinc phosphorus-calcium | 0,09 0,090,16 |
| Density at a temperature of 25ºС, g/cm3 | 0,905 |
M-8B oil has another name - Autol. It is produced from distillate components. The finished mixture is thermally treated with the addition of active additives. They increase the quality properties of the oil. Thanks to this, the scope of its application is expanding.
Other oils may also be used. For example, when using SAE 30 and 10W-30 oils, you need to consider the following:
- SAE 30 oil should not be used at temperatures below 4°C. This will make it difficult to start the engine;
- At temperatures exceeding 27°C, 10W-30 cannot be used. The consequence of such actions will be increased oil consumption.
If the motor is equipped with a gearbox , its maintenance is carried out as follows:
- Unscrew the oil filler cap and the neck plug to check the oil;
- remove the drain cover and drain the oil;
- tighten the drain plug;
- pour oil into the filler neck until it flows out of the oil check hole;
- tighten all plugs.
Before draining the oil through the top pipe, you must first empty the fuel tank. Otherwise, fuel will leak out. The result may be a fire.
Ignition repair
Faulty ignition is one of the most common problems that arise when operating a Mole cultivator. First you need to check the spark plug. It must be unscrewed and carefully inspected.
Dry means the fuel does not reach the cylinder. A wet spark plug is a warning that the cylinder needs drying. To do this, the engine is pumped with a manual starter.
If you find heavy carbon deposits on the spark plug, it needs to be cleaned with sandpaper and gasoline.
You need to measure the gap between the electrodes. It should be no less and no more than 0.8 mm. Otherwise it should be adjusted. If there is no spark, you need to install a new spark plug.
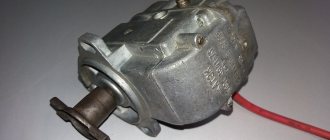
There may be a broken contact in the circuit. First you need to inspect the gap separating the ignition coil and the magnetic circuit.
Ignition coil
The operation of the air filter must be checked . It often happens that due to contamination, air does not flow into the carburetor. Even a dirty muffler can affect the power of the unit.
The Cayman company produces a wide range of walk-behind tractors that are distinguished by high quality and reliability. Cayman walk-behind tractors are profitable and inexpensive equipment for many years.
To plant large quantities of potatoes, special equipment is needed. A potato planter is not a luxury, but a means to increase productivity.
Nowadays, snow blowers for household use have become very popular. Here is all the information about the snow blower Foreman.
The ignition is affected by the condition of the insulation of wires and gasoline hoses. The magneto cores must not touch the flywheel plates. This malfunction can be identified by touch marks.
If you cannot find the cause of the breakdown yourself, you need to contact a professional. A serious problem requires a specialized approach.
Mole cultivator and everything connected with it.
We will talk about repairing a mole motor cultivator.
They asked me to repair a mole made in 1994 that didn’t even run its break-in hours (20 hours). When you try to start it, it fires a couple of times and may even run for a couple of seconds. For now I'm sinning on the ignition system. Maybe someone knows how to check it (there is a spark, but it’s rather weak) and what problems may arise with the magneto. wrote: Maybe someone knows how to check it
In stores (?) and markets, dealers in spare parts for Russian equipment have a device for checking the magneto, remove it and take it in and check for sparking. I checked my last alteration of the magneto at the Kiev market. I think traders in other markets also have it (device)
Check the magneto! If there are long breaks in operation, the magneto coil becomes unusable.
TM wrote: . The magneto coil becomes unusable.
I had it for 5 years with a broken thyristor.
, the coil rarely goes bad, first the semiconductor dies. I replaced the thyristor and everything worked
According to the instructions, you need to pour M8B in a ratio of 1:20, but the old mole in the new instructions for similar models of moles can be used MGD14M 1:40. Is it possible for me to pour gasoline with MHD oil into the mole and in what proportion?
wrote: Is it possible for me to pour gasoline with MHD oil into the mole and in what proportion should I pour it?
Need to! The fuel oil is excellent and time-tested. M8 - kills engines slowly but surely.
The spark was lost, the magneto was checked at the store and everything is fine! What could it be? Can magnets on a flywheel demagnetize? what is the problem?? Tell me, who knows! Thank you!
The spark may be lost due to the high voltage wire and/or cap. I advise you to try without a cap first. If you don’t feel sorry for yourself, you can use your hand as a candle (it’s more reliable, you’ll notice even the weakest spark).
Who knows, tell me how to make a gap on the new piston rings.
Gap in the lock?
similar to a motorcycle, 0.2-0.35 mm
There will be another question: the instructions say that the ignition angle should be 19 degrees before TDC. It’s easy to convert this to mm, but I don’t know at what point the spark is formed. How to determine by the position of the magneto rotor at what moment sparking will occur.
This place in the instructions has always touched me
Sparking was discussed here, as if from memory
: when the coil is opposite a magnet with reverse polarity
I almost forgot
.At the factory, when checking the MB-1 block, they usually put a risk for the moment of sparking
There is a risk. But on the crankcase it is at the top, and on the magneto at the bottom. And there is no way to accurately set it.
” > Well saved the photos
,16 risk post on the MB-1 body relative to the mounting screw
There is a motorized cultivator “Mole” MK-1A-01TS. The carburetor needs to be replaced. It has a K-41K carburetor installed. Question: is it possible to replace it with a K-60 carburetor, and what limits will be required?
Friends. Having wandered through the pages of the forum, I proudly noted that among us there are quite a lot of owners of this hardworking, unpretentious and very easy-to-use *iron horse*
Such an indispensable assistant in the garden. It’s just that everything related to its operation is scattered across various topics.
And sometimes it’s quite difficult to find answers to questions that interest us all, such as operation, maintenance, etc. equipment, tuning
purchasing spare parts and so on.
I propose to create a separate thread dedicated to the *MOLE* motor-cultivator of its various modifications, and in it to discuss everything that interests us so much. And Gentlemen of the Moderators, transfer into it everything that is connected with it from other topics.
ass wrote: I was proud to note that among us there are quite a lot of owners of this hardworking, unpretentious and very easy-to-use *iron horse
I completely agree! I just couldn’t understand whether people were embarrassed by this technology. Is she that reliable?
Source
Service
Timely maintenance helps keep equipment in peak functional condition. The instructions will help you troubleshoot the Mole cultivator.
Unit maintenance procedure:
- cleaning the cylinder head. The part is washed and dried;
- carbon deposits are removed from the cylinder;
- the channels, as well as the muffler and carburetor , are cleaned with fuel;
Carburetor
- The crankcase seal should be replaced after complete disassembly of the gearbox;
- Use a cloth soaked in gasoline to remove carbon deposits from the muffler.
Following these procedures will keep the unit in working order for many years.
Cultivator-weeder
And the front part of the frame will serve as a kind of beacon. More precisely, a support wheel oriented to the middle of the row spacing, since the cultivator itself, cutting into the surface layer of soil, becomes simply invisible in the resulting crumble. There was, however, an attempt to make the cultivator paw more noticeable by additionally installing vertical ends. But this idea soon had to be abandoned - too many “small things” clung to such an elaborate “chopper”.
The option, sketches of which are shown in the figure, is designed for inter-row cultivation of potatoes with a planting width of 0.5 m. Those who are accustomed to other seeding rates will have to make appropriate adjustments. It is easier to take a ready-made cultivator paw (for example, from decommissioned agricultural machinery).
But you can do it yourself, especially since the main dimensions are indicated in the sketch. In the upper part of the paw there is a bushing with a “mouse tooth” type corrugation (for details on its implementation, see No. 1 of the magazine for 1993) at the ends - for fastening in the corrugated cheeks of the rotary bracket and subsequent tightening with an M14 bolt and nut. As a result, it becomes possible to easily, quickly and widely change the angle of installation of the cultivator.
It is also better to borrow a weeder-clump breaker from agricultural machinery. Installed in the rear part of a homemade frame, it, together with the cultivator (on a swivel bracket!) forms a kind of hinge, the axle shafts of which are two M6 steel bolts with nuts and washers.
And to fish out worn-out and half-ground weeds from the conglomerate formed in the working area, a heavy multi-link chain, freely hung on end hooks, is used. The stems and roots of weeds, pulled to the surface by a rake, wither and die in dry, sunny weather.
The U-shaped rotary handle used in the weeder cultivator is practically no different from the analogue already discussed earlier. Another thing is the spring introduced into this design (wound from 1.5 mm steel wire) with a chain lock and hook.
It also performs the function of pressing the working bodies to the soil surface, depending on the state of the latter. The load, naturally, increases when working in heavy, damp and turfed areas. The soil sticks to all structural elements and is driven into the weeder's drum.
Periodically shaking the unit helps. To make it faster and more efficient, I recommend welding small thrust washers to the cross member of the weeder’s frame (not shown in Fig. 2). One has only to pull the handle up, and the hind ends of the paw will rest against them.
And further. Make a long poker-type hook from 6mm wire rod. Hang this tool on your hand while weeding so that, as necessary, you can quickly clear the frame or, say, the same star weeder from tangled roots and other things.
Let’s assume we’ve sorted out the mechanization of weeding. Next up is the hilling of potato plantations. Any gardener knows firsthand, but from his own hard-won experience, how difficult this work is. As a rule, it takes a lot of time to complete it.
You will get exhausted even if you take a hiller plow as your assistant, the advantages of which are outlined in the previous issue of the magazine. The situation can be improved, in particular, by using the plow discussed above if you install it instead of a cultivator paw. But there is another, radical solution: get a more specialized technology.
Tips and tricks
If you need a working tiller, be sure to undergo regular maintenance. You should not buy “left-handed parts”. Regular inspection of the unit by a professional will extend its service life.
After purchasing a cultivator you must:
- start to produce the fuel mixture from the carburetor;
- treat all moving parts with oil or special lubricant;
- After work, drain the fuel regularly.
In order to repair the device as rarely as possible, the load should be correctly calculated. This will protect the equipment from premature failure.
We recommend that you read the article about the K60V carburetor.
Do-it-yourself electric cultivator on an angle grinder
An electric cultivator, a common and reliable assistant in the garden.
Other parts and components were taken from a failed motor cultivator. The grinder has 6000 rpm. Instead of a cutting wheel, it was necessary to install a Ø50 mm pulley on it with a groove for the V-belt, through which rotation is transmitted to the Ø150 mm pulley of the cultivator gearbox.
I also use an extension cord on a reel, which I made using drawings taken from the website for Craftsmen. A very comfortable and necessary device. I recommend.
Before hilling the potatoes, I loosen the rows with an electric cultivator and after one day, so that the pulled out weeds dry out, I hill up the potatoes freely, playfully. Our soil is clayey and heavy, especially when it dries, but with a cultivator the work becomes much easier. It’s a pity that our industry does not produce such electric cultivators.
1. Electric cultivator. The motor-cultivator, taken as the basis of the design, has undergone minor modifications. The angle grinder suspension unit with the drive belt tensioning mechanism was attached to the frame by welding. 2.4. The electric cultivator is lightweight, miniature and has good performance, and most importantly, it does not require spending money on fuel.
Did you like this site? Join or subscribe (notifications about new topics will be sent by email) to our channel in MirTesen!
Chain reducer
Low price
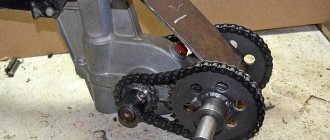
— Relatively low reliability and average service life. Structurally, the gearbox consists of 2 gears and a chain. The chain does not always withstand peak loads and tends to stretch over time, which leads to repairs (chain replacement).
— The main disadvantage is the excessive rotation speed of the gearbox output shaft in the range of 140 rpm and above. This speed is due to the design features of this gearbox, namely the presence of only 2 gears.
Conclusion: this type of gearbox is suitable for cultivators with a small cutter diameter, and accordingly for cultivators up to 40 kg and a power of 3-4 hp. The small diameter compensates for excess power and the cultivator moves at a comfortable speed.
A motor-cultivator with such a gearbox in the Mobile K line - motor-cultivator Mobile K MKM-MINI
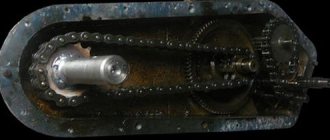
Gear-chain two-stage reducer (1 speed forward, for motor cultivators)
Correct rotation speed of cutters. The design of this gearbox uses 2 chains and a number of gears, which allows you to select the optimal rotation of the output shaft in the range from 80 to 120 rpm. At such speeds, the most effective tillage is achieved.
Attachments can be used. Due to the low speed, you can work with a plow, hiller, potato digger, weeders, etc.
Increased service life and high reliability
- Most often 1 speed. Does not allow high-quality work with a mower, brush, or snow blower.
— The price is significantly higher than a chain gearbox
Conclusion: this type of gearbox should be chosen by users who want to not only cultivate the soil with cutters using a cultivator, but also work with additional attachments - plows, hillers, weeders, potato diggers, etc.