Snow is a common occurrence in our country, especially somewhere in the Siberian outback, where there are often snowdrifts higher than cars. Naturally, the question becomes how to remove this snow, provided for this by the state. services do not work as always (but this is not certain).
Many people have the question of removing snow themselves, using a shovel, some want to get more creative, wondering how to make a shovel for removing snow with your own hands? Durable, massive, suitable for your hands.
Advantages of homemade shovels for snow removal
Undoubtedly, a factory-made snow removal tool is superior in its parameters to its homemade counterparts. Modern shovels are made of durable, lightweight plastic. Scoops are given a convenient shape and equipped with stiffening ribs. The same goes for cuttings. They are made folding, straight and curved, with anti-slip rubberized pads. At home, such a homemade snow shovel will not work. However, self-made snow removal equipment also has many advantages:
- The first advantage is the price. You will have to pay a decent amount for a good branded shovel. The equipment is used only in winter. The rest of the time it is stored in a barn. If we take the southern regions as an example, there is little snow here. You will need the tool a couple of times a year. There is no point in buying it for exorbitant money. It’s better to put together equipment completely free of charge from a piece of plywood or tin that will help clear a path or small area of snow.
- The second advantage is the individuality of the design. A person makes a shovel according to his requirements: the length of the handle, the size and shape of the scoop. You can even calculate the optimal angle of inclination of the handle in relation to the scoop to improve the ease of use of the equipment. This cannot be done with a store-bought product. You have to use what the manufacturer offers.
Homemade shovels are in many ways inferior to factory-made snow clearing tools, but they also have many advantages.
Of course, at retail outlets you can buy cheap Chinese-made equipment so as not to have to worry about making it yourself. However, the quality of such a tool is very questionable. The plastic bucket can break under the load when throwing away wet snow. In addition, the inconvenient position of the handle relative to the scoop while shoveling will affect back pain.
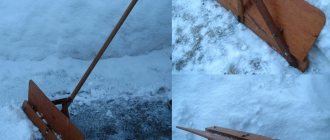
Wooden shovel
Making a snow shovel out of wood with your own hands is quite simple and quick. You will need a sheet of plywood measuring 0.5 by 0.5 meters. Thickness - 4-5 mm. You will also need aluminum strips and a finished cutting. For the cutting, you can take a square block with a cross-section of 5 cm and process it with a plane. Tools you will need:
Fine grit sandpaper.- Jigsaw (preferably electric).
- 40 mm self-tapping screws and small nails.
- Drill.
- Drill attachment for cutting holes (crown).
- Screwdriver.
- Primer for processing the finished product.
- Board 50x10x2 cm.
When all materials and tools are prepared, you can begin work. By checking the drawing prepared in advance, everything can be done in 1-1.5 hours. Step-by-step instruction:
- Cut a square base 0.5x0.5 m from a piece of plywood.
- The board needs to be cut into a crescent shape. There should be 10 cm in the center, and 4 cm on the sides.
- You need to cut an oblique hole in the center of the board so that the handle can be strengthened at an angle. The diameter should match the cutting.
- Insert the handle into the hole in the board. Measure the length and cut off the excess. Clean the cut area with sandpaper if necessary.
- Attach a sheet of plywood with small nails to the board on the cut side.
- Insert the finished cutting into the hole and screw it to the plywood with a self-tapping screw. To avoid cracking, it is better to drill holes first.
- Next you need to reinforce the shovel with metal. Bend a metal strip up to 10 cm wide in half. Place it on the edge of the scoop and tap it well with a hammer. Secure the entire structure with several nails.
- The second strip needs to be used to strengthen the connection between the bucket and the board.
- The third strip strengthens the joint between the handle and the bucket.
At the end, you need to treat the entire shovel with primer. This will avoid fungus and rapid rotting and will extend the service life for several years. In order not to waste money at all, you can find all the material at hand. Aluminum strips can be replaced with strips cut from tin cans. Ask for a piece of plywood at any sawmill. The primer is replaced with old paint residues.
Types of homemade snow shovels
Factory-made equipment differs in shape, size, material, and design. The manufacturer equips some models with additional devices, for example, handles and anti-slip pads. If we specifically consider homemade snow removal devices - shovels for snow removal, then their main difference is in the material of manufacture and purpose.
Based on the material used, there are three types of tools:
- Snow removal equipment with a metal scoop is superior in strength. However, ordinary tin quickly rusts and freezes with wet snow. Galvanized or stainless steel is considered a good material, but there are disadvantages here too. When the zinc coating wears off, the same rust spots will appear. Stainless steel is expensive. Both types of metal have impressive weight. The best material for a scoop is aluminum. The metal is light, inexpensive, resistant to corrosion, and snow does not stick to it. Advice! It is optimal to even make a cutting from an aluminum tube. The tool will be light and durable. The metal scoop is bent from tin, aluminum, galvanized or stainless steel
- A plastic snow shovel is made with your own hands from a used canister. Alternatively, for the scoop, the workpiece is cut out from the wall of a used plastic barrel or a tray is used. However, the convenience of working with a primitive shovel is not up to par. It’s optimal to buy a ready-made scoop in a store and attach the cutting yourself at home. Plastic equipment is lightweight, resistant to moisture, and in addition does not freeze over with wet snow. The downside is the fragility of the scoop.
Advice! To prevent the plastic scoop from rubbing against ice and snow, its edge is framed with a metal strip.Plastic equipment is lightweight, convenient, and does not rust from contact with wet snow.
- The advantage of wooden equipment is its ease of manufacture.
To build it, just attach a wooden handle to a rectangular piece of plywood. The downside is the fear of moisture. Wet wood becomes heavy. Plywood delaminates from water. The material for a wooden shovel is plywood. Tip! Before each storage, a wooden shovel must be dried, otherwise the fungus will destroy the wood.
In addition to the material of manufacture, shovels differ in purpose:
- Ergonomic models have an unusual shape. Due to the bends of the handle, the load on the spine during work is reduced. A shovel can not only clear snow, but also be used for other household needs. An ergonomic shovel is considered universal in use
- Standard models are equipped with a long, non-folding, even handle. It can be made of wood or aluminum alloy. A regular rectangular scoop. There may be a handle at the end of the handle. The equipment is designed for clearing paths and small areas of snow. A standard shovel consists of a straight, long handle and a regular scoop
- There is a separate type of shovel for motorists. Their feature is a shortened or folding handle, which allows you to transport equipment in the trunk. The scoop is usually made of metal, which allows you not only to throw away snow, but also to cut ice. Car shovels are equipped with a shortened or folding handle
- An electric snow blower-shovel is made by craftsmen with their own hands. The equipment consists of a housing, inside of which an electric motor rotates the auger. The knives grab the snow and throw it to the side through the discharge sleeve. An electric shovel is convenient for servicing the local area. Works well on dry snow, but sticks when wet. An electric shovel is good for clearing dry snow from the local area.
- Copying factory tools, craftsmen assemble with their own hands a miracle shovel for snow removal, equipped with an auger. The mechanism is located in the bucket. As the shovel moves, the auger rotates spontaneously, which scoops up snow with its blades and throws it to the side. The shovel is convenient for cleaning narrow sidewalk paths. The snow should be loose, dry, and of small thickness. An auger shovel is convenient for clearing dry snow from narrow paths
Assembling a super snow shovel with an auger or an ergonomic handle and scoop with your own hands is difficult. Usually limited to the standard option. With this universal equipment you can clear any area of snow that has easy access.
Snow shovels
Before you go to the store to buy a suitable tool, you should find out which manufacturers produce the highest quality and most reliable snow removal equipment. But to ensure that your snow shovel doesn’t disappoint, you need to look beyond the manufacturer. The ease of use of the purchased device largely depends on the size and material. If you wish, you can consider the option of making a snow shovel with your own hands, but in this case, you will first have to find out all the nuances regarding such devices.
In the design of a snow shovel, two main elements can be distinguished - a bucket for collecting snow and a handle. Sometimes in stores you can find models that are made using a larger number of parts. But even with such differences, similar instances are intended to perform the same function.
Traditionally, wood, plastic and metal are used to make snow shovels.
Made of plastic
The plastic used by manufacturers must be frost-resistant.
For some models, it is complemented by a metal edging on the bucket, which allows the product to more easily withstand mechanical loads and increases its service life. Plastic shovels are more convenient to use due to their light weight. This is an ideal solution for women and teenagers. At the production stage, the material is treated with chemical compounds, and the area near the handle with the bucket is protected with a special edging, which makes the product more wear-resistant.
Made of wood
They are most often chosen by those owners who want to save money. The main disadvantage of such devices is the fragility of the material. In addition, wood tolerates moisture much worse than plastic, which very quickly causes cracks to appear on the surface. Wooden snow shovels are best used for removing recently fallen snow. In order to easily cope with ice and wet precipitation, you will need to additionally equip the bucket with a metal edging, which will increase the service life of the tool.
https://youtube.com/watch?v=MfZGup8tya0
Made of metal
These shovels are the most durable and therefore last longer than other snow removal tools. But they are also more expensive than other types, although this is not surprising, given their high level of performance. Metal shovels can easily handle not only snow, but also ice.
To reduce fatigue, you can purchase a tool made of aluminum or duralumin, which weighs less than steel products. Aluminum is lighter than wood, but still does not have the same amazing strength as metal shovels. In comparison, duralumin looks preferable, because this material is much stronger, although much heavier than ordinary aluminum. Steel shovels require considerable physical effort, so, as a rule, only men work with them.
When evaluating shovels by weight, you also need to pay attention to the handle. For more convenient work, the handle must correspond to the height of the owner
Cleaning the area with a short-handled shovel will be very tedious.
It is equally important that the bucket has the appropriate width. The wider it is, the more snow you can collect in it.
But to remove wet sediment, it is best to purchase a small shovel.
It is most convenient to clear the courtyard area of snow using a three-sided model, since it allows you to retain all the collected light and loose snow. Its bucket has longitudinal ribs that increase the degree of its sliding over the surface.
When choosing a snow removal tool, you need to pay attention to the nature of the work and the individual load. So that snow clearing equipment can be transported in a car and conveniently stored, manufacturers produce special folding and collapsible models
There are solutions for children too - small shovels that will allow even little helpers to take part in joint cleaning.
To ensure that snow clearing equipment can be transported in a car and conveniently stored, manufacturers produce special folding and collapsible models. There are solutions for children too - small shovels that will allow even little helpers to take part in joint cleaning.
How to make a snow shovel
To make snow removal equipment convenient to work with, you need to assemble it in the right size. If the shovel is huge, and the handle is heavy, after a few minutes of using such a shovel, back pain will be guaranteed. The heavier the material, the smaller the bucket is made. The length of the cutting is adjusted to suit your height.
Tools and materials
To work, first of all you need a tool. Its list will depend on the materials used. If plywood and wood are chosen, then you will need a saw, a jigsaw, a screwdriver, a hammer, and a screwdriver.
The list of tools depends on the material chosen for assembling the shovel
If you make a metal scoop, then to the listed tools you need to add a grinder, pliers, and an electric drill. Nails, self-tapping screws, bolts and rivets are used as fixing elements.
DIY snow shovel drawings
There is nothing complicated about a shovel to make a detailed drawing for its manufacture. As an example, you can use the diagram shown in the photo:
The diagram is suitable for assembling a wooden or metal model
Professional approach
If you are a creative person who is used to taking things seriously, the list of actions will be familiar. At the beginning of any technical work, the drawing comes first, and here too, it is necessary to complete the drawings of a snow shovel.
The drawing should contain information about the thickness of the bucket and what material it is supposed to be made from. The diameter of the cutting, the type of tree used for this.
Next comes the technological map, which may include this drawing. If you need to make something more interesting, narrowly focused, you can look at a photo of a snow shovel, made with your own hands, or a serial one on the Internet.After all the preparatory activities have been carried out, the necessary materials, tools, and processing machines have been selected, production should begin.
First comes the ladle, the process here depends on what material you have chosen. If you want to make wood, you must first sand it. Then coat with epoxy resin.
It is recommended to cover the edges and sides with aluminum thresholds, this will increase strength. If the ladle is made of any metal, it must also be ground if necessary.
Reinforce it using metal strips and install a fastener for the handle. The cutting is also first processed, sanded, and then coated with resin or varnish.
And only when all the parts are ready, you can start assembling. It is recommended to secure the handle as best as possible, since very often after prolonged use it begins to dangle in the mount.
How to make a snow shovel from plywood
To assemble snow removal equipment, you will need a rectangular piece of plywood sheet measuring 400x400 mm, with a minimum thickness of 5 mm. It’s easier to purchase a handle or use a plane to make it from timber with a side size of 50×50 mm. You will also need a piece of board 400 mm long, 70 mm wide, 20 mm thick. A tin strip is prepared to frame the edge of the scoop.
The optimal size of a plywood scoop is 400×400 mm, but can be increased to 500×500 mm
Assemble a snow shovel with your own hands as follows:
- A square is cut out of a plywood sheet. The ends are treated with sandpaper. The front edge of the future scoop is framed with a tin strip. It is better to secure it with rivets, having previously drilled through holes.
- A backboard is made from the board, which simultaneously acts as a handle holder. Opposite corners are cut off from one end of the workpiece. They are rounded slightly to give the scoop a curved shape. The edge of the hewn board is applied to the edge of the plywood sheet and secured with self-tapping screws.
- A hole is drilled in the center of the resulting side. Its diameter is slightly larger than the thickness of the cutting.
- The cutting is inserted into the prepared hole. Its end is leaned against the plywood, an oblique cut is marked and the excess part is sawed off according to the marking. The obliquely cut end of the handle should be adjacent to the plane of the scoop without gaps.
- A through hole is drilled in the center of the plywood sheet. The same is done with the end of the cutting. The elements are connected with a furniture bolt. You don’t have to drill the hole, but simply fix the end of the handle to the scoop with a self-tapping screw, but such fasteners are less reliable.
- To strengthen the scoop, the junction of the backboard with the plywood can be sheathed with a thin metal strip.
Scraper manufacturing options
A shovel is a good thing, but it’s hard to throw snow with such a tool. Let's look at the options for improved factory-made and home-made scrapers.
Blade scraper on wheels
To make a mechanical blade scraper, you will need a wheelset with a metal frame. There are many options for where to get it. Any baby stroller or trolley for transporting bags will do.
First you need to make a blade, that is, the scraper itself. It is difficult to bend a steel sheet 2 mm thick, so it would be good to find a pipe with a diameter of 270 mm. First, cut a piece 10–15 cm longer than the width of the frame. The blade should cover a strip of such size that the wheels after it roll over the cleared area.
A segment slightly smaller than a semicircle is cut along a piece of pipe. To prevent the blade from scratching the tiles or asphalt, a conveyor belt is bolted to the bottom.
When making the frame, the cart is remade so that four stops are formed for the blade: 2 on top and 2 on the bottom. A wheel pair and a U-shaped handle are attached to the lower stops on the rear side. The upper stops simultaneously form racks. They are bolted at one end to the handle, and at the other to the hinges on the back of the blade. On the front side, the second ends of the lower stops are also fixed to the hinges of the blade.
The result will be a scraper, as shown in the diagram. All connections must be bolted only. Then, with any tilt of the handle, during operation, the blade will constantly lower itself to the ground.
Scraper improved with brush
You can find such an interesting tool in a store or make it yourself. A scraper with a brush allows you to cleanly remove snow from paving slabs. In the store version, it can be a plastic shovel with a removable brush. The homemade design is a scraper of any configuration. Simply attach a brush with stiff bristles to the back of the blade or scoop. While working, it will sweep up the remaining snow, which can then be easily removed with a shovel.
Factory made plastic scraper
According to the principle of operation, a plastic scraper resembles a blade, only it does not have wheels. The basis of the tool is a rectangular plane with stiffening ribs. A handle is fixed in the center of the scraper at the top. During work, a person simply pushes the snow away from himself with a plastic element or scoops it towards himself.
Steel ski scraper
The simplest design of a steel scraper is shown in the photo. It consists of a rectangular aluminum sheet to which a U-shaped handle is attached. The disadvantage of the model is the high labor costs.
You can improve the tool by putting it on skis. To do this, runners from a steel angle 1 m long are attached to the U-shaped handle at the bottom. The ends need to be bent upward to make something like skis. The scraper blade is attached to the handle so that the lower end of the aluminum sheet rests on the skids.
Read also: Fiskars snow shovel: features of the use of automobile snow shovels
The video shows how to quickly make a scraper:
Snow scraper
In the presented drawing of the scraper, you can see that it is a regular scraper with a U-shaped handle. A bucket is similar to a shovel, only with high sides. Snow removal is performed by pushing the scraper in front of you. The inclined handle design reduces stress on the arms and back. Here, most of the damage goes to the human feet. The more snow in the bucket, the harder it is to step to push it.
You can make your own scraper for snow removal from the same plywood. But a wooden instrument saturated with moisture is very heavy. In addition, plywood wears out quickly when rubbing against asphalt. Here you can find two options: nail a galvanized sheet to the bottom of the plywood or immediately bend the bucket out of an aluminum sheet.
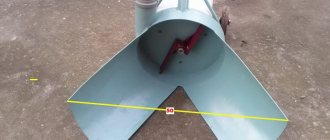
DIY snow shovel made of tin
If tin, aluminum or galvanization is chosen for the scoop, the manufacturing principle remains exactly the same. However, metal makes it possible to experiment with shapes. To prevent the snow from scattering from the shovel when thrown, the scoop is equipped with sides.
The sides allow for more snow to be captured by the scoop
To make the sides, the tin blank is cut out to larger sizes. For three sides, a tolerance of up to 50 mm is added. Three sides are bent at right angles. A hole for the handle is cut in the center of the rear shelf. The side sides are cut at an angle, reducing the height towards the working leading edge. The handle is inserted into the hole in the back bar. The end with an oblique cut is fixed to the center of the scoop. You can use a self-tapping screw, a bolt, or an overhead clamp bent from a metal strip.
Without sides, a tin shovel has a similar structure as a plywood tool
If stainless steel is chosen for the scoop, it is difficult to bend the sides. It is better to make a shovel using plywood tool technology. For the scoop, only one backboard is made from a board with a central hole for the handle.
Important! For a metal scoop, do not frame the end of a tin strip, since this is no longer necessary.
Winter helper made of metal
Often people refuse metal shovels, arguing that they are too expensive and heavy. But you can make a snow shovel with your own hands and it’s completely free. You just need to use the materials that are always available on the farm . For this you will need:
- Oven tray or saucepan lid with a diameter of 50-60 cm.
- Metal tape. The thickness of the tape should be about 3−4 mm.
- Wood cutting.
- Grinder (you can use a jigsaw with a blade for metal).
- Drill.
- Riveting tool.
If you have all this, then making a metal snow shovel will not be much effort. In addition, it will turn out strong, capable of withstanding heavy loads. Step-by-step instruction:
- You need to prepare the base of the bucket. Using a grinder (or jigsaw), cut out the base of the ladle from a baking sheet or lid. Suitable sizes are 0.5x0.5 m or 0.4x0.6 m.
- Now we need to strengthen the bucket. To do this, you need to take a metal strip and cut six strips. Three for length and width. Make holes in the tape at intervals of 3-5 cm. Then place it on the ladle in the form of a grid and attach it with a riveting tool.
- Measure the handle. Cut off the excess part. Sand the cut area.
- Attach the handle to the ladle. To do this, cut two metal strips of 10-15 cm each, wrap the strips around the handle and rivet them to the bucket.
To extend the life of a homemade shovel, you need to open a part of the wood with varnish, paint or antifungal liquid. If you use this tool only for its intended purpose, it will last for many years.
How to make a snow shovel from plastic
The easiest way to make a shovel is to buy a ready-made plastic scoop at a retail outlet. It is simply placed on a cutting of a suitable size. If you take a different route, you need to find a 10 liter plastic canister. It should be flat.
A durable scoop can be made from a thick-walled plastic canister.
One of the side walls of the canister is cut off. This is easier to do with a grinder. The canister shelf with a neck and handle will act as a tailgate. A hole is cut in the center for the cutting. The remaining shelf from the bottom of the canister is cut off entirely. There is no need for a bend on the working edge. The side boards are cut at an angle. The handle is fixed with self-tapping screws. The disadvantage of such equipment is its low strength. Wet snow can cause the scoop to bend and crack.
Plastic shovel
A plastic shovel is considered the most convenient for cleaning and throwing snow. It's easier to buy a scoop in a store. At home, all that remains is to place it on the handle and secure it with a self-tapping screw. A lightweight shovel is very convenient. The strength of the scoop is ensured by stiffening ribs cast from plastic, and the edge of the blade is protected from abrasion by a steel strip.
You can make a snow shovel from a PVC sheet with your own hands using the following method:
- For the scoop you need to find a piece of plastic. The sheet must be break-resistant and flexible at the same time. You can test it by bending, of course, within reason. If the plastic doesn't burst, it means the scoop will turn out great.
- Draw the shape of a scoop on a plastic sheet. The most convenient size is 50x50 cm. Cut the workpiece with a jigsaw. Burrs on plastic do not need to be cleaned. They will be erased while clearing the snow.
- The most difficult job is attaching the handle. It is fixed in the center of the scoop using sheet steel plates.
To make the blade resistant to abrasion, the working edge of the scoop is wrapped around galvanized sheet steel and secured with rivets.
How to make a snow shovel from a baking sheet
A used oven tray will serve as a good material for a scoop. It usually has an enamel coating that will protect the metal from corrosion. To make a shovel, first attach a wooden block to one side of the baking sheet with self-tapping screws. A small back edge will create a slope for the cutting.
It is better to use the entire baking sheet without bending or cutting it, since in place of damaged enamel the metal will begin to rust from moisture
The end of the cutting is cut at an oblique angle. They attach it to the scoop with bolts. You can use overhead clamps.
Plastic tool
The easiest way is to buy a ready-made canvas and attach it to the cutting. Compared to a wooden tray, its plastic counterpart has the following advantages:
- The weight of a plastic scoop is about half that of wood fiber and oriented strand products. Snow does not spoil the plastic, so the shovel lasts longer; it does not even have to be stored indoors.
- Low price and availability. A plastic scoop is cheaper than an aluminum one and is sold in almost any hypermarket.
- The plastic must be hard and flexible. If the material remains intact after applying sufficient breaking force, it is suitable for making a scoop. Plastic barrels and similar used items are quite suitable for our purpose.
- We cut out the tray with an electric jigsaw or a fine-toothed hacksaw. The edges will turn out rough and uneven, but you should not process them, as they will be sanded down during the snow removal process.
- We attach the handle to the center of the scoop. Metal strips are applied at the joints. The fastening elements here are screws for plastic with a countersunk or semicircular head (provided the material is sufficiently thick). Nails and wire are also used for fastening, but in this case it will not be possible to remove large volumes of snow.
Read also: Device for removing snow from the roof
Manufacturing Features
A snow shovel is an indispensable tool in winter.
In order for the equipment to have a long service life, it is manufactured in accordance with certain requirements:
- The tray must be strong enough to withstand heavy loads.
- To make the shovel glide easily through the snow, the shape of the bucket is given a ribbed surface.
- A rubberized grip at the end of the handle will help prevent slipping in your hands.
- The length of the handle for a shovel should be suitable for the height of a person; usually it is 1.5-1.8 m. The optimal length is up to the shoulders of the person who is going to use it.
- The length and width of the tray depend on the person’s build. For the average person, a scoop measuring 50x50 cm is suitable.
Also, we must not forget about the angle of inclination of the bucket. The larger the angle, the easier it is to collect snow. But at the same time it will be more difficult to reset it. Typically, an angle of 200 to 250 is used.
During the design of the structure, various modifications such as folding handle should be avoided. Despite its convenience and practicality, its service life will be short.
Alternative methods for clearing snow in the yard
Despite the fact that the most widespread method of removing snow from the local area using a shovel, there are no less effective, alternative options for removing snow mass. To quickly clear paths and paths, you can use a metal box or an ordinary iron basin , which are filled with bricks, after which they are rolled over the surface and easily crush the snow.
Also, the path or local area should be sprinkled with coarse salt , then thick ropes should be laid on top and a tarpaulin should be laid. Salt prevents ropes and tarpaulins from freezing to the ground under a layer of falling snow. The area is cleared after the snowfall stops - just take the tarpaulin by the edges and throw the accumulations of snow mass to one side.
To speed up and facilitate the process of cleaning snow-covered areas, you can install a shovel on a small wheel, and then carry this structure along the cleaning path. This method allows you to quickly and effectively remove snow from large areas. There are also other interesting ways to independently optimize a regular snow shovel and are currently widely used.
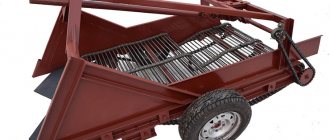
How to make a snow shovel on wheels from a metal barrel
In the absence of sheet steel, the ladle is made from a barrel. First, the container is opened with a grinder. If the barrel has a volume of 200 liters, then a segment from about a third of its part will be required. The workpiece already has a curved shape, so there is no need to bend the edge from below.
The frame for the shovel will be the frame of a wheelbarrow with one or two wheels.
The frame is welded from pipes, exactly as in the example of a sheet steel structure. If you have a car at home, then you should refuse unnecessary work. The body is simply removed from it, and a segment cut from a barrel is fitted in front. Moreover, the car will fit even with one wheel. At the end of winter, the instrument will be re-equipped, returning the body to its place.
Requirements for snow removal tools
There are special requirements for work equipment, purchased or made in-house
- performing functional tasks (in this case, high-quality snow removal);
- presence of a comfortable handle;
- the height of the instrument corresponds to the height of the person;
- the size of the tray should allow you to clean snow, capturing its optimal amount;
- the bucket should have some inclination relative to the shaft for ease of operation;
- the structure must withstand the specified load (snow weight).
The service life of a shovel depends not only on the material of manufacture and build quality, but also on compliance with operating rules.
Expert opinion
Strebizh Viktor Fedorovich, leading construction foreman
To make a scraper with your own hands, you need to prepare the materials and tools chosen for the blade and handle and tools for working with them. If you want to clarify something, please contact me!
Wooden Shovel: A plywood shovel with a handle for clearing snow. Snow shovels made of wood and plywood
- Make runners from the pipes by bending their ends.
- Make a U-shaped handle.
- Weld the handle to the runners at an angle convenient for work.
- The working blade is attached to the handle posts, and its lower edge is fixed to the runners.
Made of metal
Metal scrapers are the most common. They can be of any width, so they are suitable for cleaning large areas. For example, this tool can quickly clean a large yard.
Large metal cleaning tools are reinforced with strong corners. They can be operated by two or even three people (if the snow layer is very high).
- Cut a sheet of metal 50 cm wide and 60 to 100 cm long.
- The edges of the metal blank can be bent to create a ladle shape.
- Secure the canvas with a wooden board, which should reach a maximum of the middle of the metal workpiece.
- Make a handle (regular for a narrow scraper, U-shaped for a wide one).
- Attach the handle to the canvas.
Materials and tools
The first step is to decide on the material for the scraper itself and the handle. The most durable metal tools.
But a metal shovel may turn out to be too heavy , and if deformed, it will scratch the tiles. Therefore, for paths lined with paving slabs or other coverings that can be damaged, it is better to make scrapers from plastic or plywood.
Which is better: heated floors or radiators?
Warm floorBatteries
The most economical and easiest to manufacture plywood scrapers. But plywood wears out quickly. If you need a tool for many years of use, it is better to make it from metal or plastic.
Plastic scrapers are ideal for removing light layers of snow from sidewalks or driveways. It is inconvenient to rake large snowdrifts with a plastic tool - the plastic bends under heavy load.
The handle can be made of metal or wood . In the first case, they take a thin pipe, in the second, ready-made cuttings of a convenient thickness. You can make a practical U-shaped handle from a pipe. The cuttings are more suitable for a regular handle, but if desired, you can make a wide handle by fastening 3 cuttings.
The length of the handle is calculated taking into account the height of the person who will be doing the cleaning. The angle of attachment of the working blade and handle should be such that it is possible to remove snow without bending over. To make a scraper with your own hands, you need to prepare the materials and tools chosen for the blade and handle and tools for working with them.
Expert opinion
Strebizh Viktor Fedorovich, leading construction foreman
To adjust the level of lift of the blade, bolts are used that are screwed into holes in a piece of tube welded to the tow hitch and placed on an L-shaped bracket. If you want to clarify something, please contact me!
What to make a snow blower blade from
- Plywood . The advantage of this material is its lightness. It is better to use plywood with a thickness of 6-10 mm. Thinner plywood will not withstand heavy loads; thicker plywood is suitable for a snow blower, but not for a shovel, as it will make the tool heavy.
- Aluminum, steel . Aluminum sheet is lighter than steel, but more expensive. The choice is yours.
- Plastic . If the cleaning area is not too large, and heavy snowfalls are rare in your area, you can use a sheet of durable, not too flexible plastic as a canvas for a snow blower.