A winter summer cottage covered with a blanket of snow is a truly indescribable landscape. But even such beauty has to be removed so that you can move around unhindered. A high-quality and durable snow shovel helps you clear your garden plot in winter quickly and without much effort. You can buy it at any hardware store, but in order not to waste money, it is better to make a snow shovel with your own hands.
Tips for use
You should not expect that you can do all the snow removal work with a shovel.
In fact, there should even be several of them - different in width and material. And a few more tips.
- In addition to shovels, you need to have scrapers, which are convenient for shoveling snow into piles, and ice axes for removing ice. And of course, don’t forget to sprinkle the paths with a special compound that prevents ice at the end. The shovel must be used for its intended purpose, otherwise its service life will be short.
- During work, you need to correctly calculate the snow load. Don't take too much snow. It is better to do several approaches than just one, thereby damaging your health and instrument. But you should also not use a snow shovel to move bulk construction materials (for example, sand).
- After work, all shovels must be shaken off snow. Wooden shovels require more delicate handling - they deteriorate from excess moisture, so they should be wiped dry.
- To place shovels, use special racks or wall mounts located in a dry place - a utility room or garage.
Before starting and after completing snow removal work, the shovel must be inspected for damage. Weak points are the transition of the bucket blade to the handle and fastenings. If cracks appear, it is difficult to do anything, but the risk of injury during work increases. Loose fasteners can be tightened or replaced. Even if it breaks, do not rush to throw away the tool - you can try to repair it by replacing the failed part.
For an overview of two models of shovels, see the following video.
What is a shovel?
It would seem that it’s impossible to think of anything simpler, what should I describe here? Not so. Shovels are divided into types based on many points.
A shovel for a man must be strong, heavy, and reliable. A woman's shovel may be lighter, but just as durable.
What is this shovel going to do? What type of soil and sand will she encounter? There are different types of shovels for different tasks.
From small compact ones, designed for hiking, to massive bayonet ones, which can even break ice.
Most importantly, you can make a snow shovel with your own hands. And not just snow, but everything your heart desires.Wheeled roller for snow removal
A rollback is a type of snow shovel. It is also called a dump. This tool allows you to achieve maximum results with minimal effort. Materials that will be needed when making a rollback:
- Wheels from a cart.
- Sheet of steel 1−1.5 mm thick.
- Metal tube.
- Bulgarian.
- Welding machine.
Manufacturing is not as simple as in previous variations. In this case, you need to know a little about welding metal. But the result is worth it. Step-by-step manufacturing instructions:
- The first step is to make a kickback blade. You need to cut a piece of sheet steel with a grinder. The optimal dimensions are 70x40 cm.
- A small metal plate should be welded to the back of the blade to strengthen this area. Drill three holes in it: one will serve for fastening, the other two are needed for a stopper that holds the blade at the desired angle.
- Make a cutting from a metal tube.
- Two flanges are welded to the bottom of the handle. Holes are pre-drilled in them in order to subsequently install the wheel axle.
- A handle is welded to the top of the handle.
- Next, 60 cm of steel tube is sawn off and threaded through the flanges on the handle. This is a wheel axle. The wheels are put on it, and then the retaining rings.
- A small tube is welded horizontally to the bottom of the handle. It is needed to attach the blade to the wheelbase. The blade is secured with a bolt.
- Paint thoroughly.
To make the shovel glide better, you can attach a rubber band to the bottom of the blade. An alternative version of this mechanism is a four-wheel recoil.
Roof scraper
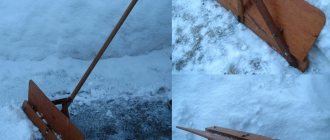
In winter, not only the paths on the plot, but also the roofs of houses require snow removal. Assembling a snow blower for roofs with your own hands is a completely doable task. A roof cleaning shovel looks like the letter P attached to a long handle. A strip of plastic extends from it - a tape for throwing snow off the roof. The procedure for making a scraper with your own hands:
- Bend a U-shaped profile from sheet metal. Width - 55 cm, length - 65 cm, height - 35-45 cm.
- Cut a strip of any metal 65 cm long and up to ten centimeters wide. Attach it with bolts to the side walls of the resulting profile.
- You need to attach a cutting to the strip.
- A plastic tape is attached to the bottom of the side edges using small nails. The plastic must always be rolled into a roll. When snow gets in, the roll will unwind.
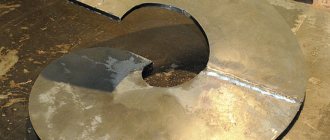
Winter helper made of metal
Often people refuse metal shovels, arguing that they are too expensive and heavy. But you can make a snow shovel with your own hands and it’s completely free. You just need to use the materials that are always available on the farm . For this you will need:
- Oven tray or saucepan lid with a diameter of 50-60 cm.
- Metal tape. The thickness of the tape should be about 3−4 mm.
- Wood cutting.
- Grinder (you can use a jigsaw with a blade for metal).
- Drill.
- Riveting tool.
If you have all this, then making a metal snow shovel will not be much effort. In addition, it will turn out strong, capable of withstanding heavy loads. Step-by-step instruction:
- You need to prepare the base of the bucket. Using a grinder (or jigsaw), cut out the base of the ladle from a baking sheet or lid. Suitable sizes are 0.5x0.5 m or 0.4x0.6 m.
- Now we need to strengthen the bucket. To do this, you need to take a metal strip and cut six strips. Three for length and width. Make holes in the tape at intervals of 3-5 cm. Then place it on the ladle in the form of a grid and attach it with a riveting tool.
- Measure the handle. Cut off the excess part. Sand the cut area.
- Attach the handle to the ladle. To do this, cut two metal strips of 10-15 cm each, wrap the strips around the handle and rivet them to the bucket.
To extend the life of a homemade shovel, you need to open a part of the wood with varnish, paint or antifungal liquid. If you use this tool only for its intended purpose, it will last for many years.
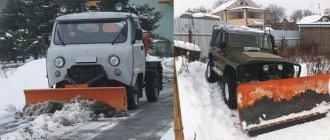
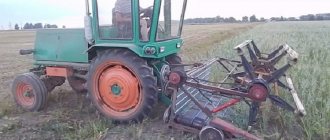
How to make a blade for a walk-behind tractor with your own hands
When making your own attachments, you first need to carefully study its structure. The presented photos and do-it-yourself drawings of a blade for a walk-behind tractor give only a visual idea of the design. It is optimal to first consider the snow removal device in reality. To do this, you can visit a retail outlet or ask a friend of the equipment owner to take measurements from the dump. When this is not possible, you need to be prepared for the fact that errors may arise during work that will have to be corrected.
Do-it-yourself blade drawings for a walk-behind tractor
You can find a lot of diagrams on the Internet or thematic literature, but they are all almost similar to each other. This is due to the simplicity of the shovel design. There is no need to invent anything extra here. For example, the do-it-yourself blade drawings for the Neva walk-behind tractor will be similar to those for the Zubr and Zirka. Minor changes may only be made in the design of the coupling.
The drawing will help you make a shovel with a hydraulic lift. In the absence of hydraulics, the lift is made using a lever, for example, from a spring
Car scraper
Such an accessory should be easy to use. The ideal brush allows you to easily, quickly and effectively clean the car body, including hard-to-reach places. At the same time, it ensures the safety of the paintwork.
The curved shape of the product facilitates high-quality processing of areas with complex geometry (spoilers, roof rails, radiator grille). The handle is made of material with low thermal conductivity (frost-resistant plastic, rubber). In this case, the inner side of the brush in contact with it will not be cooled. To combat wet and compressed snow, the accessory is equipped with a plastic scraper:
The length of the handle should correspond to your anthropometric data or have a retractable mechanism (this option is useful if you have a large car).
- the material itself;
- fluting or cutting of the surface.
A mitten made of waterproof material is attached to the handle of some models:
The bristles should be soft and have split ends, otherwise they will scratch the surface of the car in severe frost. The optimal length of the pile is 4-5 cm.
Making a shovel handle
There is an opinion that the cutting should be perfectly round. Actually this is not true. With a heavy load, the round handle will rotate in your palms, and you will have to spend a lot of effort to hold it. It is better to make a rectangular handle with slightly rounded corners. Working with such a tool will be much easier and more convenient.
To make a cutting, you need to perform the following steps:
- Give the piece of timber the correct shape. The cross-section can be hexagonal or octagonal. Fitting is done with a saw, plane and abrasive material.
- Take a board 40 mm thick and spread it onto a beam 30-50 mm wide. After this, the corners are ground off with a plane and the workpiece is processed with sandpaper.
- Glue together several thin slats or strips of plywood. For better fixation, fasten them with thin self-tapping screws through pre-drilled holes. This is necessary in order to prevent the formation of cracks. The screw heads should be buried in the wood. Process the workpiece, bring its edges to a smooth state using a plane and sandpaper.
The handle must be perfectly smooth to prevent splinters from damaging your hands. To completely eliminate this possibility, you can treat the wood with an open flame. A blowtorch is best suited for this.
Auger shovel - types and description
Despite the variety of models, the tools are similar in operating principle and mechanism design.
Modernized infantry can be:
- Single-stage - with 1 working mechanism, equipped with a circular blade, spirally twisted. When the drum rotates, they capture snow and feed it to the blades, which push the mass out through the outlet sleeve.
- Two-stage - in addition to the auger, it is equipped with a rotor, which additionally loosens the snow mass so that it can be pushed out with an air flow through an outlet channel.
Auger shovels according to the type of drive are divided into:
- Hand tools made by analogy with a scraper blade. They are equipped with a spiral blade, which is driven by human pushing efforts.
- Mechanical tools with electric motor or internal combustion. The snow throw reaches 12-15 m, but these are no longer auger shovels in the literal sense of the word, but rather a means of small-scale mechanization or attachment for a mini tractor or walk-behind tractor.
The latter are divided by type of movement:
- On wheels or skis. They are set in motion by human efforts.
- Self-propelled - on wheels or tracks. Here a person controls the unit using a handle.
When working with a regular pedestal, a large load is placed on the shoulders and back. Especially with large snow-covered areas. Using a manual auger shovel can make the job much easier.
Plastic tool
The easiest way is to buy a ready-made canvas and attach it to the cutting. Compared to a wooden tray, its plastic counterpart has the following advantages:
- The weight of a plastic scoop is about half that of wood fiber and oriented strand products. Snow does not spoil the plastic, so the shovel lasts longer; it does not even have to be stored indoors.
- Low price and availability. A plastic scoop is cheaper than an aluminum one and is sold in almost any hypermarket.
- The plastic must be hard and flexible. If the material remains intact after applying sufficient breaking force, it is suitable for making a scoop. Plastic barrels and similar used items are quite suitable for our purpose.
- We cut out the tray with an electric jigsaw or a fine-toothed hacksaw. The edges will turn out rough and uneven, but you should not process them, as they will be sanded down during the snow removal process.
- We attach the handle to the center of the scoop. Metal strips are applied at the joints. The fastening elements here are screws for plastic with a countersunk or semicircular head (provided the material is sufficiently thick). Nails and wire are also used for fastening, but in this case it will not be possible to remove large volumes of snow.
Plywood construction
The main element here is a piece of plywood, which is fixed on a piece of board cut from a blank with a length equal to the width of the shovel. The handle is made from a lath or a thin long bar. You will also need nails and a thin metal plate for fastening. The tools you will need are:
- file (jigsaw);
- hammer;
- plane;
- pliers;
- sandpaper.
From the unprocessed section of the board we saw off the part needed to make the end - the basis for attaching the plywood sheet. We process the workpiece on each side with a plane, achieving smoothness. We draw the contours of the part with a pencil. On one side we draw an arc, while the other remains straight. The width of the middle is 8 cm, the edges are 5 cm. Remove excess wood.
We decide on the shape of the cutting, which can be round or rectangular. The edges of the rectangular handles are rounded for convenience.
If you have chosen a rectangular section, cut out a section about 4.5 cm wide from an edged board or strip. There should be no knots - stress concentrators, where cracks will appear due to the load. The presence of a slight discrepancy in width in different parts of the cutting does not pose a problem. If there is bark, remove it and sand the holder.
To firmly secure the handle in the end part, we cut out an opening in the center of the part with a width corresponding to the cross-section of the handle. It is recommended to start cutting with a jigsaw and finish the work with a chisel. The depth of the opening is different on different sides: 4 cm and 4.5 cm. Half a centimeter is left for a bevel, ensuring an ideal fit of the holder. The angle of inclination of the scoop depends entirely on this bevel, on the height of the person and the manner of handling the tool. A 0.5cm difference is comfortable for most.
Then a line is drawn along which the cutting is cut; a square is used here. The excess length is cut off, while you need to monitor the angle of the cut - the bevel on the handle must coincide with the opening. We connect both parts. We nail a piece of plywood to the end: one nail is driven in the middle, two at the edges. To prevent the plywood from splitting, the sharp parts are “bitten off” from the nails: the blunt end will not push the fibers of the material apart, but will tear them apart.
Using a tape measure, we determine where the handle is attached to the plywood bucket. On the back of the scoop we mark the places where the nails will be driven in and nail the handle. Inaccurate markings will cause deviations in the handle, causing the tool to tilt to the side during operation.
To give strength, the shovel is reinforced with metal strips. Ideally, galvanized iron is used, which is left over after the roof was repaired, but ordinary tin cans will also work.
To make the bottom edge, cut a strip slightly longer than the width of a standard scoop (50×50 cm) - 55-60 cm and 6 cm wide. The cut piece is folded in half lengthwise and an edge is obtained, which is put on the scoop part from below and secured. To ensure a tight fit of the metal to the plywood, adjustment is made with a hammer.
The pieces of metal that protrude from the sides are bent. The edge is fixed with three nails, which should pierce the plywood through. The excess parts are folded over. The end part is trimmed with a metal strip in a similar way. Next, the handle is attached to the central part of the plywood with self-tapping screws. The connection point on the reverse side is reinforced with a piece of metal.
How to make a snow shovel on wheels
To make the tool convenient and effective, you need to follow the rules and requirements during assembly. They are simple and will help you avoid common mistakes. Having decided to assemble a snow shovel on wheels with your own hands, from the general requirements for such equipment you should take a closer look at the following points:
- The ladle is made of durable material. It must withstand the load from dry and wet snow, and not deform when colliding with ice or other obstacles.
- I calculate the depth of the bucket in direct proportion to my physical capabilities, the size of the wheels and the design of the handle. If a person is in poor health, he will not move much snow. The same goes for structural elements. A weak handle will bend under heavy load, and small wheels will slip.
- The shovel handle is equipped with a comfortable handle for gripping with the hand. It is optimal to consider rubber anti-slip pads.
- The length of the handle is determined individually according to your height. It is optimal to equip a shovel with a wide bucket with two wheels for better stability
- The number of wheels depends on personal preference. However, here you need to take into account the width of the bucket. There is no point in placing a narrow shovel on two wheels. It will be uncomfortable to use the tool. If the bucket is wide, then a pair of wheels will be required for stability.
Advice! If the goal of cleaning is to perfectly clear the area of snow, then the scraper can be improved by adding a brush. It is placed behind the bucket. In one pass, the scraper removes the bulk of the snow, and the brush sweeps away the remaining snow.
Particular attention is paid to the design of the handle. Telescopic and folding options are not suitable
Such handles bend under load and often fail. It is optimal to use a solid lever. If the shovel needs to be transported in the trunk of a car, then it is better to make the handle removable with a reliable bolt fastening.
An interesting video will help you make a snow shovel on wheels:
Tools and materials
To assemble a snow shovel on wheels with your own hands, it is not necessary to draw up a drawing. However, the diagram will help give a better idea of the design. An example of a drawing can be found in the relevant literature or on the Internet. It is best to copy the diagram yourself from a real instrument. This will give you a clearer idea of where and which node is installed, how it is positioned, and secured.
The diagram gives a clear idea of all the components, which will simplify the process of assembling the shovel
Once the drawing is developed, it is easier to determine what materials and tools will be required.
To assemble the scraper you need to prepare:
- One or two wheels. The quantity depends on the size and design of the shovel. They can be taken from an old car, stroller, or other mechanism. A bicycle with one large diameter wheel is used for a tool with a small bucket, which is convenient for cleaning narrow winding paths.
- Steel for the ladle. Rolled sheets, preferably galvanized, are suitable. The optimal metal thickness is 1 mm. You can use aluminum or stainless steel. If there is no sheet steel, use a grinder to saw through the body of a used washing machine, a barrel, a gas cylinder or a large-diameter pipe.
- Pipe for handle with a diameter of 20 mm. The frame can be welded from a profile tube of the same cross-section.
- Additional materials may require bolts and nuts, metal tires, angles, and a piece of rubber hose for the handle.
Since a snow scraper on wheels is made entirely of metal with your own hands, you will need the appropriate tool. To trim parts, use a grinder. The workpieces are connected by welding. You may also need an electric drill, wrenches, hammer, and pliers.
General requirements for the product
A snow shovel is an indispensable assistant in winter. In order for it to serve for a long time, manufacturing must meet a number of conditions. Shovel requirements:
- The bucket must be strong to withstand the load.
- The desired shape of the bucket is ribbed. This will make it easier to glide through the snow.
- The end of the handle should have a rubberized grip. This will avoid slippage.
- The length of the cutting is 1.5−1.8 m. Depends on the height of the person.
When designing the structure, it is advisable not to provide a folding handle, as this reduces strength. The width of the bucket depends on physical capabilities: the more weight a person can lift, the wider the bucket can be made. A wide shovel can remove more snow at a time than a narrow shovel. But there is no point in this if you can’t lift that much weight. After drawing up the drawing, production can begin.
The simplest option for a DIY snow shovel would be a wooden product. Medium in complexity - plastic and metal. The most difficult things to make are rollbacks and auger cleaners.
Plastic shovel
This is a more convenient and lightweight model with a comfortable handle. Among the main advantages are:
- equipped with comfortable sides that trap snow on the working surface;
- the presence of wide ribs gives better glide;
- frost-resistant, flat surface of the bucket, especially if composite plastic is used, which is also resistant to mechanical damage;
- gentle effect on the surface of paths and lawns.
Of course, standard plastic is not very durable; the scoop zone of the structure wears out quite quickly. However, high-quality specimens can last up to 4-5 seasons. Moreover, such a shovel will not get wet and rust. Many models are resistant to salt and are equipped with additional attachments and convenient fastenings.
Popular manufacturers of plastic shovels include GARDENA, Fiskars, etc. On sale you can find models with a telescopic handle and compact car designs. Special plastic scrapers with arched handles are popular. The latter option is used mainly for wet and loose snow.
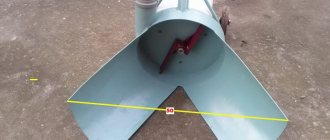
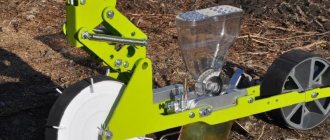
Shovel FORTE QI-JY-50
The blade body is made of durable plastic with a working width of 0.6 m. An auger is attached to it, the rotation of which begins when the operator pushes it. With a fairly low force, the tool's performance is quite high.
But it is effective only with recently fallen snow cover up to 15 cm high that has not yet had time to compact. The auger will not be able to handle a high layer of infusion - it will simply get stuck.
Craftsmen among the people adapted to this situation. They attach an additional scraper in front of the auger at a height of 15 cm, which scrapes off the top crust. The blade passing behind removes the remaining part.
When working with a tool, you need to choose the optimal angle of inclination of the body so that the metal part does not come into contact with the ground.
DIY snow scraper with brush
The store-bought version of a scraper with a brush resembles a double-sided rake, only instead of teeth there are bristles on one side, and a rigid base is fixed on the other side. When cleaning, first scrape off the bulk of the snow, and then sweep away the remains with a brush.
In the DIY version, you assemble a snow scraper with your own hands from plywood, securing a long handle perpendicular to the rectangular blank. One side is framed with a tin strip. Bristles from a plastic broom or brush are applied to the other side of the workpiece, pressed with a metal tire and secured with self-tapping screws through the drilled holes.
How to make at home
If your yard is covered with snow, and you did not have time to buy a cleaning device in time, you will have to make it yourself
It is important to initially decide what to make a shovel from. The simplest option to quickly arm yourself in bad weather is a plywood structure.
First, you need to construct the back surface of the bucket from a piece of board. In advance, an arc-shaped mark is made on the workpiece with the following parameters:
- center height 100 mm;
- height at edges 50 mm
Using a plane, the workpiece is cut along the contour and cuts are made for the handle in the central part with a hacksaw. Using a chisel, you need to cut out a rectangular hole in this place. The handle will be inserted into it.
A cutting made from a board is inserted into the hole. In this case, its surface should be flush with the lid, go under the plywood and subsequently lie flush against it.
The plywood should then be placed over the back cover and secured with nails. Prepared steel plates corresponding to the parameters of the bucket are bent over the edges of the bottom and fastened with screws to its surface. Using a small plate, strengthen the attachment of the handle to the plywood.
A snow shovel is a useful tool on the farm. In snowy winters, you can clear the site and prepare access roads. To do this, you need to purchase any model made of plastic or metal, choose the desired design, or make the simplest version of equipment from plywood.
Six Scraper Roof Cleaner
You can make a bottle scraper without spending a single ruble. The principle of operation of such a snow blower is as follows: scrapers are attached to a rope and thrown over the roof, and then pulled in one direction or the other. The scrapers grab the snow and throw it down. To make such a device you need canisters and rope. Manufacturing procedure:
- Cut off the top of each canister.
- Make holes in the lids.
- Take a long rope (the length depends on the height of the roof). and find its middle.
- Mark the middle of the rope. The first canister must be secured at a distance from the mark equal to the length of one roof slope.
- Do the same at the other end of the string.
- Attach all other canisters at equal intervals.
This device can be used both by two people and alone. In order for one person to clear the roof with such a snow blower, you need to attach some kind of weight to the other end. He will pull the rope towards himself and clear the second slope of the roof.
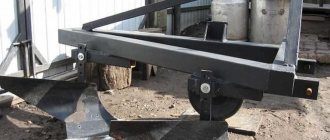
DIY blade drawings
Rice. 1
. Cross member 1 - pipe, 2 - axle (2 pcs.), 3.4 - washer (4 pcs.), 5 - hex nut (2 pcs.)
Rice. 2
. Thrust reaction rods 1,2 - horizontal and vertical pipes, 3 - washer (5 pcs.), 4 - bushing (2 pcs.), 5,6 - mounting plates to the blade (thickness 6 mm).
Rice. 2 a
. Horizontal pipe
Third element
— two thrust reaction rods (Fig. 2)
.
The diameter of the horizontal pipe (Fig. 2 a)
is the same as that of the cross member. The dimensions of the bushings and washers of the left and right rods are the same. We weld the sleeve and washer to a horizontal pipe on an axis transversely, observing the axial seating size of the washers. We cut the opposite end of the pipe at an angle of 30 degrees, and weld the support plate for fastening 5 to the blade to the end. In the center we drill a hole d 10-12 mm for an M8 bolt. It is advisable that the hole be directed towards the outer edge of the blade for ease of removal and installation. We weld the lower end of the vertical pipe to the horizontal one. To the upper end, cut at an angle of 45 degrees, we weld the mounting plate 6 to the blade with two holes d 8 mm. When fixing a rod with a short horizontal pipe, we additionally install another washer 3 on the right axis of the cross member. Tighten the nut (key 36) until it stops and cotter it. We attach the long rod in the same way to the left side of the cross member.
Classification by materials
Its durability and convenience depend on what material the shovel is made of. The cleaning process is less time-consuming if the tool is equipped with a capacious bucket and captures and throws away snow well. The working element must be positioned at the correct angle. All these characteristics can be matched with a snow shovel with a rectangular or trapezoidal bucket.
The border of the sides increases its capacity. But lifting large amounts of snow requires a lot of effort.
In addition, the handle of the shovel affects the convenience of the shovel. It can be made of wood, which is convenient when purchasing a shovel for the local area. Such a cutting is simply shortened if it turns out to be of inappropriate length. An aluminum handle is much lighter, but also more expensive. The plastic handle is too fragile and is more suitable for a ladle.
There is a great variety of shovels on sale.
They differ in shape and materials:
- moisture-resistant plywood;
- polyethylene and other types of plastic;
- polycarbonate;
- Cink Steel;
- aluminum or duralumin;
- combined materials.
Plastic equipment is light weight and short-lived. But plastic is not afraid of moisture and can be stored anywhere. You can extend the life of plastic equipment by inserting metal plates into it. The main difference is frost resistance and resistance to chemicals.
The aluminum snow shovel is reliable, lightweight and durable. But to consume less energy during operation, this tool is held at an angle of 45 degrees. This is the best option for long-term cleaning of a large area. Duralumin is a metal alloy that allows you to give maximum strength to a lightweight product. It is a little heavier than wood, but much stronger. A steel snow shovel is an example of reliability and durability. With its help, even ice can be easily cut off. But to manipulate it you need to be in good physical shape.
A shovel with a plywood sheet is the cheapest and is available for self-assembly. Due to its structure and small thickness, the product wears out quickly. On more expensive models, there is an additional metal border on the bucket. Mainly suitable for removing fresh snow. It will be difficult to remove icy caked crust. But even a steel border with cross members does not prevent moisture-resistant plywood from cracking over time.
Model selection
Manual wheeled bulldozers are produced by many manufacturers. The principle of constructing snow cleaning equipment is the same. Dimensions, design and some minor design nuances differ.
Snow shovel on wheels Elektromash
A popular domestic development is a manual two-wheeled bulldozer. Equipment allowing for cleaning work has the following characteristics:
- The blade is made of 2 mm steel. Working width 70 cm.
- Movement occurs due to 2 wheels. The rubber run does not damage the decorative surface of paving slabs.
- The blade is equipped with a mechanism that allows you to adjust the angle of rotation.
- The tool is easy to operate thanks to the adjustable handle. The length is set according to the height of the operator.
- A special stop prevents the lower edge of the knife from cutting into the ground during harvesting work.
The weight of the tool is about 11 kg. Light weight and high maneuverability allow an elderly person to operate the blade.
Wheeled snow shovel Bulldozer
The two-wheeled blade of the “Bulldozer” series is distinguished by increased bucket dimensions. In one pass, the working width of the strip is 80 cm. Plastic wheels do not damage paving slabs. The Bulldozer model has the following characteristics:
- The steel blade easily cuts off ice build-ups and compacted snow layers. Durable metal does not deform from impacts against hard objects during cleaning.
- The adjustment mechanism of the blade allows you to change its angle to move snow accumulations to the edge of the curb.
- The handle is equipped with two adjustment mechanisms. The operator is given the opportunity to change the angle of inclination and length.
Even an elderly person can clear snow drifts with a two-wheeled bulldozer, applying a minimum of physical activity.
Advice! A homemade bulldozer is easy to make yourself. A pipe with a diameter of 200-300 mm cut lengthwise is suitable for the dump. The wheels are taken from an old cart or stroller.
Shustrik-3 device
The two-wheeled device “Shustrik-3” is characterized by increased maneuverability. The tool is easy to move over obstacles; you can simply carry it by hand or roll it on one wheel, lifting one side. Even a child can use the scraper. The handle is equipped with an adjustment mechanism that allows you to change its length. The blade is convenient to maneuver on narrow sidewalks, enter hard-to-reach areas, and go around obstacles when cleaning areas with flower beds, pillars, and sculptures.
The steel ladle is 60 cm wide and 20 cm high. The width of the adjustable handle is 41 cm. The tool is equipped with a rotating mechanism. When removing snow accumulations, the bucket is directed to the right or left. If you just need to push the snow out of place, the blade has a turn to the other side.
The video demonstrates the removal of snow mass by a nimble: Classification of wheeled units
Equipment on wheels makes it possible to clean large areas without burdening a person. Sometimes wheeled models have a motor, which will increase the cost of the device. The simplest mechanisms with wheels are of the manual type.
This technique is driven by a person and operates on the principle of a trolley. There are several designs of snow shovels on wheels:
- Four-wheeled devices. They are often called mini bulldozers. At the base there is a metal frame with a wheel on each side. In front is a blade; its level is easily adjustable, allowing you to collect snow in the direction indicated by the equipment. This cart works even with wet and caked sediments.
- The model with two wheels looks like a regular garden wheelbarrow. Its productivity is lower, but it is easier to work with. If significant unevenness is encountered on the surface, the blade is raised to prevent impacts.
- The most modern device is called the “snow wolf”. This snow blower has one large wheel and a plastic bucket, which makes it maneuverable and very light. With its help you can clean narrow alleys and hard-to-reach areas. How to make a snow shovel on wheels from a metal barrel
In the absence of sheet steel, the ladle is made from a barrel. First, the container is opened with a grinder. If the barrel has a volume of 200 liters, then a segment from about a third of its part will be required. The workpiece already has a curved shape, so there is no need to bend the edge from below.
The frame for the shovel will be the frame of a wheelbarrow with one or two wheels.
The frame is welded from pipes, exactly as in the example of a sheet steel structure. If you have a car at home, then you should refuse unnecessary work. The body is simply removed from it, and a segment cut from a barrel is fitted in front. Moreover, the car will fit even with one wheel. At the end of winter, the instrument will be re-equipped, returning the body to its place.
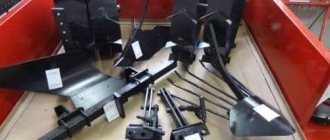
Attaching a homemade snow blade to a walk-behind tractor
Typically the weight of the blade does not exceed 20 kg. You can hang it on any walk-behind tractor. Depending on the model of the unit, the manufacturer provides for connecting the hitch to the front or rear. In the second version, the steering column of the walk-behind tractor has the ability to rotate 180 degrees.
To connect attachments, each unit is equipped with a hitch. It can be horizontally adjustable or non-adjustable. The hitch also differs in configuration for each brand of walk-behind tractor. Examples of the most common models are shown in the photo below:
If we talk about the lifting mechanism, it can be manual or hydraulic. In the first option, adjustment is made using a lever. The hydraulic lift is powered by a hydraulic pump.
Each walk-behind tractor manufacturer describes in the instructions the nuances of installing attachments. The recommendations should be followed.