We continue the topic of chainsaw repairs and today we will study the malfunction of the ignition unit .
I would like to remind blog readers that we are primarily addressing issues related to tool malfunctions that arose while working at the cutting site. What should a logger do when his main tool stops working when felling, bucking or pruning?
I’ll say right away that it is impossible to repair the ignition module in the field - only replace it with a new part! The only solution to the problem is to have a spare ignition module with you. With a high degree of probability, I assume that you will respond negatively to this statement, to put it mildly, with slight irony. “What nonsense is it to buy an ignition module and carry it with you!” But, I remind you once again that this article is for lumberjacks, many of whom work on shifts. First of all, this problem is relevant for “lumberjacks” who work with their own tools and have discussed the conditions with the employer, indicating the fact that they have their own tools and repairs are at their own expense. Such details of the contract may be included in the calculation of the piece rate for the work, therefore, in the event of force majeure, they may have a different impact on the result of such a “partnership”.
However, I propose to consider questions regarding the ignition malfunction of the chainsaw in order to be able to at least diagnose this breakdown. As for other ignition parts - magneto (I mean flywheel), armored wire, spark plug, the malfunction can be corrected directly by the lumberjack himself
A little about contact and electronic ignition
When I started working in the forestry enterprise, in the late 90s, we felled with the old Urals and logged with Husqvarna 262. The timber was good quality, so the bucking operator only had time to divide the logs into ridges, an endless stream of bundles. Ignition in the Urals was no longer cam (contact), but electronic. By the way, for novice lumberjacks who have not encountered contact ignition, but are interested, I want to briefly clarify about the old type of ignition.
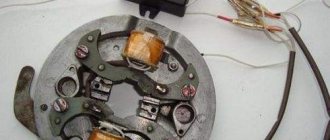
Cam contact ignition on older models of chainsaws (Druzhba, Ural) was simple, and most importantly, it did not have any electronics (various electronic boards) in its design. The “cams” worked as a breaker; the current was supplied by a high-voltage coil. lumberjack could fix the ignition fault in a short working time. However, the ignition was “covered” too often. The disadvantage of cam ignition was an “open” spark, which negatively affected the metal contacts themselves - over time they became covered with soot, the layer of which grew and the spark deteriorated and disappeared. I had to clean the contacts and reset the gap. Another argument against cam ignition is its larger size and greater weight than electronic ignition (this comparison is relevant for modern gearless saws).
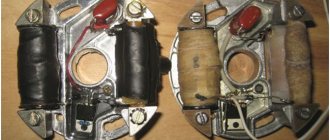
Electronic ignition, in turn, is a module that includes not only a coil, but also an electronic board. On the first Urals with electronic ignition, as far as I remember, the electronic board was filled with mica (epoxy resin), which, in case of repair, was melted and the board was removed. Later they began to use sealant. Although it’s hard to call it a board, since these are separate radio components - a triac, diodes, a capacitor, a resistor. There were two coils - high-voltage and low-voltage, which were located opposite each other. Under the low-voltage coil there was an additional coil (spark), which “caused a spark.” To be honest, we have never repaired an electronic ignition in the Urals and took it to the electromechanical shop of a local forestry plant, where they revived it in a short time.
Modern chainsaw ignition
The ignition on modern gearless chainsaws is a module that includes a coil and an electronic board - a transistor type. The ignition system (non-electronic part) includes a flywheel with magnets (magneto), a glow plug, and an armored wire (high voltage wire).
What's inside the ignition module?
Perhaps someone watched videos on video hosting sites and observed a cross-section of the module. Below are stills from this video for viewing.
This is what the ignition coil looks like in a module sawn in half
On the other side of the coil there is an electronic board, intensively filled with sealant
It is most likely possible to “ring” the board and coil in the module. To do this, you need a “manual” - an electrical diagram of a specific chainsaw model. But this procedure will only help to find out the “diagnosis”, confirm the functionality of the module or lack thereof. As you understand, it is impossible to repair such a module on your own, either in the field or on rotation, or in services.
Therefore, we, lumberjacks, need, first of all, to be able to find an ignition malfunction - if it comes down to a module failure, then it should be replaced. If the malfunction is diagnosed in other parts of the ignition, we eliminate them. You can check the malfunction of the ignition module without ringing it.
Main parts of chainsaw ignition
Let's move directly to the main ignition components of a gearless chainsaw. I will list the parts of the ignition system:
- Flywheel with magnets (magneto)
- Ignition module
- Glow plug
- Armored wire (high voltage wire)
- Circuit wires (on-off)
What is a flywheel? For novice lumberjacks, I’ll explain that visually this resembles a huge (specifically in a chainsaw) gear-fan made of duralumin, the blades of which, when rotating, play, first of all, the role of cooling the engine. The flywheel is installed on the left side of the chainsaw, immediately behind the starter cover. The flywheel is attached to the crankshaft with a key and two studs. The end of the shaft is threaded to secure the flywheel with a nut. This nut must be tightened tightly when installing the flywheel, otherwise it may cut off the key that prevents play. By the way, the key is located on the crankshaft so that when the magnets align with the core of the ignition module, the piston is at the appropriate level (top dead center) to produce a spark and ignite the fuel.
At the end of the flywheel, among the blades, massive magnets with different north-south polarities are installed. As a rule, two magnets are installed, but some chainsaw models may have more. Opposite them, on the other side of the flywheel, counterweights are installed for uniform rotation.
Massive magnets with different north-south polarities, which create a magnetic field when the flywheel rotates
Next to the magneto (flywheel) at a certain distance (gap) there is an ignition module (a coil with an electronic board in a polymer or textolite “jacket” on a plate metal core, which also serves as an attachment to the saw body). The ignition module can be installed on different sides - to the right of the magneto (flywheel), to the left or from above - depending on the chainsaw model.
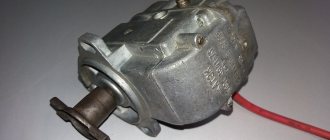
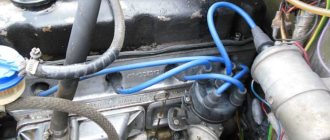
Husqvarna ignition module with high voltage wire
From the module (coil) there are on-off wires (breaker) and a cable (armored wire) mounted in the cap into which the glow plug is inserted. The on/off wires have a small cross-section, unlike the spark plug cable, which carries high voltage. The spark plug has a side and central electrode, a body and, accordingly, an insulator. The spark plug is screwed into the cylinder head and transmits a spark to ignite the fuel mixture in the internal combustion engine.
Read also: Taps for threading, size table designation
Chainsaw ignition operation
Let's study how electronic ignition works on a modern gearless chainsaw.
When the operator pulls the starter, the ratchet engages the pawls on the flywheel, causing it to rotate along with the crankshaft. The magnets on the flywheel, as they rotate, act on the iron plate core of the ignition module. This effect is a magnetic field. The low-voltage winding in the coil, thanks to the magnetic field, generates an electromotive force and transmits a high voltage to the cable through the high-voltage winding. The electronic board in the module is configured to produce a certain voltage frequency required specifically for a given model of chainsaw, and to be more precise, all the characteristics of the internal combustion engine.
The converted high voltage is supplied by the module through a cable to the glow plug, where a spark is struck between the electrodes. A spark, as we know, ignites the fuel mixture and sets the piston in motion, the operation of the internal combustion engine and, accordingly, the operation of the entire tool.
Ignition troubleshooting
It is very important for a lumberjack to make a correct diagnosis when his sawing tool begins to “mope” or “falls into a coma.” This, I repeat once again, is extremely important, because the consequences of incorrect diagnosis can lead to unreasonable expenses, wasted time and even nervous breakdowns.
The fact is that inexperienced lumberjacks often associate the failure of a chainsaw with a carburetor malfunction. Indeed, in wet or snowy weather during intensive work in the cutting area, it is possible to correlate some signs of a chainsaw failure with a carburetor malfunction. If at the same time “whims” of the carburetor were systematically observed, the prerequisites for an error in diagnosing the malfunction only increase. The operator begins to adjust the carburetor, clean, blow and dry it to no avail. It’s even worse if he is convinced that he is right and decides to purchase a new carburetor. However, a spare carburetor will not be superfluous)).
To immediately avoid such a mistake, you just need to check the spark on the spark plug. In general, in order to eliminate any malfunction in the ignition system, you must start by checking the spark on the spark plug. Trite and simple! But for some reason, some lumberjacks began to ignore this procedure and climb into the carburetor. Although…
How to properly check a spark plug
It is not worth ruling out a malfunction of the glow plug itself. Nowadays, there is a lot of adulterated fuel for chainsaws. And a poor-quality mixture directly affects the “life expectancy” of the glow plug.
We unscrew the glow plug from the engine and carefully inspect it - if it is damp, then it is filled with fuel mixture and, indeed, the carburetor may be the cause of the malfunction. If the spark plug is dry, then you need to check for a spark. The defective spark plug should be immediately removed and replaced with a known good spark plug.
Visually, a spark plug defect can be guessed by the following signs:
- layering or deposits (slag, varnish) on the electrodes;
- heterogeneous color and shape of electrodes;
- soot deposits, oil deposits;
- molten central electrode;
First, make sure that the ignition key is turned on when checking. Exactly. It happens that the operator, having turned off the intermittently working saw, begins to check the spark plug with the ignition off.
The unscrewed (working) glow plug, without removing it from the cap, must be attached with a thread (“skirt”) or a side electrode directly to the cylinder. The contact must be reliable! Holding the spark plug by the cap with one hand, jerk the starter with the other hand and observe the presence of a spark on the spark plug between the electrodes.
High voltage wire
With proper ignition, there is either a spark or there is none at all. If the spark is weak, then the fault should be looked for in the spark plug itself, or in the power cable (armored wire - high-voltage wire). In rare cases, if a weak spark from a spark plug is observed after repeated replacement of serviceable spark plugs, then the fault is still present in the ignition module. In this case, during operation of the tool, the faulty module heats up.
It is very rare, but it happens that a high-voltage wire is broken (from personal experience), in case of mechanical impact and in case of overheating. A spark from a damaged cable makes its way to ground (to the cylinder) - a short circuit occurs and engine operation stops due to lack of ignition. In this case, it (the armored wire) must be replaced. How to check if the wire is working properly? Only a temporary replacement - an analogue from another working chainsaw. Or in a barbaric way for your health - hold the wire with your fingers while checking. I hope that the lumberjack is smart enough and will not, therefore, check the serviceability of the cable.
By the way, if the cap is faulty (it pierces), then when checking the spark on the spark plug, when you hold the cap with your fingers, the fault will be revealed instantly)). Such a breakdown of the spark plug cap is usually detected in wet weather.
It also happens that the spark plug cap is not pierced, but the fault is contained inside the cap - a poor-quality (or lack thereof) connection of the cable to the seating spring on which the glow plug is mounted. The cause of such a malfunction is the negligence of the user of the tool, who often tears the cable from the spark plug, avoiding careful removal.
Ignition switch wires
Usually the wires for turning the ignition on and off are in pairs - one to ground, the other from the coil to the Stop-Start button. When they are closed, the ignition disappears and the chainsaw stalls. Although there may be only one wire.
In my practice (experience), this wire was damaged.
How did this happen?
Due to my negligence and inexperience. When installing the starter on Huskvarnaya, I did not place the wire in the mounting grooves on the deflector and it lay on the edges of the grooves. When I secured the cover, the wire was “crushed” by these edges against the cover. The wire insulation was damaged, although the wire cores remained intact. What happened in the end?
The chainsaw actually worked properly. She will work. Even if the wire strands break completely, the tool (ignition) will work, but the chainsaw will not turn off. But if the wires damaged in the insulation (the ends going to the module) are shorted together (or a single wire to ground), then the ignition will disappear and the tool will not work and will not start.
The need to adjust the ignition
If it turns out that the fault is still in the module, then it is necessary to check the gap between the coil (core) and the flywheel (magnets). If the gap does not meet the required parameters, then it is knocked down.
It should be understood that the ignition itself cannot go astray on imported gearless chainsaws. If this happens, then your instrument is counterfeit, or you have encountered a defect!
The problem lies in the screw clamps with which the ignition module is secured. To be more precise, in their absence. What it is?
The ignition module is secured with screws. The chainsaw vibrates during operation, and vibration affects all parts of the structure, all components. The gap between the magnetos must be constant and appropriate. The screws (seat) securing the ignition module must be “sealed” with a special retainer - a viscous substance of varying consistency. In the case of igniting a chainsaw, the fixative must be of a strong consistency. The retainer is essentially a gasket, a seal that prevents loosening of fasteners - screws.
To troubleshoot the problem, you must:
- Unscrew the screws securing the module;
- fill the mounting holes of the screws with fixative;
- put the screws back on;
- set the gap;
- Tighten the module mounting screws securely.
Read also: The best steel grades for hunting knives
Another case when it is necessary to set the ignition is when replacing a faulty module with a new one. We will look at how the ignition is set in the next chapter.
How to set the ignition
I myself have never replaced the ignition module or set the gap. Although there was a malfunction in the module - at work it was damaged more than once. The problem was fixed by service.
However, on the Internet, as you know, there are a lot of videos and article notes on how to replace and set the ignition on gearless chainsaws. Well, let's use these recommendations.
In our case, when identifying malfunctions at a logging site, replacing the magneto and adjusting the ignition is only relevant if there is a serviceable module in stock, as well as a screw retainer. With a high degree of probability, I can suspect that such an option is excluded, although among prudent “shabashniks”, “it may even be possible.”
If the repair “endures”, the ignition was acquired after a “trouble” and was not on duty, then it is advisable to entrust the repair to a specialist at the service center. If you have time and need to save money, then we carry out repairs on our own.
First of all, we remove (disconnect the connectors) the wires from the module - the high-voltage cable, the start wires. We unscrew the fastening screws (usually there are two of them) and remove the defective coil.
In its place we install a new, working ignition module. We connect all the wires, use a screw fastener in the mounting threaded holes, and tighten the fastening screws.
Now we need to set the required gap. We turn the flywheel with magnets towards the fragments of the coil core. Between the magnets and the ends of the core we install a probe, 0.2-0.4 mm thick (check in the “manual” for your saw model). If the dipstick is missing, then it can be successfully replaced with a fragment from a plastic juice/beer bottle. To do this, cut a rectangular strip, install it between the coil and the flywheel, and tighten the module mounting screws.
The gap has been established; it is necessary to remove the strip of plastic bottle that served as a feeler gauge. To do this, hold the edge of the strip with pliers and turn the flywheel. The strip will be removed as the flywheel rotates.
What else would I like to say about the ignition? Based on my observations from personal experience, I can say that ignition modules “fly” more often on Husqvarnys (3 cases in my entire work experience). On Shtil, my ignition never “flyed”, although I admit that I worked as a professional Shtil for only 1.5 years. In my personal household I have a “household equipment” (lopper) - Shtil 180, I’ve been using it for 12 years, but such a misfortune has never happened. In the early days I worked as a “Partner”, but also there were no problems with the ignition. I didn’t work with other saws, I only “tasted” it for a short time while sawing wood.
I may be wrong, so refute my speculations and statements. I will be glad to discuss.
How to set the ignition on a chainsaw
In this review, to your attention a question that arises among many chainsaw owners. During the operation of such a tool, the consumer may encounter a situation in which it is necessary to adjust the ignition timing. Over time, the breaker may fail; the coil also does not last forever, although it lasts much longer and is quite difficult to disable. So let's figure out how to set the ignition on a chainsaw.
Structural components
All engines, be it a car or another instrument using an internal combustion engine, have similar operating principles.
No exception, there are such famous chainsaws that are happily used by consumers such as Goodluck, STIHL or Husqvarna.
The drive in them is the familiar internal combustion engine, respectively the fuel tank, the engine and the working element that directly performs the work, as well as other attachments that help with control.
Sometimes during operation some problems may arise with this fairly reliable tool like a chainsaw.
And also watch the video Disassembling the STIHL MS180 chainsaw
Good evening, I have the same problem. I saw a calm ms180c, I didn’t work much, the last time I sawed trees, the engine began to have interruptions. Then it stalled. what I didn’t do, 0, disassembled the blower, cleaned the carburetor, reassembled it, started up with half a turn, worked great, picked up speed, stalled, and again 0, replaced the spark plug. ignition coil, 0, disassembled carburetor, clean, blew, reassembled, started. and it worked again, the gas ran out, I poured a little, added gas, everything was 0 again, the spark plug was wet, there was a spark, tell me. I described how to solve this problem meticulously, so that it would be clearer, maybe someone has encountered this problem. Thanks in advance.
Hello, did you try it when you pulled the spark plug out? is there a spark? It happens that there is a spark and everything seems to be in order, but the saw still does not start. I actually had almost the same situation on another brand. It turned out there was no compression. I changed the seals and it seems to still be working (for the second year now). Another problem that happens is filters. did you change them? in general, a bunch, different answers every time, so as not to bother for a long time, try the service, if it’s too expensive, then...
How to adjust?
The greatest load when operating a chainsaw, of course, falls on the engine. Its most vulnerable part is the ignition coil. Minor problems can be fixed yourself, for example, adjusting the ignition.
Ignition adjustment is necessary if:
- you want to extend the service life of the saw - for preventive purposes;
- the chainsaw does not start, a problem has been identified in the gap size (for each model, manufacturers have written their own gap size, the average value is considered to be from 0.2 to 0.4 mm);
- the motor runs intermittently;
- the power of the tool has decreased.
At home, we can adjust the gap in the ignition coil, which in many cases solves the above problems.
Algorithm for setting the gap
To adjust the gap in the chainsaw ignition coil, you will need: a template for setting the gap or a feeler gauge (most often a homemade blank is used, for example, a piece of a plastic bottle or cardboard), a socket wrench of the required size.
All models have the same coil structure; only the gap dimensions recommended by the manufacturer may differ. Let's consider, as an example, the gap adjustment algorithm for one of the most popular and recognizable chainsaw models - Shtil 180.
Ignition system of the Stihl MS 180 chainsaw. A - coil and magnets on the flywheel, B - contact location, C - flywheel.
Let's prepare everything we need, including cutting out a strip from a plastic container without embossing - it will serve as a template. The optimal clearance for the Shtil 180 chainsaw is 0.2 mm. (depending on the model, this value can range from 0.2 mm to 0.4 mm). Next we perform the following sequence of actions:
- Remove the protective cover;
- Let's remove the module with a candle holder and a high-voltage wire;
- Unscrew the ignition bolts to loosen them;
- Let's bring the magnets located on the flywheel to the coil;
- We clamp a plastic strip between the flywheel and the coil. Thus, we set the required gap;
- Tighten the bolts and remove the strip of plastic;
- Let's carry out a check: spin the flywheel a full rotation several times, make sure that the movements are free and the flywheel does not cling to anything.
The procedure for adjusting the ignition coil gap will be the same for all brands. However, I would like to note that a distinctive feature of Chinese-made chainsaws is frequent breakdowns of electronic ignition units and loosening of threaded fasteners due to poor quality assembly.
Consequently, the gap will have to be adjusted approximately 3 times more often than, for example, with the same Shtil. It is also worth noting that low-quality spark plugs are often supplied with Chinese-made saws. It makes sense to stock up on them in advance.
Possible reasons for setup ineffectiveness
If the work performed did not give the desired result, the reason for the failure may be:
- unclear operation of the ignition system;
- clogging of the jets or reduction of their cross-section with resinous deposits, which can be removed by washing in acetone;
- When the carburetor threads are loosened, a gap may form through which air can leak.
After eliminating the detected deficiencies and malfunctions, it is recommended to repeat the carburetor adjustment in the standard sequence. If re-tuning is not effective, you must use the services of service specialists.
Unstable engine operation can also be caused by:
- air leakage through the crankshaft seals and the cylinder seat;
- Poor sparking of the electronic ignition system cannot be ruled out.
Complex faults can only be fully eliminated if appropriate repair equipment is available.
Structural components
All two-stroke gasoline engines have a similar operating principle, and therefore the ignition system in them has a standard structure and design.
Chainsaw ignition device:
- Magneto: a device that converts mechanical energy into electrical energy and provides a pulse of current to the chainsaw's spark plug;
- Spark plug: designed to ignite the fuel-air mixture through a discharge that occurs between the electrodes;
- Electrical cable;
- Engine shutdown button.
Plugs come in spark, arc, glow and catalytic types. Chainsaws use spark plugs for 2-stroke engines. The schematic diagram of the chainsaw ignition is shown in the image.
Chainsaw ignition circuit
Basic malfunctions of the ignition system of chainsaws
Having roughly understood how the ignition system of Chinese or domestic chainsaws works, you can already figure out what problems there may be with this mechanism and how to fix them.
Spark plug
Most often, breakdown occurs due to the spark plug. It is worth checking whether the insulator is damaged and whether the electrode is worn out. The entire spark plug is checked for integrity and absence of defects - this includes the integrity of the wires from the coil, the presence of insulating material, etc.
High voltage wire
Next, check the spark plug wires. Often they can run in such a way that there are many bends. In those places the wire can be damaged, while outwardly looking perfect. Next, inspect the spark plug cap and ignition wire. There should be no brown coating on it. If there is one, this means that the spark does not shoot in the right place, but in all parts near the ceramic insulator. The cap may also have damage - cracks, chips. The check must be carried out carefully, because a damaged insulating layer can result in an electric shock.
On/off button
A frequent breakdown of the ignition system is a malfunction of the shutdown switch. To check it, the wires are disconnected from the module and the functionality of the saw is checked. If there is a spark, the problem is in the switch.
Problems with ignition modules (coils) of chainsaws
Husqvarna chainsaw ignition coil
The switch and the ignition module that regulates its operation can often fail. The coil may also be faulty. If all elements of the ignition system are in working order, but there is no spark, the module and coil are suspected. And the problem with the malfunction of these elements is that you cannot repair the module or fix part of the coil - they need to be replaced. Of course, if possible, it is better to install the module from some old saw and understand whether this is the problem. After all, you can simply make a mistake at some stage and suspect what actually works.
You should not trust all kinds of testers - they often show false information about the serviceability of the ignition system. Only diagnostics with another module or coil will be reliable.
If the electronic module is bad, the following sign is observed: as soon as the chainsaw heats up, a very weak spark is given. Also, after refueling, the unit may not start. This is observed due to the fact that the coil or module gets very hot, their resistance increases, so the spark weakens.
If there are breakdowns in the ignition system, and there is no experience in repairing them, you should not try to repair everything yourself. Basic things, such as checking the integrity of a spark plug or wires, can be carried out at home, but more complex diagnostics, and even more so the replacement of units, should be carried out by professionals. And then you can be confident in the quality of the work performed.
What is a spark plug and why should you change it?
The part itself is responsible for igniting the air-fuel mixture. It is necessary to replace the spark plug in case of problems with the engine (it runs, but is unstable), this procedure is also necessary when the tool simply stops turning on.
Spark plugs for Husqvarna chainsaws and power units from other manufacturers are also recommended to be replaced every hundred hours of operation of the chainsaw. This is a consumable part that wears out due to:
- Poor quality oil applications (electrons, side and center, covered with black soot)
- Poorly adjusted carburetor or broken starting system (due to this, fill the fuel mixture with a spark plug);
- The carburetor has failed (the spark plug will not ignite a spark, which will cause problems starting the engine of the tool).
Varieties of candles
There are no universal candles. They differ in a number of parameters:
- Body geometry;
- Thread diameter;
- Thread length (shirt length, as the craftsmen call it).
There are such concepts as “warm” and “cold” candles. A lot of glow indicates that the plug is cold (it is not efficient enough to absorb the heat coming from the combustion chamber), while a low glow indicates that the plug is hot.
When replacing a spark plug, purchasing a new spare part, the easiest way is to find one that meets the parameters specified by the manufacturer (these parameters are indicated in the instructions included with the tool). If for some reason you do not have access to the data, conduct a visual inspection of the spark plug, remove the parameters, including the number indicated on it (glow).
At the moment, on the modern market you can find spark plugs produced under the brands Champion, Stihl, Brisk, Bosch, Oregon, NGK, and there are also certain options suitable for production models Partner, Husqvarna, Stig, AL-KO, Oleo. Mac, Wolf Garten, Mc Culloch, etc. Don't forget that you need to know the gap on the chainsaw's spark plug.
READ The best way to cut wire boxes
You must disassemble this item to remove the necessary settings. Unscrew it easily using the spark plug wrench that is usually part of the power supply.
Ignition faults
Most often, we think about repairs after the chainsaw stops starting, or visual signs of serious damage appear.
Signs of ignition malfunction:
- The chainsaw starts, but works unevenly (troits), often sneezes and shoots;
- The power of the chainsaw has noticeably dropped;
- When you sharply press the accelerator trigger, failures in engine operation are observed;
- The chainsaw does not start well when cold, it stalls violently until it warms up;
- Fuel consumption has increased significantly;
If such flaws appear in the operation of your chainsaw, then it’s time to diagnose, adjust, and possibly repair the ignition system.
Fault location determination:
First of all, it is necessary to inspect the spark plug; if a lot of carbon deposits have accumulated on it, then the cause of the malfunction is most likely related to the operation of the carburetor, piston group or fuel quality. If the spark plug visually appears to be in good working order, does not spark and is dry, make sure there is a spark.
- Unscrew the spark plug, put the ignition cable on it;
- Using insulated pliers, press the spark plug threads to the motor housing;
- Pull the starter handle sharply towards you and make sure there is a spark;
If there is no spark, replace the spark plug with a new one and test again. After making sure there is a spark, start the engine. But what to do if there is no spark even on a working spark plug? Let's continue the search:
We test the electrical cable for breaks and insufficient contact with the spark plug. We check the serviceability of the spring in the cap of the candle holder and the presence of contact with the armored cable;
To check the serviceability of electrical wiring, it is best to use a tester.
You can set the correct gap using a feeler gauge; they are not in short supply and are available for a small fee.
Diagnosing a fault with a multimeter
The malfunction of the ignition coil can also be determined using the so-called hardware method. However, for this you must have a multimeter with which diagnostics are carried out.
Step-by-step ignition diagnostics with a multimeter:
- We set the multimeter to a position where the arrow is at the 200 ohm mark.
- We study the instructions for the chainsaw. We find out the optimal resistance for the winding of the coil installed on our model (in most modern chainsaws this indicator ranges from 3-5 Ohms);
- We connect a multimeter to the primary winding of the coil and measure the resistance, if it is normal, we continue testing;
- We connect the multimeter to the secondary winding of the coil, compare the readings obtained with those indicated in the instruction manual;
- We connect the multimeter to the hole in the coil into which the wires are inserted. If the device produces normal readings, we come to the conclusion that the coil is working properly. If the measurement results are far from optimal, you will have to replace the assembly (coil) with a new one;
Video review of fault determination using a multimeter
Ignition adjustment
As we have already noted, you can adjust the ignition system both in the workshop and at home. To do this, you will need ordinary wrenches, a screwdriver and a 0.4 mm feeler gauge (you can make a feeler gauge yourself from scrap materials - regular copier paper, a plastic bottle, etc.).
Step-by-step adjustment of the chainsaw ignition:
- We diagnose the malfunction;
- Remove the protective cover;
- We remove the module with a candle holder and an electrical cable. We carry out a visual inspection of them and, if necessary, replace them with a new one;
- We install the ignition module, but do not tighten the fastening screws all the way;
- We determine the area with the magnet on the flywheel;
- We set the gap properly, in accordance with the parameters specified in the instruction manual;
- We tighten the module fastening screws until they stop, check the settings with a feeler gauge, and, if necessary, re-adjust;
- We install the protective cover and check for the presence of a spark on the spark plug;
- We screw in the spark plug and start the chainsaw;
You should also check whether the counterweight flywheel is catching on the module. If this happens, you may have a failed bearing or play in the shaft.
Possible faults
If the saw does not start, the first thing you need to check is the spark plug, which gives a spark, which ignites the fuel in the cylinder. Start by removing the high voltage wire that the spark plug is connected to. Then unscrew the spark plug itself from the cylinder cover and inspect its condition. When working properly, the candle should be dry and have small deposits on the ceramic of a light color:
- If the spark plug is wet, it means there are problems with the carburetor. It is necessary to adjust and set the fuel level in it;
- Soot on the walls of the spark plug is dark or black in color, indicating a malfunction in the piston group.
If you have not found any visible causes of the malfunction here, the spark plug is dry, the carbon deposits are light, continue to work backwards. Since this is the final point of ignition of the working mixture. Now check if the spark is getting to the spark plug. This is the ignition system unit.
How to set the ignition on a chainsaw
The ignition of the chainsaw should be adjusted periodically. This action involves setting the correct spark plug gap between the coil and the flywheel. The parameter depends on the chainsaw model. It is indicated in the operating instructions. The average value is the parameter 0.2-0.4 mm
Having the correct gap is important to ensure that the spark occurs at the right moment, i.e.
not earlier and not much later than fuel supply.
Special templates will help you adjust the ignition on a chainsaw, but it is not always advisable to purchase them for one-time use. Therefore, they can be replaced with a homemade one. To make it, you need to cut a strip from a plastic bottle. The part of the container where there is no relief embossing is suitable. After this, you can install the ignition in the following sequence:
- Unscrew the ignition bolts a little to loosen them.
- Connect the magnets located on the flywheel to the ignition coil.
- Press the plastic plate between the flywheel and the reel, and then tighten the bolts back.
- Remove the strip.
- Turn the flywheel a full rotation several times in a row, making sure that it does not catch anywhere.
If the diagnostics revealed any malfunctions of the coil and it was not possible to adjust it, then the part must be replaced, since repair is impractical.
Troubleshooting Tips
Fuel transfusion and filling of a chainsaw spark plug can be one-time and accidental. For example, “over-pumping” with a pump cap (primer): the engine does not start immediately, the operator presses his finger on the cap again and again, tries to start it, then pumps it up again.
In this case, the reason is not at all in the carburetor. You need to unscrew the spark plug and ventilate the combustion chamber by pulling the starter cord several times, as when starting. The candle is wiped, dried on the flame of a gas burner or burner, or another one is used. They check the spark, put the spark plug in place. They try to start it first without choke.
If it does not start after 3-4 jerks, press the pump cap 2-3 times. They try again. That is, after an overflow, it is better not to pump up the fuel first, but to pump it up incrementally. Until the engine starts.
Candles sometimes require their own maintenance and care.
- Inside, around the insulator, there should absolutely be no soot or dirt.
- The contact between the electrode and the plate from the spark plug body is cleaned with “zero” sandpaper. Carefully, without rounding the end of the electrode.
- You need to know the recommended spark plug gap indicated in the instructions for each chainsaw model (from 0.5 to 0.65 mm or more).
- To accurately adjust the spark plug gap, special feelers are used - a fan-shaped set of plates of different calibrated thicknesses, which fold into a handle like a folding knife. Sold in auto tool and spare parts stores.
- When working in winter, it is better to store the chainsaw at low temperatures. When taken out of the heat and into the cold, a sharp temperature change can cause condensation to form everywhere, including in the ignition system, and this is harmful.
One of the reasons for the lack of spark in a chainsaw is described in the following video, where they also talk about how to fix the breakdown:
Modern chainsaw ignition systems are quite compact and reliable. You just need to protect them from direct moisture, shock, and exposure to extreme temperatures. And then there will be no problems with the lack of spark during startup. Also, 1-2 spare spark plugs that are known to work will not be superfluous.
The chainsaw's ignition system is a series of parts that produce a spark when the tool's engine starts. In most cases, the ignition system is a fairly reliable unit, but sometimes, for various reasons, some of its parts fail. Let's study the features of repairing and adjusting the main elements of the chainsaw ignition system.
Basic malfunctions and their elimination
If you cannot start the saw the first time, there may be several reasons. Most often the problem is related to the spark plug:
- wear of the electrode or damage to the ceramic insulator;
- loose fit of the removable cap (if any);
- sparks flying along the ceramic winding, a sign of which is a brown residue on the outer shell;
- cracks in the spark plug cap (a saw with this problem will continue to work, but may cause pain to the user when touched).
If no problems were found with the spark plug, it is recommended to inspect the wires coming from the coil. They may be torn or have other mechanical damage. Wire breaks inside the insulation are possible, so sometimes these violations cannot be detected by visual inspection.
The cause of the breakdown may lie in the shutdown switches. It's easy to check them. To do this, you need to disconnect the wires from the module and then check the ignition. If a spark appears after switching off, the switch must be replaced.
Causes of problems
When the chainsaw does not start the first time, it is recommended to inspect the wires that are connected to the coil. So you can find:
Important! Damage to the internal insulation cannot be identified upon inspection. If during the initial assessment of the coil everything is in order, you need to look for the cause of the breakdown in the toggle switch (you need to disconnect the module from the wires)
Don't know how to check the ignition on a chainsaw? To start:
If everything is in order during the initial assessment of the coil, you need to look for the cause of the breakdown in the toggle switch (you need to disconnect the module from the wires). Don't know how to check the ignition on a chainsaw? To start:
- assess the condition of the electrode (it may fail due to wear), check the integrity of the ceramic insulator;
- inspect the removable valve, which should fit tightly (it is not removable in all models);
- a brown coating on the ceramics of the winding indicates a wandering spark;
- look for a crack in the spark plug (sometimes the cap cracks).
Carefully inspect the coil for traces of fuel. The spark plug must be dry (any traces of deposits present must be light in color). If you find excess fuel, the problem may be in the carburetor, which, by supplying a large amount of gasoline, floods the spark plug. In addition, plaque may also indicate a change in the geometry of such components of the chainsaw as the piston and cylinder.
Thorough check
If a preliminary assessment of the condition of the coil does not produce results, a thorough diagnosis must be carried out.
Experts recommend taking a multimeter and checking the resistance level of the coil. Study the optimal performance of your model (this information is in the instructions for the chainsaw). Please note that sometimes the “ringing” ends with the indication “open circuit”; there is no need to panic, since many saws use semiconductor parts. A positive test result indicates a malfunction. Checking the serviceability of the electrical circuit. The cable is placed against the gap between the cylinder and the coil. In the absence of a breakdown spark, we can conclude that the high-voltage cable is faulty or the internal insulation is damaged. Checking for the presence of a spark (a special device is also used). The testing device is placed between the coil terminal and the spark plug bulb (this place is called the open circuit)
Pay attention to the data displayed on the meter screen, compare it with the optimal values for your chainsaw. Not everyone can do this testing method at home, since special equipment is expensive. Performing homemade ignition
This test involves the use of a candle. It is taken out and leaned against the cylinder body, while simultaneously starting the starter. Watch for the spark. The method is not the most reliable due to the non-standard speed of rotation of the flywheel (since the position of the candle is unnatural), but many craftsmen actively use it.
In field conditions, when the above methods for checking ignition are not available, this method is used.
For the method you will need a nail without a hat, which is placed close to the cylinder - 7 millimeters from it
Be careful not to damage the part. Pull the starter and watch for spark. If it appears and is bright, there is no malfunction.
The method is useful if there are no electronic components. In addition, you will have to adhere to these rules.
- Do not unscrew the spark plug completely so as not to speed up the rotation of the flywheel. This will negatively affect engine performance.
- The spark plug is placed so that the distance between it and the cylinder is no less than that recommended taking into account the compression model of the spark plug and the dielectric properties of the fuel mixture used (on average it is placed at a distance of 7 millimeters).
Structural components
All two-stroke gasoline engines have a similar operating principle, and therefore the ignition system in them has a standard structure and design.
Chainsaw ignition device:
- Magneto: a device that converts mechanical energy into electrical energy and provides a pulse of current to the chainsaw's spark plug;
- Spark plug: designed to ignite the fuel-air mixture through a discharge that occurs between the electrodes;
- Electrical cable;
- Engine shutdown button.
Plugs come in spark, arc, glow and catalytic types. Chainsaws use spark plugs for 2-stroke engines. The schematic diagram of the chainsaw ignition is shown in the image.
Checking the muffler
Do not underestimate the breakdown of this chainsaw assembly. If the muffler becomes clogged, the saw will lose power and, of course, will not start. If the muffler is dismountable, then we disassemble it, inspect it and remove all carbon deposits. In some models, the muffler will have to be unscrewed; after washing, the non-removable muffler should be dried with a hairdryer.
Please note: carbon deposits contain carcinogens that are dangerous to human health; dry cleaning is unacceptable as it can lead to inhalation of these harmful substances. When we remove the muffler, we plug the engine exhaust hole with a clean rag.
The reasons why the muffler may become clogged are:
When we remove the muffler, we plug the engine exhaust hole with a clean rag. The reasons why the muffler may become clogged are:
- Using the wrong fuel mixture (too much oil)
- Using the wrong oil (oil not for two-stroke engines or poor quality oil)
Replacing oil seals
How to repair a Shtil 180 chainsaw if the seals need to be replaced? It is necessary to disassemble the engine, which will first require removing it from the chainsaw. Removal is carried out according to the algorithm described in the paragraph: “The control key of the Shtil 180 chainsaw is broken - how to fix it.”
After the engine is removed, the 4 screws securing the engine pan are unscrewed, after which it is removed. Thus, by removing the pan, we gain access to the seals and bearings of the crankshaft.
An important point when replacing oil seals is to reinstall and seal the pan.
To carry it out efficiently, it is necessary to clean and degrease the pallet and its installation location on the saw cylinder, and then coat it with sealant and install the pallet, tightening it crosswise to the required force.
Reassembling the chainsaw after repair is carried out in the reverse order.
Removal and installation algorithm
In cases where it is necessary to clean the Shtil 180 carburetor or disassemble it, you will first need to remove the assembly from the chainsaw. This must be done in compliance with a certain algorithm of actions:
- Place the protective cover for the chainsaw on the bar.
- Remove the top cover of the chainsaw.
- Unscrew the two nuts securing the air filter and carburetor.
- Remove the air filter housing.
- Disconnect the wire from the engine control lever.
- Carefully remove the lever from its seat in the housing, while simultaneously disconnecting the air damper rod from it.
- Pull the carburetor towards you and disconnect the fuel supply, as well as the throttle linkage.
The design and principle of operation of the chainsaw ignition system
The standard ignition system of a carburetor engine consists of:
- magneto;
- spark plug;
- an electrical cable connecting them to each other;
- engine shutdown keys.
Ignition circuit for the Ural chainsaw
A magneto is a type of alternator that supplies electricity to the spark plugs. It consists of a stationary winding of an inductance coil and a permanent magnet mounted on a flywheel that rotates with the crankshaft of a gasoline engine. The moving magnetic field creates an electromotive force in the low-voltage winding, which is converted by the transformer into a voltage with a potential sufficient to produce a spark.
For contact magnetos, the first terminal of the high-voltage winding is connected to the spark plug, and the second is connected to the ground through a mechanical switch. At a certain moment, a special design element separates the contacts, which leads to a sharp increase in voltage in the network and a spark in the interelectrode space of the spark plug.
The ignition circuit of a chainsaw with a contactless magneto is based on the operation of a control coil, which plays the role of a voltage regulator. The electronic unit also includes a diode, a capacitor and a thyristor that passes current with a voltage of a certain value. When it opens, the capacitor is intensively discharged, forming a current in the turns of the primary winding, which is induced into a high-voltage voltage, causing a breakdown on the spark plug installed in the cylinder. The electrical network operates in pulse mode in time with the rotation of the crankshaft and the translational movement of the cylinders.
Ignition Calm at the Benzo-Zip parts store
Ignition Stihl on all gasoline saws consists of three main parts - a flywheel-fan, a coil (magneto) and the spark plug itself. The flywheel is a round aluminum part with blades on which the starter dogs and magnetic soldering or spraying are located. Directly, the Stihl ignition coil will differ on different models of the tool in the center distance and other parameters, which we’ll talk about today. It looks like a box with high-voltage wires.
You can purchase a reel, also referred to as a “module,” quickly and reliably on the pages of the website of spare parts for chainsaws, “BenzoZip”. Here wholesalers and retail buyers can profitably order parts for any tool models from the German manufacturer. We offer the largest list of ignitions for saws profitably, inexpensively and quickly.
Starter: device, spring installation
The starter in the design of the chainsaw is designed to start. The sooner the problem associated with it can be identified and eliminated, the longer the service life of other parts will be.
The starter works as follows: in the saw body there is a groove into which a handle with a cord is attached. If you lift the handle sharply, the cord will also pull, and the drum will catch. As a result, the drum with spokes located on the shaft begins to unwind. At the same time, due to the rotation of the crankshaft, the fuel mixture is compressed. If the handle goes down, the shaft stops.
If you increase the power of the saw, the amount of fuel mixture increases. Therefore, more pulls of the starter handle are required to start the engine. In order to speed up the return of the drum, a special steel return spring is installed in production. In addition to this, other methods are used:
- Installation of a damper for preliminary enrichment of the mixture;
- Installation of an automatic decompression valve;
- To pump fuel before starting, install a primer.
Using these methods helps the engine start faster. This is especially felt when starting a cold engine and in the cold season.
Checking the fuel system
The gap between the ignition coil and the chainsaw flywheel
You won't be able to look inside the ignition unit. And the reason for this is the non-demountable design. In service centers, its functionality is checked using a special tool. It will be possible to troubleshoot problems at home if you replace the unit.
But before you run to the store for a new ignition unit for the Stihl chainsaw, you need to make sure that the problem does not lie in the incorrect gap between the contacts of the flywheel and the ignition module. The reason for the lack of a spark can be either too large a gap or its complete absence. In the latter case, the flywheel will begin to come into contact with the module contacts, as a result of which scratches will form on it.
Chainsaw starter device
- remove the starter;
- loosen the screws securing the ignition module;
- place a plate cut from an ordinary plastic bottle between the module and the flywheel;
- tighten the screws.
If all these manipulations result in a spark, the Stihl chainsaw is ready for further work. Otherwise, you will have to re-inspect. If the inspection again reveals a lack of clearance, you will have to look for the cause in the crankshaft bearings.
The Shtil chainsaw may not start even if there is a spark. In this case, it is necessary to look for problems in the operation of the fuel system. To do this, you need to inspect the spark plug for wet deposits. Its presence indicates excessive fuel supply. When the fuel mixture begins to literally flood the spark plug, it cannot ignite it.
Faulty chainsaw spark plugs
- unscrew the spark plug;
- turn the Shtil chainsaw over, draining the fuel;
- in the same state, pull the starter handle several times to remove any remaining fuel;
- screw the spark plug into place;
- set the engine control lever to the hot start position;
- pull the starter handle several times.
All these manipulations must be carried out with the ignition off, positioned as far as possible from open fire.
If the problem was improper starting of a cold engine, “blowing it through” will help return the Stihl chainsaw to performance. If even after “blowing” the Shtil 180 chainsaw does not start, you need to look for a solution to the problem in the carburetor.
First you need to check the condition of the fuel filter. To remove it, you need to unscrew the fuel tank cap. Next, aluminum wire with a bent end will come to the rescue. With its help, remove the fuel hose, at the end of which there is a filter.
Chainsaw device Shtil 180
The condition of the filter can be checked by blowing into it. If air does not pass through, then the filter needs to be cleaned or replaced. If air flows freely, you need to look for a blockage in the fuel hose by disconnecting it from the carburetor. The blockage can be cleared mechanically or by replacing the hose.
If the fuel hose and filter are clean, but fuel does not flow to the spark plug, the cause may be a malfunction in the air pulse supply to the fuel pump.
There is a membrane in the pump body, which during movement ensures the supply of fuel to the carburetor and engine. If the Stihl MS 180 chainsaw does not start, the diaphragm may have ruptured. You can check its integrity by removing the pump cover. If any defects are found during the inspection, the membrane is replaced.
Chainsaw repair Shtil 180
Question: During operation, the stihl ms 180 c chainsaw stopped idling and stalled. I started it with difficulty, but stalled again at idle.
After this it doesn't want to start. The next day, after unsuccessful attempts to start it, I removed and washed the air filter. It didn’t help, I had to remove the spark plug - it turned out to be dry, although there were plenty of attempts to start it.
I cleaned the breather with a needle (it was not clogged). I changed the fuel filter (although the old one was not visually dirty). I cleaned the carburetor and installed a new spark plug just in case. The saw won't start! I unscrewed the spark plug again - it was dry. What to do?
Answer: Remove the muffler. Look at the piston, if there are longitudinal stripes on it, then it needs to be replaced.
Question: What is the difference between the drive and chain sprocket of the Stihl 180 chainsaw?
Answer: There is no difference between a “drive sprocket” and a “spin wheel”; these are different names for the same part.
Question: I bought a Shtil ms 180 chain saw, I really liked it, but I want to ask you, can my saw cut thick wood?
Answer: The standard length of the MS 180 bar is 35 cm, it is possible to cut a log of 70 cm in diameter, if logs of this diameter predominate, then you need a chainsaw of greater power.
The MS 180 will, of course, cope with the task, slowly and surely sawing all large-diameter logs, but you need to remember that by giving heavy loads to a device not designed for this, you (at best) reduce the service life of the chainsaw, that is, bring its major repairs closer .
Currently reading: Gap on Trimmer Spark Plugs
Question: Please tell me, is it possible to use a 45 cm guide bar on a Stihl 180 chain saw?
Answer: The MS 180 chain saw can be equipped with a bar of maximum length 40 cm.
Question: Where is the breather located in the Shtil ms 180 chainsaw?
Answer: The ventilation system valve (“breather”) is located “on top” of the gas tank and oil tank, it cannot be seen visually, because everything is covered by the starter housing.
Question: On the MS 180, the gas button gets stuck in a horizontal position. What to do?
Answer: Most likely, the lever-traction mechanism is faulty; when the unit is turned over, one of the levers or rods “falls”.
Question: Why does the cylinder heat up and when it heats up, does the Stihl 180 chain saw stall?
Answer: The problem is in the ignition module, perhaps there is no compression (necessary).
Question: We use a Stihl 180 chainsaw with a standard bar; we recently found out that people are installing a Carving bar on this model. According to the catalog, you can install a 30 cm tire of this type, but is it possible to install a 25 cm tire or is it not possible on this model?
Answer: Carving has a very small nose radius. It is better to use a chain with a 1/4 pitch with this tire. And this is where the problems begin. Chains like this are very rarely available in retail, and in addition to the 180th, you can also find a 1/4 sprocket.
Maybe it makes sense to look for a 30 cm Rollomatic Mini tire on 3/8 1.1. Its article number is 3005 000 3905, if I’m not mistaken. She has a small nose with a 7-tooth star. Somewhat larger than Carving, but not so picky about lubrication.
Question: Where should the arrow on the piston point to the muffler or vice versa on the Stihl 180 C chain saw?
Answer: The arrow should point towards the muffler (the rule for all STIHL chainsaws).
Question: Tell me, what is the clutch thread (left or right) on the MS 180 chain saw?
Answer: All STIHL chainsaws have a left-hand thread on the clutch.
Question: The starter on the Shtil ms 180 chainsaw pulls out jerkily, what is the reason?
Answer: There may be several reasons - from a faulty starter (starter spring, etc.) to a faulty cylinder-piston group.
Question: Why is there play in the chain sprocket on the Stihl 180 chainsaw?
Answer: The clutch cup needle bearing is worn out, but even on a new saw the chain sprocket has minimal play!
Question: Shtil 180 chain saw. Second fill of gasoline, full tank. Gasoline is seeping from below. Why?
Answer: The gas hose rubber could have popped out and could overflow through the gas tank breather. The first needs to be corrected, the second is acceptable!
Question: On the Stihl 180 chainsaw, the chain does not move during operation while the brake lever is in the middle position, and only begins to rotate when you move it towards you. What can be wrong?
Answer: The chain brake on a chainsaw has two positions: extreme, “pull-away”, - this is the brake in the working position “on”, the chain does not move; the extreme “towards you”, move it until it clicks - this is the brake in the cocked position, the chain rotates.
You most likely have the brake on, you need to move the handle to the extreme “towards you” position, i.e. Pull the handle until it clicks and if this does not help, then the brake is faulty and you need to contact a service center!
Question: How to properly adjust the carburetor of the Shtil MC 180 chainsaw?
Answer: On the Stihl 180 chain saw, only the idle speed is adjusted, since the carburetor is rolled and adjusted at the factory. The idle speed is adjusted so that the chain does not rotate at minimum speed, or according to the tachometer.
Question: Tell me what to do. The Shtil 180 chainsaw does not start. There is a spark, but the spark plug floods and does not want to start. Where to start repairing or disassembling?
Answer: All repairs must begin by removing the muffler and seeing what the piston looks like.
Question: The Stihl MS 180 chainsaw does not stall when moving the lever up, I turn it off with the air damper, what should I do?
Answer: By moving the lever up, you interrupt the contact, in your case the contact is not interrupted, the contact spring has “moved away” (bent), the contact spring wire may be broken, the control shaft (the lever that you lift up) is worn out.
Question: Tell me how to replace the clutch springs on a Shtil 180 chainsaw?
Answer: clutch springs can be replaced even without removing the clutch. All you need is a small but strong hook made of strong wire and a standard spark plug wrench. We remove the cup, put the key on the hexagon of the coupling and use the hook to unhook the stretched spring.
We immediately put a new one in its place - it’s simple. We hook one hook of the spring with our fingers, and use the hook to pull the second hook into the hole. It will catch, then we push it with a screwdriver so that it fits into the hole properly.
We turn the crankshaft 1/3 of a turn, put the key on the hexagon again, hold it from turning and also replace the spring with a new one. Next - the third. We put the cup in place and work. You can also check the condition of the springs with your fingers.
The stretched spring allows the weights to move on the cross and can be removed very easily. When we replace the springs with new ones, the clutch should become like a monolith and it is not possible to pull the weights off with your fingers, only if you push against it with a screwdriver.
Currently reading: pump for trimmer on AliExpress - buy online at a good price
How to set the ignition. Ignition settings.
The video shows how easy it is to adjust the magneto gap using the side of a plastic bottle. Repair.
Insufficient supply of the fuel mixture from the carburetor to the cylinder or a violation of the correct ratio between fuel and air mixed in the carburetor can occur for several reasons: due to a clogged air filter, unadjusted carburetor, clogged channels or filter mesh.
As a rule, repairing chainsaws is not complete without cleaning the air filter, since it gets dirty quite quickly. In this case, repair of the ignition of the Shtil 180 chainsaw is required. Adjustment for repair. When this happens, the flow of air into the carburetor is reduced, and the fuel mixture leaving it becomes too rich, which disrupts the normal operation of the engine.
Carburetor misalignment can be corrected by adjusting it. This is usually done using three screws - maximum and minimum speed and the idle screw. Adjustment must be carried out in strict accordance with the instructions, failure to comply with which may lead to engine damage. Some saw manufacturers leave only one adjusting screw (idle speed) to prevent unwanted interference by inexperienced users with the operation of the carburetor. For an example of adjusting a chainsaw carburetor, see the article Working with a chainsaw.
If adjusting the carburetor does not help, you need to clean its channels and filter mesh, and at the same time check the integrity of the membrane. The carburetor is one of the most complex devices in a chainsaw, so you need to start disassembling and cleaning it with a full understanding of the responsibility of this operation. It consists of many small parts that have the ability to unnoticeably jump out of their places and get lost irretrievably, so that after disassembling this capricious device, you may not be able to reassemble it.
Below is a diagram of another chainsaw carburetor.
Muffler. Often the cause of engine malfunction, especially when the engine runs normally at low speeds and stalls under load, is clogging of the muffler spark arrester with combustion products, which prevents normal exhaust. Repair in this case consists of removing the muffler, disassembling it (if it is dismountable) and wet cleaning it from carbon deposits using detergents.
Engine malfunctions
When repairing a chainsaw with your own hands, you need to act by elimination - inspect alternately all the possible causes of a malfunction, starting with those that take the least time to check and eliminate (see here about the design and operation of a two-stroke engine).
Ignition system. Almost all types of engine problems listed above can be caused by ignition system failures. Therefore, when they occur, it makes sense to start troubleshooting with a spark plug. This is all the more justified since the state of the latter can provide useful information about the operation of the fuel system. So, if a problem occurs, you need to unscrew the spark plug and inspect it.
The wire is disconnected and the spark plug is unscrewed with a special wrench.
If the spark plug is dry, this means that the problem is most likely not in the ignition system, but in the fuel mixture not entering the cylinder. You can wrap the spark plug back and get to work on the fuel system. If the spark plug is heavily splashed with fuel mixture, it means there is an excess of it. This may occur due to carburetor misadjustment or violation of starting rules. The spark plug is wiped and dried, the cylinder is dried by turning off the fuel supply and operating the starter to ventilate the combustion chamber and remove excess fuel. Then install the spark plug in place and repeat the start.
The presence of a large amount of black carbon also indicates a malfunction in the fuel system.
The ratio between oil and gasoline in the mixture may be incorrect, the carburetor may not be adjusted, or low-quality oil may be used. The spark plug is washed in gasoline, cleaned of carbon deposits with a needle or awl, the electrodes are cleaned with fine sandpaper and replaced.
In all these cases, it would be a good idea to check the gap between the spark plug electrodes. Depending on its brand, it should be in the range of 0.5-0.65 mm. You also need to check the spark plug seal. If it is worn out or damaged, the tightness of the combustion chamber may not be ensured, which leads to a decrease in compression in the cylinder and problems in engine operation.
Even if, when checking the spark plug, there is good reason to believe that the fault is in the fuel system, you need to check the spark plug for the presence of a spark. At least to be sure that everything is in order. For this:
- put the ignition cable on the spark plug;
- using pliers with insulated handles, apply the thread or nut of the spark plug to the cylinder;
- pull the starter handle and see whether there is a spark or not.
If there is no spark, you just need to replace the spark plug. If the new spark plug does not have a spark, you need to check the condition of the high-voltage wire for a break and contact with the spark plug.
The STIHL chainsaw, and specifically the MS 180 model, is used primarily for harvesting wood and performing various construction work. STIHL 180. Adjusting the ignition of the STIHL 180 chainsaw. STIHL 180, video. Similar equipment is used very often due to the large list of functions and capabilities. The main feature of this model is reduced vibration, which is very important. Naturally, during use, the chainsaw may break down, which means you will have to repair it.
Check the ignition coil on a chainsaw
If the preparatory steps did not help in identifying the cause of the chainsaw defects, then you need to check the ignition coil of the saw. Diagnostics is carried out in several steps:
- Measure the coil resistance using a multimeter. To do this, you need to know the rational characteristics that are indicated in the instruction manual. But due to the use of semiconductor parts in the system, when you try to “ring” the coil, the result will be an “Open Circuit” reading. This is fine. A sign of a malfunction is a good test result. That is, if it was possible to find the resistance of the coil using a special tool, then it is absolutely faulty.
- Check for spark with a special device. This device should be installed in the open circuit located between the spark plug and the high-voltage terminal of the saw’s ignition coil. The characteristics will be visible on the screen. This method of checking is often used in service centers, since the device needed for this is expensive, and the costs will not be comparable to the usefulness provided.
- Testing the coil using a spark plug, i.e. perform a homemade ignition. To do this, you need to unscrew it, and then attach the body to the cylinder. Now you need to pull the starter and watch for the spark. But this method gives only an approximate result, since the flywheel rotates faster due to the unnatural position of the spark plug.
READ Disassembling Chainsaw Partner 350 Video
If none of these methods gives a result, or if necessary, check in field criteria, you can proceed as follows:
- Remove the cap from the candle, insert a nail without a head into the core at a distance of 6-7 mm from the cylinder. This must be done very carefully so as not to destroy the part.
- Perform the actions required to wind the instrument. Now you need to look at the presence of a spark and its color. If there is no malfunction, the spark will be strong and the color will be bright blue.
This method can be used in the latter case and only if there are no electrical components, with all this, it is important to follow the rules:
- you cannot completely unscrew the spark plug, as this can lead to faster rotation of the flywheel, which is not the correct operating mode of the engine;
- it is necessary to place it at a distance that corresponds to the compression model and dielectric properties of the fuel consistency, therefore this parameter can be looked at in the annotation (the value of 6-7 mm is average).
Why does Chainsaw Shtil 180 flood the candle?
A chainsaw consists of many components important for its operation, including the spark plug. This small part needs to be replaced periodically. You can replace it yourself. Usually, to do this, it is enough to use universal instructions that are suitable for all models of the power unit. But before you look for instructions, you will have to purchase a new spare part. Don't know which spark plug to choose for your chainsaw? This and other information is available in this article.
What is a spark plug and why should you change it?
The part itself is responsible for igniting the air-fuel mixture. It is necessary to change the spark plug when there are problems with the operation of the motor (it works, but is unstable); this procedure is also necessary when the tool simply stops starting.
It is also recommended to replace spark plugs for Husqvarna chainsaws and for power units from other manufacturers every hundred hours of operation of the chainsaw. This is a consumable spare part that wears out due to:
- using low quality oil (electrons, side and central, will be covered with black soot);
- a poorly tuned carburetor or a broken starting system (because of this, we fill the spark plug with the fuel mixture);
- the carburetor has failed (no fuel will flow to the ignition spark plug, which causes problematic starting of the tool’s engine).
How to adjust?
The greatest load when operating a chainsaw, of course, falls on the engine. Its most vulnerable part is the ignition coil. Minor problems can be fixed yourself, for example, adjusting the ignition.
Ignition adjustment is necessary if:
- you want to extend the service life of the saw - for preventive purposes;
- the chainsaw does not start, a problem has been identified in the gap size (for each model, manufacturers have written their own gap size, the average value is considered to be from 0.2 to 0.4 mm);
- the motor runs intermittently;
- the power of the tool has decreased.
At home, we can adjust the gap in the ignition coil, which in many cases solves the above problems.
Algorithm for setting the gap
To adjust the gap in the chainsaw ignition coil, you will need: a template for setting the gap or a feeler gauge (most often a homemade blank is used, for example, a piece of a plastic bottle or cardboard), a socket wrench of the required size.
All models have the same coil structure; only the gap dimensions recommended by the manufacturer may differ. Let's consider, as an example, the gap adjustment algorithm for one of the most popular and recognizable chainsaw models - Shtil 180.
Let's prepare everything we need, including cutting out a strip from a plastic container without embossing - it will serve as a template. The optimal clearance for the Shtil 180 chainsaw is 0.2 mm. (depending on the model, this value can range from 0.2 mm to 0.4 mm). Next we perform the following sequence of actions:
- Remove the protective cover;
- Let's remove the module with a candle holder and a high-voltage wire;
- Unscrew the ignition bolts to loosen them;
- Let's bring the magnets located on the flywheel to the coil;
- We clamp a plastic strip between the flywheel and the coil. Thus, we set the required gap;
- Tighten the bolts and remove the strip of plastic;
- Let's carry out a check: spin the flywheel a full rotation several times, make sure that the movements are free and the flywheel does not cling to anything.
The procedure for adjusting the ignition coil gap will be the same for all brands. However, I would like to note that a distinctive feature of Chinese-made chainsaws is frequent breakdowns of electronic ignition units and loosening of threaded fasteners due to poor quality assembly.
Consequently, the gap will have to be adjusted approximately 3 times more often than, for example, with the same Shtil. It is also worth noting that low-quality spark plugs are often supplied with Chinese-made saws. It makes sense to stock up on them in advance.
Adjusting the carburetor of the STIHL MS 250 chainsaw (with revolution counter):
Before adjusting the carburetor of the Stihl chainsaw, it is necessary to carry out maintenance of the chainsaw (clean the carburetor of the chainsaw, wash the chainsaw engine, replace the spark plug, clean the air filter, check the chain tension, adjust the idle speed, warm up the engine).
1. Screw screws “H” and “L” (on a muffled chainsaw) until they stop, and then turn both out 1 turn. 2. Start the chainsaw and warm it up. Give full throttle and turn screw “H” until the maximum engine speed is 14,000 rpm. by tachometer (by engine revolution counter). Keep the maximum speed for adjustment for no more than 10 seconds! 3. Using the “LA” bolt of the idle speed stop, ensure that the chain begins to move, and then turn this bolt ¼ turn counterclockwise. 4. If, after this adjustment of the chainsaw carburetor, the idle speed is not stable, and the chainsaw accelerates poorly, then you need to turn the “L” screw slightly counterclockwise until the chainsaw quickly picks up speed and works well at idle speed. Then adjust the “LA” bolt (idle speed according to the tachometer should be 2800 rpm).
Note: It will not be possible to adjust the chainsaw carburetor if there is air leakage into the engine from the side (through the gasket under the carburetor, through the carburetor accelerator pump, through the chainsaw crankshaft seals or somewhere else).
Ignition
The main one in this group of problems is the engine.
Ignition is one of the main elements affecting the trouble-free operation of the tool. Therefore, we will consider this block first.
Gone are the days when the ignition was controlled by a breaker with cams and moving contacts that supplied a spark to the spark plug.
It was not a very reliable system due to the many elements that affected the operation of the engine. If there were no visible faults, the chainsaw could simply stop starting. And we could observe a picture of constant tugging on the winding cord. Today, manufacturers have switched to contactless ignition systems.
How to check the system and identify a defective unit
Weak power or complete absence of a spark in the combustion chamber may be associated with contamination of the spark plug contacts, their deformation, damage to the armor wire, spark plug insulation, breakdown of the starting toggle switch, malfunction of the magneto or violation of the gap between it and the flywheel. Potential problem areas should be checked in order of increasing diagnostic complexity, so it’s best to start with the candle.
The most common and fairly simple ignition malfunction is associated with contamination or damage to the spark plug contacts. This element is located under the air filter cover, above the carburetor. We disconnect the candlestick with the high-voltage wire and unscrew it using a hex key (included with the saw). We carry out a visual inspection to identify mechanical damage or excessive contamination. The contacts must be dry, clean, and the gap between them must be about 0.7 mm. If the spark plug is wet, it means it is flooded and the problem is not in the ignition, but in the carburetor.
Once you are sure the spark plug is clean and has the correct gap, you can do a quick test. To do this, just connect it to the candlestick (without screwing it into the socket), bring the contacts to the metal body of the engine and pull the starter. If there is a spark and it is bright, then the problem is solved. Dim indicates a problem with the coil. A complete absence means that the problem is not here at all. To be sure, you can try installing a completely new or obviously tested spark plug, the performance of which is 100% certain. If the picture does not change with it, then it’s time to move on to the next detail. The absence or very weak spark at the spark plug contacts is often associated with an offset gap between the flywheel and magneto. On average, this indicator varies between 0.4 – 0.2 mm. In most cases, the optimal gap value is indicated by the manufacturer in the technical documentation for a specific saw model. Having determined the ideal or average gap, you can begin adjustment. It is important to make sure in advance that the distance between the elements does not currently correspond to the required values. To avoid doing unnecessary work.
- We remove the side cover to gain access to the part and loosen the fixing screws (usually there are 2 of them).
- Usually the gap is set using special plates, but you can also get by with simple notebook sheets, the thickness of which is about 0.05 mm.
- We turn the flywheel and place the magnets (they protrude slightly) opposite the module contacts, and install several sheets between them.
- Press the magneto and tighten the fixing screws.
- We check the spark on the removed spark plug using the technology outlined above.
If the gap is set correctly, but problems are still present, then there are 3 options left. A common problem is a magneto malfunction, but before we figure out how to check the ignition coil on a chainsaw, let's look at 3 simpler potential problems. Damage to the insulation of a high-voltage wire leads to a spark breaking through to the body of the tool, without bringing it to the spark plug. The problem is identified through a simple inspection, and if necessary, the place is isolated. As insulation, you can attach a piece of hose to the damaged area by wrapping it with electrical tape to secure it.
As the wire is checked, the candle holder (cap) is also inspected. It should be intact, without cracks, and the spring located inside should not have a brown coating. If deformed or dirty, the contact can be cleaned and straightened with pliers. Ideally, it is recommended to replace it with a new set.
A defect in the start button is expressed by the constant closure of the ground and breaker contacts. This problem is associated with oxidation or mechanical damage to the elements of the starting toggle switch. The presence of this breakdown can be checked by simply breaking the circuit by disconnecting the wire from the closing contact on the module.
How to check a chainsaw's ignition coil with a multimeter
The use of electronic measuring instruments allows you to obtain the most accurate information about the performance of equipment, but it is not always necessary to resort to this method. In the case of a multimeter, you can check the resistance between the magnetic core and ground, as well as the candlestick cap. The test result will be an exact Ohm value, but in most cases it will not be possible to identify a deviation or compliance with the norm, due to the banal lack of initial information. In 95% of cases, manufacturers of modern chainsaws do not indicate optimal resistance values for coils, due to the impossibility of repairing them. Using a multimeter to obtain an Ohm value, without the availability of initial data, turns into a regular continuity test aimed at identifying an open circuit. A complete absence of data on the tester display will indicate an obvious breakdown and the need to replace the module. To clarify: between the magnetic circuit and the ground, the measurement is made at a position of 200 kOhm, and when transferring the probe from the ground to the candlestick, the multimeter is set to a measurement mode of up to 20 MOhm (otherwise there are no readings).
On average, the resistance on a working instrument has the following values: magnetic circuit - ground (180 kOhm), magnetic circuit - candle holder (14 MOhm). If the indicators differ by more than 30% or are absent altogether, the chainsaw ignition module needs to be replaced. If the values are relatively normal, the problem should be looked for in another node.
A more specific device that is popular in service centers is called the ZAT 4. This is a small piece of wire with a signal indicator that allows you to check the spark under vacuum conditions (simulating a combustion chamber). Using this device, it is easy to determine the performance of the coil, even if the spark plug is faulty. The diagnostic process is as follows:
- The end of the wire with the corresponding contact is installed in the candlestick.
- The opposite end of the tester is placed on the spark plug, which is screwed into the engine.
- The starter rotates as if the tool were started normally.
The behavior of the indicator determines the state of the ignition system. If the light flashes brightly, but the saw does not start, then the spark plug requires service or replacement. If there is no spark, then the problem is in the coil, armor wire or spark plug. It happens that the blinking rate is disrupted, which indicates a possible transistor malfunction (typical of a hot engine). In general, ZAT 4 simplifies and shortens the diagnostic process, but you pay about 2 thousand rubles for it. for a single use in everyday life is an extremely individual matter. In general, it is quite easy to check and identify a malfunction without using third-party devices, following the methods outlined above.
How to Check a Chainsaw Ignition Coil with a Multimeter
How to check the ignition coil
One of the important components of the ignition system of any internal combustion engine is the coil. Specifically, it is considered the main unit of contact, non-contact, and electric ignition systems, acting as a typical energy storage device created for the upcoming dispersal of charge among the cylinders.
Causes of coil failure
Partial damage to the ignition coil leads to unstable operation of the engine, and its complete breakdown makes it completely impossible to start the engine. That’s why, when the engine stalls, loses its power, or has other signs of unclear operation, one of the first actions should be to check the ignition coil. Chainsaw ignition system. How to check magneto. This element fails quite rarely, and the malfunction, as a rule, is as follows:
- Insulation damage due to extreme heat, vibration or high voltage, which in turn leads to a short circuit in the coil windings;
- Overload caused by faulty high-voltage wires or spark plugs can cause the winding in the coil to break.
Methods for checking the ignition coil
Checking the ignition coil using the “old-fashioned” method can damage the electrics of a modern car
To properly check this car part yourself, it is recommended to perform certain steps step by step. How to test an ignition coil with a multimeter. First of all, after removing the coil, you need to visually inspect it and make sure that there are no external signs of a short circuit: black dots indicating burnout, cracks, or other signs of breakdown.
https://youtube.com/watch?v=3L-ja5c7ObY
How to check the ignition coil on a chainsaw
Hello everyone, free consultation skype: opk.vitek TEL: 380979677418.
How to check the ignition coil
How to properly check the ignition coil
, you will need
a multimeter
, a manual for your equipment and a pair of hands.
In our country, for a long time, there were two equally popular ways to check the ignition coil for functionality: by checking the spark between the car body and the spark plug, or by measuring the resistance of the windings with a multimeter (tester). Testing the ignition coil with a multimeter is not difficult at all, and today we will figure out how to do this. The use of the first method can be fatal not only for the coil, but also for the electronics of most modern cars, so its use is categorically not recommended by manufacturers. It is safer to check this component of the car with a measuring device.
How the chainsaw ignition works and how it works
The design of a carburetor engine does not depend on the model of the tool. Therefore, we can talk about a standard chainsaw ignition system. It consists of the following parts:
- Magneto. Is an alternating current generator. Needed to supply the spark plug with electronic current. From the outside, this part looks like a stationary winding of an inductance coil and a permanent magnet, which is fixed on the flywheel. The latter spins immediately with the engine crankshaft.
- Spark plugs.
- An electronic cable that connects the 2 previous elements.
- Buttons to turn off the device.
READ Chainsaw Starter Won't Crank
The ignition circuit of the chainsaw is ordinary. After the tool starts, a rotating magnetic field appears due to the movement of the flywheel and crankshaft. It creates a moving force in the existing winding, which is transformed into voltage. This potential is enough to form a spark.
The only differences between different chainsaw models may lie in whether a contact or non-contact magneto is used. In the first case, one winding terminal goes to the spark plug, and the second one goes first to the shutdown button, and then through it to the ground. In the 2nd case, the device contains a capacitor, which, when discharged, generates a current.
How to determine the advance angle of the built-in ignition?
The design features of the built-in ignition coil ensure a match between the optimal factory position of the moving piston and the discharge of the spark plug. During operation of 4-stroke power units, the spark must jump before the piston returns to its uppermost position. This is due to the fact that such engines take longer to burn fuel. In their factory design, the speed of operation of internal combustion engine parts is equal to the speed of planned ignition of the filled fuel. In this regard, the piston has time to travel a certain path from the moment the created spark instantly jumps to the place where the spark plug is located, to the period during which the burning gases are guaranteed to create extremely high pressures.
During mass assembly of engines under standard factory conditions, manufacturers do not perform ignition adjustments. Instead, marks are left on the rotating elements, which must be aligned during installation.
Checking and adjusting the carburetor
In service centers, carburetor adjustment is carried out using special equipment. For each saw, the angles of rotation of the adjusting screws are different (they are indicated in the operating instructions). The need to adjust the carburetor does not arise very often, especially if the saw was purchased from a trusted seller. All of our Husqvarna saws are sent to a service center before being sold, where specialists adjust the speed control.
However, failure to secure the adjusting screws sometimes occurs.
Reasons for failure to adjust the chainsaw carburetor:
- Severe wear on the engine (pistons). In this case, it is necessary to take greater care of repairing the engine, but adjusting the carburetor can improve the functionality of the saw for a certain amount of time.
- There is a blockage in the carburetor due to damage to the air filter, the use of poor quality gasoline and the formation of scale. In such a situation, in addition to adjusting the carburetor, you will also need to flush it.
- Severe vibration of the saw or damage to the protective cover. This happens extremely rarely, but there are still cases.
Signs that indicate the need to adjust the chainsaw carburetor:
- The engine either does not start, or starts and immediately stalls. This occurs due to the use of a poor fuel mixture.
- Significant increase in fuel consumption and emissions. An increase in the amount of exhaust gases indicates that the fuel is not completely burned. The reason for this may be fuel oversaturation.