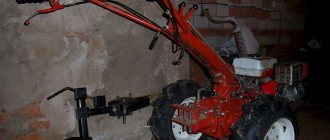
Walk-behind tractors are a technique that can make agricultural work, if not enjoyable, then at least harmless to health. In addition, you will be able to cultivate large areas of land very quickly and efficiently.
Like any other equipment, walk-behind tractors have a complex system consisting of different parts, elements and structures. At first glance, the muffler does not seem to be the most significant part of the unit, but at the same time it plays an important role in the high-quality and uninterrupted operation of the walk-behind tractor.
In this article we will look at how to make a quiet muffler. We will also tell you the process of creating this element with your own hands. Many walk-behind tractors are unique in that they are easy to upgrade yourself, adding designs that you can make practically from scrap materials. The same applies to the muffler.
Homemade muffler for a walk-behind tractor: how to make it yourself
The popularity of walk-behind tractors as a universal equipment for a summer cottage has increased significantly in recent years.
In general, these are quite profitable and reliable assistants. But, like any technology, they have their drawbacks and weaknesses. For most, even the most expensive and powerful models, the muffler is such a weak point. Constant hard work, increased levels of vibration, bumps and other negative factors most often affect this part, which leads to its breakdown at the most inopportune moment. A breakdown of the muffler leads to a significant drop in the performance of the walk-behind tractor; it may stop starting, stall, or fire. In this article we will tell you how to make a homemade muffler for a walk-behind tractor with low noise, the quality and reliability of which you can already be sure of.
The “main” breakdown of any walk-behind tractor
During the active use of the walk-behind tractor, many users began to notice the very weak design of the muffler. Various bumps, constant shaking and hard field work take their toll on this vulnerable spot. Metal that is too thin, or an ill-conceived fastening, often cannot withstand the load and breaks at the most inopportune moment. Almost all walk-behind tractors, regardless of cost and manufacturer, suffer from the breakdown of such an important part as the muffler. With such a breakdown, the walk-behind tractor does not start, loses a lot of power, begins to stall, shoots or makes other unusual sounds.
How to make a muffler for a walk-behind tractor with your own hands?
If you decide to make a muffler for your walk-behind tractor yourself due to a breakdown or poor quality of a factory part, first of all you need to acquire a minimum set of tools. To work you will need:
- welding machine;
- adjustable wrench;
- vice;
- Bulgarian;
- drill or drill bit.
Afterwards, you should carefully familiarize yourself with the design of the factory muffler in order to understand the design itself and note the weak points of the part. Typically, such vulnerable points are the flange mount, which is made of low-quality metal or is of insufficient thickness, expansion chamber partitions, narrow pipes that impede the exit of exhaust gases, reducing the productivity of the entire walk-behind tractor.
The actual stages of manufacturing and assembling a new muffler should be performed in the following sequence:
- Flange mounting. Typically, the thickness of the workpiece is selected around 8-12 mm, but the thicker the better. Especially if the future design provides for the muffler to be directed upward.
- Expansion chamber. In fact, this is the main part in the muffler. It looks like a kind of thickening with partitions inside. It is these partitions that reduce the flow rate of exhaust gases and reduce noise during operation of the walk-behind tractor. To make a quiet muffler on a walk-behind tractor, you need to place at least 3 partitions in the expansion chamber. Too many of these partitions, of course, will help make your walk-behind tractor quiet, but this will interfere with the operation of the engine.
- Exhaust pipe. This part must have sufficiently thick walls and at the same time not be too heavy so as not to destroy the entire structure. The diameter of the pipe should be selected to be the same diameter as the engine exhaust pipe - this will ensure smooth operation of the entire fuel system of the walk-behind tractor.
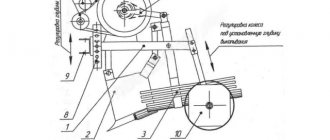
Below is a detailed drawing for making your own muffler for a walk-behind tractor.
We invite you to watch a video about what a self-made high-quality muffler for a Neva walk-behind tractor looks like:
How to choose a walk-behind tractor
A walk-behind tractor is a universal mini tractor designed for agricultural work. With its help you can plow and harrow land, plant, hill up and dig up potatoes. The range of tasks that small-sized equipment solves is not limited to this. Attachments allow you to adapt a self-propelled device for removing snow and mowing grass or equipping the unit with a trolley for transporting goods. Let's talk about how to choose the right walk-behind tractor.
Types of walk-behind tractors
The main operational characteristics of miniature tractors depend on the type of motor. Manufacturers produce two types of equipment:
- Gasoline walk-behind tractors - the power units of self-propelled devices run on AI-92 fuel.
- Diesel walk-behind tractors - DT fuel is used for refueling - the so-called diesel fuel.
Each type of engine has its own advantages and disadvantages. Let's take a closer look at them.
Operational differences between gasoline and diesel walk-behind tractors
To decide which walk-behind tractor will do the job better, it is enough to identify the main operational differences:
- A gasoline walk-behind tractor is endowed with relatively high power, so it can process large areas. It has a low noise level, is environmentally friendly, easy to operate, and weighs less than a diesel unit.
- A diesel walk-behind tractor is economical because its fuel costs less than gasoline. However, this type of equipment has a disadvantage - sensitivity to weather conditions. At sub-zero temperatures, starting the unit will not be easy.
A small-sized gasoline tractor makes less noise, has a low vibration level, and is easy to start. Diesel vehicles consume little fuel, are easy to operate and maintain, and have high traction force.
Functionality of walk-behind tractors
Mini tractors for gardening can cope with the following functions:
- clearing snow in winter;
- cargo transportation;
- lawn maintenance;
- excavation.
To understand how to choose a walk-behind tractor, you should familiarize yourself with its areas of application.
Using walk-behind tractors in the country, in the garden and vegetable garden
When thinking about purchasing a walk-behind tractor for their plot, summer residents plan to cultivate the land with the help of machinery. However, mini tractors are capable of performing much more operations.
Snow removal and cargo transportation at the dacha
In winter, a mini tractor can rid your garden plot of snow drifts. The following equipment is used for this:
- Snow blower - captures snow with auger blades and throws it several meters away from the paths.
- Plow - A metal blade pushes and clears away stuck or frozen snow.
- Brush - sweeps away light snow from paths.
The walk-behind tractor shoots at the muffler
One of the most common muffler failures.
Most often associated with a problem with spark plugs or low-quality fuel. When a walk-behind tractor starts shooting, sneezing and making other strange sounds during operation, first of all you need to check the spark plugs, replace the fuel, and readjust the carburetor. If the problem persists, remove the air filter, with the engine running, cover the air with your palm and wait until the engine stalls. Repeat the procedure several times. If the above manipulations do not help, it is best to contact the service center.
Crosser walk-behind tractor
The Crosser walk-behind tractor belongs to a Chinese brand; all production facilities are also located in China.
This brand is successfully sold in Ukraine, Russia and European countries. The main qualities due to which this equipment has become so popular are powerful engines, an optimal ratio of quality and cost, as well as easy operation that even a novice farmer can master. Crosser walk-behind tractor
Crossers receive praise from their owners, this is due, first of all, to the availability of models for different needs - for different areas and volumes of work, you can choose your own crosser walk-behind tractor model.
Basic equipment of Crosser walk-behind tractors
Coulter Rotary plow Active milling wheel Wheels
Please check the contents of your device at the time of purchase. Some heavy duty diesel models have an additional road wheel and driver's seat.
Flame from the muffler of a walk-behind tractor
If a flame bursts out of the muffler while the walk-behind tractor is running, the problem is most likely due to incomplete combustion of the fuel. Incomplete combustion, in turn, can occur due to misfire, a saturated mixture, due to overheating or late ignition. Other causes may include water in the fuel, bad spark plugs, poor ignition, low cylinder pressure, or a demagnetized flywheel. Consequently, if such a problem occurs, you should pay attention to the quality of the fuel, replace the spark plugs, and adjust the carburetor and ignition. If the above methods do not help, it is better to contact a specialist.
Do-it-yourself muffler for walk-behind tractor
Walk-behind tractors are a technique that can make agricultural work, if not enjoyable, then at least harmless to health. In addition, you will be able to cultivate large areas of land very quickly and efficiently.
Like any other equipment, walk-behind tractors have a complex system consisting of different parts, elements and structures. At first glance, the muffler does not seem to be the most significant part of the unit, but at the same time it plays an important role in the high-quality and uninterrupted operation of the walk-behind tractor.
In this article we will look at how to make a quiet muffler. We will also tell you the process of creating this element with your own hands. Many walk-behind tractors are unique in that they are easy to upgrade yourself, adding designs that you can make practically from scrap materials. The same applies to the muffler.
15 DIY windsock models (photos and drawings)
Windsocks are one of the ancient metrological devices for measuring wind speed and direction. At ancient times in history, some of them became home decorations or replicas. There are no particular difficulties in their manufacture. It is important to understand what you want to see, how to implement it and with what help. Of course, you can work without drawings, but what will come out in the end, and whether it will come out at all, is a big question. Do-it-yourself windsocks can be made from metal, fabric, plastic bottles, wood, etc.
If you have some ingenuity, you can make a windsock using any available means.
Weather vane made of plastic bottles.
Everything is made from old plastic bottles. Stylish and beautiful.
Similar models are used at heliports.
Suitable for the roof of a house or garden.
Model with side light indicator. Actively used since the 18th century.
Everything is made from scrap materials, practical and looks good.
One of the possible complex models.
The kids would love it. Why, children, everyone would be jealous.
The arrow-shaped model is usually considered standard.
There is more of a decorative use here than a true purpose.
Detailed description of the components.
Based on ready-made drawings, you can come up with your own wind direction or try to experiment with the drawings you found.
In the USA, windsocks are butterflies, in our country they are cockerels. There are plenty to choose from.
English windsock. Not better than our models, but not worse either.
How to make a muffler for a walk-behind tractor with your own hands?
A muffler is a structural element of a walk-behind tractor, which is part of the exhaust system. Its main task is to remove and neutralize exhaust gases, as well as suppress noise.
To make a homemade muffler for a walk-behind tractor with low noise, you will need the following tools:
- welding machine;
- Bulgarian;
- drill;
- adjustable wrench;
- vice.
Types of replacement equipment
Depending on the tasks being solved when cultivating the soil, cultivators are equipped with various tools. The most common of them:
- Paws. There are:
- chisel-shaped - allow you to loosen soil up to 15 cm deep;
- lancet flat-cutters (flat cutters) - destroy weeds and also work the soil to 4-6 cm, allowing you not to raise the wet bottom layer to the surface;
- lancet universal - intended for inter-row or continuous cultivation of the land (working up to 14 cm). Such paws perfectly crush the soil, cut off weeds, and partially lift wet layers of soil to the surface;
- single-sided flat-cutters (weeders, razors) - cope well with weeds.
Cultivator shares: a - flat-cutting lancet, b - universal, c - rigid loosening, d - spring loosening
feeding knives - loosen row spacings, embed fertilizers into the soil (up to 16 cm);
needle discs - destroy the earth crust, destroy weeds (processing up to 4 cm, soil shift by 1-2 cm);
- furrow cutters - intended for creating furrows for irrigation (up to 20cm);
- hillers - cut ridges (up to 25 cm), destroy weeds between the rows, and also cover weeds, the depth of treatment with hillers is up to 16 cm.
All replacement equipment is attached to racks, which can be connected to the frame in different ways.
And this article talks about making a potato digger with your own hands.
The walk-behind tractor shoots at the muffler
The design of walk-behind tractors is quite simple at first glance. However, troubles happen that can simply stop the work of cultivating the land and the operator may not know what to do.
If you notice that the walk-behind tractor begins to shoot at the muffler, you need to immediately stop work and try to find the cause of the breakdown and fix it immediately. It's very easy to do.
So, if you have such a problem, then the reason may be hidden in the spark plug, or rather, there are gaps in the spark supply. You need to first clean the spark plug itself. Then you must unscrew it and connect the spark plug body to ground, while simultaneously turning the crankshaft of the starting handle, checking for the presence of a spark.
If you start the walk-behind tractor, but it turns off and there are popping sounds from the muffler, you need to check the spark plug. If it is wet, you need to clean it or even replace it with a new one. The presence of liquid on the spark plug will prevent a spark from appearing between the electrodes.
Hay chopper: 8 photo examples, made by yourself
A hay chopper is a small relief in the life of the owner. The main thing is that you can do it yourself, spending two or even three times less money than buying it in a store. It is enough to have a little knowledge of technology or know how to use the Internet. Better yet, both options.
One of the possible options for a do-it-yourself hay chopper. The motor can be taken from unnecessary equipment. You can use a barrel as a bunker. Grinding will take place using knives that can be commandeered from a food processor. All that remains is to find a smooth shaft and weld several pipes for support.
One of the options with a barrel. Of course, you will have to kill a lot of time for such a model. But it’s cheaper than analogues in the store.
Craftsmen even manage to give a broken vacuum cleaner a second life.
In Yeisk, a similar unit is sold for 9 thousand.
That's what having a locksmith kit makes life-giving.
Power 5.5 kW. No worse than foreign analogues.
Hay grinder from a washing machine. Practical and budget-friendly.
Model from a washing machine. The body is cut to height for convenience.
Flame from the muffler of a walk-behind tractor
A situation also happens when a walk-behind tractor fires and a flame appears from the muffler. Do not panic, but immediately stop working, turn off the engine and try to get rid of the cause of such a breakdown.
The whole point may be that the fuel is not completely burned in the system. There may be several reasons for this:
- misfire;
- fuel mixture too rich;
- overheating during prolonged hard work;
- power drop;
- late ignition;
- water in fuel;
- low pressure in the cylinder;
- demagnetization in the flywheel.
As you can see, there can be a lot of reasons, but don’t despair. You need to check all these systems and find the original source of the breakdown. This is quite simple to do - in the operating instructions you will find the structure of the unit and answers to many questions.
Sound moderators for shotguns
While watching the wonderful film “No Country for Old Men,” I couldn’t help but notice the shotgun with a silencer in the hands of Anton Chigurh)
This seemed interesting and I decided to find out more about it. First, here's a quote from Cormac McCraty's original work: “It was a twelve-gauge Remington automatic with a military-grade plastic stock and a Parkerized barrel. The gun was equipped with a factory silencer that was a foot long and as thick as a beer can.” I wouldn't be wrong in guessing that this was a Remington 11-87 with phosphate coating in plastic. As you can see from the screenshot, the size of the device in the book will be about two times larger. And, of course, such a short guy is not capable of jamming the whistle. Let's start googling the topic of moderators for smooth things. Among a bunch of theoretical speculations, a couple of very real projects were found:
https://www.metrogun.com/ The principle of operation is quite banal, but for some reason no one else has thought of it. As a muffler, an extension tube ported along the entire length is used, which is screwed into place of the choke:
It looks like this:
Personally, I have an association with fishing rods. And indeed
According to the manufacturer, the 32-inch extension cord allows you to reduce the volume by up to 50%, and even more on Sabsonics. They produce special cartridges for this with lead and steel shot:
And also sub-caliber bullets in PC:
As I understand it, this thing is especially popular among those who like to shoot cars there)
As they say, draw your own conclusions. Next up will be the Finns from BR-Tuote with their Reflex Suppressors and funny advertising:
https://guns.connect.fi/rs/Reflex.html These guys make moderators for everything, but we're interested in smooth stuff. Anton Chigurh's weapon would look like a lower Remington 870:
Heavily ported extension cord and housing with chambers for temperature and pressure relief:
These entertainers even attached it to SPAS-15) XRS Reflex Suppressor:
Now this is interesting for me)
Apparently, the Mossberg 500 in 410 caliber is some kind of foreign homemade product. The original thread did not save anything; the author deleted it. And for dessert - a tutorial on making a moderator for Maverick 88 from water pipes Clickable. I hope it was informative) Reposts and discussion are welcome. Tags: “our hands are not for boredom”, maverick 88, mossberg, remington, cinema, reviews, weapons, photos
Muffler for walk-behind tractor
When a problem-free walk-behind tractor begins to act up, the owner falls into a kind of stupor and begins to look for the cause of the problems. The appearance of such a situation is doubly annoying when there is a lot of work and there is no time for downtime.
Often, troubles arise with the muffler, which, for certain reasons, begins to make strange sounds or even behave suspiciously. The main thing is not to panic, but to deal with everything with a cool mind. Let's get acquainted with several problems that occur most often.
Manufacturing stages
Creating a muffler for a walk-behind tractor with your own hands, you need to start with the mounting. The optimal thickness of the workpiece can vary from 8 to 12 mm, depending on the intended design. If, as planned, the part will be directed upward, you need to choose a thicker workpiece. To ensure a tight fit of the flange mount, you need to make your own adapter, similar to the one located on the engine exhaust pipe.
Following this, you can begin to manufacture one of the most important parts - the expansion chamber. It looks like a thickening with many partitions that reduce the flow rate of exhaust gases and thereby reduce noise. You should not make a very large number of partitions; in the future, this can prevent the engine from starting and negatively affect its operation. Standard homemade mufflers have 2-3 baffles.
The final part is the exhaust pipe, which goes directly into the muffler. It should not have too thin walls, but at the same time, not be too heavy. This can break the entire structure and damage the engine. It is best to choose a pipe of the same diameter as the exhaust pipe that comes out of the engine. This will ensure the correct operation of the entire system.
Making a homemade high-quality muffler for any walk-behind tractor with as little noise as possible is an easy task that anyone can do. They can be of various shapes and designs, but the main task remains the suppression of excess noise and the free exit of exhaust gases.
The walk-behind tractor shoots into the muffler: what to do?
The owner of such useful and multifunctional equipment needs to know that interruptions in the operation of the muffler can occur due to:
- thin and low-quality metal;
- frequent potholes;
- excessive loads;
- difficult work;
- fastenings of an ill-conceived plan.
Often the cause of popping noises in the muffler are gaps in the process of supplying sparks and spark plugs. To get rid of the problem, you need to unscrew the spark plug, combine its body and mass, turning the crankshaft using the existing starting handle.
At the same time, you should pay attention to whether a spark appears. If even after these manipulations the situation does not change, it is advisable to thoroughly clean the spark plug.
Flame from the muffler of a walk-behind tractor and black smoke: looking for the cause and solution
Many experts believe that such problems arise due to incomplete combustion of fuel in the unit. It is possible that a misfire, the use of an overly rich mixture, a drop in power or overheating may be detected.
If, after trying to start work, not only a flame appears, but also black smoke, then we are talking about the use of low-quality oil or seriously contaminated injectors. Naturally, it is advisable to purchase a higher quality lubricant and thoroughly clean the injectors of all excess.
How to make a muffler for a walk-behind tractor with your own hands?
If a factory part has failed and cannot be restored, and there is no money to buy a new one, then the best solution may be a homemade muffler for a low-noise walk-behind tractor.
What will you need for this?
- Vise;
- Bulgarian;
- Drill of impressive power;
- Adjustable wrench;
- Welding machine.
It should be noted that the flange fastening is considered the most vulnerable and weak point in the structure, therefore it is necessary to use material of increased strength and thickness. As a basis for creating a quiet muffler for a walk-behind tractor, we use the diagram below.
To form the flange mount, it is advisable to take a workpiece 12 mm thick. In order for the flange to fit as tightly as possible, it is necessary to make a part similar to the one located on the exhaust pipe of the engine.
Then it is important to take care of the expansion chamber. We are talking about a thickening with several partitions, which significantly reduce the speed of movement of flows of used gases and noise. It is important not to overdo it with the number of barriers, otherwise the unit will not be able to start the first time.
To make the final part - the exhaust pipe, it is important to take a part of the same size as the exhaust pipe. The pipe must be strong and reliable.
To once again make sure that creating a quiet muffler for a walk-behind tractor is real, you should familiarize yourself with videos in which ordinary people demonstrate the results of their efforts and share “recipes” for success.
Varieties of techniques
Before you make a muffler with your own hands, you need to study the design of the standard part that came with the kit. This will allow you to avoid making the same mistakes that were made in the design of the factory device. As a rule, the weakest point of any muffler is the flange mounting. It is made of very thin and soft metal, which is not designed for heavy loads. This vulnerability entails the following problems:
- To lighten the entire structure, thinner and lighter metal is used.
- Ill-conceived partitions that quickly burn out.
- The small diameter of the pipes contributes to poor passage of exhaust gases and a decrease in the power of the entire walk-behind tractor.
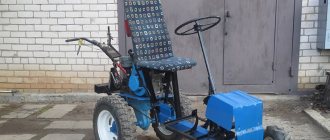
What homemade products for a walk-behind tractor you can make with your own hands
Homemade products for walk-behind tractors are invented and made by almost all owners of this equipment. The purpose of these actions is to expand the functionality of the unit with minimal financial investment. In the basic configuration, the motor cultivator has extremely limited capabilities. Installing various options on it can turn a small machine into a full-fledged mini-tractor. Often, homemade devices are in no way inferior to factory-made analogues. In order to improve a walk-behind tractor with your own hands, a set of tools that are available in every workshop of a country house or cottage is sufficient. The materials you need can be found at a junkyard, shed, or scrap metal collection point.
TOP 10: do-it-yourself sportbike from the Urals. Photo review
Irbit motorcycles have always been popular. First from the military in the 1940s, but then it was the M-72, which was actually a copy of the German BMW. Over time, motorcycles were produced for police, sports, everyday use and military purposes. But if you have an everyday, old Ural at home, you can modernize it, give it a new life, so to speak, by converting it into a sportbike with your own hands.
Modern sports tuning. Opposite in "STREET" style. Engine capacity increased to 750 cm3.
Kirovograd sportbike. Done to perfection.
The driver also decided to keep up with the neighbors.
Good tuning of an old bike, combined with proper care, will help you ride it for at least another 30 years.
When you have a wonderful motorcycle. Why not book him a photo shoot?
The most interesting thing is that a beer of the same name is produced in Saxony. Why not advertising?
The basis was a Ural produced in 1984.
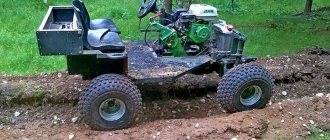
Improvement of the chassis
The first thing users of a walk-behind tractor think about is how to make a cart with a seat for it. Using equipment in normal mode using levers requires the application of great physical effort. However, the use of a trailer reduces the stability of the vehicle. This problem can be eliminated by extending the wheelbase. This is done using extensions that are attached to the axle shaft with pins or bolts. Having solved the stability problem, the operator is faced with another issue: the unit is poorly controlled. The differential for the walk-behind tractor helps to give it good maneuverability. This device is made by analogy with components of passenger cars. Homemade unlockers for walk-behind tractors are made using ordinary household tools - an angle grinder, welding and a sharpening machine.
The low weight of the walk-behind tractor causes poor traction between the wheels and the ground. Slipping is a common occurrence when lifting virgin soil, working on wet ground or driving in snow. To avoid slipping, weights are attached to walk-behind tractors.
These devices are divided into the following categories:
- Wheeled. They are discs that are mounted on wheels or hubs. Disks are made monolithic from metal, concrete or hollow, filled with sand. The weight of wheel weights can be 30-70 kg.
- External. Made from any heavy material (steel, lead, concrete). Attached to the body using hooks or bolts. Some craftsmen weld a frame from a corner to the body. Sandbags, bricks, scrap metal and other heavy objects are placed in it.
You can improve the cross-country ability of a walk-behind tractor by installing lugs. The easiest way to make lugs is to make a rim from a strip of metal and weld blades onto it. The rim diameter should be larger than the rims and smaller than that of the tires. The rim is installed with flat tires. After the lug is installed, the wheel is inflated.
You can improve the transmission by installing a homemade variator on the engine. The system of belts and discs will allow you to smoothly change the speed of the unit, without jerking or vibration.
Homemade muffler with a pleasant sound
I don’t know how it is now, but many people used to know that an old car fire extinguisher is an excellent preparation for direct flow. The story is simple: what I didn’t do with the original muffler can on the pita was of little use. I changed the muffler stuffing, made a flute like a Yamaha one, but still the sound was disgusting, rattling and loud, in general - a barrel organ.
It is possible to install a full-fledged direct flow from the pit, but you need to shorten it, digest the fasteners, but you understand: there was no particular desire to buy a barrel for 5 rubles and still digest it all, but the desire to get rid of the original muffler still did not leave.
And so back to the fire extinguisher. One was lying gathering dust in the garage a long time ago, but to make a direct flow you need two... And so, one fine May morning, on a small river, among the snags on the surface, the desired second fire extinguisher was spotted. Exactly the same as the first one, and now there were two of them. Well, you yourself understand what this led to.
In general, let's go)))
We take the most attractive tool in the garage, affectionately called “Binder,” and saw the bottoms of the fire extinguishers evenly.
Next, take a forty pipe, cut the gas distribution slots with a grinder, or, if you’re not too lazy, drill a billion holes. Then we weld one end of the pipe to the part of the muffler where the outlet will be.
You don’t even need to do anything with the outlet hole: the mounting location for the fire extinguisher spray is just perfect and the diameter is just right.
Now we stomp into the kitchen and tear open the casing of the ZIL refrigerator, tearing out the glass wool from there. Just wear thick clothing and gloves when working with glass wool, otherwise you will itch for two days, and if during these two days you want to relieve yourself, then... yes, it will itch there too... In general, we take glass wool and stuff the outlet part of the jar as tightly as possible.
Then we proceed to the entrance part. The thread in it needs to be cut so that the magpie pipe passes through, and, of course, we also fill it with glass wool, the denser the better.
Well, well, the only thing left to do is weld both parts together and weld the pipe to fit it with the standard muffler.
I didn’t bother with the fastenings to the frame, and why should I? I made two points of attachment to the luggage frames (it couldn’t be stronger): this fastening withstood a revolution on the asphalt and the can became a junk)))
The end of the jar is at your own discretion. I made pipes of a smaller diameter, and it looks quite good)
The sound, let me tell you, turned out surprisingly great! Even though it’s forward flow! At idle you can’t hear it at all, even the electronics are louder, but when driving it’s just the most beautiful sound - a soft growl without a dull metallic rumble and yelling.
Well, here’s the final look) The plastic doesn’t burn, the sound is pleasant, nothing was done to the original pipe. What else does?)))
Reducing noise from the unit
Even the most modern and expensive motor cultivators make a lot of noise during operation, especially at high speeds. This factor greatly tires the operator and can serve as a reason for deterioration of relations with neighbors. A homemade muffler will help solve the problem. This is a task that can be accomplished by any craftsman with basic skills in handling iron.
In order to make a muffler for a walk-behind tractor with your own hands, you will need the following tools and materials:
- roulette;
- welding machine;
- Bulgarian;
- electric drill;
- hammer;
- aluminum clamp;
- stainless steel 2 mm thick;
- metal shavings.
Having collected everything you need, you can begin to improve the exhaust system.
This is done in the following sequence:
- Make 2 oval pipes from stainless steel. The diameter of the pipes should differ by 1-1.5 cm. The pipe joints should be fastened using a welding machine.
- In a pipe of smaller diameter, make a maximum number of holes with a diameter of 8 mm. Wrap it with metal shavings. Wrap the shavings with steel wire.
- Insert the smaller pipe into the larger one. Fix them in the desired position using steel rods and welding.
- Attach the muffler to the exhaust pipe and secure with a clamp.
Why do you need a plow
One of the most difficult tasks in farming: preparing the land for sowing. After all, in order to get the next harvest, the soil must first be loosened. This requires a plow, with which it is easy to move layers of earth up.
In order to create furrows as quickly as possible, the plow is attached to a walk-behind tractor. Thanks to the use of this technique, the time spent on field processing is reduced tenfold.
Due to the draft force, a harrow is created. This principle has been known for a long time; people used it thousands of years ago, so its effectiveness has really been tested by time.
For more information about the plow for a walk-behind tractor, watch the video:
Blade for walk-behind tractor
The blade is a necessary device, which is needed at any time of the year. The front blade is used to clear snow, plan terrain, dig holes and move bulk materials. Such equipment for the Neva walk-behind tractor is of good quality, but not everyone can afford it. Do-it-yourself dumps require minimal financial investment. By installing the front blade on the Neva walk-behind tractor, you can solve many household problems. If there are levers and hydraulics, a homemade shovel can also be used as a loader.
To make a blade you will need the following tools:
- roulette;
- welding machine;
- electric drill;
- Bulgarian;
- spanners;
- acrylic paint;
- barrel 200 l;
- reinforced rubber;
- sheet steel 5 mm;
- profile pipe 40x20 mm;
- paint and brush;
- bolts and ties.
Before making a blade, it is necessary to calculate the compliance of the power of the walk-behind tractor with the dimensions of the bucket. Excessive load leads to rapid wear of parts and mechanisms of the unit. Depending on the weight and power of the machine, shovels are made 60-100 cm wide and 20-30 cm high.
Do-it-yourself snow removal for a walk-behind tractor is made in the following sequence:
- Applying markings to the barrel, sawing it into 3 equal parts vertically. Cutting 1 piece into strips 5 cm wide.
- Fastening 2 workpieces using bitumen and rivets. Aligning the edges of the product. Reinforcement of the bucket with transverse racks.
- Fastening strips of tin along the edges of the shovel. This is done by welding or bolts.
- Drilling holes for bolts. Attaching a strip of rubber to the bottom of the bucket.
- Making a hitch for a shovel. It is made by welding a piece of pipe and a semicircle of sheet metal to the blade. Holes are made on the sector to adjust the angle of attack. A homemade snow removal device is attached to the bracket of the walk-behind tractor with an adapter made of a profile pipe.
The finished product needs to be cleaned and painted. All bolted connections must be lubricated regularly to prevent corrosion.
Required parameters
When making homemade products for a walk-behind tractor, it is important to consider factors that will allow the equipment to work correctly. You cannot assemble a unit like a neighbor who works on a tractor and connect it to a walk-behind tractor
The parameters of machinery and attachments must be appropriate
Therefore, it is necessary to pay attention to the following points:
Motoblock power. So, for equipment with a capacity of 4.5 liters. With. A load of 250 kg including the driver will be sufficient. Based on this value, you can calculate the mass of cargo transported in the trailer, the number of permissible plows, and so on.
Size. The area near the house, even the largest one, is still not a field. Therefore, there will probably be areas where large equipment will not fit. In addition, large (or, conversely, narrow) equipment is not always convenient to use. It may not fit between the trees or, conversely, be too narrow for the garden bed. It is necessary to take into account such dimensions in advance.
Provide a unit for attaching equipment to the walk-behind tractor. It can be hinged, on bushings, or bearing. You need to select it specifically for your equipment.
A method of fastening individual parts of equipment to each other. Solid units can be connected to each other by welding, rivets, and bolts. The choice in this case depends on the availability of tools, time and abilities.
These are the main questions that need to be thought through. But not the only ones. In the process of making a homemade product for a walk-behind tractor, there will be many questions and nuances that will need to be carefully considered in order to make the right decision.
Digging equipment
Potato diggers of various types are very popular among farmers. These devices save people from hard manual labor, speeding up the harvesting process several times. The walk-behind tractor has a very simple design. It can be made from metal that remains after the construction and renovation of a house.
To work you will need:
- Bulgarian;
- welding machine;
- electric drill;
- heavy hammer;
- anvil;
- profile steel pipe 20x40 mm;
- reinforcement 12 mm;
- tin (preferably stainless);
- bayonet shovel without handle.
The attachment to the walk-behind tractor is made in a suspended or trailed (modular) design. The hanging tool only digs up the tubers, leaving them lying on the surface for subsequent manual harvesting. A modular potato digger not only extracts the crop from the ground, but also collects it in a mobile container on a chassis.
The manufacture of a digger is carried out in the following sequence:
- Drawing up a drawing. The width of the digger should be within 25-30 cm. The angle of attack of the tip is taken perpendicular to the coulter so that the tool does not bury itself in the ground.
- The reinforcement is cut into fragments of a given length. Using a hammer and anvil, they are given the required bend.
- A container for tubers is assembled from a profile pipe and tin. The chassis or skids are welded to the container frame. The runners are made from pipes, and the chassis is taken from an old stroller, cart or lawn mower.
- The holder and reinforcement bars are welded to the shovel. A drawbar is welded to the holder, which is fixed to the assembly container. Connections are made movable using bolts or hinges.
- Rust and weld marks are removed. The finished product is treated with an anti-corrosion agent and coated with paint.
Adjustment and adjustment of the digger is carried out using racks and steel ties.
Included with the digger, you can immediately make a disk hiller. This tool will be needed when planting tubers after they have been buried in a trench made by a plow. Hillers are made from old pot lids, profile pipes and bolts. A trolley is assembled from pipes and small wheels, onto which holders for lids are welded at a certain angle. After sharpening on a stone, the discs are mounted on holders.
Hillers
These are devices designed for hilling potatoes and other crops, as well as for weeding and plowing rows. There are three types of hillers that can be hung on a walk-behind tractor.
Dental. These nozzles can be single-row or double-row. The teeth are rigidly fixed to the frame and are located clearly on the axis of the walk-behind tractor wheels. During operation, the tines weed between rows, simultaneously covering potato bushes or other crops with soil. Typically, the width between the teeth (for two-row models) is 25 - 30 cm. Units with a capacity of 4 - 6 liters are mainly equipped with such attachments. With.
Disk. Here the discs are similar in design to those on a disc harrow. This hiller copes well with weeds and covers the bushes with soil. Some hillers have nicks on the discs. Serrated discs work well in thick weeds. The distance between the discs can be adjusted depending on the width of the bed.
Rotary. Unlike the two previous types of hillers, rotary hillers are active, that is, they do not require a hitch - they are installed instead of the wheels of a walk-behind tractor. They are excellent at loosening the ground, hilling up beds and cutting off weeds. But, in our opinion, they are less convenient, since to install them you need to remove the wheels, which takes time.
Making a field sprayer
A homemade sprayer for a walk-behind tractor is necessary in cases where the area of cultivated crops exceeds 20 acres. Doing this type of work manually is very difficult and can take a whole day. Mechanization of this process will save a lot of time and effort.
To make a sprayer you will need:
- welding machine;
- Bulgarian;
- level;
- electric drill;
- soldering iron for polypropylene pipes;
- profile or round water pipes;
- plastic or steel barrel with a capacity of 80-100 l;
- wide pneumatic wheels;
- plastic pipes;
- rubber hose;
- injectors or nipples from wheel tubes.
Assembling a homemade sprayer is carried out in the following sequence:
- Making the frame. Its dimensions are adjusted to the size of the container. The chassis is attached to the frame. For good cross-country ability you need at least 4 wheels. In the absence of wheels, wide skids are made of aluminum.
- The container is installed and secured on the frame. For this purpose, spacers and ties are used. Holes are made in the tank for supplying high-pressure hoses. The tank neck is sealed.
- A bracket for the pump is being manufactured. A model is selected that operates from a power take-off shaft (belt drive) or from electricity (motoblock generator).
- The irrigation system is being assembled. A durable holder is made from steel profiles. Plastic pipes are attached to it using clamps or plastic ties. A valve is being installed to bleed off excess pressure and injectors.
- All parts are connected together, the quality of the fastenings and the tightness of the joints are checked. The tank is filled with water, the unit is tested in various modes, and final adjustments and settings are performed.
A self-made sprayer will fully justify the efforts invested in the first season. Thanks to this device, spraying and watering the garden will be done quickly and efficiently.
DIY sandblasting cameras 6 photos
A sandblasting chamber is a useful thing in the house. Do you need to clean some coating, remove metal corrosion, or remove contamination? No problem. The cleaning process occurs by spraying an abrasive material under pressure inside a closed space. In self-built sandblasting chambers, you can use the following as an abrasive:
- Quartz sand of different fractions.
- Cast iron or steel shot.
- Slag remaining after processing copper and nickel.
The chamber can be built from a regular OSB sheet. You can buy it at any lumber market. The camera can be any size, you need to choose it for yourself and understand what it will be used for.
Detailed operating principle. Only the size and body of the structure can differ.
Such chambers are called habitable because the part is processed directly by a person. Wearing safety glasses is recommended. Thick rubber gloves are attached to the holes. It is prohibited to climb into a working chamber with bare hands!
It was made to be portable. Total weight – 10 kg. The base is made of iron profiles and aluminum sheet.
Transparent storage container. Volume – 30 liters. You can buy it at a building materials store.
According to the author, it was made by eye from what was in the garage. I just wasted my time. Intended for cleaning car rims.