It is quite possible to convert a walk-behind tractor into an ATV, but you will have to try hard to do this. To do this, you need to purchase some additional items and use special tools. So, in order to create an ATV from a walk-behind tractor with your own hands, the master must be able to handle a welding machine.
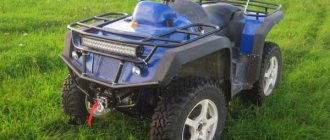
Like an ATV, a walk-behind tractor is designed for off-road driving, so converting it into a fashionable all-terrain vehicle will be relatively easy. The result is a powerful, high-speed vehicle that has high cross-country ability. At the same time, a homemade ATV will be light and safe; it will be much more difficult to fall out of it than from a motorcycle.
In addition, the functions of the walk-behind tractor can be preserved in the new design. But at the same time, the ATV can be used for off-road driving or trips into nature. But the economic functions of the all-terrain vehicle are preserved in the design.
A homemade ATV made from a walk-behind tractor will be slightly different from factory-produced models. Its seating position will not be that of a motorcycle, since the design will remain almost unchanged, like the saddle that was originally on the walk-behind tractor. In terms of power and speed, a homemade ATV with a walk-behind tractor engine will be inferior to popular models. But in terms of maneuverability and endurance, the new vehicle will be no worse.
ATV from a walk-behind tractor: stages of modification
The design of the walk-behind tractor requires minimal modification, since both vehicles are really very similar. But some changes will still have to be made. It is recommended to find or develop your own drawings of a 4x4 ATV with a walk-behind tractor engine. This will allow you to carefully consider all the details and avoid mistakes during the assembly process.
All work can be divided into 3 stages:
- First, the wheelbase of the walk-behind tractor is expanded.
- The frame structure is being arranged.
- Wheels of suitable size are installed.
About assembling ATVs
You will need to go through the following steps to complete the work:
- Acquisition and preparation of parts.
- Welding the frame and altering it.
- Installation of wheels with shock absorbers, chassis, brakes with suspensions.
- Installation of engine and gearbox. The drive is assembled at the same stage.
- Next, the electrical equipment is installed, including the battery and dashboard, turn signals, and headlights.
- The body part is being manufactured.
- The body is sanded, primed and painted.
- Install the body and seats.
Motor
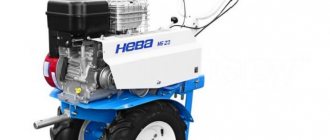
It is best to create an ATV with your own hands from a Neva walk-behind tractor. This self-propelled vehicle has a reliable and fairly powerful motor. But this is the most important part of any all-terrain vehicle. Depending on the walk-behind tractor model, the engine can have a power of 6, 6.2 or 7.5 liters. With. This is quite enough to move over rough terrain, transport small and medium loads, as well as carry out business operations, cultivate the garden, etc.
The motor may be from a walk-behind tractor of a different model, but its power must be sufficient to perform all the functions assigned to the ATV.
Features of pneumatic and swamp vehicles
As already noted, a swamp vehicle, as well as a pneumatic vehicle, are just analogues of an all-terrain vehicle.
The first option will make it easy to move over uneven terrain, and its modification most often includes from three to six wheels. The main feature of both the pneumatic walker and the swamp walker based on a walk-behind tractor is the use of wheels that exert low pressure. In this case, the tires should weigh very little, be flexible and exert little pressure on the ground. Along with a wide swing radius, the equipment will be distinguished by its endurance and maneuverability.
The two vehicles are created from the same design, just like the all-terrain vehicle, so many manufacturers use three definitions at once in the same context. Thanks to simple modification methods, you can independently create a good ATV that will not need a rolling road and will not be afraid of slopes and strong uneven surfaces.
Experts note that if you have special parts, tools, drawings and minimal mechanical skills, the walk-behind tractor can be completely modified and changed to the desired all-terrain vehicle.
https://youtube.com/watch?v=KtgftNZN0QE
Frame arrangement
Next you need to weld the steel frame, which must be strong and reliable. But, according to experienced designers, this unit is the most vulnerable part of the ATV. It is assembled from a frame from a motorcycle or bicycle. If you have nowhere to take the workpiece, you can weld a structure from pipes whose walls are 3 mm thick. They can be either round or square.
The homemade structure is attached to the future vehicle with two pins, which are fixed to the rotary joint.
Homemade all-terrain vehicle based on a walk-behind tractor
The walk-behind tractor is one of the most successful designs of agricultural machinery. That is why folk craftsmen have learned to create other vehicles based on it - swamp vehicles, caracats, etc. Despite the synonymity at first glance of these concepts, they all have their own nuances and are adapted to specific operating conditions. The similarities and differences between homemade types of transport from small agricultural machinery will be discussed in this article.
Installation on wheels
To install the structure on wheels, you need to decide on the choice of wheel rims. The best option for this are parts taken from the car. They should be designed for tires with a low profile, since such rubber has a wide bed.
When choosing tires for wheels, you should give preference to truck-type tires with an aggressive tread. Such an ATV will be able to drive through mud, bad and uneven roads. Tire pressure should be low to ensure sufficient contact area with the surface. This way the wheels will be able to overcome various obstacles on the road, and the ride will be smoother. These tires increase comfort while driving an all-terrain vehicle.
In some cases, the use of soft rubber with low pressure allows you to do without installing shock absorbers, since the tires will spring directly. The disadvantage of this solution is the fact that soft tires are less durable. Without additional protection, they will not be used for long. After all, you will have to drive off-road, where you may come across stones, thorns, branches and other sharp objects. In this case, it is much easier to puncture a soft tire than a hard one.
A homemade ATV is assembled not only from “Ant”: read how an ATV is made from a motorcycle “Ural”, “Dnepr”, “Ant”, from a scooter and Oka.
How to turn a walk-behind tractor into an ATV
Before starting work, the main thing is to find a diesel or gasoline engine in good condition. Its traction potential should be enough not only for full movement, but also for transporting the driver.
After this, it remains to choose the chassis that is used in a particular case. The choice is made between tracked and wheeled options. The first solution has higher cross-country ability. But this design is more complex to implement. And the control process is not always accessible to drivers with a minimum of technical knowledge.
Homemade ATV
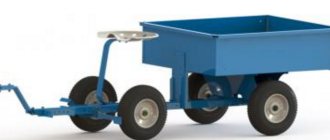
Karakat based cultivator: distinctive features and assembly
The caracat from a walk-behind tractor is similar in purpose to the device discussed above. The differences are:
- extended wheelbase with belt clutch;
- bulkiness;
- extended conditions for operation - the karakat is capable of generating speeds of up to 70 km/h on rough terrain.
Due to the fact that the main emphasis in this alteration concerns the tires, we will dwell on them in more detail.
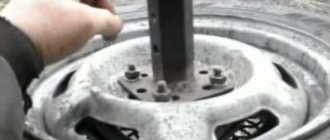
Among the existing methods of manually recreating powerful and large stingrays, several basic ones can be distinguished:
- considered the easiest. Two metal disks are taken and aggregated onto a sleeve. They put cameras on them, secured with a conveyor belt. The walk-behind tractor has good stability and endurance;
- Only one of the disks is attached to the hub. Jumpers are also installed on it. Rings are fitted to the latter welding machine;
- resembles the previous method, however, the central disk requires an additional spoke, which can be made from a metal billet or pipe;
- will allow you to give new life to disks from an old scooter, which are standardly attached to a hub.
You can use the proposed drawings as a reference outline for further assembly of the caracat.
A homemade caracat based on an engine from a soil cultivator such as “Neva” or “MTZ” is assembled as follows:
- we prepare a frame from a metal profile or pipes;
- We install front and rear wheel drive. It is allowed if they are without a differential and solid;
- the front axle can be borrowed from the chassis of the car. The steering rack is also taken from it;
- The engine is borrowed from the tillage machine. You can leave the original gearbox or replace it with a multi-stage gearbox. In this case, it will be easier to control speeds in karakat. With a gearbox, you will have to stop before changing the speed of movement;
- install the ramps and proceed to testing the Karakarta.
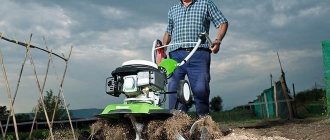
What will it take to create a children's all-terrain vehicle?
First of all, decide on the appearance of your unique ATV and its dimensions. You can make an off-road unit for a child of any complexity - it all depends on your knowledge and skills. If you don't want to spend months building an electric ATV, go with a simpler design that can be improved in the future as your child grows older.
The basis of any vehicle is the frame. A do-it-yourself drawing of the frame of a children's ATV is necessary to maintain the dimensional accuracy of all structural elements. Surely you can make the drawing yourself. If you anticipate the possibility of strengthening and upgrading your ATV in the future, then the frame should have a good margin of safety in the suspension. For the frame, you can use it as a square profile of a suitable size (for example, 25x25mm), a ¾-inch pipe or a ready-made structure from a donor model - it all depends on your desire, imagination and capabilities. If you make the frame yourself, pay attention to the quality of the welds.
Wheels, braking and steering systems, shock absorbers are the next stage of assembling an ATV for a child. Most craftsmen recommend choosing new wheels - you can, for example, take wheels for a go-kart or even for a garden wheelbarrow with a diameter of 320 mm. If you are making an ATV for an older child, he will probably want to ride it off-road - then choose wheels with wide tread and buy stamped wheels (even the simplest ones). This will increase the safety of the ATV and allow the child to overcome serious obstacles.
Drive to two rear wheels for a children's ATV from an electric motor of sufficient power through a gearbox (homemade or ready-made) is a good solution. The gas button on the steering wheel will delight your young driver and make the children's ATV look like a real one. The steering system is an important element that ensures the safety of the little driver and ensures that he can easily control his little car.
Sources
- https://grifon-kamaz.ru/drugoe/kvadrotsikl-iz-motobloka-svoimi-rukami.html
- https://motokomo.ru/drugoe/kvadrotsikl-iz-motobloka-svoimi-rukami
- https://stroy-podskazka.ru/kvadrocikly/svoimi-rukami/
- https://motorsguide.ru/system/kvadrik-svoimi-rukami
- https://minitraktor34.ru/kommunalnaya/samodelnye-kvadrocikly.html
- https://awm-trade.ru/quadrocycles/samodelnye-kvadrotsikly-podrobnyj-gajd/
- https://moto-wagen.ru/vnedorozhnyie-mototsiklyi/samodelnyiy-kvadrotsikl-svoimi-rukami-kak-sdelat-dostoynyiy-apparat
- https://piko-train.ru/avto/kvadrocikl-iz-2109.html
- https://camodelkin.ru/avto/samodelnyj-motovezdehod.html
[collapse]
Construction of a homemade ATV VAZ 2109 4x4 No. 2
Continuation of the construction of the so-called ATV
ATV wheelbase 14301030.
The bipod is made of an 8 mm wide iron sheet in a shape resembling the letter “T”. At the edge of the “rack” there is a hole with a diameter of 20 mm - the control shaft is inserted and welded there, and in the ears there are conical holes for the ball ends of the control rods. These holes are reinforced with suitable welded washers. The bipod ears are slightly bent down so that they are almost parallel to the rods.
The wheels are 15-inch, from a Chevrolet Niva car. Tires with a suitable fit diameter of 205/70 (width/height as a percentage of the width) with an off-road tread pattern. The wheel running diameter is about 660 mm.
Drawing of a homemade quad bike frame:
1 — lower spar (pipe d25x3.5,3.2 pcs.);
2.7 — upper spar (pipe d25x3, 2.7, 4 pcs.);
Tools and materials
The set of accessories used is determined by what kind of ATV they are trying to create. Utilitarian models weigh quite a lot, but boast excellent cross-country ability. It is easy to transport several people on such cars. The speed reaches 90 km/h. The stunt machine can accelerate to 137 km/h; Narrow platforms are required.
The main components of the device itself are:
- actuator;
- suspension;
- seat;
- luggage compartment;
- chassis, steering and brake parts.
You also need to take into account the battery, external light, muffler.
The ATV can only be fully assembled using a welding machine. You will also have to perform a number of works on a lathe. Such a product can only be assembled in a large garage.
To work you will need:
- electric drill;
- angle grinder;
- wrenches;
- jack;
- pliers;
- calipers;
- hammer;
- sharp knife;
- screwdrivers;
- pipe bender
Components from the following types of vehicles are usually taken as a basis:
- motorcycles;
- scooters;
- small cars.
Frame
You will either have to make this component yourself or restore it after use - in both cases, the engine must be bolted as securely as possible. It is placed in both the front and rear of the vehicle. To prevent backlash, the drive and transmission must also be connected very tightly. For the manufacture of the frame, water and gas pipes are used, the size of the metal layer in which does not exceed 3 mm. For the spar, take a pipe with a cross-section of 25 mm, and for a cross member or strut it should be 5 mm smaller.
Spot and solid welding (in that order) will help to connect the pipes. The lugs on which the levers and shock absorbers are attached must be welded immediately. The installation of the brackets will occur simultaneously with the fastening of the components and assemblies for which they are intended. Reconstructing a finished frame begins with removing all unnecessary components (only the frame remains). The back part is removed, and the front part is built up.
When this is done, the elements that are needed to attach a complete set of components and assemblies are welded. Rebuilding a motorcycle frame is not difficult. It will only be necessary to move the seatposts by 0.4-0.45 m. Next, you need to cut blanks for luggage racks from metal sheets. They are welded to the frame, and after the final connection, all parts are painted.