Vegetable growing » Potatoes
1
810
Article rating
Kira Stoletova
In order for potatoes to produce a good harvest, it is necessary to properly care for the crop. Thus, hilling up potatoes with a cultivator is considered an important event.
Rules for hilling potatoes with a cultivator
The procedure is needed to control weeds, to protect potatoes from direct sunlight, and to retain moisture in the soil.
Many have noticed that some of the dug up potatoes are green in color - this negatively affects not only the appearance of the vegetable, but also its taste, as a specific bitterness appears. It is classified as unfit for food. Green potatoes are the result of insufficient hilling.
Purpose of hilling, terms and conditions
When hilling potatoes, the following goals are achieved:
- preservation of moisture in the root area, which leads to the development of tubers without loss of nutrients and taste;
- Hilling reduces the risk of diseases and pests in tubers;
- the risk of damage to the upper tubers, which can protrude on the soil surface and negatively tolerate exposure to the sun, is reduced;
- preventing the impact of negative factors on potato tubers;
- using the hilling procedure, the size of the crop increases;
- if potatoes are planted ahead of schedule, the use of this type of treatment protects the crop from frost;
- reduction in the number of weeds.
Hilling is carried out in stages, which include:
- The first stage - processing is carried out after the potato sprouts reach a size of 10 cm. Such actions will prevent possible frost damage.
- The second stage - potato processing must be carried out after buds begin to form on the crop. This will promote the formation of tubers.
- The third stage is carried out if necessary, if there is excessively hot weather that negatively affects the development of tubers.
Hilling is carried out in the evening. This period will allow you to retain moisture longer. It is also recommended to apply mineral fertilizers before the hilling procedure if the soil is poor and the plant does not have enough useful components.
What is the purpose of hilling potatoes?
Some gardeners believe that there is no need for hilling, and the potatoes will grow on their own. This is due to the fact that most of the plant's roots are directed vertically downwards.
And to increase productivity, you should pay attention to the root shoots that form on the sides and produce new tubers
Advantages of hilling:
- Stimulation of the root system for active growth. The formation of additional root shoots increases not only the amount of harvest, but also the size of the tubers. This happens because the plant grows and absorbs more nutrients and water needed to form a good harvest.
- Additional covering of the shoots protects them from temperature changes (extreme heat or frost).
- When hilling, the soil is simultaneously loosened, which increases air access to the roots and improves plant growth.
- Additional soil drainage is created, and excess water flows into the aisle. This system balances the problem of lack or excess moisture, and also prevents the plant from drying out or rotting.
- The cleared soil around the bushes is well lit and warmed up, the plants no longer shade each other.
- Hilling prevents the appearance of green tubers, since they are completely covered with soil.
- At the same time, weeds are weeded out and pests are removed (for example, wireworms, Colorado potato beetles). Mulched soil provides favorable conditions for their enemies.
All this leads to the fact that potato yields increase after hilling.
Disadvantages of hilling:
- If carried out incorrectly, the development of shoots is disrupted.
- Excessive soil filling can negatively affect the root system if the plants were originally planted deep.
- The soil between the rows of plants dries out greatly.
- The process takes time and effort.
Recommendations for selection
You should not save on a walk-behind tractor, as a low price can bring headaches and problems in the form of low-quality equipment. When choosing a motor cultivator for hilling potatoes, you should take into account certain factors:
- Land cover density. If the soil includes clay and sand, then the device must be of high power. It will easily cope with lumps that exist in loamy soil.
- Area of potato bed. You should not buy low-power units for large areas, as they will quickly fail. For a 20-acre garden, a model with standard power is suitable. For large areas, it is better to choose a powerful device with a working width of more than 60 cm and more than 5 horsepower.
- Row length. It is easier to operate the unit if you make fewer turns.
Description of hilling potatoes using the fan method: step-by-step instructions Growing potatoes using the fan method often produces the largest yields.
This method is very simple... You can also choose a mini tractor. But it is suitable for large areas (from 10 hectares). Small tractors have power from 12 to 40 horsepower. You can watch the video of hilling potatoes with a mini tractor.
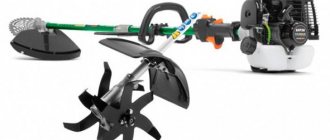
Features of hillers
To properly hill potatoes, as well as care for other vegetables in the garden, special equipment is required. It will help dig up the soil, and then cover the already planted potatoes with a layer of soil. This technique includes a hiller; the softness of the dug up earth depends on it.
Hillers have the following characteristics:
- They can run on gasoline, electricity or manual control.
- There are fallow ones, which prepare the soil for sowing, or row crops, which plow the ground with already planted potatoes.
- The hiller cultivator operates using steam, loosening the soil, digging it evenly, cutting off weeds, and saturating the soil with oxygen.
Note! A cultivator-hiller is most often used as an additional tool to a tractor for digging up a potato field.
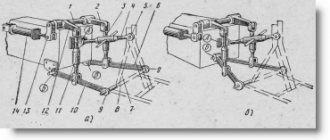
Design and principle of operation
In order to properly earth up potatoes with a walk-behind tractor, it is a good idea to find out how the standard tool works and how it works, which helps plow the fields.
How the hiller works and how it works:
- The device is a metal wedge on which movable disks are installed.
- The hiller is attached to the apparatus using the provided fasteners.
- When carrying out hilling, going in one direction, you can see that the device leaves a furrow, and moving back, the earth is filled up exactly to the height that is necessary for this crop.
- If necessary, the device removes weeds, hills and loosens the soil.
Hilling potatoes with a walk-behind tractor makes planting and care easier.
Recommendations for selection
When planning to hill potatoes with a cultivator, you should first study the rules for choosing equipment and the recommendations of summer residents.
Basic recommendations:
- Saving can lead to purchasing a device with low quality - in this case, it is better to spend money.
- If the soil in the garden contains sand and clay, then you will need a device with increased power so that it does not get stuck in clods.
- The period of use depends on the amount of horsepower. For areas with a large area, accordingly, you will need a walk-behind tractor or a cultivator with a soil handling width of 60 cm.
Hilling up potatoes with a motor cultivator or walk-behind tractor will make the work easier, but only if the equipment is chosen correctly.
Digging potatoes with a motor cultivator - how to harvest?
After hilling the potatoes, the bushes will begin to grow much faster. After some time, the tops of the crop will dry out, and it will be time to harvest. In most cases, potatoes ripen by the end of August, however, depending on climatic conditions and planting dates, the ripening period may vary.
It is best to harvest potatoes in warm, dry weather so that the tubers are clean and free from wet soil sticking to them. Before harvesting, you need to mow down the grown weeds and dry tops so that they do not interfere with digging the potatoes. It is best to dig up potatoes using a potato digger, however, in the absence of this equipment, you can again use a hiller.
To harvest, attach the hiller to the cultivator, and instead of standard wheels, attach lugs to the equipment. After this, turn on the first speed on the cultivator, move the unit in the middle of the bed, and start digging up the potatoes. During the work, the hiller will cut the soil and lay the tubers on the surface of the ground along the edges of the cultivated bed.
After digging the potatoes, the collected tubers must be laid out in a dark room, otherwise they will turn green from the sun's rays. After a couple of weeks, the tubers will need to be sorted and separated into small and large ones, and then laid out in the basement for further storage.
Harvesting equipment
We attach the digger to the tractor
The digger is fixed to the rear suspension of the tractor.
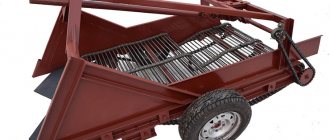
One of the most complex designs is considered to be a conveyor digger. On its front part there is a ploughshare, which cuts the ground during cultivation. The root crops, along with the soil, fall onto a conveyor, where they are cleaned of dirt. Most often, these models of diggers are used for harvesting crops on large farms. Their main disadvantage is their high price.
The vibrating potato digger also has a plowshare at the front that cuts the soil. But the table made of rods is not made in the form of a conveyor, but is tightly welded. The trimmed soil, along with the vegetables, falls on a grate that vibrates due to movement, due to which the tubers are cleaned. This model is most profitable for home use, and its price is lower than that of the previous analogue.
A fan digger is the simplest design, reminiscent of a vibrating digger. The potato digger here is made of a hiller, to which fan-shaped rods are attached to the back. The tubers are cleaned from dirt on the rods. It is recommended to use the digger together with a walk-behind tractor.
The drum potato digger is rarely used because of one serious drawback: it damages the potato skins when peeling. The drum is connected to the power take-off shaft by direct drive. On the front part there is a knife that cuts the soil.
How to make a device for hilling with your own hands?
If you don’t want to spend money, then you can make a universal manual hiller that will serve the farm for many years. It can also be used for digging potatoes. The work will require a minimum of materials: a stainless steel pipe, several metal plates curved towards the middle, and a welding machine. The assembly order is as follows:
- A piece 1 m long is cut from a pipe with a diameter of 25 mm. It will play the role of a stand, to the bottom of which you will need to weld a fastener that holds the working part of the potato digger. It is best for this element to have the shape of a flange to which the knives will be attached using threaded connections through special holes. It is necessary to weld a piece of pipe perpendicularly on top, which will act as a rod;
- For better support, the ends of the rods should be bent at a right angle. A grip is welded in the middle of the rack, which the farmer's assistant will pull on. To use it with a walk-behind tractor, you will need to make a mount on the grip;
- It is necessary to weld a knife in the shape of a faceted triangle onto the metal plates. To create a knife, carbon steel with a thickness of at least 4 mm must be used;
- Finally, the plate with the knife should be secured to the bottom of the rack.
After manufacturing, it will be necessary to process the seams remaining as a result of welding. To do this, you can use a grinder. The described option involves making a simple hiller with which you can dig potatoes. No more than three hours will be spent on the work, and as a result you will receive a reliable tool that processes the soil efficiently.
Types of tractors
Planting and hilling are carried out using 2 types of tractors:
- MTZ82;
- YuMZ-6.
MTZ82 has undergone modifications several times throughout its production. The main mechanical components are located on a frame made of steel, reinforced with side members. The required rigidity is provided by the intermediate support; the front axle is equipped with wheels of a smaller diameter. The tractor is equipped with telescopic arms that allow you to change the track width.
YuMZ-6 was designed on the basis of MTZ, intended for processing fields. It is considered one of the simplest and most reliable tractors produced in the USSR. The motor tractor has been used for many years to simplify agricultural work on large areas.
What is the need for hilling potatoes?
Many novice farmers do not attach any importance to the hilling procedure. However, this attitude is a big mistake. Hilling helps control harmful weeds, protect tubers from direct sunlight and prevents moisture from evaporating prematurely from the soil. Surely, many have noticed more than once that one of the sides of the dug up tuber is green. This is one of the signs of ignoring hilling. Many beginners simply do not perform this procedure, because they believe that fruits growing downward do not need it.
However, potatoes grow upwards and to the sides, which means they need hilling no less than other similar crops. It is best to perform this important procedure using a cultivator. With its help, hilling and weeding of potatoes will be done more efficiently.
Is it possible not to hill up potatoes?
Under certain factors, potato hilling is not carried out:
- When cultivated in southern regions, with low humidity and infrequent watering.
- With the growing method without hilling (under film or other non-woven material, in bags, under straw).
The bushes should have a lot of green mass, in which photosynthesis occurs when exposed to sunlight. During this process, soluble glucose is formed in the leaves, which goes to the tubers and is deposited there as insoluble starch.
Advantages
Hilling is popular among many gardeners and this is not surprising, since this procedure has many advantages. The main advantages of hilling potato beds with a walk-behind tractor include:
- quick cleaning of the garden from weeds that impair the growth and development of potato bushes;
- ease of procedure, so you don’t need to spend a lot of energy;
- improving the growth of potato bushes and their root crops;
- enriching the soil with moisture and nutrients;
- protection of young tubers from dangerous parasites;
- reducing the likelihood of damage to ripe tubers by sunlight.
Having familiarized yourself with the main advantages of loosening the soil, we can conclude that you need to hill up potatoes with a walk-behind tractor regularly throughout the season.
How many times to hill?
Classic - 2 hillings: the second is carried out 2-3 weeks after the first, before the potatoes bloom. But if you start this event early enough, two times is not enough. In this matter, too, I prefer to focus not on abstract “norms”, but on the needs of real plants.
If the grown bushes fall apart, or the nest does not form along the ridge, but grows across, in breadth, and tubers begin to peek out of the ground, turning green in the light, it is necessary to spud up, no matter what they say.
How many times to hill, everyone decides for himself. Photo by the author
I happened to hill up potatoes 3 and 4 times a season. Some will say that this is too labor-intensive... I don’t know, for me weeding is much more tedious. And then I walked across the field with a hoe - and the soil was loose, and there were no weeds, and the potato bushes were vigorous and beautiful, even. And then they thank you with an excellent harvest.
Instructions
I would like to start by considering the process of manufacturing a disk hiller, because this type of device is the most in demand today.
By installing disc sizes of different diameters, you can hill up potato bushes of various lengths.
Disc hiller
Many people ask the question - how to make a hiller for a walk-behind tractor with your own hands? At home, this is quite possible if you follow certain recommendations. So, let’s describe the manufacturing process step by step (for example, let’s take a disk hiller for the Neva walk-behind tractor):
- For manufacturing, we will need cutters from an old seeder, or sheets of metal 2 mm thick. They are secured using bearings with seals.
- They need to be placed at an angle to each other. The distance between the lower parts of the disks should correspond to the track width of the walk-behind tractor. They are connected by welding or using ordinary bolts.
- Here you need to follow a strict recommendation - the disks must be symmetrical to each other. Otherwise, the walk-behind tractor with the hiller will drift to the side, which will significantly complicate the entire work process.
- In addition to the discs themselves, the design of the hiller includes screw lanyards, a T-type leash and stands. Lanyards, in this case, perform the adjusting function of rotating the disks along the vertical axis.
- A do-it-yourself hiller for a walk-behind tractor, the drawings and photos of which you see below, must be made in strict accordance with the dimensions. Of course, there will be improvisation, but for the first assembly experience it is best to use other people's work.
- Depending on the capabilities, you can make a fixed or adjustable working width. The second method is more convenient, because you can change the inter-disk distance by simply rearranging the racks.
- To aggregate the hiller with a walk-behind tractor, you need to use a hitch bracket that does not have a beam. The hiller's leash is attached to the hitch using a stopper, connected with bolts and washers. The stopper itself is inserted inside the square pipe and then tightened.
The disk hiller for the Salyut walk-behind tractor is made using the same method, because the design itself and the method of connection to the walk-behind tractor are completely identical to the Neva.
Active hiller
To make such a hiller, we will need exactly the same list of materials and tools that we used in the manufacture of the disk hiller:
- welding machine;
- sheet iron;
- Bulgarian;
- fastening connections.
Using similar tools, you can make an active hiller for the MTZ, Plowman, Champion, Carver, Husqvarna, Lifan walk-behind tractor. The manufacturing principle is in many ways similar to the disk version:
- The axles also need to be adjusted to the parameters of the walk-behind tractor, and the parts themselves are welded using a welding machine.
- As previously reported, this type of hiller places certain demands on the walk-behind tractor. It must have two forward gears, as well as a PTO - power take-off shaft. Many sellers of walk-behind tractors, when they say that a walk-behind tractor has two gears, mean one rear and one forward.
- So you need to clarify this point when purchasing.
- It would be advisable to manufacture several bushings with brackets, as well as additional metal blades.
Double row hiller
The double-row hiller is the same lister type of hiller, but in double volume. Let's look at the whole process step by step:
- For work we need a sheet of metal about 3 mm thick. It is necessary to weld the base of the hiller from this material.
- A 4 mm steel strip can be used as a bracket. The field board is made of a steel sheet 5 mm thick.
- The hiller stand takes on the main load during operation. Therefore, you need to make sure that it is the most stable and reliable in comparison with other parts of the hiller.
- The wings of the hiller can be made from a sheet of steel 2 mm thick. They need to be bent a little using a pipe of the required diameter.
In principle, this is where the process of making a two-row hiller ends. You can also make an adjustable system of hiller wings, which are attached to the base using hinge technology. At the tail of the structure there are rods that regulate the angle of the wings.
Otherwise, the manufacturing principle is completely identical to that of the fixed list version.
https://youtube.com/watch?v=fSGR4FlZuFY
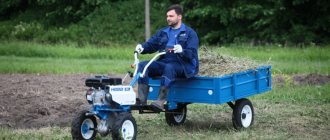
Processing with a walk-behind tractor
A walk-behind tractor is a great thing that simplifies this process of cultivating the land. If you have a field of several tens of acres, then using the manual method, at a minimum, you will process the area all day long. But if this whole process is carried out using a block, then it can be done in a couple of hours. But a person must understand that the main thing is to carry out the treatment correctly, and then you can expect a positive result.
In addition, there are different devices for such a design; the process itself will depend on the type and its methods. Using a walk-behind tractor, you can easily hill up potatoes - this is a great way to remove weeds.
Loosening occurs thanks to a sharp tool, which carries out the loosening process itself. All the elements of such a device are ordinary; some gardeners even manage to make such a tool with their own hands, but it quickly breaks down and does not produce the desired effect.
Types of walk-behind tractor
There are two main types:
- hilling potatoes with a plow-shaped walk-behind tractor;
- We hill up the potatoes with a disk-shaped walk-behind tractor.
They have striking differences from each other, and their methods of work are slightly different from each other.
Hilling with a plow-shaped walk-behind tractor
This type is divided into two types: single-row and double-row. Speaking of working with the first one, you will need to immediately worry about its settings. It is necessary to make angles of attack and its depth (from 10 to 15 cm). Depth is the process by which the blades will then be immersed. After you have set up all the parameters, then you can begin the work process. To start the process, the tool itself needs to be planted a little in the ground.
The tool must be in this position at all times during the work process. If for some reason the structure is higher than the ground during operation, then it needs to be lowered; to do this, the entire stand will need to be tilted back a little. And when the hiller is too deep, then you need to tilt the stand forward.
The single-row hiller is generally similar to the previous version. The only difference between them is in appearance - it looks like half of a two-row one. The principle of operation is the same, only in this case the time for hilling will take 2 times more.
Hilling up with a disk walk-behind tractor
The appearance of this device resembles a frame on two wheels, from which two disks are suspended. To work with such a tool, you need to master two functions and two parameters. The first thing a person should understand is what distance should be between the disks and this will help you significantly. Typically, the distance between the disks depends on what type of potato and what variety. Experts advise maintaining a distance between them of approximately 45-65 cm.
An important factor: do not forget to adjust the angle of attack and its rotations, which should be. The angle of attack must be kept the same for all hilling discs because if they are not adjusted correctly they will crash into each other. Working with this hiller has a number of features:
- due to the fact that the disks rotate, the earth is loosened;
- the ridges become higher and smoother;
- consumes little energy from the walk-behind tractor;
- Even a beginner can use it.
Types of cultivators
The cultivator for hilling potatoes can have a single-row or double-row type of device.
The first one involves going through each row. It is recommended for use for small areas. The second one can carry out work on both sides of the bed at once. Thus, speeding up the procedure twice.
However, double-row or two-blade devices are not always more effective. The indicator often depends on power. Thus, the Cayman Eco Max 50s c2 model is distinguished by reliable and long-lasting operation, and also meets high requirements for potato hilling.
The hilling procedure should be carried out carefully
However, they do not differ in processing principle. The working element is lowered into the soil, lifting the upper layers directly onto the seedlings.
It is worth adding that when working with everyone, you will first have to get used to it so as not to damage the plant itself.
How to make a purchase
Hilling potatoes with a cultivator requires purchasing a high-quality model of the device.
Basically, you should focus on indicators such as engine type, as well as weight, width and depth of development. There are many models on the market with different characteristics.
The engine type can be either electric or gasoline. The first is designed to work in small areas. The second is portable and is often used on large farms.
The cultivator can also be divided into three categories: light, medium and heavy.
It is lightweight and designed for small areas; even an inexperienced gardener can handle the operation of the unit.
Cultivators in the middle category weigh more than 40 kg. They are designed for small farm areas.
Heavy equipment weighs more than 60 kg. Only an experienced farmer can handle the job. At the same time, the unit is capable of breaking up large layers of earth, which allows it to work effectively on poorly cultivated land.
Preparing the site before planting potatoes
Immediately before planting potatoes with a cultivator, it is necessary to properly prepare the soil. Cultivator cutters will do an excellent job of this task - they are equipped with knives that pierce the soil to a depth of 30 cm and turn over the layers, while simultaneously reeling in and pulling out the roots of the weeds.
You should start plowing the garden from its edge. After you reach the end, you need to move the cultivator with cutters deep into the soil 2 meters perpendicular to the furrows. As a result, you will have a place to deploy equipment. The same will need to be done on the other side of the garden being cultivated. Then you should plow the soil along the beds.
When cultivating the soil with milling cutters, small depressions will inevitably remain on the soil surface. To avoid this, when cultivating the soil on the way in the opposite direction, it is necessary to place one cutter on the mark that was left by another cutter. As a result of this, the land will be evenly processed to the height of a spade bayonet, which is more than enough for planting potatoes.
In some cases, farmers plow the soil in their garden in a circle. Processing begins from the edge, after which the garden owner reaches the center of the plot, moving in a spiral. A significant disadvantage of this method is that after processing the soil will need to be leveled with a rake, which entails a loss of time and effort.
In contrast to this method, when plowing the soil along the beds, you will get even soil. In this case, the rake will need to be used only in those places where the equipment was deployed.
Land cultivation procedure
Soil treatment is a procedure that must be carried out constantly. The main feature of this process is to carefully loosen the soil at the time of sprinkling the main potato stems. Hilling up with a walk-behind tractor is carried out only during the active growth of the bush, and until it reaches a certain height.
If a person wants a healthy and large harvest, then it is necessary that as much air and oxygen as possible enter the roots, this is important. Gardeners also claim that hilling potatoes with a walk-behind tractor is an excellent way, which in some way helps to get rid of unnecessary plants, and can protect the bushes from sudden frosts and at the same time speed up the process of ripening and development of the bush
Processing stages
In one season you need to carry out at least 3 procedures.
- The first hilling of potatoes with a walk-behind tractor should be carried out exactly when the height of the bush is above 15 cm. According to experts, such growth usually occurs at the end of May, sometimes at the very beginning of June. The very first time you loosen the soil, you need to understand that the layer of sprinkled soil cannot be 10 cm. If you take it a little deeper, this will lead to the fact that the shoots will develop poorly and, as a result, you will get little from one bush fruits
- When the potato plant exceeds 25-30 cm, then the second stage of processing the bush needs to be carried out. Usually, with good weather and proper care, a second plowing occurs after 2-3 weeks.
- The last treatment for the season - gardeners often skip this stage, although experts do not recommend doing this. The essence of this process is no different from the first stage, you just need to sprinkle the stems much higher than in the first, by 15-20 cm. The walk-behind tractor for hilling potatoes should be convenient for you.
When such a procedure occurs, the gardener must definitely look at the condition of the soil. The main thing is that it should not be too dry or wet. The best option is land with moderately soft soil. Not all gardeners know how to properly earth up potatoes with a walk-behind tractor and therefore often damage the roots.
Planting potatoes with a cultivator - the correct procedure
Planting potatoes with a motor cultivator is carried out using special attachments. For this purpose, you will need to prepare lugs or special hedgehogs for potatoes, pre-equipped with metal extensions.
To equip the equipment with lugs and other attachments necessary for work, in most models of cultivators you will need to remove the wings, completely dismantle the stop and install a coupling mechanism in its place. After this, lugs will need to be installed instead of the standard cultivator wheels, and a two-row hiller will need to be connected to the hitch. The distance between its rows should be approximately 65 cm - this will be the distance between the rows.
After equipping the cultivator, you will need to mark out the garden. To do this, you can use a special hand marker, which is quite easy to do with your own hands. To do this, you need to take a wooden stick and screw 3 pegs to it, the distance between which should also be 65 cm. In the future, when marking the site, in order to maintain the same distance between the rows, the outermost peg must be drawn along the previously marked line.
In the future, preparing furrows and planting potatoes is as follows:
- Having marked the area, start the potato cultivator, turn it to first speed and start cutting furrows. During operation, you can adjust the position of the hiller using the hitch. The depth of the furrows is adjusted by turning the adjustment knob. After you reach the edge of the area, you should turn around and walk in the opposite direction;
- After making the furrows, we proceed directly to planting potatoes. To do this, we throw pre-sprouted tubers and treated with a pest control compound into the furrows made at a distance of about 40 cm from each other;
- After planting, we begin filling the furrows with soil. To do this, set a larger width for the soil gripping of the wings on the hiller, spreading the blades as far as possible. Place the cultivator opposite the existing ridges, turn on the first speed and begin filling the furrows with soil. The video will tell you more about planting potatoes using a cultivator.
Disc type
Hilling potatoes with a disc cultivator is highly productive, but requires proper settings.
It is important to choose the exact distance between the positions of the discs. For early potatoes, after planting, you should choose a distance of 40 cm. At the last stages of cultivation, the discs are moved apart to a width of 70 cm.
The correct angle of inclination of the nozzle is calculated experimentally. For efficient operation, it is important that the disks are strictly symmetrical.
Rules for hilling potatoes
Hilling up potatoes is a mandatory procedure, the essence of which is to sprinkle the stems of the bush with soil. This must be done so that more oxygen reaches the tubers. In addition, such plant shelter allows you to get rid of weeds, accelerate the growth of seedlings and preserve them in the event of a sudden cold snap.
During hilling, first of all, pay attention to the condition of the soil. It should not be very wet, but not dry either.
Moderately moist soil is ideal for hilling plantings.
Early processing of potatoes is especially important. It will be able to protect plants in case of a sudden drop in temperature. Hilling will also replace weeding and loosening the soil around the bushes. Even if you completely cover the potatoes with soil, they will be able to get to the surface.
It is best to carry out the hilling procedure when the soil is moist, for example, after rain. If no precipitation is expected, the soil is moistened artificially. The hilling procedure should not be carried out in hot weather. This is not safe both for the plants and for the gardener himself. The potatoes may begin to wilt. The most suitable time is early morning or evening, after sunset. Cloudy days are also suitable for this type of work.
Hilling process
When it comes to the actual hilling with the plow, all your tools should already be prepared. The main thing to do is to install several disintegrants in front of the main structure. But behind the walk-behind tractor, install a hiller - the one you chose for cultivating the land. After all the procedures have been completed, you can start working with the tools. It is necessary to place the entire tool exclusively in the middle, between all rows of potatoes, and start working at the very minimum speed, and after that you can be sure that the machine is working.
The hilling process takes place until the end of the entire bed, after which the entire structure must be carefully unfolded and go to the next beds strictly in the middle. Experts say that walking through the garden bed once is enough for the first treatment.
But if you go through it a second time, then a high percentage of the gardener will touch the roots of the fruit, and then all the tubers will be damaged. If you know in advance that you will be processing with a walk-behind tractor to hill up potatoes, then the gardener must plant the seedlings correctly, since cleaning with walk-behind tractors is only possible if there is a distance of 60-80 cm between the bushes.
Double row plow
Double-row models are much more difficult to use as they are difficult to control. Before processing the area with a two-row hiller, the lugs connected to the walk-behind tractor are placed on special extensions. In this case, it is recommended to use lugs with a large diameter, as they are better suited for double-row hillers.
During the first and second hilling, the walk-behind tractor and hiller are placed so that the potato bushes are located under them, and adjacent rows are located on both sides. Using a two-row model, the row located under the walk-behind tractor will be completely hilled. Adjacent rows are processed halfway.
Single row plow
If potatoes are hilled using a walk-behind tractor with a single-row hiller, it is not necessary to use lugs. Many people use small rubber wheels instead. Before using rubber wheels, you will have to independently establish a small distance between them. When adjusting the distance, you should take into account the width of the row so that the wheels do not touch the bushes when hilling.
Soil cultivation with a lister mechanism
Before starting work, it is necessary to immerse the ploughshare to the required depth in the ground and check that the axis of the potato hiller is perpendicular to the ground.
After this, turn on the walk-behind tractor and move it along the rows.
If the hiller goes very deep during operation, then the stand needs to be tilted a little forward. Thanks to this, the nose of the ploughshare will rise.
If the nose looks out of the ground when moving, then the stand should, on the contrary, be tilted back.
You need to tilt your nose
Types of devices for hilling
A motorized potato cultivator can be single- or double-row. Regardless of the type, the units will work on the same principle: the working part goes deep into the ground, and, starting to move, turns over the soil, which falls onto the beds.
Using a single-row potato cultivator will require you to cultivate every row between rows, which is why this technique is only used in small areas.
Double-row units process the soil on both sides of the bed, thanks to which the hilling procedure can be performed through the row. This greatly increases the productivity of the unit.
Regardless of the model, the farmer will need to independently adjust the depth of plowing. Correct adjustment will prevent damage to the stems and tubers during operation.
In addition to the above models, there are also disc hillers. They are installed on walk-behind tractors and can only process one row.
However, the quality of work will always be better than hilling with a two-row cultivator.
To set up the disk hiller before work you will need:
- Place the working elements to the side by the width of the row spacing - usually 40–60 cm. Measurements should be taken along the lower parts of the disks;
- After this, determine the angle of “attack” on the soil. At the same time, make sure that the equipment will not experience high loads, and the potatoes will be completely covered with the thrown away soil;
- The discs must be symmetrical to each other, otherwise the hiller will tilt to the side.
Despite the advantages of the disc hiller, the potato cultivator is still in great demand. It does not compact the earth the way a walk-behind tractor does, it consumes less fuel, and is much quieter. In addition, it is more maneuverable in small areas.
Disc hiller
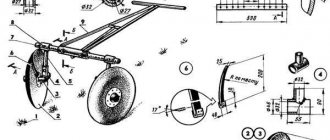
Let's get started on how to make a potato hiller with your own hands. The drawing shows that the main tool is moldboard discs. They must be within 400 mm. This is optimal. Because we usually plant potatoes at a depth of 60-80 mm, and the roots then grow approximately 200 mm. It turns out that by walking between the rows with inclined disks of the specified size, we completely hill up the row of potatoes.
So, we make 2 disks from a steel sheet 2 mm thick, with a diameter of 400. Some are made from old pot lids. Let be. But it is advisable to make high-quality disks that will last a long time. Can be taken from scrapped agricultural machinery. But the best is alloyed stainless steel. We sharpen the edges of the disks, where the cutting edges will be. Now we are making a bridge with racks on which the disks will be attached. We calculate the sizes. We put a connecting fastener for pipes on both sides of a strong steel pipe (sold everywhere). The free ends of the fasteners are directed downwards. From above we drill the pipe through the holes in the mount. We drill each fastener from both sides. Secure with bolts and nuts.
If you want to make grips of different widths, then drill two more holes on both sides. To change the grip width, simply move the posts further or closer to the ends of the bridge and secure them through the holes. Then we insert the tubes - racks - into the fastenings from below. We also drill and fasten in the joint. Two bolts with nuts for each rack. Then at the bottom of each rack we make a mechanism for inclined movable disks. First we attach the bracket for the disk. Moreover, we also do 2 - 3 pipe drilling positions. To be able to change the inclination of the disks.
On the other side of the bracket we weld a short thick steel rod. At its other end - in the bushing ring - press a closed type sliding bearing. Pre-weld a wide washer with holes for fastening the disk to the inside of the bushing. Weld the same wide washers with holes in the center of each disk. We secure the disks with bolts and nuts. We ended up with two movable disks tilted at a certain angle, attached to racks on one bridge. You can come up with an additional device for tilting the disks to the right - to the left. To do this, you need to select a hinged mounting mechanism for the bracket. These are also on sale. Yes, you can find it in old parts of agricultural machinery.
We will not consider further the creation of a manual hiller. We don't need to make handles for our device.
Attaching the hiller
The hiller for the walk-behind tractor must be connected and hung to the unit in such a way as shown in this drawing:
Attaching the hiller to the walk-behind tractor
From the drawing you can see that we need to connect the device to the walk-behind tractor to the bridge through brackets and strong steel tubes. Reinforce the connection with a crossbar. Turn on the engine. The wheels are moving. You hold on to the handles of the walk-behind tractor. Carried away by the movement, the planting tool he created with his own hands comes into action. The discs just need to be made at symmetrical angles so that they don’t lead in one direction when hilling. The considered tool option is not the only one. There are others too. Let's look at them one by one.
When to start hilling?
A variety of answers can be found in the literature to this question. The guideline in all recommendations is the height of the shoots, but different numbers are given: from 14 to 20 cm.
I myself prefer to start hilling as early as possible. In this case, I focus, however, not on centimeters, but on the signals of a completely irrational “device” - intuition. Over time, probably, every gardener develops such a feeling: you just look at the plants and understand what exactly they need now.
In fact, early hilling replaces both weeding and the recommended loosening of the soil. In our unstable climate, it also serves as protection of seedlings from return frosts. Traditionally, potatoes are planted in early May. And in the second half of the month - just at the time of sprouting - cold weather usually arrives. Covered with a layer of soil, sprouts calmly tolerate even a short-term drop in temperature just below zero (this happens.)
Potatoes grow quickly after hilling. Photo by the author
I noticed more than once: after hilling the potatoes seem to accelerate their growth. If the weather is favorable, the bushes grow and get stronger literally before our eyes. Therefore, I am never too lazy to once again walk along the rows with a hoe, loosening the soil and rolling it to the ridges.
Devices for planting potatoes manually
Hand tools include a hand plow, markers and a hand cultivator.
A very convenient device is the Vyatsky Plowman plow. Planting potatoes is done in this way. Furrow No. 1 is dug and tubers are laid out in it. They begin to dig a second furrow, while burying the first. Furrow No. 2 is used for laying fertilizers. When digging the third furrow, the second one is filled with earth. Tubers are again placed in furrow No. 3. And the whole procedure is repeated. The row spacing for this planting is 60 cm.
The instrument is height adjustable.
The Vyatka plowman shovel increases the speed of processing the site four times
Another device for planting potatoes is a marker. A very useful and convenient thing. The material from which the marker is made is high-quality steel. The width between the cones can vary from 10 to 50 cm.
Using a marker guarantees even beds
Hand cultivators are available for sale. Using the manual cultivator "Digger (6 in 1)" you can perform several types of work:
- planting and hilling root crops;
- loosen, weed and trim weeds;
- sow seeds of almost all agricultural crops;
- loosen the crusts on the surface of the ridge before planting.
The manual cultivator "Digger" will replace several tools
Correct hilling technology
If we talk about the observations and habits of avid summer residents, they advise:
- do not engage in hilling in the heat, since manipulating the soil against a background of high temperatures may cause the plant to wilt;
- try to loosen after rain;
- When hilling, you can weed the crop. In this case, the weeds do not need to be cut at the root; it is better to pull them out;
- you need to choose a convenient tool that will be convenient both in terms of the length of the handle and the type of nozzle;
- Before hilling, you can carry out root feeding: take 20 grams per 10 liters of water. ammonium nitrate and potassium sulfate. Pour the resulting solution onto 1 square meter. potato ridge.
It is better to take up the hoe in the morning or evening hours. Try to choose a day after rain. Loosening the wet soil will remove the crust on the surface and enrich the tubers with sufficient moisture and oxygen.
Hilling with a hoe is one of the oldest methods of caring for potatoes.
It is better to avoid sprinkling with dry soil. But if the year is dry, then it is better to hoe than to leave it as is.
Features of soil treatment
The eternal law of balance says that if something has arrived, it means that somewhere has lost. In gardening, this is expressed in a pattern - the richer the harvest, the more the land is depleted. To preserve and restore the fertile layer, there is a whole range of measures, including various operations - digging, soil correction by introducing certain additives, fertilizing, and loosening. To increase fertility and provide vegetable crops with all the necessary substances, the soil is dug up every autumn, after harvesting and harvesting the tops.
Digging provides access to air and moisture to the lower root layers, thereby creating optimal conditions for the development of beneficial microorganisms. Autumn digging is more effective, as it allows you to apply organic fertilizers, which have time to “reach condition” over the winter, as well as get rid of the rhizomes of perennial weeds and reduce the emergence of annuals and the number of pests. In the spring, all that remains is to loosen the soil in time to level the surface and retain moisture. But it’s not always possible to “prepare a sleigh in the summer.”
angorohka Member of FORUMHOUSE
Please tell me if the beds have not been prepared since the fall. Can this be fixed in the spring? We bought the plot last summer, but there was no way to develop it. And this year I want to start by planting a couple of beds in the far corner: with herbs and carrots. And is it necessary to fertilize? This area was never cultivated, only grass grew on it.
It is possible, but there are nuances.
Kondrat Member of FORUMHOUSE
Can! As soon as the soil dries out a little and is easy to dig, pick up the soil from the roots in the right place and sow for good health. It is quite normal for the bed to settle within a week or two. Only after digging and shaping, pour it well with water, and it will quickly settle to its normal level. Before sowing, all that remains is to loosen it with a rake. As for fertilizer, it’s great that there are forbs, the harvest will be just crazy. I planted this way the first year, the main thing is the weather and watering, but no fertilizers are needed.
Today, deep digging using the moldboard method, with turning over the layer of earth, is practically not practiced. Although this approach kills most of the weeds and pests, the soil fertility and its structure deteriorate, since humus-forming microorganisms find themselves at depth, without access to oxygen, and die.
With the non-moldboard method, used by most gardeners, the dug out lump remains in its original position. And in order to increase processing speed and save their own energy, many people prefer to use motorized cultivators instead of shovels. These mechanisms also effectively loosen the soil to a given depth without turning over the formation.
Land cultivation procedure
Soil treatment is a procedure that must be carried out constantly. The main feature of this process is to carefully loosen the soil at the time of sprinkling the main potato stems. Hilling up with a walk-behind tractor is carried out only during the active growth of the bush, and until it reaches a certain height.
If a person wants a healthy and large harvest, then it is necessary that as much air and oxygen as possible enter the roots, this is important. Gardeners also claim that hilling potatoes with a walk-behind tractor is an excellent way, which in some way helps to get rid of unnecessary plants, and can protect the bushes from sudden frosts and at the same time speed up the process of ripening and development of the bush
Processing stages
In one season you need to carry out at least 3 procedures.
- The first hilling of potatoes with a walk-behind tractor should be carried out exactly when the height of the bush is above 15 cm. According to experts, such growth usually occurs at the end of May, sometimes at the very beginning of June. The very first time you loosen the soil, you need to understand that the layer of sprinkled soil cannot be 10 cm. If you take it a little deeper, this will lead to the fact that the shoots will develop poorly and, as a result, you will get little from one bush fruits
- When the potato plant exceeds 25-30 cm, then the second stage of processing the bush needs to be carried out. Usually, with good weather and proper care, a second plowing occurs after 2-3 weeks.
- The last treatment for the season - gardeners often skip this stage, although experts do not recommend doing this. The essence of this process is no different from the first stage, you just need to sprinkle the stems much higher than in the first, by 15-20 cm. The walk-behind tractor for hilling potatoes should be convenient for you.
When such a procedure occurs, the gardener must definitely look at the condition of the soil. The main thing is that it should not be too dry or wet. The best option is land with moderately soft soil. Not all gardeners know how to properly earth up potatoes with a walk-behind tractor and therefore often damage the roots.
Subtleties of hilling
Until now, many farmers use a hoe for hilling. But such events will require a lot of effort. And if we are talking about a large planting for sale, then it is simply impossible to process all the areas in a timely manner, which will lead to the loss of part of the harvest and, accordingly, to loss of profit.
The modern market offers the use of a cultivator for hilling potatoes. The unit can not only speed up the process, but will also save energy and make the procedure more effective.
Hill up following these rules:
It is best to hill potatoes after rain. In times of drought, it is worth pre-watering the area. In this case, it is better to carry out the procedure in the early morning or evening hours. Such foresight will allow more moisture to be retained in the soil, which is favorable for crop growth; During work, it is correct to carry out only directed movements
So, it is important to work with one side of the bed, and then move to the second;
You need to go through the cultivator at least 3 times:
- When the sprouts reach a height of 10 cm from the ground;
- Half a month after the first procedure;
- When the potatoes reach a height of 25 cm.
Subtleties of the procedure using a motor cultivator
Many old-timers are accustomed to caring for potatoes with a hoe. However, this requires significant physical effort. To make the work easier, we recommend using a potato cultivator.
Before starting work, you should learn a few specific rules:
- Try to start work in the early or evening hours to avoid the heat. In addition, hilling should not be carried out on dry soil, so it is advisable to water the beds before work;
- Move constantly in one direction. First you need to hill up one side of the potato bed, then go to the end and do the same on the other side;
- Hilling is required at least 3 times. This is done for the first time when the height of the sprouts is 5–10 cm. The procedure is repeated a second time after 2 weeks, and a third time when the height of the tops reaches 25 cm.
- Hilling is also required in case of a major thunderstorm of night frosts. Trimmed weeds do not need to be removed from the garden bed - they will cover the potato stems.
All these features will help the farmer grow and harvest a rich harvest.
Benefits of using a hiller
Hilling potatoes with a walk-behind tractor has the following important advantages:
- protection of vegetable crops from adverse weather;
- the possibility of sprinkling underground shoots with additional soil, due to which root crops develop more actively;
- drainage of excess moisture to prevent rotting of the root system due to soil drainage;
- optimal aeration of the soil when it is waterlogged, due to which the root system receives more oxygen;
- maintaining optimal soil temperature;
- protection of root crops from the sun;
- destruction of weeds and control of parasites and potato diseases.
At the same time, hilling potatoes leads to the following disadvantages:
- areas of treated soil become drier;
- the potato root system develops incorrectly;
- shoots develop worse.
A video of hilling potatoes with a cultivator with a hiller allows you to understand the features of the process technology, thanks to which work in the garden becomes more efficient.
Planting potatoes with a tractor
To begin with, seed material is prepared. Potatoes are germinated for 2 weeks. After 14 days, thin white shoots are removed. During germination, provide the tubers with sufficient light. They are laid out on the floor in 1 layer, periodically turned over. Potatoes are ready for planting when powerful green shoots appear on them.
Soil preparation
Potatoes are planted when the soil warms up to 4℃. Before using a tractor cultivator for planting, the soil is moistened. The soil should crumble easily without sticking to the shovel. Digging the soil leads to the destruction of its fertile qualities. Loosening is carried out using a rake and the soil is treated with a mechanized milling cutter.
The depth of cultivation should not exceed 10 cm. If the soil is not sufficiently cultivated, the tubers will not receive oxygen, which will reduce the yield. Three types of plows are used for processing:
- rotary;
- case;
- negotiable.
The maximum effect is provided by reversible devices. Plows differ in the number of working bodies. For low-power equipment, plows with 2-4 bodies are used; for powerful tractors, 10-12 bodies are used. Planting with a mini-tractor does not require marking furrows. The rows are formed at a distance of 70 cm with a width between holes of 30 cm, the track width is 14 cm.
Planting and care
Tubers are planted manually or by connecting a mini-planter. In this case, it is possible to plant a plot of 2 hectares in an hour. You can make a planter yourself. A homemade copy is no worse than a purchased counterpart.
https://youtube.com/watch?v=PT_79Dw7vwo
Load-handling devices and their application 1985
Cultivator "Hedgehog"
Cutter (cultivator) for inter-row cultivation Comeb
Traction units of mini-agricultural machinery (review)
Further care is carried out with the help of hillers. Simultaneously with hilling, the rows are weeded and weeds are removed. Hilling is an important process that helps increase the supply of oxygen to root crops and form beautiful bushes.
It is difficult to do all the work by hand over large areas, so people began to mechanize all processes. Watering can also be mechanized by installing a drip system. This will save money on water and time.
Pros and cons of technology
The growing season for potatoes is one of the most important. It is at this time that vegetable crops require increased attention from the gardener. The need for timely processing means that hilling will be carried out in a short period of time. Otherwise, the potatoes may not take root and die.
After all, the hilling process not only helps protect the vegetable from various infectious diseases and temperature changes, but also from the harmful effects of the weed, which will be removed in time. A summer resident can cope with this labor-intensive task by purchasing a walk-behind tractor.
Let's consider the main advantages of this device.
- The time spent on processing a potato plot will be significantly reduced.
- With the purchase of a walk-behind tractor, the gardener’s productivity increases several times when compared with manual processing.
- Using a walk-behind tractor, you can create a fairly deep furrow, which will prevent potato stalks from falling over. It is no secret that in this way you can favorably influence the yield of a given vegetable crop.
- Hilling up using a walk-behind tractor allows you to create a very loose soil structure, which promotes increased air ventilation (air exchange). In other words, the potato roots are saturated with air and begin to grow faster.
- Hilling allows you to maintain the required soil temperature for comfortable plant growth.
Despite all the advantages of this extremely useful garden assistant, the walk-behind tractor has one significant drawback - its cost.
There is always the option to find a cheaper device or even buy it second-hand. However, there is a peculiar risk in this. Since any walk-behind tractor has its own service life, buying a walk-behind tractor second-hand is a kind of game of roulette. And due to the fact that the manufacture of one walk-behind tractor requires quite expensive parts, a high-quality unit simply cannot be cheap.
It is worth noting that the opinions of agronomists on the effectiveness of using a walk-behind tractor when hilling potatoes vary. The fact is that some experts argue that processing potatoes in this way only makes sense in warm regions.
This planting method initially requires less plant care from the gardener. And procedures such as hilling, weeding and watering are kept to a minimum.
Features of hilling with a walk-behind tractor
Hilling is a labor-intensive process, and the opinion of summer residents is unanimous on this. A walk-behind tractor helps make caring for plants over large areas much easier. And it can be used for caring for potatoes.
On thematic forums you can find such recommendations as “to prevent the walk-behind tractor from leading, hill up through the row” or “it is enough to carry out one hilling per season, otherwise you can damage the tubers.” Often such recommendations are needed only when everything is done carelessly.
If you take into account all the subtleties for mechanizing the process, then hilling potatoes using a walk-behind tractor can be carried out according to all the rules and without deviations. After all, it is important not only to reduce the time spent in the potato field, but also to create optimal conditions for the formation of a good harvest.
It is necessary to plan the method of hilling already during planting, since for the passage and high-quality operation of the device, a width between rows of 65-70 cm is required (for manual processing, row spacing can be smaller - from 50 cm). For a more accurate calculation, take the width between the wheels of your walk-behind tractor and add another 10 cm.
With dense planting, there may be a problem with the passage of equipment, and the risk of injury to potato bushes will also increase. For a disk hiller, in order to save space on the site, you can narrow the row spacing so that the walk-behind tractor goes back along its track.
The first hilling is carried out when the bushes have grown 15-20 cm. In this case, the hiller is adjusted so that the soil ridge is narrow and low. It’s not scary if some bushes are sprinkled almost to the top - in a couple of days they will quickly rise. Early implementation of the activity simultaneously clears the soil of fast-growing weeds.
Correctly carrying out the first hilling will make it possible to carry out the second and, if necessary, even the third. In the future, adjusting the hiller should give a wider and higher ridge. In this case, you will never damage the growing tubers, and an optimal 20-centimeter soil cushion will be formed around the bushes.
As experienced farmers advise, the first time you need to hill up at low speeds in order to notice flaws in time and to thoroughly loosen the soil between the rows. There is absolutely no need for haste here.
What is the advantage of hilling potatoes with a walk-behind tractor?
A walk-behind tractor is a suitable technique for hilling potatoes. Advantages of hilling using a walk-behind tractor:
- the ability to pull out existing weeds with a special hoe;
- prompt implementation of planned activities;
- the main work will be done by a walk-behind tractor, which needs to be properly configured and carried along the rows.
Advice! Hilling up with a walk-behind tractor is an opportunity to process potato bushes with minimal time and effort.
The walk-behind tractor simplifies the hilling of potato bushes. The work can be completed in a few hours if the equipment used is configured correctly. When working with a walk-behind tractor, a hiller is usually used.
How to use a walk-behind tractor?
As mentioned earlier, the walk-behind tractor is not as difficult to operate as it might seem at first glance. Before starting the device, it is imperative to check the engine oil level. Otherwise, the unit can be damaged before you even start using it. In turn, you will regularly need to fill the walk-behind tractor with gasoline. Moreover, the liquid must be of good quality. It is advisable that the gasoline be of the same brand as the engine.
Only after all the above manipulations have been completed can you begin to launch this device. When starting the walk-behind tractor for the first time, it is strongly recommended that you do this in accordance with the instructions.
Despite the fact that the principle of operation of walk-behind tractors is quite similar, some differences in operation may still be present.
There are two varieties - disk and plow walk-behind tractors. On a disk hiller, you can use racks to adjust the position of the disks. Thus, the soil grip width can vary from 30 to 70 centimeters.
The device is installed in the furrows so that the potato row is near the ground of the hooks. Having started the walk-behind tractor, all that remains is to carry out hilling, driving the device exactly along the furrows. For additional loosening of the soil, it is recommended to pull off the discs and install a rotating roller.
When working with a plow walk-behind tractor, you will need to spend some time setting up the plow. Its optimal position is the middle between two rows of potatoes. After setting, it is necessary to deepen the plow into the soil so that it is at the required depth. Then align the axis of the walk-behind tractor vertically to the ground surface. This will allow you to thoroughly cover the potato stems with loose soil.
How to spud?
Before hilling potatoes with a walk-behind tractor, you should understand the peculiarities of working with each hiller. Of course, the general principle of operation of each of them is very similar and practically no different. However, all the same, when hilling potatoes with a cultivator using various devices, there are some nuances that you need to familiarize yourself with in advance.
Disk
To use a disk-type hiller, it is attached to the back of the walk-behind tractor. To do this, the device is mounted on coupling brackets and bolts. When loosening the soil using a walk-behind tractor, the forward speed is reduced to increase traction. Therefore, experienced gardeners advise loosening the area only in first gear.
Before carrying out the first and second hilling of potatoes with a walk-behind tractor, attention is paid to its location in the beds. The walk-behind tractor is placed so that its wheels are between the rows and do not touch the potato bushes
Double row plow
Double-row models are much more difficult to use as they are difficult to control. Before processing the area with a two-row hiller, the lugs connected to the walk-behind tractor are placed on special extensions. In this case, it is recommended to use lugs with a large diameter, as they are better suited for double-row hillers.
During the first and second hilling, the walk-behind tractor and hiller are placed so that the potato bushes are located under them, and adjacent rows are located on both sides. Using a two-row model, the row located under the walk-behind tractor will be completely hilled. Adjacent rows are processed halfway.
Types of hillers
Loosening the soil is considered a long and labor-intensive process, on which some vegetable growers spend the whole day. Most often, so much time is spent processing the area with a regular hoe. To speed up the process of hilling potatoes, use a walk-behind tractor. With its help, it will take 2-3 hours to process the garden.
Before you start choosing a suitable device for loosening, you should familiarize yourself with their varieties in more detail. There are two main types of hillers that vegetable growers use most often when cultivating a plot.
Disk
Often, when hilling with a walk-behind tractor, they use disk-type models, since they are the most affordable. Externally, such devices look like a small frame to which two disks and two wheels are connected. In addition, the device includes:
- T-shaped leash;
- racks;
- two lanyards.
The racks from which disk models are made are used to change the distance between disks. This helps you independently adjust the width of the hiller. Turnbuckles are responsible for the angle of inclination and rotation of the disks, which allows you to adjust the depth of soil loosening.
plow-shaped
The second most popular hiller is the plow-shaped model, which is often used for loosening areas with potatoes. Before hilling potatoes with a walk-behind tractor, you should familiarize yourself with the main types of plow-shaped hillers:
- Double row. This variety allows you to immediately process the soil on two rows at once. When using a two-row model, pay attention to the plow, as it should be halfway into the soil.
- Single row. The device is practically no different from the two-row model. The main difference is that this model only processes one row.
Some people try to make a plow-shaped hiller with their own hands for hilling potatoes. However, a homemade product does not always loosen the soil well and therefore it is better to use ready-made devices.
How to hill potatoes: special devices and tools
As a rule, most gardeners hill up potatoes manually using the most ordinary hoe, although for a long time there have been many mechanical means that significantly simplify this labor-intensive and time-consuming, but very important agrotechnical procedure.
Walk-behind tractor
It is absolutely obvious that this method is quite expensive, but we must admit that it is the most rational for hilling, especially if you grow potatoes on a large scale.
The design that is installed on a walk-behind tractor for hilling potatoes can be completely different.
A walk-behind tractor will greatly simplify your work at your summer cottage, but it is worth considering the fact that its use is only possible if there is an equal distance between the potato rows, otherwise you will simply damage and injure all the tubers.
Video: hilling potatoes with a walk-behind tractor
Disc hiller
A manual hiller, such as a disk one, costs significantly less than a walk-behind tractor, and besides, you can make it yourself. To do this, you only need a handle, a handle and two blades.
It is much easier to carry out hilling with its help than with a hoe or, especially, a plow.
In general, the use of such a mechanical disk hiller is quite wide and is suitable not only for potato beds.
Video: disc hiller
There are also walk-behind tractors with disc hillers.
Cultivator
Automatic and mechanical cultivators, which are usually used to loosen the soil, are very popular when hilling potato rows.
The design of a hand cultivator is quite simple, so it is not that expensive.
The most important thing when using a cultivator, no matter manual or automatic, is to stay on the given course while hilling potato bushes, so as not to accidentally damage the beds and the root system of root crops.
Video: weeding and hilling potatoes with a hand cultivator
Plow
If you are a fan of old and well-tested tools, then the plow is your choice, although, admittedly, it is already obsolete and, as a rule, is used in a modified form.
You can use a plow for hilling potato beds in different ways.
With a plow, you can pull and hill potatoes by hand.
If you have a horse, you can use it to pull the plow.
There is an option to weld it to the wheel (although it will be more of a cultivator).
Advice! It is optimal to choose a plow that is light in weight so that you spend a minimum of effort moving it if you decide to work with it manually.
Description of the Husqvarna 434 walk-behind tractor
Multicultivator 434 attracts the attention of users with its technical parameters. Chief among them are:
- It has a Subaru gasoline engine that runs almost quietly, so the noise is not heard during startup and work in the field or in the country.
- The valves on the motor are located on top.
- Engine power is 5 liters. With.
- The cultivator has a reverse gear.
- Pneumatic clutch installed.
- The walk-behind tractor has a high level of performance and maneuverability in field conditions.
- The transmission is a removable type, can be chain or pneumatic.
Model 434 was significantly improved when compared with other modifications of this company. In particular, a pneumatic drive was installed on the handle, which allows the operator to maneuver and correctly control the mechanism. The handle also contains speeds that allow you to speed up or slow down the movement of the unit.
A towing beam has been installed, which has universal dimensions and is suitable for performing any work on the field. The cultivator has a steering column that is adjustable horizontally and vertically. A wheel is installed on the front of the walk-behind tractor, which makes the 434 model more maneuverable and easy to move. The package includes additional attachments, including protective scrapers, metal and rubber wheels, edge leveler, snow plow, and plow. This has provided numerous positive feedback from farmers.
Compared to previous models, the 434 unit has a higher number of engine speeds. The motor of the 338 walk-behind tractor is capable of 3 thousand rpm, and the improved model 434 is capable of 3.4 thousand rpm.
What is the best time for hilling?
During potato hilling season, you can often see gardeners with hoes in the fields in the middle of a hot summer day. And this is neither good for health nor good for the plant. While hilling, we still disturb it, we touch the shoots, and sometimes we accidentally disturb the underground part. In the heat, all this becomes critical, and the plants can wilt. Therefore, in hot weather, potatoes should be earthed in the morning or evening, when the sun's activity decreases.
It is best to do hilling after rain . The benefit is double. Firstly, wet soil does not fall off the ridge. Secondly, by adding moisture-saturated soil to the base of the stems, we stimulate the formation of additional stolons (underground shoots on which potato tubers are formed) - and this increases the yield.
To make hilling easy and effective, you need a convenient tool. You will find a large assortment of various gardening tools in our catalog, which combines offers from major online gardening stores. View the selection and choose the appropriate equipment for your garden .
But that's in theory. In practice, it also happens that it is high time to hill, but there is still no rain. Naturally, we will not postpone an important task while waiting for a favorable weather forecast, but if the soil is completely dry, we will water it before hilling.
Motoblock Husqvarna 338
Back in 2015, the Swedish company released the Husqvarna TF 338 cultivator, which is in great demand among summer residents.
Among the features of this model are the following:
- The presence of pneumatic wheels and soil cutters, thanks to which the unit can work on slippery, loose soil, crushed stone and pebbles.
- The package includes attachments that significantly expand the functionality of the cultivator.
- The front part of the unit is equipped with a special protective bumper, which is made in the form of a powerful welded frame. The presence of this element on the cultivator allows you to protect it from dirt, snow, dust, and pieces of soil. Therefore, you can use the 338 walk-behind tractor not only when the weather is sunny and clear, but also when there is precipitation.
- The Husqvarna TF 338 walk-behind tractor weighs 93 kg. The heavy weight allows you to work on dense soil and make furrows in hard-to-reach places, especially between trees.
A review of the technical characteristics of this model of walk-behind tractor should begin with a powerful four-stroke engine, created on the basis of modern technologies. The motor is assembled in Russia using certified developments from well-known corporations around the world.
This motor is environmentally friendly and can quickly spin up to the required speed, which allows it to be used in any weather. The engine's service life is 3 thousand hours. Even if you put metal lugs on the walk-behind tractor, the motor will work just as flawlessly.
Grousers are installed in order to install a plow or a device for a hiller on motor cultivators. They are designed to cultivate virgin soil and form neat beds after cultivation. Grousers allow you to attach a trailer to the cultivator to transport cargo - root crops, cleared snow, firewood.
Hilling rules and methods
There are various methods of hilling potatoes, which have their own specific characteristics, but all of them are carried out in compliance with the following rules.
- The procedure is carried out on moist soil, after rain or in cloudy weather. If there is a long absence of rain, the potato plot needs to be watered on the eve of hilling.
In case of heavy, prolonged rains, it is necessary to allow the soil to dry out, and only then carry out hilling.
- Before carrying out the procedure, it is important to weed the weeds.
- If it is necessary to fertilize, it is better to do this 1 - 2 days before hilling.
- Hilling should be done in the morning (before 11.00) or evening (after 18.00).
- It is strictly forbidden to carry out hilling during the daytime in the heat, this can lead to withering of the above-ground part of the potato.
- Think in advance about how and with what tools or devices the hilling will be carried out at different times. When using hand tools, choose ones that are comfortable in accordance with the height and build of the person doing the work.
Traditional
The most commonly used method is the traditional or classic hilling method. The earth is raked up to the potato bushes, first on one side, and then on the other.
A small groove is made in the center of the earthen embankment to prevent water from flowing down the inclined surfaces of the ridge. Before hilling in the traditional way, it is advisable to weed the potato furrows.
Blind
Quite often, the first hilling is carried out blindly. This name is associated with the time it was held. Hilling is carried out before the mass emergence of shoots, when only a few sprouts make their way to the surface of the earth.
Focusing on rare shoots, low ridges are formed along all rows. A week later, re-hilling is carried out in the same way.
Fan (unrolling)
This method of hilling is used when the potato bush reaches a height of more than 15 cm. It differs from the traditional one in that during the hilling process the potato stems are not directed vertically upward, but are laid out in a row like a fan. That is why the method got its name.
From above, the shoots are covered with hay, grass (if there are green manure plants) and earth. Reclining potato stems covered in this way quickly straighten out. It is their isolated growth from each other that increases productivity.
This hilling method requires leaving a wider distance between rows when planting.
Fan hilling is carried out using a shovel. When isolated shoots grow, the next hilling is carried out in the traditional way.
Video: fan hilling of potatoes, process starts at 2:30.
Grass
This method has been used successfully in Finland for a long time. To use it you need a large amount of herb. You can use grass specially cut for this purpose, or previously collected, dried weeds.
Potato shoots 5–6 cm high on top are completely covered with grass, its layer can reach 10–12 cm. Within a week, the grass layer settles and the potato shoots again appear on the surface, then the operation of covering them must be repeated.
After 2 weeks, the grass covering is no longer laid out on the top, but on the sides. The total thickness of the grass layer should be at least 22 - 25 cm.
This method does not require heavy physical labor, and the grass serves as an organic fertilizer. When using this method in conditions of high humidity (frequent rains), there is a risk of developing fungal diseases.
Characteristics, dimensions and engine
The Husqvarna TF338 walk-behind tractor is equipped with a 4-stroke single-cylinder engine producing 5 horsepower. Its working volume is 0.2 liters. The unit works with a three-speed manual transmission, in which two speeds are responsible for forward movement. There is support for 92 gasoline, as well as the more modern AI-95.
Among other parameters, let us pay attention to the permissible processing depth of 300 mm, and the processing width can reach 950 mm. The gearbox is mechanical, the clutch is belt, and the gearbox is chain
The diameter of each of the six cutters is 360 mm.
The weight of the device is 93 kg excluding attachments.
Is hilling always used?
Inventive gardeners and inquisitive scientific minds are looking for alternative solutions everywhere, and potato hilling is no exception. Firstly, they came up with planting methods that make this procedure unnecessary (for example, planting under black non-woven material). Secondly, they have proven experimentally that unlearning “works” no worse.
Hilling is a common, but not the only method. Photo by the author
What's the point? When hilling potatoes, we solve several problems at once: loosen the soil; we create additional volume in which tubers are formed; we push the plant to form stolons in the lower (filled with soil) part of the stems; we improve the lighting of plants, collecting them “in a bunch” and not allowing them to shade each other; getting rid of weeds. But it turns out that the same problems can be solved in exactly the opposite way.