Repair of the KAMAZ brake system: instructions, video | AutoKAM
To increase the reliability and reliability of the brake system, repairs of its devices are carried out using special equipment by persons who have undergone the necessary special training.
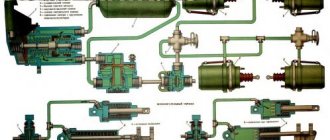
The brake mechanism, brake chambers and energy accumulators, compressor, pressure regulator, brake force regulator, single, double and triple safety valves, manual brake valve, two-section brake valve, pressure limiting valves, accelerator valve and control valve are subject to forced repair and control testing after repair. trailer brakes, pneumatic crane.
The main operations of the technological process for repairing devices of the pneumatic braking system of KamAZ family vehicles are external washing of devices, disassembling brake system devices, cleaning and washing of parts, defective parts, replacement of rubber products and faulty parts, assembly of devices and their testing.
Educational film: KAMAZ brake system
Design and maintenance of a KAMAZ vehicle - Brake system. Soviet educational film, which describes and shows in detail the structure of the braking system.
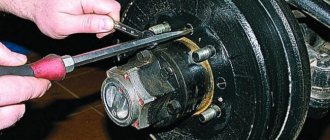
Repair of front and rear brake chambers Kamaz
Repair of brake chambers for middle and rear axles of type 20 differs from repair of front brake chambers of type 24.
To remove a brake chamber with a spring accumulator from a car, you must:
- set the hand brake valve to the “parking brake” position;
- unscrew the bolt for mechanical release of the spring energy accumulator until it stops, making sure that the brake chamber rod is retracted;
- disconnect the supply pipes, loosen the brake chamber, disconnect the rod fork from the adjusting lever.
After performing these operations, remove the brake chamber.
https://www.youtube.com/watch?v=aLKHfe5zrNk
Disassembling the energy accumulator shown in Fig. 112, b, is produced on a special stand. Disassembling energy accumulators outside the stand is strictly prohibited. When the screw is loosened, the spring expands with a force of 0.62-0.65 MPa and flies out of the cylinder. The essence of the device for disassembling the energy accumulator is to smoothly release the spring after unscrewing the screw nut.
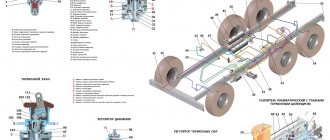
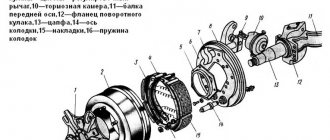
Rice. 112. Brake chambers of the pneumatic system of a KamAZ vehicle:
a – brake chamber of front axle brakes type 24; 1 – boss; 3 – diaphragm; 4 – disk; 5 – spring; 6 – clamp; 7 – rod; 8 – body; 9 – flange; 10 – nut; 11 – protective cover; 12 – fork; 13 – bolt; 14 – compressed air supply; b – brake chamber of rear bogie brakes type 20; 1 – brake system housing; 2 – thrust bearing; 3 – sealing ring; 4 – pusher; 5 – piston; 6 – piston seal; 7 – energy accumulator cylinder; 8 – power spring; 9 – screw of the emergency brake release mechanism; 10 – thrust nut; 11 – cylinder pipe; 12 – drainage tube; 13 – thrust bearing; 14 – flange; 15 – brake chamber pipe; 16 – brake chamber diaphragm; 17 – support disk; 18 – rod; 19 – return spring
: Repair of the brake chamber, replacement of the diaphragm KAMAZ, MAZ, GAZ, ZIL, PAZ
It is consistently shown how to eliminate air leaks from the front brake chamber of a car. Disassembly, assembly of the brake chamber and replacement of the cuff.
Repair of brake mechanisms Kamaz
During a major overhaul of the brake mechanism, the following are replaced with new ones:
- rubber sealing rings of the expansion knuckle in the bracket; after replacing them, the sealing edges of the ring should not have any damage;
- metal-plastic bushings for the expanding fist, the pressing force of the bushings must be at least 6000 N; after replacement, the bushings are bored to a diameter of 38.0–38.027 mm;
- friction brake linings of brake pads.
How does the brake system of a KamAZ vehicle work?
Passenger car owners do not always understand the problems of KamAZ drivers, whose design is somewhat different from that of their “smaller brothers.”
However, this does not mean at all that the problems and malfunctions of such machines are less significant and do not require attention.
Therefore, in this article, using a KamAZ car as an example, we will look at the design of one of the most important systems of any car - the brake unit.
How does the KamAZ brake system work?
The type of KamAZ brake system is not similar to the similar component of passenger vehicles.
First of all, it is worth noting that these trucks are equipped with four brake systems at once: the main (or, as it is also called, “working”), spare, parking and auxiliary. They all have a common structure (including mechanisms and parts), but they work separately from each other.
Thus, even if one of the systems completely fails, the driver will still be able to stop a multi-ton vehicle in almost any conditions.
In addition, KamAZ trucks are also equipped with the latest braking devices, which are capable of controlling the operation of all types of brakes, and special devices for emergency release of the parking brake. Let's look at the components of the brake system of this truck in more detail.
The main (or service) brake is designed to control the vehicle while it is moving. It has a pneumatic dual-circuit drive, which has a separate effect on the front wheels and elements of the rear wheeled bogie.
The main working components of the KamAZ brake chamber are the pads and the drum, and the brake is controlled by pressing the corresponding pedal.
Note! In most cases, the cause of operational failures of brake systems is damage to the shoes and drums, since they are the ones that experience the greatest load during operation (when the pedal is pressed, the shoe brakes press on the drum, thereby slowing down the movement of the vehicle).
The KamAZ spare brake system is used to stop or slow down the vehicle if any malfunctions occur in the operation of the main system.
The “reserve” is combined with the parking brake (there are common components and mechanisms) and consists of four energy storage springs, two-air cylinders, protective, bypass (two-channel) and accelerator valves, a brake valve, hoses and pipelines. This type of braking system is activated by a lever that controls the parking brake, the horizontal position of which leaves both systems in an inactive state, and its vertical position causes the parking brake to operate. Any intermediate position of the specified part activates the spare brake system.
The operation of the KamAZ auxiliary braking system is based on the energy rolling down the slope of the vehicle, and the vehicle’s power unit is used for braking (engine braking). Although this all sounds quite confusing, the principle of operation is simple.
When the driver presses a special button (it is located on the floor, near the steering column), compressed air from the triple (protective) valve moves into the brake cylinders, controlled by throttles that block the path of exhaust gases. At this moment, the fuel supply stops, and the engine begins to perform the duties of a compressor: the pressure of the exhaust gases acts on the pads and drum of the KamAZ, due to which braking occurs.
In addition to the described truck brake systems, they also provide an emergency brake release system, which provides compression of energy storage springs that are activated when the parking or emergency brake is applied.
Self-adjusting brake ratchets KAMAZ adjustment
On this page you see truck brake levers with an automatic underwater adjustment mechanism that maintains the clearance between the friction linings and the drum surface automatically as the linings wear.
Such nodes consist of the following elements:
- • Bearing housing;
- • Thrust bearing;
- • Conical coupling housing;
- • One-way rotation clutch spring;
- • Spur gear;
- • Thrust sleeve;
- • Sealing ring;
- • Worm shaft;
- • Grease nipple;
- • Adjustment lever housing;
- • Base plate;
- • Spiral spring;
- • Spring stop;
- • Internal and external return springs;
- • Spherical plug;
- • Sealing ring;
- • Worm wheel;
- • Rack;
- • Pad;
- • Cover with control handle;
- • Countersunk bolt.
In truck ratchets, the most important parts are the bevel clutch body, one-way clutch spring, spur gear, worm shaft, helical spring, and worm wheel.
Design and principle of operation
The brake lever (ratchet) structure includes the following mechanisms and parts:
- lid;
- gear type wheel;
- stub;
- worm;
- frame;
- sleeve;
- retaining bolt;
- fasteners;
- spring locking mechanism;
- locking device ball;
- oiler;
- worm axis.
In the body of this device there is a gear-type worm wheel, which is equipped with special holes. The axles on the expansion fist are installed in these holes.
In order for the axial mechanism to be fixed, the design provides a locking device, the ball of which is inserted into a special hole on the worm axis under the influence of a spring mechanism. The spring itself rests against the bolt of the locking mechanism.
The gear-type wheel mechanism does not fall out of the lever body thanks to protective covers. As the axial device rotates, the worm begins to rotate the wheel, and the expansion cam rotates with it, thereby moving the brake ratchets apart and reducing the gap between the shoes and the drum mechanism.
When you press the brake pedal, the ratchet is rotated by the chamber rod. Before adjusting the clearance of the locking bolt, you need to loosen the bolt itself by 1-2 turns, and after adjustment, tighten it back.
Advantages of Hottecke brake adjustment levers
All components of Hottecke automatic brake adjusters comply with the strict technical requirements that apply to every part delivered to the automotive assembly line.
Engineers at the plant where Hottecke adjustment levers are produced regularly conduct Life-time tests, receive information about the overall resources of the units, and take timely measures to improve the quality of components.
Each detail of ratchets for trucks undergoes additional testing at a special stand. One hundred percent input, intermediate, and output control is the key to producing serviceable, high-quality, reliable adjustment levers.
In addition to reliability, Hottecke nodes differ:
- • Corrosion resistant. Parts are tested in a salt chamber.
- • Increased safety margin of key elements, built in at the design stage.
- • The brake levers work properly in a wide temperature range from -40°C to +80°C. Lever elements that are worn out after long-term use in difficult conditions can be replaced with new ones. Repair kits are produced specifically for Hottecke adjustment levers; they are presented on our website. Universal, with all key components.
Important Design features of common tow trucks with partial loading of the vehicle
The new shock absorber is a replacement for P50.11-2905006-30, P50.11.2905005-31 of the Pervouralsk Automobile Aggregate Plant, ULIG.50.A1 452995.070 - Baranovichi Automobile Aggregate Plant January 17, 2019
Main brake valve KAMAZ EURO
On modern trucks produced by the KamAZ company, the Euro standard State Customs Committee is installed. The structure of the main brake valve is shown in the figure below.
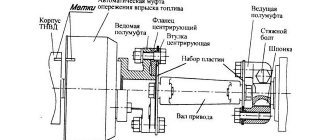
Construction of the KamAZ main brake valve
1 — top cover of the valve body; 2; 19 — screws securing the structure; 3;18 - washers for fastening on a spring basis; 4 — pushing device; 5 — GTK bushing; 6 — body base of the control lever; 7 — screw for adjusting the gas turbine engine; 8 — control lever; 9 — fastening nut; 10 — spring plate; 11 - device for maintaining balance; 12 — ring for seal; 13 — GTK piston; eleven; 16; 24; 28 — spring fastenings; 15 — hull base of the upper part of the GTK; 17;29 - support base; 20;32 — base rings; 21 - large diameter piston; 22 — atmospheric valve GTK; 23 - small diameter piston; 25 — body of the lower base; 26;30 - ring parts; 27 — body base of the valve of the lower part of the GTK; 31 — exhaust window of the GTK.
How to separate brake pads on a Kamaz
Technical service of brake devices and brake pneumatic drive Kamaz
Technical service of brake mechanisms consists of lubricating the adjusting levers and bushings of the expansion cam shafts; in regulating the strokes of the brake chamber rods and securing the brake chambers and their fastenings; in checking the condition of brake drums, pads, linings, tension springs and expansion knuckles (with the hubs removed).
The adjusting levers of the brake mechanisms are lubricated through grease fittings until the freshest grease is squeezed out. The expansion knuckle shaft bushings are also lubricated through grease nipples, but in all this it should be understood that the amount of lubricant should be moderate (less than 5 strokes when lubricating with a manual syringe), because excess lubricant can get into the brake mechanism.
The stroke of the brake chamber rods is adjusted with cool brake drums and nominal air pressure in the brake pneumatic drive. The parking brake must be turned off. Mark the location of the extreme point of the rod to move the pads to the thread. The work is carried out by 2 performers, one of whom must be in the vehicle cabin.
Determine the stroke of the rods with a ruler, installing it parallel to the rod and resting its end against the brake chamber body. Mark the location of the last point of the rod on the ruler scale, press the brake pedal all the way and again mark the location of the same point of the rod on the scale. The difference in the obtained results gives the value of the stroke of the rod.
If the stroke of the rod exceeds 40 mm, it is necessary to loosen the locking bolt and, by rotating the worm axis of the adjusting lever, move the shoes apart until they come into contact with the brake drum, i.e., you need to turn the worm axis until it stops. .how can I properly space the brake pads and adjust the brakes correctly? After which you should bring the pads together by turning the worm axis half a turn in the opposite direction (by 2.3 clicks of the lock), thereby ensuring a smaller stroke of the rods, which should be equal to 20 mm for KamAZ-4310, -43105, -5320, -5410 and -55102: for KamAZ-5511, -53212 and -54112 vehicles it is 25 mm on the intermediate and rear axles and 20 mm on the front axle.
You need to make sure that when turning the compressed air supply on and off, the brake chamber rods move quickly, without jamming. Check the rotation of the reels. They should spin freely without jamming and without touching the pads.
It is necessary that the rods of the right and left chambers on each bridge have equal stroke (permissible difference less than 2.3 mm) to obtain similar braking efficiency of the right and left wheels.
After checking that the adjustment is correct, tighten the adjusting lever lock bolt.
Inspection of the brake devices reveals the need to replace certain parts. In all this, it is taken into account that wear of the working surface of the brake drum is allowed less than 1 mm; chips, cracks, and chipping of the brake friction linings are unacceptable; their wear must correspond to the value at which more than 0.5 mm remains to the rivet heads.
If you need to change one of the left or right brake linings, change all the linings on both brake mechanisms (left and right wheels).
After replacing the brake linings, the brake mechanism is fully adjusted. To do this, loosen the nuts securing the pad axes and bring the eccentrics closer together, turning the pad axes so that they are positioned towards each other with the beveled sides of their outer ends, then by turning the axis of the worm of the adjusting lever, press the brake pads to the drum, after which, turning the eccentric axes to one or the other sides, install the pads, ensuring they fit snugly to the drum. how to separate the brake pads on a Kamaz truck photo. The fit of the pads is inspected with a 0.1 mm wide feeler gauge, which should not extend anywhere along the entire width of the pad. How to replace the front brake discs on a VAZ 2114. With this position of the pads, tighten the axle nuts and set the brake chamber rod to a small stroke.
Design and principle of operation
The device includes the following elements:
- inlet and outlet type valve;
- spring mechanism and compressor;
- rubber bushing;
- air pressure regulator;
- piston part and diaphragm.
The operating principle of the brake valve of a KamAZ semi-trailer:
- Pressing the brake pedal causes the rod to move to the right, which closes the valve.
- At this time, the valve opens, activating the brake chamber and receiver. The pressure in the brake system will depend on the degree of pressure on the pedal.
- With constant force on the brake pedal, the pressure on the piston increases.
- The force is transmitted through the mechanism of handles and rods to the crane lever, passing through the pusher element and the rubber bushing.
- The movable intake valve seat moves downward along with the piston part.
- The inlet window closes, the exhaust valve window opens.
- Passing through the outlet and the open valve window, the air flow is directed to the valve cavity.
- The pressure in the upper cavity begins to increase. When the pressure level increases, the air flow moves to the area above the piston, activating the operation of the entire mechanism.
How to do the replacement yourself
The process of replacing brake pads on a KAMAZ truck is much more complicated than on a passenger car. Therefore, many owners simply use the services of the service to solve such problems. But it is not always possible to turn to specialists. In addition, sometimes repairs need to be done on the road.
Replacing front brake pads
The replacement procedure is quite simple, but requires physical effort. An assistant would also be helpful. Since it will be difficult to remove the drum yourself. The work algorithm includes the following main stages:
- it is necessary to unscrew the wheel nuts and place the axle on a jack;
- then the wheel itself is removed directly;
- the brake drums are unscrewed - they are secured with special bolts and nuts;
With constant use, the nuts themselves can become very sticky. Then it’s best to use WD-40 and spray it on the threaded connections. Next, you need to remove the old linings - the easiest way to do this is with a chisel and hammer. You need to be as careful as possible. Since the reinstallation process involves riveting new linings into place. Therefore, damage is simply not acceptable.
Next, installation of new linings is carried out in reverse order. When assembled, everything looks like this:
The next step is to reinstall the brake drum. If possible, it is worth using graphite lubricant to prevent the bolts from sticking until the next replacement.
Replacing rear brake pads on KAMAZ 65115
The main feature of the KAMAZ 65115 brake system is the minimal difference in the procedure for replacing the front and rear pads. These operations are almost no different. The replacement algorithm includes the following steps:
- the axle is mounted on a jack - the nuts that hold the wheel on the bolts are first loosened;
- the brake drum is removed;
- New pads are installed using a chisel and hammer.
For installation, you will need a special tool - with the help of which special rivets are formed. As a result, after installing the new overlays, everything looks like this:
Important The best Grimme potato harvesters: owner reviews, technical specifications, price
Timely replacement of linings will avoid many problems on the road. First of all, the brake system fails at the most inopportune moment. And also an accident. Most accidents on the road involving trucks occur precisely due to a malfunction of the braking system. It is necessary to carefully monitor the condition of the linings.
Types of Brake Valves
Trucks, including KamAZ, operate on a braking system that uses a pneumatic drive.
According to the type of design, there are two types of brake valves:
The second type of crane is usually installed on KamAZ trucks, since they are heavy-duty.
The two-section crane can also be of several types for different car models:
- Each brake section is controlled separately;
- unified control of all sections.
The design and operating principle of these types of brake valves are the same.
Typically, KAMAZ vehicles from version 5320 are equipped with a Wabco 100-3514008 brake valve.
Separate the pads on KamAZ - Correct installation of the pads
The braking system directly affects the technical parameters and operating condition of the KamAZ vehicle. Any malfunction can cause serious malfunctions in the car. Knowing how to separate the brake pads on a KamAZ, you can independently carry out basic work measures to extend the service life of the brakes.
Major breakdowns in the brake system
KamAZ 5230 and other models sooner or later experience brake system breakdowns.
- Air in the parking brake system. This interferes with the release of the brake pedal. To eliminate the breakdown, the pads are pumped.
- Damaged vacuum. The brake will only work if there is a good vacuum. To check the serviceability, perform the following task: press the pedal several times, having first turned off the engine. This removes the vacuum. Then start the unit while holding the pedal. If the pedal goes down when starting, the vacuum is good. If the pedal remains the same, the damaged part will need to be replaced.
- Extraneous noise. It occurs due to broken pads. After checking the technical condition of the mechanism, you can replace or repair KamAZ brake pads.
Such breakdowns are major, and they require mandatory actions to restore the vehicle to its previous technical parameters.
Important! Modern KamAZ brake pads remain a mechanism that experiences the maximum possible load, as a result of which they often break down and require replacement or repair
Adjustment features
Sometimes it is enough to know how to set or separate the brake pads on a KamAZ. By adjusting the mechanism, you can restore the previous functionality.
- Initially, check how convenient the lever moves. It should move easily and then return to its original position.
- At the next stage, the holes of the mechanisms (handle and rod) are aligned. To do this, rotate it with a special worm.
- Press the block, which is responsible for the position of the mechanisms and the brake part of the KamAZ, in the desired direction.
- A bracket intended for fixing and a handle block for control are connected. To do this, bolts and mechanisms are used.
- When the worm rotates, it is possible to move the mechanism apart. As a result, the shoe and the drum mechanism come into contact with each other.
- Now the worm is turned in the opposite direction by ¾ of a turn. The gear coupling should work. The minimum worm rotation rate is 42 Nm.
- Be sure to check the functionality of the handle and rod. The stroke of the rod is also adjusted, as it must correspond to the gap. The final task will be to check the rotation of the drum mechanism.
- After 2-6 kilometers, the heating of the drum device is checked. The temperature should not be higher than 80 degrees.
Brake mechanisms need to be regularly tuned in order for them to function correctly.
Extending brake life with boring
To extend the service life of the mechanisms, it is recommended to bore KamAZ brake pads.
You can make the surface of the disc more even by using abrasive inserts. This option requires a minimum of tools and effort. A hole is made in the old block and abrasive is inserted.
Then the processed spare part is installed and driven for a short time on the car. It is advisable to drive for about 5 kilometers, braking periodically. The method is suitable for home use.
You can also contact a specialized center. Boring will be performed without removing the pads. Professionals remove the caliper and process the units with special machines. You can also read about Kamaz smoking white smoke - Causes and consequences.
Major repairs and replacement of the mechanism
During a major overhaul, replacement of the KamAZ 5320 pads is required. Usually the following parts of the mechanism are replaced:
- expansion knuckle sealing rings made of high quality rubber;
- metal-plastic expansion fist bushings;
- friction linings (such linings for KamAZ can only be riveted onto the pads using a special press and taking into account the absence of a gap).
Advice! When replacing pads on a KamAZ vehicle, the correct position of the units and their quality of processing are taken into account. The installation of new units is carried out taking into account the basic requirements.
In addition, the KamAZ pad spring may also require replacement. The best solution would be to contact a specialized center where professionals use modern equipment.
When repairing or replacing brake pads for KamAZ, be sure to take into account the main cause of the breakdown and the general condition of the technical part of the vehicle.
how to separate, bring together, bring, put
The safety of a car largely depends on the technical condition of the braking systems. During operation, KamAZ brake pads wear out and must be periodically replaced. This work is not difficult, but will require some physical effort. The degree of wear of the friction material is controlled by the stroke of the brake chamber rods. When the value reaches 40 mm and above, the brakes are adjusted, and if this is not possible, the linings are replaced.
How to install and remove pads
To dismantle the used friction material, you need to put the car on a jack or lift and remove the wheel, then remove the brake drum
Since it is made of cast iron, use the hammer carefully. Having gained access to the brake pads, remove the outer tension springs
Using a pry bar, move the part away from the expansion knuckle and remove the roller. After this, it is removed from the axle.
To replace, you can use pads purchased at the store, or restore the old ones yourself. Most drivers do this. Worn friction material is cut off from the parts and the seating surface is cleaned. Before installation, grind the linings on a lathe. The friction material is installed on the block and the holes are aligned. To position the trim correctly, install all the rivets at once. They start riveting from the middle to the edges. This will allow the material to adhere more tightly to the surface.
Installation of the restored part is carried out in the reverse order. It should be remembered that tension springs are installed on the inside of the pads. To secure them, use a simple device made of cable. The loop is inserted into the hole and the hook of the spring is pulled into it.
How to move the pads apart and bring them together
Truck braking is ensured by adjusting the brake devices. After replacing the friction material, the car's brakes are completely adjusted. This operation is performed using adjusting eccentrics. Adjustment is necessary in order to bring the pads as close as possible to the brake drum. To check the quality of work performed, use a 0.1 mm thick probe. It should not fit into the gap between the lining and the brake drum.
Important Technical characteristics of the TOP 4 engines suitable for MAZs
Partial adjustment is performed in case of reduced braking efficiency or jamming of the pads. As a result of wear of the friction material, the stroke of the brake chamber rod increases.
When the value reaches 35 mm, partial adjustment of the brakes is required.
To spread the pads on a KamAZ, you need to hang the wheel and bring the linings to the drum. Adjustment is carried out only by rotating the axes of the adjusting levers.
The actuator (ratchet) is located under the energy accumulator. To adjust, unscrew the locking bolt 2-3 turns and turn the shaft clockwise with the adjusting screw (worm) until the free rotation of the wheel completely stops. To set the required clearance, you need to turn the worm shaft back 2-3 clicks and tighten the locking bolt. After the adjustment is completed, the effectiveness of the brakes is checked.
If the brake drum heats up while the car is moving, you need to increase the gap between the linings and their contact surface, i.e. bring the pads together. The operation is identical to breeding, only the ratchet shaft is rotated counterclockwise. The quality of the adjustment is checked by the temperature of the brake drum. When the pads are set correctly, it does not heat up.
To ensure uniform braking and prevent the car from skidding, the stroke of the rods of the right and left brake chambers should be approximately the same. When adjusting the brakes, the amount of its movement is set to 20 mm. The permissible difference in indicators is no more than 2-3 mm.
Partial adjustment of KAMAZ brakes
Partial adjustment of KAMAZ Euro-1,2,3 or 4 brakes is carried out solely in order to reduce the gap formed in the space from the pads to the drum, which increases during the time the brakes are used. Large gaps that require such adjustment are detected when the stroke of the rods increases (if it exceeds the permissible 4 cm). This adjustment is performed solely by rotating the lever worms, similar to the same actions in the case of full adjustment.
In this situation, loosening the block axle nuts is unacceptable. When such an adjustment is made, it is necessary to set the minimum stroke of the rods - 2 cm. In order to obtain equally effective operation of the brakes for each wheel - both located on the right and located on the left, a prerequisite is a minimum of differences between the strokes of the rods on the right and left in the brake system.
Source
How to remove pads on a KAMAZ
Some KAMAZ drivers are not even aware of the importance of checking the performance of brake pads and replacing them in a timely manner. The fact is that worn out or faulty brake pads of a vehicle can endanger the lives of passengers, since you will not be able to brake while driving fast.
To ensure safety, it is necessary to monitor the condition of the engine, the level of oil and gasoline in the tank, as well as the condition of the pads on the KAMAZ
The fact is that worn out or faulty brake pads of a vehicle can endanger the lives of passengers, since you will not be able to brake while driving fast. To ensure safety, it is necessary to monitor the condition of the engine, the level of oil and gasoline in the tank, as well as the condition of the pads on the KAMAZ.
Brake valve repair
Repair of the KamAZ crane brake mechanism is carried out as follows:
- It is necessary to unpin and dismantle the pin of the traction device.
- Then unscrew the 4 mounting bolts from the bracket.
- It is necessary to unscrew the air lines that lead to the tap. Using a punch, mark the location of the air channels relative to the highways.
- After this, unscrew the 4 bolts from the base plate body using a 12mm wrench.
- Then dismantle the upper part of the faucet body along with the handle and separate the plate.
- Finally, remove the upper piston mechanism.
If the problem is that the faucet hisses, then it is necessary to restore the seal of the piston part. To do this, you need to replace the damping device, which dampens sudden shocks from the handle.
To replace the damper, you need to maintain the previous position of the screw and adjust the gap between the screw and the pushing part of the piston.
If the breakdown was caused by a malfunction of the valve, you need to unscrew the mounting screws, disconnect the housing and pull out the small piston, swinging the large one.
To restore the tightness, it is necessary to isolate the upper and lower sections of the sealing rings, bleed out the air, and replace the damaged parts with new ones.
Types of repair kits
There are several sets of repair tools for removing malfunctions in the brake valve:
- Small set. It only includes the sealing items and a special protective cover for the control lever.
- Average set. In addition to the contents of the previous set, it is equipped with bushings and fasteners.
- Large set. This option contains a complete set of necessary elements for self-repair of the brake valve.
Possible causes of brake pad failure
Manufacturers always indicate the service life of this part, however, this figure can vary up or down depending on the driver’s driving style (for example, with constant heavy braking, the pads can wear out after a mileage of 5 thousand km). Also, brake pads can wear out naturally. Below we will look at the main causes of pad failure:
- Natural wear of the pads due to friction;
- Poor quality material from which KAMAZ brake pads are made;
- Ineffective driving and braking (for example, sudden braking when driving fast);
- Errors in the operation of the brake system (for example, if the pneumatic system reservoirs fill very slowly or do not fill at all).
Causes of breakdowns
Malfunctions and causes of breakdowns:
- The receivers are not filled with compressed air, which is why the pressure regulator is not activated. The cause of the breakdown may be a damaged hose or pipeline, loose tightening of the pipeline connection, poor tightening of the housing mechanisms, or a violation of the tightness of the receiver.
- When the receivers are full, the pressure level regulator is activated. The cause of the breakdown is a leak of compressed air flow from the compressor part into the main line to the safety valve block.
- The mechanism is not filled with compressed air. The malfunction may be caused by incorrect adjustment of the regulator or clogged pipelines.
- The faucet is leaking air. This may be caused by a malfunction of the energy storage unit.
- Increased blood pressure. The cause of the breakdown is a faulty two-pointer pressure gauge or faulty adjustment of the mechanism responsible for air pressure.
- The brake valve hisses. The malfunction may be due to damaged electrical equipment or a defective crane handbrake.
- Loss of tightness of O-rings. This means that there is an air leak in the system or the pusher mechanism has become stuck.
Removing KAMAZ brake pads
All of the previously listed reasons can lead to uneven wear of the KAMAZ brake pads and in order to replace them, you will need to first remove them. In this article we will look at how to do this.
Before you begin to remove the KAMAZ brake pads, you should first let the vehicle cool down, place it on a flat surface, place a support under the bottom and wheel chocks.
Removing the pads (disc system)
- Unscrew the wheel nuts, jack up the KAMAZ and remove the wheel.
- Unscrew the brake fluid reservoir cap to make it easier to push in the brake piston.
- Unscrew the caliper guides. Remove the fixing brackets using a screwdriver. If there is a pad wear sensor, disconnect the connector.
- Using a flathead screwdriver, move the pads back to press in the brake piston (to do this, insert a strong flathead screwdriver between the pads) and remove the brake pads.
Removing the shoes (drum system)
- Remove the KAMAZ from the handbrake.
- Unscrew the fixing bolts and remove the brake drum.
- Release the handbrake cable, remove all springs and rods of the rear brake mechanism using a screwdriver. Now you can remove the KamAZ pads.
We hope our article was useful to you. Good luck on the roads!
to the list of articles
Source
Removing KAMAZ brake pads
Before you begin to remove the KAMAZ brake pads, you should first let the vehicle cool down, place it on a flat surface, place a support under the bottom and wheel chocks.
Removing the pads (disc system)
- Unscrew the wheel nuts, jack up the KAMAZ and remove the wheel.
- Unscrew the brake fluid reservoir cap to make it easier to push in the brake piston.
- Unscrew the caliper guides. Remove the fixing brackets using a screwdriver. If there is a pad wear sensor, disconnect the connector.
- Using a flathead screwdriver, move the pads back to press in the brake piston (to do this, insert a strong flathead screwdriver between the pads) and remove the brake pads.
Removing the shoes (drum system)
- Remove the KAMAZ from the handbrake.
- Unscrew the fixing bolts and remove the brake drum.
- Release the handbrake cable, remove all springs and rods of the rear brake mechanism using a screwdriver. Now you can remove the KamAZ pads.
We hope our article was useful to you. Good luck on the roads!
to the list of articles
KAMAZ brake drum design
The drum of a KAMAZ truck has a standard structure, unchanged for many years. This is a solid cast iron part equipped with a flange that guarantees reliable fastening of the component to the hub. During production processes, craftsmen polish the inner plane of the part, while the outer surface remains untreated due to the presence of stiffeners. The specificity of the KAMAZ brake drum design lies in the low rigidity and thin walls of the product, which are outwardly inferior to analogues installed on special equipment of other brands and models.