Virtually all manufacturers of walk-behind tractors supply garden equipment with tillers in disassembled form. Their assembly is often difficult, especially if the number of cutting knives in each section is 4. Difficulties are associated with the large number of assembly parts and the need to correctly place them on the sleeve. Let's find out how to correctly and quickly assemble cutters on a walk-behind tractor with a different number of cutting blades. Assembly elements are mounted using washers, nuts and bolts.
What types of cutters are installed on walk-behind tractors?
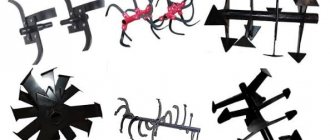
With a walk-behind tractor, you can cultivate any type of soil and perform different types of work - aeration, loosening the soil or crushing it into a lump, removing the roots of perennial weeds, mixing soil layers or fertilizers. The functions and capabilities of garden equipment directly depend on the type of installed cutters - spring, hook, flat ripper, etc. Three types of attachments are considered the most versatile, popular and functional:
- Saber-shaped. An active type of cutter for a walk-behind tractor that requires assembly. They are installed on most models of garden equipment. The cutter can consist of 2-5 sections with knives that determine the width of the cultivation. Made of steel, it provides optimal depth of loosening of soft and untrodden soil. Plant roots do not get wrapped up.
Saber-shaped cutter options with 3 and 4 knives
- Crow's feet. Inactive type of cutters with a non-separable design. Designed for processing hard, rocky and trampled soils. The cutting blades are good at breaking up plants remaining in the soil, removing the roots of perennial weeds, and promoting aeration. The blade of the knife can be shaped like a spatula, triangle or trapezoid.
Popular modifications of crow's feet cutters
- Spiral, or “Virgin” Inactive type of all-welded cutter. It is designed for deep soil plowing, virgin soil cultivation, and loosening. The design is reliable, but the processing speed is reduced. Consists of 2-4 sections.
Two sections of a spiral-shaped cutting element
The owner of a new garden equipment will need detailed instructions to assemble the cutters on a saber-type motor cultivator, since 9 out of 10 models are supplied with disassembled attachments. The other two types of cutters only need to be hung.
Functions
The milling cutter is the main working element that directly performs the work of cultivating the land. Therefore, so much depends on quality.
The sharp part makes a cut in the ground, making a revolution and rising up. The shovel picks up and lifts part of the earth. Thus, the earth is loosened, mixed and aerated (saturated with air), which all together is the main task in cultivating (cultivating) the land.
Along the way, the blade either cuts the roots of the weeds, or catches them and pulls them out. In any case, the growth of perennial root-propagating weeds is temporarily disrupted.
Assembly elements of saber-shaped cutting tools
The collapsible saber-shaped structure consists of:
- left and right knife (blade);
- shaft (bushings) - metal pipe with a diameter of 50 mm, a wall thickness of 4 mm;
- anther;
- flange, plate (may have different geometries) - steel sheet up to 15 mm thick;
- fastening elements.
Components of a 4-blade cutting device
The cutting blades are connected to the plate using bolts so that the sharp edges enter the ground when the walk-behind tractor moves forward. In this case, the right and left knives on the sections should alternate.
The need and rules for sharpening during operation
When operating a walk-behind tractor, the working surface of the knife will inevitably wear out. To restore the cutting ability of the tool, it must be sharpened periodically. The timing of the procedure is purely individual. The rate of knife wear depends on the following points:
- intensity of use of the walk-behind tractor;
- hardness of the cultivated soil;
- the presence of plant roots or stones in the ground;
- strength of knife material.
Manufacturers of agricultural equipment supply cutters with sharp blades. Therefore, when buying a walk-behind tractor, it makes no sense to sharpen knives. However, the procedure cannot be avoided during intensive use of the unit. To restore the sharpness of the knife, you will need an angle grinder (angle grinder or grinder), a sharpening wheel or a diamond wheel with a diameter of 12.5 cm.
The working edges should be sharpened at an angle of 45°. Remove the metal layer from the factory pointed side. At the same time, you shouldn’t get too carried away: just grind off 1-2 mm. Over the course of a season, it may be necessary to restore the cutting ability of the cutter several times, and excessive metal removal reduces the strength of the knife.
When using a cutter in wet soil, it is necessary to thoroughly clean the surface of the blades. When rubbed against the ground, the metal surface is cleared of the oxide film and becomes chemically active. This process is accompanied by increased corrosion, which entails the formation of pockmarks, chips, and microcracks. To prevent such phenomena, the blades should be treated with special inhibitors or automotive oil.
How to properly assemble knives on a walk-behind tractor with 3 cutting blades?
The main mistake when assembling the cutting tools of a motor cultivator is installing left-sided blades on the left section, and right-sided blades on the right. This knife mounting scheme is functional, but has a number of shortcomings:
- the increased distance between the right and left mounted parts (from 20 to 25 cm) reduces the quality of tillage - after the passage of the equipment, a wide strip of uncultivated land remains;
- the cutting blades do not overlap each other, which reduces the quality of soil loosening;
- wear of cutting parts increases;
- the comfort of using special equipment is reduced - the motorized cultivator will bounce when passing the strip due to the asymmetrical entry of the cutting tools into the ground.
Correct assembly diagram for a 2-section cutter
To correctly assemble the knives on a walk-behind tractor, you must adhere to the principle of diagonals and carry out all installation steps symmetrically. Some models of special equipment are equipped with a left and right cutter with a removable last section. Their number does not affect the installation principle of knives. The main thing when attaching the cutting blades to the next section is to shift them so that, when viewed along the bushing, they “pass” through the formed angle of the already fixed ones.
Installation of the first knife 2 sections
If the diagonal (offset) assembly is observed, the blades of the sections will cut the soil sequentially one after another. The rotation of the left and right cutter will be symmetrical. With correct installation of prefabricated elements, uniform operation and load distribution are guaranteed.
Do I need to sharpen it?
The answer to this question is yes when using crow's feet. There it is necessary to carry out regular inspection and sharpening of cutting edges. The welded design of such cutters does not imply the use of hardened metal, and therefore bends, bursts and becomes dull.
When working with saber cutters, sharpening is not only impractical, but also harmful. In addition, the product passport clearly states: “Do not sharpen edges.” In their work, rotation speed and soil composition are important. Cultivation is the process of controlling weeds, breaking up the crust and mixing fertilizer with the soil.
Instructions on how to assemble cutters for a cultivator
When starting work, it is more convenient to separate the left and right knives and prepare the keys for tightening the threaded fasteners. A three-bladed left-hand cutter will contain two left-handed and one right-handed blades in each section, and a right-handed one will contain two right-handed and one left-handed blades. Before attaching the cutting elements, you should make sure that the sharp edges are directed forward along the walk-behind tractor.
Assembling the first outer section
To assemble the left-hand cutter correctly, do not deviate from the instructions:
- Place the shaft with plates for fastening knives vertically.
External view of the shaft with three flanges
- Place the left blade parallel to the flange so that their edges and mounting holes line up.
- Place the second left knife at an angle from above.
- Secure both blades with a bolt from the outer edge, but do not tighten.
- Place the right knife on top of the first two blades at an angle.
- Secure with bolts and tighten.
Principle of installation of cutting blades
In the figure above, the cutting elements of one group are installed. To correct the error, you need to replace the upper knife with the left one.
Assembly of subsequent sections
The algorithm for installing components will be similar. The difference lies in the position of the first element on the next flange. The blade must be installed not parallel to one of the knives of the already assembled group, but so that it divides the angle (diagonal) between the already fixed knives.
The elements on the third flange must be installed offset relative to the group of knives of the second section, the fourth - offset relative to the third.
Installation of the first knife 2 sections
Nuances of assembling a 4-blade cutter
In order to correctly assemble the cutters on a cultivator with four cutting elements, the principle of diagonal displacement is also used. Only the blades are alternated sequentially, positioned on the flange perpendicular to each other. On one flange it is necessary to install one left one, then one right one, then the left one again, and complete the assembly with the right blade. The video provides detailed instructions for assembling and installing attachments with 4 cutting blades.
There are several types of cutters. Depending on the form, the following are available for sale:
- Devices with saber-shaped knives - they are in greatest demand among buyers and allow you to perform a wide range of work. The main advantage lies in the shape of the blades and the material - the cutters are made of steel and can be removed at any time. There is practically no vegetation wrapped around them, which allows you to plow the soil many times faster;
- Crawler-foot cutters for cultivators are a new solution on the equipment market. This type of equipment is often used for plowing hard soils. It cannot be disassembled, making it more durable than the first type of cutter. Among the disadvantages is the frequent wrapping of weeds around the blades. Because of this, most farmers use these cutters to work on “clean” soil. Often, “crow's feet” are used for plowing before planting potatoes, as well as for treating the soil to prevent the appearance of Colorado potato beetles and other pests.
Today you can purchase additional cutters of the required width at any gardening equipment store. However, at a reasonable price it is most often possible to buy Chinese products that are not particularly durable. In this regard, it would be quite reasonable to try to make cutters yourself.
Milling cutters for motor cultivators do not have a complex design. Before you start creating elements yourself, you need to carefully study the store options. This will make it possible to take into account all the design features of the equipment and produce effective equipment.
Before work, you need to make a drawing or use a ready-made diagram. It will need to indicate the material of each of the parts, the sequence and method of fastening.
After this, you need to prepare all the materials. If the design will use figured elements, then it is better to immediately order them from the master.
When creating a cutter, special attention must be paid to correct assembly. Try to avoid any deviations related to the design, because any mistake can significantly reduce the efficiency of the cutters
Moreover, incorrectly assembled equipment will pull the cultivator to the right or left.
An important factor is the location of the teeth. They must be installed in exactly the same position as in the design of store products.
Experts do not recommend making cutters with a diameter of more than 50 cm. Equipment of this size can sink into the ground 26 cm, covering a strip 1 meter wide. This is more than enough for high-quality plowing.
Saber-shaped cutters are considered safer and are not capable of harming the operator if he falls on the structure. The knives on them have a transverse arrangement and consistently sink into the soil, without jerking.
To extend the life of homemade cutters, you must adhere to the rules for using equipment. When starting the cultivator engine, all blades must be positioned above the soil surface. After switching the engine from idle, the blades should be slowly lowered and plowing begins.
Not knowing whether homemade cutters need to be sharpened, many beginners make a lot of mistakes. It must be remembered that the more often sharpening is performed, the better the result of the soil treatment will be, and the longer the knives will not succumb to corrosion.
Special cases
Mills for a motor cultivator with 2-3 sections usually have a solid shaft. But often there are models with collapsible or additional bushings, hung in sections. The diagonal principle of assembling knives in all of these cases will be identical to that described above. The process is complicated only by the need to perform additional steps - to assemble the entire cutter together.
Stoppers for mounting a group of knives
The structure is installed using steel stoppers. They reliably fix all elements of attachments and prevent loosening of connections under dynamic loads.
Hanging an additional section
Basic problems and solutions
Engine won't start
- It stands at an angle - it must be placed horizontally;
- Fuel does not enter the carburetor - you need to disassemble and bleed the fuel system;
- The filter is clogged - it needs to be replaced and cleaned;
- The outlet hole in the gas tank cap is clogged - it needs to be cleaned;
- Magneto failure - it needs to be replaced.
Engine
Motoblocks from the Khoper office have a gasoline or diesel engine. Each has its own pros and cons.
For a diesel engine, fuel costs even less, but a unit with an internal combustion engine will cost significantly less. So, it's up to the buyer to choose.
Recommendations for assembling knives
Manufacturers of cultivators try to simplify the assembly of attachments as much as possible. Therefore, two central technical holes are provided on the flanges on opposite sides of the square. They allow you to accurately place cutting elements on the plate.
Location of technical holes on the plate
The Two Hole Rule is as follows. When placing the very first knife on the plate, it should cover one of the technical holes and be parallel to the edges of the flange. Next, the installation of the following elements is carried out at an angle to the first. It is extremely difficult to make a mistake in this case and get confused.
Solid shafts with mounting plates can have a special design. The flanges on them may already be offset - rotated relative to the adjacent one by several degrees.
Mounting plate locations
To make it easier to install the blades according to the instructions above, it is not recommended to fully tighten the nuts. This procedure should be performed at the final stage after the master is convinced that the cutter is assembled strictly according to the diagram.
Safety precautions at work
Let's talk about how to use a cultivator correctly; in general, this is a relatively safe technique. Injuries and harm to health can only occur for four reasons:
- ejection of stones from under the cutter at high speeds;
- injury to any part of the body when caught in rotating cutters;
- burn from hot parts of the engine, muffler;
- poisoning from exhaust gases when processing closed greenhouses.
To protect against the ejection of stones, you cannot remove the protective shield, casing or wings, which are found on almost all motor cultivators. The photo shows a model on which the red protective shield is clearly visible.
The cultivator's cutters are located quite far from the operator's feet. To avoid injury, you should absolutely not get close to rotating cutters. Before removing grass, inspecting cutters, etc., turn off the engine.
Engine components that become very hot during operation are usually marked with special warning signs. Even if there is no such marking, it should be remembered that first of all this is a muffler, which becomes very hot from hot exhaust gases.
Exhaust gases from the combustion of gasoline or diesel fuel are very toxic. Therefore, you cannot work in closed greenhouses, or leave it running in the garage while preparing for work.
All doors and provided ventilation windows must be open. If there is forced ventilation, it must be turned on. But even in such conditions, working with internal combustion engines in enclosed spaces for a long time is not recommended.
You can learn more about how to properly plow with a motor cultivator in the following video.
You need to plow the land with a cultivator on time, as soon as suitable weather arrives. You should not put off work until later, as there may be any weather surprises later. When servicing the unit, first of all you need to pay attention to the quantity and quality of the oil. You shouldn’t skimp on the quality of oil; you only need a little bit of it, but it determines how long the cultivator’s engine will work properly.
A few words about installing attachments
After assembling the knives, all that remains is to install the assembled cutters on the walk-behind tractor using stoppers. For convenience, it is better to lift the special equipment and fix it in this position. Next you need to remove the wheels. Carefully place the boot on the support shaft, secure the structure on the left and right with a stopper. Check the connection is secure.
The final result of the build
If the cutter design is completely prefabricated, then installation can be performed sequentially section by section.
Installation sequence
It is recommended to put the motor cultivator into operation only after the correct assembly and installation has been checked. There should be no play caused by weak tightening of nuts or distortions when hanging equipment. High-quality work guarantees a long service life of machinery and equipment.
Advantages
Milling today is the most important agricultural technique.
Deep cultivation of the land is carried out in two ways - plowing and milling. The first method was the only one for thousands of years, since there were simply no cutters before.
The advantage of milling: high-quality and complete loosening of the soil, aeration and mixing of layers. The plow simply makes a half or full revolution of the formation. At the same time, soils with a dense structure may not crumble and remain in large clods. This requires additional processing with harrows, disc cultivators or small coulters, and in small areas with rakes.
An additional operation greatly increases labor and energy costs and reduces overall labor productivity. After cultivation with a milling cutter, no large lumps remain on most soils, and the soil is immediately completely ready for sowing.
Site cleaning
Before you start cultivating your garden with a motorized cultivator, you need to clear the area being treated with a rake from small stones and branches. In addition, it is necessary to remove all foreign objects that may interfere with the operation of the cutters. These could be stones, boards, large branches that have fallen into the garden from trees, wooden pegs for garters that could have remained from last year, any metal debris, pieces of rope or wire, etc.
Cost of some spare parts - approximate prices
| Primary shaft | RUB 1,099 |
| Main shaft under pulley | 999 rub. |
| Secondary shaft | 999 rub. |
| Reinforced cuff | 433 rub. |
| Wheel hub | 600-850 rub. |
| Engine gearbox housing | 4,900 rub. |
| Gearbox for engines | 10,000-15,000 rub. |
| Clutch cable | 450 rub. |
| Belt adapter | 8,000 rub. |
| Box body | 4,000 rub. |
| Gear reducer | 10,000 rub. |
| Lower gearbox | 9,000 rub. |
| Hex hub | 700 rub. |
| Clutch disc | 600 rub. |
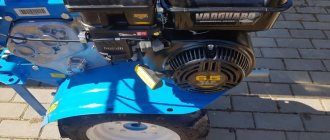
Petrol walk-behind tractor Hopper PRO 900
Shape of beds
If you plan to cultivate your garden using a motor cultivator, you need to take care in advance about the convenient shape and location of the beds. Small beds scattered throughout the site among trees and shrubs are not suitable for such work. Vegetables should be planted in continuous parallel rows located along the long side of the plot. At the beginning and end of each row, space must be left so that you can turn the cultivator around and enter the adjacent row.
Owner reviews
Ilya, 31 years old:
I don’t have an Oka walk-behind tractor, but a mini-tractor! I bought a front Forza 2 years ago and moved on to high-speed work. My 1.5 hectares of potatoes are processed quickly and efficiently. Savings in human resources, time and fuel. I felt the difference in the first week. The attachment is fully equipped. The technology is excellent.
Peter, 52 years old:
Hello. My old lady Oka is already 8 years old. Still works fine. Over the years, I have collected all the attachments I have and tested them under different loads. What can I say: in the spring I only mill the soil, in the fall I pull with a plow, I pull a 300 kg trailer, I take a disk hiller, I have a simple, inexpensive potato digger. There is other equipment, everything is simple, without bells and whistles - everything works great. In winter I also use it, plant it on a tracked attachment and complete it with a blade - that’s it! The car, of course, is periodically repaired, parts are freely available, belts too.
Inter-row processing
This is the second most important operation that you will perform with a motor cultivator throughout the season. Technically, it is performed in the same way as digging. But for successful processing of row spacing, it is necessary to correctly calculate their width in advance. To do this, you need to take into account two parameters: the width of the maximum growth of the root system of a given crop and the maximum working width of your cultivator. The row spacing (the distance between the center lines of two adjacent rows) should be equal to the sum of these two parameters. Then you can carry out the treatment without damaging the roots of the plants. And as the root system grows, you can reduce the number of cutters.