Varieties
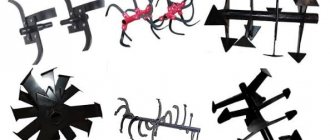
Several types and forms of this tillage tool are used. Let's look at all the types in more detail, because... Assembly differs depending on the type of cutter.
Saber-shaped
Saber-shaped or saber cutters are the most common, classic type. They are used on most walk-behind tractors. Their durability and practicality is evidenced by the fact that they are also used on powerful agricultural machinery for cultivating large fields.
The photo shows the classic version:
They have a number of advantages, such as replaceable blades. If desired, you can remove one blade, sharpen it, straighten it, or replace it with a new one. The fastening is carried out using bolts.
One blade is made as a monolith, a single piece, from a single strip of metal. There are no welded or riveted or screwed elements on it that could fall off due to significant loads when cultivating the soil.
The geometry of each blade and their location relative to each other are designed in the best way so that the cutting edges enter the ground easily and pass through it without unnecessary loads on the transmission and engine. At the same time, the soil is effectively loosened, lifted and mixed. At the same time, there are no gaps in the form of strips of uncultivated land. The entire processed strip is completely covered by the cutting edges of the left and right knives.
The cutters are made of special durable alloys that have undergone heat treatment (hardening). They are not fragile, they can withstand to some extent, bypassing, for example, a stone.
The quality of the alloy varies greatly among different manufacturers.
Crow's feet
This type of design appeared many years ago as a homemade one, made on one’s own for one’s own needs. Then it was noticed, and after some modifications this type of cutter began to be produced in the factory for walk-behind tractors.
The advantages of this option compared to the classic one:
- sharp tips penetrate the soil more easily, which is important when processing heavy, dense and dry, petrified soils. It is much easier for a walk-behind tractor to work with them;
- grass and roots can also wrap around them, but less than with saber ones. The posts here are straight, not bent. Some fibers slip between them.
The only downside to this option can be the poor quality of the factory execution of each specific product. Welded triangular cutters may fall off. If the unit is made as a non-separable unit, if one cutter is hopelessly broken, the entire unit will have to be replaced.
Due to the straight shape of the posts, such a cutter cuts the earth more than it lifts, loosens and mixes. Only triangular incisors work here.
Spiral
Structurally, this is a type of “crow’s feet”.
Difference from the usual version:
- semicircular shape of supporting posts;
- rectangular shape of the incisors.
The advantages and disadvantages are the same as those of the “crow’s feet” described above. There is a peculiarity - due to the small area of the incisors, there may be gaps; not the entire area is trimmed and loosened.
Functions
The milling cutter is the main working element that directly performs the work of cultivating the land. Therefore, so much depends on quality.
The sharp part makes a cut in the ground, making a revolution and rising up. The shovel picks up and lifts part of the earth. Thus, the earth is loosened, mixed and aerated (saturated with air), which all together is the main task in cultivating (cultivating) the land.
Along the way, the blade either cuts the roots of the weeds, or catches them and pulls them out. In any case, the growth of perennial root-propagating weeds is temporarily disrupted.
The most effective methods of plowing with a cultivator
There is only one way to cultivate the soil with a cultivator: the operator directs the unit, the cutters do their job.
However, there are approaches that allow the cultivator to work correctly and thereby make it more effective in different situations.
There is no need to chase depth of processing. Cultivation consists of loosening the top layer of soil. Wherein:
- The capillaries through which water evaporates from the ground are destroyed. Moisture retention occurs;
- Some of the roots of perennial weeds are destroyed, they are torn out from their place of growth;
- Some of the weed seeds lying on the surface are buried in the ground and will not be able to sprout.
For this, a processing depth of 10-15 cm is sufficient.
Let us remember that large agricultural holdings today grow grain crops on vast areas without plowing at all, only with discing.
Fine processing is carried out faster, with less wear and tear on equipment, saving fuel and time, which is more efficient.
If the area is very overgrown, the grass must be removed in different ways - mowed, weeded, pulled by hand or plowed with a plow, and milled the next year.
However, the following video suggests an effective, in the opinion of the author of the video, method of processing a heavily overgrown area:
The problem here is cleaning the cultivator shaft. Therefore, the video can be shown as an example of what will happen if you do not remove the grass. But after the first pass, when the cutters remove all the weeds, the area will be processed freely.
The method can be considered effective in removing stems of large weeds.
The following measures also increase efficiency:
- the weather and period with optimal soil moisture are selected;
- non-blunt cutters are used;
- a full or incomplete row of cutters is installed. Full row provides wide coverage in one pass and speeds up work;
- incomplete makes it possible to cultivate heavy soil;
- the optimal processing order is selected: along the perimeter (in a circle), in sections between trees or in a row.
It’s faster in a circle, since you don’t have to turn the cultivator 180 degrees every time. But you will have to leave the middle of the site along the cultivated land. Typically, such areas are treated with passes along back and forth, and then the ends are plowed across.
Elements of milling cutters for walk-behind tractors
A classic reciprocating cutter for a walk-behind tractor consists of three parts:
- supporting power shaft , rectangle or pipe, which transmits rotation from the gearbox and carries the remaining elements;
- flanges , which are tightly fixed to the shaft with holes for bolting replaceable cutting blades;
- knives, replaceable cutting blades.
All other types of cutters consist of the same parts. The difference is that “crow’s feet” and spiral cutters are most often non-separable, all elements are welded.
Special cases
Mills for a motor cultivator with 2-3 sections usually have a solid shaft. But often there are models with collapsible or additional bushings, hung in sections. The diagonal principle of assembling knives in all of these cases will be identical to that described above. The process is complicated only by the need to perform additional steps - to assemble the entire cutter together.
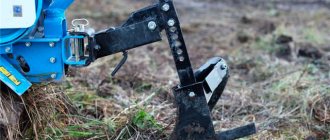
Stoppers for mounting a group of knives
The structure is installed using steel stoppers. They reliably fix all elements of attachments and prevent loosening of connections under dynamic loads.
Hanging an additional section
Advantages
Milling today is the most important agricultural technique.
Deep cultivation of the land is carried out in two ways - plowing and milling. The first method was the only one for thousands of years, since there were simply no cutters before.
The advantage of milling: high-quality and complete loosening of the soil, aeration and mixing of layers. The plow simply makes a half or full revolution of the formation. At the same time, soils with a dense structure may not crumble and remain in large clods. This requires additional processing with harrows, disc cultivators or small coulters, and in small areas with rakes.
An additional operation greatly increases labor and energy costs and reduces overall labor productivity. After cultivation with a milling cutter, no large lumps remain on most soils, and the soil is immediately completely ready for sowing.
How to operate a motor cultivator: step-by-step instructions
Before plowing with a cultivator, be sure to carry out the preparatory work described above. After, for plowing:
- The cultivator is started.
- Let the engine run for 0.5 - 2 minutes to warm it up slightly and disperse the oil through the engine components.
- The throttle is set to about halfway.
- They get to work.
When cultivating large areas, the cultivator motor must not be overheated. If a specific smell appears, the sound or character of the engine changes, work with the cultivator is stopped and time is given to the engine to cool. But it's better to do this before these signs of overheating appear.
How long the engine can run before pausing depends on the model, whether the engine has been broken in or not, at what speed the treatment is taking place, and what the weather is like outside.
Our readers often send us the following question: is it possible to plow with a walk-behind tractor on rubber wheels? We answer, if you mean plowing with a plow, then theoretically it is possible, but it’s not worth it, for this purpose it is better to use metal wheels, plowing with them is easier and faster. Rubber ones will slip.
How to assemble cutters on a walk-behind tractor step by step
Assembling a cutter for a walk-behind tractor takes 1-2 hours, but it can take a long time and become a problem if suddenly a complete set of fasteners is not available.
These are the kits used to assemble the cutters:
Despite its apparent simplicity, this is a rather complex assembly in which the correct placement of the blades is extremely important. On different assemblies there can be from 6 (two cutters with 3 blades each) to 32 (8 cutters with 4 blades each).
The video will show how to assemble cutters for a walk-behind tractor:
All blades are divided into left and right. For some, the sharpened cutting edge is bent in one direction, for others - in the other. Sometimes there are assemblies with 3 left and 1 right blades, or other combinations. There are assemblies with 1 shortened blade.
If assembled incorrectly, the following problems arise:
- The walk-behind tractor jumps during operation and moves jerkily (one or more blades are turned with the blunt side towards the ground);
- one strip is processed by two blades, but an unplowed strip remains nearby (all blades are turned in one direction);
- if all the blades are installed with the cutting edge sharpened in the opposite direction, the walk-behind tractor will not be able to plow at all;
- An incorrectly installed blade can hit the gearbox. At low speeds the engine will simply stall; at high speeds the gearbox can be punctured and the blade bent.
After any assembly and installation on the walk-behind tractor, it is necessary to rotate the cutters without starting the engine and check that the blades do not cling to the parts of the walk-behind tractor.
Assembling new blades can be done without problems if you have an old factory cutter in front of your eyes. In this case, new blades are installed looking at the correct sample.
If the installation of new blades is carried out on the old shaft and flanges, before removing the old blades, you can photograph their position on a smartphone or sketch it. You can simply remember if you disassemble one cutter after another sequentially, and not remove all the blades at once.
Figuring out from the manual how the blades should be positioned can be a challenge. The picture does not always show the correct position. Translation from Chinese may not be clear. Numerous videos on this topic on the Internet may not help, since (see above) the assemblies are all different. Sometimes the video shows simply incorrect assemblies. The correct information will have to be collected piecemeal.
If the old cutters were disassembled a long time ago, not everything is clear in the manual, there is no clear video with a suitable model, assembly is carried out according to the following general rules:
- the outer blades are always attached inside the flange area (from the side of the walk-behind tractor), and not outside;
- on most models there are equal numbers of left and right blades. On a 4-blade assembly - 2 left and 2 right;
- left/right blades alternate, turned in different directions. But be sure to keep the cutting edge facing the ground.
Let us remind you that there are models and kits with other combinations.
But no matter what blades and in what combination were on the walk-behind tractor, you can purchase a standard kit (example in the photo above) and assemble it. In this case, the main thing is that it matches the walk-behind tractor model in size, shaft diameter, etc.
Peculiarities
The walk-behind tractor is equipped with additional components. In addition to cutters, they use a blade with an adapter - this is a snow shovel, which includes a knife. The blade is installed on walk-behind tractors MKM, Salyut, Agat and a number of other models of domestic manufacturers. Individual rotary mowers are provided for different models of walk-behind tractors. Farmers can choose them according to their taste.
Tilling the soil to different depths is done with knives. It is with their help that the soil is crushed and loosened. During operation, these components are damaged or broken. As a result of wear and tear, if they become dull, there is a need to replace them.
Factory samples can be exchanged for elements of a similar brand. All of them differ from each other in the bend of the blade (right and left), length and width, the material from which they are made, and the method of fastening. When replacing, you need to pay attention to this.
A rotary mower has two rotating discs, each equipped with four blades. Each of them is attached to the disk using a cotter pin. The discs themselves are fixed on a metal frame. The new rotary mower is assembled at the manufacturing plant. Knives are replaced if they break or when there is a need for sharpening.
Cutters for walk-behind tractors can be sold complete with a pin, cotter pin, bolts and nuts, which must be properly assembled and then installed. Craftsmen can independently make knives at home for both cutters and rotary mowers, as well as for snow plows.
The design of knives can be in the form of a saber or in the form of crow's feet.
Installation
To install the cutters, it is enough to perform a number of simple operations:
- Tilt the walk-behind tractor on its side.
- Remove the wheel and install a cutter in its place. Pay attention to the rotation, the cutter must be installed with the blade forward so that it cuts the ground.
- After installation, secure the cutter on the gearbox shaft with a special cotter pin.
- Tilt the walk-behind tractor on the other side and do the same.
Installation is carried out the same way for all types of cutters and on all walk-behind tractors. It is recommended that two people perform this operation: one holds the cultivator, the other puts on the cutter.
Do I need to sharpen cutters?
The cutting edges of the blades must maintain the same sharpening angle (sharpness) as in the new (factory) state. If you sharpen the cutters more strongly, they will very quickly become dull to their previous state, since the soil is a strong abrasive, especially sandy.
Extremely dull edges will make work much more difficult. There will be extra load on the gearbox, engine and entire transmission, causing accelerated wear. Work will proceed more slowly, with excessive fuel consumption. Dense soils may not be able to be processed at all.
The cutting edges of the blades of walk-behind milling cutters should be sharpened to factory condition as they become very dull. The blade should cut, not crush the ground.
Too frequent and sharp sharpening will lead to the following problems:
- loss of time for sharpening, consumption of grinding wheels;
- abrasion of the blades during sharpening, which will accelerate their wear.
In addition, the edge, sharp as a knife, cuts the roots of weeds, which are then pulled away throughout the area. Thus, root-propagating weeds spread throughout the entire area. These include dangerous weeds such as wheatgrass, which can clog the entire area. It is difficult to weed them out, as they sprout again from the roots. A blunter cutter pulls the roots out of the ground. They are wound around the blades and shaft, then removed outside the site.
Blades made of high-quality and properly selected metals and alloys do not dull for long enough. If the edge rounds critically quickly, it means the metal is soft and the blades need to be replaced with high-quality ones.
When you need to sharpen cutters for a walk-behind tractor:
In addition to the cutters described above, there are unique designs for walk-behind tractors on sale. For example, a cutter made in the USA for the Mantis walk-behind tractor.
Many homemade cutters are also created - from springs, header tips from a combine, etc. There may be unsuccessful homemade options, but sometimes they are more effective and reliable than factory ones.
As can be seen from the article, most cutters are monolithic and only the classic version requires assembly. There is nothing complicated about this, just screw the knives to the base according to the diagram, observing a certain order.
Do I need to sharpen it?
The answer to this question is yes when using crow's feet. There it is necessary to carry out regular inspection and sharpening of cutting edges. The welded design of such cutters does not imply the use of hardened metal, and therefore bends, bursts and becomes dull.
When working with saber cutters, sharpening is not only impractical, but also harmful. In addition, the product passport clearly states: “Do not sharpen edges.” In their work, rotation speed and soil composition are important. Cultivation is the process of controlling weeds, breaking up the crust and mixing fertilizer with the soil.