Every year the popularity of agricultural machinery is successfully increasing.
After all, with the help of special equipment, all work on the site can be performed easily, quickly and with better quality. It is these key features that push many gardeners to purchase such auxiliary equipment. The most popular transport among summer residents and rural residents is, of course, a mini tractor. Fortunately, the range of additional equipment for this machine is very diverse and rich in a wide selection of models and manufacturers. We will focus on such a popular unit as a potato digger. Harvesting potatoes is one of the most labor-intensive and time-consuming processes in harvesting. Therefore, farmers or owners of large plots are happy to acquire such assistants, which allows them to harvest potatoes faster and easier.
What is a potato digger and its types
A potato digger is an agricultural technique used by farmers and private farmers to simplify the process of harvesting potatoes.
Main parts of a potato digger for a walk-behind tractor with your own hands:
- base - the metal base of the potato digger: this is a frame made of heavy-duty thick metal;
- the traction mount is responsible for fastening the mechanism's rods;
- vertical stands - needed to secure the knife-ploughshare on them;
- ploughshare - the main element of a potato digger, is a knife that goes deep into the ground, loosening the soil;
- adjusting rods - designed to adjust the angle of attack of the ploughshare;
- support wheels - necessary for moving the potato digger across the cultivated area.
Potato diggers for mini tractors are used on loose, medium-compacted soil.
Note! Regardless of the type, the operation of all devices is similar: the tool goes deep into the ground with its pointed part, moving along the beds, lifting soil layers with potato tubers.
There are the following potato diggers for the walk-behind tractor:
- fan-shaped (lancet);
- conveyor;
- vibrodynamic (screening).
Assembling a garden shredder with your own hands
Fan
A homemade fan potato digger for a walk-behind tractor is universal. The potato digger is structurally very simple. Its mechanism does not have rotating parts, which in other potato diggers quickly fail under heavy loads during harvesting. This species has other names: because of its characteristic appearance, they are called “paw” or pointed, and the industrial model is called Dolphin.
From experience with fan models for tractors, farmers using this type:
- ability to work with low-power walk-behind tractors;
- ease of connection with a walk-behind tractor;
- relatively low prices for industrial models;
- reliability;
- good cleaning speed.
The disadvantages of working with fan potato diggers include:
- the likelihood of loss of the potato crop occurs due to the small working width of the digger;
- part of the crop may be damaged by a knife, making it unusable.
Conveyor
The design of the conveyor potato digger for the walk-behind tractor is simple. In the center of the mechanism there is a transport belt, with the help of which the harvested crop of root crops moves upward along the belt, being cleared of dirt and adhering soil. The conveyor belt moves in a circle using the power from the rotating element of the walk-behind tractor through chains, a variator, and gears. You can make a potato digger with your own hands, but you need to follow the technique.
Advantages of a conveyor digger:
- does not damage potatoes;
- ease of operation;
- Compatible with high-power walk-behind tractors and small tractors.
The disadvantages of a conveyor CC include the likelihood of foreign objects getting into the conveyor, which can jam the mechanism and damage it.
Grohotnaya
The design of the vibrating CC, also called “screening”, is simple - the device consists of 3 parts:
- ploughshare;
- a movable grid with a vibrating mechanism that processes the harvested crop;
- metal carcass.
This type of CC is used in agricultural production for harvesting potatoes from large areas, sometimes on an industrial scale. The unit works like this: collecting and sifting tubers on a vibrating table is carried out through vibrations coming from a screening mechanism.
The advantages of using this unit include:
- wide coverage of the cultivated strip of soil;
- large depth of immersion of the knife into the ground;
- minor losses of potatoes during harvesting.
There are also disadvantages to using vibrating diggers:
- vibrations from the screening mechanism enter the control part of the walk-behind tractor, the impact of the vibration mechanism tires the body;
- Before working with CC, S-cleaning must be cleared of foreign plants that could clog the grate.
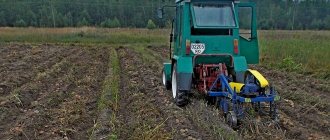
Which potato digger is better to choose for a mini tractor?
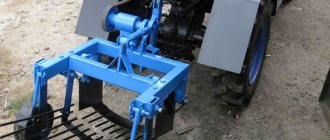
All types of units operate on the same principle. The potato digger is attached to the mini tractor using standard awnings. The ploughshare is immersed 25-30 cm into the ground, and the potatoes pass along the conveyor, clearing the soil. The peeled tubers either fall to the ground or into a box mounted on an additional mount. Advantages of a homemade potato digger:
- maximum harvest;
- in the process, the potatoes are cleared of soil;
- high speed of bed processing;
- the design is easy to make with your own hands;
- The unit can be mounted on any type of mini tractor.
Attention! Do-it-yourself double-row models of potato diggers for minitractors are made for farmland. They are suitable for harvesting large areas; such a unit processes two rows at once.
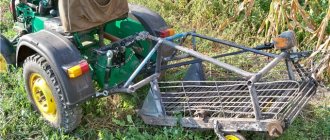
Vibrating or screening potato diggers for mini tractors
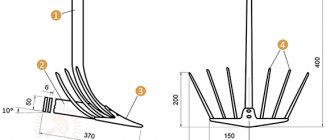
The unit is also called a shaking digger. A do-it-yourself rumble potato digger for a mini tractor consists of three parts: knives, a vibrating grid, and a frame. The ploughshare is made in different shapes: bent, pointed, concave.
The principle of operation of a potato digger for a mini tractor is to deepen the knives and drive the tubers with soil along the grate so that the crop is cleaned. The root crop returns to the garden bed or falls into the box.
Strip coverage 40 cm, immersion depth 25 cm, Yield loss can be 2-10%, the value depends on the density of the soil. The vibrating potato digger is used over large areas, but it also performs well in the country garden.
The disadvantages of home-made screening units include strong vibration and the need to first clear the beds of tops.
If the tops fall on the conveyor, the grass clogs the mechanism and gets twisted onto the wheels, which greatly complicates the operation of the trailer.
Conveyor potato diggers for mini tractors
Conveyor devices are more suitable for farms. The soil is loosened with a plow, the cut layer falls onto a conveyor, where the potatoes are separated from the ground. The conveyor belt for a homemade single-row potato digger for a mini tractor is made of metal mesh and rubber.
Refinement of a potato digger for a mini tractor in the video:
The plow is immersed 10-20 cm into the soil. Yield losses are 2-5%. The potatoes fall back into the garden bed or into the installed container. The drive belt transmits rotation to the potato digger pulley. Then it enters the chain drive through the gearbox to the conveyor belt drive and to the eccentric of the plow. The knife plunges into the ground under vibration, digs up the tubers and feeds the layer to the conveyor, where the potatoes are cleared of soil and fall into the collection.
Digger leaves clean whole potatoes
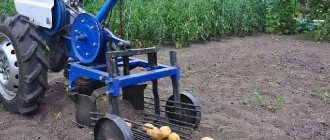
Fan potato diggers
The trailer is also called a paw or lancet digger. Fan potato diggers are easy to make with your own hands. The paw is attached to the walk-behind tractor. The sharp end of the plow penetrates the soil and pulls out the potatoes. The tubers fall onto the ploughshare and fall onto the steel bars. The soil is thrown back onto the ground, and the potatoes remain clean and return to the ridge.
The fan potato digger is undemanding to clean rows and sifts the tops
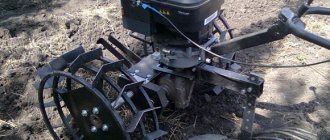
Drum potato diggers
The unit copes with the harvest in large gardens. The device consists of three parts: a frame with wheels, a ploughshare, and a drum rotating along an axis.
The knife plunges into the ground and pulls out a layer of soil with potatoes, which enters a drum made of metal mesh. There, the tubers are cleared of soil, and the crop is moved to a vegetable receptacle or to a bed.
Making a drum unit with your own hands will take a lot of time, but it is highly productive
Potato digger: do-it-yourself assembly
To assemble a vibrating potato digging device, the following materials are required: a thick metal corner (section 60x40) or a channel for making a frame, a thick steel sheet (6-8mm), a metal rod or fittings.
Additionally for the digger you will need:
- consumable fastenings (bolts/nuts/washers);
- steel pipe (diameter - 300mm);
- wide steel or rubber wheels.
The steel wheels of a homemade potato digger are inferior to rubber ones in terms of efficiency and maneuverability
When choosing rubber wheels, pay attention to the thickness of the tread, the width of the chamber - the wider, the more stable and passable the model will be
The process of manufacturing and assembling the cultivator:
- Weld the main frame of the device from corners or channels.
- Make sections from a steel sheet to strengthen the frame.
- Connect the frame with bolts or welding with reinforcing gussets.
- Then weld a grid of rods/reinforcements and steel strips.
- Attach a shaft to the grate, which is responsible for the vibration of the working digging unit.
- Afterwards, secure the elevator to the frame by welding and bolts.
Make a plowshare knife from a piece of steel pipe, cut it out using a grinder. Sharpen the ploughshare at the bottom. Connect the knife to the elevator and frame with thick bolts (diameter - 10mm).
Now make the wheel fasteners. Craftsmen recommend fixing the shaft for the wheels on the frame racks, but you can also install the wheels independently of each other on each side of the frame on the hubs. The completion of the assembly process is the installation of the wheels onto the shaft or frame hubs.
Instructions for making a fan version
The fan-type potato digger is the easiest to make, requiring only basic skills in handling plumbing supplies and power tools. Sometimes it is even possible to do without a welding machine, replacing the seams with threaded connections, but using electric welding will still give a faster and more predictable result. We will take this technique as a basis.
Required tools and materials
To make a potato digger at home, you will need the following tools:
- control, measuring and drawing accessories;
- a workbench with a vice or other fixing device;
- a hacksaw, a jigsaw with fine-toothed files, or a grinder with cutting discs;
- electric drill with a set of drills;
- set of wrenches;
- sledgehammer or heavy hammer;
- welding machine and electrodes for it.
The role of materials is played by rolled metal of various types (angle, channel, pipe, rod) and dimensions, sheet steel with a thickness of at least 6 mm, fasteners. Often you can use semi-finished products left over after construction or renovation. In addition, you will need two wheels with a diameter of 5-20 inches, preferably with rubber wheels. They can be found in almost any large hardware store.
Manufacturing and assembly algorithm
The process of making a potato digger begins with the creation of a detailed drawing of the future device. It must take into account the parameters of the available materials and the properties required from the potato digger, including the width and depth of the grip.
The volume of raised soil must be large enough to capture the entire root system, but at the same time it must be correlated with the power of the walk-behind tractor - low-power machines simply will not be able to work with large-volume potato diggers.
After the drawings have been completed and checked, we begin directly to manufacture the device. This work includes the following stages:
Marking and cutting workpieces. Blanks for the frame and grille are made from the profile, and blanks for the rafter are made from sheet steel.- Processing of workpieces: adjusting edges, forming curved parts, drilling technological holes and other preparatory operations.
- Welding permanent joints. To provide temporary fixation of parts before welding, you can use wire, tie clamps and other easily removable fasteners.
- Assembling threaded fasteners, installing bearings and wheels.
- Monitoring the accuracy of assembly and, if necessary, making changes to the device configuration.
- Repeated mechanical treatment (cleaning) of surfaces, preparation for painting.
- Application of paint and varnish coating.
- Setting up a potato digger.
The last point involves adapting the assembled device to specific conditions of use. For this purpose, at the design stage, customizable components are provided, for example, adjusting the height of the wheels, which, in turn, affects the digging depth.
Homemade conveyor potato digger for walk-behind tractor
The conveyor model is quite suitable for working in extreme conditions and heavy dust. This is a high-precision, high-speed device, if the assembly is carried out correctly and the components are securely mounted. The digger allows you to mechanize almost the entire assembly process if you install a receiving hopper in addition to a mini-tractor or walk-behind tractor, which will save money and manual labor when harvesting potatoes. In addition, improvised material can always be picked up at a landfill or at home in the garage of craftsmen. Any old mechanisms will do the job.
Conveyor potato digger for walk-behind tractor
Stages of work to create a conveyor unit:
- take a steel profile with a square cross-section and weld a frame from it;
- make a ploughshare knife from sheet steel;
- install the roller in the frame for mounting the conveyor belt;
- assemble a conveyor belt from chains and rods;
- attach brackets to the gearbox;
- install the conveyor belt and mechanisms into the frame;
- mount the wheels and plowshare to the frame.
Today, digging potatoes on a plot with a shovel is practically a thing of history. Modern potato diggers for walk-behind tractors allow you to harvest crops much faster. At the same time, it is not necessary to buy expensive equipment for production. It is enough to quickly make it from scrap materials, simplifying the harvesting process.
Note! To know how to properly make a potato digger with your own hands for a walk-behind tractor, it is important to study in advance the types and structure of various models, determine the optimal dimensions, make drawings, a diagram and inquire about the density of the soil on the site. This is the only way to choose the best option for manufacturing a mechanized device without loss of yield.
How does this happen?
A device such as a potato digger is equipped with a special shovel-knife that cuts through the ground 25 cm deep. After this, the knives rake the potatoes into the conveyor belt. Vibrations occur there, and excess soil is shaken off. The tubers are spilled onto the rows, where workers eventually pick them out with their own hands.
This is very convenient, since you do not need to make any effort to extract the crop from the ground. The whole process of working with a mini tractor is much faster than the traditional method. A person only needs to collect the finished fruits in a bag. The photo shows the harvesting process.
Advantages of this device:
- allows you to harvest without physical exertion;
- completely replaces a shovel;
- pours clean potatoes without soil onto the soil;
- works quickly regardless of weather conditions;
- capable of harvesting large fields.
Do-it-yourself conveyor CC to a walk-behind tractor
Conveyor diggers can be made in both small sizes, intended for small households, and large ones, which are used in agricultural production. The manufacturing process of a conveyor-type digger is quite complex compared to simple types. Therefore, without sufficient experience in the manufacture of such mechanisms, it is better to buy a ready-made unit at an agricultural equipment store.
Recommendation! It is better to make a conveyor device using diagrams and drawings of production sample models.
Let's consider the main stages of the manufacturing and assembly process of a conveyor potato digger for a walk-behind tractor for digging potatoes:
- Welding a frame from a steel profile and corners.
- Cutting a ploughshare knife from a piece of steel.
- Insertion of wheels or shafts for the conveyor belt mechanism into the main frame.
- Creation of a belt conveyor from a chain and reinforcement blanks.
- Installing fasteners and brackets to secure the gearbox and gear.
- Installation of transport belt and other devices on the frame.
- Installation into the frame part of the share and wheels.
A manual potato digger is easier to make, but more difficult to operate.
Rodent repellers, characteristics
Nuances
Making a conveyor potato digger is extremely difficult. For a successful result, the master must own a welding machine, have developed technical skills and have an adequate understanding and understanding of the component parts. You will still need to buy a lot of parts, since it is impossible to make them by hand.
At the moment, metal on the market, especially suitable metal of the required thickness, is expensive. After studying the drawing and calculating all the costs of creating a potato digger, many come to the conclusion that purchasing a factory model is much easier than making a homemade one, but sometimes special equipment is required for a certain soil. If you believe in your abilities, you can start creating an individual device to help you harvest.
Probably, the world has not yet come up with a more convenient tool for a mini tractor that can easily harvest potatoes. This device is easy to use, working with it is not only comfortable, but also fast. In order to make this technique, you need to carefully study the drawing of a potato digger for a mini tractor. It is worth noting that rarely does anyone manage to make a circuit themselves, especially without the proper skills and appropriate education.
Sometimes a professional just needs to look at a potato digger or at a drawing, and new ideas will already arise. And ordinary gardeners manage to make a mini-tractor for potatoes.
How to make a potato planter with your own hands
Let's look at what a homemade potato planter for a mini tractor is.
With the onset of spring, potato tubers are prepared for planting in the ground. To facilitate the process, use a special planter. The potato planter for a mini tractor can be single-row or double-row. In addition, they are simple, without support wheels and with wheels. Single-row technology is adapted for planting tubers in one row. In the case of a double-row, two rows are simultaneously processed and sown. The row spacing can be adjusted.
You can make models with lugs. In such a unit, the function of wheels is performed by lugs. They, thanks to the chain mechanism, set in motion the conveyor belt for supplying tubers. To create even rows, the device has a disc hiller and a plow for forming a furrow.
The two-row potato planter for a mini tractor fits well with mini tractors and has a hydraulic drive. Unlike a single-row planter, this model has two hoppers for filling planting tubers. The size of the capacity depends on the model of the unit.
Planting potatoes with a mini tractor completely automates the work. This is a very convenient device, but unfortunately many people cannot afford it. You can make such a device yourself, maintaining the principle of conveyor work.
To make a potato planter with your own hands for a tractor you will need:
- container or bunker for filling planting tubers;
- frame with wheels;
- device for digging ditches;
- tape with attached bowls for capturing potatoes;
- discs for filling planted tubers.
First, a frame with wheels is assembled, to which all other parts will be attached. After this, a mount is welded to couple the unit with the tractor and a longitudinal axis is installed on which the bunker will be supported. It can be made from wood, or you can use any suitable container, for example, a tank from an old washing machine. A metal pipe with a spacious hole can be used as a seeder.
Before you start assembling such a unit, you should definitely read the relevant literature or watch a video. It is not worth taking on the design without a preliminary drawing. For planting potatoes, a home-made digger can be designed for a tractor, or it can be combined with another device. Often, after assembly, the cost of manufacturing the unit is more expensive than expected, and the price difference with ready-made equipment is so insignificant that it is better to purchase ready-made equipment.
A homemade potato planter must be assembled without errors, otherwise the sowing process will be labor-intensive and long. The calculation should include absolutely everything: row spacing, distance between planted potatoes, planting depth, etc.
Connection methods
There are two ways to connect the parts of a potato digger : welding and using a bolt.
- Resistance welding is not a reliable method of fastening. The fact is that when using equipment on hard, petrified soil, there is too much stress on the metal parts of the structure. The weld may come apart.
- Bolt nut. This connection does not require special equipment, just keys and a drill. The option is much more reliable than resistance welding. This method of fastening is not subject to overload.
Note! The nut can always be unscrewed and the structure can be disassembled. This is an excellent solution if there is a need to transport a potato digger over long distances.
How to attach a potato digger to a walk-behind tractor?
The possibility of attaching a potato digger to a walk-behind tractor completely depends on the design and the unit used - the following general points can be highlighted:
- The main condition for normal operation is the power ratio between the walk-behind tractor and the unit. In practice, this means that it is not advisable to attach a powerful walk-behind tractor to weak fan-shaped potato diggers.
- Size ratio. Aspect ratio is one of the key parameters during installation. When making a potato digger yourself, you need to decide on the purchase of a walk-behind tractor (if you don’t have one), and then, according to the drawings, make the mechanism in relation to the parameters of the walk-behind tractor.
- Correspondence between the potato digger mount and the walk-behind tractor mount. The main thing when making a structure is to correlate the mounting of the walk-behind tractor and the structure itself.
A potato digger is a good helper for summer residents due to its efficiency. With economical fuel consumption, it is possible to quickly process a large sown area and with low yield loss, while the time taken is much faster than when working with a shovel.
Advantages and disadvantages of equipment
The most important advantage of a potato digger is increased productivity. Such devices allow you to harvest crops in the shortest possible time with minimal time and effort.
Another advantage of using a potato digger is minimal crop loss, because it allows you to remove a whole layer of soil with all the tubers, even the smallest ones.
The disadvantage of a mechanical potato digger is damage to the integrity of the tuber skin, which reduces the shelf life of the crop. Also, the disadvantages include the high cost of such devices, especially those related to active attachments (belt drive or PTO).
Despite the design differences between different types of potato diggers, they all cope with the task of harvesting better than a simple shovel.
How to make a potato digger for a mini tractor with your own hands
Let's consider making a potato digger for a mini tractor with your own hands. The conveyor potato digger can be assembled by hand. To do this, you need to have drawings on hand on which all parts of the unit will be outlined in detail.
How much more expedient it is to make such equipment yourself is up to everyone to decide, but it should be taken into account that a homemade potato digger is suitable for plowing a small area. Large areas are best treated with industrial equipment purchased from the manufacturer. When harvesting potatoes, a digger, made by hand for a tractor, passes through the area, digs up and collects the tubers.
In order to assemble a passive type weapon, you will need materials. First of all, a sheet of iron made of durable steel, which will serve as a shovel. It is advisable that its width be at least 3-5 mm, otherwise the iron will quickly become dull. Many people use circular disks, from which two sectors are cut out and welded together. This steel is much more durable and lasts longer.
Rebar rods are suitable for sifting out soil. They are welded on the back of the shovel.
You can use a metal channel as a suspension, having previously calculated the depth of immersion in the ground.
The blade part should be shaped like a triangle for better immersion into the soil. The device is attached to the walk-behind tractor using fasteners and requires normal movement along the rows planted with potatoes.
You can make a potato grinder for a tractor with your own hands. The assembly of this design is more complicated than the previous one, so you will need a pre-thought-out diagram. To avoid rapid breakdown, a homemade potato digger must be made of high-quality materials. To create an efficient structure, it makes sense to spend a little more time on it, and it will pay off in savings on the time spent on plowing and harvesting.
A homemade potato digger for a tractor is made from the following materials:
- metal profile pipe for the frame;
- iron layer (3-4 mm) for the ladle;
- iron fittings;
- metal channel for vertical traction;
- hub from the front of any car;
- gearbox;
- a driveshaft may come in handy;
- splined connection from the gearbox;
- one or two wheels (depending on the type of device);
- fastening elements;
- tools: drill, grinder, welding machine.
The height of the device above the ground will depend on the size of the wheel. The frame rests on two support points. The gearbox is activated either by the wheels or by the power take-off shaft of the cultivator. The spline connection is necessary for the mobility of the share and the oscillatory movements of the lattice.
The harvesting method will depend on the angle of inclination of the lattice part. If the screening part is tilted downwards too much, the potatoes will fall to the ground. When you change the angle of inclination and lift the lattice part up, the tubers will linger on the mesh, and then they can be collected directly into the bag, but for this you will need to constantly stop the machine.
A do-it-yourself potato digger can have any shape and size, it all depends on the choice of the designer
It is important to maintain the principle of operation, which involves raking the soil with potato tubers into a grid in which they will be sifted. Homemade potato diggers for mini tractors can be made from old machine parts and any available materials
The most important thing is that the potato digger meets all safety standards and does not cause injury during operation.
Model for harvesting potatoes
Fortunately, craftsmen came up with many different devices, which in turn made their work easier. A striking example of such devices is a potato digger. The principle of its operation is simple - this technique collects potato tubers. This invention is attached to a mini tractor with average power. The photo shows a classic screening model.
The most common option is a conveyor potato digger for a mini tractor. This equipment is distinguished by its high performance. Its structure is almost no different from the others. Only it contains a conveyor belt, which facilitates the heating of potatoes.
Homemade potato digger
Manufacturing and assembly
First, you need to weld a frame from metal corners and a channel (or pipes). The entire structure will rest on it. The length of our frame is about 120 cm.
We move down 30 cm from the frame and weld another channel or pipe for mounting the regulating parts of the digger.
Starting from one of the edges, we weld metal posts (vertically to the ground). The length step of the racks is 10 cm (first the long one is 50 cm, then the smaller ones are 40 cm, 30 cm). We weld the base to them, on which the bars of the grill will be located.
We connect the metal racks together with the remains of the channel. After cooking they should resemble a triangle.
A metal plate (made of sheet metal, about 30 cm wide) needs to be welded to one of the triangles. After the welding has completely cooled down, you need to bend it with a sledgehammer and secure it to the second triangle. The ploughshare can be made from sharpened metal plates (2 pieces), an old plow or a piece of pipe (200 mm), which should be bent like a plow and sharpened well. The share is attached to the elevator with bolts (size 10).
We weld the reinforcement to the base, starting from the side of the metal plate. The other side of her walks freely. The gap between the reinforcement is 4–4.5 cm. Thick sheet metal can be welded on the sides of the rods. This will prevent the root vegetables from falling out of the sides of the grill.
Instead of an elevator, a cleaning drum can be used. It is a half-cylinder made of reinforcement (section 10 mm), attached to a frame.
We install shafts on the resulting elevator (grid) that react to the rotation of the wheel and set the grate in motion (vibration).
Step 8
We attach the reduction block to the rod using bearings.
We assemble the support-transport unit (wheels, roller chains, metal disks and rod). The chains transmit rotational movements to the shafts. The rod, which acts as a connecting bridge, is secured with sprockets. Disks are welded to it, to which the wheels are attached.
Mount for walk-behind tractor
or tractors in the same way as fastening other equipment to them.
Design and principle of operation of a potato digger
Diggers can be attached to a walk-behind tractor or tractor, and can also be completely manual.
The type of construction determines what materials and tools you will need for your work. We will consider the operating principle and design of a vibrating potato digger attached to the equipment.
Experienced craftsmen can assemble a potato digger that works on its own. This design is equipped with a motor.
The operating principle of a potato digger is based on the operation of two metal knives that cut the soil. With their help, the tubers fall along the grid into a special container for collecting root crops.
The soil that gets onto the grate along with the potatoes falls off due to vibration. There may be no reservoir for potatoes at all: in this case, the vegetable falls straight to the surface of the ground. Potatoes that fall to the ground are collected by hand.
All parts of the device are equally important, because each of them affects the durability and strength of the equipment.
The main parts of our potato digger:
- Frame;
- Elevator (grid that vibrates and sides to prevent potatoes from falling out);
- Shafts (their rotation creates a vibration effect);
- Ploughshare (plow with knives);
- Support-transport unit (with its help the potato digger moves: wheels, disks, roller chains, metal rod, sprockets and bearings).
Note! Potato diggers are most effective for summer cottages with light soil, as well as with medium-heavy soil.
How to make a hammock with your own hands:
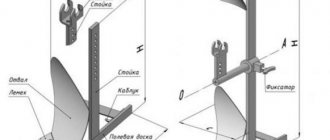
How to cook ralo?
To make a ralo, you should weld two holes for a bolt of size M12 in a sheet of metal measuring 40x40 cm and 0.3 mm thick. Exactly the same holes are made in the racks. In this case, you should retreat 50 mm from below. The leaf curls tightly. High quality nuts and drill are used.
A sheet of the same size is welded on the reverse side. Then another sheet of metal measuring 70x30 cm and 0.4 mm thick is used. It is butt welded to the side sheets.
The center is hit with a sledgehammer. The metal should take the shape of a cone. The pitched board is welded. One ends of the metal rods, the diameter of which is 10 mm (fittings are suitable), are soldered to the rail from below. The other ends extend beyond the base of the device. The length of the reinforcement should be 120 cm.
To provide reinforcement that prevents the rods from wobbling in the air, a 30 cm long riser should be welded at the end of the frame. A square pipe is welded from one riser to another (you can use a bar to which rods are welded). This achieves stability. About two thirds of the length will come out. The edges of the rods should be left free. They will vibrate when the potato digger is in operation and will ensure better removal of the tubers from the ground.
Materials and tools
Materials needed to make a potato digger with your own hands:
- The basis of the device is a metal frame. corners measuring 63 x 40 mm to each other
- Iron channel You can also use pipes (length about 130 cm).
- Sheet metal for the share and walls (thickness not less than 7 mm);
- Reinforcement (section 10 mm).
- If the connection will be held by bolts, then you need to purchase hardware.
- A chain that must transmit rotational movements.
- Metal racks of different sizes (pieces of pipe or channel).
- Wheels (can be metal or rubber, it depends on what soil the work will be done on).
- Drum made of metal or reinforcement.
- Bolts (for attaching the plowshare, size – 10).
Tools and equipment that may be needed when making a digger yourself:
- a welding machine for making a frame (possibly also for welding parts);
- wrenches or ratchet sockets;
- sledgehammer and hammer;
- scissors or metal saw;
- drill and metal drill bits.
Build process
The assembly process is regulated by basic rules, as well as the features of the device. Each type of mechanism has its own order and assembly conditions. With the exception of the standard rules, several conditions must be met:
- the connection of structural elements is carried out on the basis of an existing platform or eye;
- Initially, it is the supporting structural element that is installed;
- the parts are adjusted in accordance with the parameters indicated in the drawing or diagram;
- the assembly process is divided into stages, depending on the complexity of the design;
- The last stage is fitting the design to the equipment and a test run.
The last stage in the assembly is the most important, as it allows you to eliminate deficiencies before the main work process begins.
The most difficult option is to create a homemade screening (vibrating structure). Self-assembly process:
- the first stage is considered the moment of creating the frame;
- the frame is constructed from 4 corners: 2 – 0.8 m each, 2 – 1.2 m each;
- Several jumpers are attached to the resulting rectangle, through which the equipment is controlled thanks to vertical traction;
- a shaft for the wheel system is attached;
- several racks and a metal sheet are installed on them;
- after this, a lattice base is created;
- The last step is to install the wheels and adjusting rods.
A potato planter on a walk-behind tractor is considered ready after checking the operation, and not after securing the entire structure.
With small errors in calculations, the design may have defects or the tuber assembly process may be carried out incorrectly. If you do not follow the established calculations and circuit parameters, then installing the mechanism on the equipment itself will become problematic. During the manufacturing process, it is necessary to constantly check the dimensions with the required dimensions.
This is interesting: a disc hiller for the Neva MB 2 walk-behind tractor.
Most homemade options have a simpler collection pattern than the type presented. For example, the fan type, that is, an ordinary lancet potato planter on a walk-behind tractor, is easy to assemble. A knife is installed on a base, including corners and several fasteners, which is surrounded by rows of metal pins. The main point is the correct placement of the rods, as this will affect the efficiency of the assembly.
Many types of home-made structures are universal and differ from conveyor models only in parameters and dimensions.
Collecting root crops using a walk-behind tractor and devices installed on it is preferable to the manual method. You can either purchase a potato digger for a specific model of equipment, or you can design it yourself. Each type of mechanism has its own characteristics and difficulties in manufacturing.
Setup and service rules
The first assembly of the device with a mini-tractor is simple; you can do it yourself. Passive attachments (plows) are attached via a canopy and do not present any difficulties.
Potato diggers are more difficult to install and adjust. Some of them are driven by a PTO, while others are driven by a belt drive. Depending on what type of drive the active part has, the connection method will depend.
Direct installation also takes place using a canopy.
Equipment maintenance consists of timely cleaning and compliance with storage standards specified in the instructions. It is also necessary to lubricate parts that are subject to wear due to friction.
On any type of potato digger, it is necessary to regularly sharpen the ploughshare/cutting element.
It is also important to monitor the condition of the belt and replace it if necessary (for potato peelers).
Setting up the equipment before work involves adjusting the cutting element: it is necessary to establish to what depth the plowshare should go.
Types of potato diggers
Such units differ in size, working width and design features. If you are interested in a homemade potato digger, then first consider the features of each type of such device. The most popular are screening and fan units, but more experienced craftsmen are able to make drum and conveyor potato diggers. More details about the types of construction:
- Fan (lancet). Due to the characteristic shape of the plow, manufacturers often call this type of unit “Dolphin”. This is the simplest version of a potato digger and is inexpensive. It easily adapts to any model of mini-tractor or walk-behind tractor. There are no movable parts in the design. The principle of operation is that the soil with tubers is cut with a knife, after which the cut falls on the surface of the rods, where the soil is poured back. In this case, the tubers in their pure form lie on top of the soil. This type of digger is good for soil with low density, but it has relatively low efficiency - it lifts about 85% of the crop to the top.
- Vibrating (screening). Compared to the previous ones, they are more effective - they extract up to 98% of tubers from the soil. The mechanism of operation is as follows: the top layers along with the potatoes are picked up and placed on a vibrating table. Then, under the influence of vibration, the soil begins to peel off and escape through the cracks. The potatoes will fall out on the other side of the device. This potato digger is also suitable for collecting other vegetables. The downside is the complexity of manufacturing.
- Transporter. They can freely work on the basis of such walk-behind tractors as “Neva”. The design is very similar to vibration devices - they consist of a ploughshare and a moving conveyor. The latter has a special hooking device that supports the tubers on the platform and clears them of soil. The conveyor unit is more practical than the vibrating unit. The downside is that it is not practical to use on lightly compacted soil. It costs more than its fan counterpart.
- Drums. A potato digger equipped with a drum is used to process fields using a mini tractor. The mechanism of action involves the rotation of a lattice structure, due to which the potato tubers are cleared of soil. But users of the drum potato digger note that the potato peel is damaged in the drum. Homemade devices of this type are rare, because their manufacture is not an easy task, because it involves studying diagrams and drawings.
Types of potato diggers
Lancet potato digger.
Units for digging up potatoes:
- Vibrating (screen type, vibrating-screen). They consist of a vibrating shaft, a drive and a ploughshare. They have high performance. Mechanism of operation: the top layers of soil (along with potatoes) are picked up and moved to a vibrating table. With the help of vibration, the soil moves out through the cracks, and the roots fall out from the other side of the machine.
- Transporter. Potato diggers have a more complex structure. They consist of a shovel-shaped ploughshare, a chain-rod conveyor, and a cleaning drum.
- Universal (pointed). Fan type single-row potato digger. They are attached to the walk-behind tractor with a single hitch.
The potato digger can be equipped with other attachments, which will allow it to lift virgin soil, plant potatoes in the ground, and hill them. Some models, the most complex and expensive, can sort vegetables by type.
How to make a workbench in the garage with your own hands:
Diagram of a conveyor potato digger
1 – cardan shaft with PKM drive, 2 – base frame, 3 – reduction unit, 4 – bevel gear, 5 – drive shaft of the cleaning drum, 6 – support and transport unit, 7 – cleaning drum, 8 – chain elevator - rod with ploughshare.
Read here how to prepare a Bordeaux mixture to protect garden and vegetable plants from fungal pests. Find out how to choose the right pruning shears for grafting and pruning trees.
Potato digger for a walk-behind tractor using a screening crop separator
This design is more complex to manufacture, but the performance is 2-3 times higher than the previous model. If your vegetable garden planted with potatoes has an area of several hundred square meters, it makes sense to spend time creating an effective device. It will pay for itself in the effort saved during harvesting.
For production you will need:
- Profiled pipe for making a frame;
- Steel sheet 3-4 mm thick for the ladle;
- Circle or reinforcement made of ordinary steel;
- Channel 30-30 mm for vertical rods;
- The front hub is from any rear-wheel drive car, from the same Zhiguli;
- Gearbox from the rear axle of a VAZ classic;
- Cardan shaft (if connected to the power take-off shaft);
- Spline connection from an old gearbox;
- Wheel from old agricultural machinery (you can buy ready-made);
- Welding machine, grinder, drill;
- Fastening elements.
A potato digger for a walk-behind tractor of this design rests independently on the ground with the help of one or two wheels. The operating principle is shown in the illustration:
The supporting frame has two support points. The suspension for the walk-behind tractor is a traction device. Support wheels regulate the height of the structure above the field.
The gearbox is driven by the power take-off shaft of the walk-behind tractor, or connected to the wheels of the potato digger. The rod, one end connected to the crank mechanism, performs oscillatory movements.
The spline drives the ploughshare (moves back and forth like an excavator bucket) and the screen (moves sideways like a dog's tail). As a result, each portion of dug potatoes is separated from the soil and collected in a lattice storage tank.
If the drive has a positive tilt angle, you can periodically stop the movement and unload the peeled potatoes into bags. Or set a negative angle, then the tubers will be evenly unloaded on top of the soil for subsequent drying and harvesting.
Important! if it is necessary to harvest potatoes in wet soil (for example, after rain), you need to change the angle of work and the depth of immersion of the ploughshare.
To do this, provide an adjusting screw rod.
If such a design is too complex to implement, a simpler one can be made, with the same vibration separator. A homemade potato digger gives a lot of scope for creative thought. This design sifts the crop along the movement of the walk-behind tractor. The bucket ploughshare scoops the potatoes into the grate, which makes a reciprocating movement back and forth. For this purpose, the suspension is made on swinging hinges.
The vibrator drive itself is made of a pipe and an eccentric connected by a shaft to a pulley. The pulley (located on top of the frame in the illustration) is connected to the wheel using a belt drive. Or, using an angular gearbox, it can be connected to the power take-off shaft of your walk-behind tractor.
The sifted potatoes are shipped to the bed behind the device. Or, as it accumulates, you can stop the movement and load the crop into containers.
Conclusion: the listed structures are actually made from rubbish, which is present in any farmstead. If there is a need to purchase any components, they will not greatly increase the cost of the structure. Especially in comparison with the factory copy.
Important! A homemade potato digger can cause injury
Therefore, when operating, take basic precautions.. Potato digger for walk-behind tractor, video instructions for detailed manufacturing
Potato digger for walk-behind tractor, video instructions for detailed production.
The potato digger for the walk-behind tractor is a mounted device and is used together with the walk-behind tractor. The efficiency of its work is high. It is capable of cultivating not only a plot of land, but also a field. Its main function is to separate tubers from the soil and then lay them on the surface of the site.
DIY drum potato digger
Drum type potato digger
It works as follows. Its design includes a ploughshare; when the mechanical rotary walk-behind tractor moves forward, it cuts into the ground. Moreover, its depth exceeds that at which the potatoes should be located. During movement, the potatoes, mixed with soil, gradually move backward and fall into the drum, the axis of which is located horizontally, parallel to the line of movement.
The drum rotates. In this case, the earth wakes up between the rods, and only root vegetables remain in the drum. Moving backwards, they fall to the ground. They can then be collected manually from the ground surface into an appropriate container. This device is in-line - it works by sequentially processing the beds one after another.
This kind of homemade potato digger is used on the T16.
A potato digger can significantly facilitate a farmer’s work. Making it yourself is quite affordable, but it will require skills in working with metal.
Optimal metal thickness
To build a potato digger, you need to choose metal no thicker than 7 mm.
The optimal thickness would be between 5 mm and 7 mm. This metal guarantees the light weight of the structure and its sufficient strength.
A light digger is necessary when working with soil that has high humidity. You can take 5mm metal.
On normal soil, you can use metal of medium thickness - 6 mm.
For rocky soil, the weight of the digger must be impressive (so that it does not go off track), so the thickness of the metal should be 7 millimeters.
How to make a mechanic's workbench with your own hands:
Description of the vibration structure assembly process
A simple digger may not be enough for some people, so you should consider a more complex option. This is also relevant because domestic soils are quite wet. This implies increased technical requirements for the device.
Frame
To create the base of the structure, it is advisable to use a square pipe measuring 4 by 4 cm. For the support beams, you will need a blank of 4 meters. It needs to be divided into segments of 120 and 80 cm.
They make a rectangular base with sides of 120 and 80 cm. The corners are secured by welding.
Rods and their fastenings
The jumpers are not welded to the middle of the side of the rectangular frame, but to a quarter of the length of the side.
On the back side of the base it is necessary to weld the deckhouses in a vertical position. These will be located on the outside of the axle base installation. The wheels are then placed on the axle.
The structure is secured with bolts. To do this, drill holes with a drill.
Vertical racks
The profile of the racks made of square pipes should be fixed at a distance of 5 cm from the edge of the frame. Its length is 50 cm and no more. After 15 cm, a second profile is fixed, but 40 cm long. The third profile is fixed after 40 cm. The length of the stand is 30 cm. It turns out to be a kind of paired descending ladder.
Strengthening
To strengthen the racks, additional fastening will be required in their lower part. During excavation work, the device will experience heavy loads, so reinforcement will be required.
To do this you will need a strip of metal half a millimeter thick. The racks are connected by welding. The connection angle is 45 degrees. For additional fastening, the racks should be welded together.
Plowshare or ralo
A self-made potato digger should work the same as its industrial counterpart. It should also go into the ground easily. This is required for digging potato rows.
To make a ral you will need metal 0.3 mm thick. The blades should be cut according to the drawing. A homemade plow is welded to them. To better grip the ground, the blades must have a three-dimensional shape - be concave. To do this, tap the center of the blades with a hammer. The structure must be securely fastened.
pitched board
This is a continuation of the potato digger design. For the pitched board, which will clear the potatoes from the soil, metal rods are used. You should not take them too thick - the weight of the structure will increase.
Fittings with a diameter of 1 cm and a length of no more than 120 cm are suitable. The fittings are welded in increments of 4-5 cm.
Adjustment rods
This element is optional. It is required on wet soil. The rods allow you to adjust the angle of inclination of the pitched board, also known as a reinforcement board. Ideally, the adjustable structure should be mounted on a separate frame, which will have a pitched board in its structure. The fastenings can be tightened using bolts.
Wheels
To make it more convenient to work and move with an attached homemade digger, it should be equipped with wheels. Please note that you will need a wide tire
It doesn’t matter what device you can take it from. The wide wheel will not sink into the ground
Ideally, the wheels can be removed from a garden cart. The mount is similar.
How to adjust a potato digger on a mini tractor
If the plow goes too deep, it means that the angle of penetration into the soil is incorrectly adjusted. As a result, the conveyor will be clogged with earth and slow down the work.
To adjust the amount of immersion, rotate the screw in the direction of decreasing the angle. The most suitable position is selected on the conveyor and the frame is installed in the selected hole.
To prevent the frame from warping during operation, adjust the trailer bolts. They will mount a tractor and a potato digger on the same axle.
Manufacturing of a screen-type digger
Competently and detailed drawings of the potato digger will allow the homemade product to be easily combined with walk-behind tractors Neva, MTZ, etc.
The potato digger is assembled step by step as follows:
- Making the frame. The 40x40 profile pipe is cut into sections of 1200 (2 pcs.) and 800 mm (2 pcs.). The parts are welded extremely carefully. It should be a rectangle.
- Jumpers for installing vertical adjusting rods. Attach to a quarter of the length of the frame.
- Elements (150 mm long) for fastening the wheels are attached at the other end.
- Vertical racks. Stepping back 5 cm from the edge, attach 2 square elements (50x50 and 30x30 cm) from the side of the lintels. Then, measuring 40 cm, the profile is welded. The racks are connected.
- Making ral. The blades are cut out according to the drawing and cut from metal 0.3 mm thick. A plow is welded from the 2 parts obtained.
- Lattice design. 1.2 m long sections are cut from 10 mm reinforcement rods and welded in 5 cm increments.
- The finished structure is equipped with wheels.
As a sample, before making a mechanism in a home workshop, you can familiarize yourself with the models produced at agricultural machinery factories. For example, the modular potato digger of the KVM-3 screening type is equipped with a static knife and a shaking table moving along an elliptical path.
The Poltavachanka screen digger is small in size and can work with any walk-behind tractor; the kit includes a pin and a belt. The roller adapter allows you to mount the unit on walk-behind tractors with a rear power take-off shaft. The pulley is installed on the left and right sides, and all working elements are moved.