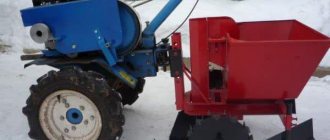
The annual potato harvest can be done quickly and comfortably if you replace manual labor with the use of special potato diggers for walk-behind tractors or mini tractors.
The use of special devices will not only greatly facilitate and speed up the process of harvesting potatoes, but will also significantly preserve health and good physical condition, since it does not require such titanic physical labor as manual digging of potatoes.
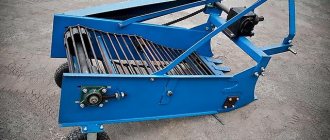
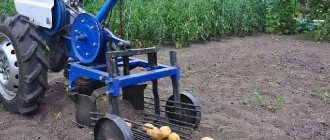
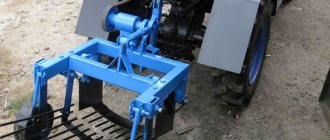
A potato digger for a tractor or walk-behind tractor is a mounted device that is attached to a walk-behind tractor or mini-tractor. Potato diggers have teeth that dig up the ground as they move. While moving along the conveyor, potatoes remain between the teeth of the unit. The tubers are automatically either placed in a special tank or thrown out between the rows. The device itself digs up and clears the crop from the ground; all that remains is to collect it from the surface of the ground.
The device allows you to clear a plot of land from crops much faster and more efficiently than using manual labor.
A potato digger for a walk-behind tractor can be purchased at country or garden equipment stores, or you can make it yourself. We will definitely look at how to make a potato digger in more detail below.
Advantages and disadvantages of homemade potato diggers
Making a homemade unit is quite possible and quite profitable. However, everything has a downside, so homemade diggers for walk-behind tractors also have disadvantages, although there are not many of them.
Disadvantages of homemade potato diggers:
- The design process requires painstaking work, because it is necessary to find drawings. Even ready-made drawings found on the Internet sometimes require modification and customization;
- The weight of a homemade potato digger made
by yourself
will be greater . Manufacturers of ready-made potato diggers optimize their products, using every opportunity to reduce their weight; - The fuel consumption of a walk-behind tractor/mini-tractor is greater when working with a hand-made potato digger. The greater the weight of the mounted potato digger, the more fuel is consumed;
Pros of a homemade potato digger
- The cost of the unit ends up being significantly lower. A device for digging potatoes from the manufacturer is not cheap, and not everyone can afford it. The cost of a potato digger is several times lower than the finished version;
- An individual project for a specific site, soil and person who will manage the process. As mentioned above, even a finished drawing of a digger, as a rule, is modified taking into account the characteristics of the site, soil, one’s own physical strength, etc.
- Improvement in the drawing development process. You can upgrade the potato digger device by adding additional parts that can increase the efficiency of the device;
As you can see, the shortcomings are not too significant. At least they don't outweigh the benefits of making your own potato diggers .
However, if we are talking about huge areas, a potato digger for a tractor or walk-behind tractor from the manufacturer will still be more profitable. Homemade devices are more suitable for medium or small areas with a relatively small planting area.
How to choose?
Efficiency assessment is carried out according to the following criteria:
- for walk-behind tractors and motor-tractors. In some cases, the choice is obvious due to the power of the walk-behind tractor. If the walk-behind tractor has an air-cooled engine with a rear power take-off shaft, only a vibrating potato digger with a rumble is suitable for it. For the Neva walk-behind tractor, only the “shaking” option is suitable. Conveyor models are not available for them. But for motorized tractors based on them, it is easier to choose a potato digger - both transport and screening options are suitable for them. If the motor tractor is in serial production, then preference should be given to transporter models;
- depending on the soil. The potato digger has proven itself well when working with light and medium-heavy soil. But if the summer was dry or the soil was overgrown, then the screen models are not up to the task. If the choice is between screening and conveyor, then preference should be given to the second;
Note! The difficulty lies in the fact that it is not always possible to accurately assess the type and condition of the soil. In this case, it will not hurt to collect information from other farmers about what equipment they use.
- quality and productivity. This is where conveyor models stand out. They know how to quickly, efficiently and carefully extract crops from the soil. Screen models are inferior in this regard;
- price. The best option is conveyor models, but they are much more expensive. But if there is a need to fit within a limited budget, then you can buy a vibration model. But let it be with two eccentrics.
Types of potato diggers
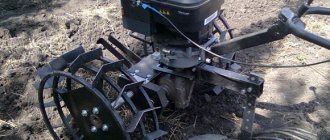
The units under consideration are divided into two main types - lancet and vibrating (screening).
Lancet potato diggers, also called fan diggers, are a ploughshare to which inclined rods are welded. This is the simplest type of device, capable of being attached to any walk-behind tractor or small tractor. A similar potato digger for a walk-behind tractor is quite simple to make.
The principle of operation of a simple potato digger is to use a plowshare to cut off a layer of earth, along with the harvest, after which the earth falls back between the rods, and the tubers remain on the surface. This design is effective only on loose soils.
The vibrating or screening potato digger consists of two main parts. This is a ploughshare (plow) and a vibrating sieve located on support wheels. During operation of the unit, the ploughshare snatches part of the soil with tubers and throws it onto the sifting grid. Thanks to vibration, the earth is sifted, leaving only potatoes on the grid.
Despite its simplicity and ease of use, as well as high productive efficiency, a do-it-yourself potato peeler for a walk-behind tractor is difficult and labor-intensive to make. However, all the difficulties in the manufacturing process subsequently more than pay off.
KK-1
Photo: https://beru.ru/
This small-sized equipment is designed for small agriculture. It is combined with the Agro walk-behind tractor using a gearbox, which is sold together with the digger. The basis of the digger is made up of rotating pulleys, pipes, shares and casings. KK-1 is capable of digging 100 meters in 2 minutes.
Potato digger for walk-behind tractor BISON KV-1
Advantages:
- light weight
- affordable price
Flaws:
- small coverage
- dimensions
The most popular models of potato diggers
Today there are several most popular types of potato diggers: the regular KKM-1, the regular KKM-3, the regular Garden Scout, the vibrating Neva and the vibrating Poltavachanka. Let's take a closer look at each of the models.
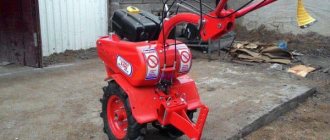
Simple potato digger for walk-behind tractor KKM-1
- The canopy includes a ploughshare and a sowing grid;
- The device is well suited for soft and medium soils, with a moisture level of no more than 25%;
- The digging depth is 20 cm, and the cultivation area is about 35 cm;
- The productivity of the structure ranges from 0.05 ha to 0.2 ha per hour;
- KKM-1 weighs on average about 40 kg;
- The speed of movement of the device is 1-2 km/h;
- The canopy is suitable for motor units such as Neva, Cascade, Salyut, Favorit, etc.
Simple potato digger for walk-behind tractor KKM-3
The third generation device is similar in characteristics to KKM-1, but has a number of improvements. For example, compared to KKM-1, the KKM-3 unit has an increased processing area - 40 cm. The device is operated by one operator. The digging depth can be changed using support wheels.
This potato digger for a mini tractor is the best option due to its weight - 40 kg.
Simple potato digger for Garden Scout walk-behind tractor
- It is a product of a Chinese factory;
- The width of the processing area is 40 cm, and the cultivation depth is 28 cm;
- The structure weighs 42 kg;
- The productivity of the Garden Scout design reaches 0.2 hectares per hour;
Vibrating potato digger for the Neva walk-behind tractor
- This compact vibrating potato digger is designed specifically for Neva motor units;
- It has a relatively small weight - 34 kg;
- The depth of tillage is 20 cm, and the width of the ploughshare is 36 cm
- The productivity of the structure ranges from 0.15 hectares to 0.2 hectares per hour;
- The speed of movement of the device is 1-2 km/h;
- The design has price advantages over competitors;
Vibrating potato digger Poltava
- The design is suitable for medium-heavy soils, the moisture level of which can reach 30%;
- The nozzle weighs 34 kg;
- The depth of penetration into the soil is only 18 cm, the coverage area of the ploughshare is 39 cm;
- The speed of movement of the device is 2-3 km/h;
- The canopy is suitable for different types of walk-behind tractors and mini-tractors (Neva, Favorit, etc.)
- The level of the wheels of the device can be adjusted;
Yarilo
Photo: https://beru.ru/
Yarilo is capable of processing up to 0.3 hectares of land per hour. Can work with walk-behind tractors of any brand. It has quite large dimensions. Nevertheless, the device is very popular among buyers!
Potato digger AURORA 11751
Advantages:
- compatible with all walk-behind tractors
- wide grip area
- does not require preliminary preparation of the territory
- minimum physical labor
Flaws:
- wide dimensions
- moderate performance
- high price
Tools for work
Initially, you need to prepare the tools that you will need to create a potato digger for a walk-behind tractor with your own hands, as well as other consumables.
Working tools that you can’t do without in the process of assembling a potato digger -
- welding machine,
- angle grinder,
- electric drill,
- square,
- level,
- perforated mounting plates,
- steel bolts with nuts.
Is it possible to do it yourself?
The device consists of 3 elements: a knife, a grid with mechanisms that create vibration, and a metal frame. Making a digger will take several hours. Experience with agricultural machinery will be required.
To create the unit you will need:
- Bulgarian;
- welding machine;
- drill, metal drills;
- metallic profile;
- steel sheet;
- steel wire with a diameter of 8 mm;
- wheels;
- bolts, levers, hinges, eccentric, measuring tape;
- ruler and pencil for marking.
Procedure:
- Measure and cut the metal profile for the frame, weld it.
- Weld a wheel stand at the bottom.
- Attach holders for hinges inside (the screen will be suspended on them).
- Weld brackets to the frame to install the gearbox and mechanism. They will create vibration.
- Weld a sifter box from metal rods and hang it on hinges inside the frame.
- Attach the gearbox to the brackets.
- Make a knife from a steel sheet: cut and bend to the desired shape.
- Attach the plowshare knife on hinges to the bottom of the frame and the screen.
- Put and fix the wheels on the made device.
Manufacturing of a vibrating cathode digger
In order to make a homemade potato digger for a walk-behind tractor on a vibration basis, we will need:
- The supporting structure is a metal channel;
- Steel sheets for creating a plowshare. The steel must have a thickness of at least 5 mm.
- Steel or iron corners from rolled metal;
- Steel or iron rods, preferably small in diameter;
- Metal pipe
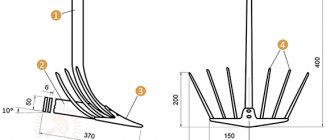
The design of a potato digger contains a frame, suspension system, control rods, wheels or other movable units.
Step 1. The basis of the vibrating potato digger
You need to start the process of making a potato digger for a walk-behind tractor with your own hands by creating a base.
In order to weld the frame, a profile pipe measuring 40*40mm is suitable. We take as a basis a square pipe 4 meters long, cut off pieces of 80 cm and 120 cm. The length of the workpiece is enough for 4 pieces, which will serve as support beams.
The support beams are welded at a 90 degree angle, creating a rectangular frame with sides of 0.8m and 1.2m. The frame is ready.
Step 2. Attaching the rods
To create the mount for the rods, we take the mentioned rectangular base. It is necessary to attach a metal channel to it with a welding machine a third or a quarter from the middle of the frame.
On the back side of the frame we vertically weld tubes for mounting the axle. Subsequently, moving elements will be installed there.
Using an electric drill, drill centimeter holes in a place convenient for fastening.
Step 3. Making vertical posts
Taking a distance of at least 5 centimeters from the edge of the base, we weld the stand. The length of the square profile is up to 50 centimeters. Having retreated another 15-20 centimeters, we again attach a second stand with a welding machine, smaller than the previous one, no more than 40 centimeters long. Next, 40 centimeters are measured, the subsequent profile is already 30 centimeters, it is also secured by welding. At the end of the work, we get a device similar to a pair of stairs.
The stands are secured in the lowest compartment of the device with a metal strip. We take a strip no larger than 0.5 millimeters and connect the profiles with a welding machine at an angle of 45 degrees.
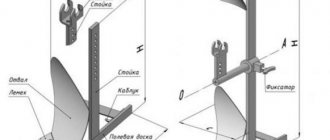
Step 4. Create a ploughshare and ralo
Having constructed the main part of a homemade potato digger, we move on to the production of the active part of our digger, the ploughshare, which will do the bulk of the work of collecting potatoes.
To create a ploughshare, a knife that will cut into the soil, we need a metal plate with a thickness of at least 0.3 millimeters. According to a pre-selected drawing, we cut out two blades from the plate, the main working parts. The blades are fastened with a welding machine and secured with a special rod. Now the knife needs to be given the most voluminous shape, for ease of digging and gripping the soil. To do this, tap the middle of the blade with a hammer.
Step 5. Making a pitched board
Pitch boards, simply put, steel rods or rods, are a necessary part of the working part of a potato digger. They are attached to the ploughshare by welding to the base of the knife.
For making pitched boards, steel rods with a diameter of 10 millimeters and a length of 1.2 meters are best suited. The reinforcement must be attached by welding to the base of the share at intervals of 4 or 5 centimeters.
Step 6. Adjustment rods
This element is not always present in the design. It is only necessary if the potentially cultivated soil is very watery. They adjust the angle of inclination of the pitched board.
The easiest way to make adjustment rods for a potato digger for a walk-behind tractor is to make a movable frame on which the reinforcing board will be located.
Step 6. Install the support wheels
The potato digging device is completed with the installation of support wheels. The design of diggers always involves moving elements for more comfortable movement on the surface of the site.
The best option is wheels from an ordinary garden wheelbarrow. The important thing is that the wheels must be used with a wide tire.
We have already made and secured the axles to the frame. Now we need to secure the wheels to the axles with a pin, according to the same principle as on a garden wheelbarrow.
Type Ugra KKV – 1 (PTO)
Photo: https://beru.ru/
An excellent helper during the harvest period. The Russian manufacturer tried to endow its products with such qualities as ease of use, long service life, and reliability. The unit is of the active type and is designed for collecting potato tubers. The operating principle is based on the use of a V-belt drive, which is connected to the angular belt reducer of the UGRA walk-behind tractor or its analogues. The presence of a gear clutch lever requires manual control. It copes well with extracting vegetables at a depth of 18 centimeters, without spoiling their appearance. The final harvest is done by hand.
Mechanical drum potato digger (for Belarus MTZ, Agro walk-behind tractors)
Advantages:
- high quality product
- easy to operate
- high digging speed
- quality work
- does not degrade the presentation of potatoes
- easy to install and use
Flaws:
- not detected
In agriculture, the quality and power of equipment plays an important role. The presented models have already been tested by many agricultural technicians. When choosing equipment, each farmer is guided by his own needs and capabilities. If skills and information are not yet sufficient, it is recommended to directly contact manufacturers and suppliers of equipment and find out all the features.
#Top 10
Read us first - add the site to your favorite sources.
Add a comment
{"commentics_url":"\/\/express-novosti.ru\/comments\/","page_id":1419640,"enabled_country":false,"enabled_state":false,"state_id":0,"enabled_upload": false,"maximum_upload_amount":3,"maximum_upload_size":5,"maximum_upload_total":5,"securimage":true,"securimage_url":"\/\/express-novosti.ru\/comments\/3rdparty\/securimage\ /securimage_show.php?namespace=cmtx_1419640″,”lang_error_file_num”:”\u041c\u0430\u043a\u0441\u0438\u043c\u0443\u043c %d \u0444\u0430\u0439\u043b\u043e\ u0432\u043c\u043e\ u0436\u0435\u0442 \u0431\u044b\u0442\u044c \u0437\u0430\u0433\u0440\u0443\u0436\u0435\u043d\u043e.","lang_error_file_size":"\u041f\u043e \u0436\u0430\u043b\ u0443\u0439\u0441\u0442\u0430, \u0437\u0430\u0433\u0440\u0443\u0437\u0438\u0442\u0435 \u0444\u0430\u0439\u043b \u0440\u0430\ u0437\u043c\u0435\u0440\u043e \u043c \u043d\u0435 \u0431\u043e\u043b\u0435\u0435 %d MB.","lang_error_file_total":"\u041e\u0431\u0449\u0438\u0439 \u0440\u0430\u0437\u043 c\u0435\u0440\ u0432\u0441\u0435\u0445 \u0444\u0430\u0439\u043b\u043e\u0432 \u0434\u043e\u043b\u0436\u0435\u043d \u0431\u044b\u0442\u044c \ u043d\u0435\u0431\u043e\u043b\ u0435\u0435 %d MB.","lang_error_file_type":"\u041c\u043e\u0436\u043d\u043e \u0437\u0430\u0433\u0440\u0443\u0436\u0430\u0442\u044c \u0442\u0 43e\u043b\u044c ""lang_text_loading":" u0437\u043a\u0430 ..","lang_placeholder_state":"\u0420\u0435\u0433\u0438\u043e\u043d","lang_text_country_first":"\u0421\u043d\u0430\u0447\u0430\u043b\u0430 \u0432\u044b\u04 31\u0435 \u0440\u0438\u0442\u0435 \u0441\u0442\u0440\u0430\u043d\u0443″,”lang_button_submit”:”\u0414\u043e\u0431\u0430\u0432\u0438\u0442\u04 4c","lang_button_preview":" \u041f\u0440\u0435\u0434\u0432\u0430\u0440\u0438\u0442\u0435\u043b\u044c\u043d\u044b\u0439 \u043f\u0440\u043e\u0441\u043c\u 043e\u0442\u0440″,”lang_button_remove ":"\u0423\u0434\u0430\u043b\u0438\u0442\u044c","lang_button_processing":"\u041f\u043e\u0434\u043e\u0436\u0434\u0438\u0442\u0435..."}
Making a simple potato digger
If the option with a vibrating digger is too complicated and time-consuming for you, you can turn to creating the simplest design of a manual potato digger.
Making a simple potato digger with your own hands for a mini tractor or walk-behind tractor does not require special materials or even drawings.
In order to make a fan potato digger with your own hands, you will need a bipod, which can easily be cut from, say, a shovel. Disused villas can be used as rods.
The further principle of creating a manual potato digger is similar to the process of creating a vibration one. There are many tutorials on how to create a digger with your own hands with videos in the public domain on the Internet.
Type 1100 under PTO keyed
Photo: https://beru.ru/
Belongs to the category of attachments for walk-behind tractors. Manufacturing company of Russian origin. Main purpose: pulling out root crops mechanically, followed by manual harvesting. Can be used for harvesting onions, beets, carrots and so on. Effective when harvesting potatoes planted in rows every 60 - 70 centimeters. To increase productivity, it is worth hanging a load weighing at least 50 kilograms on the front of the bar.
Vibrating potato digger under PTO
Advantages:
- The equipment is reliable and easy to use
- breakdowns are extremely rare
- The manufacturer provides a 1 year warranty
- good combination of price and quality
- simple design
Flaws:
- not detected