Many farmers are interested in how to make a potato digger for a mini tractor with their own hands. A potato digger is an attachment for a mini-tractor or walk-behind tractor. It is designed for digging up ripe potato tubers to the surface of the earth. Regardless of the model and brand of the device, the principle of operation is the same for all.
What is a potato digger on a mini tractor?
You can find numerous models of this agricultural tool on the market, but in fact there are only two types of potato diggers: simple and vibrating.
A simple potato digger (passive device) works on the principle of a shovel or plow, to which rods or teeth are welded.
The blade part, going deep into the soil to a depth of 10 cm, loosens it and lifts it onto the rods. On them, the soil is sifted away from the potatoes, leaving the tubers on the surface. The quality of work done in this way leaves much to be desired, since additional physical effort has to be expended to fully harvest the crop. We can say that this device is many times better than a regular hand shovel, but the existing inconveniences are compensated by the inexpensive price (if purchased).
A vibrating potato digger is a small structure mounted on two wheels. In the front part of the main frame there is a ploughshare or shovel, which performs the function of digging up the soil. The earth, falling on the grating part (also called the screening part), due to constant shaking, sifts the potato fruits from the soil and leaves them on the surface of the site.
Thanks to this device, potato harvesting is much easier, but the equipment is more expensive to purchase.
Conveyor potato digger
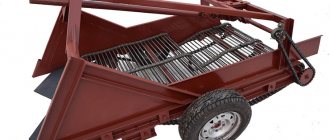
The conveyor potato digger is an active attachment: work is carried out via a belt drive.
The structure of this type of potato digger is quite simple: a ploughshare and a conveyor belt. The knife is driven by an eccentric, vibrating and removing a layer of soil along with tubers. The width of the ploughshare is 45 cm, the digging depth is adjustable to 25 cm.
After the layer of soil is cut, the knife transfers it to a belt consisting of steel rods. The belt sifts out soil and weeds, leaving only the tubers, which are then laid on the surface of the ground, making harvesting easier. Also, such a potato digger can be supplemented with a special bunker, which will make the harvesting process more convenient and faster.
The conveyor potato digger can be installed on Scout-type mini-tractors, as well as larger equipment, for example, MTZ-80.
Drum type potato digger
The design of a drum potato digger is similar to a conveyor digger, however, its steel rods form a drum rather than a belt. The knife or ploughshare also lifts a layer of soil with root crops and directs it into the drum.
The drum has a direct drive from the PTO, spinning and clearing the potatoes from the soil. However, it is important to note that this type of potato digger can be very damaging to the skin.
Some designs are double-row, which greatly increases productivity. Also, a drum-type potato digger is capable of collecting other fruits, for example, beets and onions.
The principle of operation of the tractor device
The operation of the potato digging device is cyclical and consists of several main stages:
- First, the device uses a cutting mechanism to dig up a bed of potatoes to the depth where the tubers are located in it.
- At the next stage, the mechanism loosens the ground next to the tubers, this creates a small free space near the root crop.
- With the help of a ploughshare, the earth is captured and falls into a specialized shaking mechanism. This could be a drum or a conveyor belt. Most of the land is sifted out, leaving only the tubers.
- At the final stage, the collected potato fruits are laid on the surface of the field. All that remains is to walk along the ridge and collect the potatoes.
Setup and service rules
The first assembly of the device with a mini-tractor is simple; you can do it yourself. Passive attachments (plows) are attached via a canopy and do not present any difficulties.
Potato diggers are more difficult to install and adjust. Some of them are driven by a PTO, while others are driven by a belt drive. Depending on what type of drive the active part has, the connection method will depend.
Direct installation also takes place using a canopy.
Equipment maintenance consists of timely cleaning and compliance with storage standards specified in the instructions. It is also necessary to lubricate parts that are subject to wear due to friction.
On any type of potato digger, it is necessary to regularly sharpen the ploughshare/cutting element.
It is also important to monitor the condition of the belt and replace it if necessary (for potato peelers).
Setting up the equipment before work involves adjusting the cutting element: it is necessary to establish to what depth the plowshare should go.
Advantages and disadvantages of equipment
The most important advantage of a potato digger is increased productivity. Such devices allow you to harvest crops in the shortest possible time with minimal time and effort.
Another advantage of using a potato digger is minimal crop loss, because it allows you to remove a whole layer of soil with all the tubers, even the smallest ones.
The disadvantage of a mechanical potato digger is damage to the integrity of the tuber skin, which reduces the shelf life of the crop. Also, the disadvantages include the high cost of such devices, especially those related to active attachments (belt drive or PTO).
Despite the design differences between different types of potato diggers, they all cope with the task of harvesting better than a simple shovel.
How to dig potatoes?
A potato digger is an attachment for a walk-behind tractor or tractor, designed for accelerated harvesting by digging up potato tubers, followed by sifting out the soil and laying the tubers on the surface of the ground.
The principle of using a potato digger is very simple and greatly simplifies the process of collecting tubers.
- Using a hitch, it is fixed to a tractor or mini-tractor.
- Using special teeth, the soil layer in which the tubers are concentrated is lifted.
- As soon as the potatoes fall onto the grid of rods, they are cleared of soil and appear on the surface of the bed.
If we compare mechanical harvesting with manual harvesting, then mechanical harvesting will significantly save time and effort.
How to make a potato digger for a mini tractor with your own hands
Let's consider making a potato digger for a mini tractor with your own hands. The conveyor potato digger can be assembled by hand. To do this, you need to have drawings on hand on which all parts of the unit will be outlined in detail.
How much more expedient it is to make such equipment yourself is up to everyone to decide, but it should be taken into account that a homemade potato digger is suitable for plowing a small area. Large areas are best treated with industrial equipment purchased from the manufacturer. When harvesting potatoes, a digger, made by hand for a tractor, passes through the area, digs up and collects the tubers.
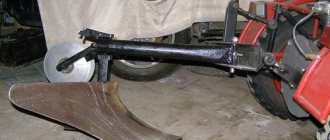
In order to assemble a passive type weapon, you will need materials. First of all, a sheet of iron made of durable steel, which will serve as a shovel. It is advisable that its width be at least 3-5 mm, otherwise the iron will quickly become dull. Many people use circular disks, from which two sectors are cut out and welded together. This steel is much more durable and lasts longer.
Rebar rods are suitable for sifting out soil. They are welded on the back of the shovel.
You can use a metal channel as a suspension, having previously calculated the depth of immersion in the ground.
The blade part should be shaped like a triangle for better immersion into the soil. The device is attached to the walk-behind tractor using fasteners and requires normal movement along the rows planted with potatoes.
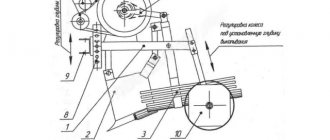
You can make a potato grinder for a tractor with your own hands. The assembly of this design is more complicated than the previous one, so you will need a pre-thought-out diagram. To avoid rapid breakdown, a homemade potato digger must be made of high-quality materials. To create an efficient structure, it makes sense to spend a little more time on it, and it will pay off in savings on the time spent on plowing and harvesting.
A homemade potato digger for a tractor is made from the following materials:
- metal profile pipe for the frame;
- iron layer (3-4 mm) for the ladle;
- iron fittings;
- metal channel for vertical traction;
- hub from the front of any car;
- gearbox;
- a driveshaft may come in handy;
- splined connection from the gearbox;
- one or two wheels (depending on the type of device);
- fastening elements;
- tools: drill, grinder, welding machine.
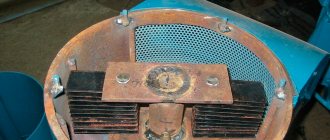
The height of the device above the ground will depend on the size of the wheel. The frame rests on two support points. The gearbox is activated either by the wheels or by the power take-off shaft of the cultivator. The spline connection is necessary for the mobility of the share and the oscillatory movements of the lattice.
The harvesting method will depend on the angle of inclination of the lattice part. If the screening part is tilted downwards too much, the potatoes will fall to the ground. When you change the angle of inclination and lift the lattice part up, the tubers will linger on the mesh, and then they can be collected directly into the bag, but for this you will need to constantly stop the machine.
A DIY potato digger can have any shape and size, it all depends on the choice of the designer. It is important to maintain the principle of operation, which involves raking the soil with potato tubers into a grid in which they will be sifted. Homemade potato diggers for mini tractors can be made from old machine parts and any available means. The most important thing is that the potato digger meets all safety standards and does not cause injury during operation.
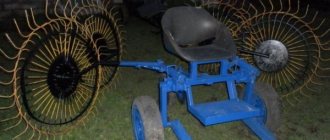
Fan potato digger
The design of such a potato digger is quite simple; it can be made from available materials. The main thing is that the metal is durable, for example, steel.
Another name - lancet digger - reflects the appearance of this device: steel teeth, similar to a fan or arrows, are attached to the plowshare.
The design consists of only three elements:
- ploughshare
- teeth
- bracket
The ploughshare requires sheet steel (thickness 3-4 mm). Rectangular steel profile for the bracket, round bars or reinforcement no thicker than 10 mm for the teeth.
The principle of operation of this design: the ploughshare lifts the layer of soil along with the tubers and directs it onto inclined teeth, on which the potatoes are cleared of soil, after which they fall to the surface of the soil.
This design is considered one of the most reliable and is also easy to implement. Detailed drawings can be found on the Internet.
How to choose in the store?
You need to choose a potato digger based solely on your needs and conditions. If the plot is small in size, then you should give preference to a single-row potato digger. Such a mechanism will be several times cheaper than others.
If you have a large area, then it would be more rational to purchase a multi-row potato digger. This mechanism will cope with the harvest over large areas in a short period of time.
Also, the choice of potato digger depends on what equipment you have for harvesting . If you have a standard tractor, then a multi-row mechanism is more suitable. But for a mini-tractor it’s worth taking a single-row digger.
How to make a potato planter with your own hands
Let's look at what a homemade potato planter for a mini tractor is.
With the onset of spring, potato tubers are prepared for planting in the ground. To facilitate the process, use a special planter. The potato planter for a mini tractor can be single-row or double-row. In addition, they are simple, without support wheels and with wheels. Single-row technology is adapted for planting tubers in one row. In the case of a double-row, two rows are simultaneously processed and sown. The row spacing can be adjusted.
You can make models with lugs. In such a unit, the function of wheels is performed by lugs. They, thanks to the chain mechanism, set in motion the conveyor belt for supplying tubers. To create even rows, the device has a disc hiller and a plow for forming a furrow.
The depth of penetration of the plow into the soil is adjustable, which makes it possible to plant tubers at the desired depth.
The two-row potato planter for a mini tractor fits well with mini tractors and has a hydraulic drive. Unlike a single-row planter, this model has two hoppers for filling planting tubers. The size of the capacity depends on the model of the unit.
Planting potatoes with a mini tractor completely automates the work. This is a very convenient device, but unfortunately many people cannot afford it. You can make such a device yourself, maintaining the principle of conveyor work.
To make a potato planter with your own hands for a tractor you will need:
- container or bunker for filling planting tubers;
- frame with wheels;
- device for digging ditches;
- tape with attached bowls for capturing potatoes;
- discs for filling planted tubers.
First, a frame with wheels is assembled, to which all other parts will be attached. After this, a mount is welded to couple the unit with the tractor and a longitudinal axis is installed on which the bunker will be supported. It can be made from wood, or you can use any suitable container, for example, a tank from an old washing machine. A metal pipe with a spacious hole can be used as a seeder.
Before you start assembling such a unit, you should definitely read the relevant literature or watch a video. It is not worth taking on the design without a preliminary drawing. For planting potatoes, a home-made digger can be designed for a tractor, or it can be combined with another device. Often, after assembly, the cost of manufacturing the unit is more expensive than expected, and the price difference with ready-made equipment is so insignificant that it is better to purchase ready-made equipment.
A homemade potato planter must be assembled without errors, otherwise the sowing process will be labor-intensive and long. The calculation should include absolutely everything: row spacing, distance between planted potatoes, planting depth, etc.
Review of the best potato planter models
KS 1A is a domestic model that helps simplify planting tubers and reduce time. The unit weighs 33 kg. The width of the wheels is 60 cm. The machine plants five tubers per 1 m. The tubers are lowered into the ground one at a time, and special discs bury them and level the soil. This model is suitable for walk-behind tractors: Neva, Oka, Kadvi, Salyut and Favorit. The cost of KS-1A varies between 14,500 and 15,500 rubles. The unit can be purchased at any specialized agricultural equipment store.
KS 1 is a Russian model that is suitable for both domestic and imported walk-behind tractors. In an hour it sows 0.2 hectares of land. The distance between the wheels is 70 cm. Plants 5-6 potatoes per 1 m. The price of this model is from 12,000 rubles to 14,000 rubles.
KSM 1 is a domestic model, weighs 44 kg. Capacity volume 41 l. The distance between planted tubers is 25-30 cm, and between rows 60-70 cm. It is combined with such walk-behind tractors as Neva, Cascade, MB, M2. The cost of this model is from 11,500 to 12,000 rubles.
When choosing a potato planter, pay attention to the volume of the bunker, dimensions, and the ability to work with other equipment. For a small area, a device with a small bowl volume is suitable, and it will cost less. The only inconvenience of such a device is the frequent stoppage of work to fill the bowl with planting tubers.
To combine with other walk-behind tractors, there are all kinds of adapters that, if necessary, adapt to any existing equipment. Lightweight models are suitable for small areas. Heavy equipment is suitable for cultivating large areas.
Models
KKM-1 and KKM-2
This is a model of a small single-row digger, the engine power of which does not exceed 4-7 kW. The potato digger can work with many domestic and foreign mini-tractors and tractors: T 25, Belarus 123, Sheafing240, T-40. The model is also suitable for harvesting onions, beets and garlic.
KKM-3
Optimally suited for a mini tractor. The ploughshare is immersed in the soil to a depth of 20 cm. The force required for work is transmitted through the power take-off shaft of the mini-tractor. Two wheels give the unit stability. The digger is serviced by one operator.
KN-2.2
For a tractor such as the MTZ-82, a double-row digger is ideal . KN-2.2 is a highly functional, reliable and durable model, which can be used even in difficult conditions. Within an hour you can cultivate half a hectare of soil.
There are no complex mechanical components in this technique, which allows one person to cope with attaching the digger to the tractor and further operating it. But the main disadvantage of the device is the price. The equipment will cost the buyer 100 thousand rubles.
There are also more budget options on the market. KVT 301 brand equipment from the Smorgon region will cost the buyer 42,000 - 45,000 rubles. The Ukrainian-made DTZ-1T is cheaper, about 23,500 rubles.
For mini tractors
Attention!
For mini-tractors, you need a single-row potato digger, which is suitable for working mainly on light soil.
KFT2-01 is the most suitable option. This potato digger does not loosen the soil deeply, up to 25 cm. It has quite high labor productivity - 0.3 hectares. at one o'clock. But the weight of the equipment is more than 120 kg. Therefore, to work with it, high traction power of the mini-tractor is required.
The 2KN digger is also suitable for a mini tractor . A small-sized device for working in small areas will help you harvest quickly and without problems. This model is suitable for the MTZ mini-tractor.
Owner reviews
Most owner reviews are positive. Almost everyone notes the ease of working with such attachments: productivity increases several times with minimal time and physical labor.
The advantage is ease of operation; simple models require virtually no maintenance. More complex types of devices, such as screening devices, may require belt replacement. Also, some owners note that the shares wear out quite quickly: this is possible if the operating rules are violated or the metal is of poor quality. In such cases, it is necessary to replace the plowshare, which can be purchased at a specialized store or made independently.
Have you used a potato digger? Did you buy it or make it yourself?
Review of popular models
It is not always possible to have the necessary materials and desire to make a potato digger for a tractor yourself. It will be much easier to buy a device if you do not have the appropriate skills and abilities required to assemble the unit yourself. There are many models on sale, among which several products are considered the most popular. These are screening and conveyor diggers of the Scout brand, which are distinguished by their affordable cost and the ability to be used with an impressive list of equipment. The greatest compatibility is demonstrated when working with the tractor series of the same name.
Another popular option is the KKM-3 model , which belongs to the category of vibration devices. It is lightweight and can be used with MTZ mini tractors, as well as other units similar to them in design.