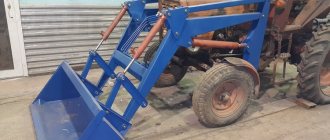
KUHN on MTZ-80, 82: rear linkage
The main differences between the MTZ-80 and MTZ-82 attachments.
Main technical characteristics of KUNs for MTZ. One of the most common and simplest types of special attachments, of course, can be called KUN at MTZ, which has become a kind of popular name - a common name for any similar type of attachments for tractors. KUN is a universal mounted hay hauler, which is essentially a tractor front-end hydraulic loader for moving, lifting and lowering various large loads.
However, if KUN is initially a hay hauler, this does not mean that it cannot work with other loads and materials that are not even remotely included in the category of hay and silage, and are not related to agricultural work. The range of application of tractors with similar attachments is very wide and varied. For example, in the same excavation work, it is capable of moving large masses of soil from one place to another, covering any distance. Advantages of front mounted equipment and technical capabilities
Slightly different equipment is installed on different modifications of Belarusian tractors, with minor technical and operational changes. Here the ratio of the load capacity and the canopy sweep may vary, which in one way or another directly affects the operation of the equipment and its tasks during operation.
1. MTZ - 80 with KUN is equipped with a prototype of the PF - 1 attachment, which has the following technical characteristics:
- weight of lifted loads up to 1 ton;
- lifting height limit up to 3.5 meters;
- the weight of the loader itself is 900 kg;
- maximum speed of cargo movement is up to 20 km/h.
2. MTZ-82 with KUN is equipped with a more advanced PKU-0.8 device than its prototype, which is somewhat narrower than its predecessor and lacks some parts, which include the so-called “rocker” with a quick-change mechanism.
- weight of lifted loads up to 800 kilograms;
- high-rise ceiling up to 3.5 meters;
- weight of the mounted loader up to 700 kg;
- maximum travel speed with load up to 20 km/h.
Kun on MTZ (tractor hitch)
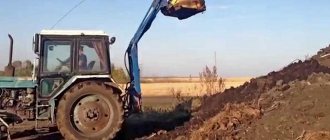
KUN at MTZ is a front-mounted attachment that is driven by the tractor’s hydraulic system and allows you to perform a wide range of earthmoving work.
A mini tractor with a KUN (front-end loader, an abbreviation for “universal mounted hay hauler”) is an indispensable assistant in country construction, repairs, and agriculture.
Features of the device and purpose of KUN 10
The MTZ KUN 10 front loader (the most popular model) is produced at Salskselmash, one of the first Russian factories specializing in the production of special equipment.
This enterprise was founded on the basis of the Gigant state farm in 1934 and is still successfully operating today. The agricultural direction in production became the main one in the 60s of the last century, and the first KUN 10 appeared in 1973.
Since then, the model has been repeatedly improved - today it is a functional universal-type mounted boom.
Despite the fact that the KUN was originally intended for the MTZ tractor (in particular, for the MTZ 80 and MTZ 82), the design allows it to also be used to complete tractors of other models, for example, as a KUN for the T-40 tractor and some modifications of YuMZ and LTZ .
The MTZ 80 tractor with KUN, as well as its more modern modification MTZ 82 with KUN, have the following advantages:
- versatility - machines can perform the function of a loader, excavator, leveler or bulldozer, thanks to which this compact equipment can be used in construction, agriculture, and landscaping;
- high performance;
- reliability.
KUHN at MTZ
The front-mounted KUHN for tractors has been successfully used for more than 50 years and has proven itself to be undemanding in maintenance and easy to operate. KUN for MTZ 82/80 tractors can be included in the machine package or purchased separately.
Design
The KUN for a mini tractor is made in the format of a boom, which is controlled using 4 hydraulic mechanisms - 2 of them are involved in the process of lifting the load and 2 regulate the angle of inclination of the bucket.
A chassis system is used as a drive, which also serves as a connector for aggregating the KUN to the main machine.
The control panel for the loader's operating parameters is located in the driver's cab and is simple.
The manufacturer also offers a wide selection of additional replaceable equipment that can be equipped with the MTZ 82 tractor with kun:
- buckets with a volume of 0.35 to 1.5 cubic meters. m.;
- forklift equipment for agricultural and loading operations;
- rake grids for working with mown grass, hay, straw;
- grip for breve, thanks to which KUNs for MTZ 82 are also applicable in logging;
- grips for working with bales and rolls;
- jaw dump.
The universal KUN for a mini tractor, in particular the most popular modification KUN-10, has the following basic characteristics:
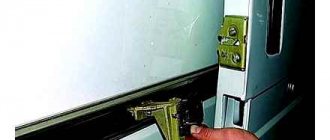
Attaching the bucket to the KUN at MTZ
- the load capacity of the rake grid and other aggregated working parts is 500 and 800 kgf, respectively;
- the loading height when using a bucket and rake grid is 2.5 m 3.5 m, respectively;
- The unloading angle of the bucket varies in the range of 55-65 degrees.
The dimensions and performance indicators of the KUN are determined by the parameters of the chassis, which is used to attach the unit directly to the self-propelled unit.
Homemade KUN for MTZ
The cost of the equipment, including compact models with lower productivity, is high, however, the KUN for the rear linkage of the MTZ or Uralets tractor can be made independently from available materials.
Tractors of this brand are equipped with a hydraulic system that allows the KUN to be mounted on the MTZ rear suspension - this is convenient, and the installation of such a loader is simpler than its front-end counterpart.
The advantage is the ability to select the optimal boom length and material unloading height.
It should be noted that making a forklift yourself is justified if you have a sufficient amount of metal; sometimes buying a used product is more profitable.
In the process, you will need a welding machine, a tool for cutting metal, a hammer, a sledgehammer and a set of adjustable wrenches. Experience with a welding machine is desirable - the quality and reliability of welding, which affects the performance characteristics of the future loader, may depend on this.
Structural elements:
- profiles and sheet metal, the thickness of which corresponds to the planned load on the unit;
- hydraulic cylinders - one larger to create a lifting mechanism and two smaller ones to adjust the bucket tilt parameters;
- cylindrical hinges for assembling the structure.
Homemade KUN at MTZ
Drawings of KUN loaders for MTZ 80 and 82 of various capacities are presented on the Internet - we recommend that you carefully read them in order to cut metal with minimal waste.
The frame of the future loader consists of 2 rectangular frames. External and, accordingly, larger in size, it is aggregated to the rear canopy of the tractor. The internal one consists of sheet metal. A large hydraulic cylinder is fixed in its lower part, and a spacer is welded to the upper part, which acts as a stiffener.
The boom structure is prefabricated. The main part of the structure makes up 70% of the length of the product, is placed as close as possible to the frame and is aggregated with the cylinder.
The middle part of the structure is attached to this fragment of the product using hinges, and the bucket is attached to it.
An important parameter is the boom radius - if it is more than 2 m, the front semi-frame must be equipped with a counterweight.
The bucket can be purchased or made from sheet metal. the final design looks like a boomerang with three attachment points - central and one at each end. Installation of KUN on a tractor can be done independently. Before testing the device, be sure to check the reliability of the connections and fastenings.
Source: https://moezerno.ru/texnika/loaders/kun-na-mtz.html
Difference in attachments
If the PKU - 0.8 is attached directly to the tractor frame, naturally disrupting the uniformity of the load during operation and putting pressure on the frame with the entire loaded mass, which leads to premature breakdowns when working with heavy loads, then the PF - 1 is equipped with its own frame, attached under the tractor to the rear axle , which evenly distributes the entire load.
In addition, PF-1 uses slightly more powerful cylinders, while the boom and other parts with mechanisms are made from reinforced (thickened) metal. Consequently, despite all the external similarities, the KUN on MTZ of different models still has significant differences in operation.
Note
Many skilled mechanics make the KUNS they need with their own hands, producing quite working and acceptable attachments. This does not mean that it is necessary and possible to refuse to purchase a high-quality factory product, but it does not exclude this possibility.
However, any homemade KUHN, even one manufactured according to all the rules and regulations, is certainly technically inferior to its factory-made counterparts.
Coon for the rear linkage of the MTZ tractor
What is a KUN on a MTZ tractor? This is one of the types of attachments that is widely used on the MTZ tractor and not only. This device, due to the hydraulic system, allows you to perform various works. The decoding of KUN is as follows - “universal mounted hay hauler”.
One of the most popular models of this equipment is considered to be KUN 10. The model is manufactured at the facilities of Salskselmash, an advanced Russian plant specializing in attachments. The first model KUHN 10 came off the assembly line in 1973. As a result of constant improvement, KUN 10 has significantly increased its functionality. For reference: the versatility of the model allows it to be used on T-40, LTZ and YuMZ tractors.
Advantages of KUHN
The MTZ 80 tractor equipped with KUN is characterized as:
- Universal - can perform partial work instead of a bulldozer, loader and even an excavator. In view of this, KUN is used during construction and installation work in the agricultural industry.
- Productive.
- Reliable unit.
Homemade rear KUN at MTZ
The cost of factory KUN for a tractor is not affordable for everyone. Therefore, it makes sense to cover the topic of making a homemade KUN.
Thanks to the hydraulic system, you can install a homemade KUN on the MTZ tractor, and you will not need many materials and tools. The human factor plays a big role, because not everyone knows how to handle a tool. The main equipment for the technological process is a welding machine. Experience with this equipment is important, because high-quality seams affect the strength and reliability of a homemade kun.
You will also need a metal cutting tool. As a rule, a grinder or even a gas cutter is used. Well, the standard ones will come to the rescue: a hammer, a set of keys, sledgehammers.
About the nuances
- Three hydraulic cylinders are required. Two of which will serve to rotate the bucket. The task of the third (largest) cylinder is to lift the bucket along with the boom. How to choose the power of hydraulic cylinders? — the selection of power depends on the weight of the loads and the length of the boom.
- You need to take care in advance of the metal elements that will represent the basis of the entire structure - these are trusses, corners, plates. The thickness of the listed elements directly depends on the future perceived load.
- As soon as the drawing of the homemade KUHN is ready, you need to purchase hinged cylindrical joints.
- The first step is a drawing, then a search for equipment and parts, tools. Thus, you can save money if you have information in advance about the required amount of materials.
Manufacturing instructions
- Initially, you should weld the frame of the future homemade KUN. The frame is a rectangle, the lower part of which is below the level of the edges. Installation on the MTZ tractor is carried out by the lower part of the frame. In the center of the KUHN structure there is also another rectangular frame, it consists of two plates. Its fastening is carried out by welding to the lower and upper edges. This frame is designed to hold a large cylinder (at the bottom). A spacer will be permanently attached to the top. Four hinges are installed on the top edge. For cylinders changing the angle, two central hinges are installed. The outer two hinges serve for the boom. The selection of the height of the base depends on the needs, in each case individually.
- The arrow consists of several components. The part of the arrow that is attached to the base is about 65% of the length of the entire arrow. The next part of the arrow is attached to the long part, the angle between them is 30 degrees. People call an arrow of this shape a “boomerang”. The result is two curved profiles with three connection points. Down the center and at each end. Another end of the main cylinder enters the frame, which is secured to the central part by welding seams.
- The central part is a hinged cylindrical joint. Why articulated? – is explained by the need to attach a lever to it, which controls the bucket. The lever consists of two elbows; on one side it is connected to a bucket, and on the other side to two small cylinders. The fasteners of the previously listed parts are mounted on hinges. You need to know: experienced mechanics advise performing the central part together with the hinge joint. Otherwise it will be difficult to put it on.
- Let's move on to the bucket. The ladle can be welded or bought from a factory, which is optional. It is not uncommon to see a forklift instead of a bucket used to pick up bales.
- Is it necessary to weight the front part if the stem length is more than 2 meters? - Yes need. In this case, a box or basket is welded onto the frame, where concrete blocks are stacked and sand is poured.
The choice is yours: buy a factory-made KUN or start developing homemade equipment. The final choice depends on financial capabilities and, of course, desire. It is also proven here that it is quite possible to make and install KUN at MTZ. Good luck to you.
Video
KUHN for the rear linkage of a tractor: what equipment can be used
The homemade product installed on a mini tractor with KUN can be of two types:
- Equipment type PF-1, which has its own supporting frame. This homemade KUN is attached to a tractor, which protects the machine from overturning. Such equipment weighs about 900 kg, is driven by hydraulic cylinders, has a load capacity of 1 ton and a speed of 20 km/h.
- The PKU-08, which is a more modern modification of the PF-1, is also installed on the rear linkage of the MTZ 82. It is not difficult to attach a homemade KUN or a KUN assembled by your own to a tractor. But it is worth considering that PKU-08 differs from MTZ in carrying less load than the previous arm of the equipment. The PKU-08 weighs only 700 kg, reaches a speed of up to 20 km/h, and is capable of lifting 800 kg of cargo at a time.
The kuna model on MTZ 80 or MTZ 82 is produced at the Salskselmash plant, which specializes in agricultural machinery. KUN 10 is a functional and practical boom, created specifically for the specified MTZ models. Kun can also be installed on a Chinese tractor. Although the equipment works better with Minsk technology. Among the advantages of KUN 10 it is worth noting such characteristics as:
- Versatility. The Belarus tractor is capable of being a loader and performing earth-moving work like an excavator. The machine is also used as a bulldozer or leveler.
- Compactness. The installation of KUN 10 at MTZ allows the equipment to be used in the city and on small construction sites. Therefore, such a tractor is constantly used for landscaping territories, digging holes and trenches, laying communications, etc.
- High level of productivity.
- Reliability.
- Ease of use.
- Easy to use.
KUN for wheeled tractors has the following design:
- The boom, which is controlled by four hydraulic mechanisms, two of them are used to lift loads, and another two are used to adjust the angle of inclination of the bucket.
- The drive that powers the chassis. Its system also has the option of a connector, with the help of which it is connected to the tractor.
- The boom control panel is installed in the tractor cab.
- Buckets can have different volumes, which vary from 0.35 to 1.5 m³.
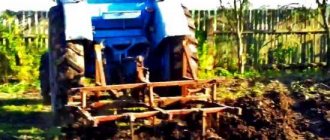
Homemade loader for the rear linkage of the MTZ tractor: materials, tools, instructions, drawings
Very often, farmers are faced with a problem when they need to buy a loader, but the purchase can cost quite a large sum. If you have enough tools on your farm, as well as quite a lot of metal, you can make your own loader for the rear linkage of the tractor.
As an example, you can take the MTZ tractor, since it is one of the most common equipment on the farm, and also has its own hydraulic system and the ability to install attachments at the rear.
Also, although a front loader can carry significantly larger loads than a rear loader, it is much more difficult to mount. For this reason, we will consider a mounted loader on the rear canopy of a tractor.
So, what are the advantages of a homemade forklift:
- If the farm has the necessary tool or was planning to buy it, and also has the necessary metal that is simply lying idle, then you can save a lot of money;
- You can choose the length and unloading height of the future product yourself.
Disadvantages or what problems may arise:
- If you still don’t have tools and metal, then it would be more advisable to purchase a new or used loader, since independent production may not only be comparable in cost, but also significantly exceed it;
- Such a loader will be weaker than the factory ones;
There is a possibility that the tractor will rear up when the rear part is overloaded, so you need to correctly calculate the boom reach or add additional weight to the front part.
Necessary materials
You will need a small amount of tools and materials for a homemade loader on the MTZ rear linkage, but the main factor is the ability to handle all the necessary tools.
Tools:
- The main tool will be a welding machine. It is very important to be able to use it, since the strength, reliability and durability of the entire structure, as well as the safety of the tractor driver, will depend on this.
- You need a precision tool to cut metal. In this case, a grinder, a gas cutter, and the like are suitable. The main thing is that the cut is accurate and even.
- Next, you just need a variety of tools that are usually available on all farms: these are adjustable wrenches, a sledgehammer, hammers, and the like.
Details:
- It is necessary to purchase or remove 3 hydraulic cylinders from unused equipment: one large one, which will raise the boom with the bucket, and two small ones to change the angle of inclination of the bucket itself. The power of the cylinders is selected depending on the length of the boom and what weight needs to be worked with.
- It is necessary to obtain metal profiles and plates, of which the further structure will consist. Their thickness is also selected to suit the tasks assigned to the loader.
- Cylindrical hinge joints are needed, but their selection should be done only after drawing up a drawing of the entire structure. This is necessary not only in order to obtain the required quantity, but also to know the load that they must cope with in the future.
- First, you need to prepare a drawing of the entire structure, and only then cutting the metal, welding and assembly. This is necessary not only in order to use the material as efficiently and economically as possible, but also to better understand the future design and achieve maximum strength. About the design below.
Step-by-step instruction
If you follow the instructions, you won’t have any problems creating your own loader for the MTZ attachment:
- First you need to make the frame of the base of a homemade loader for a tractor. It is a rectangle, the lower part of which extends beyond the edges, since it must be installed on the rear canopy of the tractor. In the center of this frame there is also a rectangular frame, which is made of two plates and welded to the upper and lower edges. A large hydraulic cylinder will be attached to this frame at the bottom, and at the top there will be a strut that is attached to the back and holds the entire frame in place. There should be four hinge joints on the top face: two in the center for the upper cylinders and two outer ones for the boom. The height of the base is determined according to needs.
- The boom is a prefabricated structure. From the side attached to the base, this is the main and longest part, which represents approximately 70% of the total length. An extension is attached to it at an angle of 30 degrees, which should look up. Thus, a shape similar to a boomerang is obtained. You should get two curved profiles, which are connected to each other in three places - at the ends and in the center. Also closer to the central part, but from the side of the base (approximately 25% of the total length), a frame is welded to which the second end of the main cylinder is attached.
- The central part of the boom is made in the form of a hinged cylindrical joint, since the bucket control lever is attached to it. It consists of two elbows (40 degree bend), to which two small cylinders are attached on one side, and on the other side a crossbar for further connection directly to the bucket. All the described parts are connected on hinges, and the two elbows have one common one.
- Now it's just a matter of the bucket. You can either purchase it or make it yourself according to ready-made drawings. You can also use a forklift for pallets or bales instead of a bucket.
- If the boom has a reach of more than two meters, it may be necessary to additionally weight the front part. To do this, you will need to weld a basket for sand, concrete blocks or metal weights onto the frame.
Drawing of a homemade forklift lift frame
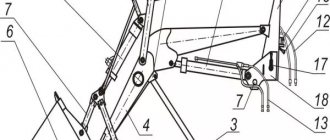
1 – stand; 2 – boom lift hydraulic cylinder; 3 – support; 4 – lifting frame; 5 – hydraulic cylinder for tipping the bucket; 6 – ladle; 7, 11 – traction; 8, 10 – bracket; 9 – pointer; 12 and 13 – high pressure hoses; 14 – bracket; 15, 17 – lever; 16 – clamp; 18 – sidewall.
It is very important to make the central part immediately assembled with the hinge joint, since it will not be possible to put it on later.
Drawing of a rack for fixing attachments
1 – sidewall; 2, 3, 4 – bracket; 5 – catcher; 6, 10 – lever; 7 – clamp; 8 – rod; 9 – spring; 11 – latch; 12 – axis.
The video shows a homemade loader on a tractor in action:
Source: https://allspectech.com/stroitelnaya/pogruzchiki-dly-stroitelstva/frontalnye/samodelnyj-na-navesku-traktora-mtz.html
Characteristics of a homemade unit
Homemade KUN for a mini tractor: installation features. The manufacturer offers buckets of various sizes, fork equipment (needed for agriculture and loading and unloading), rake grids for collecting hay, straw, and mown grass. Grabs for logs are sold separately, so KUNs are used for logging. Additionally there are grippers for bales and rolls. You can also find jaw dumps in stores. The basic equipment for a homemade KUN for a mini tractor may vary.
The dimensions of KUN 10 can be different, depending on the modification of the equipment. The carrying capacity of the rake grid, dumps and grabs is 500 and 800 kg. The equipment bucket rises to a height of 2.5 m, and the rake grid - to 3.5 m. The unloading angle of the bucket, on average, ranges from 55 to 65º. The performance and size of the equipment depend on the chassis that needs to be mounted on a homemade mini tractor or other self-propelled unit.
Buying attachments is expensive, so you can make a KUN for MTZ with your own hands. Assembling and installing such a tool is simple, you just need to draw up a diagram of the equipment and mark on it the place where it will be mounted on the wheeled tractor. A homemade KUN is attached to the rear linkage of an MTZ 80 or 82. This is much easier than installing a KUN 10, which is available in a front modification.
A homemade tractor differs from a factory one and has several significant advantages:
- Ease of mounting.
- Selection of the length and height that is necessary for specific work on the ground or at a construction site.
- You can use scrap materials left over from other equipment.
How to make a KUN for MTZ with your own hands
It is imperative to make drawings of a homemade KUN so that there are no problems with cutting the metal into individual elements. Let's look at how to make such equipment yourself:
- You will need profiles and sheet metal. The thickness of the materials must correspond to the load that is planned.
- You will need to purchase several hydraulic cylinders - 2 large ones to lift the bucket, and 2 smaller ones. They are needed to adjust the inclination level and equipment parameters.
- Cylindrical joints, without which it is impossible to assemble the entire structure of the wheel unit.
When you have all the necessary tools and materials, you can begin the process of assembling the KUN with your own hands.
You can find drawings and diagrams on the Internet, on specialized forums and websites, or you can create them yourself.
This will allow you to cut the metal so that there is a minimum amount of waste. You can contact design firms, where employees will help you create a good drawing of the future attachments for the tractor.
The loader must consist of two rectangular frames. One of them - the external one - should be larger. It is this that is aggregated, i.e. Attaches to the rear tractor of the tractor. The inner rectangular frame is cut from sheet iron. Large hydraulic cylinders must be welded to the bottom of the frame, and a spacer must be installed on top. It is needed to create a stiffening rib.
The majority of the structure is the boom attachment, accounting for more than 70%. To install it, you will need the help of another person who should know how to install it correctly. The product is placed closer to the frame and connected to the cylinder. Then you need to attach the middle part to it, after which the bucket is hung. It is worth taking into account such an important nuance as the relationship between the length of the boom and the stability of the tractor. If the boom radius is more than 2 m, then a counterweight must be installed on the front frame. This will allow the MTZ to stand firmly on the ground and not tilt in different directions while carrying loads.
The installed bucket is made independently, also from sheet metal. The elements must be welded so that a structure similar to a boomerang is obtained. It should have 3 attachment points - in the center and along the edges.
How to make a homemade loader for the rear linkage of an MTZ tractor: drawings
To make a homemade loader for the rear linkage of an MTZ tractor, drawings, you should carry out an audit in your utility rooms. You need to evaluate whether you have enough materials and tools to make such a unit for the tractor.
The role of loaders in subsidiary farming and preparation for production
Every farmer needs a front loader for his mini tractor on his farm. Unfortunately, not everyone can purchase it, given the high cost.
The way out of the situation is to reorganize your equipment.
You can make a homemade tractor loader if you have the skill to carry out such work, as well as a sufficient amount of materials and tools.
Based on practice, a loader for a mini tractor goes very well when paired with an MTZ tractor, which is manufactured at a Belarusian plant. These machines are most often found on farm plots. It is equipped with hydraulics and is suitable for mounting attachments.
A loader on a mini tractor will save money. Having selected the necessary tools and materials from your own storage facilities that have been lying around for a long time without use, with skillful hands you can make this equipment for the rear linkage. You can set its parameters yourself, which is an advantage.
If there are no materials and funds to make such an addition for a mini-tractor, then the cost of purchasing them can exceed the price of a ready-made factory loader. And homemade loaders cannot be compared in quality to purchased ones. But you can purchase a used unit with a rear suspension much cheaper.
You need to start working on creating the necessary equipment with your own hands from the drawings. It is necessary to think through all the subtleties and dimensions.
If you don't have experience designing graphics, look for standard drawings. The assembly drawing must consist of a specification that lists all included assemblies and parts, as well as materials.
Using this documentation, calculate the amount of materials and fasteners.
You will need the following tools:
- welding machine (the conditions for safe operation on the tractor will depend on the reliability, strength and durability of the structure, so this operation should be carried out efficiently and professionally);
- grinder or gas cutter for metal;
- handy tools - you can’t do without hammers, adjustable wrenches, sledgehammers, etc.;
- to create the structure, you will need rolled profiles and metal strips; their parameters are determined based on the load the installation will be subjected to, based on the planned functions;
- since the loader will be equipped with a bucket with a boom, in order to lift it, a large hydraulic cylinder will be required; to be able to control the bucket at different angles of inclination, 2 small cylinders will be required.
Having determined the load of the installation, you should calculate the required number of articulated joints that help the unit operate under load.
Cutting materials with your own hands should be carried out strictly according to the drawings; this will contribute to the economical disposal of them and will help to better imagine the future product and make the right decision to give the greatest strength and reliability.
Technology for creating a homemade loader
Manufacturing begins with 2 rectangular frames. The first of them - the main one - is made with your own hands with a lower element that extends beyond the edge. They will also attach the base to the rear of the tractor.
The second frame for the rear linkage is made of strips and fastened with a spacer, which is located at the top, and with a hydraulic cylinder at the bottom. Thanks to the support, a stationary position of the frame is ensured.
Hinges are attached to the upper edge: in the central part there are 2 hinges for the upper hydraulic cylinders and a pair of hinges for the switch mechanism. The height of the frame is determined by expediency.
The boom mechanism is a prefabricated structure. A working element, a lever, is attached to its center, the hinge. The entire mechanism is a triple folded double structure that is secured to each other at the ends and in the center.
The finished boom can have a final length of 2 m or more, so it is equipped with a counterweight. The counterweight is placed in a basket welded to the frame at the front of the machine. Concrete blocks and sand in bags will be used as a counterweight.
To produce a ladle you need to have sufficient qualifications. If you don’t have one, it’s better to purchase a ready-made one in a special store. The bucket can be replaced with a forklift for bales or pallets.
Are you here
Questions can only be asked after registration. Please login or register.
Who made what type of pitchfork for loading wood? I want to make it, but I can’t figure out where to start.
I think I wrote for loading timber with a tractor and on a coon.
who made what kind of pitchfork for loading timber I want to make it but not how not
I took one vilina 15 cm wide from the cara and cut it into lengths. I use them to move anything.
I took one vilina 15 cm wide from the cara and cut it into lengths. I use them to move anything.
I got caught with punishment when I did it.
looks good. but for this you need horns from a loader where there are such inspirations, I would need everything homemade from scrap materials.
where are such inspirations,
MAYBE WHAT WILL HAPPEN AT THE RYSKAY METAL BASE
where are these inspirations
Ask around at factories and wholesale stores. I have a 60mm round timber. I took it from a potato harvester from metal scrappers. And I found a frame from a cultivator frame with a wall thickness of 10 mm.. In general, I welded whatever I found.
Description of work
A set of drawings for self-production of a fork fork for the MTZ-80, MTZ-82, YuMZ tractor and their equivalent. Kuna's drawings were made by a design bureau, have a simple design and are suitable for self-production in a small enterprise or at home. The forks are designed for installation on a factory front hydraulic fork for loading hay or straw in agriculture. The forks have a frame for automatic unloading.
Fork dimensions: working width 1.7 m, height 1.3 m.
Album composition: Beam.cdw Grab for hay. Assembly drawing.cdw Capture. Specification.cdw Needle.cdw Coon for hay. Assembly drawing.cdw Kuhn. Specification.cdw Ski. Assembly drawing.cdw Ski. Specification.cdw Support. Assembly drawing.cdw Axle.cdw Plate 150x80.cdw Plate 150x105.cdw Plate 400x150.cdw Plate 970x50.cdw Plate.cdw Frame. Assembly drawing.cdw Frame. Specification.cdw Coon frame for hay.cdw Frame. Assembly drawing.cdw Pipe with development.cdw Pipe L-1700 mm.cdw Pipe L=448 mm.cdw Pipe L=996 mm.cdw Pipe L=1565 mm.cdw Pipe L=1885 mm.cdw Pipe.cdw Angle L= 300 mm.cdw Eyelet.cdw
Brief instructions:
- Search for suitable jobs in the search bar at the top center of the page or in the side navigation bar on the left.
- Evaluate the quality of the work using the content and screenshots of the drawings that are in the archive. To view screenshots, download the archive at the bottom of the page.
- If the work suits you, choose a payment method (Yandex-money, WebMoney or Interkassa) or use your personal account and personal account.
- Expect the archive password to be sent to your email. To speed up receiving your password, you must fill out the payment form correctly - indicate your email address.
- If you need it urgently, then contact us personally at » title=»WhatsApp - technical project» target=»new»>WhatsApp or the phone number listed in the site header.