Tension with adjuster bar
Fastening the generator using a strip
This method is used for older cars (for example, “classic” VAZs). It is based on the fact that the generator is attached to the engine using a special arc-shaped strip, as well as a bolt and nut. By loosening the fastening, you can move the bar with the generator relative to the engine to the required distance, thereby adjusting the tension level.
Actions are performed according to the following algorithm:
- unscrew the fastening nut on the arc-shaped bar;
- Using a pry bar, we adjust the position (move) of the generator relative to the engine;
- tighten the nut, fixing the new position of the generator.
The procedure is simple, it can be repeated if you were unable to achieve the required level of tension the first time.
Tension adjustment using a roller
Adjusting roller and key for it
Some modern machines use special adjustment rollers to adjust belt tension. They allow you to quickly and easily tension the belt. As an example of using this method, consider adjusting the belt on a Lada Priora car with air conditioning and power steering, as one of the most popular cars in our country.
How to tighten the alternator belt on a Priora
Work on tensioning the alternator belt on a Lada Priora car is carried out using a special tension roller, which is part of the structure. To work, you will need a 17 mm wrench to unscrew and lock the mentioned roller again, as well as a special key to turn the adjusting roller (it is a structure of two rods with a diameter of 4 mm, welded to the base, the distance between the rods is 18 mm). Such a key can be purchased at any auto store for a nominal price. Some car owners use curved pliers or “duckbills” in their work. However, we advise you to still buy an adjustment wrench, given its low price and ease of further work.
Voltage regulation process
To adjust with a 17 key, you need to slightly unscrew the fixing bolt that holds the adjusting roller, then use a special key to turn the roller a little in order to increase (most often) or decrease the belt tension. After this, use the 17 key to fix the adjusting roller again. The procedure is simple and even an inexperienced car owner can handle it.
It is only important to choose the right force
After you have done the tensioning, you need to perform a check. To do this, start the engine and turn on the maximum consumers of electricity - high beams, heated rear window, air conditioning. If they work properly and the belt does not whistle, it means you have tensioned correctly.
The automaker recommends tightening the belt every 15 thousand kilometers, and replacing it every 60 thousand. Also, do not forget to periodically check the tension, as the belt tends to stretch.
Alternator belt tension on Priora
Another method for tightening the alternator belt on a Priora
You will find detailed information about the process of replacing the alternator belt on a Lada Priora in the corresponding material.
How to tension the Ford Focus alternator belt
On different modifications of Ford Focus cars, one of two systems for adjusting belt tension is used - using an automatic or using a mechanical roller. In the first case, operation is much simpler for the owner, since the belt is tensioned using built-in springs. Therefore, the driver only needs to periodically replace the belt (either on his own or at a service station).
In the case of a mechanical roller, tension must be done manually using bench tools - a pry bar and wrenches. The design of the roller mechanism may also differ. However, the essence of the procedure comes down to the fact that it is necessary to slightly loosen the fastening of the roller, tighten it and fix it again. Also, in some modifications of the Ford Focus (for example, Ford Focus 3), there is no tension adjustment. That is, if the belt slips, it must be replaced.
Note! Buy original belts, as often non-original ones are slightly larger, which is why it will whistle and get hot after installation.
We invite you to familiarize yourself with the material, which presents the procedure for replacing the alternator belt on a Ford Focus 2 car - article.
How to choose the size of belts for Neva walk-behind tractors?
To ensure good tension and long service life of not only the entire drive train, but also the transmission, the belt size must be precisely selected for the specific model of the Neva walk-behind tractor. Belts that are too long, as well as belts that are too short, will quickly wear out and create additional stress on the gearbox or motor.
It is not difficult to deal with this problem if you have at hand a detailed table with dimensions presented below.
For the most popular Neva models you will need:
- drive belt type A-1180 – only for MB-2;
- 2 reverse and forward belts - Z(0)-1400 and A-1213 - for MB-1.
Craftsmen have learned to install automotive-type belts on such walk-behind tractors: AVX 13 × 1175, YaMZ-8401 from BelAZ, YaMZ-238AK, YaMZ-8401 and even from Don brand combines. Experts advise that the size of the selected belt, even if it is not original or not the one recommended by the manufacturer, should not deviate from the permissible value by more than 0.5-1%.
In addition to the above, before purchasing, it is necessary to externally check the belt: there should be no defects, scratches, protruding fibers, or bends that could harm the cultivator during operation. A high-quality belt is one that retains a clear factory pattern and does not stretch by hand.
Varieties
Unit belts are:
- wedge;
- toothed;
- forward travel;
- reverse.
To ensure optimal tension and long service life of not only the entire belt drive, but also the transmission, the size of the unit belt must be precisely selected for a specific modification of the walk-behind tractor. If you place extremely long products, as well as very short ones, they will wear out quite quickly and create an extra load on the engine or gearbox. For example, a 750 mm “Mole” belt drive is installed on units with a domestic engine.
In addition to the above, before purchasing, you need to check the outside of the product: the belt should not have damage, scratches, protruding threads, or kinks. A high-quality product is one that retains a distinct factory pattern and cannot be stretched by hand.
How to change a belt
One of the most common walk-behind tractor breakdowns is associated with rupture or wear of spare parts. This situation often arises if the device is primarily used for cultivating or plowing land. If a break occurs, the first thing to do is to put the cultivator in neutral gear and move it to the place where repairs will be carried out in the future. If this is not possible, it can be repaired on the spot.
Next, you need to prepare the necessary tools that will be needed in order to disassemble the part of the apparatus where the tension roller and pulley are located. Now the master begins to remove the protective casing and old worn parts. If the belts have not broken, but are very worn, they can simply be cut with large scissors or a knife. Once these worn elements are removed, you can begin installing new ones.
If it is a Salyut walk-behind tractor, which has two transmission belts, one of which remains intact, it will still have to be replaced, and there are reasons for this. This situation is explained by the fact that when using a new and old belt, they will differ in different degrees of tension when the clutch is engaged. This means that the main load will be transferred to the newly replaced structural element.
Thus, it will not last as long as stated by the manufacturer. Therefore, experts advise immediately purchasing two spare elements of this system in order to immediately repair the device if necessary. In order to facilitate the work of the master, you can remove the pulley from the motor drive shaft. Next, one or both belts are put on a pulley located on the gearbox shaft of the unit.
Don’t forget to choose a suitable belt for the Salute walk-behind tractor
When the preparation before installing these elements has been completed, you can put transmission belts on the pulley and then install it on the motor shaft. At the same time, do not forget about installing the key. If this is not done, the pulley will have to be removed again, since without it the pulley will not rotate while the drive shaft rotates. When installing belts, they are started from the top of the tension roller.
Why is running done?
The start of operation of any engine must be associated with break-in. This allows you to significantly extend the service life of any unit, including the one installed on the walk-behind tractor. At the same time, experienced craftsmen recommend running in the engine not only when purchasing new equipment, but also after a major overhaul.
This is very important, since only after a high-quality run-in can you count on the equipment working properly and without significant breakdowns for a long time
There is a certain sequence of how to break in a walk-behind tractor. First of all, you need to check the reliability of the fasteners and all bolts. The walk-behind tractor should be filled with gasoline, and only then start the engine.
As with any other equipment, it is important to use lubricant (machine oil) and coolant when preparing the walk-behind tractor for operation.
During break-in, not only the operation of the engine is always checked, but also the functionality of the brake system, as well as the reliability of the steering. Make sure that the steering wheel is in the correct position, otherwise there will be no normal running-in.
Experts recommend carrying out a technical inspection of the device immediately after running it in. This will allow you to identify possible problems and shortcomings and eliminate them in a timely manner. After break-in, a technical inspection must be carried out every 2000 hours of operation. Bearings and seals must be inspected. All elements should be wiped with diesel oil. Worn parts must be replaced immediately
Experts recommend paying special attention to the fork and control springs. It must be reliable enough for the equipment to work without failures
The main rule for running in a motor cultivator is the correct sequence of actions. Work always begins with careful preparation. At this stage, everything should be checked, lubricated and refilled as efficiently as possible. Only after this can you start the walk-behind tractor engine. The service life of the unit will directly depend on how well the diesel walk-behind tractor is run in.
https://youtube.com/watch?v=0a8X4fc3lBM
High speed operation
Expensive models of walk-behind tractors are characterized by the presence of several operating speeds. On the one hand, this option makes it possible to optimize the process of planting, harvesting or cultivating the field. On the other hand, the functioning of motor cultivators largely depends on the quality of the belt. The first thing to remember is that the length of the product always meets the requirements specified in the passport. In second place is the requirement related to strength.
Constantly switching speeds does not have the best effect on the operation of the device. This is why you should stop using cheap and not always high-quality belts.
A cultivator is a technical tool that performs the following functions:
- weed control;
- plowing the soil;
- loosening;
- applying various fertilizers to the soil.
During intensive use, some components and parts of the unit may become damaged.
. Therefore, you should purchase the necessary spare parts in advance (perhaps on the day of purchase of the cultivator itself). This will allow it to return to functionality immediately after a breakdown.
The main elements of the cultivator are a gearbox, levers, a fuel tank, a frame, a motor, a support, a wheel, and a blade of the working element. Torque transmission is ensured by a gearbox that is built into the engine.
The knives of the machine are designed to cut layers of soil, easily mix and chop them. Operating the device is effortless.
Prominent representatives of the same reliable and high-quality equipment are cultivators, and. For more information about the work of the Mole cultivator, watch the video:
All this contributes to intensive plant growth and large yields.
The Mole is a model of a Soviet and Russian cultivator, which began production back in 1983. Its production was established by the Moscow Machine-Building Enterprise named after. Chernysheva.
It is a leading company in the defense-industrial complex, employing the best specialists in the country. Now the production of the Mole cultivator has been established in the city of Omsk.
Today the complex includes several production facilities:
- foundry;
- galvanic;
- blacksmithing;
- mechanical assembly;
- welding
The main features of the Mole motor cultivator have always been increased engine life and operational reliability
.
If any parts fail, they must be replaced with new ones. The most popular spare parts for walk-behind tractors are housings, spare blades, motors, and gearboxes. The engine on the Mole is installed with a power of 4.5 hp.
If the gearbox is built into a sealed housing, when repairing the device, you will have to change the engine, including. Modern walk-behind tractor models are equipped with both gasoline and diesel engines.
.
Older devices need repairs much more often than newer models. This explains the demand for old-style parts.
For example, if the device needs a gas cap
, spark plug cap or starter pawl, it will take time to find the right part.
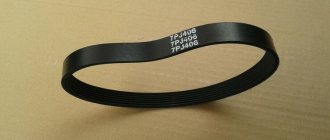
Belt
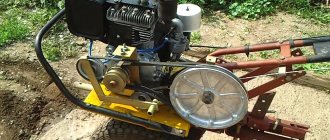
From time to time, when operating the Mole walk-behind tractor, you may notice the belt slipping.
This problem can be avoided by installing 2 belts. Proper installation requires an oversized idler pulley with driven pulley.
The roller is placed on bearings. To improve the cultivator, you only need to remove the old one and install a new roller.
The unit uses an A-750 drive belt.
It is 750mm long, 8mm high and 13mm wide.
Product composition:
- cord;
- wrapping layer;
- technical volcanic rubber.
The main task of the belt is to transmit torque from the motor to various components of the device. The belt is marked according to size (mm). Can be used at temperatures from +30 to +60 degrees.
Used in traditional drives, used in agricultural units. The belt is one of the most important elements
cultivator. In order for the device to work at full power, original belts are required.
The belt for the mole 710 cultivator is installed on units with a Russian engine. The profile of the product is 13 mm.
Mini, medium or heavy?
In order for plowing with a walk-behind tractor with a plow (plow) to be effective, it is necessary to choose the right equipment. When choosing a walk-behind tractor, Honor needs, firstly, the area of land that will be cultivated with its help, and, secondly, the tasks that it must perform.
There are three types of walk-behind tractors:
- light (mini);
- average;
- heavy.
Let's look at the main advantages and disadvantages of each of them.
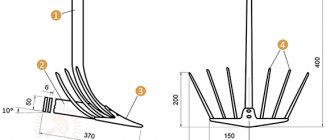
Hanging and adjusting the plow
Plows are attached to the walk-behind tractor with hitches, different types of which have their own properties. Therefore, before installing the tiller on the walk-behind tractor, it is necessary to carry out work on fastening it to the hitch. It must be secured with one pin, while maintaining play in the horizontal plane (5–6 °). By fixing the hitch with two pins or removing play, you can get a rigid connection, which is a mistake.
Next, you need to attach the plow to the coupling device, without tightening the fastening nuts all the way, in order to begin adjusting the plow. It is better to perform this operation with an assistant. When the attachment is attached, you can proceed to setting up the plow on the walk-behind tractor. Adjusting the plow is more complicated than attaching it to the unit, but this process is very important, because if you adjust the plow incorrectly, more effort will have to be put into plowing and it will not be of high quality. In order to adjust the baking powder on the walk-behind tractor, using stands you need to balance the plowing implement with the plow. To do this, we place ground hooks and the support leg of the walk-behind tractor on identical wooden stands, the height of which depends on the desired depth of plowing. This must be done so that the walk-behind tractor does not tip towards the attachment.
The next step is to use the adjustment bolts to tilt the plow bed so that its heel is parallel to the ground. After this, you need to remove all the supports and adjust the carrier so that the handles are at the same level with the belt of the worker plowing the soil. Thus, your hands do not get tired for a long time while working with the unit.
The last stage is stabilization of the plowing plane level. The angle between the sharp end of the plow and the ground can be adjusted by rearranging the bolt connections or using an adjusting screw. The second method is more convenient and practical. To do this, on a walk-behind tractor standing on a plane with an attached swing arm, you need to unscrew the adjusting screw so that the blade of the attachment “lies” on the ground. Then, unscrew the screw in the opposite direction so that the “back” of the plow rises by 2.5 seconds. above the ground, no more and no less. If this so-called angle of attack is too large or vice versa, the walk-behind tractor will not plow as it should.
Medium walk-behind tractors
Unlike light ones, they boast rear-wheel drive and are great for working on large areas (up to 0.5 hectares). Weight varies from 45 to 65 kg, the cost of such equipment, on average, is 10,000–12,000 UAH. Engine power - 4.5–12 liters. With. Many models of medium walk-behind tractors can be equipped with additional equipment.
Main advantages:
- presence of a front headlight and two gears;
- the ability to attach a plow;
- Compared to heavy equipment of this type, medium walk-behind tractors are more mobile and easier to turn.
Among the weak points of monoblocks of this class are the processing depth of up to 11 cm, which is insufficient for many crops.
Mini or light walk-behind tractors
Used to work on small plots of land, they are also called motor cultivators. The engine power of these devices is up to 4.5 horsepower.
Among the advantages of motor cultivators are:
- lightness (weight does not exceed 40 kg);
- low price (from 6000 UAH);
- the ability to process hard-to-reach places thanks to the small grip of the cutter.
However, light walk-behind tractors do not work for a long time, since they have an insufficiently powerful engine, which quickly overheats, and do not bury themselves well in the ground due to their insufficient weight.
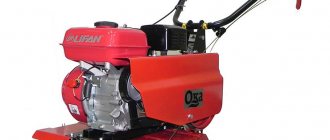
Engine
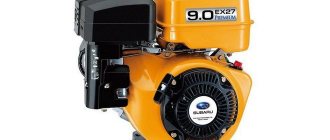
Depending on the modification, the Oka walk-behind tractor is equipped with engines from different manufacturers (DM-1M, DM-1M1, MITSUBISHI GT600 6.0/4.4, I/C 6.0 HP 6.0/4.4, Honda GX-200 6.5/4.8, Lifan 168 F-2A 6.5/4.8, Vanguard 6.5 HP 6.5/4.8, Lianlong 168F-1A 6.5/4.8, Robin Subaru EX 17 6.0/4.4, Robin Subaru EX21 7.0/5.2, KADVI 168F-2A).
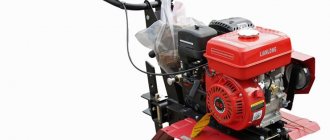
Engine Lifan LF177
One of the popular modifications is the Oka with the Lifan engine. This engine is economical, and its functionality allows it to be installed in small-sized equipment (motor cultivators, walk-behind tractors). Lifan is manufactured in China and has proven itself to be a durable and reliable engine.
The choice of model is made depending on the area of land the operator intends to cultivate using the walk-behind tractor, as well as on the main tasks (plowing, cultivation, digging up potatoes, etc.) that the device will perform.
Engine malfunctions
Let's figure out why the engine on the Oka walk-behind tractor may be acting up? So, the main reasons that the engine does not work and the walk-behind tractor does not start may be the following:
- insufficient fuel or oil level;
- low-quality gasoline;
- clogged fuel or oil filter;
- problem with spark plugs or seals (oil is leaking; spark plugs need to be replaced);
- the angle of inclination when setting up the walk-behind tractor is exceeded (more than 15 degrees, start the walk-behind tractor on a flat surface);
- the integrity of the electrical wiring is compromised;
- rupture or delamination of transmission belts;
- poor tire pressure in combination with any of the above reasons;
- attempt to start the engine without warming up;
- The storage temperature of the walk-behind tractor is too low, as well as a big minus outside when starting the equipment (store the walk-behind tractor in a warm room; in sub-zero temperatures, pour warm oil into the engine and gearbox).
Advantages of the OKA walk-behind tractor
It should be noted what advantages are typical for this agricultural tool, namely:
- ease of maintenance and operation without the use of additional devices;
- high-power motor, depending on the modification of the walk-behind tractor;
- the steering wheel is easy to control, which makes the robot much easier to operate;
- durable design of the device;
- The transportability of the walk-behind tractor is ensured by a muffler in a horizontal position and an easily removable steering wheel.
In this video you will learn which walk-behind tractor to choose:
How to change the belt on a Neva walk-behind tractor?
The simplicity of the basic device of the MB-1 and MB-2 modifications allows you to replace faulty drive elements without seeking help from a specialized workshop.
To do this you will need:
Carefully remove the old belt, being careful not to damage the tension rollers and other important parts located nearby.
To do this, it is necessary to sequentially dismantle the protective shield and the main factory casing, built-in for additional belt protection; Carefully remove the spring from the structure, which is necessary to tension the drive element; Unscrew the fastenings in the form of screws and the standard stops that serve to hold the belt on the standard engine pulley; Inspect the location of the handle of the power unit shaft and gearbox - they must be strictly in the same plane. In the Neva MB-1 and MB-2 walk-behind tractors, deviations in the location of the handles are possible by no more than 0.1 mm; If there is such a need, adjust the location of the pulleys by carefully moving the engine in its longitudinal plane; Adjust the installation location of the tension pulley - this is necessary for the appropriate tension of the installed belt; Install a new drive element - it is important to start installing the belt from the side of the gear part of the walk-behind tractor. The video will tell you in detail about manually replacing the drive element.
The procedure for replacing belts is performed in the same way for both the Neva MB-2 walk-behind tractor and its analogue MB-1
In each case, before installing a new element, it is important to inspect the installation site and thoroughly clean it of debris, if necessary.
The importance of the drive belt in the design of Neva cultivators
The design of modern Neva walk-behind tractors is quite simple: there is a welded frame (load-bearing part) in which a motor is localized, the revolutions from which are transmitted to other components through shafts. The chassis is usually represented by 2 small wheels. All mechanisms are controlled through combined levers located on the handles of the device.
Any Neva walk-behind tractor contains 2 types of shafts:
The task of the drive mechanism is to transfer revolutions from the crankshaft to the distribution unit.
Depending on what serves as a belt, the drive can be:
- chain - represented by a hinged chain connecting the drive and driven sprocket, between which the traction potential is transmitted;
- belt - transmits power due to frictional forces.
The former are less demanding to maintain, do not require tension and, despite their compactness, provide good performance data. Belts, with their price and simplicity, compensate for rapid wear and significant overall dimensions.
With an abundance of modifications released under the “Neva” label, they all belong to the group of belt-driven equipment. An important advantage of these cultivators is the upper arrangement of the distributor shaft, which contributes to more efficient cooling, and therefore less wear on the belts themselves.
Belts for the Neva walk-behind tractor, features, dimensions, tension
Belt dimensions for the Neva walk-behind tractor - information necessary for every owner of this equipment. Belt type, length, tension and adjustment, V-belt transmission malfunctions are issues that we will try to sort out in this article.
While writing this article, I came across one interesting fact: information about the types and sizes of belts for Neva walk-behind tractors and others is presented on the Internet mainly by online stores that offer to buy their products. In this case, errors occur very often.
Therefore, when purchasing a belt, you need to be very careful and refer to the operating instructions for your walk-behind tractor. The data on this page is collected from catalogs from Red October and from the instructions for walk-behind tractors.
There are a large number of modifications of Neva walk-behind tractors. It happens that there are different belt sizes for the MB-2 walk-behind tractor with different engines (see lines 3 and 4 of the table below)
Table of belts used for Neva walk-behind tractors and cultivators
| Type of walk-behind tractor Neva | Belt type |
| MB-1 old modification | Drive belt A-1180 VN-T GOST 1284.1-80 - GOST 1284.3-80 (forward) Drive belt 0-1400T GOST 1284.1-80 - GOST 1284.3-80 (reverse) |
| MB-1 | A53 (1380) |
| MB-2 | A-45 13×1143Li A1180Ld or A1180 GOST 1284.2-89 |
| MB-2S-9.0 PRO | A46.5 A (1213) |
| MB-3 | А52 13х1320 Li А1350Ld |
| MB-23 | A49 (data differs in different catalogues)A50 13×1270Li A1300Ld |
| MB Compact | A47 (1200 Li A47 (1230 professional A)) |
| MK-75 | FSCOUZ36 |
| MK-80 | А37 13940 Li А 970 Ld |
| MK-80R | Z31 1/2 10x805Li Z825Ld |
| MK-100 | A-100 GOST 1284.1-89 |
| MK-200 | A44 |
Table of applicability of pulleys and belts on Neva MB 2 walk-behind tractors
| Modification | Engine | Belt type | |
| Model | Ø c/v | ||
| MB-2K-6.2 | DM-1K (JSC "Red October-Neva") | Ø25 | A1180 GOST 1284.2-89 or A45 13×1143Li A1180Ld |
| MB-2K-7.5 | DM-1K-7.5 (JSC "Red October-Neva") | Ø25 | |
| MB-2B-6.0 | I/C 6.0 (Briggs&Stratton) | Ø19 | |
| MB-2B-6.0 PRO | Vanguard 6.0 (Briggs&Stratton) mod.117 | Ø19 | |
| Vanguard 6.0 (Briggs&Stratton) mod.118 | |||
| MB-2B-6.5 PRO | Vanguard 6.5 (Briggs&Stratton | Ø19 | |
| MB-2B-7.5 | Vanguard 7.5 (Briggs&Stratton) mod.1384320190E1DD1001 | Ø19 | |
| Vanguard 7.5 (Briggs&Stratton) mod.1384320162E1DD1001 | Ø25.4 | ||
| MB-2B-5.5M | I/C 5.5 (Briggs&Stratton) | Ø19 | |
| MB-2N-5.5 | HONDA GX200 | Ø19 | |
| MB-2B-6.5 | I/C 6.5 (Briggs&Stratton) | Ø19 | |
| MB-2S-6.0 PRO | EX17 (Robin SUBARU) | Ø19 | |
| Ø20 | |||
| MB-2S-7.0 PRO | EX21 (Robin SUBARU) | Ø19 | |
| Ø20 | |||
| More details on the types and sizes of pulley belts and cables used for Neva walk-behind tractors and cultivators of other modifications can be found here |
Download the table of applicability of pulleys and belts for Neva walk-behind tractors of various modifications with different engines: tablica-skivov-remnei2013.xls
Designation of V-belts
The V-belt drive for walk-behind tractors of types MB - 1 and MB - 2 performs the function of transmission and clutch mechanism and provides:
— transmission of torque from the engine crankshaft to the input shaft of the gearbox:
- disconnecting the engine from the gearbox during gear shifting and smoothly connecting them again, eliminating sudden changes in load on the engine:
— smooth starting of the walk-behind tractor and stopping it without stopping the engine.
The V-belt transmissions of the MB-2 and MB-1 walk-behind tractors are structurally different, which is caused by the use of different types of gearboxes in them
Possible malfunctions of the V-belt drive
| Nature of the malfunction | Possible reason | Elimination method |
| Incomplete clutch disengagement | Belt tension when the clutch lever is pressed is greater than normal | Set the normal belt tension with the clutch lever pressed, ensuring deflection of the upper belt branch within 8-10 mm when a force of 5 kG is applied to its middle part between the pulleys. |
| Incomplete clutch engagement | 1. Belt tension when the clutch lever is pressed is less than normal 2. Belt delamination | 1. Same 2. Replace belt |
Checking the tension and adjusting the belt of the Neva walk-behind tractor
Carburetor adjustment
The carburetor valves of the walk-behind tractor require periodic adjustment. Violation of the norm of the distance between the valves causes a change in the periodicity of the gas distribution stages, as a result, the engine does not reach the declared power. If the gap is large, noise appears and the valves themselves become deformed.
As soon as any extraneous noise appears in the engine during operation of the walk-behind tractor, the carburetor should be adjusted. To adjust, you need a screwdriver, a wrench and a blade (after all, the valve clearance norm is from 0.1 mm to 0.15 mm).
The MB-1D walk-behind tractor uses a membrane-type carburetor, model DM 1.08.100. The external view of the DI1.08.100 carburetor is shown in the figure below:
Appearance of carburetor DM1.08.100
1 — full throttle screw; 2 — idle screw; 3 — air damper lever; 4 — minimum speed screw; 5 - flange; 6 - dosing device; 7 - pipe; 8 - tide: 9 - hairpin; 10 - nut; 11 — inlet fitting; 12 - button.
The adjustment is performed as follows:
- use a screwdriver to unscrew the valve nut,
- the blade is inserted and the nut is tightened.
- Once the process is complete, the carburetor housing is put into place.
Replacement and adjustment
The flexible belt drive element on the walk-behind tractor can be replaced and adjusted independently.
The V-belt drive reliably transmits the force from the motor, but over time the belt wears out, cracks and tears form on it.
The task of changing it appears. This can be done in special service centers. This is the most correct choice, but it will not be cheap. You can carry out the replacement yourself, and if you have ever repaired your car, you have experience working with equipment.
Removing the used flexible element
First of all, remove the plastic safety cover by unscrewing the fixing nuts. Afterwards, the accessory belt is removed by relaxing the tension between the pulley (friction wheel) of the gearbox and the motor.
Some modifications have specialized devices for tensioning and loosening belts. But usually walk-behind tractors do not have this mechanism. To loosen the tension of the drive belt, loosen the motor fixing nuts (4 pieces) and move it to the right. Then we remove the belt. Don’t forget, you can only move the motor to the right (to the left) to tighten (loosen) the product within 20 millimeters.
We put on new products
We install the new accessory belt in the reverse order. Then you need to tighten it, taking into account the obligatory sagging of 10-12 millimeters. We definitely check the alignment of the friction wheels of the gearbox and motor. We tighten the motor mounting nuts diagonally.
When not in operation, the belt should rotate without difficulty on the input shaft, but not jump off it. To bring the accessory belt into working status, the clutch handle is squeezed out, the cable lifts the pressure shaft upward, tensioning the belt.
Self tension
When the new product and the loop former (damper) are installed, they need to be tensioned and adjusted, since the belt will immediately sag, which is considered unacceptable. This can shorten the duration of its use, the wheels will begin to slip, and the engine will begin to smoke at idle.
To perform the tension, you need to clean the friction wheel with a rag, and also loosen the bolts securing the motor to the chassis; use an 18mm wrench to turn the adjusting bolt in the direction of movement of the clock hand, tightening the device. At the same time, you need to try tensioning the drive belt with your second hand so that it springs freely. If you overtighten it, this will also have a detrimental effect on the reliability of the bearing and belt.
Upon completion of installation and tensioning, it is necessary to check for distortions. The new product must stand straight and have no kinks or distortions.
Processes that exhibit installation and tension errors:
- body vibration during movement;
- overheating of the drive belt at idle speed, smoking;
- wheel slipping during operation.
The size of the belts on the Cascade walk-behind tractor and the procedure for replacing them
Different units use belts of different sizes. Thus, the Cascade walk-behind tractor uses A-1180 or A-1213 GOST 1284 belts for forward travel, and A-1400 belts for reverse travel. The prefix “A” stands for 13 mm.
Before proceeding with removing or replacing the belt, it is necessary to dismantle the protective casing, unscrew the pulley, which has three streams; it is attached with a key and a locking ring to the shaft. When removing the ring you need to be careful not to break it. The material from which it is made is very fragile.
Next, we should move the reverse belt pulley forward to tighten the three-groove pulley, after which we can remove the belt without interference. If it is simply very worn, you can cut it off with a knife.
Next, we check the belts and, if necessary, replace them with exactly the same ones. If there are two of them on the walk-behind tractor, then it is better to replace both of them at once. If you replace only one belt, they will have different degrees of tension, and the new one will take on more load, which will lead to its rapid wear.
We begin to assemble everything in reverse order. We tighten the belts onto the gear pulley, then install the motor pulley, check the tension rollers and make sure that the belts are installed evenly, without distortions. Don't forget to put the protective covers in place and secure them.
A high-quality belt for a walk-behind tractor will ensure reliable operation of the device for processing crops. Depending on the intensity of use and power of the unit, it is necessary to select a suitable alternator belt. It would be a mistake to buy the first belt for a walk-behind tractor, which is recommended in the store. Increased physical characteristics of the unit will not improve its performance if the walk-behind tractor itself is not designed for this.
As mentioned above, a careful study of the characteristics of the walk-behind tractor and the field that needs to be processed will help avoid many problems. If the belt for the walk-behind cultivator is selected correctly, the device will cope with the following tasks:
- plowing potato crops;
- harrowing;
- landing;
- hilling process;
- fertilization;
- harvest.
In addition to the characteristics of the harvested crop, it is necessary to take into account the nature of the soil. If we are talking about heavy soil, then a powerful toothed alternator belt is selected for the walk-behind tractor.
According to its purpose, it is used to create a drive between the crankshaft and camshaft. If there is insufficient tension, the shafts literally slip out. The actual power of the device is reduced.
The diametrically opposite process is also dangerous. Long-term increased loads on the walk-behind tractor drive lead to accelerated wear of the running elements. All of the above suggests that the efficiency of the cultivator depends on the quality and correct choice of belt. There are no restrictions associated with the choice of original spare parts or analogues.
The key parameter is the size of the part and the required power. The specified parameters are presented on the belt packaging and in the technical description. The direct manufacturer of the walk-behind tractor will help you find certain information.
Centrifugal ignition timing regulator for VAZ 2108, 2109, 21099 cars
The centrifugal regulator is an element of the ignition system of the carburetor engine of VAZ 2108, 2109, 21099 cars.
Purpose of the centrifugal ignition timing regulator
The centrifugal ignition timing regulator in the contactless ignition system of engines 2108, 21081, 21083 of VAZ 2108, 21081, 21083, 2109, 21091, 21093, 21099 is designed to automatically increase the ignition timing when the load on the engine increases (increasing crankshaft speed) in order to obtaining greater effect (more power) from the most complete combustion of the fuel mixture.
Location by car
The centrifugal ignition timing regulator is located inside the ignition distributor (distributor), on its axis.
Centrifugal regulator device
The centrifugal regulator consists of two flat weights attached to a support plate mounted on the distributor shaft. The edges of the weights rest against the protrusions on the other - the driven plate of the regulator. The driven plate, in turn, is connected to the support plate through two springs. On the driven plate there is a round screen, the slots in which, when rotated, pass through the gap in the Hall sensor. Which forms an impulse to the switch and then to the ignition coil about the need to give a spark to one or another spark plug.
Operating principle of a centrifugal regulator
When the distributor shaft rotates, the centrifugal ignition timing regulator also rotates. Under the influence of centrifugal force, its weights begin to diverge to the sides. The higher the engine speed, the more the weights move apart.
The weights with their edges act on the protrusions of the driven plate of the regulator. From this, the driven plate, overcoming the resistance of the springs, rotates together with the screen at a certain angle in the direction of rotation of the roller. As a result, the slots in the screen pass through the gap of the Hall sensor earlier, which generates earlier impulses to the spark plugs, that is, the ignition timing increases.
Divergence of weights when rotating the centrifugal regulator
When the shaft rotation speed drops, the weights converge, the springs return the driven plate with the screen back, the pulse from the Hall sensor arrives later, the ignition timing returns to normal (See “Setting the ignition timing on VAZ 2108, 2109, 21099”) .
Combined operation of a centrifugal ignition timing regulator and a Hall sensor
Malfunctions of the centrifugal regulator
Basically, the centrifugal regulator is plagued by two malfunctions:
— jamming of weights;
— weakening of the springs of the weights.
A malfunction of the centrifugal regulator leads to a drop in car engine power, unstable idle speed and increased fuel consumption, since the ignition timing no longer corresponds to that required in this mode. To check the centrifugal regulator and eliminate the malfunction, you will have to disassemble the ignition distributor (change the springs or eliminate the cause of the sticking weights). In some cases, it is more expedient to replace the centrifugal regulator or ignition distributor assembly.
Applicability of the centrifugal regulator on VAZ 2108, 2109, 21099 cars
— On engines 21081 of VAZ 21081, 21091 cars, an ignition distributor 40.3706-10 with a red mark on the cover was installed. On engines 2108, 21083, the ignition distributor is 40.3706 or 40.3706-01. They have different characteristics of the centrifugal ignition timing regulator (see “Notes and Additions”).
Notes and additions
— Dependence of engine crankshaft speed and changes in ignition timing by the centrifugal regulator.
| Distributor 40.3706 | Distributor 40.3706-10 | ||
| 1000 rpm | 0 — 2° | 1000 rpm | 0 ± 2° |
| 2000 rpm | 9 ± 2° | 2000 rpm | 10 ± 2° |
| 3000 rpm | 15 ± 2° | 3000 rpm | 17 ± 2° |
| 4000 rpm | 19 ± 2° | 4000 rpm | 22 ± 2° |
| 5000 rpm | 22 ± 2° | 5000 rpm | 27± 2° |
| 6000 rpm | 24 ± 2° |
— Fine tuning and adjustment of the centrifugal regulator is carried out on special stands. It is not practical to produce it at home.
More articles on the ignition system of VAZ 2108, 2109, 21099 cars
— Malfunctions of the distributor of VAZ 23108, 2109, 21099 cars
— Malfunctions of the contactless ignition system of VAZ cars
— Applicability of spark plugs on VAZ cars
— Checking high-voltage wires of VAZ cars
— Checking the vacuum ignition timing regulator
How to replace drive belts on Neva MB-1 and MB-2 walk-behind tractors: step-by-step instructions
Based on the differences in the location of the belts on these two walk-behind tractors, we will consider the processes separately.
For Neva MB-1:
- disconnect the shield by unscrewing 2 bolt ties and removing the protective casing from the gear pulley;
- do not completely unscrew the connection of the guide pulley;
- smoothly remove the reverse belt;
- loosen the ties, move the limiter pins and remove the front transmission belt;
- We take new serviceable belts and apply them to the grooves of the required pulleys. After this, we secure them with the bolts that were removed in the previous stages.
"Neva" MB-2:
- disconnect the shield and casing;
- be sure to remove the spring that provides tension;
- unscrew the screw fasteners and unscrew the stops that hold the belt on the motor pulley. Before moving on to the next step, you need to make sure that the grooves of the motor shaft and gearbox are in the same plane. According to instrumental measurements, the non-flatness between them should not go beyond 0.01 cm;
- if necessary, adjust the pulleys. The easiest way to do this is to move the motor in a longitudinal plane;
- we adjust the tension pulley by adding or removing an element located between the disk and the bracket;
- install a serviceable belt for the Neva MB-2 walk-behind tractor, starting from the gearbox.
Further assembly of the V-belt mechanism is carried out in the reverse order of the disassembly process. An important point that users often miss is the discrepancy in the range between the protective casing and the belt accessory. According to the technical documentation, it should be at the level of 2-3 mm.
Replacing the V-belt
After purchasing a spare part, you can replace it yourself. To do this you will need a set of keys. To preserve the edges of nuts and bolts, it is better to use socket heads. Each modification of the walk-behind tractor has its own characteristics, so the procedure for replacing spare parts varies.
Replacement of worn parts on the MB-1 walk-behind tractor
On the old model of the walk-behind tractor, two belts are installed for forward and reverse movement. To replace them, do the following:
- agricultural machinery is cleaned of dirt;
- unscrew the fastening bolts and remove the protective casing;
- loosen the screws securing the guide plate, move it upward;
- By pressing the tension roller down with your hand, the worn parts are removed. If it is necessary to replace the reverse belt on the MB-1 walk-behind tractor, first remove the forward one;
- new parts are installed to replace worn ones;
- the guide plate is put in place, the screws are tightened;
- install protective covers in place;
- check how the belt moves along the pulleys, finally tighten the bolts and nuts securing the protective casing.
On a note! It is strictly forbidden to use excessive force to tighten the screws securing the guide plate, as this may lead to breakage of the threads and destruction of the motor housing of the device.
Replacing the belt on the Neva MB-2 walk-behind tractor
On new walk-behind tractors, torque is transmitted using a single belt. To replace it, do the following:
- clean the mechanism from dirt and soil;
- unscrew the mounting bolts, remove the protective covers;
- loosen the tension roller;
- remove the bracket;
- remove the worn part;
- install a new belt. First, it is put on the motor shaft, then on the gear pulley;
- install the bracket in place;
- by moving the bracket up and down, adjust the belt tension;
- install protective covers in place;
- by rotating the pulley, check the ease of movement of the belt and the absence of distortions;
- Finally tighten the mounting bolts of the bracket and casings.
Causes of wear
Belts fray and break for many reasons. The main provoking factors are as follows:
- rearrangement or misalignment of pulleys after replacing the motor (the belt bends and rubs against the edges);
- cuts, abrasions, scratches and other mechanical damage that occurs during operation;
- defective parts, which are indicated by a ring rupture when the mechanism is correctly configured;
- installing the damper too close to the pulley.
It will not be enough for a farmer who uses agricultural machinery to be able to replace worn-out parts of a mini-tractor. He should understand the reasons for the breakdown so that he can prevent them in the future. Having eliminated the root cause of the rupture, the owner of a motor cultivator will not spend money on buying new components so often.