How to raise virgin soil on a site. HOW I BOUGHT AN ABANDONED LOT
You remember there was a fascinating story in which a summer resident told how she won a plot of turf.
Yes, this is indeed a very interesting topic, and I also decided to share my memories of how I raised virgin soil. As a child and youth, I constantly had to help my parents work in the garden. And it was rather big - 25 acres! In general, I had the opportunity and time to fully learn peasant labor and find out how much it cost. Therefore, when I bought a dacha, the cultivation of these six acres seemed to me like a game in the sandbox, compared to the past battles for the harvest in the “endless” open spaces. Moreover, I inherited many of the plantings on the site from the previous owners.
In general, I turned around there to the fullest and things went well for me. But when I had a granddaughter, who needed to be fed with natural products, the garden seemed a bit crowded to me. And I began to look closely at the neighboring plot, which had not been cultivated for many years. What attracted me most about it was that it was 12 acres: one half was a neglected garden, the other was “walking” land. After consulting with my daughter, I decided to purchase this plot. No sooner said than done.
During my first walk around the new property, I realized that it wouldn’t be easy: there were heaps of dry branches, some kind of doors, cuttings of boards everywhere, and all this was covered with wheatgrass and wormwood, as well as thistles as tall as me. When I decided to go deeper into this jungle, I discovered that part of the former vegetable garden was also occupied by wild raspberries. For the sake of the purity of the experiment, I tried to stick a shovel into the ground, and it bounced off like a ball, burying itself in a continuous tangle of roots. Well, I thought, stop playing in the sandbox, now things will start to get serious.
Buy or rent?
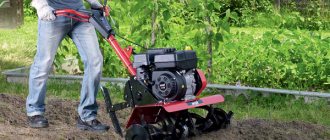
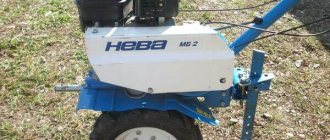
If you only need a walk-behind tractor to cultivate virgin land, it would be more profitable not to purchase it, but to rent it. Dig up the soil for the beds and hand over the unit to the landlord. For normal use in a summer cottage or small village plot, a motor cultivator, which costs much less, will be enough for you. After all, the virgin soil on the site is not cultivated every year, and a powerful, expensive machine must be used as efficiently as possible.
If you decide to buy a walk-behind tractor, try to choose a model that performs several functions and is suitable not only for tillage. Almost all modern walk-behind tractors can remove snow, be used as a lawn mower, a water pump, and for other garden purposes.
Modern manufacturers create a lot of good gardening equipment that makes the work of summer residents easier. You need to approach the issue of choice responsibly, assessing your needs and studying the functionality of the units. This approach will save you from wasting money and time.
Source
What to plant on virgin soil. Development of virgin soil without digging: planning and marking
The next stage of development involves not so much physical as mental labor.
It is necessary to think about, plan, draw, draw, and subsequently mark out future beds and row spacing in place. You can go the classic route and mark out meter-wide beds with 60-70 centimeters of free space between them.
Many natural farmers are now leaning towards narrow beds with wide aisles. As they say, what is easier - to plant 50 plants and collect 50 kilograms of crops or to plant 10 plants and collect the same 50 kilograms from them? Narrow beds are aimed precisely at getting a larger harvest from a smaller area. In addition, wide aisles will be easier to mow in the future, and more grass will grow in them (it is the grass mowed in the aisles that will become the main mulch for our future beds).
Or you can even be original: make the beds round, triangular, asymmetrical - in this matter, everything is your will.
What else is important to pay attention to when planning beds? On the climate! If hot, dry summers are the norm for your region, don't get carried away with raised beds in boxes; organic trenches and sunken beds are better suited for you. In cool and rainy climates, the opposite is true. If there is complete uncertainty with weather conditions, if there are often sudden changes in temperature, flat beds directly on the ground are preferable.
Adviсe
Digging is not an easy agrotechnical procedure; it is a real art, the level of mastery of which determines the yield in the next season.
If you listen to the recommendations of experienced gardeners, you can perform actions differently that will become less tiring. To simplify the procedure, just follow these simple tips:
- It is better to dig up the soil when it is sufficiently moist. If the soil is dry, processing will be accompanied by difficulties and you will have to make every effort.
- The shovel must be inserted into the ground in a vertical position, capturing a small layer of earth.
Beginning summer residents, setting tasks for themselves, strive to solve them in a short time. It is not recommended to apply this rule to the digging procedure. It’s better to do everything gradually, then fatigue will not be noticeable, and the quality of work will be higher.
If you spend a long time in the garden, accompanied by digging up the plot, minor health problems may arise. You often have to suffer from conjunctivitis.
This problem can be dealt with using folk remedies. You can eliminate inflammation of the eyelids by wiping with your own prepared infusion. It is made from cucumber peels. You don’t have to wipe your eyelids, but make lotions. But before using any means, you should consult a medical specialist.
It is up to the owner of the dacha to decide whether it is necessary to dig up the soil in the garden in the fall, and then again in the spring. This procedure is complex both physically and technologically. Therefore, it is recommended to listen to experienced farmers to do all the work correctly.
How to make a bed on turf. Garden bed on turf without digging
Probably every summer resident has encountered the problem of developing “virgin” lands. But digging up and choosing weeds in all the beds at once is simply an impossible task. Nikolai Kurdyumov tells how to make a new bed without digging.
So: 1) Choose a place, mark the position with pegs. You can make a narrow bed 50 cm wide, stretched from North to South.
2) Make a box according to size from available materials.
3) Inside the box, you can put manure or compost (whatever you have) directly on the grass. If there is a pile of overgrown humus left, take the humus and coarse, unrotted remains.
4) Next, put the packaging cardboard (you can put newspapers in 3 layers, magazines in 2 layers). This is necessary to cut off weeds.
5) Again, pour humus (or compost) on top of the cardboard in a layer of about 10-15 cm. And on top the author recommends straw as mulch.
6) Next, it’s good to pour the whole “this thing” with a solution of “Baikal - EM” at a concentration of 1:1000. That is, 1 tbsp. per bucket of water plus 1 tbsp. old jam without berries. (let stand for several hours for microorganisms to adapt).
7) So leave the bed for about two weeks before planting the seedlings.
Then plant tomato seedlings there in two rows in a checkerboard pattern. Make a hole up to the cardboard, poke a hole in the cardboard with a scoop (the cardboard has already softened from moisture by this time) and dig a small hole in the turf so as to plant a seedling. Of course, pour plenty of water into the hole and plant the young plants.
9) In summer, place weeded weeds and mowed grass on top of the ground. So in the first summer you can make two such beds and grow a good crop of tomatoes.
The author also advises making beds using the second method.
Again, we choose a place, fence it off, dig holes right in the turf, select grass, add humus or compost there, plant seedlings (tomatoes, cucumbers, flowers, pumpkins, etc.), water them.
Our plants grow, and the grass around them grows even faster. When the grass has grown, but has not yet killed the seedlings, we trample it, water it, cover it with paper (several layers of newspaper) and cover it with a thick layer of cut grass or humus (whatever is available). Then all summer, when it is possible, we add grass, food waste can be added (since the grass settles).
You need to water once a week, but generously.
There is little weeding required. Weeds are only emerging here and there from under the thick layer of mulch. Thus, within a year, the “virgin land” is freed from weeds, even wheatgrass disappears. There is nothing left of paper and cardboard by autumn. All summer, once every two weeks we water the beds with the Baikal-EM solution (this is written above). Earthworms will breed in huge numbers in the beds. And of course, they will work all summer, loosening and improving the soil.
Next year in the spring we will loosen the soil with a pitchfork. This is no longer virgin land! And it pleases!
But still, at the depth of a spade, the soil will not yet be loose enough and we will plant tomatoes again, adding EM compost in the fall and spring.
But in the third year (in the spring, again adding EM-compost), we loosen it with a pitchfork and sow carrots.
How to prepare the soil for planting vegetables
After the first processing of virgin soil, you cannot immediately begin cultivation. It is necessary to further prepare the land. If the soil was processed using machinery, then weeds are not selected from it, as with manual digging, but are plowed up along with the soil.
After plowing with a walk-behind tractor or
To improve the structure of the soil and saturate it with useful microelements, green manure plants (mustard, lupine, oats, rye, alfalfa) are planted. When the greenery grows, it is mowed and additional digging is carried out using machinery or manually.
Winter crops are planted in winter. In early spring, after the snow melts, the third plowing is carried out and the plot is planted with garden crops for the first time.
After manual digging
When cultivating the land manually, you can use the previous method, but more often they do it differently. The land freed from turf is treated with herbicides to kill weeds. Then sprinkle with peat, humus or sawdust and dig, mixing everything.
A week later, the soil is fertilized with complex mineral fertilizers: potassium sulfate, ammonium nitrate, nitrophoska, superphosphate and dug up a second time. The land becomes suitable for use as a vegetable garden.
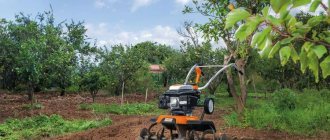
How to develop virgin soil with a tractor. How to develop plowed virgin soil with minimal losses?
Hello my dear friends! I haven’t written for a long time, I’m quite busy raising virgin soil, so to speak.. Almost everything is planted, growing and blooming. I’ll post photos of blooming and growing ones later. Now a big request to those who developed virgin soil after plowing and harrowing with a tractor. How to with minimal losses in strength and time to choose the grass that the tractor plowed? Today the tractor plowed and harrowed several times, but there’s still a lot of grass to choose. It’s become even, great. Help with advice and share your experience with anyone who can. I thank everyone in advance and say a big thank you! In the photos after plowing, they harrowed later
| and get the opportunity to rate materials, communicate in comments and much more!')">and get the opportunity to rate materials, communicate in comments and much more!')"> |
Copy the code and paste it into the window for creating a post on LiveInternet, having first enabled the “Source” mode there.
Application of mustard
Greenhouse mustard in a greenhouse
This plant can be planted several times per season. It is best to plant green fertilizer several weeks before the onset of frost. Under their influence, the green mass will fall to the ground, which will ensure the most effective protection from frost, as well as high-quality rotting of the biomass.
Mustard is characterized by rapid germination and rapid growth of green mass, which is why it is widely used for the development of virgin lands. Mowing the ground part of the plant is done before the first flowers appear on it. In order for mustard to kill perennial plants, it is planted randomly. For one square meter of land, you need to use from 4 to 7 grams of seeds of this crop. With an increase in the number of seeds, rotting of the mustard near the root may occur during its growth, which will negatively affect soil fertility.
How to develop virgin land. Virgin soil for a vegetable garden - how to develop it and how to dig up the soil
Digging the earth, as well as cultivating the soil in the fall, are one of the most important elements of crop cultivation technology. In arid areas, this contributes to the accumulation and preservation of moisture in the soil; in excessively moist areas, it helps to eliminate it.
In addition, this technique improves the air and nutrient regimes of the soil, creates favorable conditions for the life of soil microorganisms, ensures the incorporation of fertilizers, and plays an important role in the fight against weeds, diseases and pests of agricultural crops.
Very often, novice summer residents are given land for a vegetable garden with a predominance of low-value rhizome and root weeds (wheatgrass, sow thistle, dandelion, thistle) in the grass stand. It is important to properly treat such areas and dig up the turf.
Disking
There is a classic scheme for cutting a layer of perennial grasses and it is advisable to strictly adhere to it. The field is disked in two directions (first along, then across).
This agricultural technique shreds the turf and partially turns it over. Very often, on heavy, waterlogged soils, disking completely replaces autumn plowing, especially for vegetable crops.
Disking is carried out using disc harrows, hullers and plows (without turning the formation). The discs are good at cutting horizontally located rhizomes and root suckers into small pieces and provoking them to germinate. It is best to repeat disking before frost sets in.
The second treatment is carried out, as a rule, 2-3 weeks after the first, or more precisely, after the fallen weed seeds germinate.
If the turf is well cut in the fall, then when plowing under the garden in the spring it will ensure good wrapping of the layer.
How to develop virgin soil for a garden in the spring
Perennial grasses are a good predecessor for many crops. It is best to place cabbage or potatoes in such an area.
To avoid large labor costs in developing such a site, your actions must be rational.
It is advisable to divide the area in half, then mark the middle and dig the first furrow exactly in the center. Before this, remove a layer of turf 5 cm thick and lay it with the grass up at the edge of the second half of the plot.
Then, digging deep into the bayonet of the shovel, they remove the layer and fold it next to the previously removed turf. The soil at the bottom of the furrow is loosened with a pitchfork to a depth of 20-25 cm. If necessary, fertilizers are applied at the same time.
Next, remove the turf at the site of the second furrow and lay it on the bottom of the first; the furrow itself is covered with soil from the second furrow.
This is repeated until the area is dug up. The turf removed from the first furrow is transferred to the last.
This method of processing a layer of perennial grasses significantly improves the water and physical properties of the soil. And most importantly, it destroys the compacted layer of soil, called the sole.
Such a sole is usually formed as a result of tilling the soil to the same depth (at the bayonet of a shovel). As a rule, such a soil base negatively affects the growth of many agricultural crops, especially root crops.
How to dig up soil
A simple digging of an area is not much different from the above, the only difference is in removing the turf. For the winter, it is recommended to dig up the garden without breaking up the clods.
This will help retain snow and accumulate moisture in the soil. In addition, during late autumn digging, pests that have gone into the soil for the winter end up close to the surface and most often die.
Minimum tillage
In agriculture, minimum tillage is widely used, the essence of which is to reduce the number and depth of tillage in well-cultivated areas.
For example, in areas of sufficient moisture, fall plowing (digging) for row crops is replaced by shallow or surface tillage.
This leads to a reduction in labor and energy costs, and a reduction in excessive soil compaction.
Experts say that minimal tillage slows down the process of humus decomposition and thereby helps maintain soil fertility.
The practice of growing vegetables without pre-cultivation of the soil has also developed. Her followers sow seeds or plant seedlings on a layer of compost scattered over the surface of the plot.
This practice is based on the theory of natural restoration of soil fertility. According to proponents of minimal tillage, digging leads not only to the destruction of growing weeds, but also to the germination of numerous seeds in the soil.
Of course, the method of minimal tillage has its advantages: the level of soil fertility that develops under such a farming system contributes to the successful cultivation of vegetables.
However, it has been experimentally established that in dug up areas the yield and quality of vegetable crops doubles.
What to do if you need to process a large area manually
When processing a large area of virgin soil by hand, a popular method is dividing the area into small segments, which are covered with a double layer of dense material at least 5 cm thick. You can use cardboard, straw, black film or spandbond, and press down with bricks.
Mulching virgin soil under the beds with cardboard
The ground overgrown with grass is left covered until autumn, when the greenery under such dense mulch has time to rot and rot. Thanks to humus, many earthworms will appear, which will loosen the soil, and the soil will be easier to work with. The disadvantage of this method is that the beds are ready for planting only at the beginning of the next season.
It is possible to prepare the land using inverted turf. Areas overgrown with grass are dug up manually with a shovel. Potatoes are planted in the resulting holes, which are covered with dug up turf, turning it over with the grass part down.
Digging virgin soil with turning over turf
The grass in the ground rots, thereby fertilizing the potatoes and promoting their growth. This method allows you to harvest the crop the first time you plant it. But the timing of planting potatoes must be observed.
If space for beds is needed for urgent planting, and it is not possible to wait until next year, you can use the option of bulk beds. The prepared fertile soil is poured directly onto virgin soil, and the rows are dug up and treated with targeted herbicides. Plants with a shallow root system (zucchini, cucumbers) can be planted in them.
Source
Planting oats
Oats are a crop that is unpretentious to growing conditions. The planting site for this plant can be podzolic soil, peat bogs or clay soils. It is used to restore virgin lands before planting potatoes. With the help of this plant, the highest quality loosening of the soil to a great depth is produced. Oats also help enrich the soil with oxygen. When using oats, the soil is saturated with useful substances such as potassium and nitrogen. During the use of this green manure, phosphorus compounds are absorbed.
Before planting the crop, it is recommended to preliminary loosen the soil. Planting of green fertilizer is carried out in early spring. For one hundred square meters of land, it is necessary to use at least one and a half kilograms of crop. It is recommended to plant seed material to a depth of no more than five centimeters. In order to develop land in the shortest possible time using this green manure, it can be planted simultaneously with the main crop.
Sources
- https://BioZemledelie.ru/ogorodniku/kak-razrabotat-celinu.html
- https://teatrzoo.ru/ogorod-na-tseline.html
- https://PchelkinaStrana.ru/ovoshchi-i-bahchevye/obrabotka-celiny.html
- https://malinovii-rai.ru/ovoshchi-i-korneplody/obrabotka-celiny.html
- https://DSad12.ru/cvety-i-rasteniya/kak-razrabotat-celinu.html
- https://sadovnic.su/cvety/razrabotka-celiny.html
- https://sadr-russia.ru/ovoshchi/kak-obrabotat-celinu-pod-ogorod.html
- https://golosros.ru/sornyaki/kak-razrabotat-zarosshiy-uchastok-pod-ogorod-ili-gazon-prostye-i-dostupnye-sposoby
- https://25school.ru/ovoshchi/kak-razrabotat-celinu-pod-ogorod.html
- https://cooptech.ru/selhoztehnika/kak-vspahat-celinu-na-uchastke.html
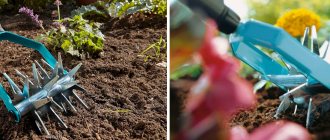
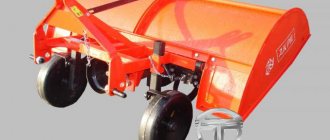
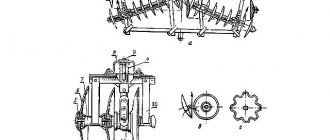
Walk-behind tractor and cultivator: differences
Some people think that a walk-behind tractor and a cultivator are no different. In fact, this is a completely different technique, which has many distinctive features.
Cultivators are highly specialized units that are designed to loosen soil. They are equipped with special cutters that are used when plowing the land.
Walk-behind tractors are considered more universal equipment. Their functionality largely depends on the additional equipment installed on them. Like cultivators, they can be used for plowing virgin soil.
A cultivator is a technique that can be used to plow up vegetable gardens
Uses of lupine
Lupine belongs to the category of annual plants that are characterized by a fairly developed root system. That is why it can be used to develop virgin lands. This is a leguminous plant, therefore, after developing virgin soil, planting peas, beans and beans is not recommended. After this plant, you can plant cabbage, potatoes, and tomatoes.
Since the plant has a powerful root system, it helps to actively loosen the soil. Lupine also has a positive effect on the process of saturating the soil with nitrogenous fertilizers. Planting green manure in most cases is carried out using the row method. Per square meter of land you need to use 4 to 5 grams of lupine seeds. Agrotechnicians recommend planting the plant in early spring. After 5 weeks, the above-ground part is embedded in the soil.
You can mow green fertilizer at any time. To eliminate the possibility of weeds developing on the site, it is necessary to prevent seeds from forming on it. Otherwise, the stem of the green fertilizer will become rigid, which will slow down the process of rotting. Thanks to the tap root system of the plant, which has an impressive length, nutrients are extracted from the depths of the site. From the above-ground part of the crop, vermicompost is produced, which can replace the effect of manure.
Rules for growing green manure
Rules for the use of green manure
To ensure high-quality use of green manure crops, it is necessary to plant and harvest them correctly. In order to eliminate perennial plants from a virgin plot, green manure should be planted in scattered form. It is strictly forbidden to mow winter green manure before frost. They must be left until next spring. These plants will not only protect the soil from freezing, but will also be able to destroy the roots of former plants.
How to improve productivity?
We are constantly receiving letters in which amateur gardeners are worried that due to the cold summer this year there will be a poor harvest of potatoes, tomatoes, cucumbers, and other vegetables. Last year we published TIPS on this matter. But unfortunately, many did not listen, but some still applied. Here is a report from our reader, we would like to recommend plant growth biostimulants that will help increase the yield by up to 50-70%.Read…
To fully restore the soil, mowing green manure should be done using a scythe or flat cutter. This will limit the possibility of damage to the root system, which will have a beneficial effect on the quality of the soil. After mowing green manure, it is strictly forbidden to plow the soil. This is explained by the fact that this procedure negatively affects the quality of feeding. Green manures are annual plants. When planting them, it is imperative to take into account the timing, which will have a beneficial effect on the quality of soil enrichment with minerals.
Green squares
Life now is such that you have to plant a lot, otherwise you won’t survive. Only having time to conquer new heights! Next to my site there is land abandoned many years ago, overgrown with wheatgrass and other weeds.
Sod - you can't get a shovel in! There are two more complicating points.
First, when developing virgin lands, I decided not to use herbicides. Secondly, everywhere in our plots we have different thicknesses of the arable horizon, where there is more, where there is less, and under it there is chalk in the form of large (and not so large) pebbles. So we had to approach the matter creatively, as people say: just in case - your own custom.
I finally found a way.
It is very effective and moderately labor intensive. But wheatgrass does not have the slightest loophole. However, I want to warn you in advance: do not take on a large piece of land at once - first assess your strengths and capabilities, try it, see how it goes.
So, I mark a strip according to the size of the future bed, 1.5 m wide and 10 m long (see figure). Using the bayonet of a shovel, I cut out a square of turf (B1) and take it to the end of the proposed ridge. I cut out another similar square nearby and take it there. Then I go deeper as far as the arable horizon allows (A1 and A2). I remove the earth at the very end.
I perform this operation across the entire width of the bed, and I end up with a small ditch. Now I cut out a square of turf (A3) and lay it on the bottom of the ditch (in place of A1). Then I go deeper on the bayonet of the shovel (VZ), but I place the excavated soil on top of the previously laid turf - and so on across the entire width of the bed.
And it turns out that I am burying the sod. Having reached the end of the bed, in the same way I lay down the soil that I brought there at the beginning of work - sod on the bottom (with the layer turned over), and the pound on top. And at the end of the event, I carefully level the resulting bed with a rake. This is the big picture. And now the nuances.
Useful waste paper
This very original method will be effective if you carefully follow the instructions.
To make it a reality, you will need rotted manure (you can use chicken manure, compost or humus). This composition must be evenly distributed over the entire area of the developed area and covered on top with black and white newspaper 5-7 layers thick. If you find this difficult, you can replace the newspaper with thick cardboard. Compost mixed with manure is poured onto the paper layer on top.
The advantage of this method is that you can make holes in newspapers in which you can plant any crops grown through seedlings. This is perfect for those who don’t want to wait a long time, being content with only potatoes and cabbage. At the end of the season, in addition to an excellent harvest of the crops you grow, you will also receive a clean area with soil enriched with vitamins and microelements.
Pros and cons of mechanical soil treatment
Mechanical plowing has a number of advantages and disadvantages. Main advantages:
- high-quality soil loosening;
- uniform tillage;
- saturation of plowed land with oxygen;
- slowing down the growth of weeds.
Among the disadvantages, one can highlight the fact that for mechanical soil cultivation you will have to buy special equipment - a cultivator or walk-behind tractor.
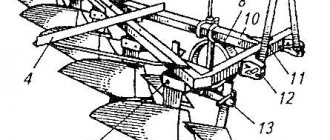
Weights - often installed on wheels so that the walk-behind tractor receives maximum traction with the ground
Radical changes
This method is considered quite simple in concept and labor-intensive in execution.
In the process of clearing a site from thickets, it is necessary to remove the top layer of earth, called turf, in which numerous roots are intertwined. The cut layers are placed in a designated area with the roots facing up and covered with material that does not transmit light. Periodically, this pile should be treated with urea so that after a few years it turns into excellent compost.
As for the soil itself, a new layer of soil is poured on top of the cleared soil, which is ordered on several machines. The main thing is to know the origin of the soil and its quality. Otherwise, you risk wasting money and getting a new layer of soil rich in weeds and pathogens and even pests.