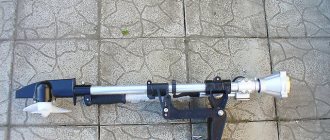
This winter, one of my good friends got into trouble. He wanted to unwind, and he invited me for winter fishing. He gave me his old hand drill, asking me to make a motor drill out of it to make it easier to drill ice when fishing. I didn’t refuse, because I recently purchased a summer cottage, and I think it will definitely come in handy there. A few days before fishing, I made a motor drill with my own hands from my trimmer, this hand drill and a purchased factory gearbox. Having returned from fishing, I want to tell you a little about how I collected it.
Source vyborok.com
A little about the motor drill itself
A motor drill is a mechanical device for carrying out excavation work (drilling) on land plots. It consists of three parts - a motor, a gearbox and a screw.
The trimmer is the engine of the motor drill itself; it can be the engine of a drill, chainsaw or brush cutter. It is best to use a trimmer from under a brushcutter, as it has more power and will allow you to drill into harder soil.
The auger is the working part of a motor drill, it resembles a kind of screw and is a structure consisting of a core (metal pipe), a tip and a screw blade. You can buy an auger, but if you don’t want to spend money, then we’ll look at how to make a homemade auger with your own hands.
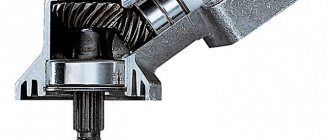
The gearbox is the transitional part between the trimmer and the auger; it is what connects them. The gearbox reduces the initial speed of rotation of the trimmer so as not to break the auger, and transfers it to the auger itself.
Source insales.ru
Let's start assembling the motor drill itself from the trimmer.
How to make an ice screw from a chainsaw with your own hands?
To make a homemade chainsaw ice drill balanced and easy to use, you must follow a certain procedure when making it.
The assembly algorithm for the device is as follows:
- First you need to make a basic workpiece. For its manufacture, a single sheet of plywood or 2 metal sheets glued together are best suited. On the finished product you will need to make markings that will tell you in which places you need to make holes for fastenings. In addition to these holes, 2 additional holes must be drilled in the workpiece. The first of them needs to be done opposite the standard sprocket of a homemade drill, and the second - directly next to the first. The second hole will serve as a place for screwing in the fixing nuts;
- Next, you will need to make a recess in the upper part of the plywood blank. A grinding machine is suitable for this. It is necessary to attach the gearbox used to the reverse location of the finished recess - this will allow you to determine a suitable place for its installation. When choosing a location, you need to take into account the features of the chainsaw that is used to assemble the homemade product. If it is equipped with a 6-ray sprocket, then a gearbox measuring 27 mm is suitable for making a drill;
- After this, the gearbox will need to be pre-centered and installed in the drill device. The element must be securely attached to the bottom of the plywood piece. The chainsaw you are using must be attached to its upper part. Next, you will need to start the internal combustion engine of the garden tool and check the stability of the device under the influence of vibration;
- Then you need to attach an auger to the homemade product. A pipe that has thick walls is suitable for this purpose. The pipe must be attached to the gearbox using two reliable bolts. Fixation of the auger and the gearbox used is carried out using an adapter, which simultaneously functions as a shock absorber. To make an adapter, a 15-centimeter pipe is suitable, onto which rings must first be welded. The finished adapter will need to be cleaned of any burrs on a lathe;
- For more comfortable operation of a homemade motor drill, you will need to attach handles to the device. They can be made from a pre-bent metal pipe, both edges of which must be equipped with rubber seals. The finished handle is attached to the homemade product using self-tapping screws or any other fasteners;
- Next, the resulting excess parts of the previously used plywood will need to be cut off. The remaining edges must be processed using an electric jigsaw;
- A ready-made hole drill from a chainsaw must be equipped with knives for making holes. Steel sheets are suitable for this purpose. Each of them will need to be cut and securely welded to a metal pipe previously used as a screw. As a result, the welded pieces of metal sheets together with the screw should resemble a spiral. To use it more effectively, the edges of the metal pieces will need to be carefully sharpened.
The finished drill is well suited for fishing, as well as for drilling holes in the soil. The device will show high efficiency and, subject to timely maintenance, will serve properly for 4–5 years.
Making a homemade auger
To do this, you will need a thick-walled metal pipe, 65G steel and a carbide tip.
First, stake a thick-walled pipe that will serve as a core.
Next, make a blade from 65G steel, because it has high strength and is easy to process with a pipe bender.
Finally, grooves must be applied to the tip profile so that the drill can plunge into any soil or ice without problems. On the reverse side of the tip, install a tail for communication between the gearbox drive and the coupling.
Source ytimg.com
Features of the spoon-type drill device
In soils that are resistant to crumbling (loam, wet sand, etc.), it is more convenient to use spoon drills. A homemade spoon drill for wells is made in the form of a cylinder, in the side surface of which a longitudinal slot is made. Sometimes the shape of this slot takes on a spiral shape. The length of the spoon drill is usually no more than 700 mm. The extracted rock is held in the cylinder cavity due to its compression and adhesion. The looser the soil, the narrower the slot in the tool should be. To obtain a cylinder, you can take sheet steel and roll it to a given diameter. The easiest way is to select a suitable piece of pipe, which initially has a cylindrical shape.
A homemade hand-made spoon drill is made from a piece of pipe of a suitable cross-section, in the side surface of which a longitudinal or spiral slot is made for excavating soil from the side walls of the well
The spoon drill excavates soil not only with its horizontally located lower edges, but also with its vertical edge. In this case, soil accumulates in the cylinder cavity. In some cases, a regular metal drill is welded to the bottom of the structure, which must be positioned strictly along the axis of the rod.
The main feature of the spoon drill lies in the fact that the axes of the drill and the rod coincide, while the axis line of the body of a hand drill, together with the cutting longitudinal edge, is shifted by a millimeter and a half relative to the central center line. Thanks to this relative arrangement of the axes, the tool manages to drill a hole with a larger diameter than the drill itself. This is possible by removing soil from the side walls of the shaft using a longitudinal cutting edge. To clean the tool from the removed soil, the drill is periodically raised upward.
It is important to note that the spoon drill quietly passes inside the casing pipes, which are installed to prevent the collapse of the well shaft
About the gearbox
There are four types of gearboxes:
- With shaft rotating clockwise
- With factory shaft, counterclockwise rotating
- Reversible
- Planar
All of them are good, especially in specific situations. But when assembling a homemade motor drill for household work, it is better to take a factory reversible gearbox.
If the drill gets stuck rotating in one direction, then by changing the direction of rotation on this gearbox, it can be easily removed.
Safety
For operational safety, all models of gas drills have an automatic clutch. The auger remains stationary during engine startup and begins to rotate only as engine speed increases. Most models also have a function to automatically block the engine in case of incorrect operation of the tool or loss of control over it.
When working with any motor drill, you should strictly follow the safety rules specified in the operating manual. It is recommended to work in protective gloves, glasses and headphones. And of course, don’t wear long clothes for obvious reasons.
It is also important to use the drilling tool exclusively for its intended purpose - to work only with the material for which it is intended.
Gearbox assembly
Install a rigid, stable coupling or a flexible one if your drill will operate at high vibrations, so the flexible coupling will dampen vibrations and shocks.
Next, connect the worm shaft and the 2-bit type gear.
When assembling the gearbox, leave a small hole between the parts for trouble-free oil filling.
Source zapadpribor.com
Drilling tool
As a drilling tool in hand motorized drills, auger drills with a spiral (flange) are used, along which the excavated soil, destroyed by the cutting knives of the drilling auger, rises to the surface. Very rarely, core drilling tools are used when drilling with hand-held motor drills. Sometimes, during geological soil sampling, sampling tools are installed on hand-held motorized drills. Depending on the type of soil and season of use, different types of cutting knives are installed on drilling augers to facilitate drilling under different drilling conditions. The auger drilling method using a motor drill is intended for the development of soft soils of categories 1, 2, 3 and partially soils of category 4 (depending on the development conditions and the motor drill used).
Assembling a motor drill
If all the components are ready for assembly, let's get started.
Disassemble the trimmer, removing the rod with the cutting mechanism, and leave the motor itself. Connect the gearbox to the motor by connecting the motor shaft to the gearbox shaft.
Attach the working part of the motor drill (auger) to the gearbox, securing everything with bolts.
Before you go and work with such a drill in the desired area, you need to fill its tank and test it on soft, loose soil
If the drill passed the tests successfully, then congratulations, your homemade motor drill from a trimmer with your own hands is ready.
I recommend the following video, where the author clearly explains how to assemble a motor drill similar to the one you made with your own hands:
Chainsaw attachment for drilling ice - operating instructions
If the owner of a garden tool does not have the time to independently assemble a drill from a chainsaw for earth and ice, then you can take the easier route and buy a ready-made attachment. It has all the necessary fastenings for its smooth installation on a chainsaw. In addition, the nozzle is made of pre-hardened metals, which allows it to make holes in a thick layer of ice or in dry, hard ground.
Installing and using a ready-made drill is quite simple. To do this, you must first remove the saw set of the chainsaw and screw a standard auger with blades into the resulting hole. Then the lower part of the drill needs to be installed above the place where it is necessary to make a hole, and the engine of the household chainsaw should be started.
In order for the attachment for a household chainsaw to serve properly and for as long as possible, it must be properly cared for. To do this, after each use the auger must be wiped, removing any remaining ice and soil from its surface and blades. If during work rust was found on the surface of the metal parts of the drill, it will need to be repainted.
The drill should be stored in a clean, dry room. There should be no drafts, high humidity and sudden temperature changes. Otherwise, pockets of corrosion will form on the drill.
Shaft
Sometimes a flexible shaft can be used to transmit torque. But we must not forget that in order for such a shaft to be strong, capable of withstanding heavy loads, it needs to be in a protective shell.
And, of course, for the drill you can use not only the engine of a chainsaw, but also the engine of a lawn mower or trimmer. You just need to correctly calculate and select the gearbox. It is not necessary to use an overly powerful engine or a large-volume engine for a drill, as this will make the motor drill too heavy.
What you need for work
It’s good if you can drill calmly and stop if you get tired. However, there are times when this is quite difficult to do. For example, the ground may be very frozen or when drilling an ice hole for ice fishing it may be very cold. In this case, there is a desire to do everything as quickly as possible, while spending as little effort as possible.
Is there a simple solution for this kind of drilling? Certainly. This is a connection between a drill and a chainsaw. The motor power of a modern chainsaw is very high; such a motor remains operational in almost all climatic conditions.
To combine you need:
- Boer;
- Chainsaw motor, can be taken from a circular saw;
- Gearbox – for transmitting torque;
- Pipe - for making the body;
- Welding apparatus;
- Grinding machine (grinder);
- Drill or screwdriver.