The first step in operating an engine is starting it. However, it is important to know how to actually perform this task correctly without harming the equipment. Especially when it comes to complex devices, in particular walk-behind tractors. Correct start-up of this equipment greatly helps to avoid malfunctions and makes it possible to operate the unit for its intended purpose. How to start a walk-behind tractor? There are a number of standards and recommendations that must be followed when turning on the engine in different everyday situations.
Preparing the walk-behind tractor for the first start
In order to put the equipment into operation, several rules must be followed:
- Check the amount of oil. Even if you were assured upon purchase that everything was filled, you must make sure that the level of technical fluid in the system is sufficient. Some models of walk-behind tractors are equipped with sensors that react to a lack of oil and simply prevent the engine from starting. But this option is not typical for everyone; there is equipment that can be started, but this can cause breakdowns.
- Refill with fuel. It is necessary to take into account the recommendations for a particular model. Some gasoline will need to be diluted. The proportions are indicated in the instructions for the equipment. If the walk-behind tractor is diesel, then you need to take into account its type according to the time of year. Flooding summer diesel fuel in winter can cause clogging of the fuel hoses, which will make the machine impossible to operate and necessitate repairs.
- Check and configure connections. Clutch, steering, gas - they need to be adjusted precisely enough to ensure smooth shifts.
Important! New equipment is always supplied with operating instructions from the manufacturer. It usually contains basic recommendations for using and maintaining the machine. Therefore, you should first read the instructions for a specific model and only then proceed to directly starting the walk-behind tractor.
Self-repair of elements and components
Difficulties in starting the engine may arise due to air getting into the fuel supply system. If you cannot start the cultivator after turning the starter several times, you need to bleed the air.
To do this, you will need to open the fuel supply valve and unscrew all connections of the fuel system. At the end, the injectors are unscrewed and purged. But what to do if even after this the equipment refuses to start? You may have made a number of mistakes when preparing fuel for refueling and inspecting the unit.
Most cases are related:
- With the inability of the air filter to pass air;
- With a plug in the hole in the tank lid;
- With a clogged fuel supply channel;
- With a broken carburetor.
After unsuccessful attempts to start the cultivator, you should check the spark plug - it is quite possible that it was filled with fuel mixture.
In this case, you will need to dry the part, bleed the cylinder, screw in the spark plug and try to start the unit. As a rule, after this the cultivator motor starts, but if this does not help, the spark plug will need to be replaced.
In this topic, we will analyze the malfunctions of walk-behind tractors and cultivators of all brands. Neva, Zubr, etc., and their elimination and repair. Most problems are typical for all types of walk-behind tractors, their engines and other components.
Starting it up correctly
Starting rules for petrol and diesel models are different. When starting the first, you need to immediately switch the choke handle. It needs to be set to the “Start” position. Only then can you open the gasoline tap and pull the starter a couple of times. If all operations are performed correctly, the walk-behind tractor should start. If it is equipped with an electric starter, then just turn it on and start the engine.
Diesel types of cars require a different approach. The first step is to bleed the air from the fuel hoses. To perform this task, the tap is opened, after which the connection for supplying diesel fuel to the nozzle is unscrewed. You need to wait for the diesel fuel to start flowing. Then the taps are opened, the gas handle is moved to the middle position. You need to squeeze the lever 3-4 times and swing the decompressor (holding it with your finger). Then it must be returned to its original position. After performing these manipulations, press and pull the starter once. When all of the above steps are completed, the walk-behind tractor should start.
Engine won't start
- If the engine is tilted
, must be placed horizontally.
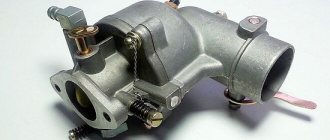
— Fuel may not be supplied to the carburetor
. The fuel system needs to be disassembled and purged with air.
— The filter may be clogged
. The filter needs to be replaced or cleaned.
— The outlet hole in the gas tank cap may be clogged
. Needs cleaning.
- Perhaps it's the candle
. You need to check the connection of the wires, the engine stop buttons, remove the spark plug and clean it. Replace if necessary.
— Possible magneto failure
. Replace.
Rules for starting the engine in the absence of a starter
Engine operation is a complex technical process for which several components in the car are responsible. One of the devices that provides the conditions for starting is the starter. This mechanism puts the engine into direct action and is not inferior in importance to the ignition or clutch system.
Important! Starters are one of the most vulnerable parts in the system. They often break down, including in the middle of the season when there is a lot of work. The engine can be started without it, which saves time on urgent repairs.
The stages of starting the engine in the absence of a starter include:
- Removing the faulty part.
- Fastening a strong rope in the hole on the round iron component, which is located where the starter is installed.
- The cable needs to be wound around this rim several times (about 4-5 turns), leaving the end about 40 cm.
- The piston is moved up, the decompressor is turned off and the rope is sharply pulled towards itself.
Despite the fact that starting the walk-behind tractor is possible without a starter, you should not constantly operate it in this mode. These recommendations are provided for emergency situations when equipment is required in working order. But you shouldn’t waste your time with repairs either - you need to quickly order a new starter. An assortment of parts for the walk-behind tractor is presented on the website, where you can select them for different models of special equipment.
Reasons and their solution
It is worth noting that for the long life of your equipment, you first need to learn how to take care of it. After all, cultivators require constant attention, namely, they need regular diagnostics and timely oil changes. If these key rules are not followed, your unit may often fail and upset you with its malfunctions.
So, why the motor cultivator does not start:
- After finishing work on the site, many owners leave the equipment idle with old fuel inside. Since after just a few days the fuel produces condensation and sediment forms, all this negatively affects the fuel system. The carburetor is even more susceptible to this, which will then need to be cleaned. To avoid such problems, always empty the remaining fuel from the tank, or work with the cultivator until the gas runs out.
- If you left gasoline in the unit over the winter, then first of all you will need to pour it out of the fuel tank. Next, fill in new clean gasoline and leave the unit for a couple of hours. After the time has elapsed, top up the tank with a small amount of fuel. If after the operation the cultivator does not start, then you should look for the problem in the electric ignition. And this is already very difficult, so we advise you to turn to specialists here.
- The engine of any garden equipment will never function without oil. So check the lubrication in your cultivator.
We have provided basic recommendations on how to start a cultivator if it malfunctions. More detailed instructions on how to repair a cultivator yourself can be found in the unit's service manual. If you do not have technical skills and are not well versed in the design of motor cultivators, then you should seek help from professionals. In a short time, specialists will be able to find out and eliminate the reason why the cultivator does not start.
How to start equipment after winter
Motoblocks start up quite poorly after a long period of inactivity. When starting up for the first time in the new season, it is recommended to immediately change the fuel (gasoline or diesel fuel) and oil in the system (“dry” cannot be stored for storage, this can cause drying out and damage to the hoses). Technical fluids must be equal in temperature to the external environment.
The walk-behind tractor may not start right away. This is a normal phenomenon: the parts in the system should warm up well. You should also let the car idle after starting the engine. It is also worth considering that you cannot immediately begin intensive use of the walk-behind tractor; the fuel thickens after winter, which increases the load on the equipment components.
If the engine stubbornly does not start, you should resort to the following actions:
- check the wires for serviceability;
- clean the contacts on the spark plugs;
- blow out the fuel line.
It is important to know! Storage conditions have a great influence on performance. If the walk-behind tractor was stored in a damp and cold room, this can cause serious problems.
Engine power has dropped
It often happens that a previously serviceable walk-behind tractor, which has served for several years, suddenly loses power.
— If the power has dropped after long-term storage
, perhaps the walk-behind tractor was stored with a wet carburetor and fuel system, which led to deposits. In this case, you can start the engine and let it run, often after these actions the power is restored. If you have the skills, you can disassemble and clean it; if you don’t have the skills, it’s better to contact the service.
— The carburetor may be clogged
. Clean
— Fuel hose is clogged
. Need to blow it out.
— Possible loss of performance of the crankcase cuff
. Remove the casing and gearbox cover and inspect the cuff.
— Carbon deposits on the cylinder, muffler
. Clean.
— The air filter is clogged
. Clean.
— No compression
. Change piston rings, cylinder, piston.
Basic recommendations for common models
Motoblocks on the market are presented from different manufacturers. But, as practice shows, there are several models that domestic consumers trust the most and buy them most often:
- "Neva";
- MTZ;
- "Ural";
- "Patriot".
Accordingly, the launch rules are different. If you need to perform the following steps: turn the ignition switch to ON status, close the throttle (fully) and open the fuel valve; set the throttle lever to ¾ of the maximum position, pull the starter cable and move the throttle.
Motoblocks from the Minsk Plant (MTZ) require a slightly different approach. Gasoline models with a manual starter are started according to the following scheme: open the fuel tap, set the choke lever to start, turn off the ignition and pump the starter 3–5 times. Then you need to turn the key in the lock and pull the starter again. After starting, the choke lever is moved to the working position. Diesel models require bleeding (to bleed out remaining air), after which you need to sharply turn the starter until the engine starts.
To start the Ural, you need to resort to the following work: set the gearshift lever to neutral and open the gas tank. Next you will need to completely close the throttle channel regulator and partially close the air damper. Then start the engine using the cord.
Starting the Patriot involves a different procedure: moving the gas lever to the highest position, pulling the cable to purge - first pulling strongly and for a long time, then in short jerks to start the engine, and then adjusting the throttle.
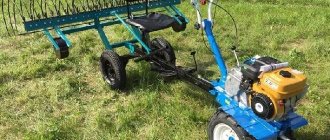
How to start a walk-behind tractor - in detail for beginners and more
Any branded walk-behind tractor consists of many complex mechanisms that are activated when the built-in power unit is started. When the engine is turned on, the components of the agricultural machine are subject to increased load, so the working life of each of the factory systems of the walk-behind tractor directly depends on the correct start of the standard motor. To reduce the load and extend their service life, the user must learn the correct procedure when starting the engine, taking into account different weather and operating conditions.
Kickback on startup: how to avoid
Many owners have noted this phenomenon when trying to start the equipment. Why does it give in your hand when you start the walk-behind tractor and how to avoid it? This phenomenon usually indicates early ignition. This is a common problem with motorcycles.
Early ignition is a consequence of contact wear during operation. To fix it, you need to reconfigure the starting system.
Another reason for kickback may be poor quality gasoline. You need to drain the fuel and replace it with another, remembering to maintain the proportion with the oil. The tank may need to be flushed additionally. When dust and dirt accumulate in it, the gasoline becomes clogged, which leads to uneven operation of the engine. You can understand for sure that it is the fuel that affects the operation of the equipment and provokes recoil when starting the engine by looking at the spark plugs. Having unscrewed it, you need to examine it for burning and soot. If combustion products are in abundance, then this clearly indicates the low quality of gasoline (provided that the spark plugs are changed regularly).
Important! In any case, the walk-behind tractor, like any equipment, requires maintenance. All basic recommendations are indicated by the manufacturer, so you should carefully read the instructions and follow all measures for servicing the machine.
Why does the walk-behind tractor stall?
Many equipment owners are interested in why the walk-behind tractor stalls. The unit can start immediately. But if it works intermittently or starts and stalls, you should know what to do in this case. In principle, you can figure out for yourself what the reason is if the walk-behind tractor stalls when starting up. To do this, check whether the ignition is on, whether there is fuel in the tank, and whether the tap is open. Also check the opening of the air damper, the flow of fuel into the carburetor, study the operation of the ignition system (if the spark plug is dry, then you need to clean the carburetor, and if it is wet, you need to overdo it with the fuel mixture) and the functioning of the starter.
The walk-behind tractor stalls when tilted if the engine oil level is below normal. The walk-behind tractor stalls under load if the spark plug is old and there are some problems. It happens that even under load the engine suddenly stalls (this can happen when the engine gets hot). Heated devices on the motor-cultivator will cause the equipment to begin to lose speed during operation.
You should also know why a diesel walk-behind tractor does not start. The walk-behind tractor will not start if there is a problem such as air getting into its fuel system, which should be released through the air plugs (you need to open the fuel valve and unscrew all the channel connections to the injectors there). Also, a diesel walk-behind tractor can stall when tilted, so you just need to place it level.
If the walk-behind tractor stalls immediately after it starts, the cause may be contamination, a worn-out air filter, or the use of low-quality fuel.
MB-1 cultivator gearbox design
Let's look at the design of the gearbox of the MB-1 walk-behind tractor. This is a device responsible for rotation, movement from the engine to the wheels. The MB-1 walk-behind tractor gearbox is assembled in such a way that on its outer side there are elements responsible for changing gears. The gearbox has five positions. When pressed, the fork disengages the clutch. When reset, it returns to its original position.
When the drive is connected to the right side, the unit will stop. The rotation comes from the sprocket. When the handle catches the left sprocket, the gear is reduced. If maximum gear is desired, the handle is pulled out all the way.
Assembly and adjustment of the gearbox is carried out after repair or malfunction. Before the procedure, each part is inspected for damage and contamination.
Sometimes the engine on the MB-1 walk-behind tractor is replaced. This is done if you want to install an imported engine on a domestic model. For this purpose, a kit is used, which includes a plate (platform, pulley), belt transmission, and a set of fasteners. There is an engine replacement diagram. Thanks to the drawings, it will be possible to easily cope with the replacement.
Old-style motor cultivators are also popular. The first Soviet walk-behind tractor, MB-1, is a very durable and reliable technique that was used for various purposes. They were produced on the basis of Soviet cultivators, which were quite durable.
Equipment from other manufacturers
In addition to the original one, you can install attachments from other manufacturers on the Oka walk-behind tractor.
For proper installation and further safe operation, make sure that all fasteners have the required diameter, suitable for aggregation with the walk-behind tractor.
At Oka you can install a plow produced by such Russian companies as Gagarin, ZAO Vsevolzhsky RMZ, and PC Rusich. One of these is the “Mole” produced by Mobil K, which is sold without a hitch. “Mole” is suitable for installation on walk-behind tractors and cultivators from various manufacturers.
Setting up and adjusting before work
In order for the unit to work as required, it must be configured. Before setting up, the device must be coupled to the walk-behind tractor. After which it needs to be adjusted and only then can you start working.
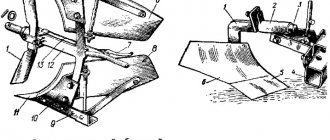
What kind of hitch is needed for a plow?
produces plows already with a hitch, but on sale you can often find just a unit, without fastening. Then the hitch must be purchased separately, in special agricultural stores. The Kadvi is equipped with a screw hitch. Using it, you can adjust the depth of the tines into the ground as smoothly as possible, as well as the angle at which it will penetrate the soil.
Thanks to the screw hitch, the most smooth adjustment of the depth and angle of inclination (angle of attack) is ensured, which, in turn, greatly facilitates the work and reduces the operator’s labor costs.
The hitch can be used in conjunction with a hiller or with two hillers mounted on a traverse (frame), as well as with various excavators, tillers and other attachments.
How to configure and adjust?
Before installation, remove the wheels from the walk-behind tractor and install lugs on the axles. Then install the hitch if the plow does not come with one. For installation you only need a wrench, a plow, a hitch and a walk-behind tractor. The stand is aligned with the mounting holes and connected with bolts and nuts using a wrench.
Tip: to make installation of the plow easier, place the walk-behind tractor on stands, which can be bricks, boards or stones.
Now you can install the plow on the walk-behind tractor and secure it with cotter pins.
Let's move on to the adjustment:
- the unit is placed on a hill, for example, on stands 15 cm high. This way it will be possible to adjust the plowing depth - according to the norm, it is from 15 to 18 cm;
- The angle of inclination is adjusted by a bolt located on the hitch. The higher the heel of the plow, the deeper the depth of plowing of the soil will be, and vice versa;
- the distance from the ground to the plow should be 3-5 cm. Next, it is recommended to carry out test plowing - this will check the depth of the furrow created, the stroke and smooth movement of the walk-behind tractor with an attachment;
- After passing the first furrow, if necessary, the hitch is reconfigured for the most accurate depth of immersion into the soil and capture of the soil layer.
Instructions for using the device
Replacing consumables (oil, fuel) Engine oil changes in the MB-1D1M10 must be performed according to the manufacturer’s instructions: the first after start-up - after 5 hours, then - at intervals of 25 hours.
Recommended oil:
| Volume | Oil type | |
| Crankcase | 1,3 | Automotive motor oil for carburetor engines M-53/10G1 or M-63/12G1, or any oil that meets the requirements of API: SF, SG, SH and SAE: 10W-30, 15W-30 |
| Walk-behind tractor gearbox | 1,8 | Transmission oil TAD-17I, TAP-15V, etc. GOST 23652-79 or other, in accordance with SAE: 80...85W API: GL3...GL4. |
The transmission oil should be changed every 100 operating hours.
The factory instructions for the walk-behind tractor prescribe the use of oil TAD-17I, TAP-15V and others in accordance with GOST 23652-79; it is also allowed to combine oils in any proportion.
Recommended fuel: high-quality gasoline AI92.
Before starting work with the walk-behind tractor, make sure that all components are securely fastened. Do not shift from forward to reverse with the engine running! This may cause damage. To safely shift from forward to reverse, stop the engine, shift the shift lever to the desired position, and then start the engine again.
Daily Maintenance
- Remove dust, dirt, and oil from the external surfaces of the engine.
- Inspect the connection of the cylinder head to the engine cylinder block; if necessary, tighten the cylinder head bolts on a cooled engine in a diametrically opposite manner crosswise through 3 bolts.
- Check the reliability of the engine mounting and, if necessary, tighten loose connections.
- Check the tightness of the gas line hose connections from the fuel tank to the carburetor.
- Clean the protective casing (inlet to the fan) from foreign objects.
Technical inspection after 25 hours of operation: check the tightness of the gas hoses, add oil, and after 50, check the degree of tension of the V-belt drive belts, replace the transmission oil.
The Oka MB-1D1M10 walk-behind tractor is designed to operate at temperatures down to -50C. In winter, the following manipulations will help make starting easier: before work, the walk-behind tractor must be in a warm room for at least 10 hours. You can pour oil heated to 50-60 degrees into the engine. After adding hot oil, allow the engine parts to warm up for 10-15 minutes.
If the engine does not start, you should warm up the carburetor pipe and the carburetor itself by placing a cloth moistened with hot water on them.
Specifications
Parameter Parameter value
| Gearbox type | Chain |
| Overall dimensions, mm., no more | 1500x600x1050 |
| Operating weight, kg., no more | 90 |
| Ground clearance, mm. | 140 |
| Transport gauge, adjustable, mm. | 310, 590 |
| Traction force, kgf., not less | 100 |
| Travel speed | 1st gear - 3.6 km/h 2nd gear - 9 km/h |
Modifications
Available modifications of the Oka MB-1D1M10 Motoblock:
- 1D1M1 (with domestic KADVI DM-1M1 engine);
- 1D1M6 (with Japanese Mitsubishi, 6 hp);
- 1D1M7 (engine made in the USA, Briggs&Stratton, 6 hp);
- 1D1M13 (USA, Robin Subaru EX 17 PREMIUM, 6 hp);
- 1D1M14 (also USA, Robin Subaru EX 21 PREMIUM, 7 hp);
- 1D1M15 (domestic KADVI 168F - 2A, 6.5 hp)
engine KADVI DM-1M1
Mitsubishi engine, 6 hp
Briggs&Stratton engine, 6 hp
engine Robin Subaru EX 17 PREMIUM, 6 hp
Engine Robin Subaru EX 21
Engine KADVI 168F-2A
Functional failures
Quite often, among the malfunctions of a walk-behind tractor engine, its unstable operation appears. If the engine idles jerkily, and when you try to add gas it stops altogether, the reason is rooted in a lack of fuel. The screens of the fuel tank, carburetor and pipeline valve should be cleaned. And when problems occur even at idle, it is advisable to check the centrifugal regulator. Often the traction jams there.
Let's assume that the walk-behind tractor simply slows down without jerking. In many cases, this is due to the use of incorrectly tuned, unsuitable or simply badly worn motors. But replacing the power plant is not always wise. Installing a better quality spark plug may help. It is also worth assuming that malfunctions in the operation of the carburetor float in the high-voltage wire may occur.
If the walk-behind tractor engine knocks, you need to inspect the camshaft and crankshaft. This is where the sources of extraneous sounds are mainly located.
In all of the above situations, there is no particular need to carry out major repairs. High-quality diagnosis of problems is very important. It is pointless to try to increase the compression in all modern engines; anyway, the decompressor will not allow this to be done.
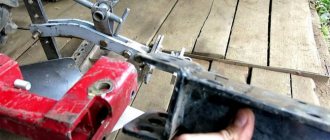
Replacing the oil seal
Before changing the oil seal on the gearbox of the Oka walk-behind tractor, you need to pay attention to the manufacturer, since each part has its own technical parameters, and the replacement procedure will differ significantly.
The oil seal is one of the simplest components of a walk-behind tractor. The cost of such a device is also low. It’s easy to determine that replacement is necessary; you just need to observe the condition of the oil, namely whether it is leaking. If this is not done, then the cost of repairs will increase.
You can replace the oil seal yourself
If you decide to make the replacement yourself, then the question arises: “How to change the oil seal on the gearbox?” The first thing to do is prepare the work surface and adjust the lighting. Next, follow these steps:
- Drain the oil from the device.
- Prepare a piece of cloth to wipe all components.
- Remove the wheels.
- Remove the boot and oil seal. This can be done with a slotted screwdriver. The part needs to be pryed and simply pulled out with a rag. Such parts are not repaired, but replaced.
- Next, wipe the shaft with a cloth, but first you need to oil it.
- Then fill the oil back.
- Put on the wheels.
Important! Remove the wheel from which you want to replace.
Reviews
Andrey, Omsk:
“In the spring, we work with a plow on the Oka River, which is already 4 years old. Before that I only used cutters and didn’t do much plowing. The first time I walked around the site - the mini tractor pulls the plow well, the soil is loose. After the second pass, I really liked the quality of the soil - I didn’t even need a rake. I don’t recommend repeating my mistake - don’t use a plow where turf grows. The blade will not cut small branches, and the straps may break, as happened to me. Otherwise, I recommend using a plow, it makes the work much easier!”
Valentin, Kazan:
“Of course, I had to get used to working with the plow. Firstly, plowing turned out to be the hardest type of work, which is why I would not use a plow for a cultivator at all. But if the tractor is heavy, then it’s fine. “Oka” has enough weight, and sometimes it goes hard. I advise you to add additional load to the wheels, then the center of gravity will drop lower and the load on the axle bearings will decrease.”
Dmitry, Tula:
“Maybe someone will find my experience of working with a plow on the Oka useful. I always make adjustments so that the ploughshare and plow heel are in contact with the ground, while the stand should be in a vertical position. Then I go through the first rows, again adjust the stand to full vertical, and change the amount of recess into the ground with the screw on the hitch. IMPORTANT: the rear edge of the share is placed at the same level with the lug, with its internal dimension, when we pass the third and subsequent furrows!