Purpose of the plow
So, what is a plow used for in agriculture? This implement is designed for plowing lands of different densities in order to prepare the soil for further sowing.
The layer of soil is cut with a ploughshare and turned over from bottom to top, with the bottom layer of soil on the outside, and the top layer with weeds moving down. The soil becomes loose and soft.
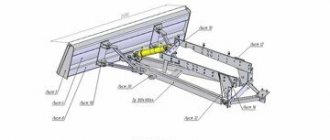
We suggest you look at a schematic drawing depicting a plow for a walk-behind tractor:
As you can see, the plow is connected to the walk-behind tractor using a special coupling device (hitch), which can either come complete with the walk-behind tractor or be sold separately.
There are two types of couplings:
- universal adjustable (angle of attack, horizontal, etc.);
- unregulated.
The KaDvi plant, which produces Oka walk-behind tractors, also produces adjustable coupling devices, with the help of which various mounted and trailed equipment can be attached to a motorized unit.
The manufacturer produces screw coupling devices that allow smooth adjustment of the depth of the plow into the soil.
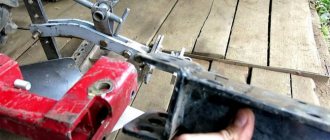
Installation of plowing attachment
There is nothing difficult to install. To do this you will need:
- secure the plow to the coupling device without overtightening the nuts. This is done so that in the future it would be possible to adjust the parameters of the plow;
- the hitch should be secured together with the plow to the shackle with two fastening pins.
This completes the installation and you should move on to the next stage - adjustment.
Adjustment is a very important stage, since the quality of plowing and the amount of effort expended depends on it. If the adjustment is incorrect, the walk-behind tractor will not be able to do its job efficiently and a lot of time will be wasted on simple tasks.
How to assemble a homemade plow
It is noteworthy that the equipment of the Kaluga plant is universal - both native Kaluga attachments and attachments from other manufacturers can be installed on walk-behind tractors from this manufacturer. The main thing is that the couplings fit.
An alternative can be tools from the following manufacturers:
- Vsevolzhsky RMZ.
- Mobil K, which produces Mole walk-behind tractors.
- PC "Rusich".
- Gagarinsky MOBIL K LLC.
But this is not the limit. Modern craftsmen are able to make with their own hands a plow, a hitch of the required size, and any other implement for the Oka walk-behind tractor.
There are many different drawings, diagrams, descriptions and videos on the Internet, which tell and show in detail how to properly assemble a homemade plow and coupling device, how to install and adjust them, as well as how to plow with a hitch.
We offer several options for drawings of homemade plows and hitches:
What shape should a plow on a mini tractor have?
This device is made of metal and is a wedge-shaped object with a certain angle, designed to correctly enter the soil.
It is important that all parameters are consistent with the main task of the plow for a mini tractor. Any discrepancy with the technology will lead to difficulties with the robot.
But if everything is done correctly, a homemade plow will not be inferior to a similar factory version.
A drawing of a plow for a mini tractor will help you make a preliminary layout. First you need to make a template. This is a pattern for your product for a mini tractor made of cardboard. The elements are combined into a structure, and if the shape of the tool is correct, then everything is done according to the scheme, but only from metal. This helps to eliminate errors in a homemade tool at the very beginning.
Setting up the plow before plowing
When starting arable work, it is necessary to correctly configure and adjust the position of the plow relative to the ground. This procedure is carried out in several stages: before the start of plowing and during the plowing of the first rut.
We invite you to watch a video that describes in detail how the plow is configured for the Oka walk-behind tractor:
Algorithm of actions when setting up a plow for an Oka walk-behind tractor:
- Prepare the necessary hand tools (wrenches), walk-behind tractor, hitch and plow.
- Replace pneumatic wheels with lug wheels.
- Attach the hitch to the walk-behind tractor using bolted connections.
- Attach the plow to the hitch by aligning the holes on the plow stand with the holes on the hitch, and secure the position of the plow using cotter pins.
Setting up the plow is not enough; it also needs to be adjusted correctly:
- Set the plowing depth, which for Oka walk-behind tractors is 15-18 cm.
- We move on to adjusting the angle of attack, which directly determines the depth of immersion of the nozzle into the soil. We tighten the bolt on the hitch, which is responsible for the height of the plow heel (the higher the heel, the deeper the depth). The optimal size is 3-5 cm from heel to ground.
- We proceed to test plowing of the soil. During the first pass, parameters such as the depth of the furrow to be cut and the smooth running of the Oka walk-behind tractor with a load are checked.
- If during the first pass we find any shortcomings, we reconfigure the system.
Installation, repair, maintenance of OKA walk-behind tractor. User manual
This article will discuss the design, repair and maintenance of the OKA walk-behind tractor. Since 1991, this motorized device has been produced at the Kaluga Motor Plant under the name Motoblock MB-1.
Starting in 2011, the unit was renamed “Oka”. Its purpose is to carry out all types of agricultural work on small and medium-sized plots of land with different types of soil. Functional attachments, presented in the assortment by the manufacturer KaDvi, significantly expand the capabilities of the walk-behind tractor.
Motoblock Oka - operating instructions
When purchasing any Oka model, the first thing you need to do is read the operating instructions for the motorized device, which contains the following sections:
- The design of the unit (as well as the design of its components: gearbox, carburetor, etc.).
- Assembling the Oka walk-behind tractor, according to descriptions and diagrams.
- Technical characteristics of the selected model.
- Instructions for starting the engine for the first time (Lifan, Honda or any other).
- The procedure for proper running-in of the power plant.
- Maintenance.
- Troubleshooting the Oka walk-behind tractor.
Motoblock device
All existing Oka walk-behind tractors have the following device:
- Gas engine;
- rigid frame;
- adjustable steering bars with rubberized handles;
- transmission (reinforced chain reducer, V-belt transmission, mechanical gearbox, clutch, PTO drive);
- chassis (wheel drive);
- gas tank;
- filters (oil and air);
- ignition system;
- inertial starter.
The kit may include tillers and a hitch.
Depending on the modification, Oka walk-behind tractors can be equipped with various engines:
- The Oka MB-1D1(2, 3)M9 walk-behind tractor is equipped with a Honda carburetor engine (HONDA GX-200) with a capacity of 6.5 horsepower.
- Models MB-1D1 (2, 3)M10 have a Lifan gasoline power unit (Lifan168 F-2A) with a capacity of 6.5 liters. With.
- The MB-1D1 (2, 3) M15 walk-behind tractor was equipped with the original factory KADVI 168F-2A 6.5 liter engine. With.
- Modifications MB-1D1 (2, 3) M13 and M14 received a Robin Subaru EX17 or EX21 power plant, with a capacity of 6.0 and 7.0 liters. With. respectively.
- Models MB-1D1 (2, 3)M and MB-1D1 (2, 3)M1 are equipped with DM-1M and DM-1M1 engines with a power of 8 hp. With.
Honda GX200 engine Lifan168 F-2A engine Robin Subaru EX17 engine KADVI 168F-2A engine
Common to all listed power plants:
- one cylinder;
- cycle for 4 cycles;
- forced air cooling;
- use of AI-92 or AI-95 gasoline.
The ignition system is electronic, which includes: magneto, spark plugs, high-voltage wire.
It is necessary to start the engine correctly, according to the algorithm specified in the instructions. If certain actions are not followed, there is a high risk of engine failure. We invite you to watch a short video on how to start the Oka walk-behind tractor:
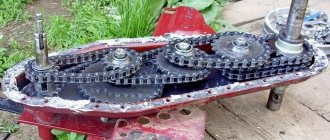
Gearbox device
The walk-behind gearbox transmits torque from the engine to the wheel drive. Its design is as follows:
- sprockets (driver and driven);
- chain;
- shaft:
- frame.
We suggest studying the cross-sectional diagram of the Oka walk-behind tractor gearbox:
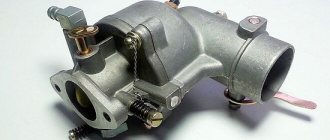
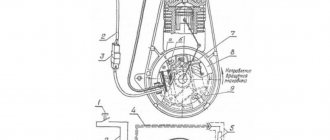
The design and principle of operation of the carburetor
Carburetors are gas distribution devices inherent in gasoline engines. The function of the carburetor is as follows:
- regulates the amount of incoming gasoline and air;
- saturates the air with gasoline vapors.
We suggest that you familiarize yourself with the carburetor diagram for the Oka:
Run-in of Oka walk-behind tractor with Lifan engine
Before starting field work, it is necessary to break in the engine to avoid damage to moving parts and mechanisms.
Before starting the running-in, it is necessary to fill the tank with fuel and check the oil level. Proper running-in of the Oka walk-behind tractor engine begins immediately after the first start and lasts more than 30 hours. During this period, you cannot give heavy loads and work more than 2 hours a day, open the throttle valve more than ¾.
Tillage should also be carried out in a gentle manner - in several passes with a depth of no more than 10 cm in one pass. After the break-in period (20-30 hours worked in a gentle mode), it is necessary to completely drain the used oil and pour fresh oil into the engine crankcase.
Maintenance of Oka
Maintenance of a walk-behind tractor includes several stages:
- Daily work before and after use.
- Change of oil.
- Scheduled inspection.
- Preservation for long-term storage.
Let's consider the first point.
Malfunctions
The instructions included with the Oka walk-behind tractor contain a table that lists all possible problems, but we will focus on the most common ones:
Installing belts on the Oka walk-behind tractor
In order to perform the replacement, it is necessary to determine what size drive belt is required for the Oka walk-behind tractor. The following drive belts are available for sale:
Lighting for Oka walk-behind tractor
Many owners of this equipment strive to modernize the device as much as possible, to further increase comfort and ergonomics when working. One of the ways to modernize is to install lights (headlights).
Making light on an Oka walk-behind tractor is not that difficult; you just need to find and connect a generator of the required power to the unit. The connection algorithm is as follows:
- a button is placed on the steering wheel;
- the generator is attached to the walk-behind tractor;
- headlights are attached to the front of the motorized device;
- through wires, a connection is made from the button to the generator and to the headlight;
- wires are insulated.
The more powerful the generator, the brighter the light will be; many people prefer to install automobile electric generators on this agricultural equipment. We invite you to watch a video on how to install the light on the Oka walk-behind tractor yourself:
How to increase speed on an Oka walk-behind tractor
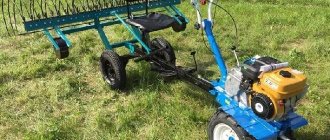
Characteristics
A mounted plow for a walk-behind tractor is a universal farming tool, without which high-quality cultivation of the land is simply impossible. Since its invention, it has been used by man to prepare the ground for further work. The process of working with a plow is called plowing.
During plowing, the top layer of soil turns, it becomes softer, weeds go into the lower layer of soil, and the top layer becomes prepared for sowing crops.
The Kaluga manufacturer of motor vehicles, JSC Kadvi, offers manufacturers not only walk-behind tractors and cultivators, but also attachments for them. For example, for the popular Oka walk-behind tractor and its modifications, the manufacturer recommends using a plow with a hitch.
| General characteristics | |
| Weight: | 7.8 kg. |
| Dimensions: | 535 mm/310 mm/410 mm. |
| Working width: | 190 mm. |
It is recommended to use a plow for the Oka walk-behind tractor for plowing or fertilizing the soil. The device is designed to work on soils whose area does not exceed 0.4 hectares.
Gearbox malfunctions
There are many reasons that can lead to the breakdown of this important unit, which will make the operation of walk-behind tractors from different manufacturers impossible. It is advisable to include among the main malfunctions characteristic of various models:
- oil leak due to high wear of the cuff;
- inappropriate lubrication parameters;
- the appearance of smudges on the output shaft;
- star rupture;
- broken chain/belt;
- Worn control lever threads.
It is important to note that most problems can be avoided by promptly changing the oil in the device. For this purpose, standard machine oil is used, which allows you to use the walk-behind tractor for many years without the need for repairs.
Equipment from other manufacturers
In addition to the original one, you can install attachments from other manufacturers on the Oka walk-behind tractor.
For proper installation and further safe operation, make sure that all fasteners have the required diameter, suitable for aggregation with the walk-behind tractor.
At Oka you can install a plow produced by such Russian companies as Gagarin, ZAO Vsevolzhsky RMZ, and PC Rusich. One of these is the “Mole” produced by Mobil K, which is sold without a hitch. “Mole” is suitable for installation on walk-behind tractors and cultivators from various manufacturers.
Setting up and adjusting before work
In order for the unit to work as required, it must be configured. Before setting up, the device must be coupled to the walk-behind tractor. After which it needs to be adjusted and only then can you start working.
What kind of hitch is needed for a plow?
produces plows already with a hitch, but on sale you can often find just a unit, without fastening. Then the hitch must be purchased separately, in special agricultural stores. The Kadvi is equipped with a screw hitch. Using it, you can adjust the depth of the tines into the ground as smoothly as possible, as well as the angle at which it will penetrate the soil.
Thanks to the screw hitch, the most smooth adjustment of the depth and angle of inclination (angle of attack) is ensured, which, in turn, greatly facilitates the work and reduces the operator’s labor costs.
The hitch can be used in conjunction with a hiller or with two hillers mounted on a traverse (frame), as well as with various excavators, tillers and other attachments.
How to configure and adjust?
Before installation, remove the wheels from the walk-behind tractor and install lugs on the axles. Then install the hitch if the plow does not come with one. For installation you only need a wrench, a plow, a hitch and a walk-behind tractor. The stand is aligned with the mounting holes and connected with bolts and nuts using a wrench.
Tip: to make installation of the plow easier, place the walk-behind tractor on stands, which can be bricks, boards or stones.
Now you can install the plow on the walk-behind tractor and secure it with cotter pins.
Let's move on to the adjustment:
- the unit is placed on a hill, for example, on stands 15 cm high. This way it will be possible to adjust the plowing depth - according to the norm, it is from 15 to 18 cm;
- The angle of inclination is adjusted by a bolt located on the hitch. The higher the heel of the plow, the deeper the depth of plowing of the soil will be, and vice versa;
- the distance from the ground to the plow should be 3-5 cm. Next, it is recommended to carry out test plowing - this will check the depth of the furrow created, the stroke and smooth movement of the walk-behind tractor with an attachment;
- After passing the first furrow, if necessary, the hitch is reconfigured for the most accurate depth of immersion into the soil and capture of the soil layer.
Run-in of Oka walk-behind tractor with Lifan engine
Before starting field work, it is necessary to break in the engine to avoid damage to moving parts and mechanisms.
Before starting the running-in, it is necessary to fill the tank with fuel and check the oil level. Proper running-in of the Oka walk-behind tractor engine begins immediately after the first start and lasts more than 30 hours. During this period, you cannot give heavy loads and work more than 2 hours a day, open the throttle valve more than ¾.
Motoblock OKA MB-D1M10
Tillage should also be carried out in a gentle manner - in several passes with a depth of no more than 10 cm in one pass. After the break-in period (20-30 hours worked in a gentle mode), it is necessary to completely drain the used oil and pour fresh oil into the engine crankcase.
Reviews
Andrey, Omsk:
“In the spring, we work with a plow on the Oka River, which is already 4 years old. Before that I only used cutters and didn’t do much plowing. The first time I walked around the site - the mini tractor pulls the plow well, the soil is loose. After the second pass, I really liked the quality of the soil - I didn’t even need a rake. I don’t recommend repeating my mistake - don’t use a plow where turf grows. The blade will not cut small branches, and the straps may break, as happened to me. Otherwise, I recommend using a plow, it makes the work much easier!”
Valentin, Kazan:
“Of course, I had to get used to working with the plow. Firstly, plowing turned out to be the hardest type of work, which is why I would not use a plow for a cultivator at all. But if the tractor is heavy, then it’s fine. “Oka” has enough weight, and sometimes it goes hard. I advise you to add additional load to the wheels, then the center of gravity will drop lower and the load on the axle bearings will decrease.”
Dmitry, Tula:
“Maybe someone will find my experience of working with a plow on the Oka useful. I always make adjustments so that the ploughshare and plow heel are in contact with the ground, while the stand should be in a vertical position. Then I go through the first rows, again adjust the stand to full vertical, and change the amount of recess into the ground with the screw on the hitch. IMPORTANT: the rear edge of the share is placed at the same level with the lug, with its internal dimension, when we pass the third and subsequent furrows!
Hillers for MTZ walk-behind tractor
Hillers are important equipment for making agricultural work easier. With this tool you can quickly and easily make furrows for planting various crops. But they are mainly used for hilling potatoes.
There are several types of hillers:
- Reversible type, consisting of two plows and being the most common;
- Disc type - considered the most effective and making a furrow using two rotating discs.
- Active type - classified as a special hiller, since this hiller first raises a layer of earth, crushes it, and then only discards it.
From the manufacturer
The proprietary model of the hiller, adapted for the Belarus walk-behind tractor, is OU-00000-01. The advantage of the model is the ability to adjust the distance between the two plows of which it consists. The width can vary from 45 to 70 cm, which is very convenient when the distance between the beds is different. The device itself weighs 20 kg, so Belarus can reach speeds of up to 4 km/h.
Analogs of hillers for MTZ walk-behind tractor
If you consider an alternative to branded models, then you should opt for the products of the Lida Mechanical Plant, which produces plows and hillers adapted for Belarus. The model is called OK-2 and has the same parameters as the branded hiller. In addition to the weight, which is 12 kg. and immersion depth, which is slightly less than the original and equal to 12 cm.
It offers a wide range of equipment, including disc and universal hillers. The consumer can choose the optimal size of the discs, which are available in various sizes from 18 to 36 cm in diameter; accordingly, they are immersed only half the diameter and process only one row.
Homemade hiller devices for MTZ walk-behind tractor
The easiest and least labor-intensive option is to make a reversible hiller, which consists of two plows. Making a disk and rotary hiller will require a lot of effort and patience.
Two plows are taken and attached to the frame, and then to the hitch on Belarus. The frame is made of a T-shape from a square pipe.
Video reviews
Video review of the operation of the MTZ 09N walk-behind tractor with a disk hiller
Video of planting potatoes
Video review of working with a universal hiller for the MTZ walk-behind tractor
Video review of working with a rotary plow
Owner reviews
Below are reviews from owners who have had experience working with hillers.
Rostislav:
If you are planning to buy a hiller for an MTZ walk-behind tractor, then choose a disk hiller, despite the fact that it is more expensive. It is much more efficient to work with it and there is no need to modify it, because it goes smoothly and does not cut the tubers. The same cannot be said about the hiller with plows. This happens because potato rows cannot always be planted straight.
Sergey:
For me, using a reversible hiller for the MTZ walk-behind tractor was a solution to problems with plowing and laying a furrow for potatoes. It’s quick to set up, and it’s simple, easy to use, and most importantly, even tracks. I connected it to the walk-behind tractor and drove off. So that the ruts are even, I pull the rope and ride along it.
How to install and plow a mounted plow
The main working parts of the tool are a metal ploughshare and a blade. The ploughshare carries out plowing, it cuts the upper layers of soil and directs them to the dump. And the blade wraps the earth raised by the ploughshare, crumbles it and throws it into the furrow. Thanks to this process, deep loosening of the soil occurs, during which it is saturated with oxygen and gets rid of weeds.
The picture shows what a plowshare plow looks like, designed for plowing with a cultivator or walk-behind tractor in the garden. Different models of plowing devices may have some differences among themselves, but mostly they are all designed this way.
Before you start plowing the ground with a cultivator or walk-behind tractor, assemble a removable plow. To do this, take two bolts and use them to attach the hitch to the rack of the mounted implement. The assembled unit is hung on the cultivator bracket, lightly fixed and then adjusted according to the following parameters:
- plowing depth;
- blade tilt angle;
- angle of inclination of the heel (field board).
To adjust to the required plowing depth, the motor-cultivator is rolled out onto stands 12-20 cm high and placed as level as possible, so that the field board is in full contact with the surface of the earth, and the stand is perpendicular to it. The mounted plow is adjusted to the required position at which it will plow, and then secured with an adjuster screw and a lock nut.
To adjust the angle of the blade, tilt the cultivator to the side. To do this, remove the stand from under the right wheel (or lug), leaving only under the left one. The nuts securing the hitch to the hitch are slightly loosened, the plow is slowly turned, giving it the optimal position for plowing.
Changing the angle of the heel (field board) is carried out by rotating the adjusting screw of the cultivator hitch. If it is necessary to increase the height of the heel lift relative to the plowshare, turn the screw clockwise and vice versa. When adjusting, be sure to ensure that the distance does not exceed 3 cm, otherwise the nose of the plow, when plowing in the garden, will begin to burrow deep into the ground and worsen the traction force of the cultivator, as well as a walk-behind tractor or a walk-behind tractor. After completing the adjustment, tighten all nuts well with a wrench. You can take a more detailed look at the process of setting up a plow for plowing with Salyut, Neva and other motor cultivators in the video.
After making the above settings, the plow is completely ready for use and you can try plowing in the garden. Before you start plowing thoroughly, especially virgin soil, you perform control plowing and evaluate whether the plow is adjusted correctly, what the depth of the furrow is and the quality of the soil dump. How to properly plow with a cultivator is well shown in the video using the Neva walk-behind tractor as an example. You can also watch a video about how the heavy Zirka walk-behind tractor behaves when plowing virgin soil.
When the plow is adjusted correctly, the power unit moves evenly during plowing, without jerking, without burying the “nose” of the ploughshare deep into the surface. The furrows from under the moldboard turn out to be even and do not “overlap” each other during plowing. If the site has hard soil, plowing is carried out in two passes. During the first plowing, a shallower depth is set, and during the second, a greater depth. In the same way you need to plow virgin soil. To cultivate small areas, they mainly use a cultivator and plowing cutters. Medium-sized plots are also cultivated with a cultivator, but with the use of a huller or a light plow, and heavy and virgin soil – with the help of a powerful motor-cultivator (for example, Neva) and a mounted plow.
How to repair a walk-behind tractor gearbox yourself?
The material presented in this article is especially in demand for people who repair their equipment themselves. Next, the main “subtleties” regarding the repair of the walk-behind tractor gearbox will be touched upon. To go directly to the topic of repair, you need to understand the gearbox structure. Looking ahead, it is necessary to say: the structure of the gearboxes of modern walk-behind tractors is similar to each other, there are only minor differences in one model or another.
To avoid the question “How to disassemble a walk-behind tractor?”, you need to be familiar with all the details. We list the main parts and components of any modern walk-behind tractor: covers and pulley; bushings with bearings; lever, axle and fork for shifting; input shaft block with gear; input and output shaft of the walk-behind tractor gearbox. Accessories: washers and seals; right and left axle shaft; clutch and clutch fork; bracket and spring.
What attachments does the walk-behind tractor work with?
Any experienced farmer knows that with the help of a walk-behind tractor, cultivator or other motorized equipment, almost all agricultural work can be mechanized, from cultivating the land to prepare it for sowing and ending with transporting the harvested crop. Motor units have become universal due to the possibility of using a variety of attachments. For example, for cultivating plowed land and cultivating virgin lands, not only moldboard and other plows were created, but also:
- harrows;
- hillers;
- rotary cutters;
- flat cutters-weeders.
Harrows are used to plow virgin soil, as well as for pre-sowing or post-harvest loosening of arable soil to a depth of 7-14 cm. Using harrowing with a walk-behind tractor or cultivator, the surface is leveled, moisture is covered, and weeds are destroyed. The working parts of such agricultural implements are metal teeth or spherical disks. In this video you can clearly see how to properly plow with a walk-behind tractor and a homemade harrow.
Using a hiller, you can hill up potatoes, cut furrows for sowing seeds, fill in planting material, and also sprinkle weeds directly in the area of the rows. Hilling devices come in single-row and double-row, with fixed and adjustable working widths, distinguishable both by their design and their efficiency. Here is a video of how the Neva MB2 walk-behind tractor performs processing with a mounted two-row hiller-weeder.
With a rotary cutter you can plow virgin soil, carry out pre-sowing and basic cultivation of plowed land. This agricultural implement allows you to mill, cultivate the land and qualitatively prepare it for sowing. It is capable of not only plowing the soil, but also crumbling large layers, mixing with fertilizer, crushing stubble particles, and leveling the sown area. Rotators for plowing come in different types, depending on the number of cutting elements. This video shows how to actually plow a walk-behind tractor with a cutter installed on it.
A flat weeding cutter helps to trim weeds, split and cut grooves without turning the formation, plow and crush the soil. Flat cutters come in all possible working widths and processing depths, which allows you to choose them for specific processing conditions of agricultural plots and crops. This video shows how to carry out processing with a mounted flat cutter in practice using the example of a Dnepr walk-behind tractor.
In addition to the listed removable tools designed to plow virgin soil and cultivate arable land, rakes, wood splitters, seeders, shredders, cultivators, rotary and segment mowers, shovels, sprayers, sweeping brushes, snow blowers, etc. are used with the motorized unit. Having a basic set of mounted agricultural implements, you can use a walk-behind tractor or a powerful cultivator to perform all kinds of economic tasks, in particular, pre-sowing plowing, sowing and planting crops, applying fertilizers, inter-row cultivation of crops, harvesting root crops, and seasonal harvesting of green fodder.
How to make adjustments
Precise adjustment of the plow for a walk-behind tractor is based on three parameters:
- width;
- depth of entry;
- angle of inclination.
To independently adjust the plow, the width is set at its edges. For better crushing and easy cutting of the soil, its edge should be attached at the same height as the soil hook, focusing on the inner side.
Read here what is better to use a walk-behind tractor or a cultivator at the dacha.
The depth is built up after the walk-behind tractor is placed on the stands. Installed stably, without displacement towards the plow.
The height of the stands should be adjusted depending on the depth to which you plan to plow the soil. If this is plowing before the winter season, then the depth is chosen to be approximately 25 cm. In spring, the depth is up to 20 cm.
After installation and selection of depth, the plow mount is adjusted. The ideal option is when it is adjacent to the soil.
If this is your first experience in plowing the ground with a walk-behind tractor, then use the tension rope as a guide, since the first row should be straight in order to further build on it.
You can also use a support wheel, it is located to the left of the plow, and runs on uncultivated ground, thereby preventing too deep penetration and adjusting the depth.
After installation, the walk-behind tractor is adjusted with special bolts so that the rear part of the plow is parallel to the soil.
The last step in the adjustment is to remove the walk-behind tractor from the stand and adjust the steering wheel to the height of your lower back. This is done to reduce stress on the hands during prolonged work.
How much does it cost to plow a field?
Manual cultivation of the soil is a rather difficult task, and if it is also virgin soil, then almost impossible. Therefore, farmers and summer residents, in order not to work manually, try to acquire special agricultural equipment - cultivators, motor cultivators, walk-behind tractors, mini tractors and various accessories for them. The equipment will allow high-quality plowing of virgin soil and quickly cultivating plowed lands.
But not every owner of a farm or dacha land has the opportunity to purchase a whole arsenal of motorized equipment. Often the power of a purchased cultivator is simply not enough to cultivate virgin soil or plow an abandoned garden. In this case, you have to turn to the owners of more “serious” agricultural equipment for help - powerful mini tractors and tractors. These high-performance machines become especially popular during the pre-planting and post-harvest seasons. They quickly and efficiently process the field, cultivate, cultivate overgrown turf and virgin soil.
Of course, agricultural machinery services are not cheap. The cost of mechanized work performed by a tractor depends on various factors, in particular:
- prices for fuel and lubricants;
- dimensions of the treated area;
- the degree of neglect of the site, the presence of vegetation on it;
- relief and condition of the soil that will be processed;
- distances from the place where the equipment is parked to the place where it will work;
- the type of excavation work and the agricultural implements used to carry it out.
How much it costs to hire a tractor for plowing virgin soil or cultivating plowed land can be found out on thematic forums where experienced farmers and beginners exchange relevant information with each other and give practical advice. Typically, tractor owners calculate the cost of plowing as follows: all costs of processing + 45-50% (virgin soil, naturally, is more expensive). But it’s difficult to say exactly the final amount, since prices can vary greatly in different regions of the country.
The most expensive tractor work is considered to be plowing virgin and arable land using a disc harrow, a tillage cutter and a three-furrow plow (25,000 rubles/1-5 hectares). It will cost a little less to disk the earth and mow the grass if you work with a mini tractor using a mounted rotary mower and a tooth harrow (20,000 rubles/1-5 ha). But even at relatively high prices, the services of tractors and mini-tractors are used by many farmers, including owners of garden and country plots. Whatever one may say, plowing and cultivating without equipment is difficult and time-consuming. In addition, this is a very responsible process that cannot be done without time and financial investments.
Setting the lower links
Properly adjusted lower links should lift up to the frame in the working position while their stabilizers remain free, allowing the blade to enter the soil under gravity. When the device is raised, the rods fix it in a given position so that it does not rake up the ground when the tractor turns. You can ensure that the plow does not move to the side during plowing by adjusting the lower flanges. They are fixed towards the furrow. Look at the body from above: correctly positioned rods should form a trapezoid, not a rectangle, that is, converge towards the tractor.
If the lifting shaft of the equipment is small, then during installation you need to ensure that the lower flanges are not blocked by the limiters of the agricultural equipment. If they touch, the knife will not go deep into the soil to the specified depth (usually 25–27 centimeters). Keep in mind that the higher the rods are attached, the greater the depth the knives go and the towing line improves, but at the same time the lifting height of the device when turning is reduced. If, when plowing, the drafts tend downwards, then you need to change the hanging points: most modern plows allow this.
How to install and configure (adjust) a plow for a walk-behind tractor: educational program
The editors express gratitude for their assistance in preparing the article
One of the most common tasks solved using a walk-behind tractor and a cultivator is plowing the soil. The plow can be purchased for almost any model that is presented on the Russian market. In theory, everything seems elementary - grab it and go. But in reality it is not so simple - it is not enough just to attach the plow, it also needs to be adjusted correctly. Our advice will help with this.
Connection "hitch-walk-behind tractor"
Let's start with the connection farthest from the plow itself - the hitch and walk-behind tractor. The hitch must be secured with one pin, and it must maintain play in the horizontal plane within 5–6 degrees. If you fix the hitch with two pins or remove the play completely, you will get a rigid connection - this is one of the most common mistakes.
Does the engine of a walk-behind tractor or cultivator need running-in? Advice, expert reviews
When a buried plow moves forward, it is subject to resistance from the soil. Under the influence of this force, the plow tends to deviate to the side. If the hitch does not have the possibility of play, then not only the plow with the hitch will deviate, but the entire walk-behind tractor as a whole. That is, the worker will have to constantly apply force to the handles to compensate for this pressure. If play is possible, then only the coupling with the plow is deflected, and the pressure on the plow compensates for the pressure from the unplowed soil on the side of the field board. Simply put, when the hitch is loose, it's much easier to work with. And if you think that a rigid connection between the hitch and the walk-behind tractor will ensure straightness of the furrow, then you are very mistaken.
An example of incorrect installation of the hitch - on two king pins
And the correct option is for one kingpin while maintaining the possibility of play at a small angle
The screw in the front serves to adjust the maximum rotation angle of the hitch. There is a similar one on the other side of the kingpin
There can be many options. The photo shows one of them. You will have a hard time with this plow - it is basically impossible to adjust it, because one of the main parts - the field board - is made incorrectly. Normally, it looks like a corner: it has not only a lower supporting surface that slides along the ground, but also a side one. It is the presence of the lateral surface that helps compensate for the pressure from the plowed soil - when the hitch is deviated to the side, the plow rests against the edge of the furrow. And here there is practically nothing to resist - the manufacturer of this plow was clearly not aware of all the nuances.
What does the “wrong” plow look like?
Wrong plow - there is a field board, but its vertical part is still missing. With this plow you will have to constantly keep the walk-behind tractor from turning, as if the hitch was installed on two kingpins
A properly made plow at work. The soil pressure on the ploughshare (1), which pulls the plow to the side, is compensated by the vertical flange of the field board (2)
Setting the plowing depth
The next step is to set the desired plowing depth. This is done by rearranging the plow stand relative to the lock. To do this, the rack must have several holes; fixation is carried out using a bolted connection. If there is only one hole, then we can draw an obvious conclusion - at least there is no provision for adjusting the plowing depth here.
The depth itself should not be very large - 5–7 cm. In this case, when turning the layer over, the effect is similar to plowing with a shovel. There is no need to go deeper - firstly, you can mix clay or sand with the fertile layer, and secondly, with a large plowing depth, the roots will be upside down, but reliably covered with a thick layer of soil on top and will safely overwinter. But we need them to freeze out, otherwise the weeds are guaranteed to grow vigorously in the spring.
A number of holes in the plow stand are needed to adjust the plowing depth
Adjusting the plowing plane level
The angle between the “tip” of the plow and the soil surface, that is, the angle of attack, can be changed either using an adjusting screw or by rearranging the bolted connections. The screw is naturally more convenient, because it is much faster, and the adjustment is carried out smoothly, and not in steps. The procedure for setting the correct angle looks like this:
Screw adjustment of angle of attack
- place the walk-behind tractor with the attached plow on a flat surface;
- unscrew the adjustment screw so that the plow touches the soil with the entire lower surface;
- Unscrew the screw in the opposite direction so that the rear part of the plow is raised above the soil by about 2.5 cm.
If the angle of attack is too large, the walk-behind tractor will slip - the plow in this case does not plow, but serves as an anchor. Too small an angle of attack means a small plowing depth - as if the walk-behind tractor is running forward without effort, plowing too easily.
For those who have at least a little experience in arable work, such subtleties do not need to be explained; they are understandable on an intuitive level. But at first, many people make mistakes.
Second and subsequent furrows
Try to make the first furrow as straight as possible. A landmark at the end of the run (at the edge of the field) may be useful for this purpose. Next, the walk-behind tractor is placed with one wheel in the furrow, and it ends up in an inclined position. The plow also tilts accordingly, but this is not necessary. To compensate for this tilt, it is possible to rotate the hitch at a small angle. In fact, this is tilting the plow in such a way that it is in a vertical position on an inclined walk-behind tractor.
The plow is already tilted at a small angle - the second and subsequent furrows can be made
How to work properly with a cultivator using the example of Husqvarna
Useful tips
It is also important to choose the correct size of lug wheels. You should not chase the diameter, otherwise the linear speed will be too high. The optimal diameter is 460–500 mm.
The size of the plow depends on the weight of the walk-behind tractor; this parameter also needs to be taken into account. The largest plows with a 23 cm grip are used on walk-behind tractors weighing about 100 kg. For walk-behind tractors weighing up to 75 kg, plows with a grip of 18 cm are recommended. A plow with a 13 cm grip is suitable for lighter cultivators. Here, too, sometimes they make a mistake - they buy a relatively light walk-behind tractor and they put a big plow on it. If we also try to use this “tandem” on “oak” soil, the result will be absolutely predictable - “it doesn’t plow.” But the problem is not in the quality of the plow, but in its incorrect choice and/or settings.
Do-it-yourself plow to walk-behind tractor
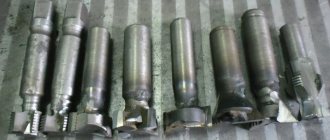
For someone who knows how to handle a tool and is trained to work with a welding machine, it will not be difficult to make a mechanism for plowing a garden with a walk-behind tractor on their own. It is enough to prepare the material: metal sheets, bolts, corner. Moreover, the products may not be new, but already used, but in good condition.
The ploughshare is made of a three-millimeter steel sheet. The remaining elements are made from a strip and a corner. The parts of the plow are connected to each other by welding and then the joints are cleaned with a grinder. Some are mounted in double rows to avoid a second pass at the beginning of the lane when driving in parallel rows.
Independent production of drawings and structural elements requires special attention. The precision of manufacturing parts will eliminate the possibility of disturbances in the functioning of the whole organism.
Modern designs of plows have a large number of varieties: single- and double-hulled, moldboard and non-mouldboard, rotary and rotary.
Advantages of homemade equipment:
- the ability to carry out accurate measurements and calculations on site;
- the cost of the finished structure will be cheaper than a similar factory one;
- selection of quality material;
- The assembly of the structure is carried out under constant supervision.
Setting the working width
Modern general purpose plows have the ability to adjust the working width using a hydraulic system. Typically, such units are purchased by large agricultural producers working on different types of soil. It is also possible to adjust the width mechanically: to do this, you need to fix the mounting bolts in other positions. This is a simple procedure that takes 15-20 minutes, but many farmers prefer to work on standard settings, simply increasing the plowing speed. Such a decision can hardly be called reasonable. The fact is that as the speed of the tractor increases, fuel consumption increases sharply - it burns 20 percent more diesel fuel, and this increases the cost of cultivating the land. As a result, production profitability decreases. If the plowing speed exceeds 10 km/h, the quality of tillage drops significantly, and wear on the working surface of the knife increases by almost 400%. Of course, buying spare parts for a plow is not a problem today. However, when working on light soils, it is more prudent not to increase the processing speed, but simply to increase the working width. Hydraulically controlled devices usually have end stops that prevent the blades from extending beyond their limits. After expansion, it is necessary to adjust the support wheel so that the balance of the system is not disturbed. It is installed parallel to the field board. When the support is located at the rear, nothing needs to be adjusted.