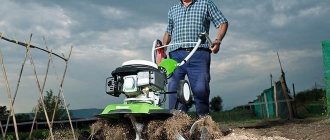
Homemade products for walk-behind tractors are invented and made by almost all owners of this equipment. The purpose of these actions is to expand the functionality of the unit with minimal financial investment. In the basic configuration, the motor cultivator has extremely limited capabilities. Installing various options on it can turn a small machine into a full-fledged mini-tractor. Often, homemade devices are in no way inferior to factory-made analogues. In order to improve a walk-behind tractor with your own hands, a set of tools that are available in every workshop of a country house or cottage is sufficient. The materials you need can be found at a junkyard, shed, or scrap metal collection point.
Improvement of the chassis
The first thing users of a walk-behind tractor think about is how to make a cart with a seat for it. Using equipment in normal mode using levers requires the application of great physical effort. However, the use of a trailer reduces the stability of the vehicle. This problem can be eliminated by extending the wheelbase. This is done using extensions that are attached to the axle shaft with pins or bolts. Having solved the stability problem, the operator is faced with another issue: the unit is poorly controlled. The differential for the walk-behind tractor helps to give it good maneuverability. This device is made by analogy with components of passenger cars. Homemade unlockers for walk-behind tractors are made using ordinary household tools - an angle grinder, welding and a sharpening machine.
The low weight of the walk-behind tractor causes poor traction between the wheels and the ground. Slipping is a common occurrence when lifting virgin soil, working on wet ground or driving in snow. To avoid slipping, weights are attached to walk-behind tractors.
These devices are divided into the following categories:
- Wheeled. They are discs that are mounted on wheels or hubs. Disks are made monolithic from metal, concrete or hollow, filled with sand. The weight of wheel weights can be 30-70 kg.
- External. Made from any heavy material (steel, lead, concrete). Attached to the body using hooks or bolts. Some craftsmen weld a frame from a corner to the body. Sandbags, bricks, scrap metal and other heavy objects are placed in it.
You can improve the cross-country ability of a walk-behind tractor by installing lugs. The easiest way to make lugs is to make a rim from a strip of metal and weld blades onto it. The rim diameter should be larger than the rims and smaller than that of the tires. The rim is installed with flat tires. After the lug is installed, the wheel is inflated.
You can improve the transmission by installing a homemade variator on the engine. The system of belts and discs will allow you to smoothly change the speed of the unit, without jerking or vibration.
Headlight and dimensions for walk-behind tractor
Almost all owners of land plots have to decide how to make light on a walk-behind tractor. Very often you have to work late or drive modernized equipment in the dark. Without path lighting, it is not only inconvenient, but also dangerous.
There are the following options for installing headlights and dimensions for the Neva walk-behind tractor:
- From the generator. A standard product or a generator from a passenger car is used. To prevent the light from dimming when the speed decreases, it is better to take a generator from a tractor. The part is installed on a bracket welded to the frame.
- From the battery. If the unit is heavy, it is better to use a battery from a moped or outboard motor. It is advisable to install batteries from passenger cars on light walk-behind tractors. They will not only provide a long-lasting glow, but will also press the wheels to the ground.
To expand the lighting sector, the headlight itself must be installed on a bracket. It is better to place the power switch on the steering wheel. The wires must be insulated and placed in a corrugated tube.
Reducing noise from the unit
Even the most modern and expensive motor cultivators make a lot of noise during operation, especially at high speeds. This factor greatly tires the operator and can serve as a reason for deterioration of relations with neighbors. A homemade muffler will help solve the problem. This is a task that can be accomplished by any craftsman with basic skills in handling iron.
In order to make a muffler for a walk-behind tractor with your own hands, you will need the following tools and materials:
- roulette;
- welding machine;
- Bulgarian;
- electric drill;
- hammer;
- aluminum clamp;
- stainless steel 2 mm thick;
- metal shavings.
Having collected everything you need, you can begin to improve the exhaust system.
This is done in the following sequence:
- Make 2 oval pipes from stainless steel. The diameter of the pipes should differ by 1-1.5 cm. The pipe joints should be fastened using a welding machine.
- In a pipe of smaller diameter, make a maximum number of holes with a diameter of 8 mm. Wrap it with metal shavings. Wrap the shavings with steel wire.
- Insert the smaller pipe into the larger one. Fix them in the desired position using steel rods and welding.
- Attach the muffler to the exhaust pipe and secure with a clamp.
The noise level after such an improvement will decrease several times. The service life of a homemade muffler will be at least 5 years. So, being content with little, you can significantly improve the conditions for carrying out agricultural and other work using a walk-behind tractor.
Necessary materials for cargo sleds
Listed below are the materials needed to produce a cargo version of a sled from an iron pipe:
- Iron pipe measuring 20x20, thickness 2 mm.
- Round plastic pipes that will act as skis.
- Solid iron sheet.
- Sheets of plywood (thickness 15-20 mm).
Naturally, the mass of the future sled will be large, but the structure is strong. The disadvantage of this version of the sled is the repeated replacement of plastic skis.
First, we weld a rectangular iron frame. For this you will need four pipes. For mechanical strength, we strengthen the frame by welding several more pipes across. Several pipes need to be welded around the perimeter, the number of which depends on the size of the sled. On average there are about 5 pipes coming out on each side.
Let's move on to skiing. We take round plastic pipes and shape them flat using a hair dryer. Once the pipe is quite hot, it is pressed with a board, and a heavy load is secured on top. We bend the part of the pipe that will be in front of the sled upward. For a sled to run smoothly, you need runners. To do this, curved plastic skis are connected to the frame.
Next we fix the drawbar in front of the sled. To complete this task, we reinforce the place of fastening with an iron sheet, and also insert a bushing there. The final step is to secure the plywood sheet directly to the frame. That's all, after which the sled is ready for use.
Before working with homemade sleds, you need to realize that they will be used in winter at low temperatures. This means that the quality of all materials must be of an appropriate level. Otherwise, the sled will not last even one winter completely.
If you are developing a passenger sled , pay special attention to safety measures. Because if you neglect this fundamental aspect, fatal consequences cannot be avoided. Remember that people's lives are in your hands. Even if you managed to make a high-quality passenger sled , you should not drive a snowmobile at maximum speed. Because you never know what to expect from non-factory products.
Freight
The design of these sleds is quite complex. For sliding, skis are used, which can be connected to the frame using shock absorbers. There are varieties created for transporting heavy and oversized cargo.
From time to time, a special box is placed on the cargo sled, with which you can set off on long tourist trips.
The main advantage of cargo sleds is their large load capacity and good maneuverability. These characteristics depend on the size of the frame (the larger, the more stable the sled will be) and the area of the sliding surface (the type of runners used).
It is also better that the platform is high from the snow crust. This way the cargo was protected from getting wet. But you should not make the sled very high, otherwise it will often tip over when turning.
Volokushi - description and dimensions of plastic snowmobile sleds
Sleigh drags are the most common option.
They have several advantages:
- compactness and low weight;
- simplicity and speed of loading and unloading luggage;
- The drag body body does not freeze.
But the drags have a serious drawback - due to the design features, their front part is often damaged. This type of sled is cheap, and making it yourself is impractical.
Passenger
They are not widespread enough in our country due to the lack of appropriate infrastructure (equipped snow trails and parking areas). Often such sleds are made independently by winter fishing enthusiasts.
READ Assembling cutters for a centaur walk-behind tractor
They are a plastic or plywood body mounted on skids. The cabin can be equipped with a heater and lighting devices.
The disadvantage is the heavy weight, so for transportation it is necessary to use massive snowmobiles equipped with a four-stroke power unit.
Movable joint adapter
With a movable joint, the angle relative to the vertical axis between the adapter and the walk-behind tractor changes. It is much easier to make such a trailer, but when making a turn it will require more effort. But this type of adapter is inferior in geometry: the turning radius and its angle are also significantly larger.
Drawings and dimensions
The base of the adapter will be a square metal profile. Usually it is taken from 160 to 180 cm in length. A smaller profile of 50-60 cm is attached directly perpendicular to it (depending on the size of the suitable track).
Wheel stands are attached to the resulting structure. As for the racks, their size is 25-40 cm. It is determined depending on the walk-behind tractor itself. Then the braces are welded, the length of which is determined by the desired size of the entire structure and other characteristics.
Next, a frame is created, the side guides of which are attached to the wheel stands using bolts. The suspended equipment is then attached to the frame, then the control lever. It has 3 elbows measuring 20, 35 and 55 cm.
To increase mass and force, another larger lever is created - 80 cm.
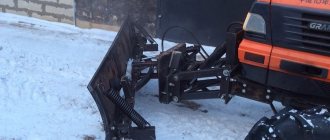
Blade for walk-behind tractor
The blade is a necessary device, which is needed at any time of the year. The front blade is used to clear snow, plan terrain, dig holes and move bulk materials. Such equipment for the Neva walk-behind tractor is of good quality, but not everyone can afford it. Do-it-yourself dumps require minimal financial investment. By installing the front blade on the Neva walk-behind tractor, you can solve many household problems. If there are levers and hydraulics, a homemade shovel can also be used as a loader.
To make a blade you will need the following tools:
- roulette;
- welding machine;
- electric drill;
- Bulgarian;
- spanners;
- acrylic paint;
- barrel 200 l;
- reinforced rubber;
- sheet steel 5 mm;
- profile pipe 40x20 mm;
- paint and brush;
- bolts and ties.
Before making a blade, it is necessary to calculate the compliance of the power of the walk-behind tractor with the dimensions of the bucket. Excessive load leads to rapid wear of parts and mechanisms of the unit. Depending on the weight and power of the machine, shovels are made 60-100 cm wide and 20-30 cm high.
Do-it-yourself snow removal for a walk-behind tractor is made in the following sequence:
- Applying markings to the barrel, sawing it into 3 equal parts vertically. Cutting 1 piece into strips 5 cm wide.
- Fastening 2 workpieces using bitumen and rivets. Aligning the edges of the product. Reinforcement of the bucket with transverse racks.
- Fastening strips of tin along the edges of the shovel. This is done by welding or bolts.
- Drilling holes for bolts. Attaching a strip of rubber to the bottom of the bucket.
- Making a hitch for a shovel. It is made by welding a piece of pipe and a semicircle of sheet metal to the blade. Holes are made on the sector to adjust the angle of attack. A homemade snow removal device is attached to the bracket of the walk-behind tractor with an adapter made of a profile pipe.
The finished product needs to be cleaned and painted. All bolted connections must be lubricated regularly to prevent corrosion.
Dimensions and features of making hedgehogs
A walk-behind tractor with an attachment for growing potatoes will save time and effort when caring for this crop. Weeding hedgehogs are a functional attachment that allows you to quickly and efficiently defeat weeds. During the weeding process, plants are not simply cut off, but uprooted. The soil around the plant is well loosened and hilled. Thanks to this, the plant is not only freed from weeds, but also receives sufficient water and oxygen.
Hedgehogs can be purchased at almost any agricultural store, but at a fairly high price.
Based on diagrams and drawings, you can make them yourself.
Ingredients for hedgehogs:
- 3 metal disks or rings;
- a small piece of pipe with a diameter of 30 mm;
- steel rods for cutting tenons.
It is preferable to use rings instead of disks , which will lighten the entire structure. The sizes of rings for making walk-behind hedgehogs are different. The most common are 240x170x100 mm or 300x200x100 mm. The rings are attached to the pipe through jumpers. The connection should be made at an angle of 45 degrees with a distance between elements of no more than 15-18 cm.
Spikes, cut from a steel rod 10-15 cm long, are welded onto the rings and the axle itself. Depending on the size, they are attached to a large ring in the amount of 15 pieces, and to a small ring - 5. Also, several pieces can be welded onto the axle.
To make it easier to work with the structure, the walk-behind tractor with hedgehogs is equipped with additional wheels.
Potato digger for walk-behind tractor
Potato diggers of various types are very popular among farmers. These devices save people from hard manual labor, speeding up the harvesting process several times. The walk-behind tractor has a very simple design. It can be made from metal that remains after the construction and renovation of a house.
To work you will need:
- Bulgarian;
- welding machine;
- electric drill;
- heavy hammer;
- anvil;
- profile steel pipe 20x40 mm;
- reinforcement 12 mm;
- tin (preferably stainless);
- bayonet shovel without handle.
The attachment to the walk-behind tractor is made in a suspended or trailed (modular) design. The hanging tool only digs up the tubers, leaving them lying on the surface for subsequent manual harvesting. A modular potato digger not only extracts the crop from the ground, but also collects it in a mobile container on a chassis.
The manufacture of a digger is carried out in the following sequence:
- Drawing up a drawing. The width of the digger should be within 25-30 cm. The angle of attack of the tip is taken perpendicular to the coulter so that the tool does not bury itself in the ground.
- The reinforcement is cut into fragments of a given length. Using a hammer and anvil, they are given the required bend.
- A container for tubers is assembled from a profile pipe and tin. The chassis or skids are welded to the container frame. The runners are made from pipes, and the chassis is taken from an old stroller, cart or lawn mower.
- The holder and reinforcement bars are welded to the shovel. A drawbar is welded to the holder, which is fixed to the assembly container. Connections are made movable using bolts or hinges.
- Rust and weld marks are removed. The finished product is treated with an anti-corrosion agent and coated with paint.
Adjustment and adjustment of the digger is carried out using racks and steel ties.
Included with the digger, you can immediately make a disk hiller. This tool will be needed when planting tubers after they have been buried in a trench made by a plow. Hillers are made from old pot lids, profile pipes and bolts. A trolley is assembled from pipes and small wheels, onto which holders for lids are welded at a certain angle. After sharpening on a stone, the discs are mounted on holders.
Types of attachments
The main motivation for purchasing any walk-behind tractor is cultivating the land. The designers paid maximum attention to this task.
The list of attachments offered for sale includes:
- plow;
- harrow;
- hiller (a type of plow with a V-shaped or disc-shaped plowshare);
- cutter;
- potato digger;
- potato planter;
- mower
Plows
The evolution of swing devices is embodied in the following types of devices:
- Standard plow . A wide knife - a ploughshare of such a device - loosens the ground when plowing, cutting off the roots of weeds. A bent sheet - the blade turns over the layer of earth.
The method of attaching a standard plow to a walk-behind tractor is illustrated in Figure 1. The main parts of this device: ploughshare, blade, stand, heel, field board are visible in Figure No. 2.
- Reversible (rotary, double-revolved) plow . Two plows are mounted on a common frame at an angle of 90 or 180 degrees. Their dumps are directed in different directions. In the working position, one of them plows the ground, and the second is located on the side. After passing the furrows, they are swapped by pressing (or removing) the latch and turning to the side. Thanks to this, the operator does not have to return to the beginning of the section each time, making an idle run.
- Zykov's plow . An improved version of the classic plow. It differs from it in the modified geometry of the plowshare-mouldboard surface. Thanks to the modification, it turns over the soil layer well and crumbles it.
Designed and produced in Ukraine, the Zykov plow is still rare in Russia. Only a few DIY enthusiasts are trying to reproduce it in home workshops.
Harrows
Soil turned over by a plow is a “semi-finished product” that requires finishing. For this work, a harrow is used, which breaks up large clods and levels the soil.
There are two types of harrows:
It should be noted that disc designs perform harrowing better and cleaner than toothed ones.
Hillers
This type of attachment for walk-behind tractors is designed for loosening the soil and creating furrows during sowing, planting seedlings and weeding.
By design, hillers are:
- single-row and double-row (with fixed and variable working width);
- disk;
- rotary (active);
Single-row hillers with a fixed width (25-30 cm) are designed to work with light walk-behind tractors (up to 4 hp). Variable working width and double-row installation allow you to use these devices on more powerful mechanisms and use them to process beds of different widths.
Rotary (propeller) hillers do not require the use of a hitch, since they are installed instead of walk-behind tractor wheels. Toothed discs of a special configuration loosen the soil well and pull out weeds between the rows.
Milling cutters
Can perform several operations:
- loosen and level the ground;
- crush lumps of soil and mix its layers;
- mix fertilizers;
- destroy weeds.
The walk-behind tractor usually comes with universal cutters equipped with saber-shaped knives. They are comfortable to work on soft soil. For dense and weed-filled soil, mechanisms called “crow's feet” are designed.
Read also: What key to use to adjust the carburetor on a chainsaw partner
The high mechanical strength and special shape of the cutters allows them to loosen neglected areas, pulling out weeds by the roots. In the fall, they are used to destroy insect pests that have hid in the ground for the winter.
Potato planter and potato digger
The main crop of our fields and summer cottages - potatoes - requires significant labor input during planting and harvesting. To mechanize these operations, two mounted units are used: a potato planter and a potato digger.
The first is equipped with a small plow that makes a furrow. Immediately behind it, a hopper is installed on the frame, from which the potatoes fall into the ground at regular intervals. Two inclined hiller discs attached to the back of the frame fill the bed. So, three operations are performed at once in one pass.
Anyone who has dug potatoes with a shovel at least once will certainly appreciate the usefulness of this simple device. The potato digger, mounted on the hitch of a walk-behind tractor, consists of a plow with steel rods welded to it. Lifting the soil under the bushes, he carefully removes the tubers to the surface. Collecting them in a bag or box after such processing is not difficult.
In addition to fan type diggers, there are more efficient vibrating screen type diggers. They are designed for processing large areas. Such equipment is connected through a power take-off shaft, which transmits torque to the potato digger pulley, causing the working elements of the mechanism to vibrate.
Mowers
Mowing grass is another important work operation performed by mounted units.
Two types of mowers are produced for walk-behind tractors:
The rotary design is easier to maintain. The segmented one resembles a hairdressing machine. It is more complex in design, but cuts the grass cleaner than a rotary one. This type of attachment is used for mowing large lawns.
In addition to purely agricultural implements, walk-behind tractors are combined with other devices:
- trailer-trolley;
- adapter (two-wheeled cart with a seat and without a body);
- snow blower;
- motor pump;
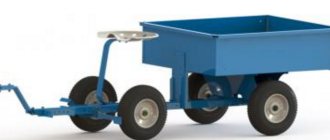
Trailer
Work on the land plot and on the estate is associated with the transportation of fertilizers and feed, crops and firewood. These problems can be solved using a trailer truck. It turns the walk-behind tractor into a “short-range” vehicle.
A useful option that some types of walk-behind trailers are equipped with is a tipper body, which makes unloading easier.
Adapter
A useful addition to the walk-behind tractor, giving it the functions of a mini-tractor. A good adapter saves the owner from tedious walking around the site.
By design, the adapters can be steering-less (only the seat, the hitch lift lever and the brake) and equipped with a steering wheel.
An adapter with a steering wheel is several times more expensive. Despite this, it fully justifies its cost if you take into account its performance capabilities.
snow blower
Many owners do not lay up their walk-behind tractor in winter. With its help, you can clear large areas of the estate from snow cover. Snow removal devices mounted with it can be divided into several groups:
- dump shovels;
- rotary throwers;
- brush mechanisms.
The simplest and most affordable is a dump-type device. The width of the shovel fixed to the front of the walk-behind tractor can be from 0.8 to 1.5 meters. The choice of its size depends on the power of the motor. The design of the blade allows for adjustment of the tilt and rotation angle.
Where a shovel is helpless, and this often happens with high snow drifts, a rotary snow blower will do the job. It is connected to the power take-off shaft of the walk-behind tractor. The rotary auger design has high performance and confidently clears the area of snow cover up to 50 cm high.
The brush attachment is used for cleaning areas with expensive decorative coatings that require the most careful work.
Motor pumps have been created to irrigate plots located far from power lines and close to water bodies. This type of attachment for walk-behind tractors is connected to the power take-off shaft. The average productivity of motor pumps is 20-40 m3 of liquid per hour. The created pressure reaches 4-5 meters with a suction depth of up to 10 meters.
Manufacturing a field sprayer for a walk-behind tractor
A homemade sprayer for a walk-behind tractor is necessary in cases where the area of cultivated crops exceeds 20 acres. Doing this type of work manually is very difficult and can take a whole day. Mechanization of this process will save a lot of time and effort.
To make a sprayer you will need:
- welding machine;
- Bulgarian;
- level;
- electric drill;
- soldering iron for polypropylene pipes;
- profile or round water pipes;
- plastic or steel barrel with a capacity of 80-100 l;
- wide pneumatic wheels;
- plastic pipes;
- rubber hose;
- injectors or nipples from wheel tubes.
Assembling a homemade sprayer is carried out in the following sequence:
- Making the frame. Its dimensions are adjusted to the size of the container. The chassis is attached to the frame. For good cross-country ability you need at least 4 wheels. In the absence of wheels, wide skids are made of aluminum.
- The container is installed and secured on the frame. For this purpose, spacers and ties are used. Holes are made in the tank for supplying high-pressure hoses. The tank neck is sealed.
- A bracket for the pump is being manufactured. A model is selected that operates from a power take-off shaft (belt drive) or from electricity (motoblock generator).
- The irrigation system is being assembled. A durable holder is made from steel profiles. Plastic pipes are attached to it using clamps or plastic ties. A valve is being installed to bleed off excess pressure and injectors.
- All parts are connected together, the quality of the fastenings and the tightness of the joints are checked. The tank is filled with water, the unit is tested in various modes, and final adjustments and settings are performed.
A self-made sprayer will fully justify the efforts invested in the first season. Thanks to this device, spraying and watering the garden will be done quickly and efficiently.
We build a walk-behind tractor according to instructions from Arkhipov
Design features of the unit
The walk-behind tractor is a self-propelled machine on two wheels, equipped with an engine removed from a VP-150M motor scooter. The reason for choosing this particular engine was that it has a design solution that allows forced air cooling of the cylinder head.
Such a motor from a scooter is capable of operating at the lowest speeds and at fairly heavy loads.
To build the walk-behind tractor, the master used control cables, engine mounts taken from a motor scooter, as well as a double arc of the frame, handles and chains. The rest of the design details were industrial production
Separately, the designer produced a U-shaped frame welded from pipes and a wheel axle turned on a lathe. He also made 3 homemade hinges for the main and control rods. They will be used as connecting elements between the walk-behind tractor itself, its steering wheel and the plow.
A steel pipe is attached to the frame of the unit by welding, ending with an axis, which is necessary for tensioning the cables going to the engine gearbox. The tension itself is carried out by means of a swinging rocker arm, the gear shift knob of which is a welded section of steel pipe.
The pitch of the chains used to create the device is 12.7 mm and 15.9 mm. Number of teeth on sprockets: output shaft – 11, secondary shaft – 20 and 60, drive axle – 40.
What is good about this particular design?
There are dozens of analogues of this model, but in comparison with them, the original model of the Kaluga master’s walk-behind tractor has a number of undeniable advantages.
- Swivel joint. The processing tools and tractors of most of these models have a rigid connection, which complicates the maneuvering of the unit and thereby makes it difficult to work with it. The parts of this agricultural unit are connected by means of hinges. This makes it possible to change the direction of movement during work, if necessary, without removing the plow from the furrow.
- Shift of the axis to the direction of movement. Many owners, when cultivating soil using a walk-behind tractor, have encountered such a difficulty that in the process of moving forward under the influence of soil resistance, the unit moves to the side. To level the furrow, a lot of effort must be made. To compensate for such a skid, the master positioned the plow axis at a slight angle in the direction of movement. When plowing, the structure is slightly turned to the left. The desired position can always be adjusted using three rod joints.
- The level of the specified plowing depth. If in other models the plowing depth is maintained by lowering or raising the plow, then when working with this walk-behind tractor it is performed automatically. Regulation is carried out by changing the angle of the plow in relation to the furrow. The structure is equipped with a field board, which acts as a lifting force when burying the plow. If, on the contrary, the ploughshare appears above the surface of the earth, then its angle of attack instantly increases, under the influence of which it again plunges into the ground to a given depth.
Homemade variator for walk-behind tractor
The variator allows you to smoothly change speed without sudden jerks, saves fuel by transmitting torque. Motors from a walk-behind tractor are often used as a generator to provide electricity to living quarters, local areas, and also to operate lathes.
A homemade variator can be made in different ways, the easiest way is to use a ready-made variator, which can be converted for a specific walk-behind tractor. Another way is to use ready-made parts from gearboxes and other mechanisms. You can also make parts yourself, provided you have special equipment (discs require hot stamping). Diagrams and videos for creating parts and assembling pulleys are easy to find on the Internet.
You can make a variator from wheel hubs, the main thing is to make a hole diameter suitable for the crankshaft. In addition to pulleys, a variator requires a belt, which is one of the most important parts. The belt must be strong, and all parts of the variator must be lubricated regularly.
General rules of constructions
Homemade products for driving on snow are varied in appearance, size, layout, power, and even the principle of movement. But in each variety there are components that provide the properties necessary for snowmobiles, namely:
- Don't fall into the snow.
- Move along the surface with minimal friction and in the desired direction.
Obviously, the probability of sinking into the snow and the friction force depend on the weight of the unit, the contact area, and the shape of the surface of contact with the snow. Of course, the condition of the snow has its influence, but this must be taken into account.
To fulfill its main purpose, the following components are always present in the design of a snowmobile:
- supports in the form of runners, wheels or tracks to support the weight of the structure with passengers on the snow surface,
- engine with gearbox, transmission device and fuel tank,
- propellers pushing the structure along the snow surface,
- steering device that changes the vector of interaction with snow to turn,
- frame on which all components are mounted.
Making homemade products is simplified by the availability of parts from specialized equipment. Often spare parts are taken from Buran snowmobiles or any tools and vehicles with motors: scooters, motorcycles, walk-behind tractors. The scope for creativity when creating each node is huge. There are many varied and proven solutions for every detail.
Four principles for making your own all-terrain vehicle tire
- 1. Two disks made of sheet metal bridge each other. Then they are attached to the sleeve and the camera is put on them. It is fixed with pieces of conveyor belt. For greater camera protection, a protector from another camera is sometimes used.
- 2. Attach one disk to the sleeve. After that, jumpers are attached to it, to which the side rings are riveted or welded.
- 3. The design is similar to the previous construction principle. In this case, when installing the central disk, a spoke made of pipe or sheet metal is required.
- 4. The fourth principle is to mount two discs on the hub, like a motor scooter wheel disc.
Let's finish here. Of all the options, you can use the one you like best. You just need to decide what the purpose of the machine is and get to work!
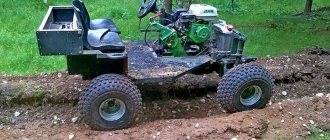
Homemade loader from a walk-behind tractor
A loader made from a walk-behind tractor is a necessary thing in the household. Buying a ready-made loader is very expensive; this is only necessary if there is constant work involving transporting goods, clearing terrain, etc. Loaders are mainly used in households for clearing snow and transporting various goods, so it would be cheaper and more efficient to make a forklift yourself.
Craftsmen are constantly coming up with new versions of this equipment, so there are many modifications, among which there is a suitable option for everyone. The loader can be assembled from special parts, or you can use what many people have in their garages. Parts from old cars and motorcycles are suitable.
The walk-behind tractor must be equipped with a powerful engine. The heavier the loads, the more powerful the equipment should be. Even walk-behind tractors with 15 hp motors. lift no more than 250 kg. A counterweight is required.
You can take the drawings of a fracture mini-tractor as a basis. The frame is made of a channel, the fracture unit is a fist from a VAZ, the steering column and shortened axles are from any car, the P40 hydraulic distributor, the bucket can be made independently, or you can use a ready-made one.
How can you upgrade a homemade walk-behind tractor?
The Arkhipov walk-behind tractor is multifunctional. It can be used as a plow or a cultivator. To do this, it is enough to replace the removable parts for the plow with parts with removed moldboards for the cultivator. As it moves, the walk-behind tractor will deepen furrows into the ground and place potato tubers in them. To plow the tubers, you just need to put the moldboards in place and walk the unit between the planted rows.
The same principle can be used to hill up sprouted plants. You can learn more about how to independently design a hiller for a walk-behind tractor from the material: https://diz-cafe.com/tech/okuchnik-svoimi-rukami.html
The agricultural unit is also convenient for harvesting. Using different blades you can change the working width. The unit is also good because it is capable of collecting missed potatoes and plant tops remaining after harvesting. For these purposes, it is equipped with a rake or harrow.
The universal design can be used not only for agricultural work. In winter, it is successfully used for snow removal. A faithful assistant will also come in handy for cleaning the paths of the local area. By installing a roller with a round brush and an additional sprocket on the walk-behind tractor, the owner will make it easier for himself to clear the sidewalks.
Homemade products for walk-behind tractors are invented and made by almost all owners of this equipment. The purpose of these actions is to expand the functionality of the unit with minimal financial investment. In the basic configuration, the motor cultivator has extremely limited capabilities. Installing various options on it can turn a small machine into a full-fledged mini-tractor. Often, homemade devices are in no way inferior to factory-made analogues. In order to improve a walk-behind tractor with your own hands, a set of tools that are available in every workshop of a country house or cottage is sufficient. The materials you need can be found at a junkyard, shed, or scrap metal collection point.
Homemade products for the Neva walk-behind tractor
Attachments and trailed equipment significantly expand the functionality of walk-behind tractors. Some equipment is included, for example, cutters, but the rest must be purchased. If you purchase the entire arsenal of additional devices for the Neva walk-behind tractor, it will be too expensive, which is why homemade products and inventions from improvised means are so in demand.
What accessories for a walk-behind tractor can be made at home?
- Rake
- Hillers
- Plow
- Seeder
- Milling cutters
- Shovel
- Adapters, trolleys
- Mowers
There are detailed articles and videos on the Internet on how to make these devices. Another important improvement for the walk-behind tractor is the muffler. It comes standard as part of the exhaust system, but does not always suppress noise. You can make a quiet muffler using this scheme:
Manufacturing of additional accessories
Walk-behind tractors go on sale assembled and with minimal equipment. A plow and a cutter are clearly not enough to perform the entire volume of agricultural work. A factory kit for converting a walk-behind tractor can cost more than the unit itself. You can make various attachments and trailers from scrap materials, using tools that are in every pantry of a country house or cottage.
Drawing of cutters for walk-behind tractor
Drawing of a plow for a walk-behind tractor
Drawing of a trolley for a walk-behind tractor
It is worth considering some options for making additional equipment yourself:
- A converted rake for collecting grass clippings, debris, branches and fallen leaves. If you do this work manually, it will take a lot of time and effort. Trailed equipment will allow you to clean large areas within a few minutes. To work, you will need a wide strip of sheet iron and several meters of reinforcement with a cross section of 8-12 mm. The reinforcement must be cut into pieces 10 cm long and welded to the plate in several rows and at intervals of 3-4 cm. Long rods are welded to the plate for attaching to the walk-behind tractor frame. Trailed rakes can be equipped with rollers to improve maneuverability and smoothness.
- Snow plow. Most units operate much more efficiently in the cold because they do not overheat. You can mechanize snow removal in winter. The blade is made from two pieces of channel welded together. This allows you to get a gripping height of up to 40 cm. The width of the blade is selected according to the power and weight of the unit within 40-80 cm. The blade is attached rigidly to the front of the machine with bolts. Initially, it can be mobile or stationary.
- Trolley and trailer. The walk-behind tractor cannot be driven on the road, so it does not have to be adjusted to the requirements of the traffic rules. The cart is made from a corner, a channel and old wheels from a small car, and a trailer is attached to it. It is made from metal profiles and boards. The towing clutch is made standard, like for cars or tractors.
By showing a creative approach, you can make a hiller, harrows and potato digger that are not inferior in quality to their factory counterparts.
What can be made from a walk-behind tractor
The use of specialized equipment allows you to solve a wide range of problems. However, some owners want to get even more functions from the walk-behind tractor.
Do-it-yourselfers are constantly inventing something and showing what can be made from a walk-behind tractor. Upgraded adapters turn into mini-tractors; you can also create a snowmobile, swamp vehicle, or ATV. By replacing the wheels with caterpillar tracks, you get a motorized towing vehicle.
These and many other amazing homemade products, methods for creating them, drawings, etc., are available at the link:
Power plant modernization
Despite the fact that the Neva walk-behind tractor is equipped with reliable American and Japanese engines, they will only produce the required power if they are regularly serviced. With use, the quality of gaskets, spark plugs and cylinder rings deteriorates. A necessary operation is the periodic replacement of the oil seal on the gearbox.
You can improve engine and transmission performance in the following ways:
- Seal all gaskets using special sealant. This will help maintain high compression and prevent oil leaks.
- Clean the spark plugs regularly and adjust the gap. You need to change spark plugs regularly, without waiting for them to fail.
- Install a stainless steel manifold. A modern exhaust system almost completely dampens vibration and noise from a running engine.
It is necessary to change the oil in the gearbox frequently. To prevent leakage during prolonged operation, the oil seal must be replaced regularly. You need to buy only the highest quality spare parts.
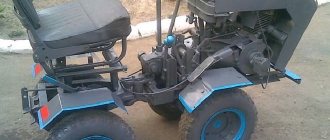
DIY walk-behind tractor
The advantage of a homemade walk-behind tractor is its price. If it is assembled with high quality, its characteristics will not be inferior to the factory ones.
It is necessary to determine which area will be processed by the walk-behind tractor, and what characteristics the soil has. This determines how powerful the engine should be.
The motor will fit from other agricultural equipment (from a chainsaw), but in this case it is necessary to supplement it with a forced cooling system. It is also necessary to create a frame to which the engine, wheels, and handle will be attached.
More detailed information on how to make a walk-behind tractor with your own hands can be found here:
What can you build on your own?
The market for factory-produced walk-behind tractors offers customers a fairly wide range of products to suit every taste. However, not many people can afford the prices for such agricultural machinery. Therefore, in gardens in rural areas, you can quite often find a homemade walk-behind tractor, which in terms of operational parameters is in no way inferior to its factory counterpart.
When creating universal designs, craftsmen most often use parts of old motorcycles and scrap metal
Morally outdated motorcycle models often serve as the basis for the manufacture of various homemade products and small-scale mechanization tools useful in the household.
Since homemade walk-behind tractors are often created from scrap old materials, the Druzhba saw motor, known to many, is often used as the engine of the unit.
Based on homemade walk-behind tractors, craftsmen create tools that are no less important in agriculture, for example: plows, as well as hillers for hilling corn or potatoes
One of these masters is the inventor Valentin Arkhipov, who is the author of the manufacture of a number of useful devices and the construction of all kinds of household equipment.
A talented designer has created a multifunctional device with which you can not only plow and harrow the land, but also plant and hill tuber crops, as well as harvest and rake tops
Therefore, when thinking about how to make a walk-behind tractor with your own hands, it is better to opt for this proven and successfully used option. Any person can handle a simple and easy-to-use agricultural implement.
Do-it-yourself jack for a walk-behind tractor
A jack is necessary for the convenience of carrying out repair work: replacing a wheel, installing lugs, etc. The scissor type is suitable for walk-behind tractors. Drawings and photos with step-by-step instructions for creating a jack can be easily found on the Internet.
A scissor-type jack can be created by converting a screw jack, or it can also be made from specially created parts. Both options are easy to implement and require minimal costs. However, special equipment is required - an angle grinder, a drill, a welding machine.
The basis of such a device is represented by two identical frames, to which metal plates installed crosswise are welded.
Do you use homemade products for walk-behind tractors?
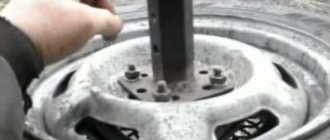
Wheel lugs
Lugs are a modified group of wheels that do not have tires or tubes.
The main purpose is to carry out work in the fields (the key value is adhesion to the soil).
They mean steel wheels with special external inserts that provide significant assistance when moving.
Kum 680 wheels for hilling
A distinctive feature is the presence of:
- solid rim;
- the spikes protrude 7 cm.
Wheel sizes of the Neva walk-behind tractor of this modification:
- diameter along the spikes – 43 cm;
- rim diameter – 35 cm.
The width of the lug is 20 cm.
The total weight of the structure is 16.5 kg.
Installation is carried out on the gearbox shaft - no additional connections are provided.
Universal wheels Kum 540 for hilling
A distinctive feature from the 680 model is not a solid rim, but the presence of only a side - it is full inside. In addition, the spikes do not have an inclination to one side, but have a V-shape.
When moving into the ground, traction with the ground is provided not only by the studs, but also by the rim itself, due to which the maximum effect is achieved.
Diameter is:
- along external spines - 54 cm;
- along the rim – 46 cm.
- width – 9 cm.
Universal wheels Kum 540 with long hub
KUM 540 is often used for hilling, but the bushing is already installed - it is connected directly to the gearbox shaft.
An additional distinctive feature is the width of the stake, which can reach 68 cm.
Main characteristics:
- number of hoops – 2 pcs.;
- diameter along the wheel at the studs – 540 mm, at the hoop – 460 mm. Spike width – 90 mm;
- The bushing diameter is 30 mm.
Installation is carried out on the gearbox shaft. The total weight does not exceed 13.5 kg.
H lugs for plowing
Features include large diameter and width. They are used when it is necessary to work with virgin soil or plots after winter inactivity, when the surface is still hard and requires preparation.
Characteristic:
- width – 20 cm;
- diameter along the spikes - 43 cm, along the hoop - 35;
- spike height – 8 cm.
Provide the best cross-country ability for your equipment. Installation is possible on the shaft of the Neva walk-behind tractor or on extensions - depending on the specific situation.
In the case of direct installation, the track width will be 40 cm; when using an extension, it will vary from 65 to 70 cm.
Mini H lugs for plowing
The lugs for Neva cultivators are similar to the KUM model range.
Main characteristics:
- wheel diameter – 32 cm;
- width – 16 cm;
- pair weight – 8 kg.
The best option for plowing soil.
H lugs for plowing with long sleeve
Full identity with the considered model range. The only difference is the presence of an already mounted bushing.
In this modification, the track size is fixed - 65 cm.
Mini H lugs for hilling
Today they are considered one of the lightweight MINI N models for plowing. During hilling, the soil is already prepared and not hard, which is why there is no need for a massive type.
The diameter of the hoop is set to 28 cm, and the width for hilling is 9 cm.
Weight does not exceed 4.85 kg.
Designed for use in summer and winter.
Modernization of walk-behind tractor. TOP 7 ideas for tuning a walk-behind tractor
For those who bought a Neva walk-behind tractor, reworking and modernizing this unit becomes an urgent task after the first season of operation. Despite the fact that domestic equipment is durable and reliable, it is quite difficult and not very convenient to work with. Refinement of the Neva walk-behind tractor will not only reduce the load on the operator, but also significantly expand the capabilities of the machine. A specialized workshop will also help you tune the walk-behind tractor, but the cost of such work may exceed the price of the equipment itself. You can convert a heavy motor-cultivator into a multifunctional mini-tractor yourself. This will require a minimal financial investment. All that is needed in order to carry out a major overhaul and modification of the Neva walk-behind tractor is time and the ability to use household tools correctly.
Features of the Neva MB-23S-9.0 walk-behind tractor with a 9 hp Subaru EX27 engine: video of use
Among all engine options for walk-behind tractors Neva, Subaru 9 hp. is the heaviest and most powerful. A model with such an engine is perfect for solving a wide range of tasks and can be used regardless of the time of year.
A distinctive feature of the engine for the Neva Subaru walk-behind tractor with 9 horsepower is the ability to use any type of attachment. In addition, the MB-23 model is characterized by a reinforced gearbox design, on which an additional cutter can be installed on each side. This allows you to simultaneously cultivate a plot of land up to 170 cm wide.
There are also several other reasons for purchasing such a model. If you decide to buy a Neva Subaru EX27 walk-behind tractor, you will save significantly on fuel for the unit. A special balancing device effectively suppresses vibrations and reduces noise during operation. The model starts up equally easily both at above-zero temperatures and in cold weather.
Homemade or purchased, which is better?
Having decided to install attachments on your “Cascade” walk-behind tractor, this issue will not be the least of your concerns. Additions are required for absolutely all models. Thus, equipment for heavy walk-behind tractors must be professional. However, most “Cascade” models allow the use of handmade attachments. The main thing here is the quality of the products, the absence of even the slightest errors in their manufacture.
Also, in order to save money, you can freely take used equipment, but, of course, carefully check its condition and suitability for work. The finished product market will provide you with a choice of many price options for both new and used additions to your walk-behind tractor. The main thing is to have a sufficient understanding of what you need, as well as to know exactly all the features of the specific model you own.
Increased speed and maneuverability
These questions are relevant for those who have to work on heavy and damp ground, on ups and downs. Even the most advanced models can slip, forcing the operator to exert additional effort to push the machine forward. Many people are not satisfied with the speed of the unit when towing equipment or transporting various loads.
There are several ways to solve these problems:
- Increase wheel diameter. Most walk-behind tractors are equipped with wheels with a diameter of 25-30 cm. If you install 45-50 cm wheels from an old small car, the speed of the unit will double. But you should not make a racing car out of a walk-behind tractor, since this device is not highly durable and has good stability. You can accelerate to 25-30 km/h only on a flat road without sharp turns.
- Manufacture and install weighting materials. For such factory-made devices in the store you will have to pay a large sum. It is better to make them yourself from scrap materials. Weights are placed on the wheels and on the frame. The wheel weight is made of steel wheels and a hexagonal solid profile. The welded parts are inserted into the hubs with a hexagon and secured with cotter pins in the drilled holes. Instead of iron disks, you can use reinforced concrete blanks or flat round flasks with a neck, into which sand is poured. The body of the walk-behind tractor is weighted using removable frames from the corner. Loads of various weights and configurations are already screwed to the frame.
- Secure the tracks. This solution will allow you to turn the walk-behind tractor into a full-fledged low-speed snowmobile. It is enough to install another axle with wheels and purchase wide rubber tracks. Stoppers need to be attached inside the tracks to prevent them from jumping off the wheels. A homemade snowmobile can also be useful in the spring, when the soil is wet and the terrain is impassable for conventional equipment. As a kit for a homemade snowmobile, you can make a sled for transporting various property through the snow, going hunting, fishing, or to the nearest store after a snowfall.
There are many opportunities for radical transformation of even a small domestically produced walk-behind tractor. This equipment can be transformed into any agricultural implement and off-road vehicle.
Basic faults
Belt adjustment and dimensions
For the Neva MB-2 walk-behind tractor, the A-1180 drive belt is used. This model uses one belt that provides forward movement.
In other modifications of the Neva MB-2 model, two drive belts are used. Reverse gearing occurs in the gearbox itself.
Replacing the belt for MB-2 walk-behind tractors is carried out in the following sequence:
- The shield is removed, and then the pulley protective cover.
- The spring from the walk-behind tractor rod is removed to loosen the belt.
- The screws securing the bracket are turned.
- The bracket rotates to a position in which the limiting pins do not prevent the part from being removed from the pulley.
- The pulleys are adjusted, and then a new belt is installed.
- Pull the belt onto the gear shaft pulley, and then onto the motor pulley.
- In reverse order, place the remaining parts in their places.
Replacement of gearbox seals
The oil seals in the Neva MB-2 walk-behind tractor are replaced if an oil leak is detected.
This condition is dangerous because the walk-behind tractor gearbox may be left without oil, and this will lead to rapid wear of the unit.
The sequence for replacing oil seals is as follows:
- Remove the cutters from the shaft, cleaning the shaft and covers from dirt and oil residues.
- Unscrew the cover bolts, tap off the oil and debris, and remove the cover from the gearbox.
- The old oil seal is replaced with a new one and wiped dry.
- The cover is returned to its place (if necessary, it is placed on sealant) and fixed with bolts.
Adjusting and tuning the Neva MB-2 carburetor
Neva MB-2 device
The functionality and durability of the walk-behind tractor engine depends on the stable operation of the carburetor. This is why its adjustment and tuning are so important. In addition, if the carburetor is incorrectly configured, a gasoline walk-behind tractor may experience increased fuel consumption
The carburetor of the Neva MB-2 walk-behind tractor is adjusted as follows:
- The full throttle and idle screw are turned to the limit.
- Both screws are unscrewed 1-1.5 turns.
- Next comes starting and warming up the engine.
- The throttle control lever is placed in a position in which the engine will operate at minimum speed.
- Set the minimum idle speed until the unit operates stable.
- The idle speed is set to maximum.
- The minimum idle speed is adjusted.
- Steps 6 and 7 are performed until the engine runs smoothly (more smoothly by ear) at idle speed.
For long-term and uninterrupted operation of the walk-behind tractor, it is necessary to regularly perform engine diagnostics, monitor the frequency of oil changes, and also comply with operating conditions and time intervals for scheduled maintenance.
Adjustment of valves
Adjusting the valves is a fairly simple procedure that requires wrenches, screwdrivers and a feeler gauge. The valve adjustment process is needed to establish optimal and technically correct clearances between the valves of a walk-behind tractor engine. Adjusting valves using the example of the Neva MB-23 walk-behind tractor (the principle is the same for everyone)
The adjustment sequence is as follows:
- remove the casing that covers the engine;
- remove the valve box cover;
- make adjustments (see below);
- Reinstall the valve box cover;
- Replace the casing.