Frame
Creating a case is one of the difficult stages. Suitable materials for this are fiberglass or fiberglass. Sheet metal can also be used, but an artificial body kit will weigh less.
First, a “blank” of the body is cut out of pieces of foam plastic, for which you will need to develop a preliminary drawing. Fiberglass is applied to the prepared form. There will be several layers, so metal fasteners are installed between them for subsequent fixation of the new body kit to the frame. To ensure that each layer is properly bonded to each other, they are additionally coated with epoxy resin. The body needs to be thoroughly dried, and then primed and painted.
After installing all components and connecting the systems, you need to check the functionality and run the vehicle, gradually increasing the load.
Read also: Setting up the clutch of a VAZ 2114
The ATV perfectly combines the advantages of a motorcycle with its maneuverability and mobility and a mini-jeep with handling, maneuverability and power. But thanks, among other things, to high demand, buying such an SUV from a warehouse costs a lot of money.
To build an ATV with your own hands - what do you need for this, what components and assemblies, tools and materials? Which “donor” vehicle is suitable, from what components should the quad be assembled? Where to start the assembly and in what sequence should all the work be carried out? Let's figure it out!
How to make an ATV with your own hands is a difficult and responsible task, but feasible for a master who has mastered welding and turning. The effort and time spent are paid off not only by large savings, but also by the result obtained - an exclusive, original model of a quadric that no one else has.
Features of assembling a homemade vehicle highly depend on the chosen base - the engine and other elements that are used by the craftsman.
6 best options for a base (“donor”) for those who have set the goal of how to make an ATV.
- Motorcycle "Ural".
- Motorcycle "Izh".
- Motor scooter "Ant".
- Another motor scooter (scooter).
- Car "Niva".
- Oka car.
Most often, some structural elements are taken from a motorcycle, others from a car.
In addition to the parts (components) for the quadric, its creator will need:
- assembly “shop” - a fairly spacious garage equipped with good heating and lighting will be useful in this capacity;
- a set of equipment and tools;
- blueprints.
To watch online, click on the video ⤵
Motor scooter ant engine IZH-planet 3. Read more
Moto scooter with Planet 5 engine. Read more
ant with planet sport engine 28 liters Read more
Ant mountings for installing an IZH engine Read more
IZH Ant part 3, engine installation and a short ride on it. More details
Izh with an ant engine. More details
Review of the Ant scooter, a dump truck with a lifting mechanism. More details
Motorcycle pickup truck based on IZH P5 and Ant. More details
Ant 2m01 with IZH Planet 3 engine Read more
Ignition from a chainsaw on a tula Read more
Izh planet scooter snow removal, Read more
Tricycle from Izh Planet MurIZh Read more
Ride on Ant. with engine IZH Planet 3 Read more
Motor scooter Ant (TGA-200) with an engine from a disabled woman. A short review. More details
How to increase engine power of an Izh motorcycle Read more
Review of Homemade mini tractor with IZH Engine Read more
source
About the device of the walk-behind tractor
Next, you will find out which walk-behind tractor is better to choose. To make it clearer what the principle of homemade walk-behind tractor manufacturing and its additional components is, you need to consider in detail the structure of the walk-behind tractor as a means of small-scale mechanization. So, this unit includes several main working units:
- The main driving force, i.e. engine.
- Transmission.
- Chassis.
- Basic controls.
Engine
The main driving force in the design of walk-behind tractors is a standard internal combustion engine. Depending on the type and brand of walk-behind tractor, for example Cayman Vario, Patriot Ural, Texas, Foreman, Crosser, Viking, Forza, the engine used may be different:
- Gasoline 4-stroke engine. This engine is used for units belonging to the light and medium class of devices.
- Diesel 4-stroke engine. Motors of this kind are used on heavy and powerful walk-behind tractors designed to work on the most difficult surface areas.
Video: The best diesel walk-behind tractor
For more information about the operation of a diesel walk-behind tractor, watch the video:
- The system responsible for supplying fuel. Consists of a fuel tank, carburetor, air filter and fuel hose.
- A lubrication system that carries out the process of lubricating those parts that rub against each other.
- A starter that spins the crankshaft.
- A cooling system that removes heat from the engine cylinder block using air flow.
- An ignition system that produces a spark at the spark plug.
- A gas distribution system that ensures the flow of the air-fuel mixture into the engine cylinder and is also responsible for the exit of exhaust gases.
Transmission
The main function of the transmission is to transmit torque from the engine to the wheelbase, as well as regulate speeds and change the movement of the unit. Its design includes several working units: gearbox, clutch, gearbox and differential (not available in all models).
Transmission can be of several types:
- Gear.
- Belt.
- Chain.
- Combined.
Basically, the classic type of gear transmission is used on heavy walk-behind tractors, and it consists of bevel and cylindrical gears.
Other types of transmission are used in light and medium types of walk-behind tractors. At the same time, regardless of the type of transmission, the design contains a PTO - a power take-off shaft, which transmits torque to the working units of the unit.
As for the clutch, it can be different:
- In the form of a V-belt transmission. The essence of the process is the clutch lever, which tightens or loosens the belt, thereby transmitting or stopping the transmission of torque from the motor to the gearbox.
- Single or multi-disc dry or wet clutch.
- Conical coupling.
Most high-quality walk-behind tractors Sadko, Don, Huter, Profi, Plowman, Champion, Carver use the second type of clutch, which is the most reliable.
Chassis
The chassis includes not only the wheelbase itself, but also the frame structure to which these wheels are attached, and where the main working units of the walk-behind tractor are located.
Today, there are two types of wheels - pneumatic and metal with lugs.
Basic controls
The walk-behind tractor control is located on the handle of the unit, responsible for changing the speed and direction of movement of the device. The controls include:
- Levers, steering wheel and gear shifters.
- Clutch control.
- Engine stop lever or button.
- Gas supply, etc.
The design of the walk-behind tractor does not have a seat for a person (as in the Salyut walk-behind tractor), so the control itself is carried out by a person with his own hands.
factory assembled
It is produced by domestic industry at agricultural engineering enterprises.
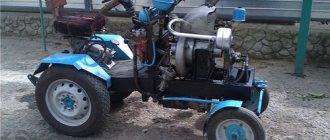
It is a gasoline engine on a two-wheeled platform, capable of both rotating the wheels of the chassis and driving cutters for cultivating the soil. “Ant” is capable of processing hard and virgin soil. In addition to the cutters, it is possible to install a plow or hiller on it. Four-stroke petrol engine with 7 horsepower. This allows you to plow the soil to a depth of 30 cm. The fuel tank holds up to 3.6 liters of gasoline, the crankcase volume is 0.6 liters. The transmission is a belt drive and chain reducer with a cast iron pulley. Speeds can be switched when moving forward; moving backwards provides only one speed. The engine has a manual starting system. The walk-behind tractor can provide a plowed strip width of up to 80 cm. The steering column can be adjusted both in the vertical and horizontal planes. The result is a fairly powerful and easy-to-use device. The only drawback can be considered the relatively high cost, which forces most owners of dachas and plots to prefer making its analogue with their own hands. A homemade walk-behind tractor will cost several times less, and the consumer qualities of the mechanism will differ little from its factory-assembled counterpart.
Other modification options
In addition, you can also make other equipment from a walk-behind tractor. For example, you can get a dumper, a pneumatic duct or a vibrating plate. Also, some craftsmen make a loader or snowmobile from a walk-behind tractor. Many people use walk-behind tractors to harvest corn.
Snowmobile
This design allows you to move comfortably in the snow. To do this you will need fairly wide wheels. The caterpillar can be obtained from an old snowmobile. It will be able to fit under the wheels of a walk-behind tractor. The snowmobile itself is made from a frame, tracks, and some suspension elements. The mount can be used from a walk-behind tractor. After the modification, you get an excellent snowmobile, which is also suitable for hunting in swamps. Therefore, the result is both a swamp vehicle and a snowmobile.
Motorized towing vehicle
Sometimes when buying a factory motorized towing vehicle you have to face many disadvantages. Therefore, most often they are made with their own hands. They turn out to be quite durable if you use a walk-behind tractor for this. This design will do its job perfectly and also save fuel. In addition, it will be possible to attach compartments to this design to store the necessary tools.
Excavator
As a result, this technique will turn out to be quite compact and convenient. However, to cope with this work, you first need to make drawings. All work with drawings must be done in great detail - this will greatly facilitate further work. After this, you can move on to the design itself. First you need to make a frame, you can use a channel. After this, you need to attach the beam (up to 11 meters in size) to the frame. Springs and springs are not needed. For a simpler option, you can use a homemade axle on which wheels are mounted. The result is a chassis. Next, using a special machine, you need to grind out all the mechanisms that will be needed for movement, as well as brackets and fastenings for hydraulic cylinders.
The ladle can be purchased at the store. For hydraulics, you will need to buy a pump, and you can also use cylinders from an old KamAZ. You also need to purchase a hydraulic distributor, which will be needed to control the excavator.
When all spare parts have been purchased, you can begin assembly. Then you need to connect the power take-off shaft of the walk-behind tractor, as well as the oil pump through the cardan. After this, you need to connect all the hydraulics with high pressure hoses. Next, the finished structure must be painted, and all parts must be lubricated, after which it must be tested in operation.
Motor drill
Many fishermen no longer want to go fishing with a conventional drill, so some of them decide to convert a walk-behind tractor, which is not needed in winter, into an ice ax. You don't need to use any special effort for this. You just need to rearrange the wheels of the Zhiguli, and also make an attachment to set the drill in motion. After which you can safely go fishing. In the summer, the walk-behind tractor will be able to be used for its intended purpose again.
Important Technical characteristics of the Mitsuber front loader
Motor winch
This homemade walk-behind tractor can be made at home. This will help save money. For manufacturing you will need a motor, a frame, and both shafts: upper and lower. The motor for this can be taken from a chainsaw. In addition, it is necessary to make drawings, and then begin assembly.
Thus, if you show a little ingenuity, as well as get some parts and make high-quality drawings, you can use the walk-behind tractor as the starting material for the manufacture of a large number of devices that will become indispensable assistants in the household at different times of the year
However, it is important to strictly follow the assembly instructions and follow all recommendations
Electrical equipment, light, lighting
Residents of small towns or villages are well aware of the role any woodworking equipment plays in their lives, which most likely many have had to use in their work. Nowadays, the construction market is replete with a large number of different models of woodworking equipment, with sawmills being the most popular. All sawmills are divided into frame, disk and band sawmills, which differ in the type of cutting tool. The tire sawmill differs radically from them in its design.
Content:
Purpose of the tire sawmill
Man has long been using wood of different species to make objects that are necessary for his life. During this time, people worked to modernize woodworking equipment. Hand saws, which were used in the past, have practically sunk into oblivion. They have been replaced by more modern and convenient machines, which include a chainsaw, multi-saw and edger, as well as tire sawmills.
Any construction or maintenance of buildings is accompanied by large financial expenses, which is associated with wood processing: sawing timber, preparing boards, manufacturing rafters, beams or furniture parts. All this, of course, you can purchase at retail in a retail chain, but when you buy a new tire sawmill, all expenses will quickly pay off, and with the help of your own woodworking machine you will build a house, a bathhouse, a garage, a country house and a summer gazebo.
The main purpose of a homemade tire sawmill is high-quality longitudinal sawing of logs of any type of wood for the production of unedged and edged boards, veneer, slats, carriages, beams and sawing of thin gauges. Sawmills of this type are designed for the production of small batches of lumber, processing of non-standard logs and obtaining special sizes of workpieces.
Tire sawmills do not require a large area for installation and can be freely installed on a limited plot of land. Of course, a chain sawmill will not replace a cylinder saw or a crown cutter, but you can cut timber and make boards with your own hands. In the photo of tire sawmills, you will see that there are machines that operate from an electrical network and are stationary installations, as well as autonomous options that run on gasoline, with which you can go into the forest and harvest the necessary lumber.
Construction of a bus sawmill
The sawmill consists of a frame, clamping stops, a movable trolley, rollers, a carriage, an electric motor, a tire and a chain saw. The sawmill frame is lightweight, so it can be transported in the trunk of a car. The tire sawmill can be relatively easily moved and installed in close proximity to the log that is being cut - in a lumber yard or construction site.
You can saw logs of almost any length on a tire sawmill. And if you provide for the additional installation of another section in the drawing of a homemade tire sawmill, then you can increase the length of the log by another couple of meters. This is considered very beneficial when constructing a house or country house for the production of floors.
Do-it-yourself minibike: photo and description of production
Homemade minibike: photo and description of making a homemade product. Several years ago, while scrolling through pictures of motorcycles on the Internet, I came across an American site dedicated to minibikes - small, homemade motorcycles with engines from various agricultural machinery. In my childhood, we also built something similar, as a rule, it was a children’s bicycle “Mishutka” with a D-6 engine.
Old minibikes and parts for them have significant value at online auctions. Having an ardent desire to someday do something similar, I began to look for drawings and came across an article in the magazine “Popular Mechanics” dated January 01, 1970 entitled “Tom thumb minibike” with instructions for self-assembling a small motorcycle.
The most valuable thing is that the article provided quite detailed drawings, all that remains is to convert all the dimensions from inches to metric, buy a welding machine, and you can start building!
From the very beginning I decided not to strictly adhere to the original design, retaining only the dimensions of the frame. The vintage Ohlsson and Rice engine from the article was replaced with an equally tiny but modern trimmer engine. In the photo you can estimate the size of the motor in comparison with a wrench of 10. At first, I did not believe that such a tiny unit would be able to move me.
The centrifugal clutch for it, as well as sprockets and chains, were purchased in China.
At first I wanted to buy a ready-made intermediate shaft; they are sold on ebay under the name “minibike jackshaft kit,” but in the end I decided to make it myself. At the same time I installed a small disc brake on it.
The overall gear ratio of both chain drives turned out to be about 16:1. 4-inch wheels, from a garden wheelbarrow. The axles are M12 bolts with adapter bushings for fitting into wheel bearings.
To make the frame, 5 meters of ordinary half-inch water pipe were purchased and a homemade pipe bender was welded.
Then, in one evening in the garage, the frame was bent and welded, the minibike began to look like what was seen in the magazine.
The steering column, like the original, does not have bearings, and a brass washer is placed to facilitate sliding. The axle is still the same M12 bolt. The platform on which the engine is mounted has oval holes for mounting to the frame, thus allowing the chain to be tensioned.
The gas tank is homemade, from a piece of thin-walled pipe, the seat is a piece of plywood, on top of which there are several layers of a fitness mat, and a leatherette cover on top.
The final version, after spray painting, looks like this
The tank volume is about a liter, the minibike weighs a lot, 20 kilograms.
From the moment all the necessary materials and parts were collected to the first test drive, about a month of weekend work passed. Despite the modest engine capacity of 33 cubic centimeters, the minibike gets off quickly and easily accelerates my 90 kg weight to an impressive 20 mph)))
Test drive a homemade minibike:
Installing the gearbox on the cultivator
First you need to establish yourself with the basic operational parameters of the power plant. The technical documentation indicates the number of revolutions of the crankshaft. This is the main value that is necessary for making calculations when converting a cultivator into a walk-behind tractor. To create a reduction gearbox for a cultivator you will need the following tools and materials:
- Bulgarian;
- welding machine;
- drill;
- sandpaper and drills;
- ruler;
- vice;
- hammer;
- metal sheet approximately 5 mm thick;
- pipe for fixing bearings.
The basic element of the stroke reducer being created for a cultivator is the body. The quality of the entire mechanism, the mutual arrangement of the axes and shafts, and the single center of rotation of the bearings directly depend on it. In our case, the body will be made of metal sheet by welding. To simplify the procedure for servicing the component parts of the gearbox, one of the walls must be made removable. The bearings and their precise boring are supported by pieces of pipe whose inner diameter coincides with the outer diameter of the bearing. After the trimmings are fixed in the desired position, they are thoroughly secured by welding.
For the manufacture of shafts, a rod with a round cross-section made of high-quality steel is used. The workpiece is machined to the required parameters and the shaft is given the desired shape. During operation, the shafts rotate together with the sprockets, transmitting torque through the chain and keys. The shafts are supported by bearings, which take on significant loads during excavation work. The service life and performance of the created gearbox will largely depend on how correctly the bearings were selected. The best option would be to use closed radial bearings, which require little maintenance. Sprockets and chain can be purchased or used from decommissioned equipment.
The sequence of assembling a reduction gearbox for a motor cultivator:
- Cutting a metal sheet into component parts of the body and cover.
- Pipe cutting.
- Installation of bearing seats.
- Manufacturing of the body.
- Coating the body and lid with paint and varnish.
- Mounting bearings.
- Mechanical processing of shafts.
- Installation of shafts with simultaneous installation of sprockets and chain.
- Securing the housing cover.
After the manipulations have been performed, the converted mechanism is installed on the cultivator frame and sea trials of the cultivator are carried out. The use of a homemade gearbox increases the power of the equipment and makes it possible to expand its scope.
Snowmobile from a walk-behind tractor
In winter, moving around the terrain becomes much more difficult, and buying even a used snowmobile involves significant financial costs. The solution to the problem is to convert the walk-behind tractor into a snowmobile. Everything you need for this can be found at the nearest landfill or scrap metal collection point. If you have enough money, modular tracks are purchased, installed instead of wheels on the axle shaft.
If we take an already manufactured tractor as a basis, then for work you will need:
- old wide wheels from an SUV;
- sheet steel with a width of at least 40 cm;
- conveyor belt with a cord base.
You can make a snowmobile in different ways. The choice depends on the skill of the vehicle owners and the availability of available materials.
Rework can be carried out in the following areas:
- Replacing standard wheels with wider ones that exert minimal pressure on the snow. If necessary, devices are attached to the wheels to increase traction (chains, ropes).
- Securing the wheels in wide and light lugs. Air is first released from the chambers. The rims are put on the wheels, which are inflated to the limit.
- Installing the conveyor belt on the wheels. To prevent the tape from flying off, aluminum strips are secured to its edges using rivets.
A homemade snowmobile made from a walk-behind tractor will not set a speed record. But for a trip to the forest for firewood or for winter fishing, its capabilities will be quite sufficient.
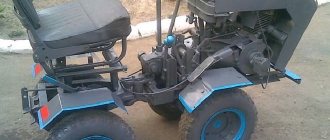
How to install an engine from an Ant walk-behind tractor
Work on installing the engine from the Ant walk-behind tractor should begin by rebuilding the motor. Then it is recommended to adhere to a certain plan in order to get a high-quality and reliable unit:
- Making the frame. This is done by welding an iron sheet and a four-millimeter diameter pipe. The frame must be firmly secured to the engine.
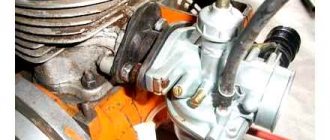
- We install the carburetor, air filter and muffler.
Important! To protect the unit from overheating, you need to install a cooling cover. In this video we will look at an ant on the engine of a walk-behind tractor:
The transmission is carried out using a chain, which drives the shafts. Their rotation speed must be different, even if the gears are selected correctly, since if it matches, the frame will not come into contact with the ground. It is necessary to provide holes for draining and filling oil, since the insides of the engine must be constantly lubricated. The steering wheel can be made from an ordinary tube, preferably metal. For ease of control, it is better to provide the ability to adjust the height. Although the equipment will work mainly in first gear, the walk-behind tractor usually has two or three speeds; there is no need to redo the gearbox.
Important TOP 4 budget chainsaws from the domestic manufacturer Lesnik
In this video we will look at an ant on the engine of a walk-behind tractor:
Attention! You will have to manually open and close the carburetor damper
- we install the wheel in the front part of the walk-behind tractor, and the level of soil plowing depth and ease of control will depend on the correct attachment;
- we make nozzles from pipes and angles, fix them with a key in special grooves and, so that there is no movement along the axis, secure them with bolts;
- We determine the capture level to be approximately 1-1.2 meters, depending on the work performed.
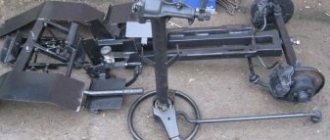
The unit based on the Ant motor scooter will be a little bulky, weighing about 90 kilograms, and slightly clumsy. But special maneuverability in the garden and field is not required, since there are usually no obstacles that need to be avoided frequently. But the motor will perfectly withstand all loads, even with long and continuous operation.
When a homemade Ant with a motor from a walk-behind tractor needs to be moved over a long distance, during the manufacture of the equipment it is necessary to provide for the possibility of installing wheels that are bolted through, or to make an additional stand for transportation in the back of a truck or in a trailer.
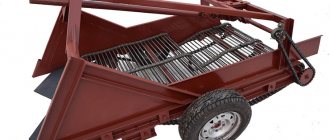
It is also possible to make the wheels smaller and attach a plow, potato digger or hiller.
Reviews
“The old Ant was collecting dust in the garage for several years. After looking at several relevant articles on the Internet, I decided to adapt a motor from a walk-behind tractor . It turned out to be an excellent household assistant, an economical and reliable unit. Moreover, doing it yourself would cost much less if you bought a new device.”
“Combining a walk-behind tractor and Ant is a great idea that miraculously came to mind. Having made the equipment, I received a unit that copes well with all agricultural work on my personal plot. It not only loosens and digs up the soil, but also helps in harvesting crops and transporting various heavy loads. I’m very pleased with the new technology.”
Snow blower with gasoline saw engine
In order not to scatter snow with a shovel in the winter, it is quite possible to make your own snow blower from a chainsaw. For the practical implementation of the project, a motor with a power of about 3 kW (4.1 hp), for example, from a Shtil saw, is required. In addition to the drive, the snow blower consists of the following components and parts:
- an intake compartment with an auger with blades located inside;
- pens;
- frames;
- snow ejector.
All these nodes are visible in the following photo.
Craftsmen presented models of snow removal equipment with wheels and equipped with sleigh runners. The last option is structurally simpler to implement. A design option for the frame and intake compartment is shown in the photo below.
The main points are selecting a pair of gears and making a good auger (shown in the photo below), which will be driven by a motor through a chain drive.
Galvanized steel sheets are suitable for the manufacture of the intake compartment body. Auger blades are often made of thick rubber. A plastic sewer pipe is quite suitable as a snow ejector.
Instructions for creating a unit
First of all, you need to make the drive shaft. To equip it you need to connect it with bearings. After this, the star is welded, and overrunning clutches are installed.
They perform a differential function during operation of the apparatus. Finally, the body is completed with a motor mount and wheels. You can attach the steering system, traction and hiller for a walk-behind tractor to the motor mount.
To connect the frame and engine, two arc-shaped pipes are needed. Between which, when connecting, it is necessary to leave space to place a container for fuel.
To connect the resulting structure, a special bracket is used, which is welded to the main part of the unit. Upon completion of all work, you can install the trailer on the walk-behind tractor.
Belt type
Installations using band saws are used in the production of lumber on an industrial scale.
Private production in most cases is equipped with homemade sawmills, made on the basis of drawings of factory units. The main advantage of such devices is the ability to quickly cut large logs weighing up to three hundred kilograms.
Manufacturing a band sawmill requires special training and the availability of a fairly large number of different building materials:
- pipes of various sizes and diameters;
- metal corners for mounting the rail system;
- channel;
- pulleys;
- profile pipes for sleepers.
In addition, you will need tools for working with metal - a welding machine, an electric drill, a grinder and a set of fasteners (bolts, nuts, screws).
Work on the manufacture of the device begins with the installation of the stationary part - the frame. The shape of this design resembles the letter “P”; the material is two channels or angles 50X100 mm.
The standard length of the channel is 8 - 9 meters, the height is at least 14 cm. After installing the frame, holes are drilled in it, the gaps between which must be at least one meter.
Afterwards, you need to tighten the channels with pipes 25 cm long, fastening is done using bolts of the required size and studs. After this, the racks on which the sawmill will be fixed are mounted. To increase stability, the structure is additionally strengthened with the required number of braces.
It is important to know: the proportions of all parts must match; for a sawmill 9 meters long, a saw measuring at least a meter is required.
A saw is attached to the trolley, and a steering wheel is installed on the side to control the operation of the unit. The clamps are made of pipes with a diameter of no more than 40 mm; movable hoses are installed inside. Clamps made of metal corners are installed on top of the pipes.
Lastly, the saw blade and motor are installed. It is best to build the structure directly at the site of future work, since the total weight of the band sawmill is very large.
You may also be interested in an article on how to make a vibrating table for paving slabs:
What can be made from a walk-behind tractor engine?
A homemade product with an engine from a walk-behind tractor can significantly save the family budget, as well as facilitate various work on the site.
The following inventions can be made from a walk-behind tractor:
- Vehicles (mini-tractor, all-terrain vehicle, ATV, motorcycle, snowmobile, motorized towing vehicle)
- Stationary equipment (sawmill, electric generator, pump, lathe)
- Agricultural equipment (loader, snow blower)
Vehicles made on the basis of a walk-behind tractor or its engine are not suitable for use on highways and other busy roads; they are intended for transporting goods around the site, as well as for movement in rural areas. The maximum speed of such devices is 60 km/h.
The base of the vehicle (frame) and wheels must be adapted to heavy loads, and the engine itself is selected based on the total weight of the device, the weight of the loads and the purpose of the equipment, for example, for a bicycle a motor of up to 5 hp is sufficient, for a snowmobile the engine power must be higher (7 hp).
Building stationary equipment and farm machinery can be more difficult, but videos with detailed instructions are easy to find.
Vehicle Upgrades
If your old bicycle, scooter or motorcycle breaks down, you should not sell the equipment for scrap. There is also no need to rush into buying a new motor. It can be replaced with a power unit from a light motor cultivator. There is only one restriction: such a car cannot be driven on public roads. But the Ant scooter with a walk-behind tractor engine can be used in the country for trips to a field or river. 5-6 hp engine quite enough to accelerate the moped to a speed of 50-60 km/h. Before installing the engine on a bicycle, it is necessary to install reinforced wheels on this vehicle that can withstand a weight of up to 100 kg.
In order to assemble a scooter with a walk-behind tractor engine, you will need the following tools and materials:
- welding machine;
- grinder with metal discs;
- electric drill;
- wrench;
- screwdriver;
- pliers;
- level;
- hammer;
- dye.
In order to install the power unit on the Ant, you will need to create a frame for it.
This is done in the following sequence:
- Drawings are drawn up, precise calculations of the frame configuration and attachment points are made. It is recommended to check the calculations on soft aluminum strips.
- The mounting bracket is welded. It is treated with anti-corrosion agents and holes are drilled for the bolts.
- The engine is carefully placed on the bracket and secured with bolts. The installation accuracy is checked and the position is adjusted.
- The motor is connected to the vehicle's chassis using a belt or chain. Gear shift cables and control levers are secured.
- Checking the functionality of the vehicle. The created homemade product needs to be run in so that all the parts get used to each other. You need to spend 6-8 hours on this with the engine running at medium speed.
If you have experience in handling household tools and knowledge in electrical engineering, you can assemble an electric excavator with your own hands. This will require channels, hinges, cables and a working electric motor. The bucket is made of sheet steel, which can be purchased inexpensively at scrap metal collection points.
Photo report: Disassembling the engine of the Ant scooter
I recently came across a miracle of Soviet technology called an “ant scooter” for repairs. The engine of this “ant” showed no signs of life. Therefore, I didn’t even bother diagnosing it, and immediately began the overhaul, which I started with its complete disassembly. Moreover, its owner asked that everything be done at the highest level, and the highest level of repair involves a complete disassembly of the engine with subsequent troubleshooting of all components and mechanisms (in my understanding, of course).
We’ll have such a wow copy on the menu today, it’s moderately well-kept, which of course makes us happy.
We remove the engine and place it on some table, not forgetting to first drain the oil from it.
We remove the cooling casings and the dynastarter; how this is done is described in detail in the article: Repairing the dynastarter of the Ant scooter
Unbend the lock washer, unscrew the nut, and remove the final drive sprocket.
We turn the engine over, unscrew the bolts on the clutch cover, tap the cover with a mallet on all sides, and remove it from the engine.
Remove the kickstarter shaft from the crankcase.
The motor chain was severely stretched and must be replaced.
Unscrew the shaped nuts on the clutch pressure plate.
We remove several clutch discs, put a puller on the inner drum, unbend the lock washer, hold the drum with the puller and unscrew the nut (right-hand thread). It’s easy to make such a puller yourself - to do this, just take an old clutch disc and “weld” a small tire to it, in general, you’ll understand everything from the photo.
Unbend the lock washer on the crankshaft journal and unscrew the nut (right-hand thread), on this engine the nut was not clamped and was easily unscrewed with your fingers.
We remove the basket along with the chain and sprocket, then remove the adjusting washer and the bushing of the outer drum of the clutch basket.
We remove the first clutch rod from the secondary shaft, then turn the engine over and shake out the ball and the second clutch rod.
Unscrew the four nuts and remove the cylinder head.
Notice how strong the scuff marks are on the cylinder mirror; this happened due to driving on pure gasoline. The cylinder must be bored, without this there is no way
We remove the cylinder, use round pliers to remove the piston pin retaining ring and push the piston pin out.
The bushing of the upper head of the connecting rod was subjected to “collective farm tuning”, but for us this is not a problem, we will install a new one. You will find all the details on replacing the bushing in the article: Replacing the connecting rod bushing of the motorcycle “Izh-Planet”, “Jupiter”, “Ant”
Unscrew the crankcase coupling bolts (marked with arrows). If you have difficulty unscrewing the bolts, try unscrewing them with an impact screwdriver, in such cases it is very helpful.
We turn the engine over, take a mallet and tap the engine evenly until the crankcase halves are completely separated.
We take out the box, hold the engine in weight and use a mallet to knock out the crankshaft.
Now admire the dirt in this engine, which has eaten all the edges of the oil seals and bearings, where it could go with such leaky oil seals. There is even a visible scratch on the inner surface of the crank chamber (marked with an arrow), probably a bird hit the engine during takeoff.
Another important point: People unfamiliar with technology, repairing their “ants” for no reason, constantly make the same mistake: they close the oil channel with a gasket or sealant, through which the lubricant gets to the right main bearing of the crankshaft and the oil seal, which ultimately leads to to the destruction of these parts.
An example where the channel was blocked with a gasket:
It is important to buy Motoblock Parma MB-01-6.5: owner reviews, technical characteristics, capabilities
An example where the channel was blocked with sealant:
And now the results:
Worn seal.
Broken main bearing rollers.
All these malfunctions are the result of unqualified repairs, so when reassembling the engine, pay special attention to this point; reassembling the engine is described in detail in the article: Repairing the Ant scooter engine
Spare parts price
Despite the fact that the production of the device stopped long ago, you can still find new spare parts for it that are produced by the industry. Some parts are imported, some come assembled. Supplied in sets:
- Clutch discs.
- Gaskets for power plant and gearbox.
- Nuts.
- Pipes.
- Levers.
The necessary parts can be found on the Internet using store catalogs. Prices for spare parts for the Ant scooter are fair. Here are some examples:
- Clutch disc – 400 rub.
- Kickstarter shaft – 1100 rub.
- Front shock absorber – 1600 rub.
- Gearbox seals – 100 RUR.
- Piston – 2500 rub.
- Gearbox – 14,000 rub.
- Wheel hub – 2000 rub.
Judging by the prices, the device is more than cheap to repair. This is an important operational property for people in rural areas.
How to install a walk-behind tractor engine on a bicycle
Depending on the shape of the bicycle frame, the motor is mounted either on the frame itself (if triangular) or on the rear wheel.
To install the engine on a bicycle, you need to change the rear sprocket to a larger diameter sprocket. When installing it, two gaskets are required - one between the spokes, the other on top of them.
Next, the sprocket is centered so that it rotates evenly: install the sprocket on the wheel, rotating, highlight the moments when it protrudes more, and tighten the nuts in those places.
It is also necessary to install the throttle and clutch lever on different handlebar grips. Connect the engine to the frame, install the chain.
Rules for operating a homemade moped
To extend the life of a moped with a trimmer motor, its owner needs to adhere to a number of important rules.
Their list includes:
- timely replacement of consumable parts - if you do not change the air filter and other elements of the moped for a long time, then its important mechanisms will begin to work under increased load. This will lead to a more complex breakdown of the homemade product:
- use high-quality gasoline and motor oil for refueling - if you fill the fuel tank of a moped with low-quality gasoline, then quite quickly the bicycle owner will be faced with the need to replace the engine CPG;
- lubricate the gearbox used in a timely manner - this will prevent the mechanism from operating under high loads;
- mix gasoline and oil strictly in the proportion specified by the trimmer manufacturer - if you add more oil than specified in the instructions, this will lead to flooding of the engine spark plug;
- regularly check the condition of the fasteners - bolts that are not fully tightened threaten not only with the engine falling, but also with injury to the owner;
- paint scratches and chips immediately after they appear on the frame - this will prevent further corrosion of the moped’s frame;
- Do not allow the trimmer to overheat the engine - if you use the moped frequently, you need to take breaks. At the same time, if the bicycle is used in hot weather, then its motor should be allowed to cool down every 15 minutes of riding. If it is cool and windy outside, then the number of breaks can be reduced to 1 time for every 25–30 minutes of driving;
- promptly change the tires on moped wheels using a trimmer - in winter, you need to install tires with spikes on homemade wheels. This will prevent wheel slipping and increase safety when using the bicycle.
Also, the owner of a bicycle with a trimmer motor will need to monitor the weight of the cargo transported on the homemade product. If the luggage is too heavy, it can lead to overheating and serious damage to the engine, as well as other mechanisms of the device.
see also
Comments 36
Hello, tell me how the Bright engine has proven itself? I want to install a similar one on a homemade product, but I haven’t found any information on it on the Internet.
Has it become quiet (in terms of noise) and economical? But it’s a cool idea to convert both two-wheeled electrons and tourists
The noise is probably the same, it all depends on the muffler, mine is homemade. But the exhaust sound is more pleasant, you can immediately hear that the powerful engine is working, reminiscent of powerful Japanese motorcycles.
Thank you very much for your experience... it will be very useful to me)))
I installed 125 cc 4-stroke on my ant, I had to assemble the gearbox in a mirror image so that the star would be on the other side, gear shifting under the original foot, a home-made exhaust for it, now you can quietly sneak up on a person on an ant and you can’t hear him, it starts with just a push and I don’t bother with spark plugs, I only need Akum to start from the button, it works without Akum,
( 1 rating, average 4 out of 5 )
DIY instructions
The main thing that will please novice craftsmen is that when creating a buggy there is no need to use a shock-absorbing system. At relatively low speeds it is still practically unnecessary. But for work you will need:
- rolled metal for the frame;
- a pair of wheels with an axle;
- wheel bearings;
- armchair;
- fasteners;
- special lubricant;
- oxygen cylinders;
- wire;
- welding fixtures;
- varnishes and paints for decorating the finished structure;
- cutting torch;
- drill and drill bits for it;
- certain turning equipment.
The body is made strictly according to individual dimensions. It is necessary to study the basic needs.
Experienced craftsmen often note that the best option in any case would be to use an independent suspension.
The front suspension is usually made using wishbones. The A-shape allows for optimal wheel maneuverability. By default, walk-behind tractors use cable gas. There is no need to dismantle it - anyway, trying to install pedals will only lead to unnecessary complications of the process. But what definitely needs to be done is a bottom for the buggy - it will increase the protection of the vehicle.
The seat is also chosen purely at your own discretion.
But it is important to remember that it is not recommended to take an Oka seat due to excessive rigidity. For road driving, it is advisable to add:
- bumper;
- headlights;
- direction indicators.
You definitely need to focus on some buggy drawings. This diagram, for example, shows a device with a frame length (along the lower edge) of 1.195 m. The distance between the extreme points of the structure is 2.985 m. The height of the product is 1.38 m. It is not difficult to make a structure based on this drawing
But you can take another drawing as a basis. The installation locations are clearly shown there:
- wheel hubs;
- upper arms;
- shock absorbers;
- kingpins;
- brake calipers;
- bearings;
- connecting sleeves.
Copying materials
The use of any materials posted on the Labuda.blog website is permitted only if you provide a direct indexed link (hyperlink) to the copied page of the Labuda.blog website. A link is required regardless of the full or partial use of materials. Some authors may prohibit copying of their materials with a warning at the end of the article.
ATTENTION! We do not allow third-party resources to embed links to image files hosted on our hosting. All images are protected from hotlink
Regular copying and saving of images to third-party resources is permitted!