Scooters Maintenance and repair. How to properly install rings on a two-stroke scooter piston
There is nothing complicated about installing rings on the piston of a two-stroke scooter, as well as a four-stroke scooter, and many people know this.
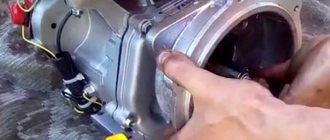
But most scooter riders who have only recently acquired such equipment have no idea how to replace the piston on a scooter, how to correctly install the rings on the piston, where the arrow on the piston should point, and much more. In this lesson, I will tell you how to properly put the rings on the piston and assemble the piston in place. Since we have already talked about four-stroke engines before, here we will talk only about two-stroke engines. So, our piston is worn out and requires replacement.
The rings and piston wear out first, and usually only those need to be replaced. If the piston is severely worn, it is necessary to bore the cylinder. It is also bored when the piston jams in the cylinder, forming deep scratches on the walls of the latter. There is nothing wrong with this, and if your new cylinder has been properly bored (which will only cost about 10), it will need a repair set of rings with a new piston. Such rings are marked 0.25. The second boring is 0.5, respectively, etc. to one.
After purchasing a piston, it needs to be assembled. In the kit, as a rule, you will find the piston itself, two compression rings, a third thin corrugated ring (more on its purpose later), a piston pin and two piston pin retaining rings.
Now about the third ring in the set. Its purpose is to spring the lower compression ring. It installs it directly under it, and usually does not provide any benefit during operation. You can throw this ring away or you can put it in, it makes no difference. Many piston manufacturers do not include it at all.
It's time to put everything back in place. Depending on the scooter model, compression rings may be the same or vary in thickness and cross-section. Most pistons for Honda scooters, for example, have different rings, where the upper one is thinner than the lower one and has a different cross-section.
You should definitely pay attention to this when installing; the top one is thinner and ground at an angle. Also pay attention to the inscription on the ring (usually the letter T or repair size), the inscription should always be on top, that is, opposite to the finger
First you need to put on the bottom, then the top. There is no need to stretch or bend them. These manipulations must be carried out carefully
Also pay attention to the inscription on the ring (usually the letter T or repair size); the inscription should always be on top, that is, opposite to the finger. First you need to put on the bottom, then the top
There is no need to stretch or bend them. These manipulations must be carried out carefully.
There are locks in the grooves for the rings that prevent the rings from turning during operation, so the ring gap must be in these locks, otherwise you will not stick the piston into the cylinder.
And the last important point is the arrow (1) on the bottom of the piston or the inscription EX. Both the arrow and the inscription must be directed towards the exhaust (2). In this case, the ring locks will be located on the side of the reed valve. If the locks are placed towards the exhaust, the piston will not last long, the rings will be pulled into the exhaust port and gradually grind it down.
During all manipulations with the piston, it is imperative to put a rag in the crankcase window so that nothing inadvertently gets in there; we still need a crankshaft with bearings.
When installing the piston pin, pay attention to the condition of the separator (bearing); it may need to be replaced. Before installing the piston pin, install the snap ring on one side before installing the piston (usually on the side where you will not be able to fit the pin and the second snap ring in)
Then place the pin with the bearing and the second retaining ring; when fixed in the groove, it will make a certain click.
That's all, now put on the cylinder, not the piston (remembering to check the condition of the gaskets and lubricate the piston and cylinder walls with engine oil), the cylinder head and tighten the bolts one by one in a cross pattern.
You can also read other articles on the topic:
Repair and adjustment, speed adjustment
Engine repair sooner or later awaits any walk-behind tractor, be it Cayman, Patriot, Texas, Foreman, Viking, Forza or any other. The procedure for disassembling and troubleshooting is simple and does not require any special tools.
It should be noted that the manufacturer does not indicate specific wear limits for troubleshooting any engine components, therefore the dimensions given below are indicated by analogy with other four-stroke air-cooled engines:
- Drain the oil from the crankcase and gearbox (if installed), removing the drain plugs, and the remaining fuel from the gas tank.
- Remove the fuel tank, muffler and air filter.
- Disconnect the carburetor attached to the cylinder head with two studs.
- Remove the recoil starter mechanism and fan shroud.
- Having secured the flywheel with a handy tool so as not to damage the fan blades, unscrew the nut securing it.
- After this, use a three-legged universal puller to press the flywheel off the seat cone.
- If the reason for disassembly is poor starting and reduced engine power, check whether the keyway is broken, as in this case the flywheel will move and the ignition timing, determined by the magnetic mark on it, will change.
- Remove the ignition coil and lighting coil, if the engine has one.
- After unscrewing the valve cover bolts, unscrew the four cylinder head bolts located under this cover and remove the head. To check the tightness of the valves, turn the head of the combustion chamber up and fill it with kerosene.
- If kerosene does not appear in the inlet or outlet channel of the head within a minute, the tightness of the valves can be considered satisfactory, otherwise they need to be rubbed into the seats with abrasive paste or (if burnout is detected) replaced.
- On models equipped with a gearbox, remove the gearbox cover and the output shaft, then press the drive gear or sprocket (depending on the type of gearbox) off the crankshaft. Replace gears with noticeable tooth wear.
- Unscrew the bolts holding the rear cover around the perimeter and remove it, after which you can remove the camshaft from the crankcase.
- Having thus freed up space in the crankcase, unscrew the bolts connecting the bottom cover of the connecting rod to its body, remove the cover and crankshaft.
- Push the piston along with the connecting rod into the crankcase.
If play is detected in the bearings, replace them. Also, since repair dimensions of parts are not provided, they are replaced with new ones:
- Connecting rod: with increased radial play on the crankshaft journal to a noticeable extent;
- Crankshaft: when scoring on the connecting rod journal;
- Carter: with significant (more than 0.1 mm) wear of the cylinder mirror in the greatest place;
- Piston: in case of mechanical damage (chips, scuffing due to overheating);
- Piston rings: when the gap at the joint increases above 0.2 mm, if the cylinder mirror itself does not have wear that reaches the rejection limit, as well as when there is noticeable waste of engine oil.
Before reassembling, lubricate all rubbing parts with clean engine oil, and clean the soot-covered surfaces of the combustion chamber and the piston bottom in order to reduce the heat load of these places. The motor is assembled in the reverse order of assembly.
To grind grain, a special device is used - the Kolos grain crusher, which is produced at. Here you can get acquainted with this inexpensive and reliable grain crusher.
On the domestic market of agricultural machinery there are various options for cultivators, not only Russian, but also foreign-made. The Mantis cultivator is a reliable technique for decades.
Modifications
Lifan 168F-2
The cheapest configuration with a connecting shaft size of 19 or 20 mm. The manufacturer's price is 9,100 rubles.
For more details about the operation of the Lifan 168F-2 engine, watch the video:
Lifan 168F-2 7A
Motor variant equipped with a lighting coil capable of powering consumers up to 90 W. This allows it to be used on a variety of equipment that require lighting devices: motorized towing vehicles, light swamp vehicles, and so on. Price – 11,600 rubles. The shaft landing diameter is 20 mm.
Lifan 168F-2 ignition circuit
The power unit has a conical shaft output; it differs from the base model only in the conical groove of the crankshaft toe, which ensures a more accurate and tight fit of the pulleys. Price – 9500 rubles.
Lifan 168F-2L
This engine has a built-in reduction gearbox with a landing diameter of the output shaft of 22 mm and costs 12,100 rubles.
Motor Lifan168F-2R
The motor is also equipped with a reduction gear, but with an automatic centrifugal clutch, and the landing size of the secondary shaft of the gearbox is 20 mm. Engine cost: 14,900 rubles.
Lifan 168F-2R 7A
As is clear from the markings, this version of the engine, in addition to a reduction gearbox with an automatic clutch mechanism, has a seven-amp light coil, which increases its price to 16,500 rubles.
Lifan 168FD-2R 7A
The most expensive version of the engine, priced at 21,500 rubles, is distinguished not only by the diameter of the gearbox output shaft increased to 22 mm, but also by the presence of an electric starter. However, the rectifier required to charge the battery is not included in the delivery package.
Salyut 100 with 168F engine - description and price
Of the many units with a 6.5 hp Lifan engine, the most common is the Salyut-100 walk-behind tractor.
The production of this light walk-behind tractor began in the Soviet Union according to the then tradition of loading military-industrial complex enterprises with additional production of so-called “consumer goods” and continues to this day at the facilities of the Moscow JSC NPC Gas Turbine Construction Salyut.
When equipped with a Lifan 168F engine, such a walk-behind tractor costs about 30,000 rubles. It has a relatively low weight (76 kg), which, combined with the average engine power for this class of equipment, makes it unsuitable for plowing without additional weight.
But for cultivation it is quite good due to the included sectional cutters, which allow you to change the working width from 300 to 800 mm depending on the severity of the soil.
The big advantage of the Salyut-100 walk-behind tractor over a number of its classmates is the use of a gear reducer, which is more reliable than a chain reducer. The gearbox, which has two forward and one reverse speeds, is additionally equipped with a reduction gear.
The Salyut walk-behind tractor does not have a differential, but the narrow wheel track (360 mm) combined with its low weight does not make turning it labor-intensive.
- Sectional cutters with protective discs;
- Tread expander bushings;
- opener;
- Rear linkage bracket;
- Tool set;
- Spare belt.
Additionally, it can be equipped with a plow, blade, snow blower, metal wheels with developed lugs and other equipment that is widely compatible with most domestic walk-behind tractors.
Video: Replacing Rings on a Motoblock
If the connections are leaking, tighten the mounting bolts, tighten the spark plugs, and check the integrity of the gaskets between the spark plug heads and the cylinders.
- Incomplete closing of the carburetor air valve.
To eliminate this problem, it is necessary to ensure the free movement of the damper by checking the quality of the drive. If jams are found, they must be removed.
Compression and carburetor problems
It happens that the launch is carried out, but the process is much more complicated. At the same time, the walk-behind tractor engine is extremely unstable and cannot develop enough power for normal operation.
This may be due to loss of compression, which can be determined by:
- Soot on the working surfaces of the valves, as well as on the seats of the cylinder blocks;
- Intake valve deformation;
- Wear of piston rings.
To restore compression you need:
- Check the technical condition of the engine gas distribution mechanism, clean parts contaminated with soot, and, if there are defects, replace them.
- Check the condition of the piston rings and replace faulty components.
If black smoke comes out of the muffler while the engine is running and the spark plug electrodes show excess oil or are covered in soot, this means that:
- The supersaturated fuel mixture is supplied to the carburetor;
- The carburetor fuel valve is sealed;
- The oil piston scraper ring is worn;
- The air filter is clogged.
To solve this problem:
- Adjust the carburetor;
- Replace the sealing valve;
- Replace worn piston rings;
- Clean or replace the faulty air filter.
When there is light smoke coming out of the muffler while the engine is running and the spark plug electrodes are dry and white, this means that a poor fuel mixture is entering the carburetor. This problem can be resolved by adjusting the carburetor.
Experience of owners of operating the Neva MB-2 walk-behind tractor - reviews from forums
Each farmer's experience is unique. The advice of those who use the same walk-behind tractor as you do on their plot of land is especially valuable. Next - some advice from owners of the Neva MB-2 walk-behind tractor regarding maintenance and troubleshooting.
Vitaly, Penza, Russia:
“I bought a Neva mb2 walk-behind tractor and was very pleased. The unit worked normally at first, but a week after the start of operation, white smoke began to emerge from the exhaust pipe. I tried to slow down the engine speed, but it didn't help. It turned out there was water in the float chamber. I drained the gasoline, let it settle, and drained the chamber. After that the walk-behind tractor worked perfectly. If anyone has had a similar problem, I advise you to use my experience!”
Alexey, Rostov-on-Don, Russia:
“I encountered the following problem: in first gear my walk-behind tractor cultivated normally, but when I switched to second gear and worked with the soil, the engine speed did not drop. When I went deeper into the ground, the cutters stopped. Knowledgeable people suggested that the problem might be in towing the belt. I adjusted the tensioner and shortened the chain on the clutch handle and the problem was solved! Now I work with pleasure, I’ve been using my Neva MB2 for two years now.”
Konstantin, Rivne, Ukraine:
“I’m not new to working with a walk-behind tractor; I’ve been using it for 4 years. Recently, if you put a load on it, the engine began to stall, as if it couldn’t pull... I barely drove it into the garage, and there was no popping noise, no smoke. The cause of the malfunction was simple: the air filter was clogged. I had to replace it and now the car runs like a beast.”
You can also help other readers of our site with your reviews on this walk-behind tractor model and its maintenance and main faults.
If you are the owner of this walk-behind tractor model, you can leave a review about its maintenance and operation, or ask any question you are interested in regarding the breakdown or maintenance of this model below in the comments.
Source
Engine
The Lifan company installs several types of engines of different power and modifications on its walk-behind tractors. The most popular diesel walk-behind tractor is the 186FD. However, such a configuration from the manufacturer costs an order of magnitude more, which means that most consumers still choose familiar models with a 4-stroke gasoline engine.
In order to avoid malfunctions of the Lifan engine, you need to carefully monitor its condition and carry out timely maintenance. Let's look at the main parts of the power unit and possible malfunctions of the Lifan engine, as well as ways to eliminate them.
DIY walk-behind tractor repair
Unfortunately, any equipment sometimes breaks down, so its owner needs to be able to troubleshoot problems on his own. Of course, if the car is under warranty, it is better to take it to a service center, where specialists will carry out warranty repairs free of charge.
Often, damage to a cultivator or walk-behind tractor occurs due to improper operation: they fill with bad fuel, allow heavy loads, or do not replenish the loss of lubricant in a timely manner. Then the car begins to stall, stall, pick up speed poorly (especially if it has an electric motor), or even stops starting altogether. But, knowing the structure of the unit and the operating principle of its mechanisms, you can identify the cause of the damage yourself and carry out quality repairs.
Compression rings, oil scraper rings, installation
Piston rings form a seal between the cylinder wall and the piston. Must provide good sealing across the entire plane of the cylinder over a wide temperature range. In four-stroke engines, three rings are most often used, of which two are compression rings and a lower oil scraper ring.
The first compression ring is intended solely to prevent the breakthrough of expanding gases in the combustion chamber. During the power stroke cycle, increasing pressure in the combustion chamber forces the first compression ring to the bottom of the piston groove and presses it harder against the cylinder walls, thereby providing sufficient insulation of the combustion chamber. The pressure in the ring groove remains on subsequent strokes without having time to decrease. The gap between the ring and the groove is 0.04-0.08 mm
Protects the second ring from high combustion temperatures and reduces the load. It has the greatest heat transfer from the piston to the cylinder; approximately 50-60% of the heat removed from the piston to the cylinder occurs on the compression rings. Some of the gases break through, the second ring begins to perform its functions, more on that later.
The first compression ring is made of high-grade cast iron, capable of withstanding high temperatures and loads while having a low coefficient of thermal expansion. During engine operation, the temperature of the ring reaches 180-210°C; at top dead center, where there is practically no lubrication due to friction, an even higher temperature is reached. The outer working surface of the ring often has a special coating to reduce friction. This can be plasma surfacing of molybdenum, cermets, and ceramics. The most common type is chrome coating, which has a matte gray color (applied by electroplating) and a peculiar porous structure that allows it to retain oil to further reduce friction. The remaining surfaces are black as a result of phosphating. The coating provides anti-friction and anti-corrosion properties.
Compression rings are not made entirely round, but have a complex arc shape in the free state and a fairly large end gap. Once the ring is in place in the piston and inserted into the cylinder, it will provide uniform clamping force at any point on the circumference.
Second compression ring
It works in more favorable conditions and performs the function of an additional seal. Also, due to its special shape, it helps the oil scraper remove excess oil, leaving only an oil film on the surface of the cylinder. The average ring temperature is 150 - 170 °C in operating mode. The gap between the ring and the piston groove is slightly lower than the first one, 0.03-0.06 mm. The variety of ring shapes determines the performance of certain functions. Such as distributing the load in the groove, reducing friction of the piston skirt by aquaplaning with oil, removing excess oil.
The chamfer on the inside of the ring determines which direction the ring will bend. If the chamfer is on the bottom, then the ring, after heating, will turn its outer surface down, as shown in the picture. And accordingly, if the chamfer is on top, then the working surface of the ring will turn upward.
Main malfunctions of walk-behind tractors
Diesel and gasoline engines have different motor resources. For the former, the normal figure is 4000 m/h, but the latter are capable of providing only 1500 m/h. Despite this, diesel models of walk-behind tractors are not in high demand. After all, both when purchased and during operation they are much more expensive. Therefore, most likely, you are working with a walk-behind tractor equipped with a gasoline (carburetor) engine.
All breakdowns that may occur during the operation of agricultural mini-equipment can be divided into two categories:
Engine faults:
- startup problems;
- malfunctions.
Malfunctions of other components and mechanisms:
- improper clutch operation;
- breakdowns in the gearbox;
- problems with the chassis;
- control and automation malfunctions;
- malfunctions of walk-behind tractor systems (cooling, lubrication, etc.).
In many ways, the success of repairing a suddenly broken machine depends on the correctness of the diagnosis. As for maintenance, it is carried out precisely in order to identify small faults that will later lead to serious ones.
If you do not have the necessary knowledge, premises, tools and materials necessary to service and repair the motor, entrust the work to a specialist!
Functional failures
Quite often, among the malfunctions of a walk-behind tractor engine, its unstable operation appears. If the engine idles jerkily, and when you try to add gas it stops altogether, the reason is rooted in a lack of fuel. The screens of the fuel tank, carburetor and pipeline valve should be cleaned. And when problems occur even at idle, it is advisable to check the centrifugal regulator. Often the traction jams there.
Let's assume that the walk-behind tractor simply slows down without jerking. In many cases, this is due to the use of incorrectly tuned, unsuitable or simply badly worn motors. But replacing the power plant is not always wise. Installing a better quality spark plug may help. It is also worth assuming that malfunctions in the operation of the carburetor float in the high-voltage wire may occur.
If the walk-behind tractor engine knocks, you need to inspect the camshaft and crankshaft. This is where the sources of extraneous sounds are mainly located.
In all of the above situations, there is no particular need to carry out major repairs. High-quality diagnosis of problems is very important. It is pointless to try to increase the compression in all modern engines; anyway, the decompressor will not allow this to be done.
Other common engine starting problems
What to do if the walk-behind tractor engine runs intermittently and does not develop the required power? There may be several reasons for this behavior:
- The air filter is clogged.
Air does not enter the carburetor, which means that the fuel does not burn well - the filter needs to be cleaned or replaced.
The remaining fuel and its combustion products form a thick coating on the internal walls of the muffler that must be removed.
- Carburetor.
In this case, the assembly must be removed, disassembled, and all components must be properly cleaned. After this, the carburetor must be assembled and adjusted correctly.
- Wear the piston group of cylinders.
Temperature and heavy loads take their toll, and even the strongest metal wears out and deforms over time. Such parts must be replaced immediately, otherwise you may pay for them with irreparable damage to the engine itself.
- Ratchet or ratchet error
The presence of this problem is indicated by the absence of crankshaft movement when starting the engine. To replace the clutch housing and ratchet, you will need to completely disassemble the starter.
- Loosen the screws holding the starter housing to the engine housing.
If the starter cord does not return to its original position, it will need to be adjusted. To do this, the screws are unscrewed and the assembly point is set manually to ensure normal return of the cord.
- The beginning of spring break.
A fairly common reason for the starter cord not reversing is the failure of the starter spring - it will have to be replaced.
The service life of any equipment is significantly increased by proper maintenance of its main units and components. The speed at which worn parts are replaced is very important. Therefore, in case of the slightest failures and malfunctions, they must be corrected immediately - as a result, this will prevent much more serious and costly problems.
Engine block motor malfunctions during operation
Engine components and parts installed on mini-agricultural machinery are subject to significant loads. They can also fail while the device is running, which can lead to serious problems very quickly.
If during operation the engine begins to pick up speed on its own, that is, “straighten out,” most likely this means that the fastening of the governor and thrust levers has become loose. In this case, the user will need to adjust the motor drive.
Sometimes, when the throttle is wide open, the engine does not accelerate when the throttle is pressed, but instead begins to lose power until it comes to a complete stop. This is a clear sign of overheating, so you need to turn off the walk-behind tractor and wait until its components have completely cooled down. After this, you need to check the oil level in the crankcase, and also check the cleanliness of the ribbed surfaces of the blocks and cylinder heads.
Under high loads on the engine, it may seize. There may be several reasons:
- There is not enough oil in the crankcase;
- The nadir is formed on the lower end of the connecting rod;
- The connecting rod or oil cartridge has failed.
If the walk-behind tractor engine is stuck, it will need to be disassembled and checked for the condition of the main components and components: defective, deformed, burnt out, etc., which need to be replaced.
Before installing new rings
Before you start work, you need to get everything you need. The operation will require wrenches, sockets, preferably with a ratchet, a torque wrench and a piston ring puller.
When choosing a new set at an auto parts store, you should pay attention to both the appearance of the packaging and the rings themselves. The packaging should contain complete information about them, namely: who the manufacturer is, what they are made of, etc.
p. The rings must also have markings indicating the top side, they themselves must not have any flaws, in addition, there must be instructions on the packaging or inside that describe the correct installation of the piston rings
The packaging must contain complete information about them, namely: who the manufacturer is, what they are made of, etc. The rings must also have markings indicating the top side, they themselves must not have any flaws, in addition, there must be There should be instructions that describe the correct installation of the piston rings.
If the seller claims that small defects will rub off, he is openly lying, trying to sell substandard goods, it is better to refuse such a purchase, since the money will be wasted.
Beginning of work
First of all, you will need a thin, flat-type probe. The new part is inserted inside the cylinder to check the clearances and correct position. The part should sink all the way to the middle. The correct position is tightly adjacent to the walls. If you notice a gap between the wall and the part itself, then it can be considered defective. It cannot be installed.
To speed up the process, sort the items by purpose. For convenience, you should arrange them in the following order:
In that sequence, the elements are put on the piston. You won't need any additional tools other than your hands. The separator occupies the lowest position in the groove, so immediately replace it. Before installing the following components, you need to remember important nuances.
Orientation of oil rings on the piston
The oil scraper rings are the thinnest and most flexible of the entire set. If you apply a little force by pressing on the part with your fingers from opposite sides, it will bend. The bending side is provided for a reason, being a special design feature. Do not press too hard to avoid deforming the material.
Remember the bend of both rings. If there are no marks on the convex surface, make notes for yourself with a marker, or check the side of the bend immediately before installing it on the piston.
Zhiguli wheels on a walk-behind tractor: selection, installation and possible malfunctions
It's best to wait until winter to replace it. Then there comes a pause in field work and you can do this work much more thoughtfully and calmly. It is recommended to improve walk-behind tractors in stages. First, the mass is increased, additional lighting fixtures are installed - and only then comes the turn of the wheels. Some experts recommend using only wheels from Zhiguli cars, and selecting lighter brands of the same size tires. In most cases, all-season tires are sufficient. Winter and summer options are unreasonably expensive, require regular replacement when the season changes, but there is still no particular practical difference.
In this case, you need to align all the parts as carefully as possible, otherwise there will be a beating against the ramp when driving. Experts recommend connecting the parts of a walk-behind tractor using the same technology used to assemble it in factories.
You can install Zhiguli wheels on the Neva walk-behind tractor. The work in most cases comes down to drilling 4 holes and tightening bolts in them. As practice shows, after changing wheels, walk-behind tractors noticeably accelerate. This property is valuable when transporting various goods. The increase in speed is noticeable both on asphalt and on dirt. Sometimes you even have to shift the walk-behind tractor into lower gears.
Correct installation of piston rings
Sooner or later, your engine will wear out and will require either a replacement of the piston rings or the piston as a whole.
It seems that changing piston rings is an ordinary task, accessible to anyone who is more or less familiar with the structure and operating principle of a primitive four-stroke engine. But, unfortunately, people are afraid to spend 15 minutes of their incredibly precious time reading literature and stuff everything into the engine according to the principle (and that’s how it was. It’ll probably work). Well, the flag is in your hands and contact the service as soon as possible.
READ Wallpaper engine how to set your own wallpaper
So, we take the piston and see 3 grooves for installing piston rings. There are no limit stops on 4-stroke engines, like on 2-stroke engines, for example.
There are two types of piston rings on 4-stroke engines. The first two, which are installed in the two upper grooves, are compression. Even from the name it is clear that they are responsible for the presence of compression in your engine and must retain the gases formed at the moment of the outbreak due to the combustion of fuel in the combustion chamber.
The next three rings are oil scraper rings. Here, too, their purpose is immediately clear. They are responsible for skimming off the oil that coats the cylinder walls as the piston returns down. If these rings leak, then the oil will remain on the cylinder walls, and this can lead to the fact that the engine will begin to consume oil, and, naturally, smoke will appear.
How to install first? Yes, in principle, as they were from the factory, in the same order, but to avoid mistakes we show them again.
Initially, we install the main oil scraper ring: the one that has a wave-like structure. Installing it could not be easier, since it is the most elastic of all.
Next, install the upper and lower THIN oil scraper rings. They are a little harder, but there shouldn't be any problems installing them either.
Now we install the piston compression rings: those that are thicker and “harder”. First install the lower one, then the upper one. They are a little more difficult to place as they are less elastic and harder. You are unlikely to be able to break them, but with completely crooked hands, bending them couldn’t be easier.
Do you think that's all? No!
The fact is that the rings still need to be correctly positioned on the piston so that the ring locks (the cut location) do not fall on each other. Simply put, it is necessary that the cut of the lower ring is not located directly above the cut of the upper ring.
We start with the upper piston rings.
We place the lock of the lower ring in the middle above the cavity of a valve, for example, an intake valve (it can also be an exhaust valve, there is no difference).
We place the lock of the upper ring strictly on the opposite side from the lower ring. Accordingly, if the lock of the lower ring is above the cavity under the intake valve, then the lock of the upper ring is above the cavity under the exhaust valve.
Now let's move on to the oil scraper rings. These rings need to be positioned in exactly the same way so that no lock matches. Therefore, we place the upper ring above the hole for the piston pin, on the right side.
We place the second one (the one at the bottom) on the opposite side, also approximately in the middle of the hole for the piston pin.
We place the last wave-shaped oil scraper ring in any of the four resulting sections between the hole for the finger and the cavity for the valve.
And now to your question: what kind of nonsense is the author telling us here? And why so painstakingly set the position of all 5 rings?
Let's explain. We did all this so that it would not happen that when one lock was located above the other, gases would not pass through these locks (in the case of piston rings) and oil would not remain on the walls (in the case of oil scraper rings).
If we take into account the piston rings, then this is a loss of compression and the passage of hot working gases to the oil scraper rings, which are not designed for such suddenly high operating temperatures. As a result, the rings may burn out after a certain time.
If we turn to the oil scraper rings and the coincidence of the locks on them, then the oil will not be completely removed: it will reach the piston rings, which will lead to coking of the ring grooves, and as a result they will settle and then burn.
As a result, you will get burnt rings and piston wear.
Bottom line: adjusting the ring locks before installation is a matter of 2 minutes, and this operation can extend the service life of the motor by tens of hours.
READ How to properly install an electric meter on the street
Source
Installing the piston pin
Depending on the piston group model. Different conditions for seating the piston pins are used. On old style pistons. To install the finger you need to heat the piston. Heated in different ways. Place on a heated stove. Light a fire inside the piston. The main danger is overheating the piston. As a result, it can get carried away and change its geometry. A slight heating is enough for the holes under the pin to expand and the pin to easily enter the piston. That's why I don't use open fire. Simply place the plunger in a bucket of hot water. After which the finger easily enters the piston. Modern pistons use a different technology. There is no need to heat anything. The finger fits freely into its seats. And there is no need to worry about it turning. After the engine starts running. And the piston will heat up and the finger will grab the piston. During subsequent disassembly of the engine. Removing the pin from the piston will not be an easy task.
Before installing the pin into the piston, a retaining ring must be installed on one side. When installing, the finger will rest against it and take the correct position.
Fuel supply problems
If attempts to start the walk-behind tractor are unsuccessful, this means there is a malfunction in the engine or starting system. In order to determine the source of the breakdown, you first need to check the spark plugs.
If the spark plugs are dry, this means that the fuel mixture is not entering the engine cylinders. There may be several reasons for this:
- there is no fuel in the tank;
- the fuel supply valve is closed;
- the hole in the gas tank plug is clogged;
- foreign objects have entered the fuel supply system.
To resolve fuel supply problems, you must:
- Fill the tank of the walk-behind tractor.
- Open the fuel tap.
- Clean the drain hole located in the gas tank cap.
- Remove the fuel valve, drain the gasoline from the tank and rinse it with clean gasoline. After this, you should remove the connecting hose located on the carburetor side and blow it out together with the carburetor jets without disassembling the latter using a fuel pump.
If fuel enters the carburetor but does not reach the cylinder, the problem is in the carburetor itself. To eliminate it, this unit must be removed, disassembled and cleaned. Well, after that - assemble and install in place. Therefore, before performing all the necessary manipulations, it will not hurt to refresh your memory of the structure and principle of operation of the carburetor.
How does it work?
To understand breakdowns and fix them, it is important to understand how everything works in a normal situation. For greater simplicity, we will focus only on models with internal combustion engines. Previously, there were two-stroke walk-behind tractors, but now they are increasingly being replaced by four-stroke analogues. Diesel devices are also gaining popularity. As for the transmission, it can be configured in three different options.
The traditional approach involves the use of a gear transmission. Despite a decent level of reliability, this device takes up a lot of space. The force is transmitted using either a cone or a cylinder. Light walk-behind tractors are mainly equipped with a worm-gear transmission. A typical operating principle of a walk-behind tractor controller contains:
- a device that monitors the number of revolutions;
- a rod connecting this device to the throttle valve;
- spring.
The control unit operates on the basis of pneumatic or mechanical connection. “Pneumatic” means the presence of a kind of wing that reacts to the speed of the air flow. Centrifugal options involve placing a special camshaft inside the crankcase. It is complemented by small weights and an easily moving rod. The rod is made of wire, and the sensitivity of the spring determines how accurately the speed values will be maintained.
The role of the valve timing mechanism is to supply a mixture of fuel and air into the cylinder. But the same device also ensures the removal of exhaust gases. To influence the compression ratio, a decompressor is used. Gasoline engines are necessarily equipped with carburetors, which are responsible for preparing the fuel-air mixture. Regardless of the type of fuel, the starting device plays an important role.
Selecting motor oil that can be poured into a walk-behind tractor engine
Motor oil for the Salyut walk-behind tractor with a Lifan engine must be used only with low viscosity (high-temperature viscosity index no more than 30, in hot conditions - 40).
This is due to the fact that, in order to simplify the design of the engine, it does not have an oil pump, and lubrication is carried out by splashing oil from the rotating crankshaft.
Viscous engine oil will lead to deterioration of lubrication and increased wear of the engine, especially its most loaded sliding friction pair in the lower connecting rod head.
At the same time, since the low level of boost of this engine does not impose high demands on the quality of motor oil, you can use the cheapest automobile oils with a viscosity of 0W-30, 5W-30, or for long-term operation in the heat - 5W-40.
As a rule, oils of this viscosity have a synthetic base, but semi-synthetic and even mineral ones are also found.
At almost the same price, semi-synthetic oil for air-cooled engines is preferable to mineral oil.
It forms fewer high-temperature deposits, which impair heat removal from the combustion chamber and the mobility of the piston rings, which can lead to engine overheating and loss of power.
Also, due to the simplicity of the lubrication system, it is extremely necessary to check the oil level before each start and maintain it at the upper mark; the engine oil should be changed once a year or every 100 hours of engine operation.
On a new or refurbished engine, the first oil change occurs after 20 operating hours.
General description of the Lifan device
The engine for the Lifan walk-behind tractor with a power of 6.5 hp, the price of which in various stores ranges from 9 to 21 thousand rubles depending on the modification, has a classic layout: it is a single-cylinder carburetor engine with a lower camshaft and a rod valve drive (OHV diagram ).
Its cylinder is made in one piece with the engine crankcase, which, despite the theoretical possibility of replacing the cast iron liner, significantly reduces its maintainability when the CPG wears out.
The motor has forced air cooling, the performance of which is sufficient when operating in hot climates, even under heavy loads.
The ignition system is transistorized and does not require any adjustments during operation. The low compression ratio (8.5) of this engine allows it to run on commercial AI-92 gasoline of any quality.
Moreover, the specific fuel consumption of these engines is 395 g/kWh – i.e. for an hour of operation at a rated power of 4 kW (5.4 hp) at 2500 rpm, with the correct carburetor settings, they will consume 1.1 liters of fuel per hour of operation.
Tillage
The purpose of Lifan motor cultivators is high-quality cultivation of land for planting, caring for seedlings and harvesting. This type of equipment is excellent for cultivating medium and small areas with any terrain and various types of soil. Plowing with this unit is available up to a depth of 200 mm, which allows you to dig up only the fertile soil layer, leaving deeper clay layers untouched.
Thanks to a large selection of attachments, using the Lifan walk-behind tractor, you can carry out any type of garden work, depending on the season and the needs of the consumer. By changing the components, the motor-cultivator can be used all year round, from plowing and planting to snow removal in winter.
The standard package of the walk-behind tractor includes:
- Milling cutters.
- Wheels d350 mm for walk-behind tractor.
- Plow.
- Hay mower.
- Potato digger.
- Pump equipment.
- Snow removal equipment, etc.
The power of the Lifan engine in the latest models allows you to easily cultivate virgin lands with complex mixed soil. However, when working with a motor cultivator, do not forget about the need for technical maintenance.
Adviсe
In order to repair and adjust the walk-behind tractor less often, it is necessary to protect the motor from falling. This is especially true for products with four-stroke engines. Their maximum inclination during operation cannot exceed 25 degrees. The unit cannot be tilted more than 15 degrees for a long time. Otherwise, you may be afraid that part of the engine will be deprived of lubrication. It will soon fail.
For the same reason, prolonged operation of the walk-behind tractor in idle mode is not recommended. Before starting work, you should always check that there is enough fuel and lubricating oil. These fluids need to be changed and even added only when the engine is turned off.
You cannot start the walk-behind tractor when the levers associated with the wheel drive are locked. A cold engine is started only after the carburetor air dampers are set to the closed position; Always use strictly recommended fuel.
The valves are adjusted using:
- universal wrenches;
- probes of various sizes;
- screwdriver with a flat blade.
For the intricacies of repairing the Subaru ex21 engine for the Neva walk-behind tractor, see below.
All rights reserved, 14+
The use of any materials without our prior written consent is prohibited.