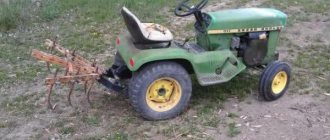
Due to the high cost, small landowners and summer residents cannot buy a modern tractor. In this case, people can try to make an agricultural machine on their own, using a Niva car as a basis: a tractor from it turns out to be reliable and cheap. In addition, the design can be supplemented by expanding the range of functions.
DIY tractor from Niva
In terms of functionality, tractors have no equal.
Reliable, versatile and wear-resistant, they take on any task related to field work. They have only one drawback - the high cost, which grows from year to year. But this problem can be easily circumvented by making a tractor from scrap materials with your own hands. A tractor is a mechanism with a wheel or track drive, characterized by the coordinated interaction of its working units. Today, “Kulibins” have learned to make homemade tractors from almost anything that runs on a powerful engine. Among them is the once popular car “Niva”, also known as “Lada” or “VAZ” 2121, which will be used in our homemade product.
The process of recreating a tractor from Niva 2121 looks like this:
- Frame assembly;
- Installation of motor and transmission;
- Hanging the steering column, hydraulics and wheels;
- Adjusting the brake system;
- Refinement of comfort elements - driver's seat and body.
Let's look at each of them in more detail.
Power unit and transmission for Niva from a “tractor”
The basis of the future homemade product will be the removed engine from the old VAZ.
To do this, dismantle:
- remove the engine from the car and place it on a subframe. We make a low landing for him, so that the front axle is between the engine and the gearbox;
- Fix with ties;
- We calculate the gear ratio, which should not exceed 2 thousand rpm for operation in the 2nd main gear - the gear used for plowing;
- For torque distribution between the axles, we limit ourselves to the Niva from the “transfer case”. It is needed in order to increase: the tractor’s cross-country ability on country roads; the driving wheels were subjected to greater rolling; the tractor moved confidently and stably regardless of mode and power.
- clutches We also take the clutch and gearbox from “Kolenchaty”;
- We connect the Niva shaft with a PTO, which is better to purchase ready-made;
- We connect the shaft hub of the secondary gearbox with the gearbox, which will give torque forward. The revolutions will be supplied to the rear semi-frame through the fracture joints and the wheel drive shaft.
shaft base and steering wheel for tractor from “For”
The fields of a homemade tractor will fit 12-14 inch old car wheels (Niva, Oka), which are equipped with tires with a rough tread pattern; The steering column is taken from a VAZ and placed on a semi-frame welded into the front plate
It is important to correctly determine the height of the steering wheel: the tractor driver’s knees should not interfere with its smooth movement; We change the worm gear, for which we make a gap in the adjusting nut in the cover and in the bearing of the oil tank; It is almost impossible to assemble a full-fledged hydraulic unit with your own hands. Therefore, it is easier to buy it or take it from an old tractor; We adapt the hydraulic pump and lubricant reservoir to the engine next to it, making the hydraulic outlet at the front and rear multi-position for installing attachments; We install a power cylinder that will control the adapters
Important Expeditionary super all-terrain vehicle Burlak for off-road
more Read: Tractor Agromash 30tk description and models advantages
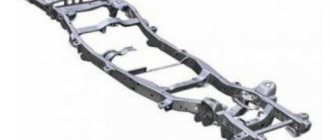
Making a homemade frame
The frame is the “skeleton” of any traction device, be it a passenger car or a tractor. The body, transmission, engine, suspensions, etc. will be attached to it.
The frame for a homemade tractor from Niva can be:
- all-welded - classic design. Characterized by:
- ease of manufacture;
- low maneuverability, especially when cornering and when driving on bumpy roads with a loaded trailer;
- break frame - often called a 4x4 frame, which consists of 2 parts. Is different:
- labor-intensive assembly;
- excellent cross-country ability, making it popular among craftsmen;
- reliability under significant loads, allowing you to maintain balance on any underlying surface;
- a minimum turning radius, allowing the tractor to turn around its axis literally on the spot.
Because of this, we will focus on the last group, a detailed drawing of which is presented below.
The 4x4 frame is spar.
This means that it will be composed of:
- cross members - stiffeners;
- longitudinal spars - externally it is a metal box;
- fasteners and brackets that will keep the body from moving.
Procedure:
- We weld 2 half-frames using channel No. 8 with dimensions of 90 x 36 cm (front) and 60 x 36 (rear).
- We supplement the front half-frame with 2 sections of square pipes on which the engine will be supported;
- We mount a stand made of thick-walled metal (1.2 cm) to the rear half-frame, which we reinforce with an equilateral corner;
- We weld a rectangle at the back of the stand - it will serve as a rear hitch onto which auxiliary adapters will be hung - a harrow, a plow, a milling cutter for a tractor;
- In the upper part of the front half-frame we adapt a platform for the tractor driver’s seat, for which we weld it with a metal sheet;
- We weld steel forks to the center of the half-frames;
- We take a trunnion and support bearings (for example, from an old KAMAZ);
- Using 2 steel forks and a hinge, we connect the half-frames to each other;
- We retrofit the front part of the supporting structure with a hub from the front car wheel - this will give it the ability to move in 2 planes. The displacement range can be adjusted using a gear wheel and limit stops.
Power unit and transmission for tractor from Niva
The basis of the future homemade product will be the engine removed from the old VAZ.
To do this it:
- We remove the engine from the car and place it on a subframe. We give it a low landing, so that the front axle is between the engine and the gearbox;
- Fix with ties;
- We calculate the gear ratio, which should not exceed 2 thousand rpm for operation in 2nd gear - the main one used for plowing;
- To divide the torque between the axles, we limit ourselves to the transfer case from the Niva. It is needed in order to: increase the tractor’s cross-country ability on country roads; the drive wheels were subjected to greater rolling; the tractor moved confidently and stably regardless of the mode and power.
- We also take the clutch and gearbox from Niva;
- We connect the crankshaft to the PTO, which is best purchased ready-made;
- We connect the gearbox secondary shaft hub to the gearbox, which will transfer torque forward. The revolutions to the rear half-frame will be supplied through the fracture joints and the driveshaft.
Wheelbase and steering wheel for a tractor from Niva
- For a homemade tractor, 12-14 inch wheels from an old car (Niva, Oka), which are equipped with tires with a rough tread pattern, are suitable;
- The steering column is taken from the VAZ and placed on a plate welded into the front half-frame. It is important to correctly determine the height of the steering wheel: its smooth movement should not be interfered with by the tractor driver’s knees;
- We change the worm gear, for which we make a gap in the bearing adjusting nut and in the oil tank cap;
- It is almost impossible to assemble a full-fledged hydraulic unit with your own hands. Therefore, it is easier to buy it or take it from an old tractor;
- We fit the hydraulic pump and lubricant reservoir next to the engine, making a hydraulic outlet in front and rear for multi-position installation of attachments;
- We install a power cylinder that will control the adapters.
Making a tractor from Niva
The process of producing a mini tractor from a model 2121 car:
- Assembly of the main frame.
- Connecting the engine and mounting the transmission.
- Attaching the steering wheel, wheels and hydraulics.
- Setting up the braking system.
In addition, you can make the transport more comfortable by installing a driver's seat and a body.
Frame for the future vehicle
It can be called the basis or skeleton of any vehicle. The frame must be strong enough because the body, engine, suspension, etc. are installed on it. It is made as follows:
- Weld 2 halves using channel No. 8.
- The front part is complemented by 2 pieces of pipe on which the future motor will be supported.
- A thick iron stand is mounted to the rear half, which is secured with a corner.
- A rectangular part is welded at the back. It will perform the task of mounting necessary for attaching tools (plow, cutter, etc.).
- In the upper part of the front half, a platform for the driver's seat is prepared, for which a sheet of metal is attached to the frame.
- Steel forks are welded to the center.
- Support bearings and axle are installed. It is best to take it from KAMAZ, because the design is too heavy.
- The half-frames are connected using 2 iron forks and a hinge.
- The front part is complemented by a hub from the front wheels of the car. This will allow it to move in 2 planes at once. You can adjust the movement using gears and stops.
Engine and transmission
After completing the production of the frame, you need to move on to installing the engine. To install it, it is recommended to prepare special rubber mats and elastic pads, which are necessary to reduce vibration. And the motor itself will have to be covered with a casing with an additional cooling system.
The process of connecting the power unit:
- The engine is removed from the car and mounted on a subframe. It is advisable to make a lower landing so that the front part of the axle is located between the engine and gearbox.
- The unit is fixed with ties.
- A gear ratio is calculated that does not exceed 2 thousand revolutions per minute for operation in second gear, which is mainly used for cultivating fields.
- A transfer case from Niva is installed to regulate torque. It is necessary to increase vehicle cross-country ability when driving on bad roads. With it, the tractor will move stably and smoothly regardless of speed.
Rear and front axles
Manufacturing a mini-tractor includes assembling the chassis. To do this you need to build bridges. It is best to make the components the same size: in this case, the master will not have to calculate the gear ratio.
Car body
The last stage of agricultural machine production is the installation of a body that protects parts from water and dirt.
You can use Niva sheathing or metal sheets.
The main thing is to close the engine and all moving parts, because... soil getting into them will cause rust and breakage.
DIY tractor from Niva: final stage of assembly
The final cycle of work consists of:
- Attaching the brakes and clutch, which are connected to the pedals;
- Installation of a gas tank with a volume of no more than 10 liters;
- Adjusting the front seat from the Niva for the operator, which is suspended for greater comfort.;
- Hanging markers and headlights, the operation of which will be ensured by a generator, battery, starter;
- Attached to the body frame with or without trim. Even if winter operation is not planned, it is best to insulate the leading components from dust and moisture with casing.
Advantages of making a tractor from a Niva car
Despite the ease of manufacture, quite a few owners of old Niva cars think about the possibility of converting it into a full-fledged tractor.
This kind of event has its advantages:
- as a result of the conversion, the owner of the car receives a 4 x 4 tractor, that is, a unit with a drive to all 4 wheels. This allows you to use it for movement in difficult terrain, and with its help perform those agricultural work that some factory tractors cannot do;
- a homemade tractor from Niva can be equipped with various spare parts. If necessary, it can always be upgraded by installing an engine and other components from more powerful cars;
- the finished unit can be used to work with any attachment - a harrow, plow or cutter for a tractor is suitable for equipping it;
- homemade tractors consume significantly less fuel than some factory tractors.
In addition to all the listed advantages, the tractor assembled on the Niva base is unpretentious in maintenance, which cannot be said about most modern tractors.
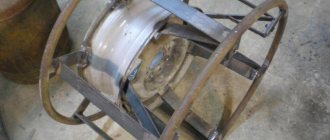
A Tyumen resident assembled a mini-loader from spare parts from a Zhiguli car.
Looking at how quickly this unusual mini-loader works, it’s hard to believe that it’s homemade. A unique iron assistant was assembled from auto parts by Tyumen resident Alexander Karaman . The Vslukh.ru correspondent met his brainchild on the shore of Lake Champions, also known as Lipovoe-2, where work is in full swing to expand the training base and hold winter swimming competitions. Walrus activists help in any way they can. Alexander also brought his mini-loader to speed up and facilitate landscaping work. At the sight of such a miracle of technology, few could remain indifferent.
“I live in a private house and was already tired of removing snow in the winter, so I decided to build a mini-loader,” Alexander Karaman explained to Vslukh.ru. — I can’t afford a Bobcat-type loader, like most private owners. On average, these cost 1.5 million rubles. A Chinese mini-tractor costs 650-700 thousand rubles, plus attachments. My loader cost me 150 thousand rubles. I think it can be made even cheaper, because this is my first experience.”
As it turns out, in order to start designing and creating technically complex mechanisms, you don’t have to be an engineer—just desire is enough. Alexander is a welder by profession. He assembled the loader in three months. “Golden hands,” his friends and ice-hole comrades say about him. At the forge of Tyumen walrus athletes, Alexander previously welded a horizontal bar complex, which is a complex structure on which both children and adults can train.
Alexander told us what spare parts he used to assemble the mini-front loader. The car is all-wheel drive, it has two shortened axles, both were taken from the VAZ “Seven”. The master also borrowed the gearbox from the Zhiguli.
Interestingly, the frame “breaks”, allowing the mini loader to turn and rest on all four wheels, regardless of the terrain. This creates good cross-country ability and traction. Turns are performed like on a large loader using a hydraulic cylinder.
The engine is Chinese, air-cooled, with a power of 13 hp, and has a starter. Hydraulics are powered by a hydraulic pump, pressure is supplied to a distributor with a joystick. With one hand, you can raise and lower the bucket, as well as turn left and right, which is very convenient.
According to the craftsman, he invented many components for his mini-loader himself, some were copied from other inventors who share their experience on the Internet. Some things have been improved. So, there is no gas pedal on a mini loader, only a clutch and brake. The clutch pedal acts as a gas pedal. You can move away from any gear. The speed is no more than 10 km per hour. You can hardly count on anything more without springs and shock absorbers.
A homemade mini-loader is 110 cm long, so it can be transported in a trailer on a car. The Tyumen master is confident that the car can be made even more compact, shortening it by 30-40 cm, which will allow it to be more maneuverable.
The next prototype promises to be more technically advanced. However, will it be possible to establish at least small-scale production of mini-loaders in Tyumen in spite of the crisis and exchange rates? Alexander is skeptical, because now it is easier for local enterprises to organize large-scale assembly of imported equipment than to introduce domestic developments.
How to make a tractor from a Niva with your own hands?
Assembling a reliable and passable tractor from the Niva 2121 is not nearly as difficult as it might seem at first glance. However, to achieve the best result, those who want to remodel will still need to find the appropriate drawings, which should describe the dimensions of the parts and methods of attaching them to the overall structure.
When studying the diagrams, you need to choose the most suitable ones for assembling the car assembly. Some craftsmen convert the existing Niva into a tractor. Others, farmers who do not own a domestic car, purchase each part separately and make an agricultural machine out of it. In any case, the best option would be to use parts from the same machine - this will greatly simplify the assembly of the tractor.
All parts used for assembly must be completely intact and in good working order. The use of worn-out spare parts or parts with cracks is not allowed - this will lead to rapid breakdown of the tractor, besides, in this case, the main elements of the agricultural machine will be subject to increased loads. The finished tractor can be painted by first treating the parts of its body with a primer - the painted metal will be much more stable to corrosion, which will allow the use of a homemade agricultural machine in the most severe weather and operating conditions.
Niva from How to make a tractor with your own hands?
reliable Assembling a passable tractor from Niva 2121 is not as difficult as it might seem at first glance. However, in order to achieve the best result, those who want to do the alteration will still need to find the appropriate drawings, which should describe the dimensions of the parts and methods of attaching them to the overall structure.
design When studying the diagrams, you need to choose the most suitable ones for assembling the car unit. craftsmen Some convert the existing Niva into others. tractors, farmers who do not own a domestic car, purchase each part separately and make it into any one. In the case of an agricultural machine, the best option would be to use parts from the same machine - this will greatly simplify the assembly of the tractor.
All parts used for assembly must be completely intact and in good working order. It is not allowed to use spare parts that are worn out or parts with cracks - this will quickly lead to breakdown of the tractor, moreover, in this case, the main elements of the agricultural machine will be subject to increased loads, which will lead to an increase in the amount of fuel consumed and a rapid loss of properties of the engine.
Important Technical characteristics and features of the T-16 tractor
oil drawings and having prepared the parts, you can proceed directly to assembly.
All work is performed in the following order:
At the very beginning, it is necessary to prepare the engine frame and other tractor components. For this purpose, you can use a ready-made body from an old car, for example, the same Niva. In this case, the frame needs to be slightly modified by welding the necessary parts by welding. For this, channels, metal corners and pipes are useful
Before welding them to the structure, it is important to clean the surfaces from coating and rust with a thick layer of primer; You will need to Next install and secure the axles, chassis transmission and part with the transfer case from the Niva. as well as parts of the tractor hydraulic system; Then you need to install the Niva from the engine - for its installation you need to first prepare special rubber mats, which, elastic together with gaskets, will effectively dampen the vibrations created by the engine
It is also necessary to install a casing equipped with an auxiliary cooling system on the motor; The tractor cabin also needs to be equipped with steering parts, as well as clutch, brake and gas pedal controls. After this, you will need to install the driver's seat - it should be mounted on a spring, which will smooth out uneven roads. The finished cabin can be sheathed with soundproofing material and the following rubber floors can be laid; On the stage mats you will need to install hydraulics and a dedicated PTO for controlling attachments; At the end you need to fasten the wheels, and they can be taken from an old Niva, cars or those with large diameter rims. It should be remembered that in order to install large wheels, you will need to replace the brakes from the Niva with a more durable braking mechanism. In addition, installations for larger wheels will require a corresponding hub diameter. The video will tell you more about making a Niva from a tractor.
Features of operation of a homemade unit
When using a homemade tractor from Niva, you must adhere to a number of rules.
These include:
- Change engine oil every 50 hours of operation. With intensive use, this must be done at least once every 30 hours;
- fill the fuel tank only with the fuel that was previously used to fill the Niva car;
- from time to time, do a wheel alignment of the tractor - it is best to perform this procedure every 3 months of operation of the agricultural machine;
- Constantly monitor the pressure in the tractor tires;
- prevent debris and dirt from getting into the engine and gearbox, as this will lead to blocking of the gears and a rapid increase in loads on them;
- check parts located under the bottom of the tractor for corrosion;
- use small attachments when working with homemade equipment to prevent rapid engine overheating.
By adhering to these simple recommendations, the owner of a homemade tractor will be able to extend the life of special equipment and save on its further repairs.
Features of operating a homemade tractor
Experts recommend that owners of homemade equipment adhere to the following rules:
- Change the oil every 3 days of operation, and if you use the machine constantly, every 2 days.
- Use gasoline intended for Niva, because the engine will not be able to operate on any other type of fuel.
- Carry out wheel alignment frequently (at least once every 3 months).
- Before each trip, check the tire pressure. Due to the design features, rubber will quickly become unusable if the indicator is low.
- Constantly check the elements located under the bottom of the vehicle for rust.
- Do not use large attachments because the motor will not cope with the heavy weight and will overheat.
If you follow these tips, your Niva tractor will last a long time and will break down less often.
Do-it-yourself tractor from Niva - advantages of manufacturing
Not every owner of an old Niva car thinks about converting it into a small tractor. However, this procedure has its advantages.
These include:
- the possibility of manufacturing special equipment with a 4x4 wheel arrangement - in this case, the unit is not only maneuverable, but also passable. In the future, it can be used for plowing areas with uneven terrain, as well as cultivating fields with loose, viscous soils;
- using any available means - a homemade product can be equipped with various parts and mechanisms. The main thing is that they are in good working order and there are no pockets of corrosion on their surface. In the future, the Niva tractor can be improved by installing more durable elements instead of its components;
- fuel economy - a Niva-based tractor will consume much less fuel than most factory-made agricultural machines. At the same time, its effectiveness will remain quite high;
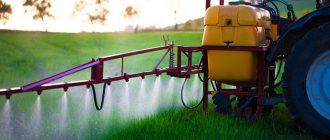
- the ability to aggregate a wide range of mounted implements - by equipping the unit with hydraulics and a PTO, it will be possible to install not only a plow or harrow, but also a seeder, mower or sprayer.
Another important advantage is ease of maintenance and high repairability. Having a thorough knowledge of the design of a homemade tractor from Niva, its manufacturer will be able to quickly replace worn parts without turning to a specialist for help.
How to make a tractor from Niva with your own hands - step-by-step assembly
Before assembling a homemade product, the manufacturer must study the diagram. It is best to stock up on two drawings. The first of them should indicate the dimensions of the small-sized agricultural machine and the order of installation of the elements. The second drawing is a hand-drawn sketch. The figure should show a ready-made unit so that the manufacturer can navigate when assembling its body and arranging the driver’s seat.
After studying the diagrams, you need to move on to searching for parts. It is best to use nodes from the same car. If this is not possible, then you will have to look for parts from individual machines. The main thing is to carefully check them and give preference to those elements that are preserved in the best condition.
make it like a tractor from Niva with your own hands - step-by-step assembly
Before assembling a homemade product, the manufacturer must study the diagram. It is best to stock up on two drawings. The first of them should indicate the dimensions of the small-sized agricultural machine and the order of installation elements. The second drawing is a sketch, hand-drawn. The figure should show a ready-made unit so that the manufacturer has an opportunity to navigate when assembling its body and arranging the driver’s seat.
After studying the diagrams, you need to move on to searching for parts. It is best to use nodes from the same car. If this is not possible, then you will have to look for machines separate from the part. The main thing is to check them carefully and give preference to those elements that have been preserved in the best condition.
To assemble a tractor from Niva, you need 2121 to act in the following sequence:
- The first is the stage of assembling a durable and vibration-resistant supporting structure. Metal pipes and channels are suitable for its manufacture. The channels will play the role of the long side parts, and the steel pipes will act as the ends and fixed cross members fixed to the sidewalls. The parts must be fastened together by welding, allowing the parts to cool from time to time. In the corners of pipe joints and channels, you will need to weld metal corners that will strengthen the overall structure. After this, the frame will need to be covered with a layer of primer and painted in several layers - this will protect the frame of the Niva from the tractor from corrosion. The second option is to use a ready-made frame frame from the old Pravda. car, it’s quite difficult to find;
- dried on Next, after painting the frame, you need to install the bridges. They can be fixed using suspended hinges to bearings - in this case, the chassis will dampen the vibrations of the tractor when driving off-road;
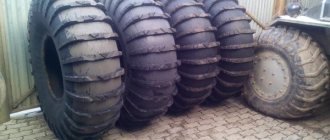
- Then the homemade product will also need to be equipped with a transmission mechanism equipped with a transfer case from Tires. The wheel fields must have a deep tread pattern - otherwise the unit will not get the necessary grip on the ground. The tire pressure should not exceed 2.1 atm. As the wheels move, the pressure inside them will increase, so overinflated tires may burst;
- At the next stage, you need to install and secure the engine from the Niva car. To do this, you need to prepare a metal platform and cover it with a thick layer of rubber - it will dampen vibrations on top. The internal combustion engine of a fixed motor will need to be installed whose casing will protect the driver from burns;
- The tractor Next from Niva will need to be equipped with hydraulics and a place. The PTO of their installation depends on the needs of the tractor driver. unit If it is used to work with an excavator or a bucket, then it is better to install the hydraulics in the front part of the agricultural machine. To work with a plow, or harrow, cultivator, the hinged mechanism can be secured to the rear of the agricultural machine. It is better to take the hydraulics itself and the PTO in a ready-made form;
- homemade Then the tractor from Niva will need to be equipped with a canopy or a cabin. The driver module can be made of sheet steel with a thickness of at least 5 mm. For fastening you need to make a separate rigid frame. You will need to install a cabin with windows;
- Based on the size of the cabin, you need to arrange the driver's seat. In the rear part you can install a seat, which will be attached using an old spring. The front seat allows you to remove the steering wheel, PTO levers, gearbox and other controls. You can learn more about the manufacturing of the tractor in detail from the video.
The finished agricultural machine will need to be tested. This procedure alone will not take a day, so the manufacturer needs to be patient. First, the unit must be filled with oil, fuel for the engine and transmission, and distilled water must be poured into the radiator. After this, you need to drive a few kilometers on a straight road, without making any sudden maneuvers. Next, you need to test the tractor when driving off-road - while driving, the unit should not create strong if. squeaks occur, which means you will need to tighten the bolts.
Finally, the manufacturer will be required to check the hydraulics. To do this, you need a tractor to install a plow or harrow from the Niva and drive it across the field. If, when the implement is lowered, the hitch does not tilt to the side and it does not slip, then the homemade agricultural machine is completely ready for operation.
Read Tractor: more husqvarna tc 130 advantages of the unit
Homemade equipment: how to make a mini tractor with your own hands
Agricultural walk-behind tractors have one serious drawback - the operator has to walk along the cultivated area with them. As a result, fatigue sets in quite quickly, and the time it takes to complete work increases, which leads to a sharp decrease in the efficiency of labor costs. Another thing is a mini-tractor, which has a full wheelbase and steering. But not everyone can afford to buy such equipment. Therefore, in the agricultural environment, you can increasingly find homemade mini tractors, which are designed on the basis of professional or semi-professional walk-behind tractors.
Converting a walk-behind tractor into a mini tractor: main points
Unlike amateur equipment, professional and semi-professional equipment has a greater service life and power. For example, from a walk-behind tractor with a 9 hp diesel engine. you can make a pretty decent mini-tractor for plowing and cultivating. Ultimately, it all depends on the goals that the owner of the modified equipment intends to achieve.
Designing and assembling a homemade mini tractor is not an easy task, but it is doable. And to solve it successfully, you need to focus on two points:
- Development of a body and frame, as well as a diagram of their connection with the base of a mini-tractor - a walk-behind tractor.
- Development of a kinematic scheme.
The frame and body of a homemade mini-tractor are made of metal corners or profiled pipes. When calculating the structure, it is necessary to take into account the ratio of its weight to the power of the motor, as well as the resistance that the machine will overcome when performing various types of work.
If you choose a powerful walk-behind tractor as the basis for a homemade mini tractor, this allows you to use ready-made car or motorcycle trailers. Moreover, leading manufacturers of walk-behind tractors have long provided for the design possibility of connecting such trailers to their manufactured equipment.
The kinematic diagram of a homemade mini-tractor is a set of design solutions that ensure the transmission of torque from the walk-behind tractor engine to the drive (mainly rear) wheels. When calculating, it is necessary to distribute the load on the drive axle evenly - both reliability and durability, as well as functionality, that is, the possibility of using the equipment, directly depend on this.
How to do it
Perhaps the most interesting option for self-assembly is a homemade 4x4 fracture mini tractor,
which is made on the basis of a walk-behind tractor. In general, this is a fairly common method of assembling a mini tractor, which proves its efficiency and performance during operation.
The video shows a homemade mini tractor with a walk-behind tractor engine.
Externally, this design looks rather cumbersome, but the internal contents are completely proportional, i.e. Every detail is in its place, precisely adjusted to the dimensions and parameters. Let's look at the design features in more detail:
Photos of drawings of units
- The frame structure will consist of two components - spars and traverses. Spars are made of three components. The front part will be made of channel No. 10, the last part will be made of a steel pipe with parameters 8x8 cm.
- The rear traverse will be made from channel No. 16, and the front one from channel No. 12. Cross members are made in the same way. In principle, all homemade all-wheel drive mini tractors have a similar frame design, with the same technical parameters.
Almost any power unit can be used as an engine, the power of which will be sufficient to carry out agricultural work. The ideal option, in this case, would be to use a 4-stroke water-cooled diesel engine. The gearbox and power take-off shaft transfer case can be taken from a GAZ-53 car. The clutch will fit from a GAZ-52. When connecting the clutch and engine, certain problems may arise. We will have to re-make the engine flywheel, and also make a new clutch basket cover to fit it to the engine. The flywheel is ground on a lathe, cutting off the rear area, and also turning an additional span in the middle. In general, homemade mini tractors involve adjustments to certain parts, so you should be prepared for the fact that you will have to turn to a turner to grind some components. The bridge is installed into the structure with virtually no changes. It is attached to the frame using four stepladders. As wheels you can use similar ones taken from passenger cars.
But there is one important nuance here: the front wheels should be approximately 14 inches, which is the optimal value for the front axle wheels.
The fact is that using a smaller diameter can cause the unit to fall into the ground, and using a larger diameter will make it impossible to perform certain maneuvers. The driving diagram for mini tractors and homemade mini cars, presented below, clearly shows the principle of the arrangement of wheels on the axles, as well as their attachment to the frame. To increase the maneuverability of the homemade product, you can install power steering on the steering wheel. You can take it from old equipment, or assemble it yourself. To do this we need an oil pump driven by the engine.
Homemade mini tractors have a very important advantage - they have very good maneuverability. Of course, this assembly method is a little more complicated than the alternatives, but it is definitely worth the effort.
There are quite a lot of models of cultivators of foreign and domestic production from various companies on the Russian market of agricultural products. Cultivator Texas - true European quality at an affordable price.
Potato planters mechanize and improve the planting process, making the rows even, planting the tubers at the same distance from each other and at the same depth. Here you will find all the necessary information about potato planters.
In general, in this assembly method, a lot of components are taken from old domestic cars. For example, the steering rack can be borrowed from an old Zhiguli, the same can be said about the drum brake - it can also be taken from a used car.
DIY mini tractor: where to start?
In fact, there are many options for constructing a mini tractor yourself. However, the principles used are approximately the same everywhere:
- The gearbox rotates towards the operator and is fixed on the frame.
- Control is realized using steering rods.
- A hydraulic drum brake is used.
- The brake and clutch are pedal controlled.
- Manual control is used for the accelerator and attachments.
- The operator's seat is located above the rear drive axle.
One of the easiest ways to create a mini tractor with your own hands is to buy an adapter - a two-wheeled cart with a seat for the operator and an aggregate system (for installing attachments).
Mini tractor frame
The chassis is the basis of a mini tractor. Its main quality should be reliability, but you need to carefully monitor the total weight of the structure in order to ensure normal adhesion of the wheelbase to the soil when performing work and at the same time not to overload the engine.
To make the frame of a homemade mini tractor of medium power, a lightweight channel, profiled pipe or metal corner is suitable. The dimensions of the structure, the assembly of which is carried out by welding, must correspond to the dimensions of the machine. It is necessary to make holes along the contour of the frame for hanging and securing the structural elements of the mini tractor.
The ratio of the weight of the frame and its strength must be optimal. You should not overload the structure with additional stiffening ribs, nor should you skimp on metal, sacrificing overall reliability indicators.
Before you begin assembling the frame, you need to decide what trailers and attachments you are going to use when working with it. And in order not to lose your thoughts during the design process, before starting work you should make drawings of the future machine and its main components with the main dimensions. To do this, you can use ready-made documentation, which needs to be adapted to the specific parameters of your mini tractor.
Front and rear axles
These units are created from individual spare parts and units removed from cars or even trucks or other agricultural equipment. However, you will have to do some details, as well as the assembly itself, yourself.
To make a front axle, you will need:
- cross beam;
- bushings for supporting rotary axles;
- axle bushings;
- the axles of the wheels;
- bearings (ball and roller);
- bolted connections.
A piece of profiled pipe or metal corner will do the job perfectly as a cross beam. For the manufacture of axle shaft bushings, structural steel 45 is suitable. The rotating support bushings are made of profiled pipe, modified for the installation of bearings, and are closed with steel covers made of steel grade St3. The front axle assembly, consisting of a cylindrical race and roller bearings, is welded in the center of the cross member. Using large bolts, the bridge must be secured to the bushings in the cross member of the frame.
The tightening force of bolt connections is responsible for the amount of play of the front axle relative to the design of the mini tractor. Too tight, as well as too loose fastening has a negative impact on driving comfort, so the play must be optimal.
The rear axle is assembled in the same way. The finished design can be borrowed, say, from a UAZ car. The long stocking of such a bridge will need to be shortened so that standard short axle shafts can be used. It wouldn’t hurt to protect the rear axle, or rather its welded joints, from possible impacts during operation. For this purpose, a support is used - a metal corner placed along the welds of the prefabricated bridge structure.
UAZ COMPONENTS
A homemade tractor consists of important components, the quality of which determines the operation of the machine as a whole:
- motor;
- transmission device;
- chassis;
- steering part;
- assembly system (suspended means and power rotation shafts).
A homemade mini-tractor is most often wheeled, less often tracked, with an engine power of 10 to 50 horsepower.
It is advisable to take the engine, gearbox, beams, and chassis from the same car so that their installation is easier and faster. If you wish, you can experiment and try to connect units and components from different machines. This is a complex process, but it can add interest to working with the design of a mini-tractor.
Another homemade model
Remember that the tractor must be stable. This quality depends on what kind of gearbox the homemade product will have. It should be with an increased number of gear ratios. These numbers increase the tractive effort, which should not exceed 300 kg.
You should make a drawing of the cooling system in advance to know exactly where the adapters should be located. The manufactured mini-tractor may overheat during operation. To prevent this from happening, you can install a radiator with 2 sections.
Important Design and technical characteristics of garbage trucks built on the basis of ZIL
When choosing a crawler tractor, pay attention to the drive. It is installed on the rear of the track to cause less damage to the rollers
During operation, you need to remember to clean the tracks themselves, since when using rear-wheel drive, snow and dirt clog them.
Starting to assemble a homemade model
The coupling device consists of the following elements:
- Transmission;
- clutch cover;
- release bearing flange;
- M6 screw for fastening the flange;
- release bearing;
- basket with clutch drive disc,
- bolt M 12x1.5;
- motor tail boom;
- flywheel;
- crankshaft bearing;
- crankshaft;
- gearbox extension.
Frame:
- bumper (channel No. 12);
- front side members (pipe 80x80x6);
- front cross members (pipe 80x80x6);
- engine mounting support (pipe 80x80x6, 2 pcs.);
- cabin fastening supports (beam No. 8, 4 pcs.);
- racks (pipe 80x80x6, 4 pcs.);
- scarves (steel sheet s10, 6 pcs.);
- tail spars (tube 80x80x6);
- tail cross members (pipe 80x80x6);
- automatic mounting plate for working tools (steel sheet s10);
- auto-mounting bracket (steel sheet s10, 2 pcs.)
Steel water pipes with a diameter of 57 mm are suitable for a welded rectangular frame consisting of a pair of side members and a pair of cross members.
In this model there is a bridge from an UAZ
The steering column can also be borrowed from UAZ. If it is placed on the right side of a homemade tractor, then securing the steering mechanism with the steering gear will not be difficult. The lever is removed from the splines and placed back in a vertical position. As for the transverse steering rod, gas-electric welding will be required for its manufacture. Tips with ball fingers are welded to the corners measuring 30 by 30 mm, which slide over each other.
The UAZ rear axle can also be used in the design of a mini-tractor. A flange is cut off on the long axle shaft and a hole is drilled in the center. The trim is processed and inserted into the hole, the outside is scalded, and the excess is cut off.
The long stocking is shortened. Two short axle shafts are used. The cut of the stocking is chamfered and its joint is welded. A caliper is placed at the welding site to protect against impact on the shank. Using a V-shaped structure, the mini tractor axle is attached to the frame. The structure itself will fit comfortably on the standard rear axle cushions.
To build a mini-tractor, you can use the master brake cylinder of a UAZ car. You can also take the steering gear, column and rod. To strengthen the gearbox, it is necessary to prepare a crossbar welded into the structure.
The steering from the UAZ car, as well as the longitudinal rod, steering column and transverse rod, which is shortened to 450 mm, are all useful for the design of the mini-tractor.
The transmission layout is noteworthy. After the engine, it is necessary to install the clutch basket and gearbox. These units from a UAZ car are perfect for a mini-tractor (assembly unit: distribution box with low gear).
On the floor under the seat, it is advisable to place a gas tank, a battery and a ground switch, and hanging pedals from a UAZ car. Fuel will be supplied to the fuel pump through a fine filter or sump taken from this SUV.
Wheelbase and kinematic diagram
The choice of wheels for a homemade mini tractor deserves special attention. It is quite possible to use wheels from a passenger car, but the dimensions must be observed here. The optimal dimensions of wheel rims for the front axle are 12-14 inches. When choosing a smaller diameter, there is a risk that the machine will bury its nose into the ground during operation. On the other hand, if the front wheels are too large, the operator will have to exert considerable effort to perform maneuvers. However, to facilitate the process of driving a car, you can always use the power steering from a passenger car or other agricultural equipment.
Mini tractor wheel tires must have developed lugs. This will increase the maneuverability of the machine, reduce the load on the chassis and facilitate the control process.
As for the kinematic scheme, it is better to use ready-made options, the search for which currently will not take much effort. The diagram must be adapted to the parameters of the components that you are going to use to create a mini tractor. It would be useful to consider the possibility of connecting attachments, which will greatly increase the functionality of a homemade machine.
Control system and operator seat
After manufacturing and installing the chassis, you can begin to implement the kinematic diagram and install the control system. The most important thing in this matter is to place the operator's seat correctly. The front seat of a passenger car, which is easy to find at car services and in workshops that dismantle vehicles, will do an excellent job of this role.
The steering wheel should be set at the optimal height for the operator. The steering wheel should not interfere with the free placement of the knees - it must be mounted so that working with it in a sitting position does not cause discomfort.
All the necessary parts for pedal, manual and lever control of the machine and its functional units can be found in the same place as the seat and all other spare parts - in workshops or on the market.
Engine installation and body arrangement
After assembling the chassis, implementing the kinematic diagram and installing the operator's seat with the control system, you can begin installing the main unit of the minitractor - the engine. To securely fix it on the frame, you should use a special plate with grooves - it will also give the chassis additional rigidity. Next, you need to lay out the electrical and mechanical circuits of the control system, connect the instrument panel and configure the operation of the control system.
The body trim is carried out at the user's request, however, it is still better to cover some components and structural elements. This will prevent their contamination and failure in case of contact with foreign objects and soil.
At this point, the assembly of the mini tractor can be considered complete. Next, all that remains is to check the quality of your creation in work.
engine Installation and arrangement of the body
After assembling part of the chassis, implementing the kinematic diagram and installing the operator's seat with the control system, you can begin the main installation of the minitractor unit - the engine.
To securely fix it on the frame, you should use a special plate with grooves - it will also give the chassis additional rigidity. Next, you need to lay out the mechanical and electrical circuits of the control system, connect the instrument panel and configure the operation of the control system. body The lining is carried out at the request of the user, however, some components and structural elements are still better. closing will prevent their contamination and failure in case of contact with foreign objects and soil.
At this point, the assembly of the mini tractor can be considered complete. Next, all that remains is to check the quality of your creation in the Source.