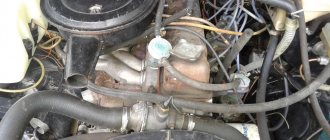
Adjustment of compensators UMZ 4216 GAZelle Business.
Adjustment of compensators UMZ 4216 GAZelle Business.
Hydraulic compensator.
Maintenance of the gas distribution mechanism.
Hydraulic compensators ensure backlash-free kinematic connection of the gas distribution mechanism parts throughout the entire service life of the engine. Maintenance of the mechanism consists of periodically checking with the engine running that there are no sharp knocks from the operation of the gas distribution mechanism.
After starting a cold engine, a knocking sound may appear from the hydraulic valve compensators, which should disappear as the engine warms up to a coolant temperature of plus 80...90 °C. If the knocking noise does not disappear more than 30 minutes after reaching the specified temperature, it is necessary to check the serviceability of the hydraulic compensators as follows.
A knock that appears when starting a cold engine, repeatedly starting the engine (with several unsuccessful starts), starting the engine after a long stop and subsequently disappears when the engine warms up is not a malfunction of the hydraulic compensator. In this case, the cause of the knocking is the entry of air into the high-pressure chamber of the hydraulic compensator, which leads to a loss of its rigidity and the operation of the valve drive with shocks.
It is recommended to remove air when the engine is running in idle mode. do the following:
- start and warm up the engine to operating temperature. For 3-4 minutes, set the engine operating mode at a constant speed of 2500 rpm or at a varying speed range of 2000...3000 rpm, then listen to the engine idling at 800±50 rpm for 15...30 seconds. The knocking should stop;
- if the knocking does not stop, repeat the cycle up to 5 times;
- If the knocking does not stop after carrying out the above work, work for another 15 minutes at a speed of 2000...3000 rpm, then listen to the engine idling for 15...30 seconds.
If the knocking does not go away after 5 cycles plus 15 minutes of engine operation, it is necessary to adjust the valve mechanism, for which:
- Remove valve cover
- Set the piston of the first cylinder to TDC.
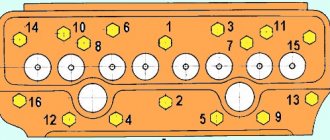
- Loosen the lock nut and turn out the adjusting screw until a gap appears on valves 1, 2, 4, 6.
- Smoothly turn the adjusting screw clockwise to select the gap.
- Turn the adjusting screw clockwise 1.5 turns (corresponding to a stroke of 1.5 mm) and tighten the locknut.
- Set the piston of the fourth cylinder to TDC.
- Loosen the lock nut and turn out the adjusting screw until a gap appears on valves 3, 5, 7, 8.
- Smoothly turn the adjusting screw clockwise to select the gap.
- Turn the adjusting screw clockwise 1.5 turns (1.5 mm) and tighten the locknut.
- Install the valve cover.
- Start the engine.
If the knocking does not go away after adjusting the valve mechanism, the following work must be done:
- using a stethoscope (or other device that amplifies sound) to localize the source of the knocking;
- remove the valve cover;
- Rotating the camshaft, set the piston of the first cylinder to TDC.
In this position, check the hydraulic compensators on valves 1, 2, 4 and 6 by applying force to the adjusting screw along the axis of movement.
Rotating the camshaft, set the piston of the fourth cylinder to TDC. In this position, check the hydraulic compensators on valves 3, 5, 7 and 8 by applying force to the adjusting screw along the axis of movement.
a) elastic elasticity with a short-term application of a force of about 10 N (1 kgf) indicates the presence of air in the high-pressure chamber of the compensator;
b) the appearance of a gap between the working end of the hydraulic compensator and the cam when a load of about 20...30 N (2...3 kgf) is applied for a period of 10...15 seconds and disappears after the load is removed, indicates a leak in the check valve of the hydraulic compensator or wear of the plunger pair;
c) the presence of a gap between the tip of the rocker arm and the valve indicates wedging of the hydraulic compensator;
Replace hydraulic compensators that have the above symptoms.
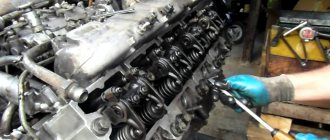
If there are no comments listed above, dismantle the rocker arm axle, remove all hydraulic compensators from the rods and check the appearance of the hydraulic compensators and the area of the adjusting screw for rough scratches, cracks, signs of wear, foreign particles, and contamination. Check the oil supply to the hydraulic compensators and the running-in at the end of the hydraulic compensator.
Parts that have irreparable defects must be replaced.
Source
What do you need to prepare for work?
valve The first condition that must be met when making adjustments is a cold engine, that is, when its temperature is the same as the temperature of the surrounding atmosphere. Now it’s time to think and prepare the necessary tools:
- crank;
- a set of measuring probes;
- screwdriver;
- set of wrenches.
After the necessary equipment has been assembled, you need to complete several preparatory steps:
- unscrew the license plate to install the crank;
- remove the spark plugs to make cranking easier;
- remove the ignition distributor cover to make marks corresponding to the position of the pistons at TDC;
- disconnect the negative battery.
Adjustment without hydraulic compensators
Until 2009, the Gazelle car was equipped with the UMZ 4216 engine without hydraulic compensators, the design of the gas distribution mechanism is practically no different from the previously created UMZ 100 carburetor engine (popularly called “weaving”).
With the start of production of Gazelle business cars, the “weaving” engine was modernized, an injector was installed, and the “gasket” oil seal was replaced with a standard rubber one. In addition, with the installed catalyst, the car began to belong to the Euro-3 class. Adjustment of the thermal clearances of the UMZ 4216 valves is carried out according to the manufacturer’s instructions, similar to the technology performed on the Gazelle “weaving”.
The frequency of adjustment on internal combustion engines is recommended every 10,000 km. If the car is constantly serviced by one specialist who adjusts the gaps, then, according to his recommendation, the mileage interval between adjustments can be increased to 20,000 km.
The engine reminds the driver of the need to adjust the gaps by lack of traction characteristics, increased fuel consumption, or an excessively loud ringing clatter. An experienced specialist can already determine by the sounds of an idling engine the condition of the thermal gaps. A smoothly running engine with no quiet knocking sounds from the valves is a sign of a small clearance (“pinched” valve) and, conversely, a very loud knock indicates that the clearance is too large. In both cases, it is necessary to normalize the thermal gaps, since if the gap goes positive or negative during operation, the injection phase changes.
The effect of the gap on the injection phase is explained by the rate of increase in the contact of the camshaft cam surface with the valve stem. With less clearance or no clearance, the speed increases and the valve opens and closes with some advance. If the gap is increased, the valve operates with a delay. Therefore, when the owner asks to adjust the gas gap, it is advisable to clearly explain to him the principle of gas distribution and the adjustment is made in the same way as the gas gap is set.
The regulation procedure is determined by the design of the engine and is carried out in two stages. If the car comes for servicing, it is necessary to reduce the engine temperature naturally before starting work. To do this, just open the hood of the engine compartment, and to speed up the cooling process, install an autonomous fan above the engine, powered by the car’s battery.
The technological scheme of work is as follows:
- Remove the valve cover and inspect the integrity of the gas distribution mechanism parts for mechanical damage.
- By rotating the crankshaft, set the mark in the form of a mark located on the drive disk, aligning it with the pointer in the form of a pointed rod on the front cover of the cylinder block. In this case, the first cylinder is on the compression stroke.
- Check the first valve with a 0.3 mm feeler gauge. The feeler gauge should pass between the sliding surface of the rocker arm and the end of the valve. With a reduced gap, if the feeler gauge does not pass, it is necessary to unscrew the locking nut and rotate the adjusting bolt to increase the gap, monitoring its change with the feeler gauge. The gap interval of the first and eighth valves can be set from 0.3 to 0.35 mm.
- Check the second valve with a 0.35 mm feeler gauge. The regulation procedure is carried out in the same way as in paragraph 3. It is recommended to set the valve clearance interval from the second to the seventh from 0.35 to 0.4 mm.
- Next, the fourth and sixth valves are checked and adjusted.
- Rotate the crankshaft 360 degrees until the marks indicated in step 2 are aligned.
- Check and adjust the valves in the following sequence: eighth, seventh, fifth and third in accordance with the clearances specified in paragraphs 2 and 3.
Important Review of the model range of Chinese mini tractors Scout
How to open a car yourself
To open a slammed car door:
- First of all, remember where you have a spare set of keys. If you are at home, ask your family to bring it or go yourself.
- Use a metal ruler. You can also use any flat, flexible object, such as a knife. It is necessary to remove the rubber seal. At the same time, you need to press with a ruler on the central locking lock, which should unlock.
- Bend the upper corner of the door near the handle. This can be done using a piece of plastic. It is necessary to insert a stone into the resulting gap. You need to insert a thin object with a hook at the end into the hole. You can take a wire and bend one of its ends at an angle of 45°. The material from which the wire is made should not be too soft and flexible. The hook must be at least 6–7 cm long. It is necessary to pick up the door rod and pull it up.
- Lower the window. The method is suitable for owners of Soviet-made cars. You need to press your palms tightly against the glass and press down.
- Break the lock. You can use a thin screwdriver or other similar shaped object (nail file). The screwdriver should be inserted into the hole and turned slowly. It is recommended to use this method only in extreme cases, since the locks on both front doors will need to be replaced.
- Break the glass. It is advisable to break the rear side window to reduce repair costs.
- On some car models, you can climb into the cabin through the trunk if it is open. You need to lower the rear seats by pulling a special loop or cord, and then crawl inside.
- Also, many people advise making a loop on the rope and carefully using it to pry the door lock. The method will work, but only if the lever in the machine has the appropriate shape that the loop can hook onto.
Nuances of valve adjustment on GAZ cars
The valves are not always adjustable; in some cases, the knocking noise remains even when the recommended clearances are set. There may be several reasons for this phenomenon:
— the camshaft cams are worn;
— the axis on which the rocker arms stand has a groove;
— the noses of the rocker arms have worked unevenly;
— the cracks of the springs worked together.
If there is wear on the heels of the rocker arms, it will not be possible to adjust the valves well using feeler gauges; in this case, you should use an indicator.
When there are defects on the camshaft cams, it will not be possible to get rid of valve knock, even if you make adjustments using an indicator. In this case, only the camshaft needs to be replaced, and no adjustments will help. If the spring retainers have worked, it will also not be possible to adjust the gaps, since the rocker arms will not rest against the valve, but against the valve spring cup. This defect can be eliminated by installing new crackers.
Good afternoon. In today’s article I will talk about how the valves on the ZMZ 402 are adjusted in two stages (this is faster).
For those who don't like to read, below is a detailed video:
Adjusting the Gazelle Next valves
Based on the UMZ 4216 engine, the Evotek engine (UMZ Evotech) was developed. The modernization mainly affected the cylinder block, but the principle and structural elements of the gas distribution mechanism remained unchanged. Automatic adjustment of thermal clearances of valves with compensators is provided. Engine 4216 Evotech, as it is often called by owners, with installed hydraulic compensators, is used in Gazelle Next cars.
The adjustment procedure is no different from the procedure for servicing the gas distribution mechanism UMZ 4216. The only exception is dismantling the valve cover. The valve cover is made of plastic and is attached to the cylinder head with ten bolts (on the 4216 the cover is secured with six bolts).
Reasons for changing the gap size in the valve system
It should be noted that the adjustment consists of establishing a certain fixed gap between the rocker arm and the valve. Its value can change quite quickly. The following problems are considered to be the causes of such unwanted deviations:
- failure of the crankshaft;
- incorrect timing of the cams in the gas distribution mechanism;
- violation of the integrity of the cylinder block.
In addition to the listed engine malfunctions, the cause of the floating gap may be the behavior of the driver behind the wheel of the Gazelle. Extremely aggressive driving, such as rapid clutch release, for example, can lead to premature wear of functional components.
Source
How to adjust valves after disassembling the block
After complete disassembly, the engine must be adjusted again, the same applies to the operation of the valves. The principle of setting the gap remains identical, only it is necessary first of all to carry out comprehensive maintenance of the engine, that is, to run it in for at least 50-60 km. You should not pay attention to the fact that the valves will not be adjusted during this period.
And of course, adjustments are performed only on a fully functional engine. If one of the spark plugs does not work or the connecting rod is knocking due to a loose pin, all this must be corrected without fail. Next, adjustment is performed according to the above algorithm.
Engine valve 4216 for Gazelle
- crankshaft malfunctions;
- problems with the gas distribution mechanism (incorrect timing of the cams);
- mechanical damage to the cylinder block;
- too aggressive driving (quick release of the clutch, which also wears out the crankshaft).
In an injection-type Gazelle (that is, without a carburetor, but with a direct injection system), the principle of valve adjustment is similar, only the receiver does not need to be removed. In this case, it is enough to simply remove the valve cover, behind which access to the necessary tightening nuts is hidden.
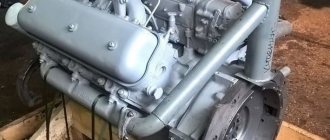
UMZ 4216 engine ready for installation on Gazelle
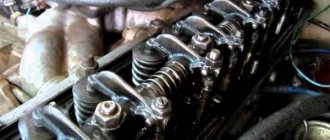
The gaps are adjustable on a cold (15-20°C) engine. The gap values should be 0.30-0.35 mm for the exhaust valves of the first and fourth cylinders (outer valves). For all other valves - 0.35-0.40 mm. Remove the cylinder head cover (see Replacing the cylinder head cover gasket). Using a socket or a 36mm wrench, turn the crankshaft by the damper pulley mounting bolt clockwise (front view)…
If the valves do not close (exhaust stroke), turn the crankshaft one more revolution. Using a set of feeler gauges, we check the gaps in the valve drive of the first cylinder.
Using a 14mm wrench, loosen the locknut of the adjusting screw and unscrew the adjusting screw one or two turns. Insert a dipstick between the valve stem and the rocker arm. We tighten the adjusting screw until the feeler gauge moves in the gap with little force.
Having set the gap, hold the adjusting screw, tighten the locknut (the gap will decrease somewhat) and check the gap again. We adjust the clearances of both valves of the first cylinder.
Instead of a screwdriver, the adjusting screw can be held with an 11 key.
By turning the crankshaft clockwise each time 180° (half a turn), we adjust the clearances in the valve drive of the remaining cylinders according to the order of their operation, i.e. 1-2-4-3 Install the cylinder head cover with gasket.
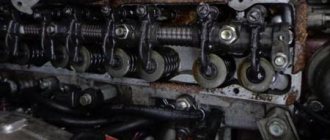
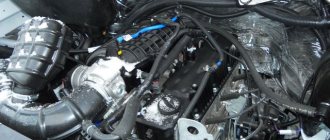
We will show you how to independently adjust the valves in the UMZ 4216 engine with hydraulic compensators on a Gazelle Business car. Unhook everything unnecessary and remove the valve cover. Set the label:
In this case, the valve motors are not released; they are always in a clamped position. How do we determine which cylinder to start tuning with? To do this, we take some kind of flat bar. We put it between the third and fourth valves and see where our slope goes. By this slope we can determine whether the valve is clamped or not clamped. Those. if our slope goes towards the fourth valve, this means that the fourth valve is now weakened, and the third valve is “pressed”. This tells us that the settings start from the first cylinder.
This means we set up the first, second valve, then the fourth. How to adjust the valves, first remove the nut:
Then we unscrew the bolt until the hydraulic compensator stops pressing on it. As soon as this happens, we make one full turn on the exhaust valves, and one and a half turns on the intake valves. Although the manuals say that on all valves it is necessary to make two, two and a half turns. But as practice has shown, when you make 2.5 revolutions, especially when the car is operated on gas, the valve seats begin to burn and, as a result, the hydraulic compensator cannot compensate for this pressing and the valve begins to burn out.
Important: How to strip the tires for an all-terrain vehicle yourself and how much does a set of tires cost?
Video of valve adjustment on the UMZ 4216 engine with hydraulic compensators in Gazelle Business:
Reserve video on valve adjustment in Gazelle Business with UMZ 4216 engine:
In theory, there is no need to adjust valves on an engine with hydraulic compensators. But after such adjustment, the engine runs much quieter and smoother. For those who have gas, it is simply necessary to do this. After what mileage is it recommended to adjust the valves? It all depends on driving style and fuel. Some people will be able to drive 70 thousand km without any problems, while for others, at 40 thousand, the seats burn out and the valve fails.
Parks and monuments, streets
Taganrog sea trade port
The commercial port of Taganrog is located on the coast of the Azov Sea, founded in 1698 as a naval base. Rebuilt in 1769 as a port fortress. Since 1784 it has been a Russian commercial port. Since 1991 – an international trade port.
Today, year-round navigation is provided here. During the cold season, two icebreakers operate. There are 7 berths for mooring ships. They accept ships with a draft of up to 5 m.
Sculptural composition “Romance with a double bass”
Address: Pushkinskaya embankment, square
The monument was created based on a humorous story by Chekhov, who was born and raised in Taganrog. The author of the composition is a modern sculptor from Rostov-on-Don Dmitry Ryndin.
According to the humoresque's plot, a girl whose clothes were stolen while swimming hid in the case of a double bass. While the owner of the double bass was looking for suitable clothes, the musician’s friends took away the case with the girl.
Monument to Taganrog underground fighters “Oath of Youth”
Address: per. Spartakovsky, 1
The sculptural composition “Oath of Youth” is dedicated to the anti-fascist youth organization that worked in Taganrog during the occupation of 1941-1943. The monument was erected to mark the 30th anniversary of the liberation of the city. Authors: Vladimir and Valentina Grachev.
The installation site for the sculptures is the site in front of the Chekhov gymnasium. It was former high school students who became participants in the underground youth organization.
Sculptural composition “Mercury” (or “Palm with Hermes”)
Address: per. Gogolevsky, 4a, main entrance to the Rainbow market
The monument was opened in 2012 to mark the 20th anniversary of the shopping complex at the Raduga market. The author is modern sculptor Dmitry Ryndin.
The double name of the monument is associated with two variants of the name of the patron of merchants. The Greeks have the god of trade and profit - Hermes, the Romans - Mercury.
Old sundial
Address: st. Greek, near the Stone Staircase
The 1833 sundial is the oldest sundial in Russia. After restoration in 1972, the gnomon turned out to be tilted at the wrong angle, not corresponding to the latitude of the area. Therefore, the clock readings lost their accuracy.
New sundial
Address: st. Petrovskaya, entrance to the park named after. Gorky
A new sundial was installed in 2000. Manufactured with funds from the Lemax enterprise, which produces heating equipment in Taganrog.
Depaldovskaya staircase
Address: between st. Greek and Pushkin Embankment
Depaldova, or stone staircase, was built in 1822.
Patron and merchant, hereditary Greek Gerasim Fedorovich Depaldo bequeathed 15 thousand rubles for the arrangement of the staircase descent.
A 115 m long staircase connects Grecheskaya Street with the city Embankment. The author of the project is Italian Franz Boffo. He used a technique that allows him to visually change the appearance of steps and flights. From top to bottom, the staircase appears the same across its entire width, which was achieved through different heights of steps (there are 190 in total).
Depal's staircase in Taganrog served as a prototype for the Potemkin Descent in Odessa.
Novo-Bessergenovsky source
Address: st. Sadovaya
The source consists of five springs. Their flows form a stream that flows along the bottom of the ravine and flows into the Taganrog Bay. Thanks to the fast flow, the water flow does not freeze in winter when it is cold. In summer – maintains a cool temperature.
Not far from the source there is the Church of the Icon of the Mother of God and the Topol sanatorium.
GAZ 31 2002, 92 l. With. — self-repair
Comments 12
Thank you, it was useful. In the book, the adjustment is carried out in 4 turns of 180′, but here it turns out that it’s possible in 2))
thumbs up with both hands! I adjusted the valve like this, the engine just whispers =) I drove for two days without a tape recorder =)) I listened to the engine! =))
I also posted the code at ZMZ to assemble the engines, everyone there does it on both 511 and 513
The last time I adjusted the valves using this scheme. I've already driven 4000 km, the flight is normal! I drive gas and 95.
This is interesting: Is it possible to make power thresholds on a car yourself?
So I drove after such an adjustment and everything was fine.
Obviously this is not according to the book. I agree that you should use it, but not completely trust it, because... Only then was I able to set the valves to a rustling state when I reduced ALL values by 0.05, BUT I still did it according to the book, that is, after adjusting the valves of EACH piston, I rotated the crankshaft by 180. This is where I disagree, because I tried to adjust two pistons at once, but one at a time is mandatory!
Anything is possible, but I did it according to this scheme, everything worked with a bang, I couldn’t hear the valves.)))
Obviously this is not according to the book. I agree that you should use it, but not completely trust it, because... Only then was I able to set the valves to a rustling state when I reduced ALL values by 0.05, BUT I still did it according to the book, that is, after adjusting the valves of EACH piston, I rotated the crankshaft by 180. This is where I disagree, because I tried to adjust two pistons at once, but one at a time is mandatory!
Based on the book! There is this method in the murzilka attached to the car!
I didn't have it written in the book.
I adjusted it literally a month ago, so I couldn’t have made a mistake) It’s not a fact that the books are the same)
Comparison with competitors
By its nature, Lada-Largus has few analogues on the Russian market and the CIS car market. This is largely due to the weak demand for the B-class in the post-Soviet space. Despite this, it is quite possible to highlight some parallels and compare a number of similar models in terms of cargo transportation.
First of all, we note that among the most popular competitors and analogues of the Lada-Largus in the CIS there are simply no such load-lifting models. Just think, but the brainchild of AvtoVAZ is capable of transporting up to 800 kilograms in its “van” variation and about 650 kilograms in the “station wagon” variations. None of Largus’ competitors can boast of such data. Moreover, on average, among car analogues, the load capacity ranges from 450 to 650 kilograms, which, frankly speaking, is not much.
In terms of capacity and overall size of the luggage compartment of the Lada-Largus, everything is not so rosy. Yes, the car is not a clear outsider in this regard, but it is not among the leaders either. A similar trend is clearly visible in the comparative table below:
Why adjust valves?
Imagine that in its normal form the valve opens, admits fuel and releases exhaust gases, and when not in operation it fits tightly into the surface of the combustion chamber. If the valve is not adjusted, at best it will not adhere tightly to the top of the combustion chamber. The fuel is supplied unevenly, compression in the cylinders will drop significantly, and accordingly there will be no traction (the power of the unit will drop).
It is much worse when the valve practically does not open, that is, there is no thermal gap. The engine will choke due to exhaust gases, and dense carbon deposits will appear in the cylinders over time. This moment is also called air starvation of the engine; thrust and power will also be lost.
Preparing to work on valve adjustment
Adjusting the valves of the UMZ 4216 engine on the Gazelle is not difficult. This procedure should be performed if a characteristic metallic knocking sound of valves is heard while driving or the engine suddenly begins to stall after a few kilometers. Valve adjustment is also mandatory when carrying out a major overhaul of the power unit or replacing pistons or crankshaft.
How to properly adjust and set the clamping gap recommended by the manufacturer? And are there any differences in the valve adjustment procedure when you have to adjust an injection engine?
Checking and adjusting gaps
So, the valves on a Gazelle car are adjusted using keys 14, 11 and 36 (to rotate the crankshaft during the adjustment process). First of all, you need to unscrew the valve cover, move it to the side, and then disconnect all the electronics. There is no need to unscrew the spark plugs - they will not interfere in any way with this task. The valve cover is unscrewed using a regular 10mm wrench. By removing the electrical wiring clamps and hoses, you can gain access to the valves. According to the manufacturer's recommendations, the gaps in the first and fourth cylinders should be at the level of 0.3-0.35 mm, while on the rest - 0.35-0.4 mm.
However, in practice it has been repeatedly proven that this parameter practically in no way affects the operation of the engine and its service life. Therefore, you can set any selected gap (0.35 mm) on all valves.
Next, you need to throw a 36mm wrench onto the crankshaft rotary shaft and turn it clockwise until the valves close. After this you need to measure the gap. This can be done using a probe. If the gap is larger or smaller than the selected one, you must turn the control tightening nut clockwise or counterclockwise to obtain the required gap size. To do this, you will need a 14mm wrench. It is also possible to squeeze the dipstick during the adjustment process, but not very much (so that it can then be removed by hand, without a specialized tool).
The Gazelle car has a valve system that must be held with a screwdriver when adjusting (for which there is a gap in the valve head). This can also be done using an 11mm wrench, which fits perfectly under the head. There is no need to turn the engine (that is, the crankshaft) after each valve. After completing all the procedures, you can start the engine, drive a few kilometers and carry out a control check. Naturally, before this you need to complete the complete assembly of the block.
It should also be noted that valve adjustment on the 4216 engine can only be performed when the engine temperature is 15-20°C, no more. If the car has been driven before, you need to let it cool for 1.5 hours. Otherwise, the gap will be greater than the specified one by about 0.1 mm - and this is quite a lot.
Important Guide to door trim and locks on GAZelle Business
Preparatory operations
Despite the fact that adjusting the valves of the 4216 Gazelle engine is relatively simple, you need to understand that the process is very responsible. Before adjustment work, the machine should be carefully prepared.
The first thing you need to do is secure the car. The handbrake alone should not be trusted. It is better to additionally secure yourself with wheel chocks. Then, if the engine is hot, it is allowed to cool. The engine must be completely cold.
Before starting work, you need to get to the valve mechanism. This is relatively easy to do on injection engines, but more difficult on carburetor engines.
First you need to remove the air filter:
- First of all, remove the filter cover, then unscrew the fastening nuts.
- The hose of the vacuum ignition corrector and the breather pipe are also removed.
- Next, disconnect the rods from the carburetor - they will greatly interfere.
- Finally, the valve cover is unscrewed.
At this point, the preparatory work is completed and you can proceed directly to adjusting the valves of the 4216 Gazelle engine.
How often does it need to be tuned?
When operating a vehicle under high load - transporting heavy loads, driving in the mountains and at low speeds - the adjustment period is reduced to 8-10 thousand km. And if gasoline that does not match the cylinder head is poured into the tank, the valves need to be adjusted every 5-6 thousand kilometers. Otherwise they will burn out and the engine will lose compression.
To avoid stripping the threads while adjusting the valves, the nut must be rotated very smoothly with a wrench at the beginning of unscrewing and at the last turn of tightening. The tips of the valve mechanism rods of the ZMZ-402 engine are made of duralumin, and not steel, as on the ZIL-130, for example. Therefore, it is extremely difficult to adjust the valves by ear. Rattling and knocking noises can be made by:
- worn camshaft cams;
- unevenly operated rocker arms;
- worn out axis;
- loose springs.
Valves with a defective camshaft cannot be adjusted properly. Therefore, it would be more advisable to replace the camshaft. The same applies to worn-out spring retainers, since the rocker arms in this case will rest not against the valves, but against the spring cups.
Sources
- https://etlib.ru/video/regulirovka-klapanov-gazel-kamminz-3297
- https://SwapMotor.ru/tehnicheskoe-obsluzhivanie/regulirovka-klapanov-dvigatelya-zmz-402.html
- https://gruzovik.biz/articles/regulirovka-klapanov-kamaz-s-dvigatelem-cummins
- https://FB.ru/article/443898/regulirovka-klapanov-dvigatelya-gazel-poryadok-deystviy-tehnika-vyipolneniya-rabot-neobhodimyie-instrumentyi-i-sovetyi-spetsialistov
- https://diagnozbibike.ru/regulirovka-klapanov-umz-4216/
- https://spb.camsparts.ru/regulirovka-klapanov-dvigatelya-cummins-6isbe/
Preparation
Setting up valves is quite a complex and responsible job. Therefore, before this action, you must prepare the car. First you need to securely secure the car. In addition to the handbrake, you also need to use wheel chocks. Next, we leave Gazelle for several hours. This is necessary to ensure that the engine cools down properly. More specifically, the time must be calculated based on temperature conditions. On the injector, access to the valves is easier; on the carb, you will have to tinker. The air filter is removed. Here you will have to tinker. Work should begin by removing the air vent cover, after which the fastening nuts are unscrewed. The hose of the vacuum ignition distributor and the breather pipe are dismantled. The throttle and air damper linkages must be disconnected from the carburetor, otherwise they will interfere. The valve cover is unscrewed. This completes the preliminary stage.
Instructions for adjusting valves.
Required tool:
- screwdriver.
- open-end wrench (10,12,13,14).
- measuring probes for 0.35 and 0.45 mm.
Required spare parts and consumables:
- valve cover gasket. (Necessarily).
- sealant (if you are installing a rubber gasket).
- crankcase exhaust hose (if dry).
- studs, washers from UMZ 421, nuts, Grover washers (optional, if you want to remove oil stains).
How are the valves adjusted on the ZMZ-402?
Attention - valve adjustment is performed on a cold engine!
- Remove the valve cover.
- We bring the piston in the first cylinder to the top dead center of the compression stroke.
The easiest way to determine the top dead center in the first cylinder is to place a mark on the pulley (damper) to the casting on the front cover and, by removing the distributor cover, make sure that the slider is looking at the spark plug wire going to the first cylinder.
By and large, you don’t have to do this, just align the mark, and with the valve cover removed, chat with the pushers to understand which ones are free (I did this on the injector).
If you do not see the mark, top dead center can be found by removing the spark plug from the cylinder and inserting the counter into the spark plug channel and turning the crankshaft.
- We adjust the exhaust valve of the first cylinder (0.35 mm), the exhaust valve of the second cylinder (0.45 mm), and the intake valves of the first and third cylinders (0.45 mm).
- We rotate the crankshaft 360 degrees (a full turn, i.e. we put it on the same mark again)
- We adjust the thermal clearance of the exhaust valve of the fourth cylinder (0.35 mm), the exhaust valve of the third cylinder (0.45 mm), and the intake valves of the second and fourth cylinders (0.45 mm).
- Close the valve cover and assemble the attachments.
If after warming up you hear knocking of the valves, it is permissible to reduce the thermal gap from 0.45mm to 0.4mm. It is undesirable to reduce the clearance of the outer valves (the likelihood of burnout greatly increases).
Small tuning.
The ZMZ-402 engine is widely known for its ability to spray oil on the road; sometimes it seems that oil can seep through the walls of the block. That is why, at the beginning of the article, I recommended buying studs and washers from the UMZ-421 engine.
Previously, when I adjusted the valves myself, I recommended that all car owners convert the standard screw fastening of the valve cover to studs and nuts from UMP.
There is no difficulty in the modification, everything is installed by BOLT-ON.
- In place of the screws, screw the studs from the UMP.
- You put a gasket on them (preferably cork, I came to this alteration because it makes installation much faster).
- Reinstall the valve cover.
- Sequentially install the washers from the UAZ, the groovers and tighten the nuts.
- there is no risk of turning off weak threads in the cylinder head when installing the valve cover
- Oil leakage is significantly reduced, since, thanks to washers from UMP, the valve cover is less deformed.
- The installation of the cork gasket is simplified.
How often do valves need to be adjusted?
The manufacturer has established a regulation for adjusting the valve mechanism - once every 15,000 km, but, in practice, the valves are usually adjusted once every 40,000 km, or when they knock, whichever happens first. When using HBO, it is recommended to follow the regulations!
Features of valve adjustment on ZMZ-402 with installed gas equipment?
On thematic forums you can often find a recommendation to increase the thermal gap for the exhaust valves by 0.05 mm. As a justification for increasing the thermal gap, an increased combustion temperature of the gas is indicated.
There is no need to do this under any circumstances - the difference in exhaust temperature between gasoline and gas is no more than 10%, here's probably a picture for you:
Believe me, 10% in the exhaust temperature, this is not a significant difference, and the increased clearance in the valve mechanism will irritate with an unpleasant knock, constantly losing adjustment and accelerated wear.
Conclusion.
That's all for me today. I hope that the article was useful to you and fully answered the question of how valves are adjusted on the ZMZ-402. If you have any questions or if you want to add to the article, write comments.
The gas distribution mechanism of the eight-valve ZMZ-402 is designed to release gases and timely supply a combustible mixture or air to the power unit. The timing belt must be properly adjusted, otherwise the internal combustion engine begins to make noise and fuel consumption increases. One of the basic methods of effective tuning is to adjust the 402 engine valves yourself.
Modified valves ZMZ 402
intake valves, comparison
exhaust valves, comparison When modifying the valves, two goals were pursued. Increase the flow area and reduce the weight of the valve. The second goal is of priority importance, because the valve-seat flow area, taking into account the rather strange shaped cylinder head channels, will not be of decisive importance. The valves are of course quite archaic, especially considering the 9mm stem. But on standard valves, my hand does not rise at all to assemble the cylinder head. I usually take Chelyabinsk valves as a donor. As I said above, valves from different manufacturers were brought to me for modifications, but subjectively I liked these ones. Despite their price and the fact that in their native St. Petersburg you have to run around to find them. The result of the improvements is shown in the photo. Probably no special comments are required.