The question of how to make an all-terrain vehicle from a walk-behind tractor with your own hands is very relevant for farmers and even owners of small plots. This technique is an assistant for all occasions, since it is very easy to attach additional equipment to it, which makes the motor cultivator as functional as possible. Traditionally, this technique is used in garden plots and vegetable gardens. As a rule, a walk-behind tractor has a lot of work to do, since it can plow the ground, collect leaves, and pile up hay. But the equipment sits idle for some time. During this period, you can occupy her with other work. For example, you can make an all-terrain vehicle out of it. All it takes is a little work to turn your farm equipment into a universal all-terrain vehicle. At the same time, some equipment is very easy to work with. There are models that are modified by the attachment. This option is as easy as possible to use.
It is more convenient to make an all-terrain vehicle from a Neva walk-behind tractor. A special feature of this equipment is that the manufacturer allows you to install universal attachments on it. This makes it possible to modify the motor cultivator as quickly as possible. Thus, a swamp vehicle can be made from a walk-behind tractor in a matter of minutes. However, to transform farm equipment, you must have an all-terrain attachment to the walk-behind tractor at hand.
Manufacturers offer various additional equipment for this type of equipment. But such consoles are not cheap. For those who are not ready to spend thousands of rubles on turning a walk-behind tractor into an all-terrain vehicle, you can try making the equipment yourself. There are no particular difficulties here, but some skills are still required. First of all, the master needs to understand technology and be able to work with a welding machine.
All-terrain vehicle made from a walk-behind tractor
Considering that a motor cultivator spends a considerable amount of time in the garage, many farmers strive to use this equipment in other work that is not related to agriculture. This is how the idea came up to make an all-terrain vehicle from available equipment. Moreover, it could be a snowmobile, a swamp vehicle, or even a car capable of moving through mountainous terrain. If you take the work seriously, you can even make a tracked all-terrain vehicle from a walk-behind tractor. As a result, the device will work even in late autumn and winter, and not sit idle in the garage, which can be harmful for equipment.
The interesting thing is that an all-terrain vehicle based on a walk-behind tractor turns out to be very good.
It easily overcomes off-road conditions, wet rural paths and snow embankments.
In order to cope with such work, you should use a motor cultivator with a 2 or 4 stroke engine. In this case, the equipment must be equipped with an air cooling system.
Experts recommend not to re-equip the walk-behind tractor too much. Otherwise, it will be difficult to return it to its original form. It is best to use an all-terrain attachment for a motor cultivator. This will reduce operating time, and the walk-behind tractor can be turned into a snow and swamp-going vehicle in a matter of minutes.
Wheels (low pressure chambers)
To move on wet and unstable ground, you can use lugs. They provide high grip. Large-diameter low-pressure chambers perform even better. Pneumatics have minimal ground pressure, and the presence of air contained in the all-terrain vehicle’s chambers will make it possible to create a floating all-terrain vehicle.
For installation on the rear axle, homemade or special wheels for all-terrain vehicles, swamp vehicles and snowmobiles are used. They can be purchased assembled or as separate elements: tire, tube, disc. The wheel is easy to assemble.
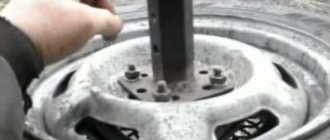
- Homemade discs for pneumatics are made by welding ordinary discs and mounting plates using metal tubes. This expansion is necessary in order to adjust the small diameter of the car rim to large cameras and better fix them.
- A large camera is placed on a specially expanded disk - either a proprietary one or from other units (GAZ 53, Ural, Kamaz or another truck, an aviation camera, etc.).
- An air valve is installed in the hole of the disk.
- The wheel is inflated with air.
- The resulting tires are installed on a homemade all-terrain vehicle.
You can increase the cross-country ability of regular wheels on low-pressure chambers by creating an additional tread. For example, additionally secure the cameras with chains, conveyor belts, homemade tracks or another method.
Another option is to cut a patch lug from the tire. The depth of the structure’s hook reaches more than 20-25 mm. Rolling resistance increases, while at the same time the slip coefficient decreases sharply.
For more details, see the article on pneumatic tires on low-pressure tires.
Features of working on an all-terrain vehicle
In order for the equipment to work correctly and not fail at a crucial moment, it is necessary to take into account some nuances. There can be many design options, but for high-quality operation of a walk-behind tractor in the form of an all-terrain vehicle, it is necessary that the equipment be equipped with an independent suspension. It is advisable to supplement everything with low-pressure pneumatic wheels, which, if desired, can be replaced with tracks. As for the frame, it can be of any type. Here the master chooses the option that is best suited for the specific type of wheels and purposes of using the all-terrain vehicle.
You can create a homemade all-terrain vehicle from a walk-behind tractor quite simply. To do this, the side members are connected to the strut and a special steering bushing. Next, cameras from the truck are used. It's better if she has low blood pressure. It is necessary in order to conveniently hook the wheels. Next, the suspension and motor are attached, which is taken directly from the walk-behind tractor. The brakes, clutch and exhaust can then be attached. The result will be a great all-terrain vehicle that can be used for a variety of purposes. This technique can accelerate to 75 km/h. At the same time, the all-terrain vehicle will demonstrate excellent maneuverability, including through swamps and difficult trails.
Karakat based cultivator: distinctive features and assembly
The caracat from a walk-behind tractor is similar in purpose to the device discussed above. The differences are:
- extended wheelbase with belt clutch;
- bulkiness;
- extended conditions for operation - the karakat is capable of generating speeds of up to 70 km/h on rough terrain.
Due to the fact that the main emphasis in this alteration concerns the tires, we will dwell on them in more detail.
Among the existing methods of manually recreating powerful and large stingrays, several basic ones can be distinguished:
- considered the easiest. Two metal disks are taken and aggregated onto a sleeve. They put cameras on them, secured with a conveyor belt. The walk-behind tractor has good stability and endurance;
- Only one of the disks is attached to the hub. Jumpers are also installed on it. Rings are fitted to the latter welding machine;
- resembles the previous method, however, the central disk requires an additional spoke, which can be made from a metal billet or pipe;
- will allow you to give new life to disks from an old scooter, which are standardly attached to a hub.
You can use the proposed drawings as a reference outline for further assembly of the caracat.
A homemade caracat based on an engine from a soil cultivator such as “Neva” or “MTZ” is assembled as follows:
- we prepare a frame from a metal profile or pipes;
- We install front and rear wheel drive. It is allowed if they are without a differential and solid;
- the front axle can be borrowed from the chassis of the car. The steering rack is also taken from it;
- The engine is borrowed from the tillage machine. You can leave the original gearbox or replace it with a multi-stage gearbox. In this case, it will be easier to control speeds in karakat. With a gearbox, you will have to stop before changing the speed of movement;
- install the ramps and proceed to testing the Karakarta.
Driving in the snow
You can also make a snowmobile based on a walk-behind tractor. This is an excellent option for using agricultural machinery in winter. Usually it sits idle in garages, but after a little modernization the cultivator becomes an excellent all-terrain vehicle.
To work, you will need a walk-behind tractor, a welding machine and powerful wheels, which can be replaced with tracks if desired. Such a snowmobile will have very high cross-country ability and will cope even with difficult snow drifts. The snowmobile should be assembled strictly according to the drawing.
But before you start modifying, you need to carefully consider the use of technology. The recommended power and type of design depend on this. In addition, you should definitely consider the load capacity of the device. This is especially important in cases where the snowmobile is planned to be used to transport heavy loads on snow.
In order not to make mistakes in the calculations and not to spoil any parts of the expensive walk-behind tractor, you should first study the drawings, and then make a mock-up from cardboard. This will allow you to move in the right direction and evaluate your capabilities. For a good craftsman, making a snowmobile from a walk-behind tractor with your own hands should not be difficult. You can even make caterpillars yourself, if you have certain equipment at hand, as well as the skills to work with it. At a minimum, the master needs to be able to operate a welding machine.
Detailed stages of transformation
- First, you need to spread the wheels using special bevels, which are turned on a lathe or purchased in a store;
- Then you need to take care of creating the frame. These parts are often “borrowed” from a bicycle or motorcycle, but the possibility of welding them from classic water pipes is not excluded;
- Now you should attach this same frame to the walk-behind tractor at the swivel joint, using two pins;
- Afterwards you need to deal with the wheels. Naturally, car tire wheels (with a low profile) are considered the best option. They are distinguished by a fairly wide stock and an excellent rubber chamber that will fit perfectly to them;
- Cameras should be selected from trucks, then there will be no doubt about the practicality and endurance of the device.
Thanks to this simple modification method, you can get an excellent ATV that does not need a well-trodden road and is not afraid of sharp turns and slopes.
In total, it can be noted that if you have additional tools, materials, drawings, video tutorials and other things, the walk-behind tractor can be completely retrained and “breathe new life into it”!
Nowadays, a walk-behind tractor is not only a popular agricultural machine. This is also the foundation for the manufacture of various home-made units. The most recent category includes an all-terrain vehicle or, as it is also called, an ATV, as well as a caracat. Any of the mentioned motor vehicles will find use in regions with difficult climatic conditions and simply among extreme sports enthusiasts.
How to choose equipment for creating an all-terrain vehicle
As for the type of all-terrain vehicle that may be suitable for creating an all-terrain vehicle, almost any option can be chosen. But not all equipment of this type is easy to modernize. Specialists most often use the Neva to create all-terrain vehicles, since these motor cultivators are the most versatile.
The main thing in a walk-behind tractor is the presence of a cooling system. If you plan to transport cargo or people on an all-terrain vehicle, you should pay attention to models with a powerful engine. To create a snowmobile, it is better to take equipment that is equipped with a four-stroke engine. The thing is that such engines start much better in any weather. Moreover, the four-stroke power unit will not cause problems even in sub-zero weather, which is exactly when the snowmobile is planned to be used.
https://youtu.be/x7wodD8pAfw
It is impossible to say with certainty what exactly the engine should be like. Both gasoline and diesel power units are suitable for working on an all-terrain vehicle. Each case has its own pros and cons. The thing is that gasoline is more expensive. But diesel fuel freezes at sub-zero temperatures, so it is not suitable for a snowmobile.
Models of equipment for moving on snow or off-road also do not play a big role. Now they sell both reliable Belarusian options and good Chinese equipment, which is distinguished by an affordable price and quite acceptable quality. The main thing is to choose those models that are popular. In this case, if repairs are necessary, you will not have to spend a lot of time searching for spare parts.
If you plan to create a tracked all-terrain vehicle, it is best to pay attention to a one-piece frame. The team will have to work hard to achieve the desired result.
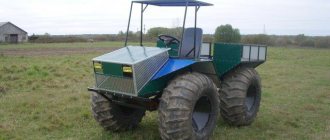
DIY pneumatic vehicle
A homemade pneumatic vehicle made by craftsman Ivan Stepchenko from Sumy.
Next, the author talks about his homemade all-terrain vehicle.
The pneumatic vehicle is made from a motorcycle MT Dnepr -11, and various scrap metal. The main pleasure for me is the design process itself and the anticipation of the result.
The engine, gearbox, axle and everything connected with it were taken from the motorcycle. The rear axle is a homemade bridge from the Volga, which is slightly lightened and expanded.
The differential is open and has a driven sprocket instead of a bevel gear. In place of the rear wheel of the motorcycle, only a hub remained with a brake drum to which the drive sprocket was attached. Replacing these two sprockets allows you to change the gear ratio.
Wheels taken from UAZ, lightweight. The wheels themselves are made from inner tubes from a tractor trailer with protection from the same cut inner tube and a shell made of durable reinforced PVC and rubberized clamps. Wheel pressure 0.2 atm. The seats are designed for 4 people. The 55A battery is under the seat, there is also a glove compartment.
Since the motorcycle engine operates under difficult conditions, it overheats and often has to be stopped. I decided to do forced cooling.
There was a cooling system fan from a VAZ 2106 available, so I decided to install it. There is no room in front of the engine, so I installed it underneath the sump. I made a deflector from an aluminum sheet. The first tests confirmed the correctness of the solution; with forced cooling, the engine operates much more stable.
Let me summarize: the all-terrain vehicle is very huge, the visibility is excellent, the clearance is huge, and the cross-country ability is excellent for such a configuration. The disadvantages are large weight and dimensions.
Where is it used?
Initially, this type of equipment was created as an assistant for the farmer. With a motorized cultivator you can plow the ground, transport loads, collect garbage, hay and leaves. However, the useful qualities do not end there. Based on it, you can create a snowmobile that will help those who live in the North.
This type of equipment is very convenient for fishing.
A good and properly modernized motor cultivator does not care about dirt or snow. Even in difficult areas, such equipment can accelerate to 75 km/h.
An all-terrain vehicle is especially useful in rural areas where there is no asphalt, but there are frequent showers and snowfalls. In this case, an all-terrain vehicle can become a real savior. At the same time, when the season comes, the all-terrain vehicle can be upgraded again into a regular walk-behind tractor, which will plow the land, clean the territory and perform a lot of other useful things, allowing the farmer to save time and effort.
About the device
Tracked walk-behind tractors are much less common than their wheeled counterparts. The explanation for this is quite clear - wheeled walk-behind tractors Cayman, Patriot, Texas, Foreman, Crosser, Viking, Forza are more suitable for plowing land, i.e. its design is most suitable for working on the ground.
Thus, all conversions of a wheeled walk-behind tractor into a tracked walk-behind tractor involve the additional attachment of one wheel on each side. As a result, we get a 4-wheeled walk-behind tractor, on which you can already put on tracks (homemade or store-bought, for example, Buran caterpillar).
Additional wheels
By the way, additional wheels can be made removable so that you can quickly turn it back into a standard walk-behind tractor for working in the garden. This can be achieved by attaching these wheels to an axle that we already have in stock, through a flexible or rigid transmission.
This solution is the most appropriate, because there is no need to weld additional fasteners.
As for the design of such walk-behind tractors, they are completely identical to wheeled walk-behind tractors:
- Engine. Tracked models use a more powerful 4-stroke engine, which has an axle locking function.
This is important because it allows the crawler to turn in place without making a full circle to turn.
- Transmission. Gearbox, gearbox and clutch system - this standard set is also included in the design of tracked walk-behind tractors.
- Chassis. Here, in principle, everything is clear from the name - the design uses tracks instead of a wheelbase. As already mentioned, in the case of alteration, one roll is added to the existing pair of wheels on each side, on which a homemade caterpillar is already put on.
- Controls. They are located on the control handle, including various clutch levers, emergency engine stop, etc.
Before we begin to describe the method of making tracks yourself, it would not hurt to evaluate the offer of some special stores that sell walk-behind tractors and related materials. In particular, we will estimate the cost of some types of tracks for well-known walk-behind tractors.
Caterpillars for the Neva walk-behind tractor
Snowmobile attachments for the Neva walk-behind tractor
Thus, the tracks for the Neva walk-behind tractor, the price of which is about 28 thousand rubles, is a full-fledged snowmobile attachment. Seats for drivers can be purchased separately, thanks to which the Neva walk-behind tractor becomes similar to a mini tracked tractor, albeit with lower performance indicators.
Technical data:
- developed speed (with Neva walk-behind tractor) – about 18 km/h;
- total weight of the console – 37 kg;
- length – 100 cm;
- width – 60 cm;
- height – 34 cm;
- number of passengers – one driver and one passenger.
For more information about the caterpillar drive for the Neva walk-behind tractor, watch the video:
In addition, an attachment to a walk-behind tractor on tracks is available for sale, designed for attachment to the Agat and Salyut models. Its cost is 25-27 thousand rubles. This design does not have the ability to attach a driver's seat, which somewhat limits the capabilities of this device.
However, it is quite suitable for off-road and snowy driving. Snowmobile attachments on tracks for walk-behind tractors are quite common, as evidenced by a fairly large number of different models in online stores.
Their distinctive feature is the ability to control them not only with two hands, following the walk-behind tractor, but also while sitting in a folding sled, which, however, must be purchased separately.
Considering that the average price for such attachments is about 30 thousand rubles (plus the price of folding sleds is about 5 thousand rubles), we can say that making tracks yourself is a fairly optimal solution for those who do not have the opportunity to spend extra money on purchasing .
Turning a motorcycle into a walk-behind tractor
In order to make a homemade walk-behind tractor from a motorcycle, you must first prepare drawings of the final unit expected. Absolutely all homemade products from a walk-behind tractor are created subject to the least possible modernization of the used components from the motorcycle. To create such a design, you need to have a reserve of experience and have certain knowledge in this area, then it will be possible to even make a snowmobile from a walk-behind tractor.
Such walk-behind tractors are created with a pre-designed transmission, consisting of many stages. One of the main elements of this design is the gearbox, which comes with an adapter. The device is quite difficult to equip with a main gearbox.
In addition, the walk-behind tractor made from ZAZ will be manufactured on the basis of a single-axle chassis, and will be a small-sized tractor. Remaking a walk-behind tractor takes a lot of time, but this is the best option if you want to acquire equipment that would be capable of performing all agricultural work. Moreover, they must be performed very quickly, with high quality and relatively cheaply when compared with new equipment.
This is interesting: The best seeders for a walk-behind tractor and how to make a planter with your own hands: let’s look at it in detail
Vehicle Upgrades
If your old bicycle, scooter or motorcycle breaks down, you should not sell the equipment for scrap. There is also no need to rush into buying a new motor. It can be replaced with a power unit from a light motor cultivator. There is only one restriction: such a car cannot be driven on public roads. But the Ant scooter with a walk-behind tractor engine can be used in the country for trips to a field or river. 5-6 hp engine quite enough to accelerate the moped to a speed of 50-60 km/h. Before installing the engine on a bicycle, it is necessary to install reinforced wheels on this vehicle that can withstand a weight of up to 100 kg.
In order to assemble a scooter with a walk-behind tractor engine, you will need the following tools and materials:
- welding machine;
- grinder with metal discs;
- electric drill;
- wrench;
- screwdriver;
- pliers;
- level;
- hammer;
- dye.
In order to install the power unit on the Ant, you will need to create a frame for it.
This is done in the following sequence:
- Drawings are drawn up, precise calculations of the frame configuration and attachment points are made. It is recommended to check the calculations on soft aluminum strips.
- The mounting bracket is welded. It is treated with anti-corrosion agents and holes are drilled for the bolts.
- The engine is carefully placed on the bracket and secured with bolts. The installation accuracy is checked and the position is adjusted.
- The motor is connected to the vehicle's chassis using a belt or chain. Gear shift cables and control levers are secured.
- Checking the functionality of the vehicle. The created homemade product needs to be run in so that all the parts get used to each other. You need to spend 6-8 hours on this with the engine running at medium speed.
If you have experience in handling household tools and knowledge in electrical engineering, you can assemble an electric excavator with your own hands. This will require channels, hinges, cables and a working electric motor. The bucket is made of sheet steel, which can be purchased inexpensively at scrap metal collection points.
Conversion of the "Ant" scooter into a karakat
This vehicle is an almost finished all-terrain vehicle. Only minor modifications required. The disadvantage of the design is the low-power engine (11 hp). It is recommended to replace it with a 2-cylinder, for example Lifanovsky.
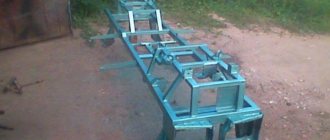
Creating a Frame Frame
The rectangular frame is assembled from a profiled pipe and reinforced with a corner. The workpieces are connected by welding. The dimensions indicated in the drawings must be accurately maintained so that there are no distortions in the design.
If the frame is made of 2 parts with a steering knuckle between them, then the rear crossbars are reduced to the fracture site in the form of a triangle. This will increase the rotation angle.