- home
- Media center
- Articles
- Compressor lubrication ZIL 130
Menu
- News
- Articles
- Video materials
- Photo materials
- Publication in the media
- 3D tour
18.08.2020
The compressor is widely used in various areas of life. Many people buy it for personal needs. Not everyone can buy a device due to its high cost. Many craftsmen manage to remake automobile mechanisms. The modification of the compressor for the ZIL 130 brand has gained the most popularity. This device is characterized by ease of maintenance and availability of spare parts. To adapt it for work in the farm or garage, you need to make minimal changes to the design.
Compressor lubrication ZIL 130
The compressor is widely used in various areas of life. Many people buy it for personal needs. Not everyone can buy a device due to its high cost. Many craftsmen manage to remake automobile mechanisms. The modification of the compressor for the ZIL 130 brand has gained the most popularity. This device is characterized by ease of maintenance and availability of spare parts. To adapt it for work in the farm or garage, you need to make minimal changes to the design.
A practical option
The design based on the compressor from MAZ, ZIL 130 - 157 has proven itself as a reliable, efficient device. The unit from these cars will require minimal do-it-yourself modifications. From MTZ, GAZ is ineffective, but from KamAZ it needs major improvements. The receiver is installed based on the needs for sandblasting - a 50 liter gas cylinder or a ready-made one from a KamAZ vehicle and a smaller one from a ZIL, which already have the necessary holes.
The approximate layout of a self-made device and the pneumatic connection diagram for the compressor are as follows. The receiver, in a horizontal position, is installed on supports with wheels. A compressor without a bottom cover is installed on a piece of channel 200–250 mm wide through a paronite gasket. At the opposite end of the channel, through milled grooves, an electric motor is mounted on feet. The grooves are necessary for tensioning the belt, which is selected with a small cross-section so that power losses on the drive are minimal. The channel is attached to the top of the receiver, the wiring from the compressor to the receiver is connected from above and from the end, a pressure control gauge is installed, an overload valve and an outlet fitting with a valve are mounted from the end.
The electric motor is selected depending on the needs. For a 220 V network, the minimum required power of a three-phase electric motor is 1.5 kW, speed – 1420 rpm. The required gear ratio between the motor shaft and the compressor pulley in this case is 1: 3. At higher powers, the ratio is reduced - productivity increases. For a 220 V power supply, 2.2 kW is optimal. By using 380V (3 phase), the power can be reduced.
The outer diameter of pulleys for automobile units is approximately 210 mm. In the case of using a 1.1 kW motor with an 80 mm pulley, the gear ratio is 210/80 = 2.6. The electric motor will operate at maximum power at a pressure of 8 atm. A capacity of 260 l/min (maximum) is obtained at 2500 rpm of the compressor shaft. By changing the ratio, you can reach 3200 rpm - the maximum speed of the unit on the ZIL 130.
Preparation for revision
During the period of rapid development of automotive technology, many consider the ZIL 130 obsolete, and the equipment on it is outdated. Craftsmen turn to the compressor of this car brand for several reasons:
- the unit is easy to find;
- it is easy to use and maintain;
- The ZIL 130 compressor requires minimal modification costs.
If a specialist is going to use the product under heavy loads, more investments will have to be made. A powerful device will require the selection of an appropriate engine and receiver. It is necessary to budget for these parts and supplies in advance to stay within your projected budget.
If a decision is made to modify any version of the ZIL 130 compressor, it is necessary to prepare the necessary tools:
- drill;
- welding machine;
- a set of keys;
- Screwdriver Set;
- puller;
- file;
- Bulgarian.
Special machines may also be useful.
You should take care in advance about the necessary parts for the lubrication systems of the homemade ZIL 130 compressor. These include:
- container for liquid;
- metal sheet 5 mm thick;
- hoses;
- rubber gaskets for shock absorption of parts mounted on the frame;
- clamps for fastening hoses.
The lubrication system of a homemade compressor for the ZIL 130 must be assembled from high-quality reinforced hoses.
Conclusion
When assembling a compressor from Zilovsky with your own hands, you should remember that this work will require the performer to be able to handle various tools and adhere to the technique of processing all kinds of parts. It is also worth remembering that the purchase of certain units will lead to costs, which means that before starting work, you should carefully evaluate all the costs and compare them with your capabilities. The fact is that with intensive use, such a compressor only lasts for a couple of years.
You can effectively and quickly clean any part or structure surface for further repair or use using sandblasting. But this device requires a source of compressed air with the necessary pressure and performance. A self-made compressor for sandblasting will save you from purchasing expensive and not always sufficiently reliable equipment.
Basic equipment
The most important element affecting the functionality of the device is the engine. It must have good power and a fairly high speed. Some experts tend to believe that 1 kW is enough. We can agree with this if the unit is going to be operated at low loads and for a short time. For reliable operation, 2-3 kW motors with a speed of at least 2000 per minute are required.
It is important to decide on the method of transmitting torque from the motor to the installation. The direct connection is believed to minimize power and rpm losses. This is true when the motor has sufficient power. In most cases, craftsmen use belts to transmit torque.
When assembling a homemade compressor with their own hands, some craftsmen install a gearbox to solve this problem. It would be good if it was found among the spare parts. Otherwise, you have to pay decent money for a good gearbox.
At the same time, receivers try to make them small in size. There is no point in purchasing them separately if modifications are carried out independently. Gas cylinders, used fire extinguishers of various sizes, or other metal containers are suitable for making a receiver. Additional elements need to be attached to them:
- pressure gauge;
- pressure regulator;
- check valve configured for the operating mode of the future unit.
Engine
If we assemble a ZIL 130 compressor with our own hands, then it is very important to choose the right power unit, which will be as close as possible to the operating parameters of the device. In this case, they usually look at the rotation speed
It should be at least 2000 rpm, since it is this parameter that will create maximum pressure and allow the structure to operate in a gentle mode.
The selection of power is approached separately. The fact is that the cost of an electric motor very often directly depends on this parameter. It is generally accepted that for such compressors a power of 1 kW is sufficient. However, this is justified if the unit is planned to be used for a short time and without heavy loads. Therefore, more powerful products are most often used.
The working process
When refining the product, attention should be paid to the problem of the operating time of the units. The compressor on the car is connected to a common lubrication system. This provides reliable protection of parts from wear. Lubricating the ZIL 130 compressor yourself is not difficult, but it will require changes to the mechanism parts.
First of all, it is necessary to make a hole in the housing of the ZIL 130 compressor, moving 10 mm below the middle of the crankshaft. This place is intended for filling oil. Another hole is drilled at the bottom of the channel where the drain plug should be located. On the opposite side of the pulley, a fitting is installed in the bearing cover, connected to a container that plays the role of an expansion tank for lubricating the compressor in the ZIL 130. An oil-resistant hose is used for the connection.
The expansion tank occupies a place next to the cylinder block. For this container, a clutch reservoir from a VAZ classic is used. To install the fitting, you need to unscrew the intake valve of the vehicle line.
When modifying, lubricant for the ZIL 130 compressor is impossible without making changes to the cylinder system. Smart heads came up with a way to spray oil in all directions. To do this, drill 3 holes in each of the connecting rods. They are made with a diameter of 3 mm and countersinked with a 10 mm drill. One of them is done in the connecting rod cap, the other two - in both sides of the lower head. The compressor is lubricated by oil mist, which is formed during operation of the mechanism.
There is no point in inventing a device for regulating pressure, the so-called “soldier”. It is easier to use the factory one. It is also advisable to install the overload valve and pressure gauge from the machine.
Step-by-step instructions for manufacturing equipment for supplying air from a Zilovsky unit
To create a device that pumps air, compressors are used:
- ZIL 130;
- ZIL 157;
- MAZ;
- KamAZ;
- GAS;
- MTZ.
The KamAZ device has good performance, is durable and reliable, but requires serious modification, while GAZ and MTZ are ineffective. Therefore, many people choose a Zilov unit to make a device that pumps air with their own hands.
Let's look at an example of such an assembly. Let's take as a basis the ZIL 130 compressor, a 50-liter propane cylinder.
Expert opinion
Ilya Vyacheslavovich
Consultant for body repair at krasymavto.ru
Ask a Question
For a 220-volt network, you need a 2-3 kilowatt motor; when using 3 phases, the power may be less.
General form
Connection node
Electrical connection diagram
The frame is made of angle steel; bolts, screws, sealant, and clamps are required for fastening.
- First of all, we make a pallet. For this you need a metal sheet 5 mm thick. To avoid oil leaks at the junction of the sump with the compressor crankcase, a paronite gasket and sealant treatment are used.
- To prevent the device from jamming during operation due to poor lubrication, it is necessary to fine-tune the components. To do this, you need to remove the head, take out the connecting rods and drill them together with the liners. The depth of the holes should be 3 mm, diameter - 10 mm. This is enough to lubricate the bearings. During operation of the device, an oil mist is formed, which lubricates the cylinders.
- The next step is to make two threaded holes in the crankcase. We screw in the fitting for filling and draining oil here.
- The system must be connected to the painting area with a special tube. The air coming out of the device is very hot, so copper products are used for this purpose.
- If the compressor performance is not enough to operate the device’s spray gun, you can connect additional receivers. To control the pressure, a pressure gauge is installed on the receiver. If the pressure is insufficient and unstable, the paint layer on the car body will lie unevenly.
- An overload valve can be installed in the receiver, which will protect the device in case of excessive pressure increase.
- Many craftsmen also install a dehumidifier. For these purposes, a special dryer (alcohol) from a KamAZ vehicle is used, which is located between the compressor and the receiver. Alcohol and antifreeze are used as working fluids.
Useful! For a car enthusiast who has little experience in welding and plumbing, making an air injection device based on a ZIL 130 compressor with his own hands will not be difficult if you follow our recommendations.
Assembly
The compressor modification has been completed. Now the device needs to be carefully assembled. This process requires care to ensure that dirt particles do not get inside. Parts must be washed with degreasing agents and dried.
AK-20 glue is used to install fittings and plugs. The gaskets are placed on the sealant. It is advisable to replace these inexpensive parts with new ones. The crankshaft bearings are mounted using a mandrel. The interference limits should be from 0.002 to 0.030 mm. To install the connecting rod, the crankshaft must be secured in a vice, put on the connecting rod and tighten with bolts. After fastening, the part should turn easily by hand.
Installation of piston rings and pins requires the use of special tools. In addition, you need to remember that compression rings are put on with the inner groove up, scraper rings are put on with the outer groove down. Ring locks are placed on opposite sides at an angle of 1200.
To assemble the ZIL 130 cylinder head, it should be secured. This will make it easier to install and adjust valves and other parts. After assembling the internal elements, you need to tighten the top bolts.
Zilov compressors have proven themselves to be reliable units for performing simple work. Is it worthwhile to improve such devices? The question remains open. Much depends on the complexity of the tasks facing the master. If you have the money, you can purchase a powerful unit and not waste time adjusting various parts. But there are many hobbyists who like to do things with their own hands, and it brings them pleasure.
Source
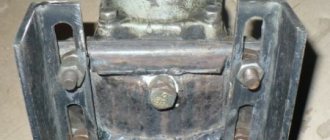
Plate
First, we remove the original compressor from the D-240 engine. We are left with an open hatch with a drive and gear. We need to install a metal plate in the old place of the compressor. This will be the site for the Zilov compressor. We make the plate from iron, 0.8-1 cm thick, dimensions (24x19) cm. Fig. 1
slab drawing
We make holes in the slab for fastening the studs, cut them, and install the studs. We will attach our plate to these studs. Next, we attach the plate, place the compressor on top, and mark the holes for the studs for attaching the compressor. We drill, tap, and install studs. Before final installation of the slab, we make a gasket under it. Let's make it from paronite. We mark, cut out, it is advisable to apply sealant on both sides. We installed the stove, tightened the nuts, put the compressor on top; it is now on studs, like on a slide, moving left and right to tighten the belt. photo
Important Technical characteristics of the KamAZ-43255 two-axle truck
belt tension compressor place compressor plate compressor plate
Communities › DIY › Blog › Modification of the lubrication system of the ZIL 130 compressor
Hi all! I started remodeling my compressor and immediately decided to drill the connecting rods. I took it apart and was surprised at the good condition of the piston. The earbuds were certainly starving. There are many articles on the Internet on solving oil starvation by drilling the connecting rod. I decided to try this method too. I removed the connecting rods and drilled three holes with a diameter of 3 mm. and made a countersink on top with a 10 mm drill. Then I put it all back together in reverse order, replacing the head gasket along the way. Let's see what this modification will do. Well, the assembly of a new compressor and a new receiver is ahead!
Device
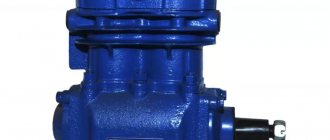
The compressor is a two-cylinder piston type device. Its operating principle is to pump air through the movement of pistons. The compressor device consists of:
- wire housing with channels;
- oil seal;
- springs;
- seal.
The pistons are made of aluminum and equipped with pins that are secured with retaining rings. Through the intake valves, the air in the engine air filter enters the compressor cylinders. It is compressed by pistons and enters the pneumatic system. Then it passes through the discharge valves, which are located in the cylinder head.
Cooling system
The engine has a closed liquid cooling system. It consists of: radiator, thermostat, pump, temperature sensor, compressor and pipe. It works on the principle of forced circulation of cooling. If the fluid in the system overheats, it is necessary to open the radiator cap. When it is opened, a stream of hot water is released from the neck. Therefore, this must be done carefully.
Lubrication system
The lubrication system is combined. The lubricant comes from the lubrication unit of the motor system and cools with the help of coolant.
Plunger mechanism
The plunger mechanism of this compressor is used with a bearing row. Experts say that the part is able to withstand heavy loads at high speeds. However, it is important to note that the inlet valve needs frequent cleaning. In this case, the channel becomes clogged quite often. To check it, the crankcase is unscrewed. You will also have to remove the cover. An adjusting screw is used to adjust the plunger. When the cover comes out, you can install a large screw. In this case, it is necessary to select the appropriate protective ring. To solve problems with abrasion of the lining, special means are used to seal the block. Some experts recommend periodically cleaning the tubules.
Malfunctions and repairs
Noise and knocking during compressor operation, as well as oil that appears in the air cylinder, indicate a malfunction of the device.
- Over time, cracks and chips form on the crankcase block. The crankcase is completely replaced if cracks appear on its walls. Cracks are welded if they are located on the crankcase mounting flange and are small in size.
- To check the tightness of the cylinder, it is placed in a water bath and filled with compressed air. If bubbles appear, then it is considered not airtight. Repairs are made by boring the container and honing it to the repair size. The detachable block must be solid, without nicks. Deviation up to 0.04 mm is allowed. It is impossible for a 0.05 mm probe to pass under the measuring ruler.
- The repair size of the pistons is determined by the number stamped on the bottom of the piston. This is the number +04, +0.8.
- If the ball bearings are worn out, they are compressed and replaced with new ones.
- If the crankpins of the shaft have wear above 0.05 mm, then the crankshaft is completely replaced.
- To fix a worn upper connecting rod head, press in a repair bushing after making a hole with a diameter of 14.019 mm.
If the end of the cover and its back part do not fit tightly to the body, then due to friction they, together with the seal, will wear out. When cracks appear, they are replaced with new parts.
Breather
In the ZIL engine, the compressor crankcase is directly connected to the engine crankcase, and the engine crankcase, in turn, is connected to the atmosphere through a breather. In our case, the compressor crankcase cannot be connected to the atmosphere in any way and during compressor operation it squeezes out the crankshaft oil seals.
I solved the problem by installing a homemade breather. I drilled a hole in the place where, in my opinion, it would be the least likely to be bombarded with oil. I cut a thread in the hole and screwed a fitting into it, put a hose on the fitting and threw it over my head downwards. Although unpresentable, excess pressure began to be released and the seals are now in place.
Saddle Inspection
The seat on the ZIL-130 compressor is installed under the discharge mechanism. To inspect it carefully, you need to remove the front connecting rod. After this, the piston itself moves back. The next step is to lift off the protective cover. Its plate is fixed with four screws that can be unscrewed with a key. In this case, the plug is screwed counterclockwise.
Then all that remains is to get to the saddle, which is fixed on the nozzle. There should be a seal at the bottom of the device. In this case, the plate is checked separately. It is also worth inspecting the top of the saddle. Soot often collects on it. You can clean the housing using gasoline. In this case, it is important not to damage the rocker arm.
Do-it-yourself lubrication of the ZIL 130 compressor
After browsing through Internet forums, I found many questions regarding a homemade compressor based on car compressors. But I didn’t find any practical answers to them. Therefore, I want to propose a practical design of a compressor based on “foot-mounted” units from ZIL, MAZ, KamAZ, etc. vehicles.
One of the copies of this design has proven itself to be the best, having worked for 15 years without anything. repair (during this time I added oil twice). Depending on the capacity of the receiver and engine power, this design can be used for painting cars, operating pneumatic tools, inflating wheels, and simply blowing dust off machines. For a person whose hands have grown out of place, it will not be difficult to make such a structure, so I want to tell you only the general features of the construction and the dependence of powers and volumes in “more-less” units. The compressor from ZIL 130 - 157, MAZ can be used with minimal modifications. The KamAZ compressor requires a lot of modification, and the GAZ, MTZ compressor is ineffective.
Receiver
They usually try to make a typical iron-based compressor from the ZIL 130 compact and mobile. Therefore, using large and voluminous receivers simply does not make sense. Also, you should not purchase these elements of the unit separately, since you can always create them yourself. You can use almost any metal container for this. In this case, it is best to use gas cylinders or old fire extinguishers.
It should be noted right away that further refinement of the receiver will be required. You will need to install a pressure gauge and pressure regulator on it. Usually a separate unit with a gearbox is purchased, which is installed at the entrance to the container. It is also very important to install a back pressure valve. It is adjusted to the optimal operating mode of the future product with a certain margin of 10-15%.
How to make a paint compressor based on ZIL 130 with your own hands
The best basis for creating a paint compressor with your own hands is ZIL 130, the compressor of which is structurally most suitable for this. For body painting, the use of a compressor is important, as it improves the quality and strength of the applied layer and increases productivity. In addition, it can be used to inflate tires and supply air to pneumatic tools.
Due to the considerable cost of the compressor, purchasing a device for a “one-time” painting of your car is not practical, and not everyone can afford it. Home craftsmen can make such a device with their own hands.
Torque transmission
When making a compressor with your own hands from a Zilov compressor, you need to make a very important decision about how the power will be transferred from the engine to the unit itself. At the same time, some masters prefer to connect directly, believing that this way they will not lose the number of revolutions and power. However, it is worth remembering that for such methods of implementing connections you need to have a fairly powerful engine. Therefore, a belt drive is most often used.
When making a compressor with your own hands, they usually try to connect the Zilov compressor to the engine through a gearbox. This way you can get quite a good force during the initial start-up or if there is pressure in the receiver. However, the cost of a good gearbox is quite high, and option c can be considered the most optimal.
Replacing the seal
To replace the seal yourself, it is important to carefully inspect the seal. As a rule, a lot of soot accumulates on it. It should also be noted that the seals wear out due to overheating of the pad. This happens due to clogged tubules. To correct this situation, it is recommended to unscrew the protective cover of the compressor. After this, the rings are unscrewed. Next, all that remains is to extend the rocker arm. New linings are installed on a well-cleaned surface. Prices for new ZIL-130 spare parts are quite reasonable.
Do it yourself or buy a ready-made device
Today's market for pressure boosting and air injection devices is replete with variety. Screw, piston and other types of compressors are produced for different purposes. Those who have chosen a ready-made device should choose the type of mechanism with the required technical characteristics and at the optimal price.
Of the variety of products offered, of course, it is better to choose products from well-known brands. Their main disadvantage is their high cost. Large amounts of money will only pay off if you engage in professional car repairs.
If you purchase a cheap device from an unknown brand, you need to be prepared for unpleasant surprises. Inexpensive products are often made of low-quality material, the engine fails, and warranty repairs last for several months.
A unit made by hand from Zilovsky (ZIL 130) is considered by many craftsmen to be more reliable. According to numerous reviews, such a device has good performance, durability, and wear resistance.
In addition, a repair kit for the Zilov compressor can be purchased at any auto parts store. A self-made, high-quality device that works for a long time and works properly will delight its owner and become the envy of many car enthusiasts.
After studying the instructions for making a device with your own hands from a ZIL 130 compressor, you can come to a conclusion: buy a pig in a poke or make the device yourself.
Household use
To begin with, it should be said that such products will not be very productive, and their production may require high costs. However, there are a lot of application options that make you look for material on how to make a compressor with your own hands from a Zilov compressor.
- First of all, such a device is perfect for inflating car tires.
- Also, such a unit can be used to work with some low-power pneumatic tools.
- Most often, these products are used in workshops for applying paint to surfaces. The fact is that if there is a volumetric receiver, they can work for quite a long time and create the pressure necessary for this.
- Some specialists use such units in blacksmithing and other industries. The main thing is that the technical characteristics correspond to the specified parameters.
Discharge mechanism
The pumping mechanism in the device is very compact in size. According to experts, the device can withstand high pressure. Thus, the price for the ZIL-130 compressor is quite justified. The saddle in the device has two outputs. This part does not come into contact with the rocker arm.
The injection mechanism is connected to the crankcase through a tube. The model uses a small diameter shaft. At its base there are two rings and lubricant for the ZIL-130 compressor. A short plug is installed at the end of the shaft. The exhaust valve of the supercharger is used with a protective sleeve. If there are problems with the air supply, the first thing to check is the blower outlet. Next, unscrew the cap and completely clean the valve. The next step, experts recommend checking the spring, since there is a lot of pressure on it.
Source
How is direction checked?
Before checking the movement of machine installations, you should remember the necessary rule to act in order for each type of compressor. A certain chronology of steps is required.
In case of correct rotational actions, the pressure numbers on the device will immediately decrease. In the opposite situation, the following outcome is possible:
In case of incorrect rotation, be sure to swap 2 phases of your choice in the compressor box structure. And then open the above valve completely.