During partial disassembly, perform the following operations
— Remove the oil drain plugs, remove the oil pump intake cover mounting bolts 20 (Fig. 1) from the gearbox complete with the magnet, and remove the intake cover gasket from the intake.
— Unscrew the nuts of the remote gear shift mechanism to the upper roof, remove the spring washers, the mechanism and the gasket of the remote gear shift mechanism from the studs.
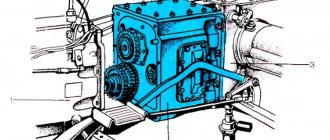
— Unscrew the bolts securing the top cover 13 to the gearbox housing 18, remove the top cover assembled with the rod and forks and the cover gasket from the crankcase.
— Unscrew the bolts and remove the power take-off hatch covers and their gaskets.
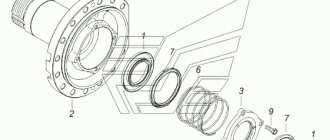
— Unscrew the nut securing the flange 16, having previously removed the cotter pin, remove the Belleville washer and use a puller (Fig. 2) to remove the flange 16 (see Fig. 1) securing the propeller shaft to the driven shaft of the gearbox.
Unscrew the bolts of the cover 15 of the rear bearing of the driven shaft, remove the cover with the oil seal and the speedometer drive.
— Remove the clutch spring 1, unscrew the nut securing the hose for lubricating the bearing to the clutch housing 4, unscrew the hose assembly from the clutch release clutch and remove the clutch 1 assembly with the bearing from the cover 3 of the rear bearing of the drive shaft.
— Unscrew the coupling bolt of the clutch release fork, remove the spring washer from it and, moving the clutch release fork shaft with the splined end forward, remove the fork.
Then knock out the key from the shaft groove and remove the shaft from the hole in the 4th clutch housing.
The need for gearbox care
Helps to extend the life of the speed box - its timely maintenance. In particular, the car owner must monitor the efficiency of the gears and control lever, and control the level of oil poured into the MAZ car system.
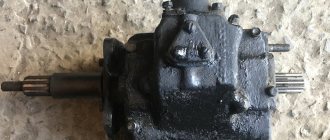
If it is necessary to repair the gearbox on a MAZ, it is necessary to remove the gearbox from its original location. The device must be visually inspected for external deformation. There is a high probability that this is precisely the reason that the gearbox “does not obey” the driver’s commands. If there are no deformations, you can begin to disassemble the gearbox into components.
If the MAZ gearbox circuit fails, the following signs will appear:
- Some gears do not work, for example, 4 and 5;
- difficulty in manual switching is noted.
To flush the gearbox, about 3 liters of special oil are required. Repair of a MAZ gearbox may involve restoring axles, washing, or fault-defecting the gearbox. Also, the crankcase and cover are subject to repair.
In this article, we will tell you what functions the gearbox performs in a MAZ engine, make several recommendations for repairs, and also indicate a MAZ gearshift diagram with a divider, which you can examine and study in detail.
[Hide]
During general disassembly, perform the following operations
— Unscrew the bolts securing the cover 3 of the rear bearing of the drive shaft 2, remove the cover 3 assembled with the oil seal and remove the drive shaft 2 assembly from the gearbox housing 18, using a puller.
— Move the driven shaft 14 assembly forward until the rear bearing leaves the seat, remove the retaining ring from the annular groove with flares and press the rear bearing and worm 35 of the speedometer drive gear off the driven shaft with a puller.
After this, the first gear and reverse gears are removed from the gearbox housing 18 into the shaft 14 assembly and removed from the splined surface of its gearbox.
— Remove the bolts securing the oil pump 25 to the gearbox housing, remove the pump 25 assembly and gaskets.
— Unscrew the bolts of the rear bearing cover of the intermediate shaft 17, remove the cover gasket. Remove the safety wire, two bolts securing the thrust washer of the rear bearing of the intermediate shaft 17 and remove the washer.
Take out the axis 26 of the reverse gear block and the block 27 of gears with bearings. Remove the roller bearings and spacer from the block of 27 reverse gears.
The intermediate shaft 17 assembly is advanced until the rear bearing of the intermediate shaft exits the gearbox housing housing 18, the retaining ring is removed from the bearing groove with pliers, the bearing is pressed from the shaft and the intermediate shaft 17 assembly with gears is removed from the gearbox housing.
— Remove the cotter wire, unscrew the clutch housing mounting bolts 4, remove the spring washers from the bolts and remove the clutch housing from the gearbox housing 18.
Then remove the oil level plug and oil channel plug from the gearbox housing.
Final disassembly of the gearbox involves complete disassembly of the following components and mechanisms:
— driven shaft and rear bearing cover;
— intermediate and drive shafts;
— gearbox remote control mechanism;
— upper cover of the gearbox;
- oil pump.
When disassembling the driven shaft and rear bearing cap, perform the following operations.
Install the driven shaft 14 (see Fig. 1) complete with gears on the stand with the threaded end in a vertical position.
Remove the spring thrust ring from the annular groove, remove the front bearing, synchronizer 5 of the fourth and fifth gears from the shaft, and remove the locking key with the thrust washer of gear 8 of the fifth gear.
Insert a steel drift between the internal teeth of gear 8 of the fifth gear and the thrust washer and, by rotating the gear, remove the thrust washer from engagement with the splines of the driven shaft.
Remove the 8th gear of the fifth gear of the driven shaft and the thrust washer of the fifth gear.
Remove gear 9 of the third gear and synchronizer 10 of the second and third gears from the shaft.
Having rested against the gear 11 of the second gear, press the bushing of the gear 8 of the fifth gear, the bushing of the gear 9 of the third gear and the spacer bushing of the gears of the second 11th and third 9th gears using a press.
Remove gear 11 of the second gear and the thrust washer of the second gear from the driven shaft and knock out the segment keys from the grooves of the shaft.
Having removed the cotter wire, unscrew the bolts securing the replacement gears from the cover 15 of the rear bearing of the driven shaft, remove the cover and cover gasket.
Unscrew the cap of the cover of the replacement gears, remove the gasket, remove the shaft of the driven spur gear of the speedometer drive and remove the speedometer drive gear from the cover.
Having installed cover 15 on the stand with the plane of connection with the gearbox housing, press the oil seal assembly out of it.
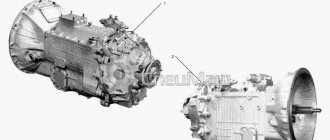
MAZ-54323 calculations for replacing the YaMZ-238A gearbox. | Truck repair and operation
Listening to the polemics of MAZ car drivers and the dissatisfaction with the YaMZ-238 gearbox, you begin to involuntarily go through options for installing other gearboxes. I personally generally had no complaints about the YaMZ-238 gearbox. Well, I’m not in a hurry to change gears. Yes, not very easy gear shifting, thoughtfulness in cold weather when switching the deduplicator. That's basically it, no, later I have a complaint - the gear ratio of the first gear is small, or it would be better if they added a creeping gear to it. But no matter how it was, on three cars I had a YaMZ-238 gearbox and, thank God, it was successful. Apart from the seals and demupplicator synchronizer plates, I didn’t buy anything for it. Used/Used spare parts. Of course I used it. After talking at some point with the aggregator for these checkpoints and telling him my experience with the gearbox, I heard the following conclusion from him. You are just very lucky, we are suffering with them, failure of the bearing on the intermediate shaft and failure of the secondary shaft is a fairly common occurrence. Who cares, as soon as I switched to the 238 gearbox, I immediately got rid of all 236 boxes.
But now about the main thing. If we have a YaMZ-238A gearbox on the MAZ-54323, then with modern tubeless tires of size 315/80-22.5 having a statistical rolling radius of 0.499 meters, the speed characteristics will be as follows;
The maximum speed will be 102.158 km/h.
If, for some reason or desire, we install a five-speed YaMZ-236 gearbox instead of the YaMZ-238A gearbox, then with the same tires we will get different speeds.
As you can see from the table, the speeds will become the same, but no wonder, because the gearbox range has greatly decreased.
The maximum speed became 109.897 km/h. As can be seen from the table, the maximum speed has increased, but the starting speed in first gear has also increased. And also, through this gearbox, the car has become worse adapted to changing road conditions. And it will be more difficult for the driver to select engine speed in the green zone of the tachometer.
But suddenly, by some lucky coincidence, you came across a new six-speed gearbox from the Yaroslavl plant and you decided to install it. How the speed characteristic will change. To do this, let's take it and count.
As can be seen from the tables, the maximum speed will be 96.70 km/h. Looking at the speed table of the six-speed gearbox, one can easily conclude that it is preferable to use instead of the widely and long-known YaMZ-236.
If you decide to install a KAMAZ gearbox with a divider, then the speeds will be as follows.
At 10 increased speed will be 89.54 km/h.
If we got a YaMZ-238 gearbox 12 Fas Gear with the flywheel housing, then we’ll do the calculations again to get the result.
View of the 12-speed FAS GIR gearbox.
Looking at the table, we see that the maximum speed when using it will be 92.99 km/h.
If we found and installed an eight-speed gearbox B 8 with Renault, then after calculating the table we will get the following results.
Let's look at the maximum speed with this gearbox: it = 96.70 km/h.
If we install the V-9 checkpoint, we will get the following table. In principle, the V-9 differs from the V-8 gearbox only in the addition of a creeping gear.
Accordingly, the maximum speed with the V-9 gearbox will also be equal to 96.70 km/h.
If we adjust the V-18 gearbox, we will get the following results.
As you can see, such a gearbox with a large range and 18 gears allows you to accelerate the car to 111.59 km/h.
If we decide to install a ZF-8 or ZF-9 gearbox, then the difference will again be in addition to the ZF-9 creeper gearbox.
Let's calculate the speeds on the 9S1310TO gearbox,
The maximum speed for these gearboxes will be the same and equal to 96.70 km/h, but the ZF-8 will not have a creep gear.
Appearance of the ZF 16S 1820 TO/ gearbox
We are compiling a speed table for this gearbox.
As you can see from the table, the maximum speed will be 86.35 km/h.
To be continued.
Related posts:
www.capfa.ru
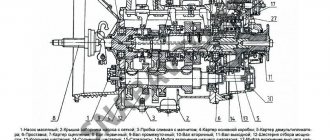
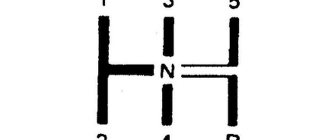
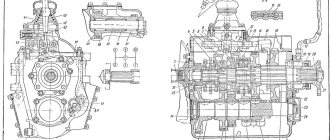
Device diagram
The diagram of the gearshift device for a gearbox with a divider on a MAZ is not simple, but it will greatly help you when carrying out repair work. The MAZ manual gearbox consists of elements such as a crankcase, shafts, mortar, synchronizers, gears and other equally important elements.
9 speed
Such a unit is installed, in most cases, on trucks or cars that will be subject to high traffic.
8 speed
This unit, like its predecessor, is popular among machines with high payloads.
5 speed
The most popular among passenger cars.
Want to keep your divider box in good condition for years to come? Then she needs care and basic checks. It is necessary to monitor the operation of elements such as gears, a mortar, the control lever itself, and so on. Has it happened that a breakdown can no longer be avoided? We will give you the following recommendations for self-repair:
- familiarize yourself with the diagram and instructions of your mechanism in detail;
- in order to carry out repairs, first of all it is necessary to remove the box completely and only then can you begin repairs;
- after you pull it out, do not rush to disassemble it completely, sometimes the problem is on the surface, pay special attention to all the details, if you see suspicious “behavior”, then most likely the problem is in this element;
- If you still have to disassemble the box completely, put all the parts in the order of disassembly, so as not to get confused when you put it back together.
If you are not confident in your abilities, do not have certain skills and knowledge, contact the service center. Isn't there such a possibility? Well, it's never too late to learn new and useful things. Ask questions in the comments, we will give you open and detailed answers.
This article examined the gear shift scheme for MAZ of all types. We hope that the information was useful to you in your repair. Let your box serve you for many years!
Change of oil
In order to change the oil in a MAZ gearbox, you must:
- Drive about 5-10 km by vehicle to warm up the old oil in the box. At elevated temperatures it becomes liquid and is easy to drain.
- 10-15 minutes after stopping the engine, place the vehicle on a lift or inspection pit.
- Remove the crankcase protective cover.
- Unscrew the plug and check the volume of oil fluid in the manual transmission.
- Check the gasket for wear and, if necessary, replace it with a new one.
- Replace worn filter elements.
- Open the drain hole and drain the oil into a prepared container.
- Fill with new oil fluid.
- Screw on the drain cap.
- Reinstall the clutch protective cover.
- Start the engine and check the oil level at various speeds.
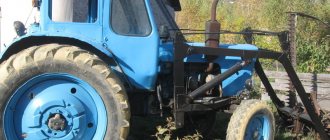
One of the famous brands in Belarus is MAZ. The equipment produced by the Minsk Automobile Plant (MAZ), which includes tractors, timber trucks, and heavy-duty vehicles, is known throughout the world.